override fun onCreate(savedInstanceState: Bundle?) {
    super.onCreate(savedInstanceState)

    setContent {
        ChatTheme {
            ChannelsScreen()
        }
    }
}Channels Screen
ChannelsScreen is a ready-to-use screen that displays the current user's channel list. It's typically the first screen users see after logging in.
Included features:
- Header with user avatar, customizable title, and action button
- Search for channels by name or message content
- Channel list with pagination, unread counts, and last message preview
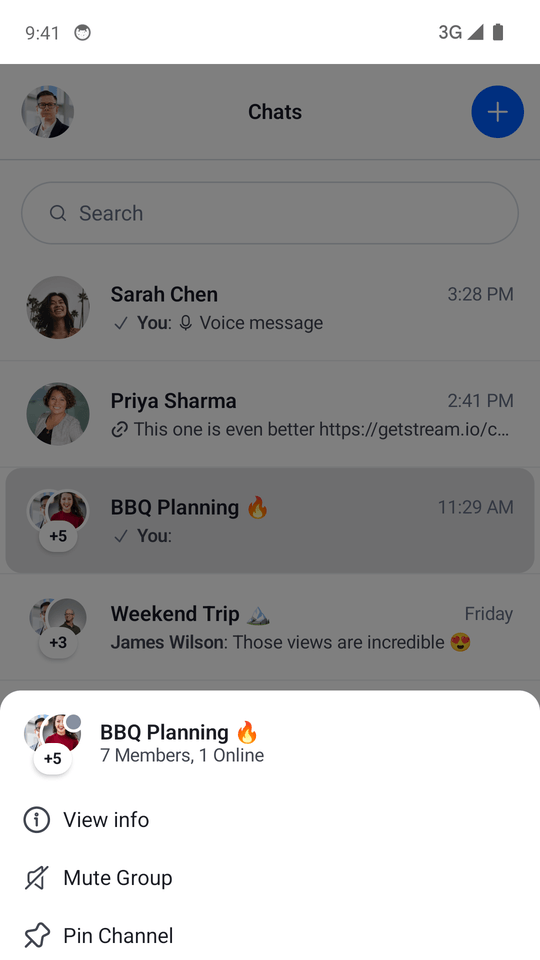
- Long-press menu for channel actions (leave, delete, mute, view info)
- Empty state when no channels match filters
- Loading state while fetching channels
For most apps, ChannelsScreen provides everything you need. If you require a different layout or want to embed the channel list in a more complex UI, use the individual bound components instead.
Usage
To use ChannelsScreen, you just need to call it within setContent() in your Activity or Fragment:
The ChannelsScreen can be used without any parameters, but we advise that you pass in the title of your app, as well as the action handlers.
This small snippet will produce a fully working solution, as shown in the image below.
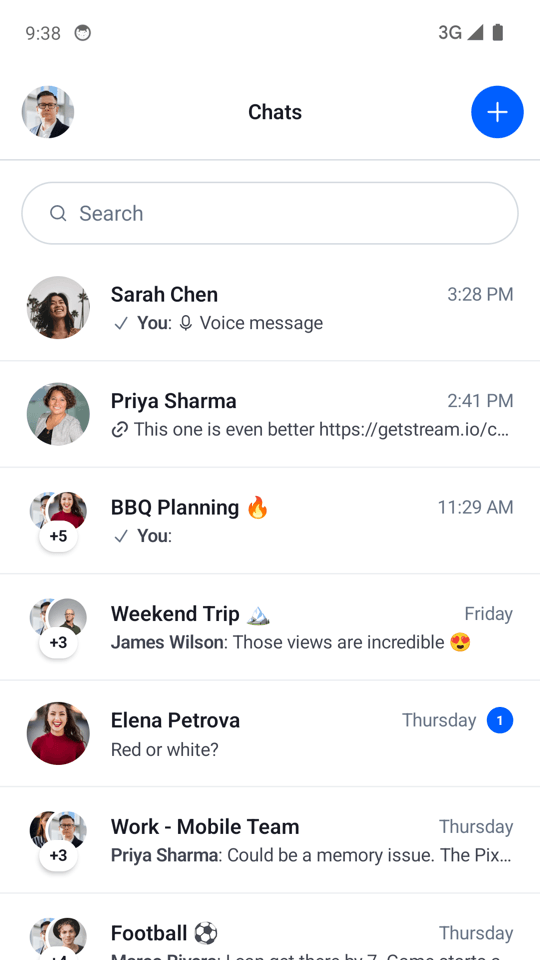 |  |
|---|
To get a better feel of the component, you'll want to customize its actions.
Handling Actions
When it comes to action handlers exposed in the ChannelsScreen signature you have access to the following:
fun ChannelsScreen(
    // ... ViewModel factory and UI customization
    onHeaderActionClick: () -> Unit = {},
    onHeaderAvatarClick: () -> Unit = {},
    onStartChatClick: (() -> Unit)? = null,
    onChannelClick: (Channel) -> Unit = {},
    onSearchMessageItemClick: (Message) -> Unit = {},
    onViewChannelInfoAction: (Channel) -> Unit = {},
    onBackPressed: () -> Unit = {},
    isBackPressEnabled: Boolean = true,
)
There are several action handlers you can use with the ChannelsScreen:
onHeaderActionClick: Handler for the default header trailing icon click action.onHeaderAvatarClick: Handler for the clicks on the user avatar in the header.onStartChatClick: Handler for the "Start Chat" action. When non-null, a button is shown in the empty state that triggers this handler.onChannelClick: Handler for aChannelbeing clicked.onSearchMessageItemClick: Handler for aMessagebeing clicked.onViewChannelInfoAction: Handler for the View info action selected inChannelActionsSheet.onBackPressed: Handler for the system back button being clicked.isBackPressEnabled: Controls whether the built-inBackHandleris active. Whentrue(default), back press deselects the current channel or callsonBackPressed. Set tofalseto handle back navigation yourself via a parentBackHandler.
All of these actions are empty by default, but if you want to customize them, you can do the following:
override fun onCreate(savedInstanceState: Bundle?) {
    super.onCreate(savedInstanceState)

    setContent {
        ChatTheme {
            ChannelsScreen(
                onChannelClick = {
                    // Open messages screen
                },
                onSearchMessageItemClick = {
                    // Open messages screen and scroll to the message
                },
                onHeaderActionClick = {
                    // Handle the header click action
                },
                onHeaderAvatarClick = {
                    // Handle the header avatar clicks
                },
                onViewChannelInfoAction = {
                    // Show UI to view more channel info
                },
                onBackPressed = { finish() }
            )
        }
    }
}
Overriding the ViewModels
In case you want to control the logic when using the ChannelsScreen, you can do so by providing a ChannelListViewModelFactory that you use to build the respective ViewModels yourself.
Here's an example:
class ChannelsActivity : AppCompatActivity() {

    // 1
    private val factory by lazy {
        ChannelListViewModelFactory(
            chatClient = ChatClient.instance(),
            querySort = QuerySortByField.descByName("last_updated"),
            filters = null
        )
    }

    // 2
    private val listViewModel: ChannelListViewModel by viewModels { factory }

    override fun onCreate(savedInstanceState: Bundle?) {
        super.onCreate(savedInstanceState)

        setContent {
            ChannelsScreen(
                viewModelFactory = factory // 3
            )
        }
    }
}
There are a few steps here that allow you to override and control the ViewModels:
- You create the
ChannelListViewModelFactoryyourself, which lets you describe the data and configuration used to build theViewModels. - You lazily create an instance of the
ChannelListViewModel. This means that you'll either build theViewModelfirst and then pass it to the Compose component, or your Compose component will create theViewModeland you'll get access to it here. - You pass in the factory to the
ChannelsScreen, which allows this connection to happen.
The ViewModels should be the same and you should easily be able to react to things like item clicks, changes in the state and more.
Even though ChannelsScreen offers limited customization, you can still achieve a unique look and feel by modifying ChatTheme parameters.
For more information on how to do so read our Customizing Components page.
Customization
ChannelsScreen is one of our screen components and as such it doesn't offer much customization. As with any component, you can customize the content theme and styling by wrapping it in the ChatTheme.
When it comes to UI and behavior customization in the ChannelsScreen signature you have access to the following:
fun ChannelsScreen(
    viewModelFactory: ChannelListViewModelFactory = ChannelListViewModelFactory(),
    viewModelKey: String? = null,
    title: String = "Chats",
    isShowingHeader: Boolean = true,
    searchMode: SearchMode = SearchMode.None,
    isBackPressEnabled: Boolean = true,
    // ... Action handlers
)viewModelFactory: The factory that you build yourself, if you want access toViewModelsfor custom behavior. This lets you control not just the way theViewModels are built, but also their lifecycle, as you can share them between components. You can also customize its parameters to affect the behavior of the screen.viewModelKey: An optional key to differentiate between multipleChannelListViewModelinstances. Useful when you have multipleChannelsScreencomponents in your app.title: The title of theChannelListHeader.isShowingHeader: Flag that controls whether theChannelListHeaderis shown.trueby default.searchMode: The search mode to be configured for the screen.SearchMode.Noneby default. It can take the following values:SearchMode.None: Hides the search input.SearchMode.Channels: Shows a search input that allows users to search for channels by name.SearchMode.Messages: Shows a search input that allows users to search for messages across channels.
ChannelListViewModelFactory Configuration
The ChannelListViewModelFactory provides configuration options for customizing the behavior of the channels screen. Here's a complete overview of all available parameters:
ChannelListViewModelFactory(
    // Query configuration (mutually exclusive with Predefined Filters)
    querySort = QuerySortByField.descByName("last_updated"),
    filters = null,

    // Predefined Filters (mutually exclusive with Query configuration)
    predefinedFilterName = "...",
    filterValues = null,
    sortValues = null,

    // Pagination limits
    channelLimit = 30,
    memberLimit = null,
    messageLimit = null,

    // Features
    draftMessagesEnabled = true,

    // Search
    messageSearchSort = null,
)
Query Configuration
querySort: Defines the sorting order for channels. Defaults toQuerySortByField.descByName("last_updated"), which sorts channels by their last update time in descending order (most recently updated first). You can also sort bylast_message_at.filters: Optional filters to apply when querying channels. Whennull(default), all channels the user is a member of are shown. UseFiltersto create complex filter conditions.
Example with custom sorting and filtering:
ChannelListViewModelFactory(
    querySort = QuerySortByField.descByName("last_message_at"),
    filters = Filters.and(
        Filters.eq("type", "messaging"),
        Filters.`in`("members", listOf(currentUserId))
    )
)
Predefined Filters
For frequently used queries, reference a predefined filter created in the Stream Dashboard instead of passing a Filter to the ViewModel. The filter and sort templates are stored server-side; you pass values for any placeholders via filterValues (and sortValues for templated sort fields). When predefinedFilterName is set, the query's filters and querySort are ignored. See Querying Channels for more details.
// Reference a predefined filter by name and substitute its placeholder values.
val factory = ChannelListViewModelFactory(
    predefinedFilterName = "user_messaging_channels",
    filterValues = mapOf("user_id" to userId),
)

// Placeholder values accept 'Any' type (String, Boolean, Int, Float, Double, List, Map).
val factory = ChannelListViewModelFactory(
    predefinedFilterName = "user_per_channel_type_archived_hidden",
    filterValues = mapOf(
        "channel_type" to "messaging",
        "user_id" to userId,
        "archived" to true,
    ),
)

// If the predefined filter templates a sort field, supply it via `sortValues`.
val factory = ChannelListViewModelFactory(
    predefinedFilterName = "team_channels",
    filterValues = mapOf("team_id" to "engineering"),
    sortValues = mapOf("sort_field" to "last_message_at"),
)
Pagination Limits
channelLimit: Number of channels to fetch per page. Defaults to30.memberLimit: Number of members to fetch for each channel when loading the channel list. Defaults tonull(server default).messageLimit: Number of messages to fetch for each channel when loading the channel list. Defaults tonull(server default).
Feature Parameters
draftMessagesEnabled: Whentrue, enables draft message support. Draft messages are shown in the channel list instead of the last message preview when present. Defaults totrue.
Search Parameters
messageSearchSort: Optional sorting order for message search results. Whennull(default), the server default sorting is used.
Advanced Parameters
chatEventHandlerFactory: Factory for creatingChatEventHandlerinstances that handle real-time events for the channel list. For more details, see Channels State and Filtering.
If you want to build a completely custom channel list, follow our Custom Channel List Cookbook recipe.
On this page: