

This tutorial will teach you how to build chat for your iOS app with offline support, optimistic UI updates, reactions, threads, URL previews, typing indicators and image sharing. You can use this as the foundation to build any type of in-app chat or messaging.
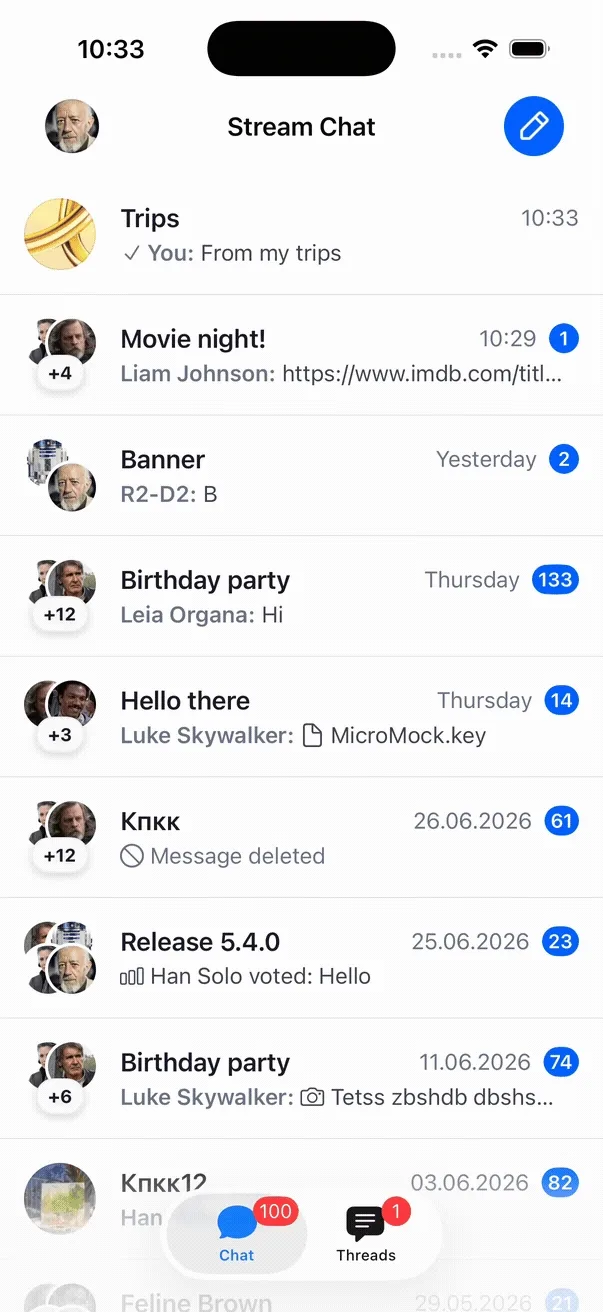
On the right you see a GIF of how the end result will look, a sample app is also available on our repo.
The UI is created using SwiftUI, which is easier to change and extend than UIKit. A UIKit iOS chat tutorial is available if you don't use SwiftUI.
Chat state and events are exposed via delegate methods and Combine publishers.
This chat tutorial uses Stream's edge network for optimal performance. Stream powers chat, activity feeds and video for thousands of apps and over a billion end users.
Our pricing is flexible and has multiple tiers. For hobby projects and small companies we provide a free maker plan.
This tutorial and its content has been tested against the following versions:
- Xcode 26 (or latest)
- Stream Chat SDK version 5.0.0 (or latest)
You can download our sample application preconfigured for use with Swift UI to get started.
Let's get started with the tutorial and see how quickly you can build chat for your app.
Main Features
These are the main features that our chat app will have:
- Channel List: Browse channels and perform actions such as search and swipe-to-delete.
- Message Composer: Customizable and expandable with bespoke implementation.
- Message Reactions: Ready-made and easily configurable.
- Offline Support: Browse channels and send messages while offline
- Customizable Components: Build quickly with customizable and swappable building blocks
Installation
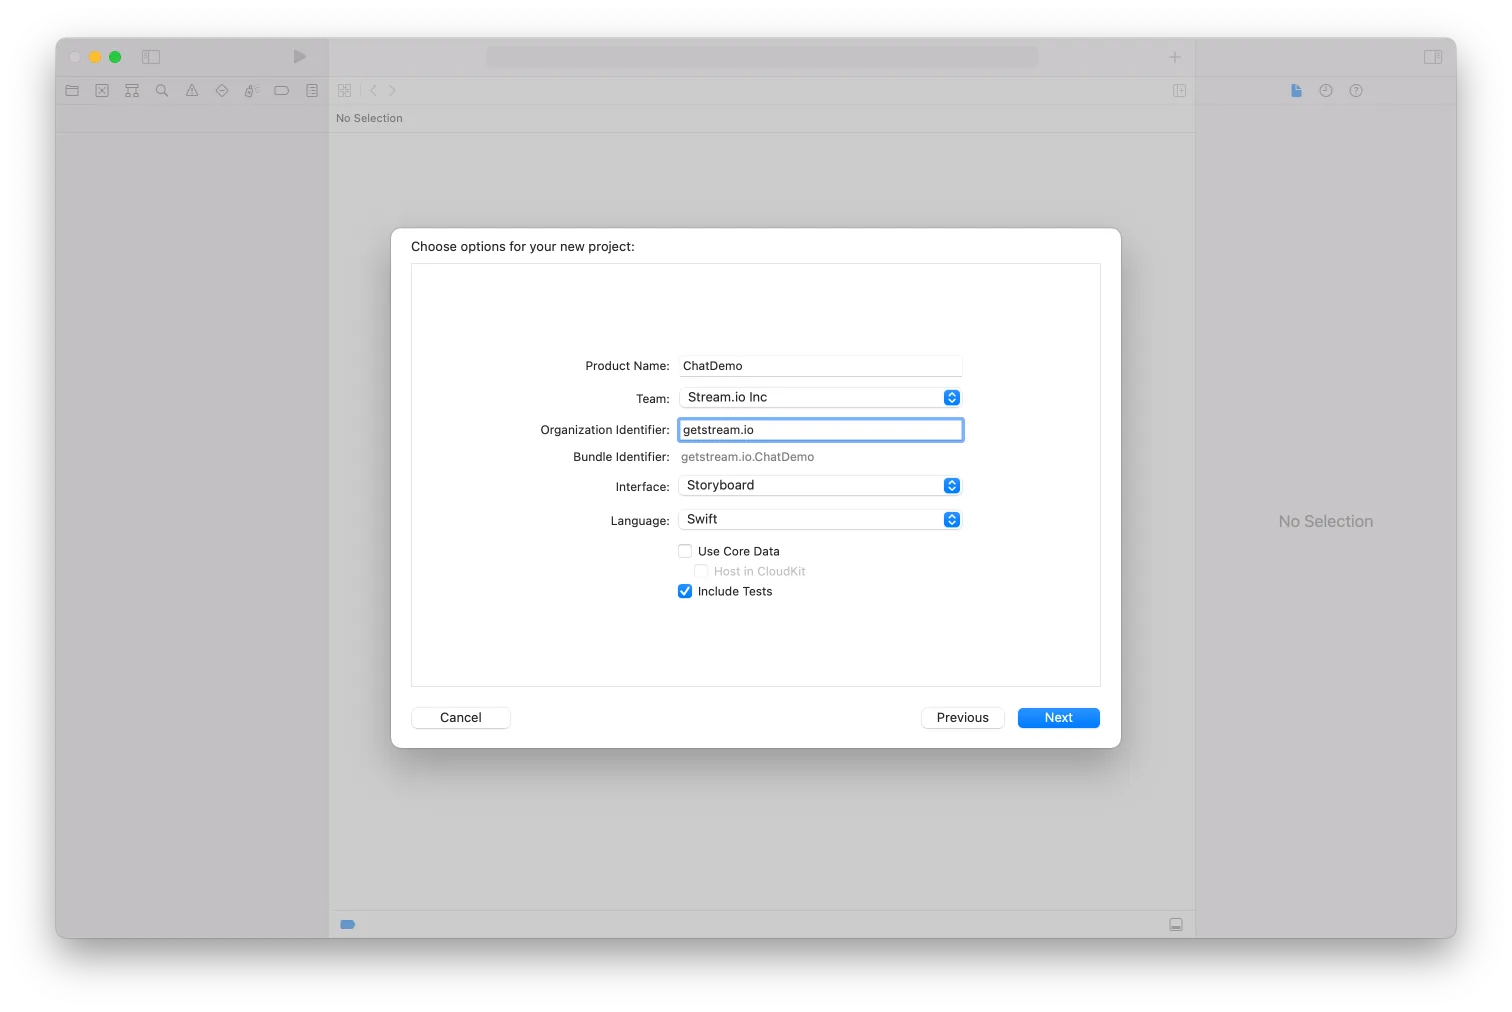
Create a New SwiftUI Project in Xcode
To get started with the SwiftUI SDK, open Xcode and create a new project.
- Create a new app project in Xcode (26 or later)
- Choose iOS from the list of platforms
- Choose the "App" template
- Use SwiftUIChatDemo for the project name
- Select "SwiftUI" in the Interface option
Install the Chat SDK
We are going to use the Swift Package Manager to integrate the SDK.
Use the following steps to add the SDK via Swift Package Manager:
- Select "Add Packages..." in File menu
- Paste the URL https://github.com/getstream/stream-chat-swiftui
- In the option "Dependency Rule" choose "Up to next major version", and in the text input next to it, enter "5.0.0".
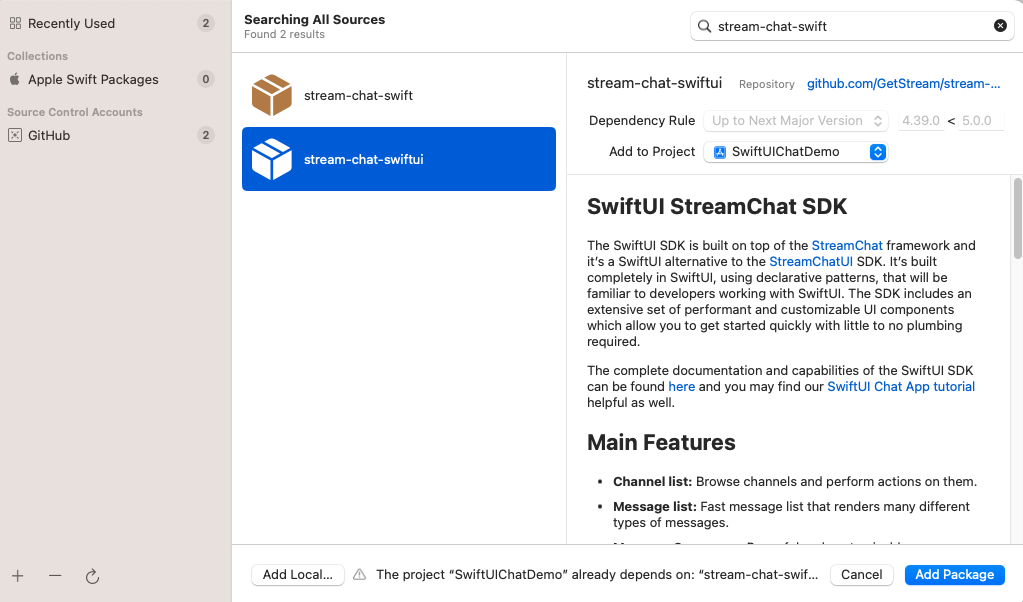
- Choose "Add Package" and wait for the dialog to complete
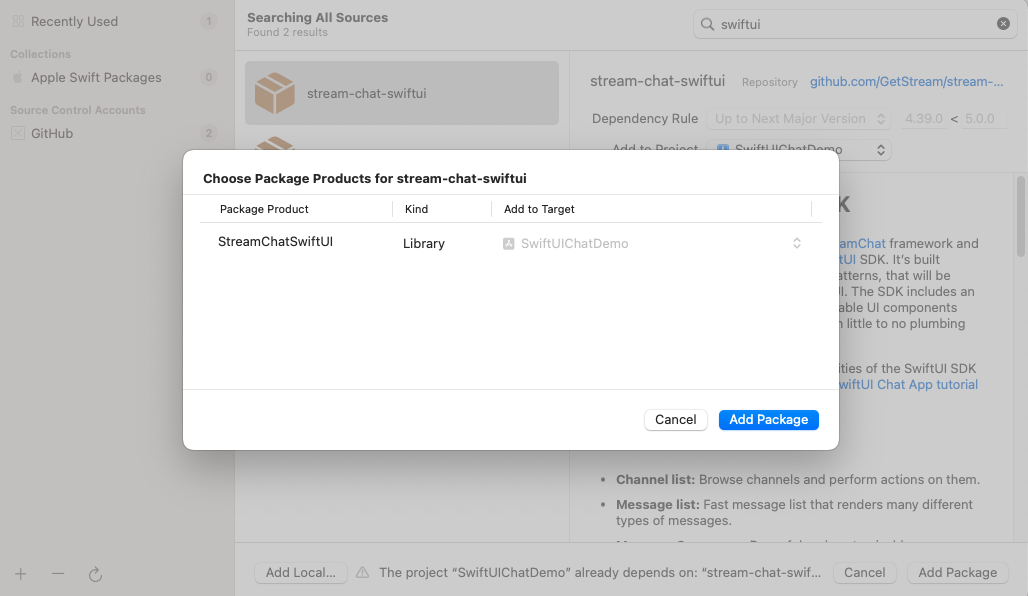
- Only select "StreamChatSwiftUI" and select "Add Package" again
You now have an empty project for your chat app with the SwiftUI SDK as a dependency. Let's get started by creating the chat client.
Client setup
Step 1: Setup the ChatClient
First, we need to setup the ChatClient. For this, go to the created SwiftUIChatDemoApp.swift file and add the following code inside the SwiftUIChatDemoApp struct:
12345678910var chatClient: ChatClient = {
    //For the tutorial we use a hard coded api key and application group identifier
    var config = ChatClientConfig(apiKey: .init("8br4watad788"))
    config.isLocalStorageEnabled = true
    config.applicationGroupIdentifier = "group.io.getstream.iOS.ChatDemoAppSwiftUI"

    // The resulting config is passed into a new `ChatClient` instance.
    let client = ChatClient(config: config)
    return client
}()
In the code above, we are creating a new instance of our ChatClient. We are providing a hardcoded API key here to make it easy to follow the tutorial.
Alternatively you can also sign up and get your own API key.
The ChatClient instance handles the low-level integration with our backend API, and it comes with offline support out of the box.
In the ChatClientConfig, we are setting the isLocalStorageEnabled to true.
This property controls whether we cache the data locally. When it's set to true, we are able to browse the existing chat history, even when the internet connection is not available.
The applicationGroupIdentifier is an App Group ID, that you will need to use if you want to share credentials between your app bundle and any extensions you want to add to your messaging app later on.
Next, we need to setup the StreamChat instance, that is a context provider object for our SwiftUI SDK. You will use it to setup different fonts, colors, images and other customizations in your app.
Step 2: Setup the StreamChat instance
To setup the StreamChat instance, add the following code inside your SwiftUIChatDemoApp struct:
12345@State var streamChat: StreamChat?

init() {
    streamChat = StreamChat(chatClient: chatClient)
}
Step 3: Connect the User
As a next step we're going to connect a user to the chat. The example below will show how to authenticate a user using a JWT token. It's also possible to have anonymous or guest users. For the full background on connecting and authenticating users see the auth & connect docs. This example uses a hardcoded JWT token. In a production app the JWT token is typically provided as part of your backend's login and registration endpoints.
Here's our connectUser implementation that authenticates the user. You should call this method right after the setup of the streamChat instance in the init method of the SwiftUIChatDemoApp.
1234567891011121314151617181920private func connectUser() {
    // This is a hardcoded token valid on Stream's tutorial environment.
    let token = try! Token(rawValue: "eyJhbGciOiJIUzI1NiIsInR5cCI6IkpXVCJ9.eyJ1c2VyX2lkIjoibHVrZV9za3l3YWxrZXIifQ.kFSLHRB5X62t0Zlc7nwczWUfsQMwfkpylC6jCUZ6Mc0")

    // Call `connectUser` on our SDK to get started.
    chatClient.connectUser(
        userInfo: .init(
            id: "luke_skywalker",
            name: "Luke Skywalker",
            imageURL: URL(string: "https://vignette.wikia.nocookie.net/starwars/images/2/20/LukeTLJ.jpg")!
        ),
        token: token
    ) { error in
        if let error = error {
            // Some very basic error handling only logging the error.
            log.error("connecting the user failed \(error)")
            return
        }
    }
}
Step 4: Setup the init method
1234init() {
    streamChat = StreamChat(chatClient: chatClient)
    connectUser()
}
Here's the finished result:
12345678910111213141516171819202122232425262728293031323334353637383940414243444546474849505152import SwiftUI
import StreamChat
import StreamChatSwiftUI

@main
struct SwiftUIChatDemoApp: App {

    var chatClient: ChatClient = {
        //For the tutorial we use a hard coded api key and application group identifier
        var config = ChatClientConfig(apiKey: .init("8br4watad788"))
        config.isLocalStorageEnabled = true
        config.applicationGroupIdentifier = "group.io.getstream.iOS.ChatDemoAppSwiftUI"

        // The resulting config is passed into a new `ChatClient` instance.
        let client = ChatClient(config: config)
        return client
    }()

    @State var streamChat: StreamChat?

    init() {
        streamChat = StreamChat(chatClient: chatClient)
        connectUser()
    }

    var body: some Scene {
        WindowGroup {
            ContentView()
        }
    }

    private func connectUser() {
        // This is a hardcoded token valid on Stream's tutorial environment.
        let token = try! Token(rawValue: "eyJhbGciOiJIUzI1NiIsInR5cCI6IkpXVCJ9.eyJ1c2VyX2lkIjoibHVrZV9za3l3YWxrZXIifQ.kFSLHRB5X62t0Zlc7nwczWUfsQMwfkpylC6jCUZ6Mc0")

        // Call `connectUser` on our SDK to get started.
        chatClient.connectUser(
            userInfo: .init(
                id: "luke_skywalker",
                name: "Luke Skywalker",
                imageURL: URL(string: "https://vignette.wikia.nocookie.net/starwars/images/2/20/LukeTLJ.jpg")!
            ),
            token: token
        ) { error in
            if let error = error {
                // Some very basic error handling only logging the error.
                log.error("connecting the user failed \(error)")
                return
            }
        }
    }
}
If you run the project, you will not see anything at this point. Let's fix that by providing a channel list.
Before proceeding to the next step, you should make sure that the connectUser call was successful. To do that, check your console in Xcode and make sure that the log.error from the code above is not invoked.
Presenting a channel list
There are 2 ways you can build the UI for the channel list
- Stream's low level API + offline support exposes state. You can build custom UI on top of this state layer
- Or you can use some of our pre-made UI components. Most customers end up mixing and matching between these 2 approaches to meet their design requirements
The UI components include a ChannelList, MessageInput, MessageList, ChannelHeader etc.
Open up SwiftUIChatDemoApp and replace the ContentView with ChatChannelListView in the WindowsGroup defined in our view's body definition.
12345var body: some Scene {
    WindowGroup {
        ChatChannelListView()
    }
}
The ChatChannelListView is a reusable component that provides many features (pagination, swiping actions, search, etc), as well as customization options.
To find out more details about this topic, please check this page.
You can also build one by yourself, either by reusing our building blocks or starting from scratch. Here's an example of how to build your own channel list using our lower level components.
Create a new file called CustomChannelList and add the following code:
1234567891011121314151617181920212223242526272829303132333435363738394041import SwiftUI
import StreamChat
import StreamChatSwiftUI

struct CustomChannelList: View {

    @StateObject private var viewModel: ChatChannelListViewModel

    public init(
        channelListController: ChatChannelListController? = nil
    ) {
        let channelListVM = ViewModelsFactory.makeChannelListViewModel(
            channelListController: channelListController,
            selectedChannelId: nil
        )
        _viewModel = StateObject(
            wrappedValue: channelListVM
        )
    }

    var body: some View {
        NavigationView {
            ChannelList(
                factory: DefaultViewFactory.shared,
                channels: viewModel.channels,
                selectedChannel: $viewModel.selectedChannel,
                swipedChannelId: $viewModel.swipedChannelId,
                onItemTap: { channel in
                    viewModel.selectedChannel = channel.channelSelectionInfo
                },
                onItemAppear: { index in
                    viewModel.checkForChannels(index: index)
                },
                channelDestination: DefaultViewFactory.shared.makeChannelDestination(options: .init())
            )
            .toolbar {
                DefaultChatChannelListHeader(title: "Stream Tutorial")
            }
        }
    }
}
In order to use it, you just need to replace the ChatChannelListView with CustomChannelList in the init of the SwiftUIChatDemoApp.
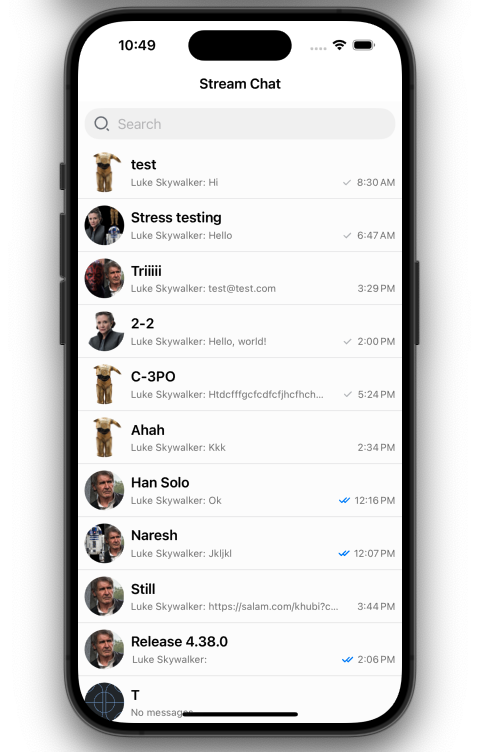
If you run the app now, you should see the following UI shown on the right.
In case you want to do UI customizations of the channel list, you should provide your own ViewFactory in the ChannelList creation. To find out more, check our docs about channel list customizations.
You might have noticed in the examples above the ChatChannelListController which was passed to the channel list, with a default value of nil.
The ChatChannelListController provides the channels state, and you can provide different filtering and sorting criteria to it, with its ChannelListQuery.
When its value is nil, a default controller would be created, which would list all the channels where the current user is a member of.
If you want to provide your own channel list query, please check the following page.
Project Permissions
Next, let's add permissions to our app so that we can access the camera and gallery. Our message input UI component supports this by default.
- Select your project from the Project navigator on the left
- Open the Info tab for the SwiftUIChatDemo target
- Add a new entry with "Privacy - Camera Usage Description" as key and "SwiftUIChatDemo camera use" as value
- Add a new entry with "Privacy - Photo Library Usage Description" as key and "SwiftUIChatDemo photo use" as value
If you run the app again, and open the gallery from the message composer, you should see the permissions popup. After accepting it, you will see the images from your photo library available for selection.
Presenting a channel
The ChannelList comes with default "push" navigation that opens the selected channel. You can change this behaviour by providing your own handling of the onItemTap method provided to the initializer of the ChannelList.
If you want to keep the "push" navigation, and only need to change the destination with your own channel view, you should provide your own implementation of the channelDestination parameter. That is a closure with the channel as an input, and returns any SwiftUI view.
12345678910111213141516171819202122232425262728293031323334var body: some View { NavigationView { ChannelList( factory: CustomViewFactory.shared, channels: viewModel.channels, selectedChannel: $viewModel.selectedChannel, swipedChannelId: $viewModel.swipedChannelId, onItemTap: { channel in // Handle your own navigation here viewModel.selectedChannel = channel.channelSelectionInfo }, onItemAppear: { index in viewModel.checkForChannels(index: index) }, channelDestination: CustomViewFactory.shared.makeChannelDestination(options: .init()) ) .toolbar { DefaultChatChannelListHeader(title: "Stream Tutorial") } } } class CustomViewFactory: ViewFactory { @Injected(\.chatClient) var chatClient: ChatClient var styles = RegularStyles() static let shared = CustomViewFactory() func makeChannelDestination(options: ChannelDestinationOptions) -> @MainActor (ChannelSelectionInfo) -> CustomChannelView { { channelInfo in CustomChannelView(channelId: channelInfo.channel.cid) } } }
Here's an example how to create the CustomChannelView with the building blocks we provide.
123456789101112131415161718192021222324252627282930313233343536373839404142434445464748495051525354555657585960616263646566676869707172737475767778798081import SwiftUI
import StreamChat
import StreamChatSwiftUI

struct CustomChannelView: View {

    @State var channelInfoShown = false
    @State var messageDisplayInfo: MessageDisplayInfo?
    @StateObject var viewModel: ChatChannelViewModel

    init(channelId: ChannelId) {
        _viewModel = StateObject(wrappedValue: ChatChannelViewModel(
            channelController: InjectedValues[\.chatClient].channelController(
                for: channelId
            ))
        )
    }

    var body: some View {
        NavigationView {
            if let channel = viewModel.channel {
                VStack(spacing: 0) {
                    MessageListView(
                        factory: DefaultViewFactory.shared,
                        channel: channel,
                        messages: viewModel.messages,
                        messagesGroupingInfo: viewModel.messagesGroupingInfo,
                        scrolledId: $viewModel.scrolledId,
                        showScrollToLatestButton: $viewModel.showScrollToLatestButton,
                        quotedMessage: $viewModel.quotedMessage,
                        currentDateString: viewModel.currentDateString,
                        listId: viewModel.listId,
                        onMessageAppear: viewModel.handleMessageAppear(index:scrollDirection:),
                        onScrollToBottom: viewModel.scrollToLastMessage,
                        onLongPress: { displayInfo in
                            messageDisplayInfo = displayInfo
                            withAnimation {
                                viewModel.showReactionOverlay(for: AnyView(self))
                            }
                        }
                    )

                    MessageComposerView(
                        viewFactory: DefaultViewFactory.shared,
                        channelController: viewModel.channelController,
                        quotedMessage: $viewModel.quotedMessage,
                        editedMessage: $viewModel.editedMessage,
                        willSendMessage: viewModel.scrollToLastMessage
                    )
                }
                .overlay(
                    viewModel.reactionsShown ?
                        ReactionsOverlayView(
                            factory: DefaultViewFactory.shared,
                            channel: channel,
                            currentSnapshot: viewModel.currentSnapshot!,
                            messageDisplayInfo: messageDisplayInfo!,
                            onBackgroundTap: {
                                viewModel.reactionsShown = false
                                messageDisplayInfo = nil
                            }, onActionExecuted: { actionInfo in
                                viewModel.messageActionExecuted(actionInfo)
                                messageDisplayInfo = nil
                            }
                        )
                        .transition(.identity)
                        .edgesIgnoringSafeArea(.all)
                        : nil
                )
                .navigationBarTitleDisplayMode(.inline)
                .toolbar {
                    DefaultChatChannelHeader(
                        channel: channel,
                        shouldShowTypingIndicator: viewModel.shouldShowNavigationBarTypingIndicator,
                        isActive: $channelInfoShown
                    )
                }
            }
        }
    }
}
In some apps, the chat is invoked from a different place than the channel list. In that case, you need to display the ChatChannelView programmatically. You can find more details on how to do that here.
The ChatChannelView provides many customization options. To find out more about the possibilities, have a look at this section of our docs.
You can find more details about components above in our docs:
Theming
A lot of the features of the SwiftUI Chat SDK can be modified through theming. It offers a quick and easy way to add basic branding and style to your chat implementation. You can change fonts, colors, icons, presentation logic and much more. You can find more information about the appearance customizations here.
Let's see some examples of what is possible.
One common thing to change is the background and text color of the message bubbles. In order to do this, we need to specify the corresponding colors in the ColorPalette.
Add the following code before creating the StreamChat instance.
1234let colors = Appearance.ColorPalette()
let streamBlue = UIColor(red: 0, green: 108.0 / 255.0, blue: 255.0 / 255.0, alpha: 1)
colors.chatBackgroundOutgoing = streamBlue
colors.chatTextOutgoing = .white
We can also change the fonts. For example, if we want to use bigger font for the text messages, we can change its body value to be title.
123let fonts = Appearance.FontsSwiftUI()
fonts.footnoteBold = Font.footnote
fonts.body = Font.title
Similarly, we can change icons in our Images class, for example, for the send button.
12let images = Appearance.Images()
images.composerSend = UIImage(systemName: "arrowshape.turn.up.right")!
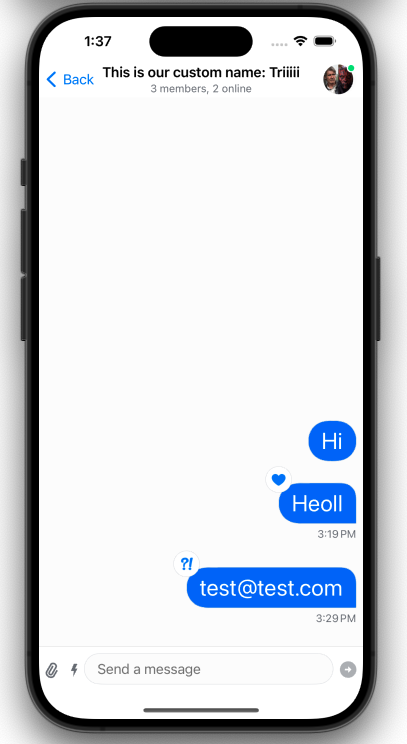
Additionally, you can change presentation logic, such as the name of the channel.
123456struct CustomChannelNameFormatter: ChannelNameFormatter {
    func format(channel: ChatChannel, forCurrentUserId currentUserId: UserId?) -> String? {
        "This is our custom name: \(channel.name ?? "no name")"
    }
}
let channelNameFormatter = CustomChannelNameFormatter()
To put this all together, we need to provide these values to the StreamChat object, during its creation.
12345678let appearance = Appearance()
appearance.colorPalette = colors
appearance.images = images
appearance.fontsSwiftUI = fonts

let utils = Utils(channelNameFormatter: channelNameFormatter)

streamChat = StreamChat(chatClient: chatClient, appearance: appearance, utils: utils)
Add this code in the init method of the SwiftUIChatDemoApp, replacing the existing StreamChat object creation. If you now run the app, you should see the customizations applied to your chat.
Custom messages & attachments
Custom messages & attachments allow you to bring more rich content into the chat experience. Marketplace apps use it to display offers, hospitality apps often show your reservation and apps like Strava use it to show cycling routes. Other use cases include custom video messages, polls, live locations etc.
You can build any type of custom message or attachment with Stream. In cases where you want to have a different UI for an existing attachment (e.g. different files renderer), you should use one of our customization slots instead.
You can find a fully working example for custom attachments in our docs.
Video / audio room integration
For a complete social experience, Stream provides a Video & Audio calling iOS SDK, that works seamlessly with our chat products. If you want to learn more on how to integrate video into your apps, please check our docs and our tutorials about video calling and livestreaming.
We also have a guide on how to integrate video with chat.
UI Components & Cookbook
If you want to build your own UI components, from scratch or while re-using some of Stream's building blocks, check our cookbook for examples.
In the cookbook, we have examples on:
- how to build your own channel header
- how to build your custom composer
- how to align the message list differently
- how to have different reactions placement and styling
- how to build your own message list using the state from the low-level client
Final Thoughts
We have shown you how to build a fully featured in-app chat experience with SwiftUI, which includes reactions, threads, typing indicators, offline storage, URL previews, user presence and more. It's pretty crazy how APIs & SwiftUI components enable you to build chat in hours. On top of that you now know how easy it is to add your own theme to the app and even fully customize its key components.
The chat app we built uses Stream's edge network for optimal performance and scalability. Stream powers thousands of apps and over a billion end users. There are several price tiers available, including a free plan for development and a free maker plan.
Both the Chat SDK for SwiftUI and the API have plenty more features available to support more advanced use-cases such as push notifications, content moderation, rich messages and more. Additionally, we have shown how to use our low-level state from the chat client, in case you want to build your own custom messaging experiences.