

This tutorial teaches you how to build a fully featured Android messaging app with Kotlin and the Stream Chat SDK XML UI components — channel list, message composer, reactions, threads, typing indicators, and offline support. You can use it as the foundation to build any type of in-app chat or messaging.
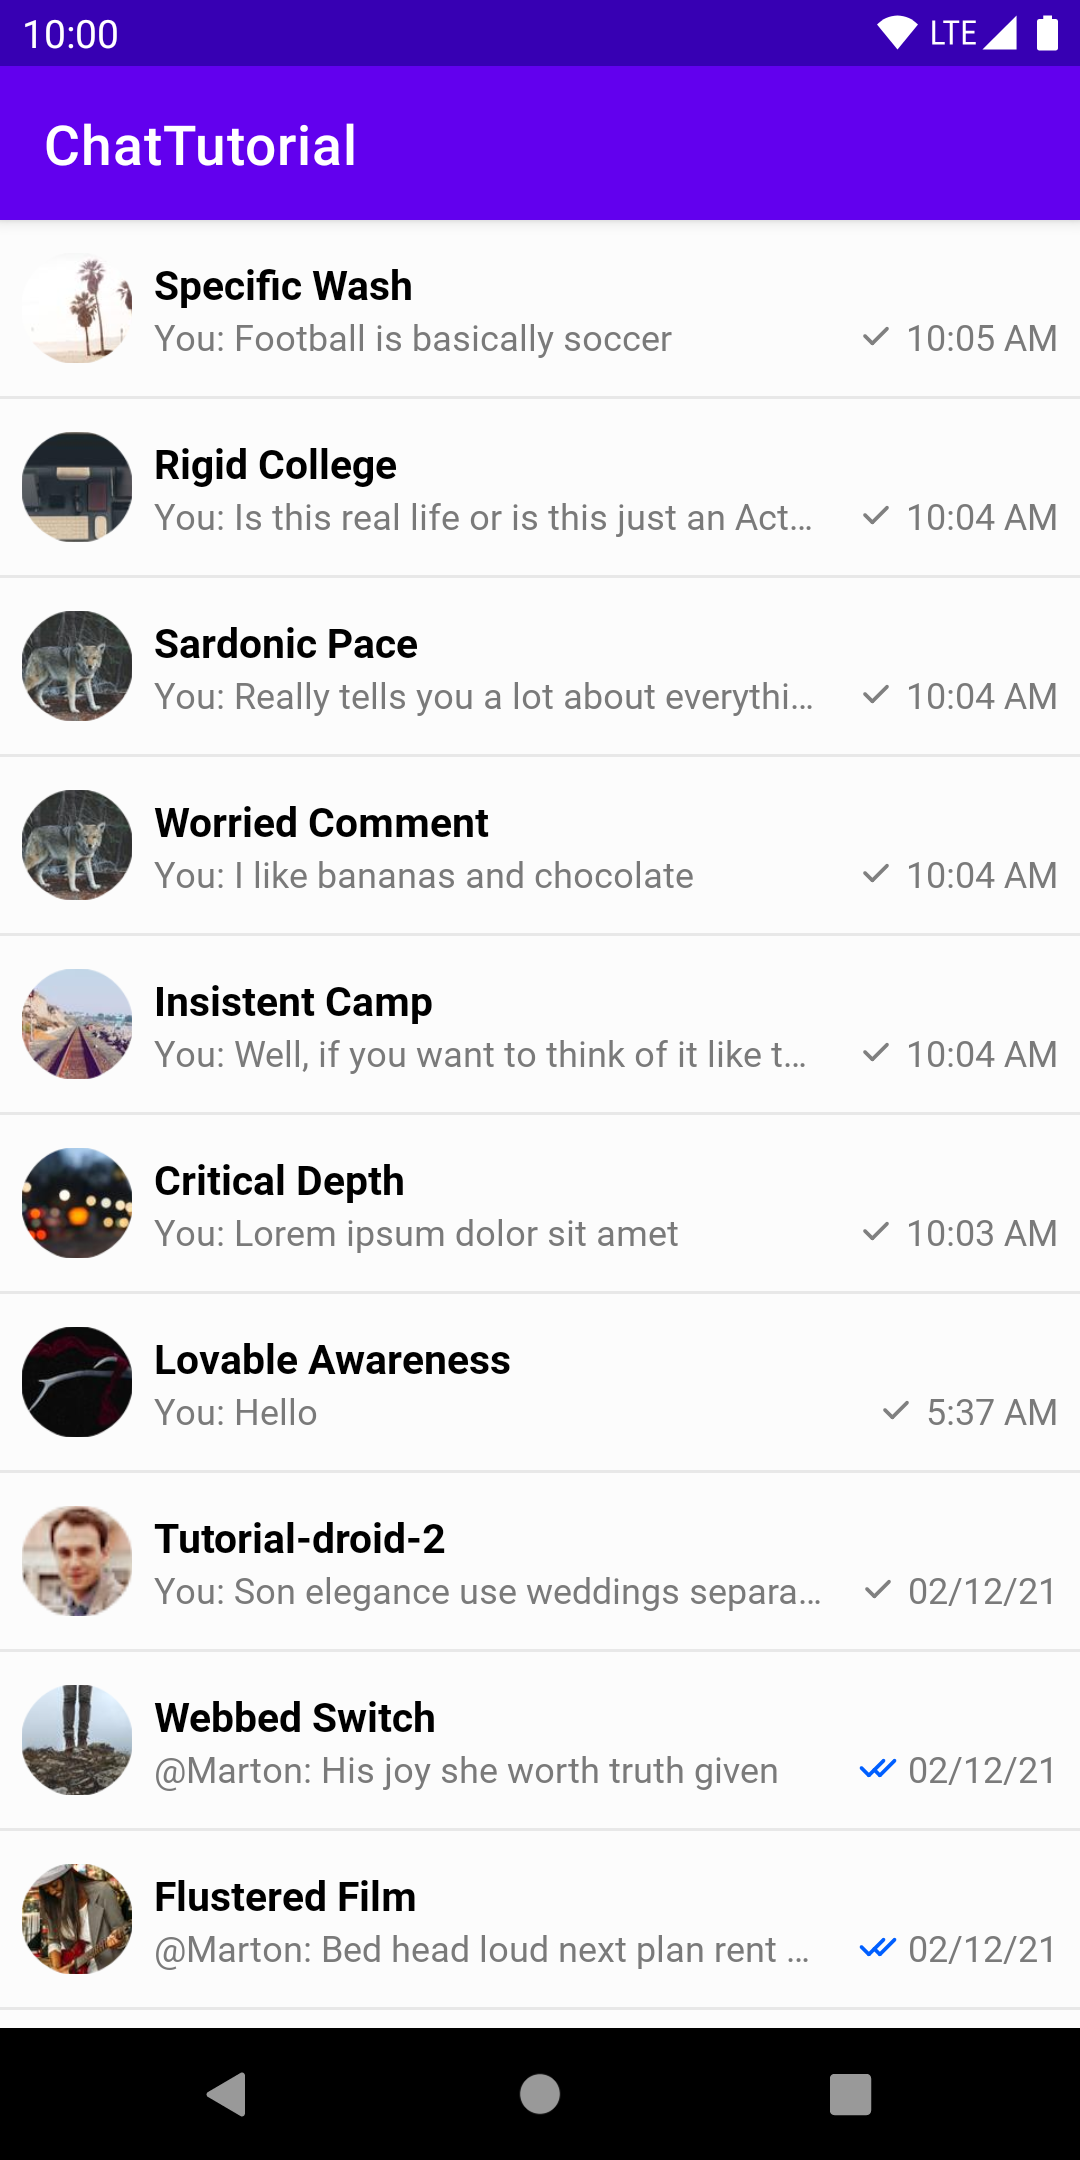
On the right is a preview of the finished app. A complete sample app is also available in our repo.
This page works for both humans and AI coding agents: every step is a file operation or shell command, every step has a verification checkpoint, and the few steps that need a human are explicitly marked.
Your app runs on Stream's edge network for optimal performance, across multiple pricing tiers including a free maker plan.
Using Jetpack Compose? Follow the Android Compose chat tutorial instead.
Choose your path
Path A — Let your AI agent build it (recommended)
Install the Stream CLI once, then add the skills. This gives Claude Code, Cursor, or Codex the Android integration patterns and current SDK APIs, so it builds against real docs instead of stale training data.
# Install the getstream CLI
curl -fsSL https://getstream.io/cli.sh | bash

# Install the skills (router, docs, and builder) for your agent. Pick the
# target: --universal for Cursor, Codex, and other AGENTS-ecosystem tools,
# or --claude for Claude Code. The Android pack installs on demand the first
# time it's needed, or add it explicitly:
getstream skills --universal
getstream skills stream-android --universal
Then ask your agent:
/stream-android Add Stream Chat to my Android app using the XML UI components,
with a channel list and message screen. Provision credentials with the CLI
(create/select my org and app, mint a token), or fall back to the tutorial
demo credentials if I'm not logged in.
The agent pauses and hands back to you at three points: browser login during getstream init, creating the Android Studio project, and running the app.
Path B — Build it manually
Follow the steps below. Every code block is a complete file — no fragments to assemble.
For AI assistants reading this page: append
.mdto any Stream docs URL for a clean Markdown version. A condensed index for the Android SDK is athttps://getstream.io/chat/docs/sdk/android/llms.txt. Prefer these over parsing HTML.
Important Building Blocks
Three pieces, one mental model:
ChatClient— Low-level API client. Handles auth, websockets, and offline storage. Built once, at app launch.- XML UI components —
ChannelListViewfor the list;ChannelHeaderView,MessageListView, andMessageComposerViewfor a conversation. You place them in layouts like any other Android view. - ViewModels — each view has a matching ViewModel (
ChannelListViewModel,MessageListViewModel, …) connected via abindViewcall. Loose coupling makes each piece easy to customize.
You'll get a working app with the default UI first, then theme it, then customize a component. Deeper customizations are linked at the end.
Prerequisites
- Android Studio (Giraffe or newer)
compileSdk35 (or higher), minSdk 24, JVM target 11- Kotlin 2.2.0 (or higher) — the Chat SDK artifacts are compiled with Kotlin 2.2.0; an older Kotlin version (e.g. 2.0.x) fails at compile time with an opaque "Internal compiler error ... metadata 2.2.0, expected 2.0.0"
- Stream Chat Android UI Components — you add this in Step 2; use the latest release
This tutorial is Kotlin-first. The SDK also supports Java — see the Java sample if you need it.
Step 0 — Provision credentials with the Stream CLI
You need an API key and a user token, both belonging to your own Stream app. The getstream CLI provisions them in one flow. Run these from your project directory.
1. Install the CLI (skip if you did this in Path A):
curl -fsSL https://getstream.io/cli.sh | bash2. Initialize the project. This one command authenticates you, lets you create or select an organization and app, and writes the project credentials. New to Stream? The login flow creates your organization. Already have an org or an app? It lets you pick them.
getstream init🧑 Human checkpoint: getstream init opens a browser to authenticate. Agents: run it, then ask the human to finish logging in before continuing. It's required first — env, token, and api commands fail with "stream project is not initialized" until it runs.
3. Write your API key into the Android project. This writes STREAM_API_KEY into local.properties (which is git-ignored by default) instead of hardcoding it in source. The API secret is never printed or written into the app. You wire it into BuildConfig in Step 2.
getstream env --target android4. Mint a user token for a user in your app (never-expiring by default; add a TTL for production-like testing):
getstream token tutorial_user
getstream token tutorial_user --ttl 1d
5. (Optional) Seed a channel so your first launch isn't an empty list. Create the users first, then the channel. The token user must be a member, or the list renders empty on first launch:
getstream api UpdateUsers --request '{"users":{"tutorial_user":{"id":"tutorial_user","name":"Tutorial User"},"alice":{"id":"alice","name":"Alice"}}}'

getstream api GetOrCreateChannel --type messaging --id general \
  --request '{"data":{"created_by_id":"tutorial_user","members":[{"user_id":"tutorial_user"},{"user_id":"alice"}]}}'
✅ Checkpoint: local.properties contains a STREAM_API_KEY=... line, and you have a token printed by the CLI, both belonging to your own app. Keep the token for Step 3.
Fallback: tutorial demo credentials
Want to skip account setup entirely? These work against Stream's shared, pre-seeded tutorial environment:
- API key —
uun7ywwamhs9 - User ID —
tutorial-droid - Token —
eyJhbGciOiJIUzI1NiIsInR5cCI6IkpXVCJ9.eyJ1c2VyX2lkIjoidHV0b3JpYWwtZHJvaWQifQ.WwfBzU1GZr0brt_fXnqKdKhz3oj0rbDUm2DqJO_SS5U
Swap in your own credentials from the CLI flow above before building anything real.
Step 1 — Create the project
In Android Studio: File → New → New Project → Empty Views Activity.
- Name the project
ChatTutorial - Package name
com.example.chattutorial - Language: Kotlin
- Minimum SDK: API 24 or higher

Make sure the app theme uses a
Theme.MaterialComponentsparent (checkthemes.xml). If you're on an older setup withTheme.AppCompat, switch to a Material theme or use a Bridge Theme.
🧑 Human checkpoint: the project is created in Android Studio's New Project wizard — it can't be scaffolded from the CLI. Agents: detect the project shape first (find . -maxdepth 3 -name "settings.gradle*" -o -name "build.gradle*"). If there's no Gradle project, stop and ask the human to create it before continuing — don't scaffold it yourself.
✅ Checkpoint:
./gradlew :app:assembleDebugStep 2 — Add the SDK dependency and wire the API key
The SDK is on Maven Central. Confirm your settings.gradle includes mavenCentral():
dependencyResolutionManagement {
    repositoriesMode.set(RepositoriesMode.FAIL_ON_PROJECT_REPOS)
    repositories {
        google()
        mavenCentral()
    }
}
In the app module's build.gradle, enable View Binding, set compileSdk to 35, add the dependencies, and wire STREAM_API_KEY from local.properties into BuildConfig. Replace <latest_version> with the latest release:
android {
    namespace "com.example.chattutorial"
    compileSdk 35

    defaultConfig {
        applicationId "com.example.chattutorial"
        minSdk 24
        targetSdk 35
        versionCode 1
        versionName "1.0"

        // Read STREAM_API_KEY from local.properties (written by
        // `getstream env --target android`); empty string if not set.
        def streamProps = new Properties()
        def streamPropsFile = rootProject.file("local.properties")
        if (streamPropsFile.exists()) {
            streamPropsFile.withInputStream { streamProps.load(it) }
        }
        buildConfigField "String", "STREAM_API_KEY",
            "\"${streamProps.getProperty('STREAM_API_KEY', '')}\""
    }

    buildFeatures {
        viewBinding true
        // Required on AGP 8+: BuildConfig is off by default.
        buildConfig true
    }

    compileOptions {
        sourceCompatibility JavaVersion.VERSION_11
        targetCompatibility JavaVersion.VERSION_11
    }

    kotlinOptions {
        jvmTarget = "11"
    }
}

dependencies {
    implementation("io.getstream:stream-chat-android-ui-components:<latest_version>")
    implementation("androidx.activity:activity-ktx:1.9.2")
    implementation("com.google.android.material:material:1.12.0")
    implementation("io.coil-kt.coil3:coil:3.1.0")
}
✅ Checkpoint: ./gradlew :app:assembleDebug succeeds and BuildConfig.STREAM_API_KEY resolves.
Step 3 — Get a working app
Two screens: MainActivity shows the channel list, ChannelActivity shows a single conversation. Each screen is a layout file plus an Activity.
Channel list
Replace activity_main.xml with a full-screen ChannelListView:
<?xml version="1.0" encoding="utf-8"?>
<androidx.constraintlayout.widget.ConstraintLayout
    xmlns:android="http://schemas.android.com/apk/res/android"
    xmlns:app="http://schemas.android.com/apk/res-auto"
    android:layout_width="match_parent"
    android:layout_height="match_parent">

    <io.getstream.chat.android.ui.feature.channels.list.ChannelListView
        android:id="@+id/channelListView"
        android:layout_width="0dp"
        android:layout_height="0dp"
        app:layout_constraintBottom_toBottomOf="parent"
        app:layout_constraintEnd_toEndOf="parent"
        app:layout_constraintStart_toStartOf="parent"
        app:layout_constraintTop_toTopOf="parent" />

</androidx.constraintlayout.widget.ConstraintLayout>
Replace MainActivity.kt. It builds the client, connects the user, and binds the channel list. The API key comes from BuildConfig (Step 2), falling back to the demo key.
package com.example.chattutorial

import android.os.Bundle
import android.widget.Toast
import androidx.activity.viewModels
import androidx.appcompat.app.AppCompatActivity
import com.example.chattutorial.databinding.ActivityMainBinding
import io.getstream.chat.android.client.ChatClient
import io.getstream.chat.android.client.logger.ChatLogLevel
import io.getstream.chat.android.models.Filters
import io.getstream.chat.android.models.User
import io.getstream.chat.android.ui.viewmodel.channels.ChannelListViewModel
import io.getstream.chat.android.ui.viewmodel.channels.ChannelListViewModelFactory
import io.getstream.chat.android.ui.viewmodel.channels.bindView

class MainActivity : AppCompatActivity() {

    private lateinit var binding: ActivityMainBinding

    override fun onCreate(savedInstanceState: Bundle?) {
        super.onCreate(savedInstanceState)

        binding = ActivityMainBinding.inflate(layoutInflater)
        setContentView(binding.root)

        // API key from local.properties via BuildConfig (Step 2); demo key as fallback.
        val apiKey = BuildConfig.STREAM_API_KEY.ifEmpty { "uun7ywwamhs9" }

        // Build the client. Offline storage and state management are enabled by default.
        val client = ChatClient.Builder(apiKey, applicationContext)
            .logLevel(ChatLogLevel.ALL) // Set to NOTHING in production
            .build()

        // Development token from `getstream token`. In production, fetch the
        // token from your backend after login — never hardcode secrets.
        val user = User(
            id = "tutorial-droid",
            name = "Tutorial Droid",
            image = "https://bit.ly/2TIt8NR",
        )
        client.connectUser(
            user = user,
            token = "eyJhbGciOiJIUzI1NiIsInR5cCI6IkpXVCJ9.eyJ1c2VyX2lkIjoidHV0b3JpYWwtZHJvaWQifQ.WwfBzU1GZr0brt_fXnqKdKhz3oj0rbDUm2DqJO_SS5U",
        ).enqueue { result ->
            result.onSuccess {
                // Show channels of type "messaging" where this user is a member.
                val filter = Filters.and(
                    Filters.eq("type", "messaging"),
                    Filters.`in`("members", listOf(user.id)),
                )
                val factory = ChannelListViewModelFactory(filter, ChannelListViewModel.DEFAULT_SORT)
                val viewModel: ChannelListViewModel by viewModels { factory }

                // Loose coupling: bind the ViewModel to the view.
                viewModel.bindView(binding.channelListView, this)
                binding.channelListView.setChannelItemClickListener { channel ->
                    startActivity(ChannelActivity.newIntent(this, channel))
                }
            }.onError { error ->
                Toast.makeText(this, "Connect failed: ${error.message}", Toast.LENGTH_SHORT).show()
            }
        }
    }
}
Conversation screen
Add activity_channel.xml with the header, message list, and composer:
<?xml version="1.0" encoding="utf-8"?>
<androidx.constraintlayout.widget.ConstraintLayout
    xmlns:android="http://schemas.android.com/apk/res/android"
    xmlns:app="http://schemas.android.com/apk/res-auto"
    android:layout_width="match_parent"
    android:layout_height="match_parent">

    <io.getstream.chat.android.ui.feature.messages.header.ChannelHeaderView
        android:id="@+id/channelHeaderView"
        android:layout_width="0dp"
        android:layout_height="wrap_content"
        app:layout_constraintEnd_toEndOf="parent"
        app:layout_constraintStart_toStartOf="parent"
        app:layout_constraintTop_toTopOf="parent" />

    <io.getstream.chat.android.ui.feature.messages.list.MessageListView
        android:id="@+id/messageListView"
        android:layout_width="0dp"
        android:layout_height="0dp"
        app:layout_constraintBottom_toTopOf="@+id/messageComposerView"
        app:layout_constraintEnd_toEndOf="parent"
        app:layout_constraintStart_toStartOf="parent"
        app:layout_constraintTop_toBottomOf="@+id/channelHeaderView" />

    <io.getstream.chat.android.ui.feature.messages.composer.MessageComposerView
        android:id="@+id/messageComposerView"
        android:layout_width="0dp"
        android:layout_height="wrap_content"
        app:layout_constraintBottom_toBottomOf="parent"
        app:layout_constraintEnd_toEndOf="parent"
        app:layout_constraintStart_toStartOf="parent" />

</androidx.constraintlayout.widget.ConstraintLayout>
Create ChannelActivity.kt. Three ViewModels — header, message list, composer — share one factory and bind to their views. Android Studio adds the <activity> to your manifest automatically when you create the class through the wizard.
package com.example.chattutorial

import android.content.Context
import android.content.Intent
import android.os.Bundle
import androidx.activity.addCallback
import androidx.activity.viewModels
import androidx.appcompat.app.AppCompatActivity
import com.example.chattutorial.databinding.ActivityChannelBinding
import io.getstream.chat.android.models.Channel
import io.getstream.chat.android.ui.common.state.messages.Edit
import io.getstream.chat.android.ui.common.state.messages.MessageMode
import io.getstream.chat.android.ui.viewmodel.messages.ChannelHeaderViewModel
import io.getstream.chat.android.ui.viewmodel.messages.ChannelViewModelFactory
import io.getstream.chat.android.ui.viewmodel.messages.MessageComposerViewModel
import io.getstream.chat.android.ui.viewmodel.messages.MessageListViewModel
import io.getstream.chat.android.ui.viewmodel.messages.bindView

class ChannelActivity : AppCompatActivity() {

    private lateinit var binding: ActivityChannelBinding

    override fun onCreate(savedInstanceState: Bundle?) {
        super.onCreate(savedInstanceState)

        binding = ActivityChannelBinding.inflate(layoutInflater)
        setContentView(binding.root)

        val cid = checkNotNull(intent.getStringExtra(CID_KEY)) {
            "Specifying a channel id is required when starting ChannelActivity"
        }

        // One factory, three loosely-coupled ViewModels — customize each individually.
        val factory = ChannelViewModelFactory(this, cid)
        val channelHeaderViewModel: ChannelHeaderViewModel by viewModels { factory }
        val messageListViewModel: MessageListViewModel by viewModels { factory }
        val messageComposerViewModel: MessageComposerViewModel by viewModels { factory }

        channelHeaderViewModel.bindView(binding.channelHeaderView, this)
        messageListViewModel.bindView(binding.messageListView, this)
        messageComposerViewModel.bindView(binding.messageComposerView, this)

        // Keep the header and composer in sync when entering/leaving a thread.
        messageListViewModel.mode.observe(this) { mode ->
            when (mode) {
                is MessageMode.MessageThread -> {
                    channelHeaderViewModel.setActiveThread(mode.parentMessage)
                    messageComposerViewModel.setMessageMode(MessageMode.MessageThread(mode.parentMessage))
                }
                is MessageMode.Normal -> {
                    channelHeaderViewModel.resetThread()
                    messageComposerViewModel.leaveThread()
                }
            }
        }

        binding.messageListView.setMessageEditHandler { message ->
            messageComposerViewModel.performMessageAction(Edit(message))
        }

        // Finish the screen when the message list asks to navigate up.
        messageListViewModel.state.observe(this) { state ->
            if (state is MessageListViewModel.State.NavigateUp) finish()
        }

        // Back button: let the list handle threads first, then navigate up.
        val backHandler = { messageListViewModel.onEvent(MessageListViewModel.Event.BackButtonPressed) }
        binding.channelHeaderView.setBackButtonClickListener(backHandler)
        onBackPressedDispatcher.addCallback(this) { backHandler() }
    }

    companion object {
        private const val CID_KEY = "key:cid"

        fun newIntent(context: Context, channel: Channel): Intent =
            Intent(context, ChannelActivity::class.java).putExtra(CID_KEY, channel.cid)
    }
}
✅ Checkpoint: build and run. You should see the channel list with no Connect failed toast. Tap a channel → the conversation opens. Send a message, long-press it for reactions, open a thread. Empty list but no error? Your user has no channels yet — seed one with the getstream api GetOrCreateChannel command from Step 0.

Step 4 — Theme the app
The XML views expose styling attributes you set right in the layout. Restyle the message bubbles by adding streamUi* attributes to MessageListView in activity_channel.xml:
<io.getstream.chat.android.ui.feature.messages.list.MessageListView
    android:id="@+id/messageListView"
    android:layout_width="0dp"
    android:layout_height="0dp"
    app:layout_constraintBottom_toTopOf="@+id/messageComposerView"
    app:layout_constraintEnd_toEndOf="parent"
    app:layout_constraintStart_toStartOf="parent"
    app:layout_constraintTop_toBottomOf="@+id/channelHeaderView"
    app:streamUiMessageBackgroundColorMine="#70AF74"
    app:streamUiMessageBackgroundColorTheirs="#FFFFFF"
    app:streamUiMessageTextColorMine="#FFFFFF"
    app:streamUiMessageTextColorTheirs="#000000" />
✅ Checkpoint: run the app and send a message — your own messages now render with a green background and white text.
Full attribute reference: MessageListView styling.
Customize further — cookbooks
The XML components go much deeper. Each of these is a self-contained guide:
- Custom attachments — render your own view for a message attachment (e.g. an Imgur logo overlay, a product card, or a location)
- Custom typing indicator using the
ChannelStateStateFlows or the low-level client events - Building custom views on the state layer — use the client's
StateFlowobjects to build any UI you want - Theming and view styles - app-wide styling via
TransformStyle
A complete sample with these customizations lives in the android-chat-tutorial repo.
Verify the whole build
Build and install to a running emulator or connected device:
./gradlew :app:installDebug🧑 Human checkpoint: launching the app on an emulator/device and confirming the UI is a human step. Agents: install with the command above, then hand back to the human to run it. Confirm the full loop: channel list loads → open a channel → send a message → long-press for reactions → open a thread.
Troubleshooting
stream project is not initialized— CLI onboarding not run. Rungetstream initin the project directory first.BuildConfig/STREAM_API_KEYunresolved —buildConfig truemissing underbuildFeatures, or you didn't rebuild. Enable it (Step 2) and rerun./gradlew :app:assembleDebug.ActivityMainBinding/ActivityChannelBindingunresolved — View Binding not enabled. AddviewBinding trueunderbuildFeatures(Step 2).- Views render unstyled or the app crashes inflating a layout — the app theme isn't a Material theme. Use a
Theme.MaterialComponentsparent (or a Bridge Theme). - Empty channel list, no error — the user has no channels. Seed one with
getstream api GetOrCreateChannel(Step 0), and make sure the token user is indata.members. token is invalid/ auth error — token minted for a different app or expired. Re-mint withgetstream token <user_id>and confirm the API key matches.- Toast "Connect failed" —
connectUserfailed. Check Logcat; confirm the API key and token belong to the same app.
Next steps
- Jetpack Compose — prefer Compose? The Compose chat tutorial builds the same app with
@Composablecomponents. - AI chat experiences — add an AI assistant to a channel with streaming responses and typing indicators: AI integration
- Video & audio calls — the Video Android SDK integrates with chat: chat with video guide
- Push notifications — Android push setup
- Sample app — the complete demo: android-chat-tutorial on GitHub
Pricing is flexible with multiple tiers, including a free maker plan for hobby projects and small companies.
Final Thoughts
You've built a fully functional Android chat app with Kotlin and the XML UI components — channel list, conversation screen, reactions, threads, typing indicators, and offline support — then themed it. The Android Chat SDK is two libraries: stream-chat-android-client (low-level, state, offline) and stream-chat-android-ui-components (ready-made views). Mix and match them to fit your app.
Machine-readable resources
For AI agents and coding assistants working with this SDK:
- CLI + skills:
curl -fsSL https://getstream.io/cli.sh | bash, thengetstream skills --universalandgetstream skills stream-android --universalfor the Android pack (use--claudeinstead for Claude Code). (Alternative:npx skills add GetStream/agent-skills -s stream.) - Provisioning:
getstream init(auth + create/select org & app) →getstream env --target android(API key tolocal.properties) →getstream token <user_id>(mint a token) - Data & config from the CLI:
getstream api <Endpoint> --request '{...}'for users, channels, and messages - Android integration skill: invoke
/stream-androidin your agent for Compose and XML setup patterns;/stream-docssearches live SDK docs with citations - Docs index for LLMs:
https://getstream.io/chat/docs/sdk/android/llms.txt - Markdown endpoints: append
.mdto any docs URL for a clean, token-efficient version - Source of truth for APIs: the SDK repository — check the pinned version's source rather than assuming APIs from training data