


AI chat widget
The AI chat widget is a round button on top of an app's screens that opens the user's conversation with an AI assistant. This UI cookbook builds it for React Navigation: a launcher on the home screen, and the assistant's channel in a full screen modal with the message list, the AI state indicator and the composer. It works on top of an app that already has a chat, and on its own, in an app that only wants the assistant. The modal follows Chat in modals, and the AI parts are on SDK integration.
The widget only shows the conversation. The assistant's replies come from an AI agent on your backend, which watches the channel, sends each reply as the assistant user, and reports what it is doing with ai_indicator.* events. AI integrations overview explains how the backend drives the reply.
What you'll build
- a launcher button on the home screen
- the assistant's channel in a full screen modal
- the widget on its own, in an app that only has the assistant
Approach: Compose. Choosing where to start explains the approaches.
Best practices
- Give each user one channel with the assistant, created by your backend, and pass the widget its id.
Channelwatches it the first time the modal opens, so a user who never opens the widget costs no request. - Mark the assistant's replies on the backend, and tell
Chathow to recognize them withisMessageAIGenerated, so every message list types them out as they stream in. - Give the modal its own
OverlayProviderwith the same props as the root one, so the message menu and the image gallery render inside it on iOS. - Present the modal as a full screen modal, and give its header a close button, because a full screen modal can't be swiped away.
- Give the launcher an accessible label, since it shows only an icon.
- In an app with a channel list, keep the assistant's channel out of that list, so the conversation has one place. Give it a channel type of its own, created in the Dashboard, and filter the list on the type your other channels have.
- Turn off replies in threads for the assistant's channel type if your assistant doesn't answer in threads.
Describe the navigation
The root stack has the app's own screen and the assistant's modal. The modal has a stack of its own with one screen, which holds the nested OverlayProvider:
export type RootParamList = {
  Home: undefined;
  Assistant: undefined;
};

export type AssistantParamList = {
  AssistantChannel: undefined;
};
The configuration shared by the root and the modal lives in one module, so both OverlayProviders get the same props, and so does Chat:
import type { OverlayProviderProps } from "stream-chat-react-native";
import type { LocalMessage } from "stream-chat";

declare module "stream-chat" {
  // The field the backend sets on the assistant's replies. Optional, because every message in the
  // app shares this interface.
  interface CustomMessageData {
    ai_generated?: boolean;
  }
}

// The user's channel with the assistant, which your backend creates.
export const assistantChannelId = "YOUR_ASSISTANT_CHANNEL_ID";

// The same props for every OverlayProvider in the app.
export const overlayProps: OverlayProviderProps = {
  accessibility: { enabled: true },
};

/** The assistant wrote the message: the backend marks its replies with `ai_generated`. */
export const isMessageAIGenerated = (message: LocalMessage) =>
  !!message.custom?.ai_generated;
isMessageAIGenerated reads the custom field ai_generated, which the client puts under message.custom. Passed to Chat, it makes every message list render the text of those messages with StreamingMessageView, which types out whatever the text grows by, and leaves out the "Edited" label that each streamed update would add. A reply that is already stored shows in full. Mark assistant messages with ai_generated shows how the backend sets the field, and SDK integration explains how the message bubble uses it. The function is declared at module scope, so Chat gets the same one on every render.
Build the launcher
AssistantLauncher is a round button pinned to the bottom right of the screen it is rendered in, above the safe area. Pressing it navigates to the modal. The button is the SDK's Button, with the MessageBubbleEmpty icon from the components context, so an app that replaces the icon set replaces it here too.
import { StyleSheet, View } from "react-native";
import { useSafeAreaInsets } from "react-native-safe-area-context";
import { useNavigation } from "@react-navigation/native";
import type { NativeStackNavigationProp } from "@react-navigation/native-stack";
import { Button, useComponentsContext } from "stream-chat-react-native";
import type { RootParamList } from "./navigation";

/** A round button at the bottom right that opens the conversation with the assistant. */
export const AssistantLauncher = ({
  title = "Assistant",
}: {
  title?: string;
}) => {
  const { icons } = useComponentsContext();
  const navigation = useNavigation<NativeStackNavigationProp<RootParamList>>();
  const { bottom, right } = useSafeAreaInsets();

  return (
    <View
      pointerEvents="box-none"
      style={[styles.container, { bottom: bottom + 16, right: right + 16 }]}
    >
      <Button
        accessibilityLabel={`Chat with ${title}`}
        iconOnly
        LeadingIcon={icons.MessageBubbleEmpty}
        onPress={() => navigation.navigate("Assistant")}
        size="lg"
        type="solid"
        variant="primary"
      />
    </View>
  );
};

const styles = StyleSheet.create({
  container: { position: "absolute" },
});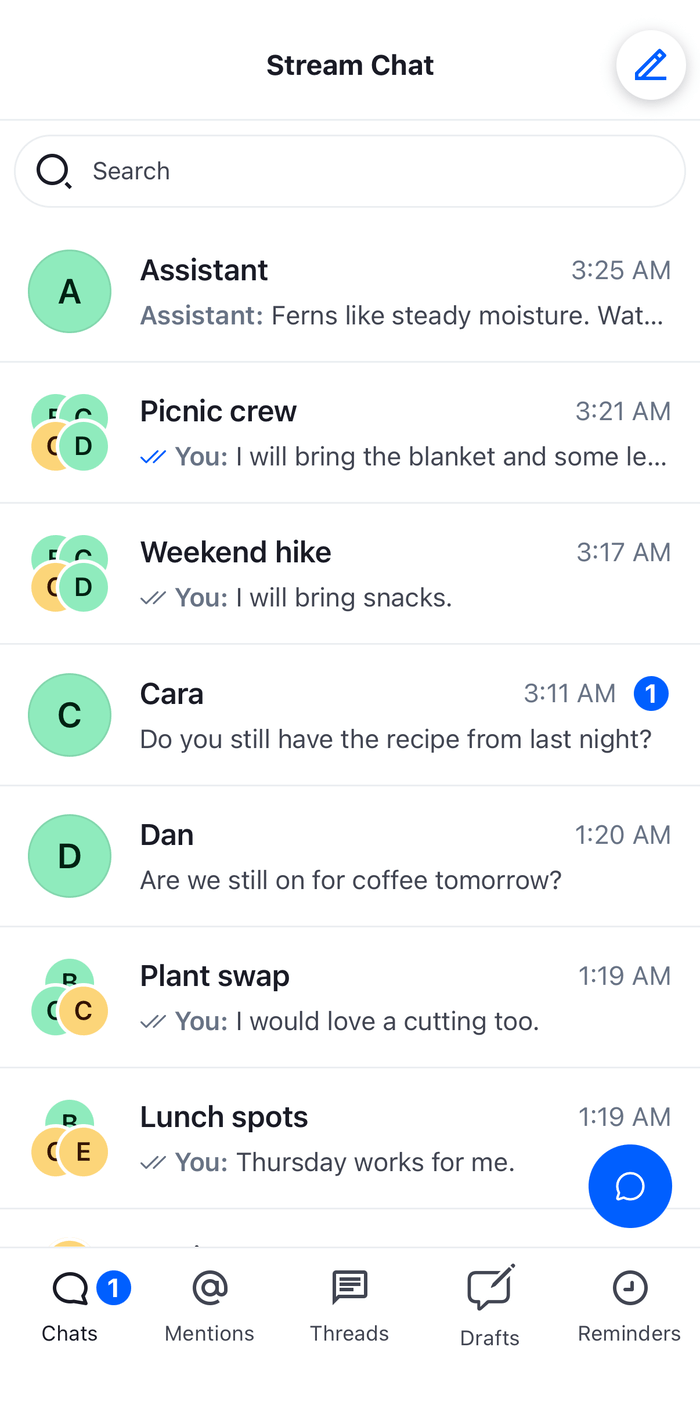 | 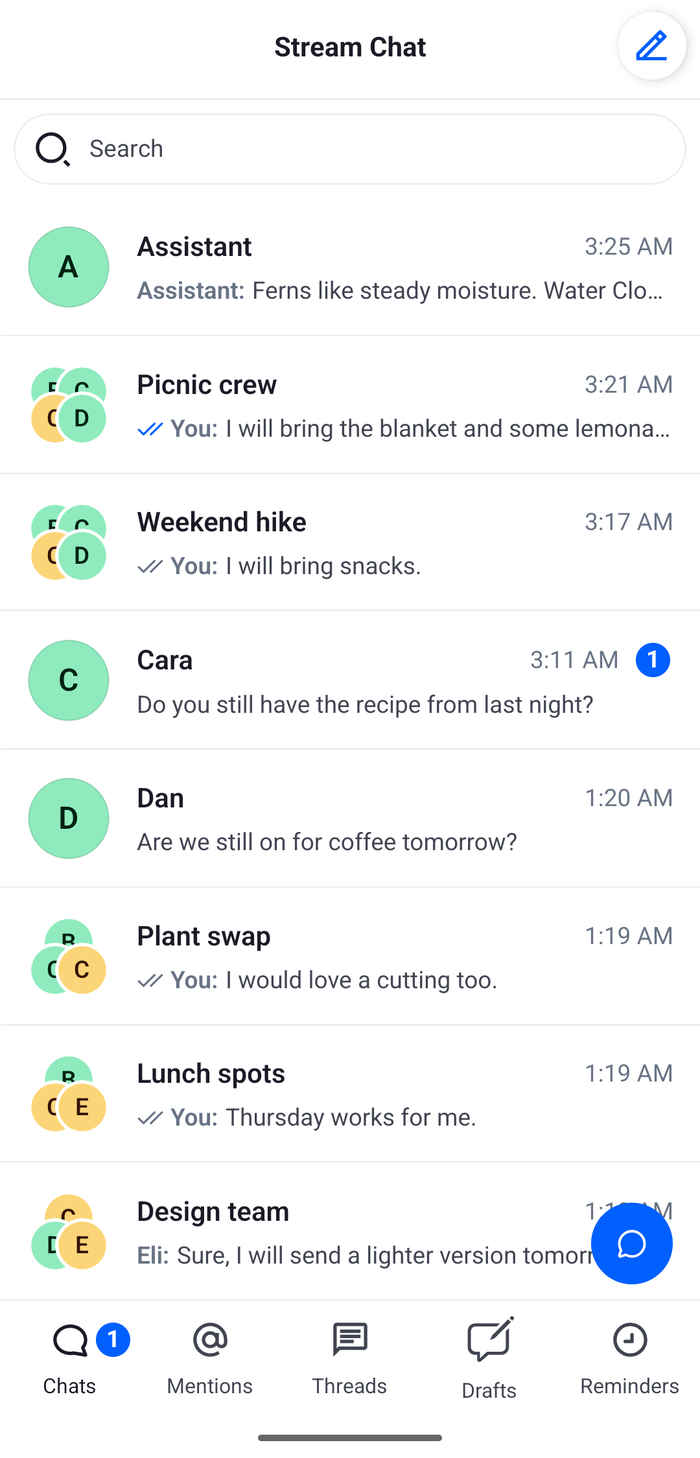 |
The launcher is a child of a screen, not of the navigator, so it shows only where you render it. Render it on every screen that should have it, or in a shared layout. The ComponentsContext it reads comes from Chat, so the screen has to render below it, as in the app below.
Build the assistant's modal
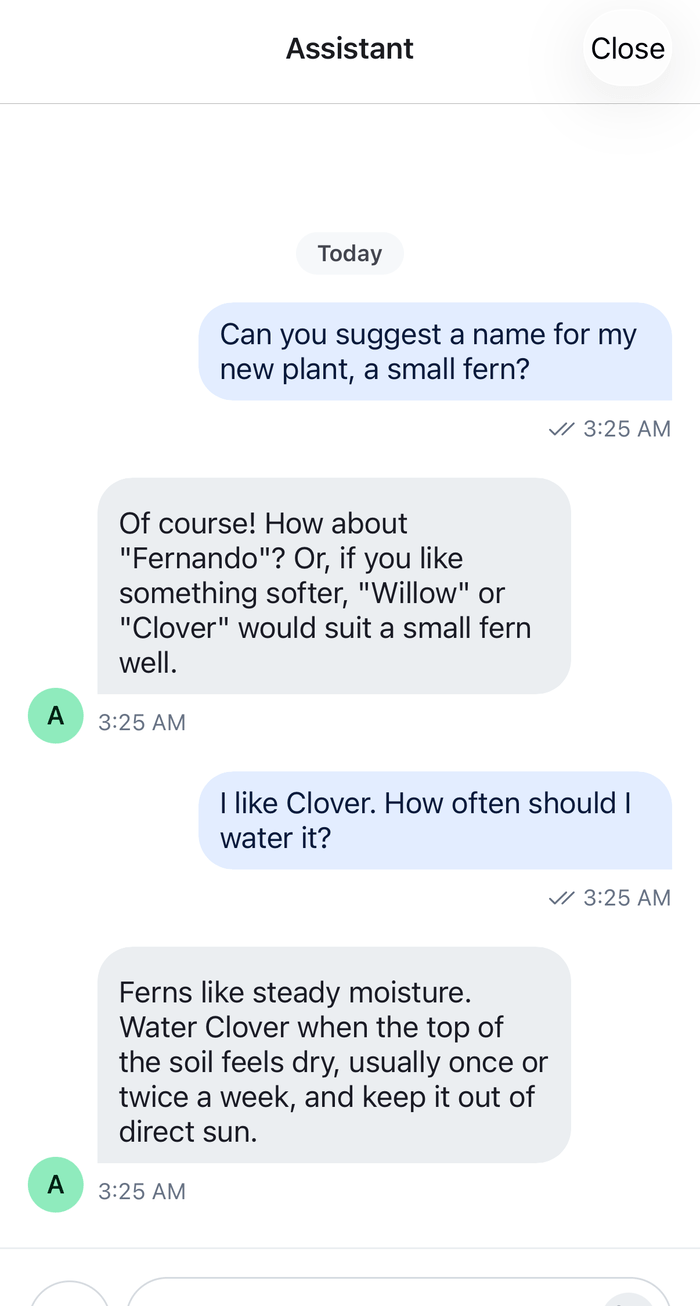
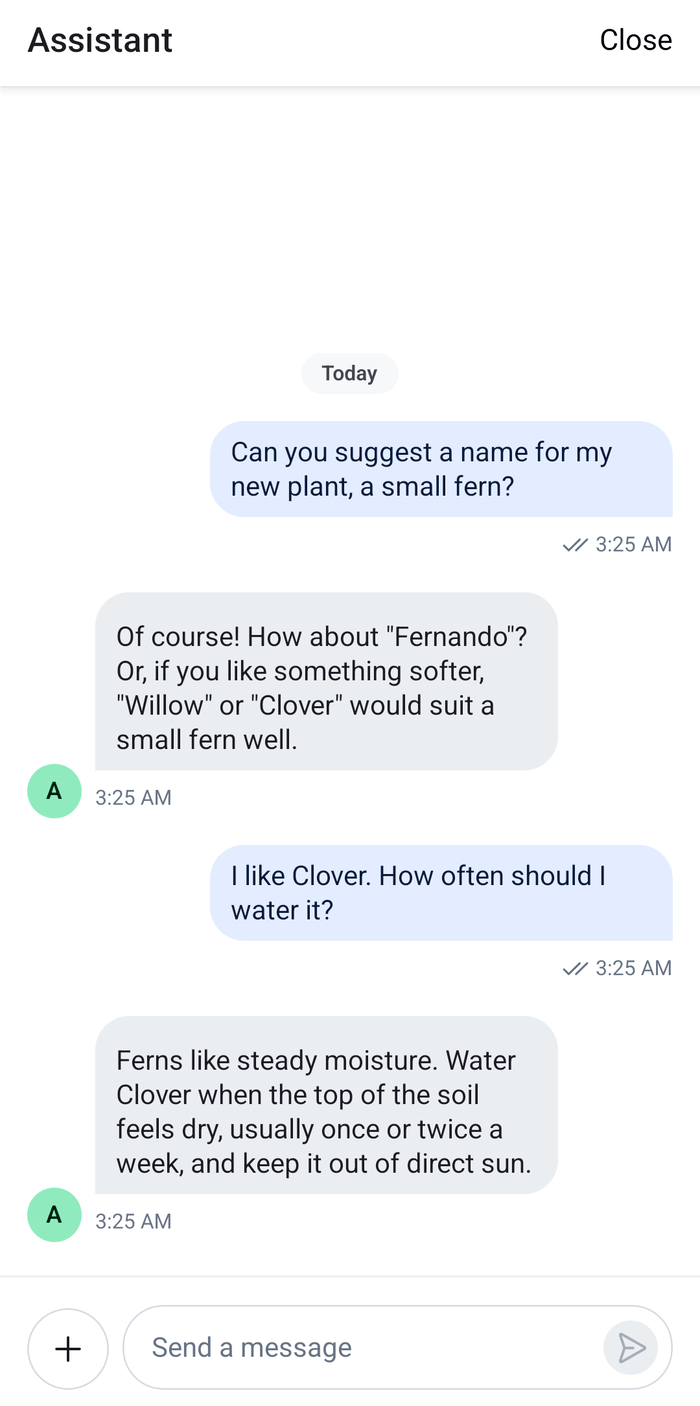
AssistantModal is the screen the root stack presents. It renders the nested OverlayProvider around a stack with one screen, and that screen renders the conversation: the message list, AITypingIndicatorView and the composer.
Channelwatches the channel when it mounts, unless it is already watched and loaded with its latest messages, so the modal needs no request of its own.AITypingIndicatorViewfollows the channel's AI state. It shows "Thinking..." and "Generating..." between the list and the composer while the backend reports those states, and nothing otherwise. Streamed answers with a stop button shows the whole streaming flow, with a status line for every state.- While the assistant is thinking or generating, the default composer shows its stop button in place of the send button, and pressing it stops the answer. Streamed answers with a stop button replaces it with a button of your own.
- The header height, from
useHeaderHeight(), is passed toChannelaskeyboardVerticalOffsetandtopInset, so the composer stays above the keyboard and the list starts below the header. - The close button in the header calls
navigation.goBack(). On the first screen of the inner stack, it reaches the root stack, which dismisses the modal.headerBackVisible: falsehides the back arrow the inner stack would show for the root stack's history, so Close is the one way out.
import { useMemo } from "react";
import { Pressable, StyleSheet, Text } from "react-native";
import { useHeaderHeight } from "@react-navigation/elements";
import { createNativeStackNavigator } from "@react-navigation/native-stack";
import {
  AITypingIndicatorView,
  Channel,
  MessageComposer,
  MessageList,
  OverlayProvider,
  useChatContext,
} from "stream-chat-react-native";
import { assistantChannelId, overlayProps } from "./chatConfig";
import type { AssistantParamList } from "./navigation";

const Stack = createNativeStackNavigator<AssistantParamList>();

/** The conversation: the message list, the AI state and the composer. */
const AssistantChannelScreen = () => {
  const { client } = useChatContext();
  const headerHeight = useHeaderHeight();
  const channel = useMemo(
    () => client.channel("messaging", assistantChannelId),
    [client],
  );

  return (
    <Channel
      channel={channel}
      keyboardVerticalOffset={headerHeight}
      topInset={headerHeight}
    >
      <MessageList />
      <AITypingIndicatorView />
      <MessageComposer />
    </Channel>
  );
};

/**
 * The screen the root stack presents as a full screen modal. The modal is presented above the
 * root `OverlayProvider`, so it has one of its own.
 */
export const AssistantModal = () => (
  <OverlayProvider {...overlayProps}>
    <Stack.Navigator>
      <Stack.Screen
        component={AssistantChannelScreen}
        name="AssistantChannel"
        options={({ navigation }) => ({
          headerBackVisible: false,
          headerRight: () => (
            <Pressable
              accessibilityLabel="Close Assistant"
              accessibilityRole="button"
              hitSlop={12}
              onPress={() => navigation.goBack()}
            >
              <Text style={styles.close}>Close</Text>
            </Pressable>
          ),
          title: "Assistant",
        })}
      />
    </Stack.Navigator>
  </OverlayProvider>
);

const styles = StyleSheet.create({
  close: { fontSize: 17 },
}); |  |
Add it to your app
Render the launcher in the screen that should have it, present the modal from the root stack, and pass isMessageAIGenerated to Chat. The rest of your app stays as it is. The modal's screen sets headerShown: false, so the only header is the inner navigator's, rendered inside the nested OverlayProvider:
import { NavigationContainer } from "@react-navigation/native";
import { createNativeStackNavigator } from "@react-navigation/native-stack";
import { StyleSheet, Text, View } from "react-native";
import { GestureHandlerRootView } from "react-native-gesture-handler";
import { SafeAreaProvider } from "react-native-safe-area-context";
import {
  Chat,
  OverlayProvider,
  useCreateChatClient,
} from "stream-chat-react-native";
import { AssistantLauncher } from "./AssistantLauncher";
import { AssistantModal } from "./AssistantModal";
import { isMessageAIGenerated, overlayProps } from "./chatConfig";
import type { RootParamList } from "./navigation";

const apiKey = "YOUR_API_KEY";
const userId = "YOUR_USER_ID";
const userToken = "YOUR_USER_TOKEN";

const RootStack = createNativeStackNavigator<RootParamList>();

/** One of your app's own screens, with the launcher on top. */
const HomeScreen = () => (
  <View style={styles.home}>
    <Text>Your app's own screen</Text>
    <AssistantLauncher />
  </View>
);

export const App = () => {
  const client = useCreateChatClient({
    apiKey,
    tokenOrProvider: userToken,
    userData: { id: userId },
  });

  return (
    <SafeAreaProvider>
      <GestureHandlerRootView style={styles.container}>
        {client ? (
          <OverlayProvider {...overlayProps}>
            <Chat client={client} isMessageAIGenerated={isMessageAIGenerated}>
              <NavigationContainer>
                <RootStack.Navigator>
                  <RootStack.Screen component={HomeScreen} name="Home" />
                  <RootStack.Screen
                    component={AssistantModal}
                    name="Assistant"
                    options={{
                      headerShown: false,
                      presentation: "fullScreenModal",
                    }}
                  />
                </RootStack.Navigator>
              </NavigationContainer>
            </Chat>
          </OverlayProvider>
        ) : (
          <Text>Connecting...</Text>
        )}
      </GestureHandlerRootView>
    </SafeAreaProvider>
  );
};

const styles = StyleSheet.create({
  container: { flex: 1 },
  home: { alignItems: "center", flex: 1, justifyContent: "center" },
});
Use it on its own
An app without a chat of its own needs the same setup: Chat around the navigator, and the assistant's modal. The home screen is your app's own, with the launcher on the screens where the assistant should be available. The user's token and the assistant's channel come from your backend. Without a channel list, the assistant's channel is the only conversation the user has, so it needs no channel type of its own.
How it works
Example
The user has a question for the assistant while reading the app's home screen:
- The user presses the launcher.
AssistantLaunchernavigates to theAssistantroute, and the root stack presentsAssistantModalas a full screen modal. - The modal renders its own
OverlayProviderand stack.AssistantChannelScreenrendersChannel, which watches the assistant's channel and loads its latest messages, and the message list and the composer appear. - The user sends a question. The backend's agent posts an empty reply marked
ai_generated, then sendsai_indicator.updatewithAI_STATE_THINKING. The client setschannel.state.aiState,AITypingIndicatorViewshows "Thinking...", and the composer shows its stop button in place of the send button. - The agent writes the answer into the reply a few words at a time. Each update reaches the client as
message.updated, andStreamingMessageViewtypes out the new part. - The agent stores the final text and sends
ai_indicator.clear. The indicator goes away, and the send button comes back. - The user presses Close.
navigation.goBack()on the first screen of the inner stack reaches the root stack, which dismisses the modal, and the home screen is where the user left it.
- The modal's
Channelis the only one mounted for the assistant's channel, and it unmounts when the modal closes. Opening the modal again mounts it again, andChannelskips the watch when the channel is already watched and loaded. - The message actions inside the modal are the same as in the rest of the app. Reply in Thread needs a thread screen in your navigator, as Navigation describes. If your assistant doesn't answer in threads, turn off replies for the assistant's channel type.
AI_STATE_EXTERNAL_SOURCESshows no indicator, sinceAITypingIndicatorViewcovers thinking and generating only. Streamed answers with a stop button shows every state.- On Android, native stack modals are drawn in the same window as the rest of the app, so the root
OverlayProvideralready covers them. The nested one works on both platforms, so the same setup serves both.
Read more
- Chat in modals: why a modal needs its own
OverlayProvider, and the setup with Expo Router. - Streamed answers with a stop button: a reply as it's generated, with a status line for every AI state and Stop.
- AI integrations overview: the AI states, the
ai_indicator.*events and how the backend streams a reply. - SDK integration:
StreamingMessageView,AITypingIndicatorView, the stop button and the AI composer. - Navigation: how the screens of a chat app connect.