

Google recently introduced its Generative AI platform, featuring a collection of large language models (LLMs) that utilize techniques inspired by AlphaGo. Gemini is an artificial intelligence that generates new content or data from existing sources. These technologies generate realistic and coherent text, images, audio, video, and other media forms, producing entirely synthetic yet believable outputs.
Google's Generative AI leverages deep learning, a subset of machine learning characterized by its ability to process and learn from vast quantities of data. This advanced technology enables AI models to make informed predictions and create new content, drawing upon the extensive knowledge and patterns they have gleaned from the data they have been trained on.
One of the key advantages of these foundation models is their ability to adapt to specific use cases with minimal training, requiring only a small amount of example data to tailor their outputs effectively; this makes Generative AI a versatile and powerful tool in the realm of content creation.
So, Gemini offers a multitude of applications to enhance your product. In this post, you will delve into building an AI chat application for Android, utilizing Stream's Compose Chat SDK alongside Google's Generative AI SDK for Android.
Before you begin, we recommend cloning the Gemini Android repository to your local device using the command below before you open the project in Android Studio.
1git clone https://github.com/skydoves/gemini-android.git
Now, let's configure secret properties before building the project.
Configure Secret Properties With API Keys
Gemini Android employs the secrets-gradle-plugin for secure API configuration, ensuring that sensitive information is safely managed and not exposed in public repositories. Before you configure API keys, start by creating a file named secrets.properties and include the following properties in it:
12STREAM_API_KEY=
GEMINI_API_KEY=
Now, you should get the API keys below to build Gemini Android on your local machine:
-
Stream API Key: To utilize Stream's real-time Chat SDK, you need to obtain an API key from the Stream Dashboard. If you don't already have an account, you can conveniently sign up using your GitHub account. You can also simply follow this instruction to get the Stream API key.
-
Google Cloud API Key: To access Google's generative AI SDK, you should acquire a Google Cloud API key from Google AI Studio. It's straightforward to get the API key using your Google account.
For detailed instructions, you can check out the How to build the project section on the GitHub repository.
Now, it's ready to build the Gemini Android project.
Build Gemini Android
Once you have completed the project build, you should be able to see the following result:

Now it's time to build your own project, taking inspiration from the Gemini Android project. This post will walk you through the key features and implementation aspects of the Gemini Android project, equipping you with the knowledge to develop your application.
Add Gradle Dependencies
To begin implementing AI chat functionalities, you first need to add the following dependencies to your module-level and app-level build.gradle.kts files:
12345// app module's build.gradle.kts
dependencies {
    implementation("io.getstream:stream-chat-android-compose:6.0.12") // Stream Chat Compose SDK
    implementation("com.google.ai.client.generativeai:generativeai:0.1.2") // Generative AI SDK
}
Stream SDK is an open-source project, so you can see all source codes, commit histories, and releases on GitHub.
Note: If you're completely new to Stream Chat Android, you can also take a look at the Compose Chat Tutorial.
Modularization
Gemini Android is designed using a multi-module strategy to enhance the app development process. The multi-module strategy offers several advantages below:
-
Reusability: By effectively modularizing reusable code, this approach facilitates code sharing and restricts access to the code from other modules. It ensures that common functionalities are easily accessible across different parts of the application without duplication.
-
Parallel Building: With this strategy, each module can be built in parallel, significantly reducing overall build time. This parallelization makes the development process more efficient, especially in larger projects.
-
Decentralized Team Focus: This approach allows different developer teams to concentrate on their assigned modules. By focusing on specific modules, teams can work more independently and efficiently, leading to better code quality and faster development cycles.
Gemini Android's core system consists of several modules below:

Modules within our architecture are categorized into feature and core modules, each with its distinct set of responsibilities. We will explore the feature modules in detail later on. Let's focus on understanding the core modules, examining them one at a time.
Core Modules For Domain Logic
Core modules can further be classified into two categories based on their roles: domain-specific modules and UI-specific modules. Let's take a closer look at the domain-specific core modules, which are subdivided as follows:
- core-model: It comprises value objects; this structure represents models sourced from the network or other core modules.
- core-database: This module includes the Room database, entities, and DAO (Data Access Object) components. It is responsible for persisting data from remote sources into the local database, ensuring efficient data management and retrieval.
- core-datastore: This is designed to store user preferences and settings. It plays a role in storing and retrieving user-specific information, like whether a user has interacted with a popup.
- core-network: This is dedicated to providing comprehensive network solutions for accessing and retrieving remote resources.
- core-data: This module is responsible for implementing all the domain logic. It orchestrates the model, database, datastore, and network modules within a repository framework, which serves as a single source of truth for the application's domain logic, ensuring consistency and reliability in data handling and processing. Therefore, the presentation layer relies on the
core-datamodule to fetch or query data. It does so by adhering to the repository interface contract, ensuring a clear and structured way of accessing data within the application's architecture.
Core Modules For UI
Here are the UI-specific core modules:
- core-navigation: Offers seamless navigation solutions, enabling effortless and intuitive transitions between different feature screens. It ensures that each component can navigate to others smoothly and without any complications.
- core-designsystem: Consolidates all common design components into this independent module. By doing so, it enables various extended modules, like feature modules, to utilize these components, thereby enhancing reusability across the application. This approach essentially serves as a single source of truth from a UI design perspective, centralizing all design elements and ensuring consistency throughout the application.
By now, you should have a clearer understanding of the modularization structure within the Gemini Android project. You can adopt various modularization strategies depending on your specific needs and circumstances. With this foundation in place, let's delve into theming.
Theming
Jetpack Compose offers seamless approaches to ensure your app maintains a consistent appearance by offering predefined themes in a source-of-truth manner.
Stream's Compose chat SDK offers a theming solution called ChatTheme, which enables the unified styling of all UI components, ensuring a consistent and cohesive appearance across Stream Compose components. In the Gemini Android project, ChatTheme is utilized to customize the appearance of Stream's UI components, as demonstrated in the following example:
123456789101112131415161718192021222324@Composable
fun GeminiComposeTheme(
  darkTheme: Boolean = isSystemInDarkTheme(),
  content: @Composable () -> Unit
) {
  val streamColors = if (darkTheme) {
    StreamColors.defaultDarkColors().copy(
      appBackground = BACKGROUND900,
      primaryAccent = STREAM_PRIMARY,
      ownMessagesBackground = STREAM_PRIMARY
    )
  } else {
    StreamColors.defaultColors().copy(
      primaryAccent = STREAM_PRIMARY,
      ownMessagesBackground = STREAM_PRIMARY_LIGHT
    )
  }

  ChatTheme(
    colors = streamColors,
    reactionIconFactory = GeminiReactionFactory(),
    content = content
  )
}
This allows you to apply unified styles across all Stream's Compose components within the GeminiComposeTheme Composable, as shown in the example below:
123456GeminiComposeTheme { ChannelsScreen() .. }
Implement a Channel List Feature
In the Gemini Android project, the channel feature is the initial screen users encounter upon launching the application. Utilizing the Stream chat SDK for Compose, implementing a channel list is streamlined, as exemplified by the ChannelsScreen Compose UI component:
12345678910ChannelsScreen(
  isShowingHeader = false,
  onItemClick = { channel ->
    composeNavigator.navigate(
      GeminiScreens.Messages.createRoute(
        channelId = channel.cid,
      )
    )
  }
)
The ChannelsScreen component allows for customization of various elements, such as the title, header, and search functionality, along with adding listeners to these components. As demonstrated in the provided code, navigation to the message list screen is facilitated through the onItemClick lambda parameter.
Joining Default Channels
Upon building the project, you'll initially encounter an empty channel list screen, as you haven't joined any channels yet. This sets the stage for the next step: creating and joining several channels, specifically for AI chats.
First, take a look at the ChannelService class, where you'll see it fetches predefined Gemini channel models from the network via Gist:
12345interface ChannelService {

  @GET("GeminiModel.json")
  suspend fun geminiChannels(): ApiResponse<List<GeminiChannel>>
}
The network response is encapsulated in an ApiResponse. This is part of the Kotlin library Sandwich and is designed to simplify handling network responses in Android development. If you're keen to delve deeper into the benefits of modeling network responses, check out Modeling Retrofit Responses With Sealed Classes and Coroutines.
Moving on to the ChannelRepositoryImpl class, you'll find the joinDefaultChannels function below:
123456789101112131415161718192021222324internal class ChannelRepositoryImpl @Inject constructor(
  private val chatClient: ChatClient,
  private val service: ChannelService,
  private val geminiDao: GeminiDao,
) : ChannelRepository {

  override suspend fun joinDefaultChannels(user: User): ApiResponse<List<GeminiChannel>> {
    val response = service.geminiChannels()
      .suspendOnSuccess {
        data.forEach { geminiChannel ->
          val channelClient = chatClient.channel(geminiChannel.id)
          channelClient.create(
            memberIds = listOf(geminiUser.id, user.id),
            extraData = mapOf(
              "name" to geminiChannel.name,
              "image" to "https://avatars.githubusercontent.com/u/8597527?s=200&v=4.png",
            )
          ).await().onSuccessSuspend {
            geminiDao.insertGeminiChannel(geminiChannel.toEntity())
          }
        }
      }
    return response
  }
In the code snippet provided, the joinDefaultChannels function is designed to fetch predefined Gemini channel models from the network by calling service.geminiChannels(). Following this, it creates Stream chat channels. This is accomplished by iterating through the list of Gemini channel instances and utilizing the chatClient.create function to generate each channel. For further information on creating Stream chat channels, you can refer to Stream's documentation on Creating Channels, which offers a comprehensive guide on the process.
Furthermore, this function also inserts Gemini channel items into the database. This step is crucial for future use, particularly in the messages screen, ensuring that the relevant data is readily available when needed.
Finally, let's turn our attention to the ChannelViewModel class, which serves as the presentation layer responsible for managing UI states and events. In the code snippet below, you'll see how it handles joining the predefined Stream channels that were set up in the ChannelRepositoryImpl:
1234567891011121314151617181920212223242526@HiltViewModel
class ChannelViewModel @Inject constructor(
  private val repository: ChannelRepository
) : ViewModel() {

  private val userFlow = repository.streamUserFlow()

  private val channelEvent: MutableSharedFlow<ChannelEvent> = publishedFlow()
  internal val channelUiState: SharedFlow<ChannelUiState> =
    combine(channelEvent, userFlow) { event, user ->
      event to user
    }.flatMapLatest { pair ->
      val (event, user) = pair
      when (event) {
        is ChannelEvent.JoinDefaultChannels -> {
          val response = repository.joinDefaultChannels(user = user)
          if (response.isSuccess) {
            flowOf(ChannelUiState.JoinSuccess)
          } else {
            flowOf(ChannelUiState.Error(response.messageOrNull))
          }
        }

        ..
    }.asStateFlow(ChannelUiState.Idle)
}
As you may have observed, Gemini Android is built using Jetpack Compose, and as such, its overall architecture capitalizes on the advantages offered by Compose: Unidirectional event & data flow. This approach was invented to handle events and data is illustrated in the figure below, demonstrating how it aligns with Compose's principles for a streamlined and efficient application structure:

When ViewModel receives events from UI components, it triggers domain logic through the repositories. The data retrieved from these interactions is then observed as an observable stream. Subsequently, this data stream is delivered back to the UI components as a UI state.
After completing all the processes above, you will see the channel screen shown below, containing some predefined channels:

Implement an AI Chat Feature
Now is the perfect moment to build an AI chat feature. Google's Gemini Android SDK provides access to Gemini Pro models hosted on Google's servers. The Gemini SDK is designed to produce text responses based on inputs such as text or images provided by users. Essentially, you have the option to use two types of models as outlined below:
- gemini-pro: Ideal for scenarios where the prompt input is solely text-based. Responses can be generated using the
GenerativeModel.generateContentsuspend function. - gemini-pro-vision: A multimodal model that accepts text and images as inputs. When the prompt includes a combination of text and images, responses can be generated with the
GenerativeModel.generateContentsuspend function.
Fundamentally, those two above large language models (LLMs) models can be likened to advanced autocomplete tools. Leveraging LLMs to develop such features eliminates the need for machine learning (ML) expertise, significantly cutting down the costs associated with acquiring ML knowledge or hiring ML specialists for particular scenarios. If you want to learn more about this, check out Google's LLM concepts guide.
Now, let's create the GenerativeModel, a component designed to generate responses based on Google's generative AI with given input prompts.
Create GenerativeModel
Creating the GenerativeModel is straightforward. As shown in the code snippet below, it can be initialized by specifying the modelName and apiKey parameters:
1234val generativeModel = GenerativeModel(
  modelName = "gemini-pro",
  apiKey = BuildConfig.GEMINI_API_KEY,
)
Additionally, you can customize the content generation process by providing a generationConfig parameter, as illustrated in the following code example:
12345678910val generativeModel = GenerativeModel( .. generationConfig = generationConfig { this.temperature = 0.75f this.candidateCount = 1 this.topK = 30 this.topP = 0.5f this.maxOutputTokens = 300 } )
Every prompt you send to the model includes parameter values that control how the model generates a response. The model can generate different results for different parameter values. You can adjust the configuration parameters below:
- Max Output Tokens: A token roughly equates to four characters. The "Max output tokens" setting defines the upper limit of tokens that the response can generate. For instance, a limit of 100 tokens might produce approximately 60-80 words.
- Temperature: This parameter influences the randomness of token selection. A lower temperature setting is suitable for prompts needing more deterministic or specific responses. In contrast, a higher temperature can foster more varied or imaginative outputs.
- TopK: Setting
topKto 1 means the model chooses the most probable token from its vocabulary for the next token (known as greedy decoding). AtopKof 3, however, allows the model to pick the next token from the three most probable options, based on the temperature setting. - TopP: This parameter enables token selection starting from the most probable, accumulating until the sum of probabilities reaches the
topPthreshold. For example, with tokens A, B, and C having probabilities of 0.3, 0.2, and 0.1, respectively, and atopPvalue of 0.5, the model will choose either A or B for the next token, utilizing the temperature setting, and exclude C from consideration. - Candidate Count: Specifies the maximum number of unique responses to generate. A candidate count of 2 means the model will provide two distinct response options.
You have the flexibility to fine-tune the values of each parameter to tailor the generative model to your specific needs. For a deeper understanding of Large Language Models (LLMs) and their configurable parameters, check out the LLM Concepts Guide.
Build a GeminiChat Composable Screen
Before exploring the generation of Gemini responses, it's essential to set up the chat interface. The Stream SDK offers a handy component known as MessagesScreen, which includes a variety of pre-configured components like a top bar, message list, input field, and more. These elements are designed for easy customization to fit your app's needs.

However, in this post, the GeminiChat is crafted using MessageList, MessageComposer, and MessageListHeader to customize specific functionalities that align with the generative AI model's requirements. For a deeper dive into how this customization is achieved, you're encouraged to explore the GeminiChat component on GitHub.
Chat With Gemini Via Text Messages
Now, it's time to generate responses via generative AI. First thing first, you can create the Chat instance using the given GenerativeModel like the code below:
12val generativeModel = GenerativeModel(..) val chat = generativeModel.startChat()
Chat manages the capture and storage of interactions with the model, offering functionalities for continued dialogue. This lets you converse with the model, generating responses considering your past chat history. Once you create the Chat instance, you can send a message with the suspend function, generativeChat.sendMessage() like the function below:
1234567891011121314151617181920212223@HiltViewModel
class ChatViewModel @Inject constructor(
  repository: ChatRepository,
  chatClient: ChatClient,
) : ViewModel() {

  private suspend fun sendTextMessage(text: String): String? {
    val response = generativeChat.sendMessage(text)
    val responseText = response.text
    if (responseText != null) {
      channelClient.sendMessage(
        message = Message(
          id = UUID.randomUUID().toString(),
          cid = channelClient.cid,
          text = responseText,
          extraData = mutableMapOf(STREAM_CHANNEL_GEMINI_FLAG to true)
        )
      ).await()
    }
    return responseText
  }
  ..
 }
The sendMessage function returns GenerateContentResponse, which includes various details about the generated response. You can access the main body of the response through the text property. Upon retrieving this response, you can forward the message derived from the response to Stream's channel, ensuring the reply is synchronized accordingly.
After integrating the function with the UI states and executing the project, you will observe the following outcome:

For an in-depth look at the text generation process, refer to the ChatViewModel.sendTextMessage function.
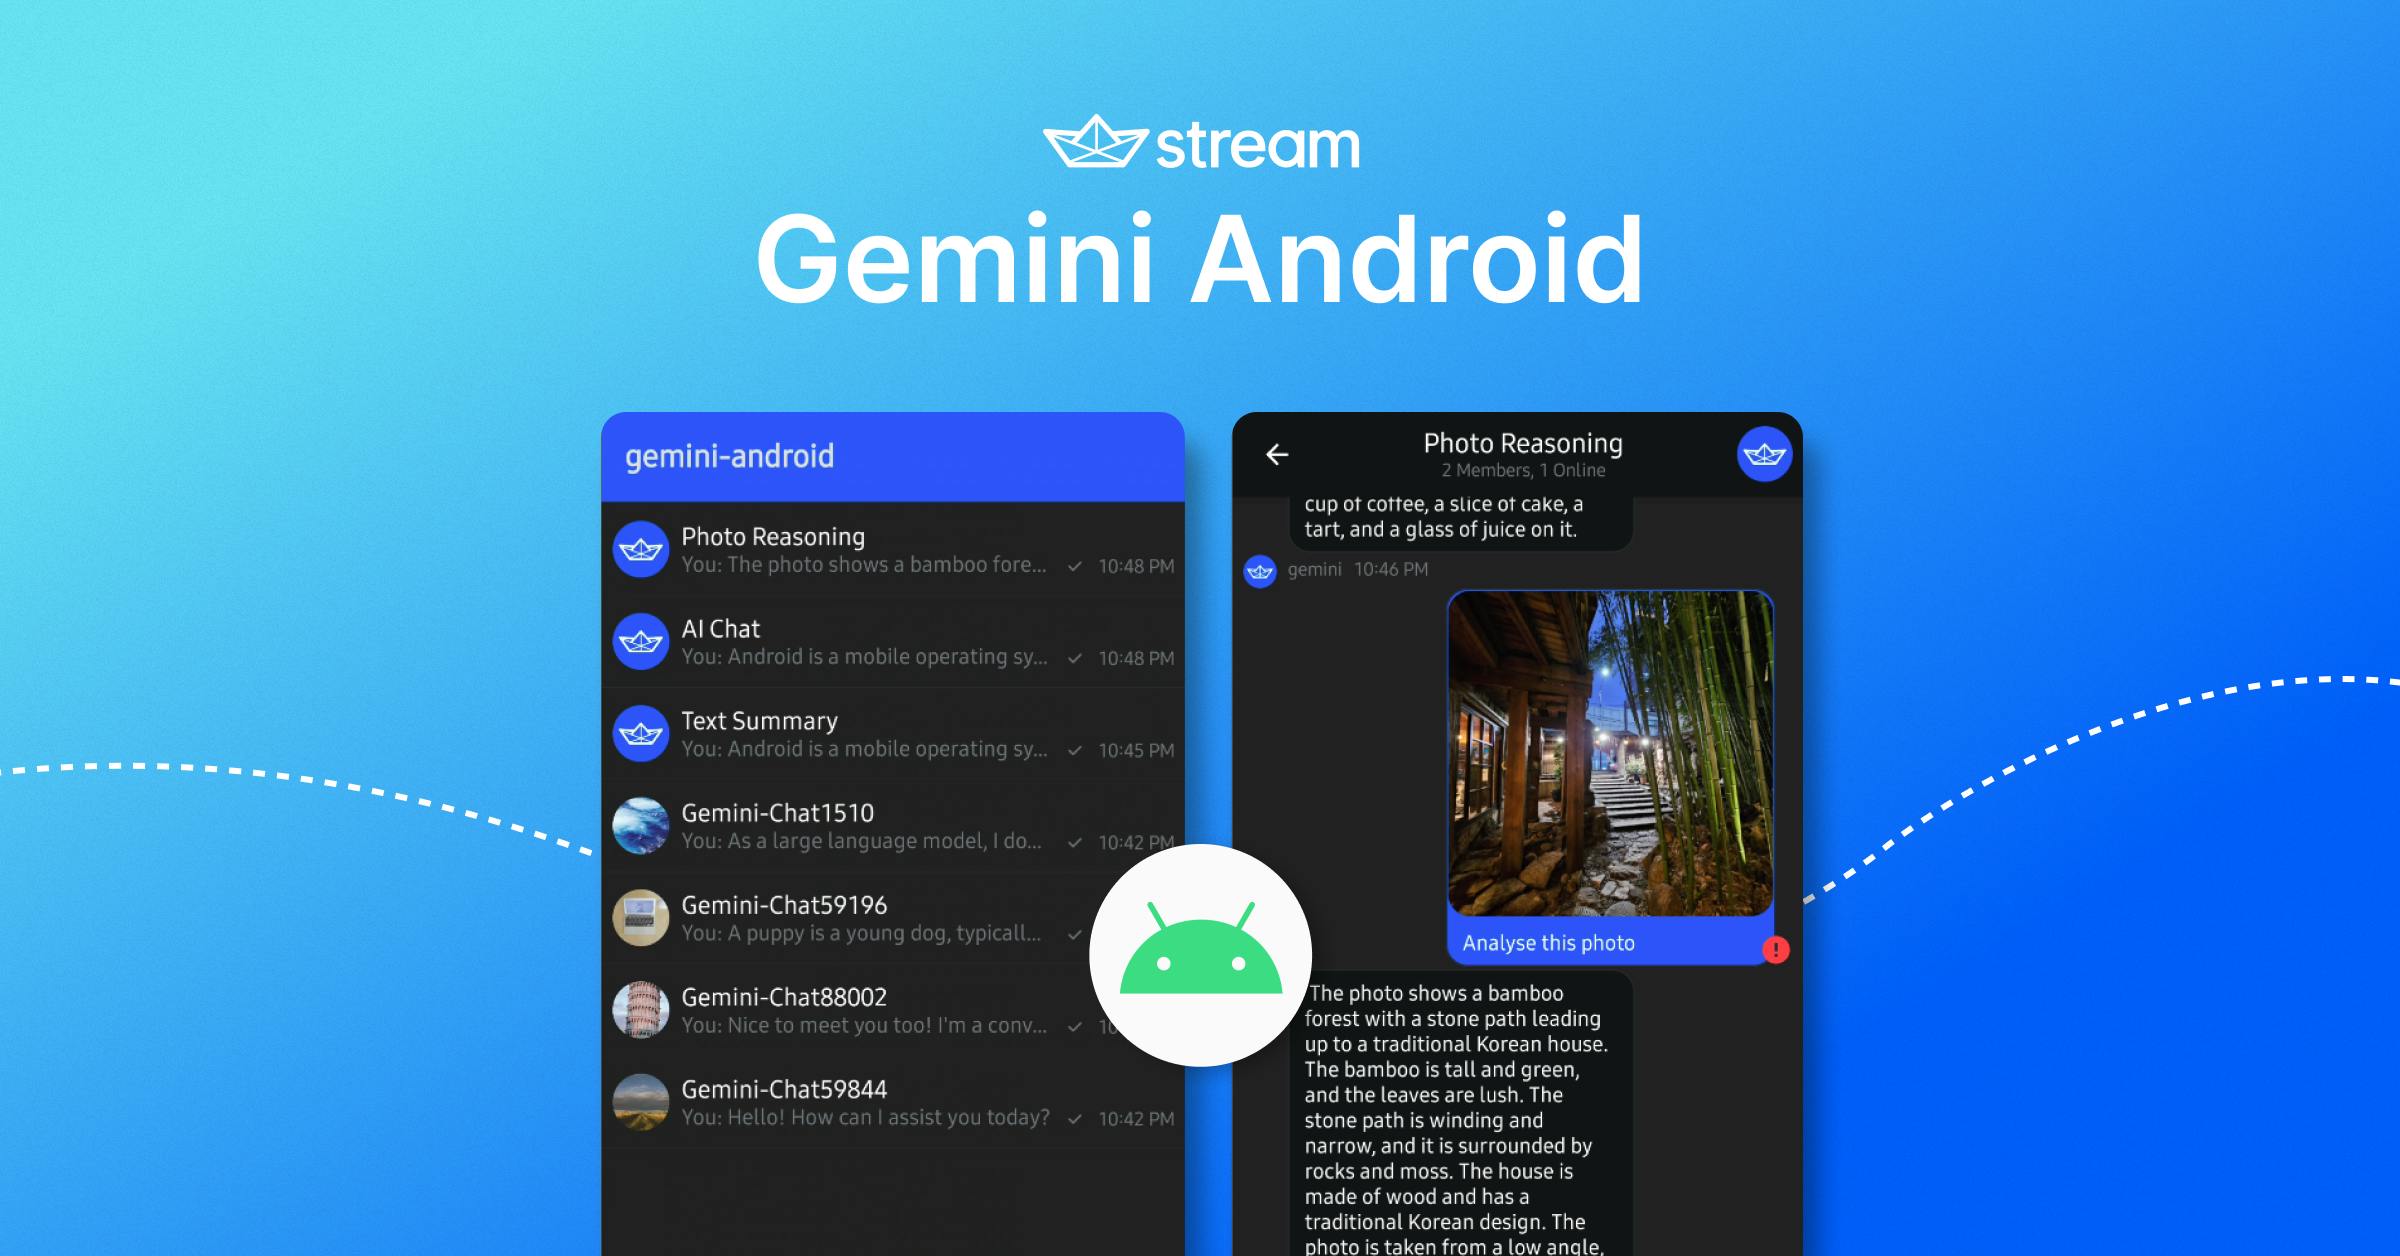
Photo Reasoning with Gemini Via Bitmap Images
Let's dive into implementing photo reasoning. Photo reasoning encompasses the artificial intelligence (AI) system's ability to analyze and interpret visual data from images. It entails a comprehensive understanding of the image's content and context, including identifying patterns, objects, faces, scenes, and possibly the emotions or actions captured in the photos. Photo reasoning is utilized across various fields, such as computer vision, image processing, and machine learning. It supports a wide array of applications, including image classification, object detection, facial recognition, and automated photo tagging.
Google's generative AI technology offers capabilities that facilitate photo reasoning. This functionality can be accessed through the GenerativeModel.generateContent function, as demonstrated in the following example:
12345val content = content {
    image(bitmap)
    text(prompt)
}
val response = generativeModel.generateContent(content)
Gemini Android incorporates photo reasoning for multiple images, utilizing adjustments to the prompt to enhance analysis, as shown in the code example below:
1234567891011121314151617181920212223private suspend fun photoReasoning(message: Message, bitmaps: List<Bitmap>): String? {
  val text = message.text
  val prompt = "Look at the image(s), and then answer the following question: $text"
  val content = content {
    for (bitmap in bitmaps) {
      image(bitmap)
    }
    text(prompt)
  }
  val response = generativeModel.generateContent(content)
  val responseText = response.text
  if (responseText != null) {
    channelClient.sendMessage(
      message = Message(
        id = UUID.randomUUID().toString(),
        cid = channelClient.cid,
        text = responseText,
        extraData = mutableMapOf(STREAM_CHANNEL_GEMINI_FLAG to true)
      )
    ).await()
  }
  return responseText
}
The photoReasoning function creates an instance of the Content that can contain texts and images for the following question and generates a response with the given Content instance. Once you implement this function and combine them with UI elements, you'll see the result below:

For an in-depth look at the photo reasoning process, refer to the ChatViewModel.photoReasoning function.
Conclusion
You've now explored the comprehensive architecture of Gemini Android, the principles of Google's Generative AI, the Gemini SDK, and the implementation of AI chatbot systems with capabilities for text generation and photo reasoning. Generative AI offers a wide array of applications that can significantly enhance the user experience within your app. For additional insights and examples, be sure to visit the GitHub repositories linked below:
You can find the author of this article on Twitter @github_skydoves or GitHub if you have any questions or feedback. If you'd like to stay up to date with Stream, follow us on Twitter @getstream_io for more great technical content.
As always, happy coding!