

What do apps like WhatsApp, Messenger, or even Snapchat all have in common? They allow users chatting with each other to also send short voice messages to each other directly in the chat conversation.
In this tutorial, we will look at what it takes to build voice messaging into a simple chat app covering everything from the recording, animations, and storage, all natively in SwiftUI, and using Stream's Chat API as the backend.
Grab your favorite cup of coffee, open Xcode, and let's dive into the code! .
Before You Start
The voice messaging feature of Stream's SwiftUI Chat SDK is available only in version 4.46.0 or later. If you want a UIKit version instead of SwiftUI, head to the iOS async voice messaging tutorial. Feel free to use any version of Xcode 15 to work along with this tutorial. Explore and download the accompanying SwiftUI project and UIKit:
- Voice Messaging: Final SwiftUI project.
- Voice Messaging: UIKit version.
Explore the Voice Recording Interface and Interactions
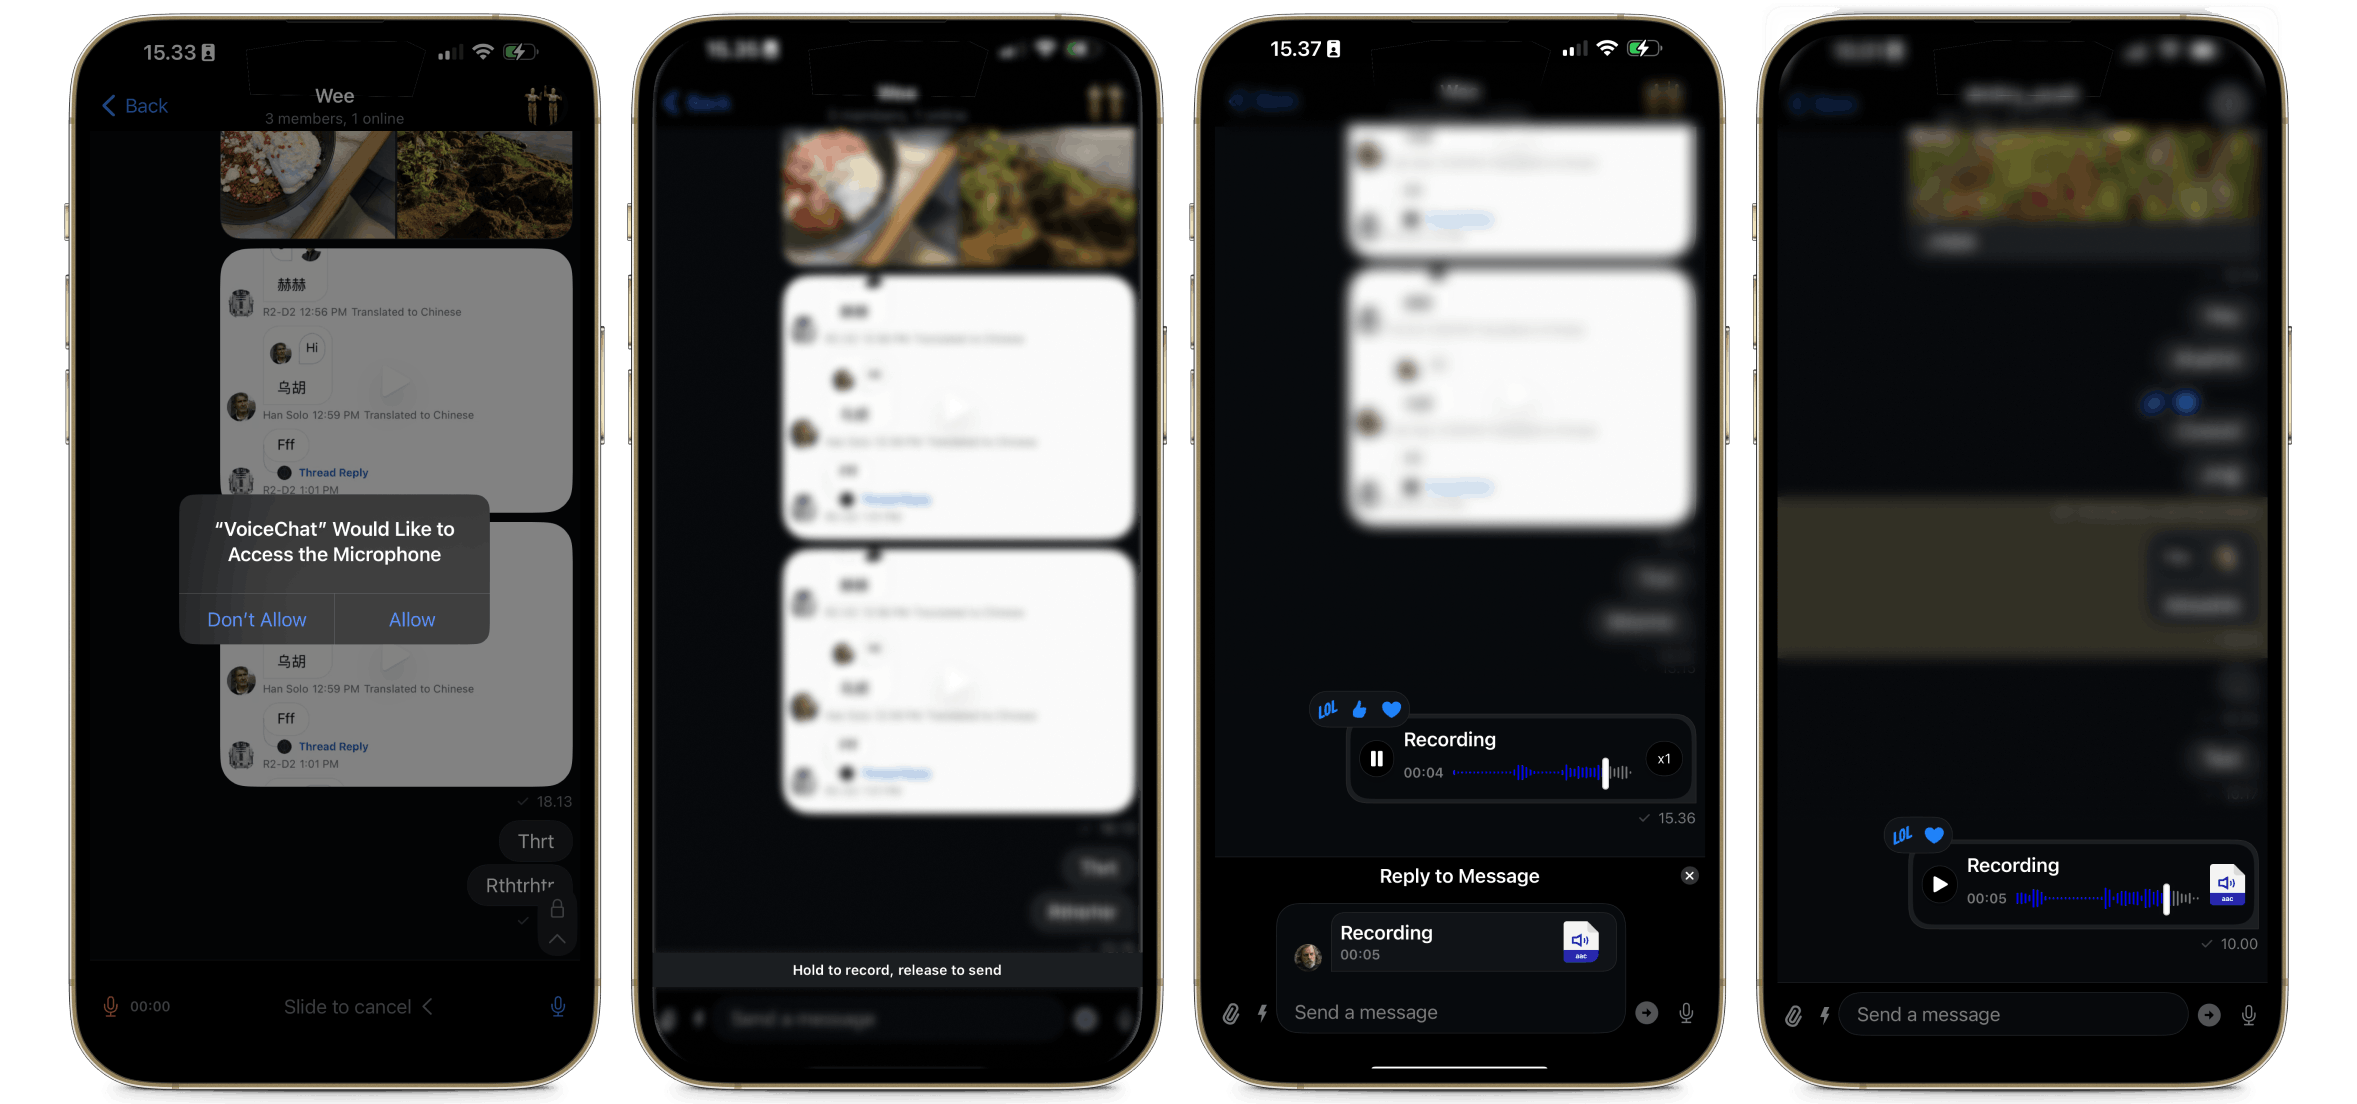
When you enable the audio recording feature in your SwiftUI app, a microphone button will appear beside the send button in the compose area of the message composer view. The microphone button allows users to record audio and send it to others. You can explore the recording interface with the following gestural interactions.
- Single tap: Tapping the microphone icon displays a recording tip view. This view instructs you about how to record an audio.
- Tap-and-hold: Press and hold the microphone button for longer than one second to begin a recording.
- Finger release: Releasing the finger after keeping it for more than one second places the recording in the compose area.
- Playback or cancel: Once the recording shows in the compose area, you can tap the play button ▶ to listen to it or tap the x-mark to cancel.
- Tap to send: When you finish recording, tap the send button to display it as an outgoing audio message.
Create a New SwiftUI Project and Install Chat Dependencies
Start with a SwiftUI project by creating a new one. We will use Stream's Chat SDK and iOS docs to support messaging. We can access all SwiftUI components using the SDK to build a fully functional messaging app supporting audio recording.
- In Xcode, Go to File -> Add Package Dependencies....
- Copy and paste the URL https://github.com/getstream/stream-chat-swiftui into the search field on the top right to fetch the chat SDK from GitHub.
- Follow the next two steps shown in the images below to complete the installation.
Step 1: Click Add Package after pasting the URL above into the search field.

Step 2: Click Add Package again to finish the process.

Configure Microphone and Photo Library Privacies

In this section, we should configure the app to prompt users for the first time they use it to grant access to their protected resources. In the context of this app, we are required to add privacy settings for the microphone and access to the user's photo library. Add them by selecting your app's root folder and clicking the Info tab, as illustrated in the images below.
- Privacy - Microphone Usage Description.

- Privacy - Photo Library Usage Description.

Connect the Chat Functionality to the SwiftUI App
Let's use the following steps to configure the chat messaging part of the app. We will implement it in the app's conformer Swift file. It is the file with your project's name. In this demo app, we have VoiceChatApp.swift.
- In VoiceChatApp.swift, create a new instance of the low-level
chatClientfor SwiftUI. The chat client creates a connection to the backend infrastructure of the messaging app. Its setup requires an API key and a valid user. Our demo app in this tutorial uses a hard-coded API key. You will need an API key to move your app from development to production. Sign up to get one for free. - Create a
StreamChatinstance. - Connect the user to the backend.
- Use an
initmethod to set theStreamChatinstance and the user.
Walk through the comments in the following sample code to see the implementation details of the steps above.
1234567891011121314151617181920212223242526272829303132333435363738394041424344454647484950515253545556import SwiftUI
import StreamChat
import StreamChatSwiftUI

@main
struct VoiceChatApp: App {

    // Step 1: Create a new instance of the low-level chatClient for SwiftUI.
    var chatClient: ChatClient = {
        //For the tutorial we use a hard coded api key and application group identifier
        var config = ChatClientConfig(apiKey: .init("8br4watad788"))
        config.isLocalStorageEnabled = true
        config.applicationGroupIdentifier = "group.io.getstream.iOS.ChatDemoAppSwiftUI"

        // The resulting config is passed into a new ChatClient instance.
        let client = ChatClient(config: config)
        return client
    }()

    // Step 2: Create a StreamChat instance.
    @State var streamChat: StreamChat?

    // Step 4: Use an init method to set the StreamChat instance and the user.
    init() {
        streamChat = StreamChat(chatClient: chatClient)
        connectUser()
    }

    var body: some Scene {
        WindowGroup {
            ChatChannelListView()
        }
    }

    // Step 3: Connect a user to the backend.
    private func connectUser() {
        // This is a hardcoded token valid on Stream's tutorial environment.
        let token = try! Token(rawValue: "eyJhbGciOiJIUzI1NiIsInR5cCI6IkpXVCJ9.eyJ1c2VyX2lkIjoibHVrZV9za3l3YWxrZXIifQ.kFSLHRB5X62t0Zlc7nwczWUfsQMwfkpylC6jCUZ6Mc0")

        // Call connectUser on our SDK to get started.
        chatClient.connectUser(
            userInfo: .init(
                id: "luke_skywalker",
                name: "Luke Skywalker",
                imageURL: URL(string: "https://vignette.wikia.nocookie.net/starwars/images/2/20/LukeTLJ.jpg")!
            ),
            token: token
        ) { error in
            if let error = error {
                // Some very basic error handling only logging the error.
                log.error("connecting the user failed \(error)")
                return
            }
        }
    }
}
In this section, you configured the backend of the chat messaging support to work seamlessly with the SwiftUI app, although you have not yet seen a preview. In the next section, let's add the chat SDK's channel list view.
Provide a List of Channels
Think of the channel list of the chat SDK as the list of contacts in WhatsApp. We initiate a chat by selecting a particular contact from the channel list view. There are two ways to display a list of contacts in the SwiftUI app.
- Build a completely custom UI: You can use the low-level chat API to create an entirely bespoke channel list without using the one the SDK provides. The API also has offline support, allowing users to browse channels without an internet connection.
- Use the SDK's ready-made UI components: This option allows you to access the default chat channel list for the SDK in your app. It also provides several options to theme or modify the visual appearance to your design requirements.
Let's use the ready-made UI components option to implement our channel list. Add a new Swift file and replace its content with the following sample code. For example, let's create CustomChannelList.swift.
123456789101112131415161718192021222324252627282930313233343536373839404142import SwiftUI
import StreamChat
import StreamChatSwiftUI

struct CustomChannelList: View {

    @StateObject private var viewModel: ChatChannelListViewModel
    @StateObject private var channelHeaderLoader = ChannelHeaderLoader()

    public init(
        channelListController: ChatChannelListController? = nil
    ) {
        let channelListVM = ViewModelsFactory.makeChannelListViewModel(
            channelListController: channelListController,
            selectedChannelId: nil
        )
        _viewModel = StateObject(
            wrappedValue: channelListVM
        )
    }

    var body: some View {
        NavigationView {
            ChannelList(
                factory: DefaultViewFactory.shared,
                channels: viewModel.channels,
                selectedChannel: $viewModel.selectedChannel,
                swipedChannelId: $viewModel.swipedChannelId,
                onItemTap: { channel in
                    viewModel.selectedChannel = channel.channelSelectionInfo
                },
                onItemAppear: { index in
                    viewModel.checkForChannels(index: index)
                },
                channelDestination: DefaultViewFactory.shared.makeChannelDestination()
            )
            .toolbar {
                DefaultChatChannelListHeader(title: "Stream Tutorial")
            }
        }
    }
}
The above sample code uses a SwiftUI list to display the default chat channel list the chat SDK provides when you run the app. So far, we have done everything about chat messaging, allowing users to input text and send it to others. Run it to see the channel list as shown in the video preview above. In the video preview of the final project, you see that there isn't any way to record and send voice messages. Let's dive into that fun part in the next section.
Adding Voice Recordings To Chat With an Attachment Type
The chat SDK allows you to include attachments like files, media (audio, video), and URLs in messages. There are several built-in attachment types you can implement in a SwiftUI app. However, the one we need for our voice messaging use case is the voiceRecording attachment type. Check out working with attachments/files in the iOS documentation to learn more about the other available types.
How To Enable Voice Recording in Your SwiftUI App
We did not see the voice recording feature after running the app in the previous section because this feature is turned off by default. To use the feature, we can enable it with the code snippet below.
1234let recordingPossible = Utils(
    composerConfig: ComposerConfig(isVoiceRecordingEnabled: true)
)
let streamChat = StreamChat(chatClient: chatClient, utils: recordingPossible)
In summary, we assign the voice recording feature to a Swift utility class, signifying this feature is a secondary priority task, and users can use the actual chat app with the primary focus on text messaging. The reason above justifies why the audio recording support is turned off in the chat SDK by default. Head to the Apple documentation to learn more about the utility class.
Let's add the code snippet above to our chat messaging configuration file VoiceChatApp.swift, which we implemented previously. The updated version of the file becomes:
12345678910111213141516171819202122232425262728293031323334353637383940414243444546474849505152535455565758596061import SwiftUI
import StreamChat
import StreamChatSwiftUI

@main
struct VoiceChatApp: App {

    // Step 1: Create a new instance of the low-level chatClient for SwiftUI.
    var chatClient: ChatClient = {
        //For the tutorial we use a hard coded api key and application group identifier
        var config = ChatClientConfig(apiKey: .init("8br4watad788"))
        config.isLocalStorageEnabled = true
        config.applicationGroupIdentifier = "group.io.getstream.iOS.ChatDemoAppSwiftUI"

        // The resulting config is passed into a new ChatClient instance.
        let client = ChatClient(config: config)
        return client
    }()

    // Step 2: Create a StreamChat instance.
    @State var streamChat: StreamChat?

    // Step 5: Assign the voice recording feature to a Swift utility class. This means the voice recording is a secondary priority task compared to the actual use case of the app, rich text messaging.
    let recordingPossible = Utils(
        composerConfig: ComposerConfig(isVoiceRecordingEnabled: true)
    )

    // Step 4: Use an init method to set the StreamChat instance and the user.
    init() {
        streamChat = StreamChat(chatClient: chatClient, utils: recordingPossible)
        connectUser()
    }

    var body: some Scene {
        WindowGroup {
            ChatChannelListView()
        }
    }

    // Step 3: Connect a user to the backend.
    private func connectUser() {
        // This is a hardcoded token valid on Stream's tutorial environment.
        let token = try! Token(rawValue: "eyJhbGciOiJIUzI1NiIsInR5cCI6IkpXVCJ9.eyJ1c2VyX2lkIjoibHVrZV9za3l3YWxrZXIifQ.kFSLHRB5X62t0Zlc7nwczWUfsQMwfkpylC6jCUZ6Mc0")

        // Call connectUser on our SDK to get started.
        chatClient.connectUser(
            userInfo: .init(
                id: "luke_skywalker",
                name: "Luke Skywalker",
                imageURL: URL(string: "https://vignette.wikia.nocookie.net/starwars/images/2/20/LukeTLJ.jpg")!
            ),
            token: token
        ) { error in
            if let error = error {
                // Some very basic error handling only logging the error.
                log.error("connecting the user failed \(error)")
                return
            }
        }
    }
}
You can now run the app with an iOS device (iPhone or iPad) to test it by speaking and recording your voice. The following sections give you a deep tour of the voice recording interface.
Voice Recording UI: Overview
The audio recording UI has the following sections. Now that the app is ready for testing, you can run it, begin speaking, recording your voice, and exploring the various sections of the UI.
Recording View

The recording view is the UI that appears while your hand is holding the microphone button during recording. This view also shows a count-up timer for how long the recording has lasted.
Locked View

While recording an audio, you can lock the recording screen by swiping the lock button up. Once you lock the recording screen, you can do the following:
- Delete recording: Returns the user to the initial state.
- Play/pause recording: Shows the recording playback in a preview state.
- Confirm recording: Adds the recording to the message compose area where it is ready for sending.
Customize the Voice Recording Experience
The voice recording view provides maximum customization options. You can swap most of its UIs with custom implementations. The animations in this section are examples of how you can customize the voice recording views after integrating the chat SDK into your app. You can, for example, swap the count-up timer and the ongoing recording view with the Slide to cancel animation you see above.
Additionally, you can change the SDK's default recording locked view with the custom lock animation view you see here. That sounds interesting. Isn't it? Let's get our hands dirty by implementing a custom tip view in the next section.
How To Customize the Recording Tip View

The left image preview in this section shows the default recording tip view from the Chat SDK. Let's customize it to create the image preview on the right. To achieve the tip view on the right, we should implement the SDK's View Factory protocol and use the Apple TipKit framework to display the custom tip. A tip view in this context is nothing more than a convenient way to show users an app's new and hidden features. Using Apple's TipKit framework will also help handle the tip interactions and display frequency by defining specific rules. If you are new to TipKit, read Apple's documentation to learn more.
Let's use the following steps to swap the default tip view with one we custom-made:
Import the TipKit framework and add a Standard SwiftUI view for the tip's UI. Check the full implementation in CustomRecordingTipView.swift. You can also find the file in the final project when you download it from GitHub.
Create a custom view factory class in a new file CustomRecordingUIs.swift.
123456789101112131415import StreamChatSwiftUI
import SwiftUI

class CustomFactory: ViewFactory {

    @Injected(\.chatClient) public var chatClient

    private init() {}

    public static let shared = CustomFactory()

    public func makeComposerRecordingTipView() -> some View {
        CustomRecordingTipView()
    }
}
We implement the makeComposerRecordingTipView method in the CustomFactory class, which conforms to the SDK's view factory protocol. The makeComposerRecordingTipView method displays the CustomRecordingTipView() we created in step 1 above.
Lastly, in the app's Scene we should update the ChatChannelListView to display the CustomFactory class, which overrides the default recording tip view.
123456789101112131415var body: some Scene {
            WindowGroup {
                ChatChannelListView(viewFactory: CustomFactory.shared)
                    .task {
                        do {
                            try Tips.configure([
                                .displayFrequency(.immediate),
                                .datastoreLocation(.applicationDefault)
                            ])
                        } catch {
                            print(error.localizedDescription)
                        }
                    }
            }
        }
See the full implementation in VoiceChatApp.swift.
Run the app now and single-tap the microphone button. It will display the screen in the video preview below. Record your voice, send it as an audio file, and use reactions to react to it. Congratulations!
Where Do I Go From Here?
In this tutorial, you learned to implement audio/voice chat in a SwiftUI app using Stream. We enabled voice recording support in a voice chat app, primarily focusing on rich text messaging. Eventually, we overrode the SDK's tip view with a native tip UI using TipKit.
If your iOS app does not yet support SwiftUI, you can download the UIKit version of the final Xcode project to explore how it implements the voice messaging feature.
Check out our iOS Chat SDK's documentation, audio recording customization options and its advanced guide to learn more about tailoring the UI to build a unique experience for your app.
And if you are looking for a way to get a taste, and quickly get started using our Chat SDK, we have tutorials covering both UIKit and SwiftUI.