

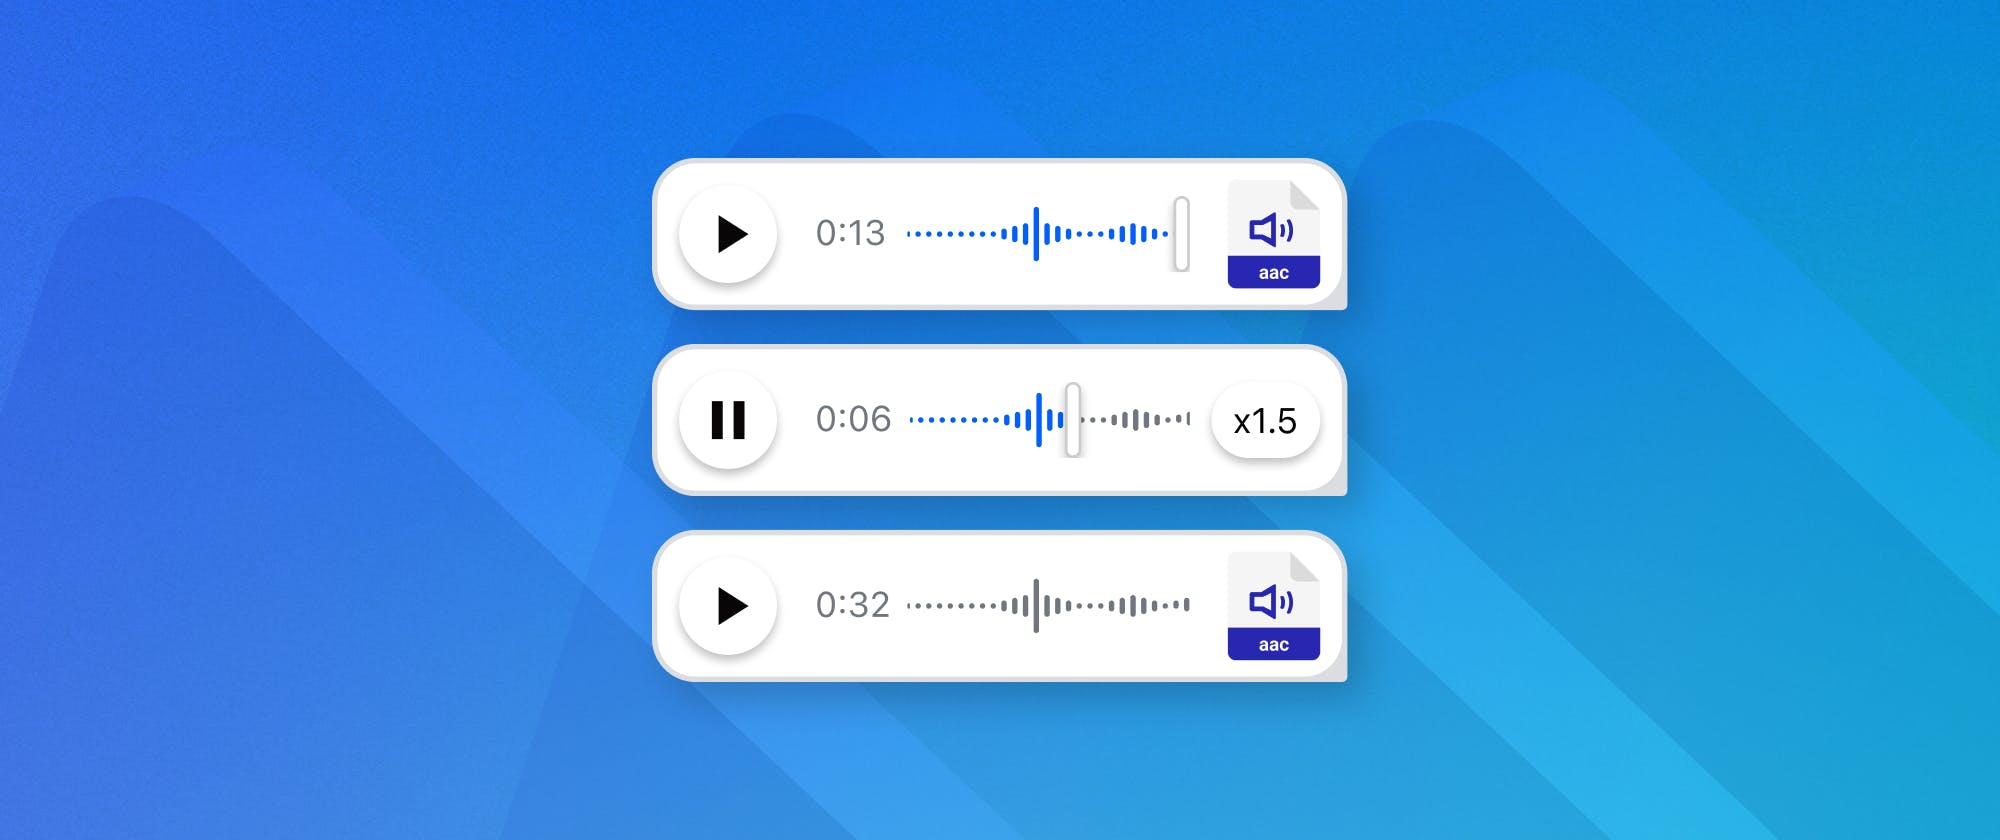
Voice messaging is common in popular chat apps such as Telegram, WhatsApp, and Messenger, allowing people to record audio clips and send them to others.
This article will explore async voice messaging support in Stream Chat iOS. In the above voice-recording-supported apps, users typically send voice messages through audio attachments. Our iOS SDK has a built-in attachment type for handling recorded audio clips.
Prerequisites
The voice recording feature is available in Stream Chat iOS version 4.32.0. If you are an existing user of Stream, you should update your Stream Chat package version in Xcode to benefit from the voice messaging feature. In addition, you should use Xcode 14 or 15 to follow this tutorial.
When Choose Stream Chat's Audio Recording Option?
When building a messaging app, consider integrating voice and text chats to work effortlessly and seamlessly together. Luckily, you have Stream Chat iOS. The iOS SDK provides reusable components to add audio recording functionality to your app quickly and with minimal effort.
The voice recording feature of Stream Chat iOS lets people communicate instantly in your app with a tap and the release of a button. This tutorial teaches you how to build a chat messaging app with async audio recording and transmission functionality to enhance direct chat conversations.
Create Your Stream Account

Although following this tutorial does not require having a Stream account, creating a production messaging app with Stream requires an account. Head to our website to start your free trial account.
Use Cases of In-App Voice Recording
- Telemedicine: When a patient receives a voice message from a doctor, it feels more personal than text messages.
- Dating: Sending voice clips to new matches helps them build trust, ensure you are real, and stay safe.
- Team meetings: Let your team replace unnecessary meetings and stand-ups with async voice messages for project status updates.
- Marketplaces: Sellers can answer multiple buyer questions quicker with voice notes as an alternative to text messages requiring long written replies.
- Group collaboration and communication: Share audio feedback and insights asynchronously with all team members.
Key Features of the Voice Messaging Support
The Chat SDK provides a pre-built voice recording UI that updates automatically depending on the recording state. You can also customize the UI with a bespoke implementation. Check out the key features:
- Haptic feedback: Users receive haptic feedback through the iOS device during a recording flow.
- Recordings grouping: People can create multiple voice recordings, group them and send them as audio attachments in a single message.
- It integrates seamlessly with your existing iOS app. Later in this tutorial, you will discover how to easily enable the voice messaging feature with a single line of code.
- Playback speed adjustment: Users can play recorded audio at x0.5 or x2.
Voice Recording Interaction Techniques
When you integrate our voice messaging, people can employ the following interaction styles to record and send voice messages with Stream Chat iOS.
- Tap gesture: Tap a mic icon to display a popup with instructions on recording audio.
- Tap and hold gesture: To accomplish the recording, use a tap and hold gesture.
- Release to send or cancel: Once you release the microphone button after recording, you can deliver the voice message with the send icon or cancel it with the X mark.
- Slide up to lock: Sliding up while recording locks the recording screen.
- Slide to cancel: While recording, you can slide to the left to cancel the voice message.
- Pause and resume recording: While recording, you can tap the pause button to halt the recording and press it again to resume.
Step 1: Create Your Xcode Project and Install the Chat SDK
Launch Xcode and create a new Storyboard project with the settings in the image below.
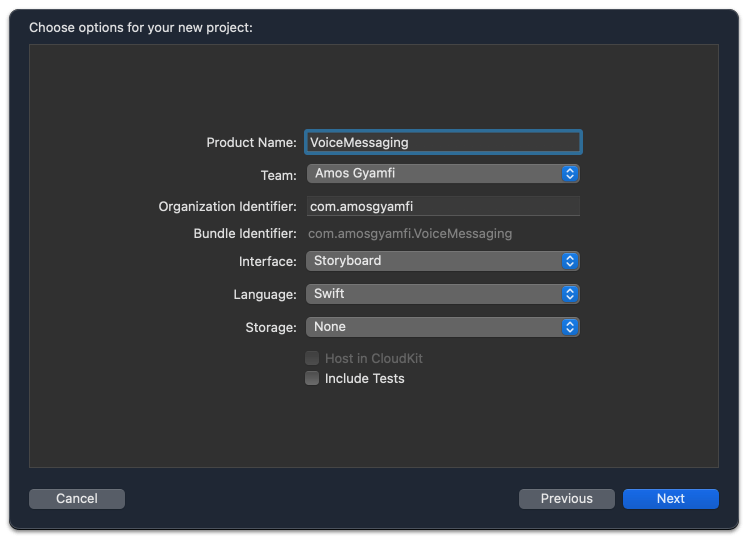
Choose the Product Name you prefer, navigate to the next screen, and save the project. To install the Stream Chat iOS SDK, select File -> Add Package Dependencies... in Xcode. Copy and paste https://github.com/getstream/stream-chat-swift in the search bar and follow the steps to add the package.
Step 2: Configure Your Project for Microphone Usage
When building an iOS app to record users' voices, you must ask for users' permission for microphone usage when they launch your app for the first time. You can add the microphone usage description under the Info tab, as shown below.

Step 3: Set Up the Chat SDK
Let's configure the SDK to display a list of channels and messages with ready-made UI components.
Add Stream Chat Client Extension
The first step is to create the Stream Chat client. You can perform the implementation in your AppDelegate.swift. At the top of AppDelegate.swift, add a globally accessible shared instance of Stream Chat with the code snippet below.
1234567// AppDelegate.swift

import UIKit
import StreamChat
extension ChatClient {
    static var shared: ChatClient!
}
The AppDelegate.swift file will look like the sample code below.
1234567891011121314151617181920212223// AppDelegate.swift

import UIKit
import StreamChat
extension ChatClient {
    static var shared: ChatClient!
}
@main
class AppDelegate: UIResponder, UIApplicationDelegate {
    func application(_ application: UIApplication, didFinishLaunchingWithOptions launchOptions: [UIApplication.LaunchOptionsKey: Any]?) -> Bool {
        // Override point for customization after application launch.
        return true
    }
    // MARK: UISceneSession Lifecycle
    func application(_ application: UIApplication, configurationForConnecting connectingSceneSession: UISceneSession, options: UIScene.ConnectionOptions) -> UISceneConfiguration {
        // Called when a new scene session is being created.
        // Use this method to select a configuration to create the new scene with.
        return UISceneConfiguration(name: "Default Configuration", sessionRole: connectingSceneSession.role)
    }
    func application(_ application: UIApplication, didDiscardSceneSessions sceneSessions: Set<UISceneSession>) {
        // Called when the user discards a scene session.
            }
}
Add a Demo Chat Channel List
Replace the content of ViewController.swift with a class that implements the SDK's chat channel list.
123456// ViewController.swift

import StreamChat
import StreamChatUI
import UIKit
class DemoChannelList: ChatChannelListVC {}
Create a Chat Client Instance and Connect the Chat
This section requires a few steps. You will initialize the Stream Chat client and connect an authenticated user in SceneDelegate.swift.
Initialize the Stream Chat Client
First, you should use your API key to initialize the Stream Chat client. In this demo, we generated the API key for you. If you plan to build a production app, you can sign up for a free chat account to obtain an API key.
1ChatClient.shared = ChatClient(config: config)
Secondly, use the ChatClient.shared.connectUser method to create and connect the user to the backend using a token. You must generate the token from your server side for a production app. Head to our token and authentication page to learn more.
12345678ChatClient.shared.connectUser(
            userInfo: UserInfo(
                id: userId,
                name: "Tutorial Droid",
                imageURL: URL(string: "https://bit.ly/2TIt8NR")
            ),
            token: token
        )
Check out the full implementation of the two steps described in SceneDelegate.swift.
12345678910111213141516171819202122232425262728293031323334353637383940414243// SceneDelegate.swift

import UIKit
import StreamChat
import StreamChatUI
class SceneDelegate: UIResponder, UIWindowSceneDelegate {

    var window: UIWindow?

    func scene(
        _ scene: UIScene,
        willConnectTo session: UISceneSession,
        options connectionOptions: UIScene.ConnectionOptions
    ) {
        let config = ChatClientConfig(apiKey: .init("dz5f4d5kzrue"))

        /// user id and token for the user
        let userId = "tutorial-droid"
        let token: Token =
        "eyJhbGciOiJIUzI1NiIsInR5cCI6IkpXVCJ9.eyJ1c2VyX2lkIjoidHV0b3JpYWwtZHJvaWQifQ.NhEr0hP9W9nwqV7ZkdShxvi02C5PR7SJE7Cs4y7kyqg"

        /// Step 1: create an instance of ChatClient and share it using the singleton
        ChatClient.shared = ChatClient(config: config)

        /// Step 2: connect to chat
        ChatClient.shared.connectUser(
            userInfo: UserInfo(
                id: userId,
                name: "Tutorial Droid",
                imageURL: URL(string: "https://bit.ly/2TIt8NR")
            ),
            token: token
        )

        /// Step 3: create the ChannelList view controller
        let channelList = DemoChannelList()
        let query = ChannelListQuery(filter: .containMembers(userIds: [userId]))
        channelList.controller = ChatClient.shared.channelListController(query: query)

        /// Step 4: similar to embedding with a navigation controller using Storyboard
        window?.rootViewController = UINavigationController(rootViewController: channelList)
    }
}
Step 4: Run the App
When you run the app using a simulator or an iPhone, you will see a screen that prompts ("VoiceMessaging Would Like to Access the Microphone") you to allow access to the device's microphone. Tapping OK will show the default channel list screen for the home page. Tapping any channel list items displays the message list view for outgoing and incoming messages.

Step 5: How to Enable the Voice Recording Feature
In the previous steps, we displayed the chat channel and message list screens. Currently, there is no option to start recording your voice because the SDK turns off the voice recording feature by default. When you enable the voice recording feature, a microphone button will appear beside the send button in the compose area. The image below demonstrates the message list screen without and with the mic button.

You can enable the voice recording feature and turn on the microphone with a single line of code in your project's SceneDelegate.swift file.
1234// SceneDelegate.swift

// Enable Async Voice Messaging
Components.default.isVoiceRecordingEnabled = true
You should set the Components.default. isVoiceRecordingEnabled property to true in the scene method's body of SceneDelegate.swift.
12345678910111213141516171819202122232425262728293031323334353637383940414243444546// SceneDelegate.swift

import UIKit
import StreamChat
import StreamChatUI
class SceneDelegate: UIResponder, UIWindowSceneDelegate {

    var window: UIWindow?

    func scene(
        _ scene: UIScene,
        willConnectTo session: UISceneSession,
        options connectionOptions: UIScene.ConnectionOptions
    ) {
        let config = ChatClientConfig(apiKey: .init("dz5f4d5kzrue"))

        // Enable Async Voice Messaging
        Components.default.isVoiceRecordingEnabled = true

        /// user id and token for the user
        let userId = "tutorial-droid"
        let token: Token =
        "eyJhbGciOiJIUzI1NiIsInR5cCI6IkpXVCJ9.eyJ1c2VyX2lkIjoidHV0b3JpYWwtZHJvaWQifQ.NhEr0hP9W9nwqV7ZkdShxvi02C5PR7SJE7Cs4y7kyqg"

        /// Step 1: create an instance of ChatClient and share it using the singleton
        ChatClient.shared = ChatClient(config: config)

        /// Step 2: connect to chat
        ChatClient.shared.connectUser(
            userInfo: UserInfo(
                id: userId,
                name: "Tutorial Droid",
                imageURL: URL(string: "https://bit.ly/2TIt8NR")
            ),
            token: token
        )

        /// Step 3: create the ChannelList view controller
        let channelList = DemoChannelList()
        let query = ChannelListQuery(filter: .containMembers(userIds: [userId]))
        channelList.controller = ChatClient.shared.channelListController(query: query)

        /// Step 4: similar to embedding with a navigation controller using Storyboard
        window?.rootViewController = UINavigationController(rootViewController: channelList)
    }
}
Rerun the app and be ready to record your voice to send to others. That was easy, huh? Keep reading to discover how to record and send voice messages.
How to Record and Send a Voice Message
Follow the steps below to record and send voice messages using Stream Chat iOS:
- Tap and hold the microphone icon beside the text message compose area and start speaking. The long-press gesture will trigger a recording mode. To lock the recording mode, you should swipe up the lock icon. Once you still hold the mic icon, you can slide to the left to cancel the recording.
You can slide up to lock the screen when recording, and the recording will continue. In addition, you can tap the stop icon and navigate through the timeline of the recorded audio. After recording the audio, you can discard it by tapping the bin icon or accept/confirm it by tapping the checkmark icon. Confirming the recording sends it as a message attachment.
The Stream Chat SDK gives developers maximum flexibility in audio recording. In your implementation, you can send the recorded voice clip immediately instead of confirming it first. When you send recorded audio to others, they can play it back by tapping the play icon or navigating through the audio waveform (timeline) using the slider. The playback speed is also customizable. The playback speed adjustment allows people to preview the recorded audio faster (x2) or slow (x0.5) it down.
When users send multiple recorded audio messages as attachments, after playing the first audio clip will automatically start playing the second audio. Alternatively, you can define criteria to override this behavior in your production app's implementation.
- Release the microphone button when you finish talking to make the voice message ready to be sent. Now, you can tap the play icon to resume the recording or tap the X mark to cancel the voice message if you prefer not to send it.
- Finally, you can tap the send button beside the microphone to deliver the audio message.
Customizing the Recording Components
The SDK provides many customization options to tailor your app's voice recording experience using the configuration of its components.
- Enable and send a group of recordings as part of a single message
isVoiceRecordingConfirmationRequiredEnabled: You can set this component as true to group recordings together and send them as part of one messageComponents.default.isVoiceRecordingConfirmationRequiredEnabled = false. The default implementation is set to true. When it is set to false, the system automatically sends the recording when people finish it by releasing the finger from the mic recording icon. - Enable and disable sequential audio playback
Components.default.audioPlayer = StreamRemoteAudioQueuePlayer.self: Setting the value of the above component toStreamRemoteAudioQueuePlayer.selfmakes a group of recordings play in sequential order. - Enable and disable recording haptic feedback: To provide haptic feedback during recording flow, you should set
Components.default.audioSessionFeedbackGenerator = StreamAudioSessionFeedbackGenerator.self.
Refer to the voice recording documentation to learn more about customizing the other UI components.
Wrap Up
This tutorial taught you how to seamlessly and effortlessly enable in-app async voice messaging using a Stream Chat iOS app. This audio clips feature allows people to record their voice within your app and send it to others to communicate effectively and express emotions in ways text cannot.
The tutorial also outlined several use cases whereby you can use the audio/voice recording and messaging feature you discovered in your app. Go ahead and start using this excellent feature today and share what you build with us.
Stream Chat iOS has many other great features, so refer to our documentation. You can start your free trial today if you still need a Stream account.