Setup
To get started, create a new Swift project in Xcode with a “Single View App” using the project name GetStreamActivityFeedDemo. Stream’s iOS Activity Feed Components are published on all major package repositories; so we’ll use CocoaPods as our dependency manager for this tutorial.
1cd ~/path/to/my/projects/GetStreamActivityFeedDemo/
Ensure CocoaPods is installed
Note: If you do not currently have CocoaPods installed, you can do so by running the following command:
1sudo gem install cocoapods
Moving On
Now that you are in your project directory and have ensured that CocoaPods is installed, let’s go ahead and initialize CocoaPods and install the Stream Activity Feed Components within our project.
Initialize CocoaPods and create a Podfile:
1pod init
Open the generated Podfile and modify the contents of the file with the following:
123456789101112131415platform :ios, '11.0'
inhibit_all_warnings!

target 'GetStreamActivityFeedDemo' do
  use_frameworks!
  pod 'GetStreamActivityFeed'
end

post_install do |installer|
  installer.pods_project.targets.each do |target|
    target.build_configurations.each do |config|
      config.build_settings['SWIFT_VERSION'] = '4.2'
    end
  end
end
Now that we’ve modified our Podfile, let’s go ahead and install the project dependencies via the terminal with one simple command:
1pod install
The above command will generate the GetStreamActivityFeedDemo.xcworkspace file automatically. With our workspace now containing our Pods project with dependencies, as well as our original project, let’s go ahead and move over to Xcode to complete the process.
Debugging
If you encounter any issues while installing the package, please make sure that you are using the latest version of CocoaPods and that your repository is up to date. You can use the following command to update:
1sudo gem update cocoapods
Note: Occasionally, it helps to clean the CocoaPods cache using the following command:
1rm -rf ~/Library/Caches/CocoaPods/
Once you’ve cleared the CocoaPods cache, it’s important to run the command pod install from within your directory to regenerate the cache.
Add Stream to your application
To setup Stream we need to add a couple things in your AppDelegate.swift. Here is what your AppDelegate should look like:
1234567891011121314151617181920212223import UIKit
import GetStream
import GetStreamActivityFeed

@UIApplicationMain
class AppDelegate: UIResponder, UIApplicationDelegate {

    var window: UIWindow?

    func application(_ application: UIApplication, didFinishLaunchingWithOptions launchOptions: [UIApplication.LaunchOptionsKey: Any]?) -> Bool {
        Client.config = .init(apiKey: "YOUR_API_KEY",
                              appId: "APP_ID")
        Client.shared.setupUser(GetStreamActivityFeed.User(name: "User One",
                                                           id: "USER_ID"),
                                                           token: "USER_TOKEN") { (result) in
          if result.error == nil, let viewController = self.window?.rootViewController as? ViewController {
            viewController.reloadData()
          }
        }

        return true
    }
}
Note: You will get a compiler error No such module 'GetStream', it’s expected before building. Build the project using Command+B or ignore the error for now, we’ll build the project before running anyway.
Your application is now configured with the API credentials for the demo application.
Client.shared is a singleton we define in app delegate and re-use throughout the entire application. The shared client manages current user's session (token) and your Stream application API credentials (apiKey and appId).
Note for the impatient: we still need to add a tiny bit of code before we can launch our application. Bear with us for a minute :-)
Because this is a tutorial, we do not have a real signup flow and we will use a pre-generated user session token, on a real-world application, your authentication backend would generate such token at log-in / signup and hand it over to the mobile app.
This is how you would generate the token server side (no need to do this for this tutorial):
123456// npm install getstream --save

let stream = require('getstream');

let client = stream.connect('YOUR_API_KEY', 'YOUR_API_SECRET');
let userToken = client.createUserToken('USER_ID');
123456# pip install stream-python

import stream

client = stream.connect('YOUR_API_KEY', 'YOUR_API_SECRET', location='us-east')
user_token = client.create_user_token('USER_ID')
12345678910# gem install "stream-ruby"
# gem install "stream-ruby"

# or add this to your Gemfile and then run bundler
# gem "stream-ruby"

require 'stream'

client = Stream::Client.new('YOUR_API_KEY', 'YOUR_API_SECRET', :location => 'us-east')
user_token = client.create_user_session_token('USER_ID')
1234// composer require get-stream/stream

$client = new GetStreamStreamClient('YOUR_API_KEY', 'YOUR_API_SECRET');
$userToken = client->createUserSessionToken('USER_ID');
Timeline Feed
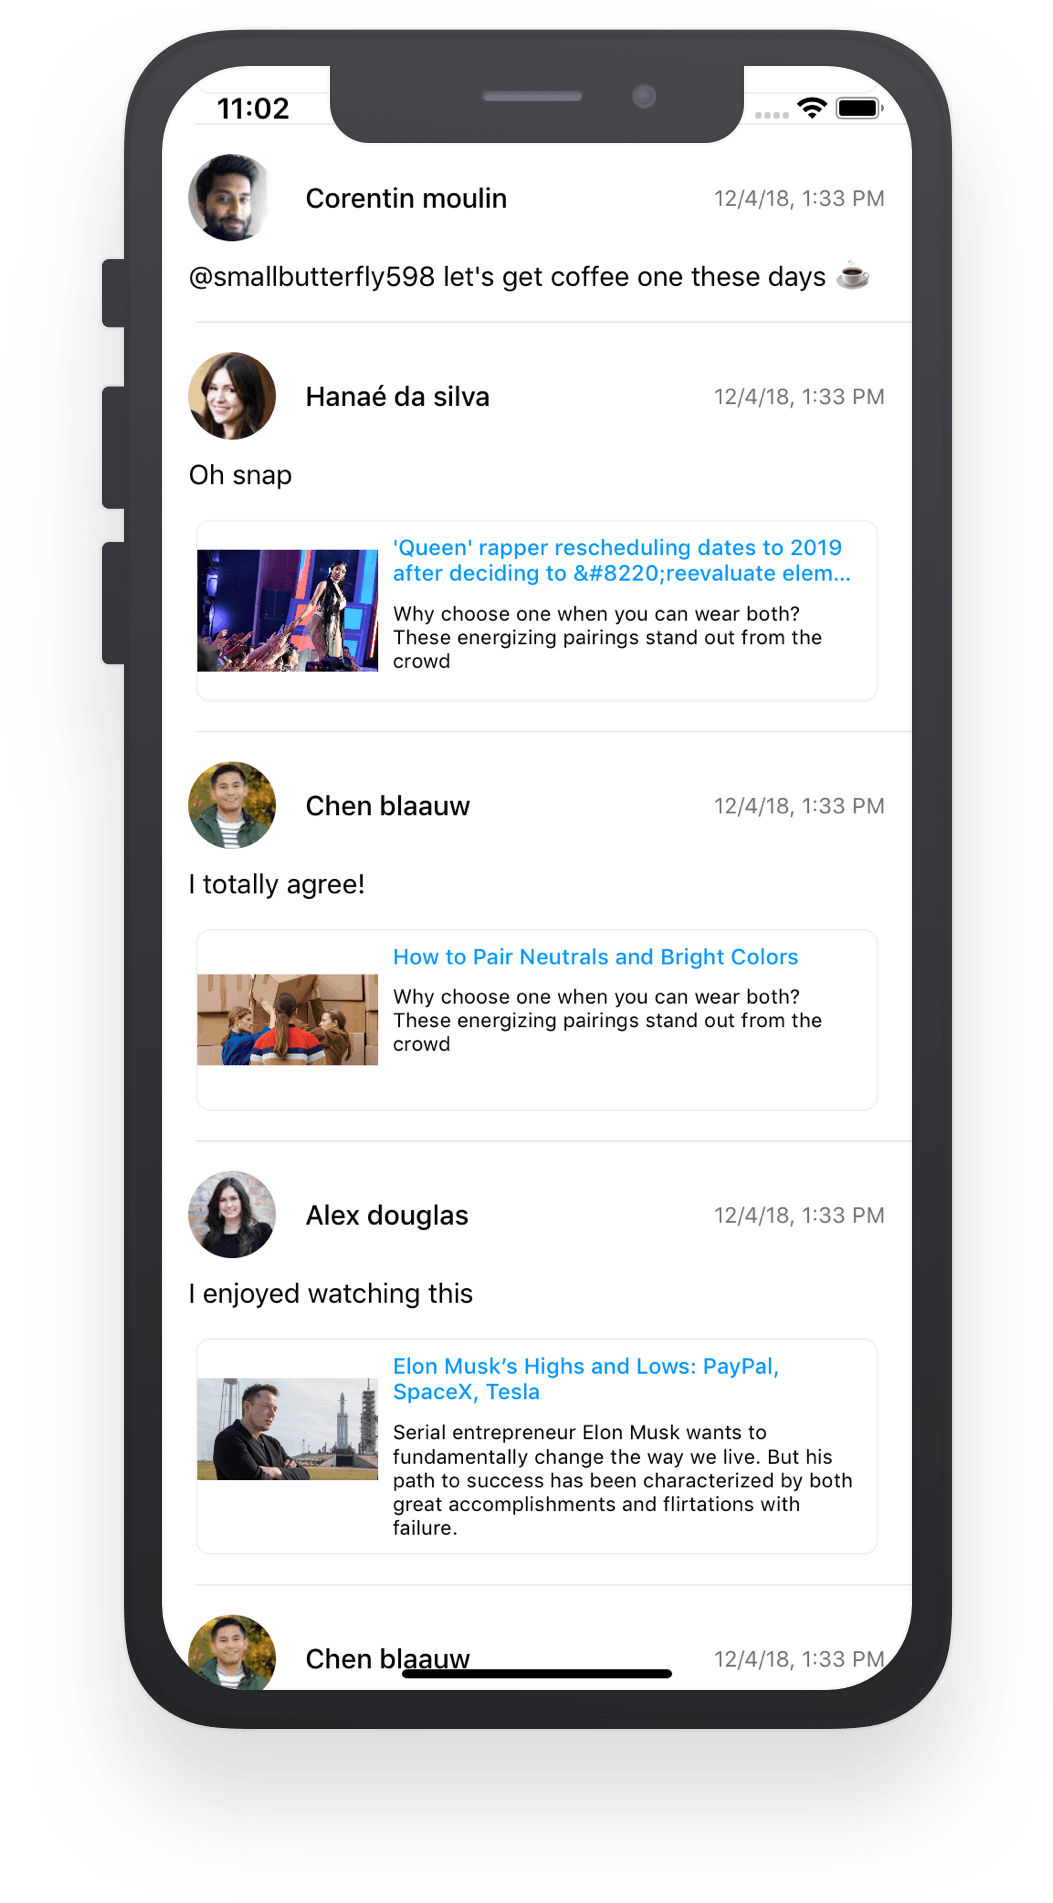
Adding a timeline feed is very simple, the library comes with a built-in FlatFeedViewController class which loads the current user's timeline using the APIs and renders its content.
Because we started this project as a “Single View App” we already have a ViewController in our project.
The example newsfeed is loaded with some demo data, this way you can see how different kind of activities are rendered out of the box.
Update ViewController
First, we need to update our ViewController
- Open ViewController.swift and import GetStreamActivityFeed and GetStream
- Change ViewController's parent class from the UIViewController to FlatFeedViewController<Activity>
1234567891011121314import UIKit
import GetStream
import GetStreamActivityFeed

class ViewController: FlatFeedViewController<GetStreamActivityFeed.Activity> {

    override func viewDidLoad() {
        if let feedId = FeedId(feedSlug: "timeline") {
            let timelineFlatFeed = Client.shared.flatFeed(feedId)
            presenter = FlatFeedPresenter<GetStreamActivityFeed.Activity>(flatFeed: timelineFlatFeed)
        }
        super.viewDidLoad()
    }
}
Our application is now showing the content of our user's timeline. To make this more interesting we have added some random example data.
The timeline feed supports out of the box:
- Custom Activity type
- Attachments with images and Open Graph data
- Open web links
- Open an image gallery
- Emojis 🙌
- Pagination
- Refresh by pull from the top
Note: real applications have more than just one view controller and often need more complex customizations. Under the hood the activity feed library allows you fine tune how feeds are used in your application. At the end of the tutorial you can find the link to our example application which shows how to use this library in a real world application.
Likes
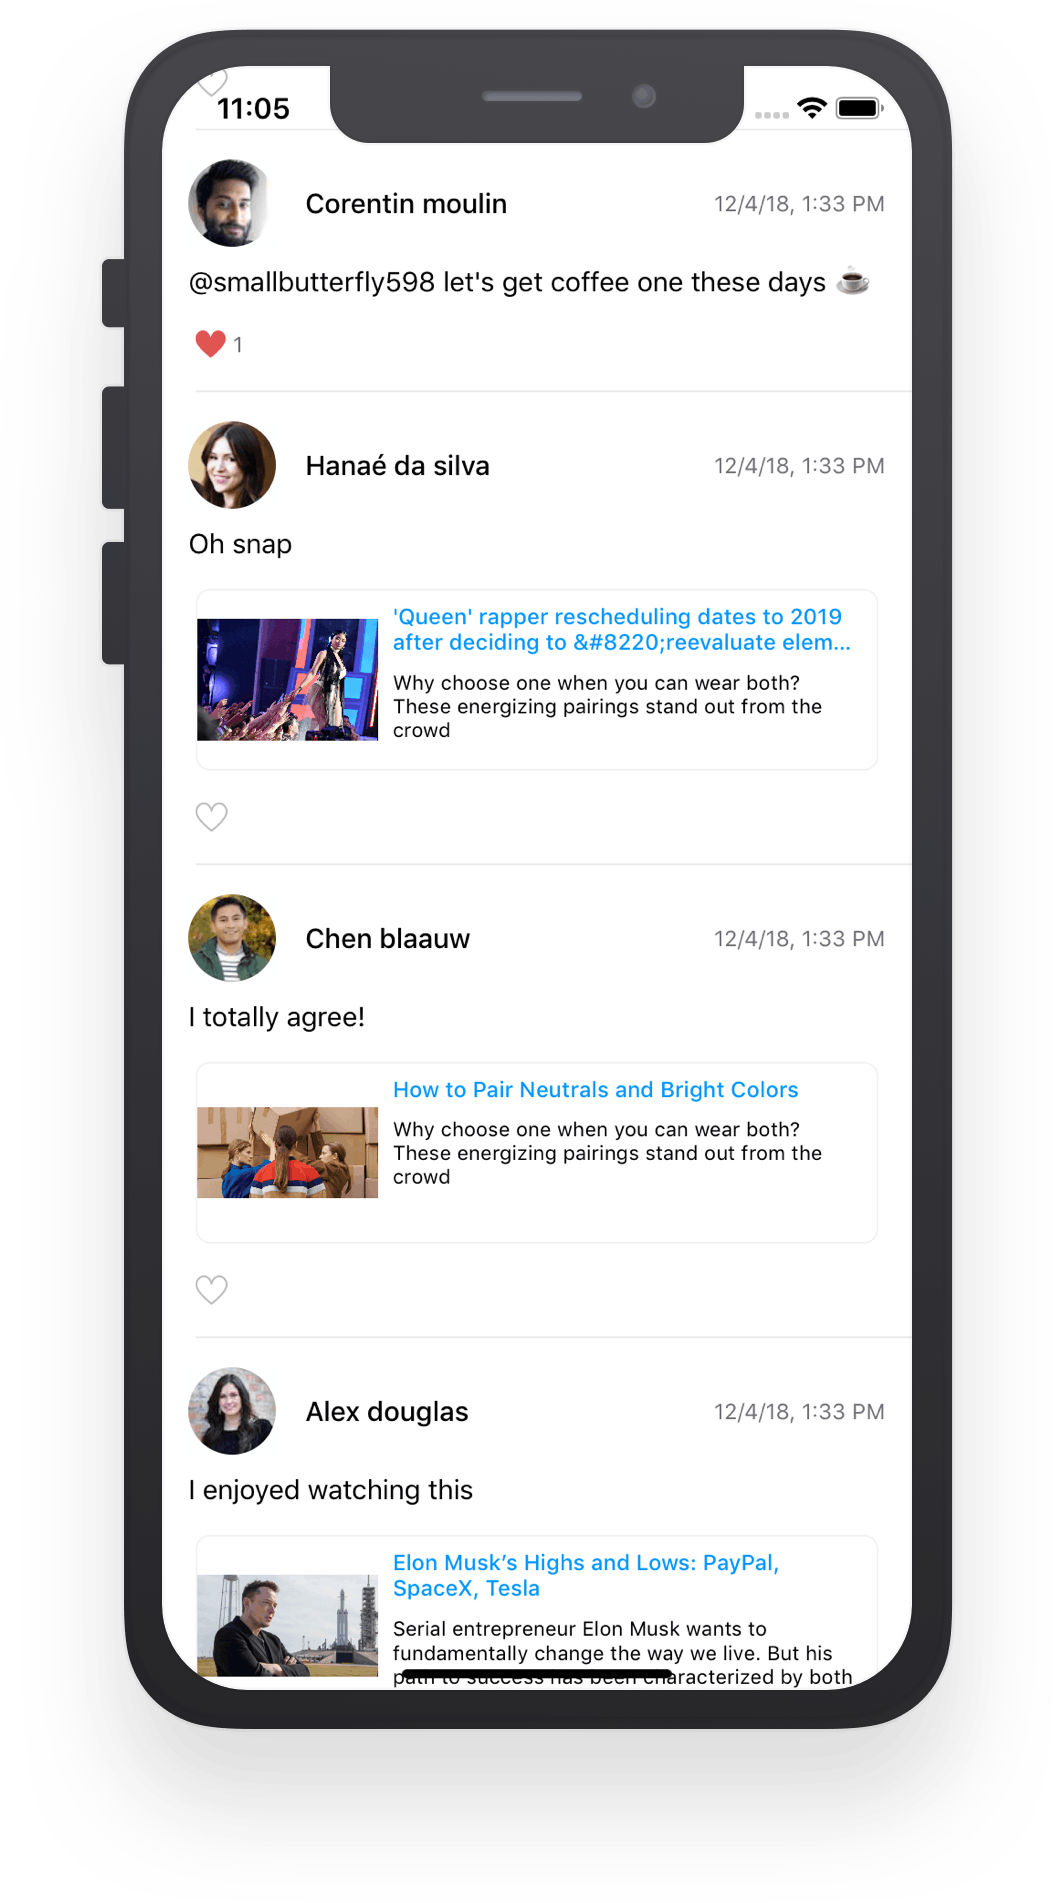
The Activity Feed Components provide functionality to add/remove reactions to the activities such as likes and comments.
Adding likes to activities is very simple and supported out-of-the-box by the library. The only thing we need to do is change how we initialize the feed presenter class to show likes.
1234567891011121314import UIKit
import GetStream
import GetStreamActivityFeed

class ViewController: FlatFeedViewController<GetStreamActivityFeed.Activity> {

    override func viewDidLoad() {
        if let feedId = FeedId(feedSlug: "timeline") {
            let timelineFlatFeed = Client.shared.flatFeed(feedId)
            presenter = FlatFeedPresenter<GetStreamActivityFeed.Activity>(flatFeed: timelineFlatFeed, reactionTypes: .likes)
        }
        super.viewDidLoad()
    }
}

Behind the scenes this adds an additional table view cell o display the Like button and the likes count.
Additional setup for like buttons possible with overriding the next method:
1234override func updateActions(in cell: PostActionsTableViewCell,
          activityPresenter: ActivityPresenter<Activity>) {
// cell.updateLike(...) { ... }
}
Comments
Comments are a very common functionality used on newsfeeds. The library comes with built-in support for comments, let’s see how we can add comments along with each activity.
For this we are going to add a detail screen for each activity. The detail screen will show the full activity information as well as the list of comments and a comment box to post new ones.
First we are going to add this method to our View Controller class:
123456override func tableView(_ tableView: UITableView, didSelectRowAt indexPath: IndexPath) {
  let detailViewController = DetailViewController<GetStreamActivityFeed.Activity>()
  detailViewController.activityPresenter = activityPresenter(in: indexPath.section)
  detailViewController.sections = [.activity, .comments]
  present(UINavigationController(rootViewController: detailViewController), animated: true)
}

The code that we just added does two things:
- It handles the tap on activities by overriding tableView’s didSelectRowAt method
- Initializes and present DetailViewController with current activity’s data
As a final touch, we are going to add the comment count next to the like button. For this we only need to add .comments to the list of reactionTypes
This is how the ViewController should look after these two changes:
123456789101112131415161718192021import UIKit
import GetStream
import GetStreamActivityFeed

class ViewController: FlatFeedViewController<GetStreamActivityFeed.Activity> {

   override func viewDidLoad() {
      if let feedId = FeedId(feedSlug: "timeline") {
          let timelineFlatFeed = Client.shared.flatFeed(feedId)
          presenter = FlatFeedPresenter<GetStreamActivityFeed.Activity>(flatFeed: timelineFlatFeed, reactionTypes: [.likes, .comments])
      }
      super.viewDidLoad()
   }

   override func tableView(_ tableView: UITableView, didSelectRowAt indexPath: IndexPath) {
      let detailViewController = DetailViewController<GetStreamActivityFeed.Activity>()
      detailViewController.activityPresenter = activityPresenter(in: indexPath.section)
      detailViewController.sections = [.activity, .comments]
      present(UINavigationController(rootViewController: detailViewController), animated: true)
   }
}
Bonus points: our library also supports nested reactions such as like on comments or threaded comments. You can see this in action when you open the detail screen ;)
If you are using the iOS simulator to run the examples, make sure to use the Software Keyboard (⌘K)
Status Updates
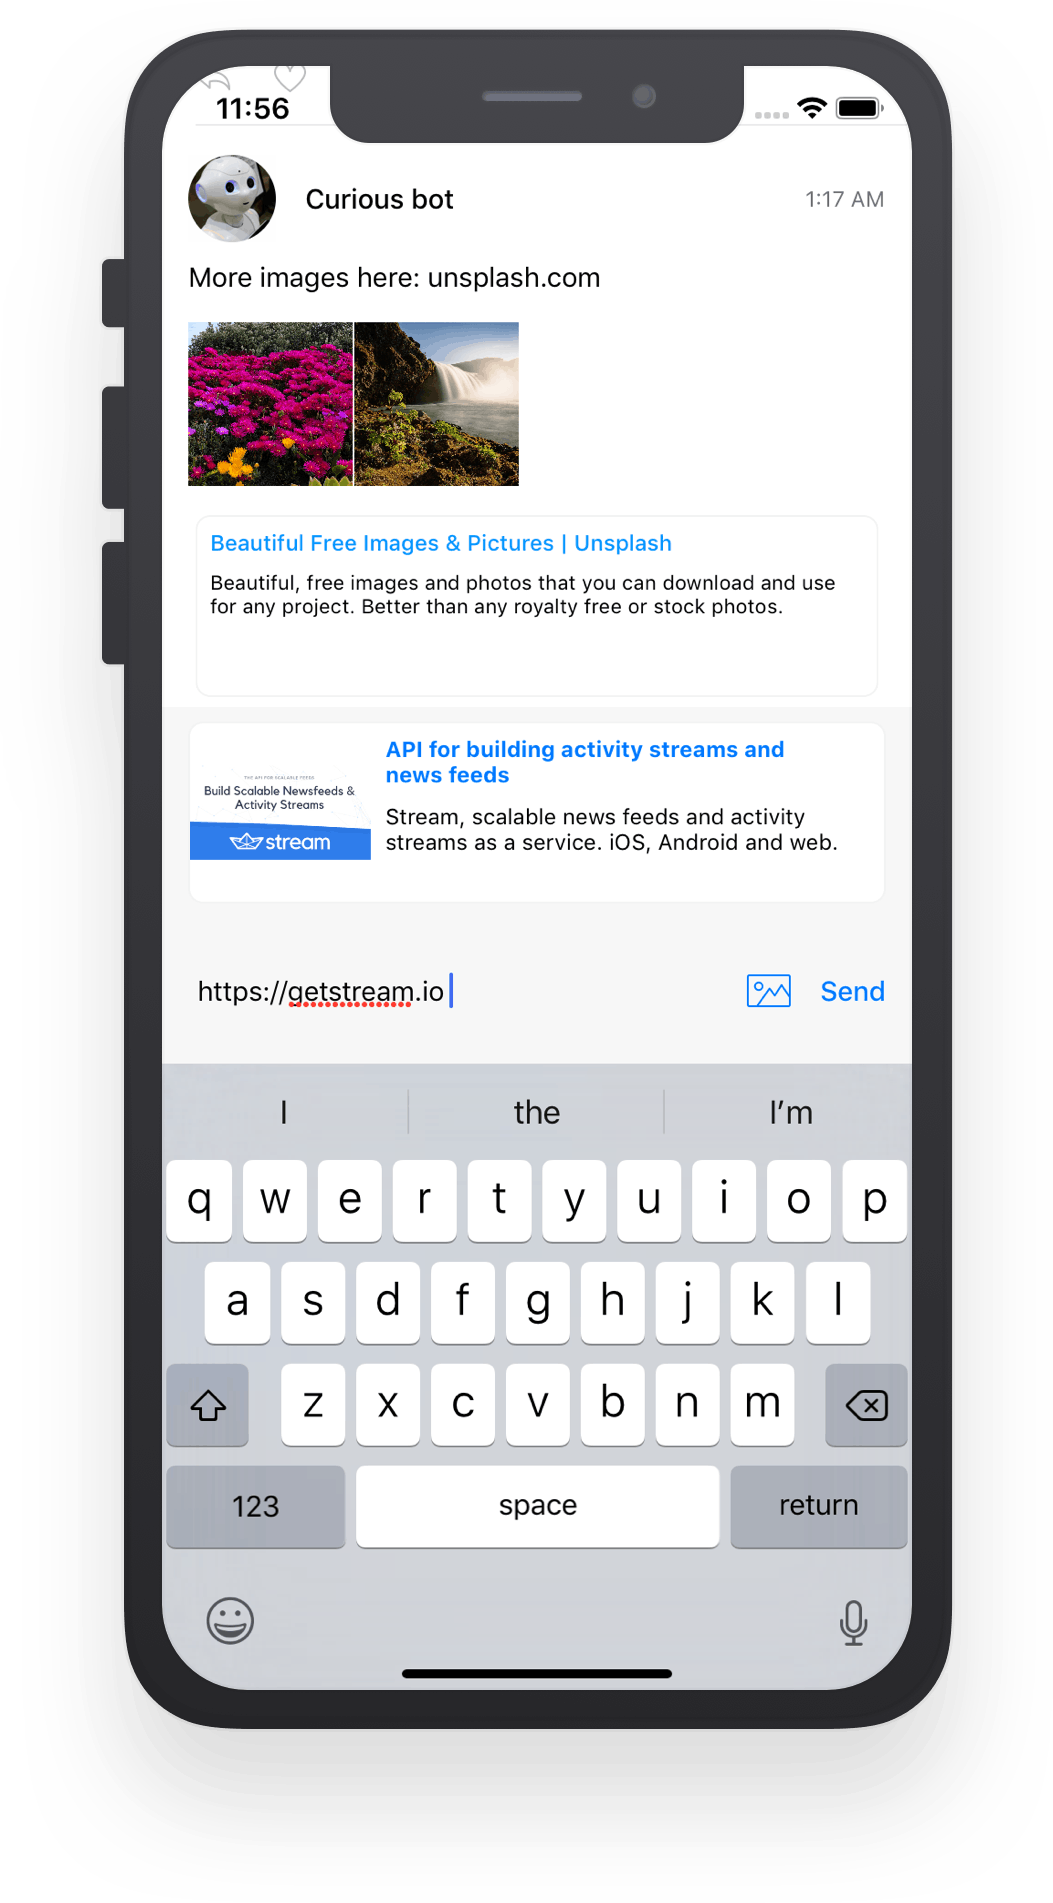
Now that we have a working timeline with likes and comments, let’s add a status update screen to post content ourselves.
We will use TextToolBar for the input of the text. Add an instance variable textToolBar in our ViewController:
1let textToolBar = TextToolBar.make()
Let’s setup textToolBar in a separate method setupTextToolBar and call at the end of viewDidLoad (Make sure to add that after super.viewDidLoad())
12345678910func setupTextToolBar() {
  textToolBar.addToSuperview(view, placeholderText: "Share something...")
  // Enable image picker
  textToolBar.enableImagePicking(with: self)
  // Enable URL unfurling
  textToolBar.linksDetectorEnabled = true
  textToolBar.sendButton.addTarget(self,
                                   action: #selector(save(_:)),
                                   for: .touchUpInside)
}

Now we need to add a save() method to create a new activity:
12345678910@objc func save(_ sender: UIButton) {
  // Hide the keyboard.
  view.endEditing(true)

  if textToolBar.isValidContent, let presenter = presenter {
      textToolBar.addActivity(to: presenter.flatFeed) { result in
          print(result)
      }
  }
}
Add this at the bottom of viewDidLoad() to show the status update form:
1setupTextToolBar()
Our timeline view comes with refresh control included; if you scroll down the timeline you will get the new activity loaded.
12345678910111213141516171819202122232425262728293031323334353637383940414243444546474849import UIKit
import GetStream
import GetStreamActivityFeed

class ViewController: FlatFeedViewController<GetStreamActivityFeed.Activity> {

    let textToolBar = TextToolBar.make()

    override func viewDidLoad() {
        if let feedId = FeedId(feedSlug: "timeline") {
            let timelineFlatFeed = Client.shared.flatFeed(feedId)
            presenter = FlatFeedPresenter<GetStreamActivityFeed.Activity>(flatFeed: timelineFlatFeed,
                                                                          reactionTypes: [.likes, .comments])
        }
        super.viewDidLoad()
        setupTextToolBar()
    }

    func setupTextToolBar() {
        textToolBar.addToSuperview(view, placeholderText: "Share something...")
        // Enable URL unfurling.
        textToolBar.linksDetectorEnabled = true
        // Enable image picker.
        textToolBar.enableImagePicking(with: self)
        textToolBar.sendButton.addTarget(self, action: #selector(save(_:)), for: .touchUpInside)
    }

    @objc func save(_ sender: UIButton) {
        // Hide the keyboard.
        view.endEditing(true)

        if textToolBar.isValidContent, let presenter = presenter {
            textToolBar.addActivity(to: presenter.flatFeed) { result in
                print(result) // It will print the added activity or error.
            }
        }
    }

    override func tableView(_ tableView: UITableView, didSelectRowAt indexPath: IndexPath) {
        if indexPath.row == 0 {
            let detailViewController = DetailViewController<GetStreamActivityFeed.Activity>()
            detailViewController.activityPresenter = activityPresenter(in: indexPath.section)
            detailViewController.sections = [.activity, .comments]
            present(UINavigationController(rootViewController: detailViewController), animated: true)
        } else {
            super.tableView(tableView, didSelectRowAt: indexPath)
        }
    }
}
Our timeline now has support for sharing status updates, the status update box comes with built-in support for:
- URL Previews
- Image Uploads
- Emoji and user mentions
Realtime Updates
As a final touch, we are connecting the timeline to Stream's real time APIs so that we can show a message each time a new activity is added to the feed.
To get FlatFeedViewController to listen for updates, we only need to call subscribeForUpdates(), that will create a Websocket connection to Stream APIs and subscribe for changes on the current feed.
12345678910override func viewDidLoad() {
  if let feedId = FeedId(feedSlug: "timeline") {
      let timelineFlatFeed = Client.shared.flatFeed(feedId)
      presenter = FlatFeedPresenter<GetStreamActivityFeed.Activity>(flatFeed: timelineFlatFeed, reactionTypes: [.likes, .comments])
  }

  super.viewDidLoad()
  setupTextToolBar()
  subscribeForUpdates()
}
Our feed now will show a notification every time a new activity is added. You can see this in action if you add a new activity.
Server-side Integration
So far we looked at how you can read and post activities using this sdk. In most cases you will also need to perform server-side interactions such as creating follow relationships, adding activities or change user-data. All the functionality we looked at in this tutorial is exposed via Stream's REST API and can be used server-side.
This is how we can add an activity from server-side:
1234567891011121314151617181920212223// npm install getstream --save
// let stream = require('getstream');

let client = stream.connect('YOUR_API_KEY', 'YOUR_API_SECRET');

let feed = client.feed('timeline', 'USER_ID');
feed.addActivity({
  actor: client.user('USER_ID').ref(),
  verb: 'post',
  object: 'I love this picture',
  attachments: {
    og: {
      title: 'Crozzon di Brenta photo by Lorenzo Spoleti',
      description: 'Download this photo in Italy by Lorenzo Spoleti',
      url: 'https://unsplash.com/photos/yxKHOTkAins',
      images: [
        {
          image: 'https://goo.gl/7dePYs'
        }
      ]
    }
  }
});
12345678910111213141516171819202122232425# pip install stream-python

import stream

client = stream.connect('YOUR_API_KEY', 'YOUR_API_SECRET')

feed = client.feed('timeline', 'USER_ID')

feed.add_activity({
    "actor": client.users.create_reference('USER_ID'),
    "verb": "post",
    "object": "I love this picture",
    "attachments": {
        "og": {
            "title": "Crozzon di Brenta photo by Lorenzo Spoleti",
            "description": "Download this photo in Italy by Lorenzo Spoleti",
            "url": "https://unsplash.com/photos/yxKHOTkAins",
            "images": [
                {
                    "image": "https://goo.gl/7dePYs"
                }
            ]
        }
    }
})
12345678910111213141516171819202122232425# gem install "stream-ruby"

require 'stream'

client = Stream::Client.new('YOUR_API_KEY', 'YOUR_API_SECRET')

feed = client.feed('user', 'USER_ID')

feed.add_activity({
  actor: client.collections.create_user_reference('USER_ID'),
  verb: 'post',
  object: 'I love this picture',
  attachments: {
    og: {
      title: 'Crozzon di Brenta photo by Lorenzo Spoleti',
      description: 'Download this photo in Italy by Lorenzo Spoleti',
      url: 'https://unsplash.com/photos/yxKHOTkAins',
      images: [
        {
          image: 'https://goo.gl/7dePYs'
        }
      ]
    }
  }
})
12345678910111213141516171819202122// composer require get-stream/stream

$client = new GetStream\Stream\Client('YOUR_API_KEY', 'YOUR_API_SECRET');

$feed = $client->feed('user', 'USER_ID');
$feed->addActivity([
    'actor' => $client->collections()->createUserReference('USER_ID'),
    'verb' => 'post',
    'object' => 'I love this picture',
    'attachments' => [
        'og' => [
            'title' => 'Crozzon di Brenta photo by Lorenzo Spoleti',
            'description' => 'Download this photo in Italy by Lorenzo Spoleti',
            'url' => 'https://unsplash.com/photos/yxKHOTkAins',
            'images' => [
                [
                    'image' => 'https://goo.gl/7dePYs'
                ]
            ]
        ]
    ]
]);
12345678910111213141516// See installation details at https://github.com/GetStream/stream-java

Client client = Client.builder("YOUR_API_KEY", "YOUR_API_SECRET").build();

FlatFeed feed = client.flatFeed("timeline", "USER_ID");
feed.addActivity(Activity.builder()
    .actor(Enrichment.createUserReference("USER_ID"))
    .verb("post")
    .object("I love this picture")
    .extraField("attachments", ImmutableMap.of("og", new ImmutableMap.Builder<String, Object>()
        .put("title", "Crozzon di Brenta photo by Lorenzo Spoleti")
        .put("description", "Download this photo in Italy by Lorenzo Spoleti")
        .put("url", "https://unsplash.com/photos/yxKHOTkAins")
        .put("images", Lists.newArrayList(ImmutableMap.of("image", "https://goo.gl/7dePYs")))
        .build()))
    .build()).join();
123456789101112131415161718192021222324252627282930313233import (
    stream "gopkg.in/GetStream/stream-go2.v1"
)

client, err := stream.NewClient("YOUR_API_KEY", "YOUR_API_SECRET")
if err != nil {
	// ...
}

feed := client.FlatFeed("user", "USER_ID")

_, err = feed.AddActivity(stream.Activity{
	Actor:  client.Collections().CreateUserReference("USER_ID"),
	Verb:   "post",
	Object: "I love this picture",
	Extra: map[string]interface{}{
		"attachments": map[string]interface{}{
			"og": map[string]interface{}{
				"title":       "Crozzon di Brenta photo by Lorenzo Spoleti",
				"description": "Download this photo in Italy by Lorenzo Spoleti",
				"url":         "https://unsplash.com/photos/yxKHOTkAins",
				"images": []interface{}{
					map[string]string{
						"image": "https://goo.gl/7dePYs",
					},
				},
			},
		},
	},
})
if err != nil {
	// ...
}
1234567891011121314151617181920212223242526272829// dotnet add package stream-net
var client = new Stream.StreamClient("YOUR_API_KEY", "YOUR_API_SECRET");

var feed = client.Feed("timeline", "USER_ID");
var user = Stream.Users.Ref("USER_ID");
var activity = new Stream.Activity(Stream.Users.Ref("USER_ID"), "post", "i love this picture");

var ogData = new Dictionary<string, object>()
{
    {"title", "Crozzon di Brenta photo by Lorenzo Spoleti"},
    {"description", "Download this photo in Italy by Lorenzo Spoleti"},
    {"url", "https://unsplash.com/photos/yxKHOTkAins"},
    {"images", new Dictionary<string, string>[]
        {
            new Dictionary<string, string>()
            {
                {"image", "https://goo.gl/7dePYs"}
            }
        }
    }
};

var attachment = new Dictionary<string, object>()
{
    {"og", ogData}
};

activity.SetData("attachments", attachment);
await feed.AddActivity(activity);
Final Thoughts
In this tutorial we saw how easy it is to use Stream API and the iOS library to add a fully featured timeline to an application.
Adding feeds to an app can take weeks or months, even if you're a iOS developer. Stream makes it easy and gives you the tools and the resources to improve user engagement within your app. Time to add a feed!
