

The PHP backend generates a token for the user and sends it to the front end (JavaScript UI) during login or registration. The token helps connect the front end to the chat API, allowing the user to access the chat interface.
Prerequisites
To follow along with this tutorial, you need to have a basic understanding of PHP and JavaScript.
You'll also want to make sure you have PHP and Composer installed on your system. Composer is a package manager for PHP projects. We will use it to install dependencies like the Chat SDK.
To check if you already have PHP installed on your system, run this command in your command line environment:
php -v
Similarly, to check if you have Composer installed, run:
composer -v
Let's dive in and start coding once you've installed PHP and Composer.
Get the Sample App
To test the sample project in this tutorial, download it from GitHub and run it with your local host. In your command line environment, just navigate to the project's root directory and run:
php -S localhost:9090
Note: The 9090 can be changed to a different number.
Create a Stream Account

To use the Stream API, you'll need to create an account. On the popup page that appears, fill in your desired username and password, along with your email address, and complete the signup.
After creating an account, navigate to the Dashboard to find your APP ID, API KEY, and SECRET keys. We will use them later to authenticate the SDK.

Create a New PHP Project
Now that we've gathered all our tools create a folder named php-chat in the directory where you store your code; this will be the home for all our project files. Inside the php-chat directory, create the following files:
- custom.js: For containing our JavaScript code.
- page.php: For the app's UI code.
- server.php: The chat server logic implementation.
- style.css: For styling the chat app.
Generate Tokens
We'll be using the PHP SDK on the server and the JavaScript SDK on the client end to get real-time updates of chat activities, including real-time messages. We need a valid token to use the JavaScript SDK, which we can generate from our PHP server.
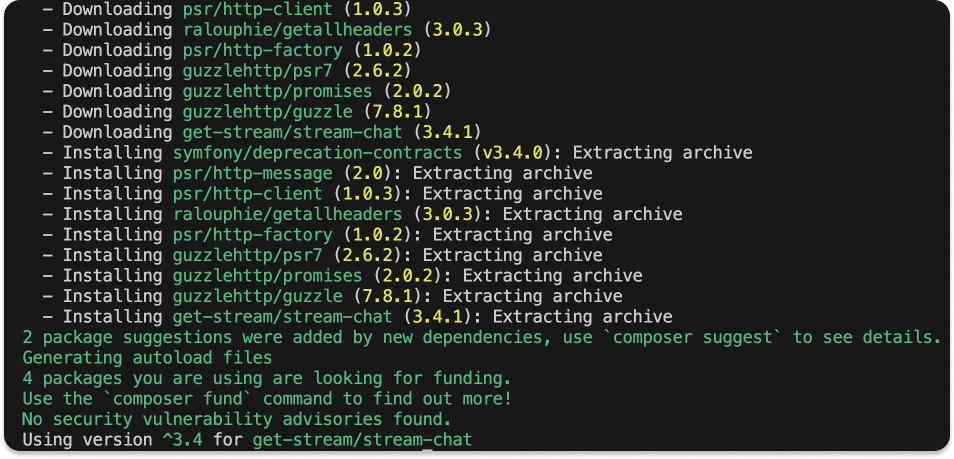
To start, open your terminal and cd into the project's root directory php-chat, then install the PHP Chat SDK using composer:
composer require get-stream/stream-chat
When the SDK installs successfully, your command line environment will display a screen similar to this one.
Now that the SDK is installed, we can add the following to the server.php file.
12345678910111213141516171819202122232425// server.php

<?php

require_once(__DIR__ . "/vendor/autoload.php");

// Set your Stream Chat API key and secret
$STREAM_API_KEY = "sa2fbst1ifzz";
$STREAM_API_SECRET = "5sg2ykgmea8amfw6awfeyb5ksxxahaawzd5zshk4ccwuhf2pf9jr35hav3bzx1h3";

// Initialize the SDK
$client = new \GetStream\StreamChat\Client(
    $STREAM_API_KEY,
    $STREAM_API_SECRET
);

// Create a user token
if (isset($_REQUEST["create-token"])) {
  die(json_encode([
      "status" => "success",
      "token"  => $client->createToken($_REQUEST["create-token"])
  ]));
}

?>
Make sure to update the and placeholders with your correct API KEY and SECRET respectively (which we grabbed from our Stream Dashboard).
In the above code, after initializing the PHP SDK, with the if (isset($_REQUEST["create-token"])) { block, we check the request for a user's create-token variable, so we can create a token with it by calling the $client->createToken(... function.
Now that we've initiated the code for our server, we can start up the server by running:
php -S localhost:9090
You can change the number to whatever you want.
Create the Chat Interface
Add the below code to the page.php file to create your chat interface:
123456789101112131415161718192021222324252627282930313233343536373839// page.php
<html lang="en">
  <head>
    <meta charset="UTF-8" />
    <meta name="viewport" content="width=device-width, initial-scale=1.0" />
    <meta http-equiv="X-UA-Compatible" content="ie=edge" />
    <link rel="stylesheet" href="./style.css" />
    <title>Vanilla PHP and JavaScript Stream Group Chat</title>
  </head>
  <body>
    <div class="main-container">
      <div class="login" id="login-block">
        <input
          type="text"
          id="user-login-input"
          placeholder="Enter your username (should be unique)"
        />
      </div>
      <div class="message-container">
        <div class="chat-container">
          <div class="chat-body" id="messages"></div>
          <div class="message-box">
            <input
              type="text"
              id="message-input"
              placeholder="Enter your message..."
            />
          </div>
        </div>
      </div>
    </div>
    <!-- JavaScipt Stream SDK -->
    <script src="https://cdn.jsdelivr.net/npm/stream-chat@1.2.2/dist/browser.full-bundle.min.js"></script>
    <!-- for making http request -->
    <script src="https://cdn.jsdelivr.net/npm/axios/dist/axios.min.js"></script>
    <!-- Our custom JavaScript code -->
    <script src="./custom.js"></script>
  </body>
</html>
You may have noticed that we include a few script tags at the end of this code:
The JavaScript Stream SDK allows us to use Stream in the app.
Axios enables us to make HTTP requests.
Create the App's UI
Let's add flair to the app by implementing the following in the style.css file:
123456789101112131415161718192021222324252627282930313233343536373839404142434445464748495051525354555657585960616263646566676869707172737475767778798081828384858687888990919293949596979899100101102103104105106107108109// style.css
* {
  margin: 0;
  padding: 0;
  box-sizing: border-box;
}

body,
html {
  max-width: 100vw;
  max-height: 100vh;
  overflow: hidden;
  background-color: #005fff;
}

.main-container {
  display: grid;
}

#login-block {
  display: none;
}

.message-container {
  display: grid;
  border: 2px solid #c4c4c4;
  min-height: 95vh;
  width: 70vw;
  display: none;
  margin: auto;
  overflow-y: hidden;
  margin-top: 20px;
}

.chat-container {
  display: grid;
  border: 1px solid #c4c4c4;
}

.chat-body {
  height: 85vh;
  overflow-y: auto;
}

.message-box {
  align-self: bottom;
}

.message {
  background: rgb(225, 235, 225);
  color: rgb(77, 73, 73);
  padding: 7px;
  margin: 5px;
  font-size: 18px;
  width: auto;
  max-width: 50%;
  display: table;
  clear: both;
  border: 1px solid #ababab;
}

.message-left {
  float: left;
  background-color: #dcdcdc;
  color: #252121;
  border-top-left-radius: 16px;
  border-bottom-left-radius: 16px;
  border-top-right-radius: 16px;
  border-bottom-right-radius: 2px;
}

.message-right {
  float: right;
  border-top-left-radius: 16px;
  border-bottom-left-radius: 16px;
  border-top-right-radius: 16px;
  border-bottom-right-radius: 2px;
}

.message-username {
  font-weight: bold;
  color: #494949;
  font-size: medium;
}

#message-input {
  width: 95%;
  height: 55px;
  padding: 6px;
  font-size: 19px;
  margin-left: 28px;
  border-top-left-radius: 2px;
  border-bottom-left-radius: 16px;
  border-top-right-radius: 16px;
  border-bottom-right-radius: 2px;
  border: 1px solid grey;
  outline: none;
}

#user-login-input {
  width: 400px;
  height: 50px;
  padding: 4px;
  font-size: 20px;
  margin: auto;
  margin-top: 50vh;
  padding-left: 20px;
  border-radius: 25px;
}
If you visit the project now, you will notice the page is blank: localhost:9090/page.php. Let's fix that in the next steps.
Initializing the JavaScript SDK
Let's start with our chat app's client side by initializing the Javascript SDK. Add the code below to your custom.js file (which, you'll remember, we referenced in the final script tag on our page.php file):
123456789101112131415161718192021222324252627282930313233343536373839404142434445464748495051525354555657585960616263646566676869707172737475767778798081828384858687888990919293949596979899100101102103104105106107108109110111112// custom.js
let client, channel, username;

async function generateToken(username) {
  const { token } = (await axios.get(`/server.php?create-token=${username}`))
    .data;
  return token;
}

// Initialize the JavaScript chat SDK
client = new StreamChat("ab2last201zm");

async function initializeClient(username) {
  const token = await generateToken(username);

  // Set the current logged user
  client.setUser(
    {
      id: username,
      name: "Jon Snow", // Update this name dynamically
      image: "https://bit.ly/2u9Vc0r",
    },
    token,
  ); // token generated from our PHP server

  // create or initialize the channel
  channel = client.channel("messaging", "general-channel1", {
    name: "General Room for platform",
    image: "https://bit.ly/2F3KEoM",
    members: [],
    session: 8, // custom field, you can add as many as you want
  });

  // Watch the channel for events
  await channel.watch();

  // Listen for new messages
  channel.on("message.new", (event) => {
    appendMessage(event.message);
  });

  // Load the initial messages
  channel.state.messages.forEach((message) => {
    appendMessage(message);
  });
}

async function sendMessage(message) {
  return await channel.sendMessage({
    text: message,
  });
}

const inputElement = document.getElementById("message-input");
inputElement.addEventListener("keyup", function (event) {
  if (event.key === "Enter") {
    sendMessage(inputElement.value);
    inputElement.value = "";
  }
});

// Get User's ID
function checkAuthState() {
  if (!user.value) {
    document.getElementById("login-block").style.display = "grid";
    document.getElementsByClassName("message-container")[0].style.display =
      "none";
  } else {
    document.getElementsByClassName("message-container")[0].style.display =
      "grid";
    document.getElementById("login-block").style.display = "none";
    username = user.value;

    initializeClient(username);
  }
}

// Listen for the Enter key press
const user = document.getElementById("user-login-input");
user.addEventListener("keyup", function (event) {
  if (event.key === "Enter") {
    checkAuthState();
  }
});

checkAuthState();

function appendMessage(message) {
  const messageContainer = document.getElementById("messages");

  // Create and append the message div
  const messageDiv = document.createElement("div");
  messageDiv.className = `message ${
    message.user.id === username ? "message-right" : "message-left"
  }`;

  // Create the username div
  const usernameDiv = document.createElement("div");
  usernameDiv.className = "message-username";
  usernameDiv.textContent = `${message.user.id}:`;
  // Append the username div to the MessageDiv
  messageDiv.append(usernameDiv);

  // Create the main message text div
  const messageTextDiv = document.createElement("div");
  messageTextDiv.textContent = message.text;
  // Append the username div to the MessageDiv
  messageDiv.append(messageTextDiv);

  // Then, append the messageDiv to the "messages" div
  messageContainer.appendChild(messageDiv);
}
Note: Make sure to change the <STREAM_APP_KEY> placeholder with yours.
Then, add this function to the custom.js file so that we can initialize the chat when the page is ready.
Get a User's ID
Each user needs to have a unique id for identification. Add this function to the custom.js file.
The above allows us to display the chat page and initialize the JavaScript SDK when a valid user enters a username and password. We'll need to listen to when the user hits Enterto trigger this. Add this code snippet to the custom.js file.
Append New Messages
To add each new message that comes into the chat, add this function to the custom.js file:
The function will take in the message payload (that contains the user's username and message), create a new Node element that holds the username and message, and then attach the message to the page using the message's id.
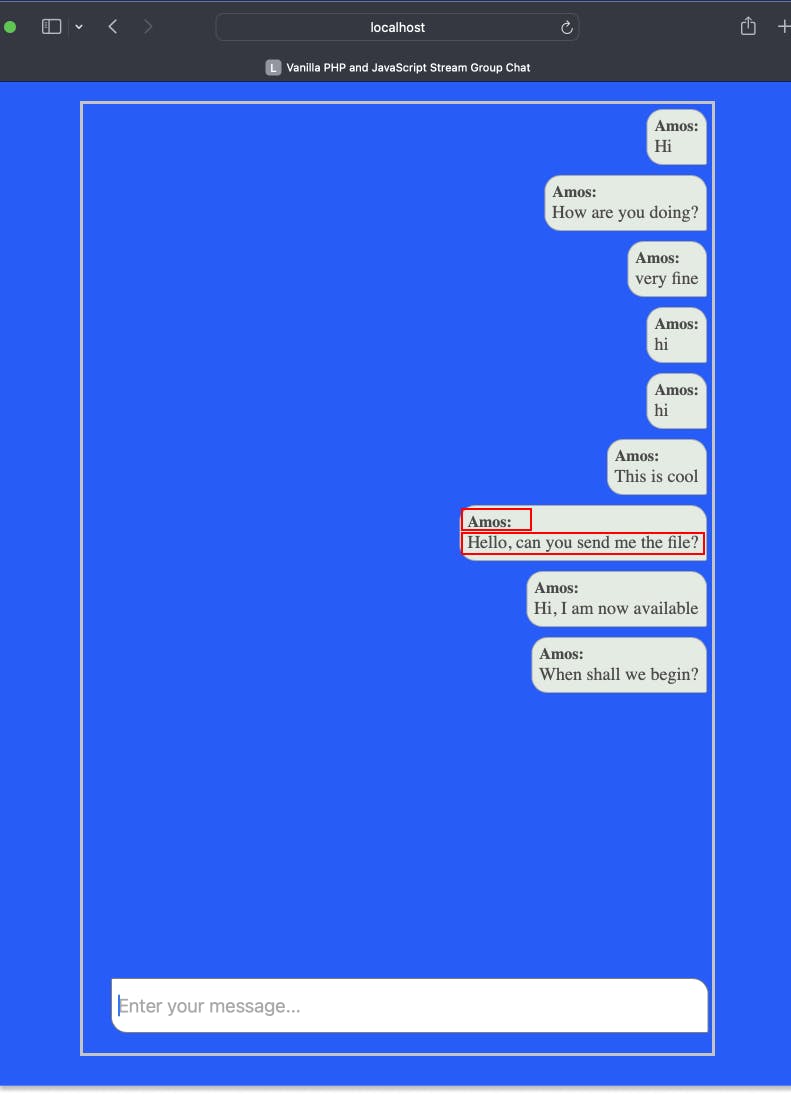
In the UI, that will look something like this:
Watch Massages for Changes
Let's start by listening to new messages coming to the channel. Prepend this code snippet to the initializeClient(username) function (at the top) of custom.js.
Now, what about old messages already on the channel? We need to render those as well. To accomplish this, add the following to the initializeClient() function.
Send Messages
So far, we can see previous and new messages added to the channel. Next, we will add functionality to allow users to send a new message to the channel. Add this sample code to the custom.js file:
Still in custom.js, use this snippet to watch the message-input for changes and when a user hits the Enter or Return key on the keyboard to send a message to the channel:
Test It Out
To test out the chat app:
- Keep the server running with
php -S localhost:9090or replace9090with your preferred number to thelocalhost. The example below uses6060. - Open the app's entry point
http://localhost:6060/page.phpin multiple browser tabs or different browsers. - Type in a username and hit Enter.
- Exchange messages.
Conclusion
We have covered the basics of starting with Stream Chat using the PHP SDK to power your chat. You can add lots of unique chat features, like the typing indicator, user presence, and much more!
Please share your incredible creations with us, happy coding!