Messaging apps are becoming more and more popular as a means through which to connect with friends and family. They're convenient and provide an easy and affordable means of communication. A recent study by Statista revealed that the current number of smartphone users in the world today is 3.5 billion; this means 45.12% of the world’s population owns a smartphone:

What's more, Android OS takes the lead, as another statistic by StatCounter shows that a whopping 72.26% of mobile phone users own an Android Phone:

With all this in mind, it makes sense to build an Android-based live chat app to support your customers in a platform that they already use and love. This post will explain how to build an Android messaging application with PHP and React Native; we’ll also use Stream Chat to take care of the WebSocket connection and other heavy lifting.
The source code for this Android Live Chat app can be found on GitHub.
Prerequisites
In addition to PHP, React Native, and Stream Chat, we'll be using the following tech to build our app:
- NodeJS
- Yarn
- Composer
- Android Studio or the Android Emulator npm package
Setting Up the API
We need to create an API to generate a token to authenticate the users of our Android App. Add the following code to your composer.json file:
{
  "require": {
      "get-stream/stream-chat": "^1.1",
      "prodigyview/prodigyview": "^0.9.91",
      "vlucas/phpdotenv": "^4.1"
  }
}
Then, to install all the dependencies required for our API, run:
1$ composer install
This is a very simple API; your API directory should look like this:
.
├── composer.json
├── composer.lock
└── index.php
Open the index.php file and add the code below:
<?php
require_once "./vendor/autoload.php";
use prodigyview\network\Request;
use prodigyview\network\Router;
use prodigyview\network\Response;

$dotenv = Dotenv\Dotenv::createImmutable(__DIR__);
$dotenv->load();
$STREAM_API_KEY = getenv("STREAM_API_KEY");
$STREAM_API_SECRET = getenv("STREAM_API_SECRET");

// Create an instance of StreamChat
$client = new GetStream\StreamChat\Client($STREAM_API_KEY, $STREAM_API_SECRET);

//Create And Process The Current Request
$request = new Request();

//Get The Request Method(GET, POST, PUT, DELETE)
$method = strtolower($request->getRequestMethod());
function getToken($username){
    global $client;
    $token = array('token'=>$client->createToken($username));
    return $token;
}
//Token route:: Allows you to generate a token from the username
Router::post('/token', array('callback'=>function(Request $request){
    //RETRIEVE Data From The Request
    $data = $request->getRequestData('array');
    if ($data && isset($data['username']) ){
        $token = getToken($data['username']);
        echo Response::createResponse(200, json_encode($token));
    }else{
        $data = array('status' => 'Invalid request');
        echo Response::createResponse(400, json_encode($data));
    }
}));
Router::setRoute();
You’ll need to add your Stream API key and secret to the .env file. So, let’s head over to the Stream website to get one.
Setting Up Your Stream App
You can create an account by clicking the SIGNUP button in the upper right corner of the Stream Home Page:

After creating your account, you'll be directed to your dashboard, where you can get your API credentials:

Now that you have your API credentials, add them to your .env file.
STREAM_API_KEY="your_STREAM_API_KEY"
STREAM_API_SECRET="your_STREAM_API_SECRET"
Be sure to replace "your_STREAM_API_KEY" and "your_STREAM_API_SECRET" with the credentials from your Stream Chat Dashboard
You can test the API with Postman by starting the PHP development server with your computer’s IP address and port number:
1$ php -S 172.20.10.8:8000 -t .
To find your IP addresss, you can google "What's my IP Address"
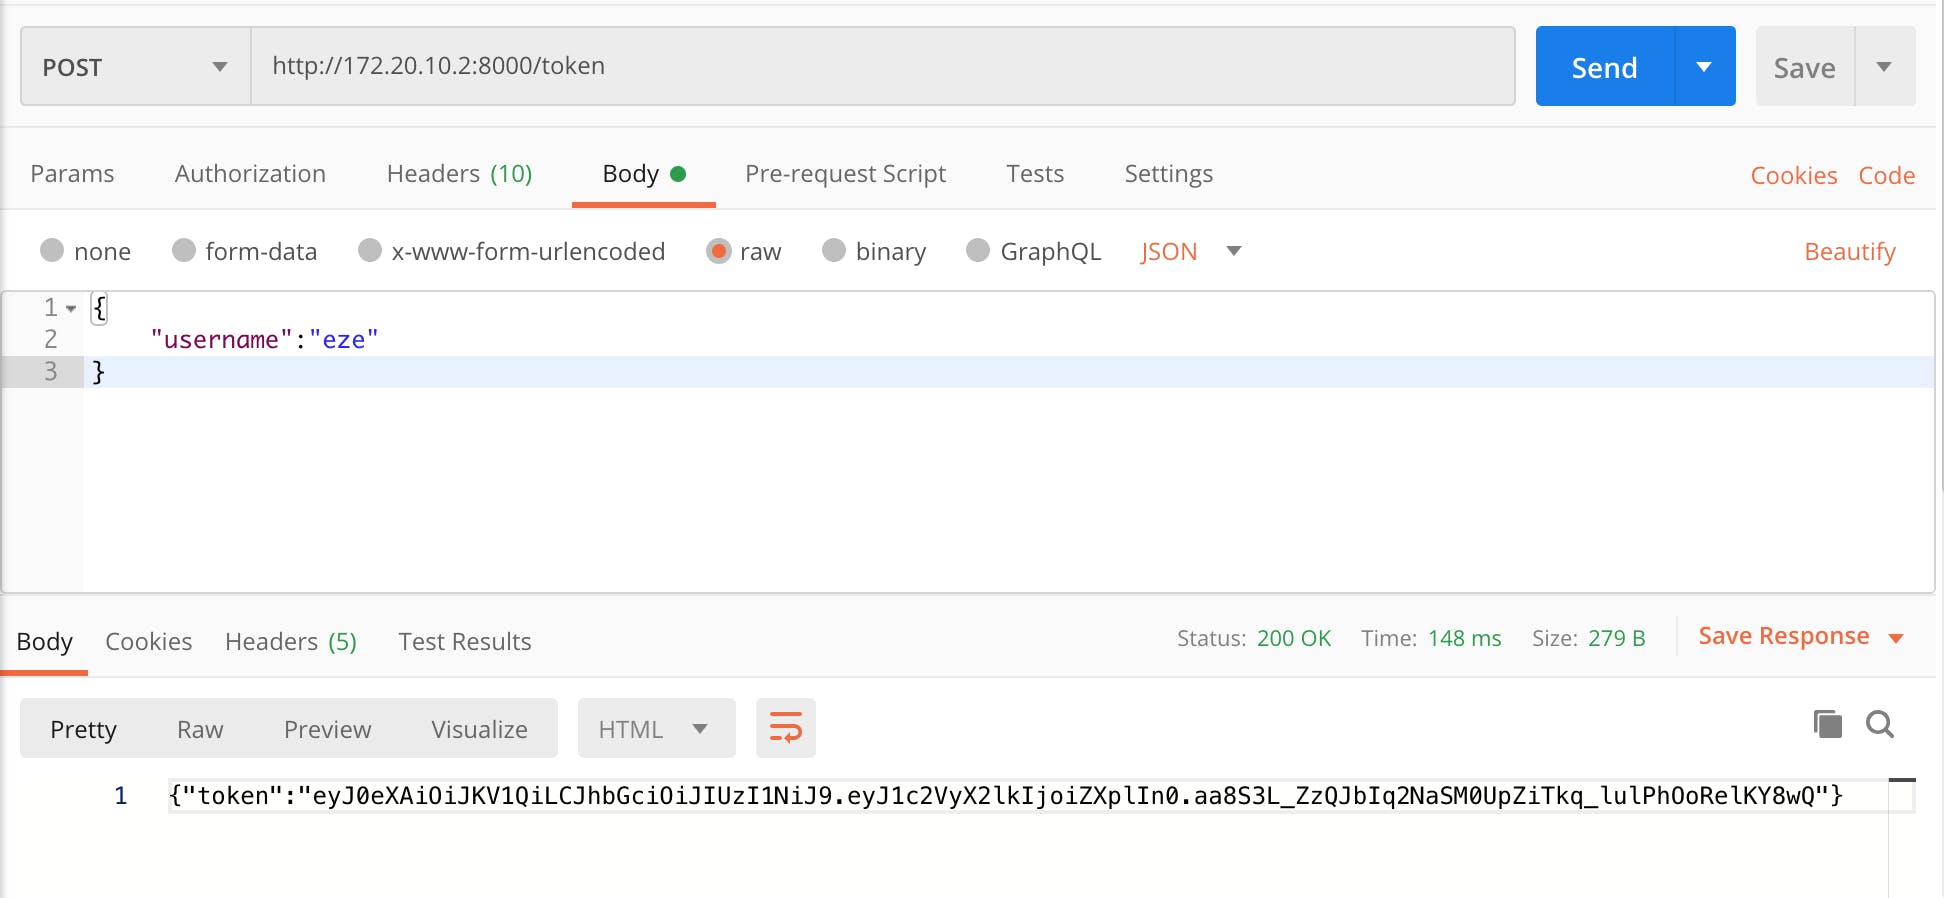
To get a user's token, send a username to the token route, like so:

If you were successful in running these commands, your API should be up and running!
Setting Up React Native
We will use React Native to build our Android App. One of the advantages of doing so is that we can also build an iOS version using the React Native Framework!
Let’s start by installing the dependencies.
First, we'll install Expo CLI, which we'll use to create our React Native application, globally:
1$ yarn global add expo-cli
Next, run the following to install the rest of the dependencies you need to bootstrap your app development:
$ expo init -t blank --name livechat
$ cd livechat
$ yarn add stream-chat-expo react-navigation@4.1.0 react-navigation-stack@2.1.0
$ expo install @react-native-community/netinfo@4.6.0 react-native-gesture-handler@1.5.6 react-native-reanimated@1.4.0 react-native-screens@2.0.0-alpha.12 react-native-safe-area-context@0.6.0 @react-native-community/masked-view@0.1.5 expo-permissions expo-image-picker expo-document-picker react-native-dotenv metro-react-native-babel-preset
After you run the code above, you’ll have a starter React Native application!
Setting Up the Expo Development Tool
In order to use the Expo Development Tool, you'll need to, first, start the Android Emulator.
Starting Android Emulator
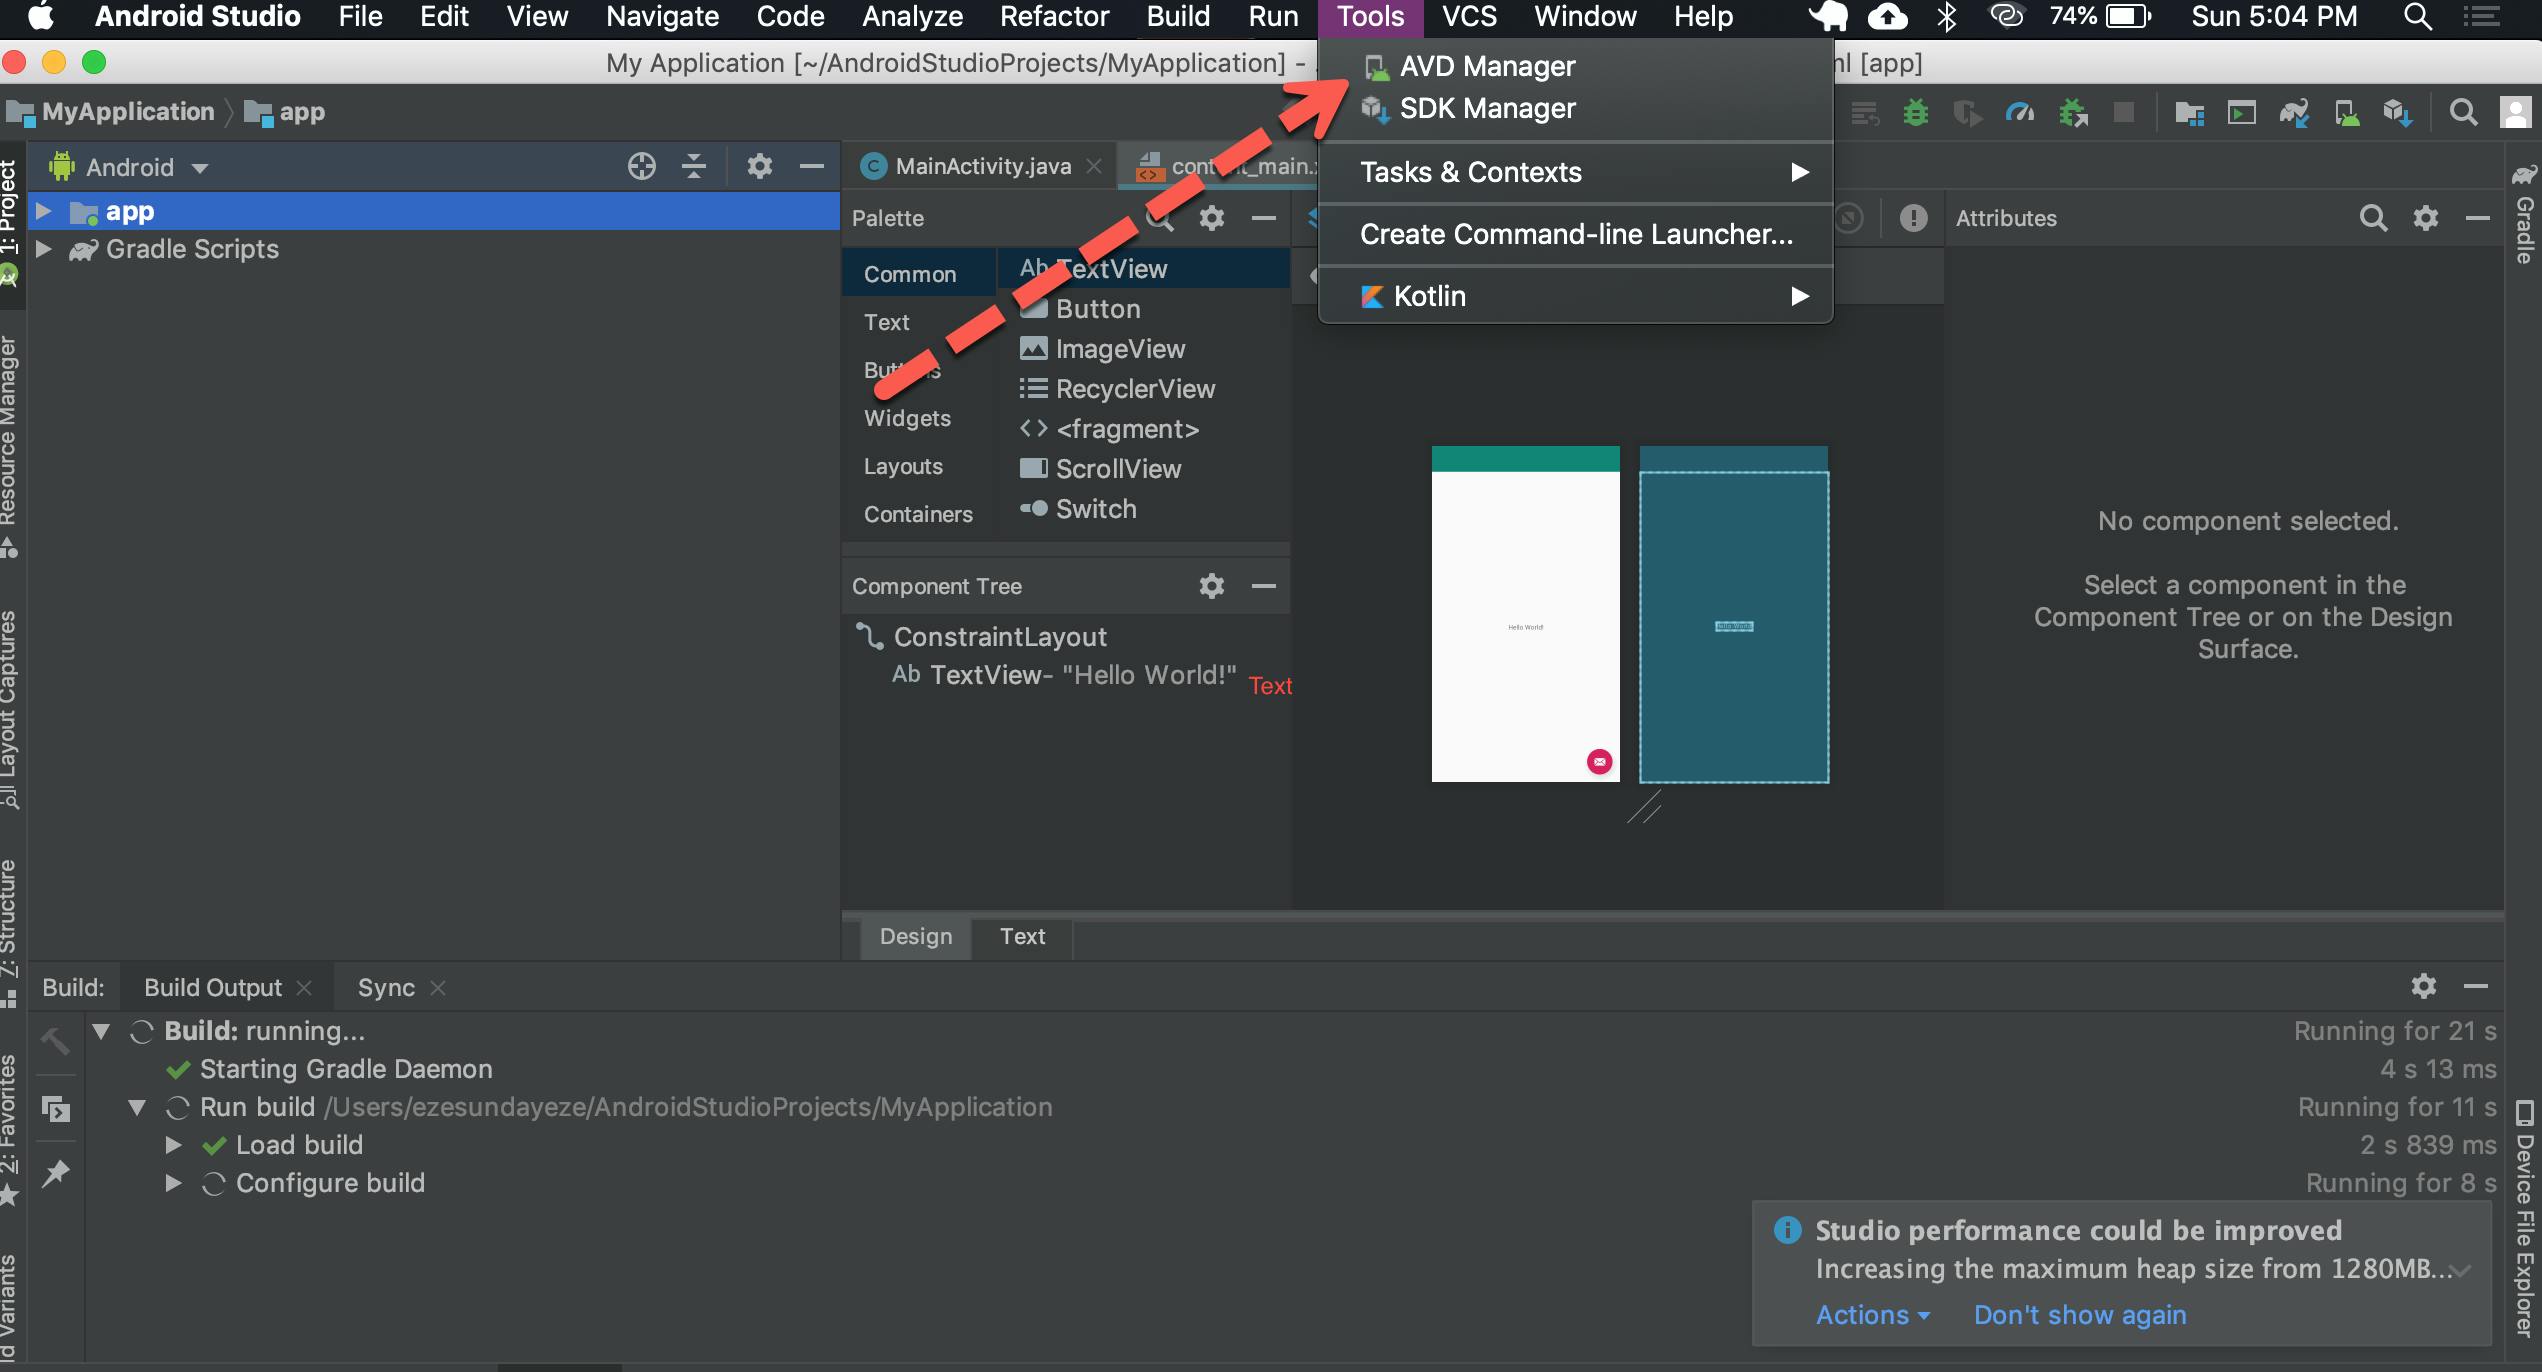
To start your Android Emulator, open your Android Studio application and create a project. Then, navigate to Tools > AVD Manager:

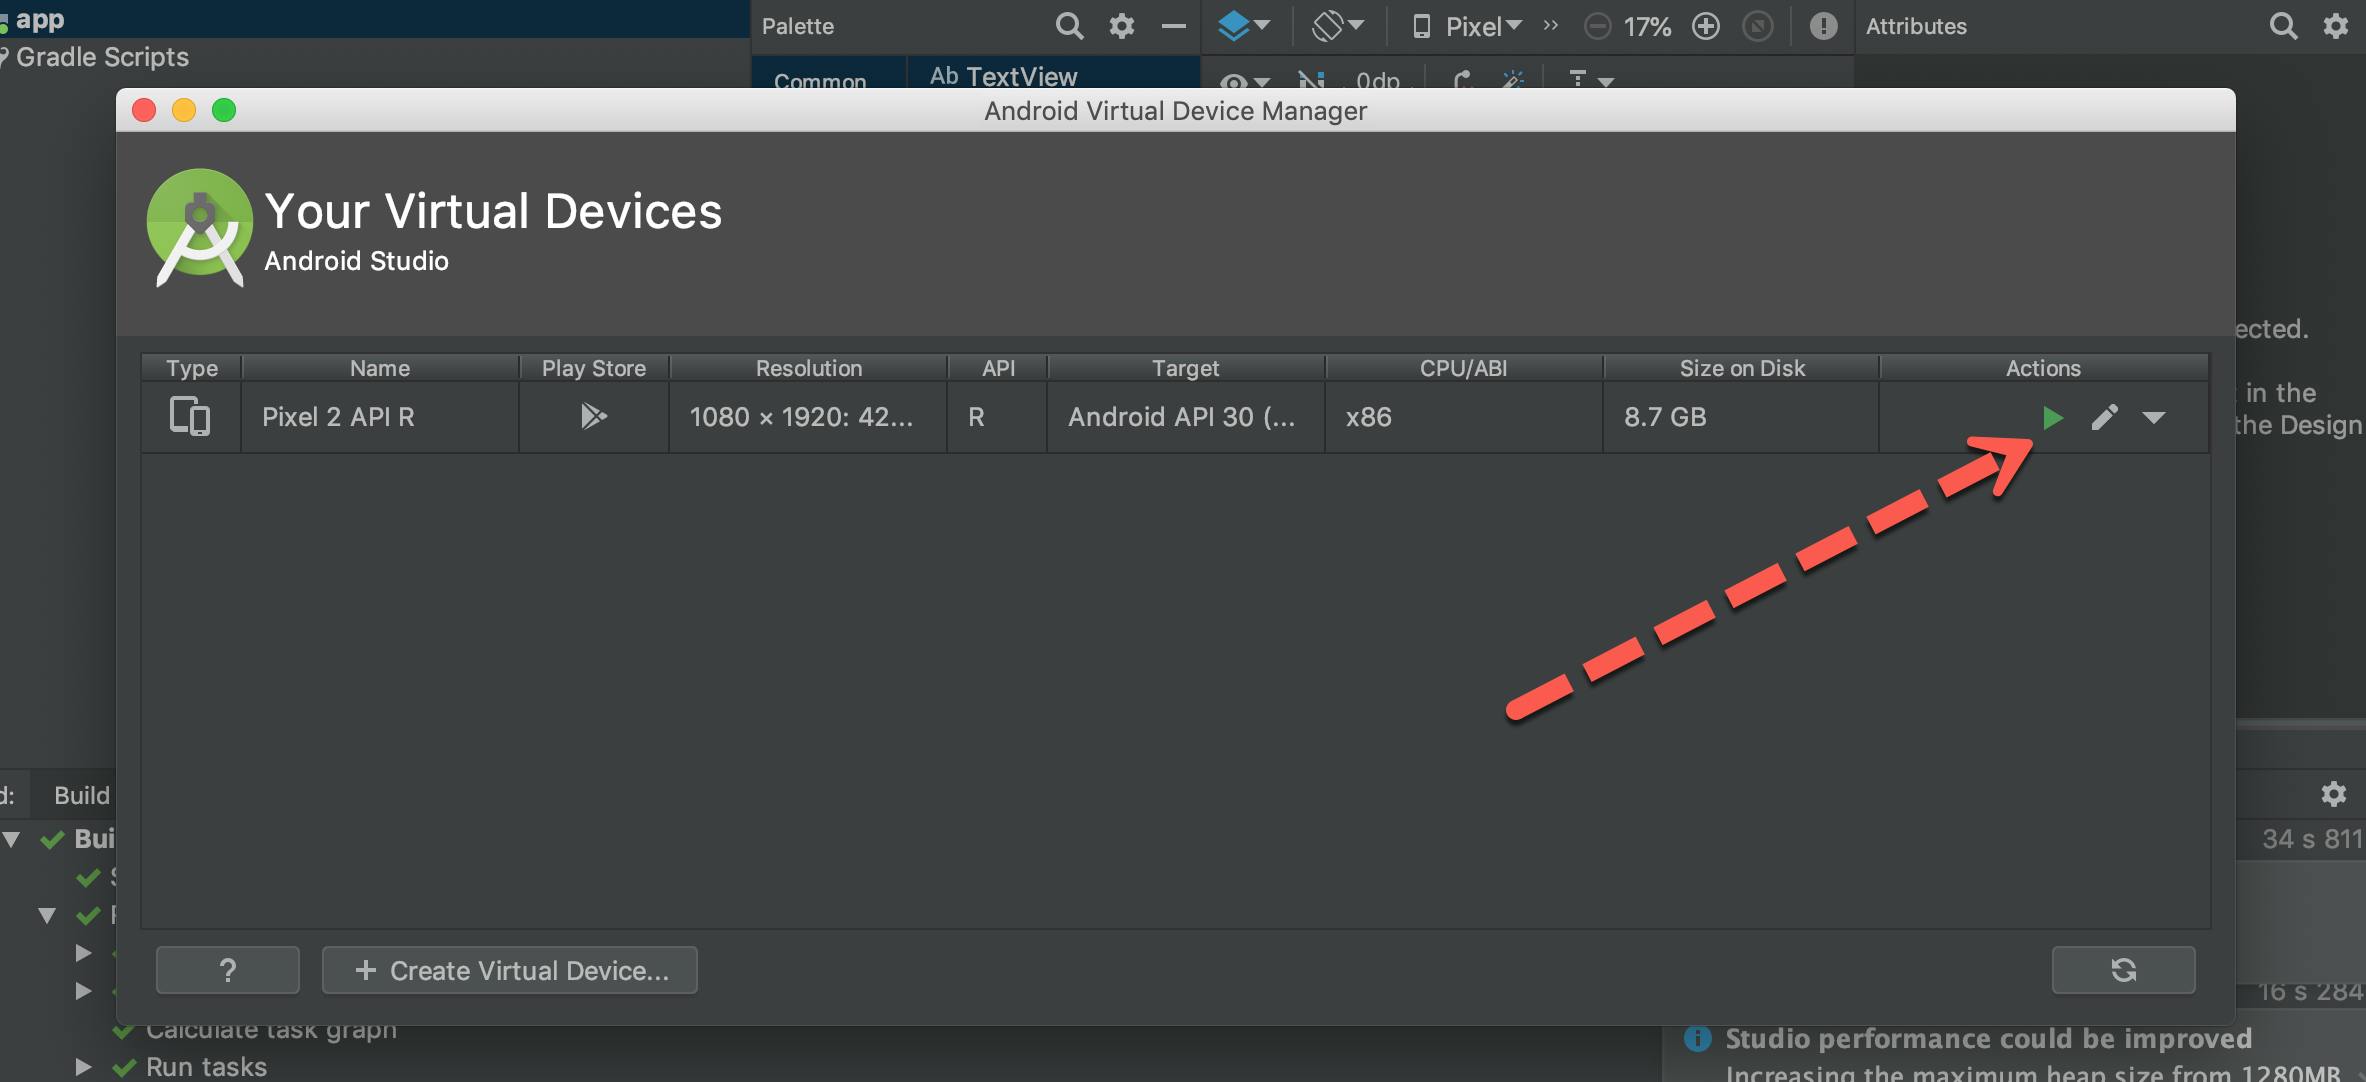
From here, you can start the emulator:

If you don’t have Android Studio and don’t wish to install it, you can install the Android Emulator npm package, which gives you a similar functionality.
Jumping into the Expo Development Tool
Now that our emulator has been started, run yarn start to start up the Expo Development Tool; the development tool should open in your browser, as shown below. From the development tool, click Run on Android device/emulator:

You should now see the default React Native home screen!
Building Out the App Files
Now, let’s get into the code!
App.js
Replace the contents of the ./App.js file with the code below:
import React, { Component } from 'react';
import Routes from './Components/Routes.js';
export default class App extends Component {
    render() {
        return (
            <Routes/>
        )
    }
}
Components
We need to create some components, such as Login, ClientChat, AdminChat, and Routes; first, let’s create a Components directory to house all our components:
1$ mkdir ./Components
Now, let’s create the components one by one...
First, create a file for the Login component and add the content below:
import React, { useState } from 'react';
import { StyleSheet, Text, View, TextInput, Image, TouchableHighlight, AsyncStorage} from 'react-native';
import axios from 'axios';
const Login = ({ navigation }) =>{
    const [username, setUserName] = useState("");
    const handleSubmit = async ()=>{
        axios.post("http://172.20.10.2:8000/token", {
          headers: {
            'Content-Type': 'application/json',
            "Access-Control-Allow-Origin": "*",
            crossorigin:true
          },
          username

        }).then((response)=>{
              AsyncStorage.multiSet([['token', response.data.token],[ 'user_id', username] ]).
              then(
                  ()=>{
                  if(username !== 'admin'){
                    navigation.push('chat');
                  }else{
                    navigation.push('admin');
                  }
                }
          )
          }).
          catch((err)=>{
            console.log(err);
        })
    }
    const handleUsername = text => {
        setUserName(text);
      };

      return (
          <View style={styles.container}>
            <View style={styles.inputContainer}>
                <Image style={styles.inputIcon} source={{uri: 'https://png.icons8.com/message/ultraviolet/50/3498db'}}/>
                <TextInput style={styles.inputs}
                  placeholder="Username"
                  underlineColorAndroid='transparent'
                  onChangeText={(text) => handleUsername(text)}
                />
              </View>
                  <TouchableHighlight style={[styles.buttonContainer, styles.loginButton]} onPress={()=>handleSubmit()}>
                      <Text style={styles.loginText}>Login</Text>
                  </TouchableHighlight>
          </View>
        )

}
const styles = StyleSheet.create({
  container: {
    flex: 1,
    justifyContent: 'center',
    alignItems: 'center',
    backgroundColor: '#DCDCDC',
  },
  inputContainer: {
      borderBottomColor: '#F5FCFF',
      backgroundColor: '#FFFFFF',
      borderRadius:30,
      borderBottomWidth: 1,
      width:250,
      height:45,
      marginBottom:20,
      flexDirection: 'row',
      alignItems:'center'
  },
  inputs:{
      height:45,
      marginLeft:16,
      borderBottomColor: '#FFFFFF',
      flex:1,
  },
  inputIcon:{
    width:30,
    height:30,
    marginLeft:15,
    justifyContent: 'center'
  },
  buttonContainer: {
    height:45,
    flexDirection: 'row',
    justifyContent: 'center',
    alignItems: 'center',
    marginBottom:20,
    width:250,
    borderRadius:30,
  },
  loginButton: {
    backgroundColor: "#00b5ec",
  },
  loginText: {
    color: 'white',
  }
});
export default Login;
From the code above, if a user enters their username, we send the username to the API, get a token back, and use AsyncStorage to save it to the Local Storage for later retrieval. If everything goes well, we then redirect the user to the chat screen.
Be sure to change the axios call URL on line 7 to use your IP address “http://xxx.xx.xx.x:8000/token".
Second, create the ./Components/ClientChat.js component:
import React from 'react';
import { View, SafeAreaView, AsyncStorage } from 'react-native';
import { API_KEY} from 'react-native-dotenv';
import { StreamChat } from "stream-chat";
import {
  Chat,
  Channel,
  MessageList,
  MessageInput,
} from "stream-chat-expo";
const chatClient = new StreamChat(API_KEY);
class ChannelScreen extends React.Component {
state = {
    id:'',
    token:'',
    status: false,
    channel: ''
}
getUserToken = async ()=>{
    await AsyncStorage.getItem("token").then((token)=>{
        this.setState({token});
    })
}
getUserId = async ()=>{
    await AsyncStorage.getItem("user_id").then((user_id)=>{
        this.setState({id:user_id});
    })
}
async componentDidMount(){
    await this.getUserId();
    await this.getUserToken();
    chatClient.setUser({
        id: this.state.id,
        name: this.state.id,
        image:
            'https://stepupandlive.files.wordpress.com/2014/09/3d-animated-frog-image.jpg',
        },
        this.state.token
        );
        this.setState({channel: chatClient.channel("messaging", "", {
                members:["eze", "admin"]
        })})
            await this.state.channel.watch();
}
  render() {
    return (
      <SafeAreaView>
        <Chat client={chatClient}>
          <Channel channel={this.state.channel}>
            <View style={{ display: "flex", height: "100%" }}>
              <MessageList />
              <MessageInput />
            </View>
          </Channel>
        </Chat>
      </SafeAreaView>
    );
  }
}
export default ClientChatScreen;
Here, we get the user token and id, then add it to the Stream Chat components. It’s also important to note that we created a channel with 2 members; this is because we want to create a one-on-one chat, specifically. One-on-one channels do not have titles and the members are defined.
Third, let’s create the Admin Chat screen ./Components/AdminChat.js component:
import React from 'react';
import { View, SafeAreaView, AsyncStorage } from 'react-native';
import { API_KEY } from 'react-native-dotenv';
import { StreamChat } from "stream-chat";
import {
  Chat,
  Channel,
  MessageList,
  MessageInput,
} from "stream-chat-expo";
const chatClient = new StreamChat(API_KEY);
class AdminChannelScreen extends React.Component {
state = {
    id:'',
    token:'',
    status: false,
    channel: ''
}
getUserToken = async ()=>{
    await AsyncStorage.getItem("token").then((token)=>{
        this.setState({token});
    })
}
getUserId = async ()=>{
    await AsyncStorage.getItem("user_id").then((user_id)=>{
        this.setState({id:user_id});
    })
}
async componentDidMount(){
    await this.getUserId();
    await this.getUserToken();
    chatClient.setUser({
        id: this.state.id,
        name: this.state.id,
        image:
            'https://stepupandlive.files.wordpress.com/2014/09/3d-animated-frog-image.jpg',
        },
        this.state.token
    );
        this.setState({channel:chatClient.channel("messaging", "", {
            members:["eze", 'admin']
        })});
        await this.state.channel.watch();
}
  render() {
    return (
      <SafeAreaView>
        <Chat client={chatClient}>
          <Channel channel={this.state.channel}>
            <View style={{ display: "flex", height: "100%" }}>
              <MessageList />
              <MessageInput />
            </View>
          </Channel>
        </Chat>
      </SafeAreaView>
    );
  }
}

export default AdminChannelScreen;
This will be the chat screen where the Admin will log in, in order to respond to chats.
Finally, create the Routes.js component and add the code below:
import React from 'react';
import { Router, Scene } from 'react-native-router-flux'
import Login from './Login';
import Chat from './ClientChat';
import Admin from './AdminChat';
const Routes = () => (
    <Router>
       <Scene key = "root">
          <Scene key = "login" component = {Login} title = "Login" initial = {true} />
          <Scene key = "chat" component = {Chat} title = "Chat" />
          <Scene key = "admin" component = {Admin} title = "Admin Panel" />
       </Scene>
    </Router>
 )
 export default Routes
.env
We’ll also need to use the dotenv npm package to access our environment variables. To do this, replace the code in your babel.config.js file with the code below:
module.exports = function(api) {
  api.cache(true);
  return {
    presets: [
    'babel-preset-expo',
    'module:metro-react-native-babel-preset',
    'module:react-native-dotenv',
  ],
  };
};
Then, create a .env file and add the API credentials you got from your Stream Dashboard.
STREAM_API_KEY="your_STREAM_API_KEY"
STREAM_API_SECRET="your_STREAM_API_SECRET"
Be sure to replace "your_STREAM_API_KEY" and "your_STREAM_API_SECRET" with the credentials from your Stream Chat Dashboard
By now, your app directory should look like this:

And everything is all set up!
Running Your App
Return to the Expo Development Tool, and click on the Run in Android emulator/device, again. Your Android live chat application should now be running!
Make sure your PHP development server is also running!
Your finished product:

Wrapping Up
In this tutorial, we built a simple one-to-one chat app. The version we created was for Android, but, because we used React Native, it can easily be adapted for iOS, as well! One of the coolest parts about building this app was the speed with which we were able to do it, by using Stream Chat. We only touched on the basics of building a chat app with Stream; if you'd like to learn more about all of the customization options available, check out the extensive Stream Chat docs!
Thanks for reading, and happy coding!
