

As developers, we typically spend time reading docs and tutorials, and watching YouTube videos to integrate APIs and SDKs to add specific functionality to apps and services. These integrations can now be completed much more quickly using AI Agent Skills.
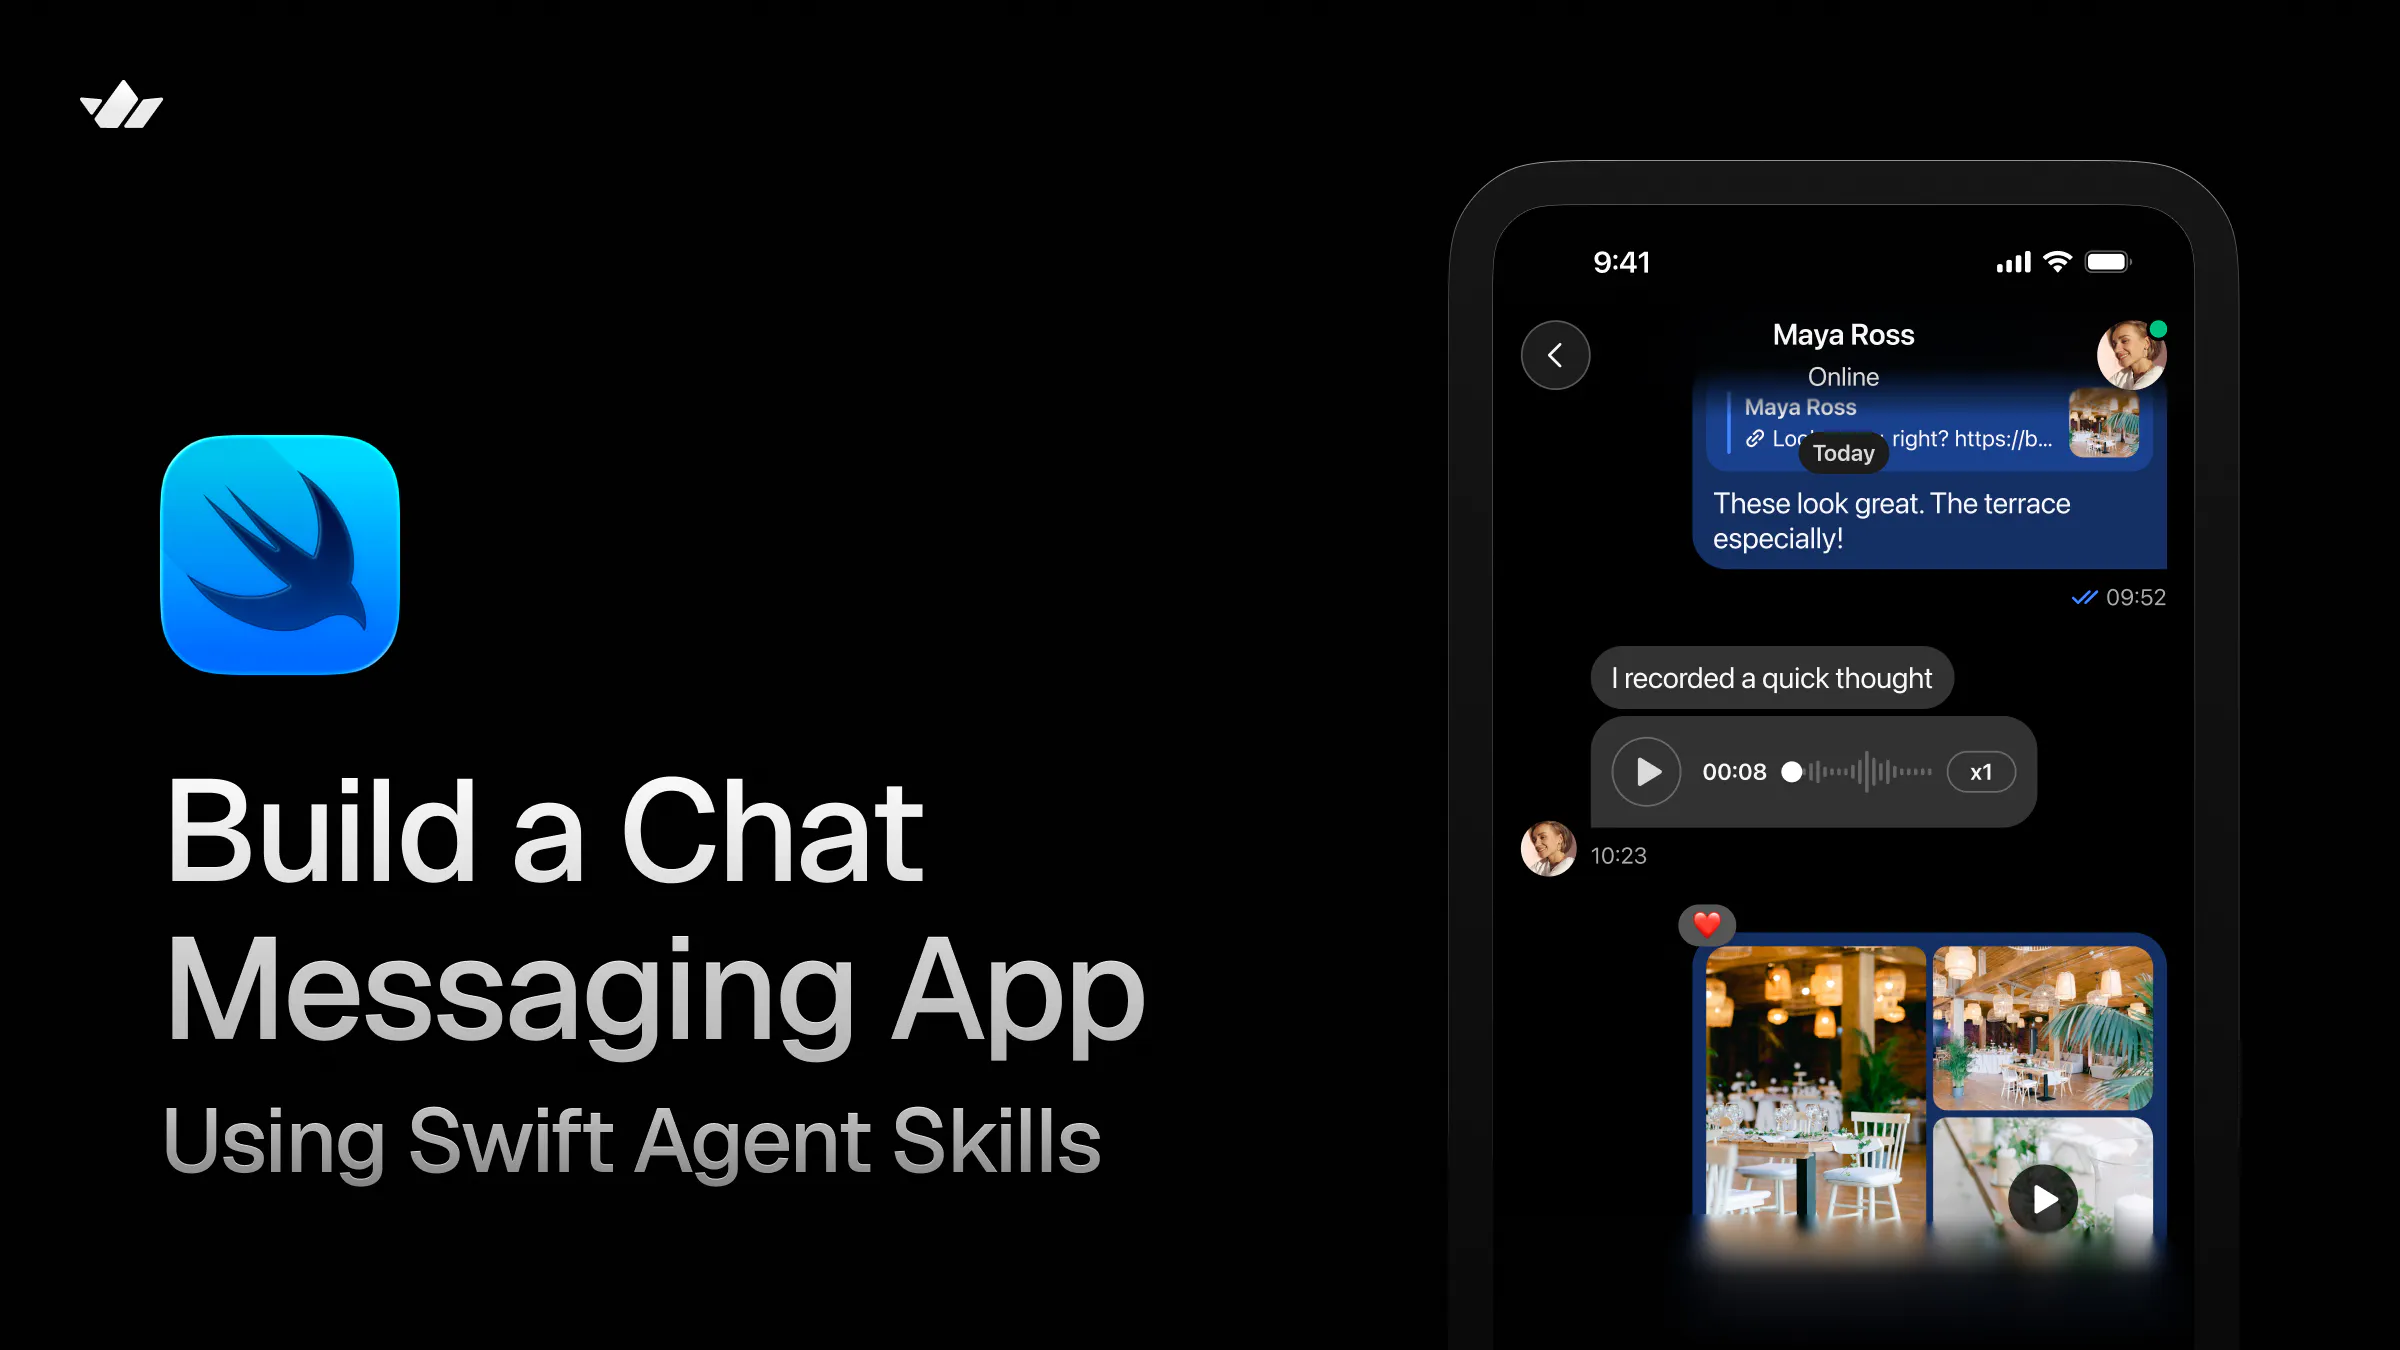
Agent Skills are sets of instructions, scripts, and reference documents that equip AI models to become experts in specific fields to perform actions. This tutorial guides you in using agent skills to create a feature-rich messaging application with a single prompt specifically for iOS.
Requirements and Final Project Demo
Let's use agent skills to implement a chat experience like this. To follow along and create the demo in this tutorial, you should:
- Have a Stream account with at least one app. Sign up or log in to create a new app or use an existing one.
- Install Stream CLI Skills for fetching user credentials and token generation and Swift Skills to enable an app creation with the iOS Chat SDK.
- Install the Long-Term Support (LTS) version of Node.js. You will need the built-in
npxin the Node package for agent skills installation. - Download and install the latest version of Xcode and any iOS simulator. The demo can also be run on a physical iOS device (iPhone or iPad).
- Install your favorite agentic coding tool, Cursor, Antigravity, Codex, or Claude Code. We will use Cursor, but feel free to use any AI-assisted coding tool you prefer.
- Use your preferred coding model, such as GPT-5.5, Opus 4.7, or Cursor Composer 2.5. As a personal preference, the final Xcode project in this article was created with Opus 4.7.
The completed project is hosted on GitHub. You can download and run it for a quick test to experience its key features, such as message attachments, text messaging, emoji reactions, video and Giphy support, and more.
Stream-Powered iOS Chat Messaging Without Agent Skills
Until recently, when you wanted to integrate Stream products, such as Chat, Video/Audio, Feeds, and AI Moderation into a service, you had to explore a demo, check out platform docs, and tutorials to get started. This approach still works great. However, it is not an efficient way to begin and test how a Stream-powered product will work in your app. It is now quicker and more efficient, thanks to agent skills, since no setup or backend configuration is required.
For example, to create an iOS chat messaging application powered by Stream without using the Swift Agent Skills, you should manually follow these steps.
- Create a new SwiftUI project in Xcode.
- Manually install the Stream Chat SwiftUI SDK.
- Configure the privacy usage description for users' microphones and cameras in Xcode.
- Set up the chat SDK's backend with API key and secret for user authentication.
- Connect the SwiftUI app to the configured chat SDK backend to get a fully working messaging app.
Stream-Powered iOS Chat Messaging With Agent Skills

As highlighted in the previous section, creating a SwiftUI messaging app using the Stream's Chat SDK requires the five steps without agent skills. You can use Agent Skills to shorten the chat integration process and reduce the number of steps. With the installation of Stream Swift Skills, the steps above can be reduced to only two.
- Create a new SwiftUI project in Xcode.
- Use the
swift-skillsin a one-shot prompt to create your chat messaging app with Stream backend in your favorite agentic coding tools.
This is possible because the Stream Swift Skills handles the Chat SDK's installation, configures the backend, and automatically connects the SwiftUI app to the SDK for you.
Overview of Stream's Swift Agent Skills

Swift Skills is part of the Stream Agent Skills. It lets your AI coding model seamlessly access Stream iOS SDK components for Chat, Video, Feeds, and Moderation, integrating them into any iOS and SwiftUI/UIKit project. It is hosted on skills.sh. Once installed with the Stream CLI Skills, developers can query Stream APIs to build their products with the agentic flow and interactions illustrated in the image above. When you install these skills, two things will happen.
- The skills will be located in your system's
HOMEdirectory inside a hidden folder.agents. If you are working with a Mac, you can reveal the.agentshidden directory using the keyboard shortcutshift + cmd + .. - They will be available for loading into your AI-assisted coding tool (Cursor, Claude Code, Codex, Amp, Cline, Antigravity, Gemini CLI, Copilot, OpenCode, Warp, Kimi Code CLI, Firebender, Dexto, Deep Agents).
In Cursor, for instance, you can manage the skills (enable or delete) under settings . Once you enable and load the Swift and CLI skills, they will teach your coding agent how to safely run the stream API, iOS SDK, stream config, and auth commands on your behalf.
Below is the structure and location of the swift-skills when installed on your machine.
12345678910111213141516171819~/.agents/skills/stream-swift/
├── SKILL.md                       # router + intent classifier (entrypoint)
├── RULES.md                       # non-negotiable Stream/Swift rules
├── builder.md                     # build & integration flow
├── sdk.md                         # shared lifecycle/auth/state patterns
└── references/
    ├── CHAT-SWIFTUI.md            # Chat + SwiftUI setup
    ├── CHAT-SWIFTUI-blueprints.md # Chat + SwiftUI view blueprints
    ├── CHAT-UIKIT.md              # Chat + UIKit setup
    ├── CHAT-UIKIT-blueprints.md   # Chat + UIKit view controller blueprints
    ├── VIDEO-SWIFTUI.md           # Video + SwiftUI setup
    ├── VIDEO-SWIFTUI-blueprints.md
    ├── VIDEO-UIKIT.md
    ├── VIDEO-UIKIT-blueprints.md
    ├── LIVESTREAM-SWIFTUI.md      # creator/viewer, goLive/stopLive, HLS
    ├── LIVESTREAM-SWIFTUI-blueprints.md
    ├── FEEDS-SWIFTUI.md           # Feeds SDK patterns (SwiftUI + UIKit)
    ├── FEEDS-SWIFTUI-blueprints.md
    └── COMBINED-CHAT-VIDEO.md     # name-collision + file isolation guide
Stream Swift Skills: How It Works
Stream Swift Skills consists of a set of Markdown documents that an agent reads, compares, and retrieves as needed for users' requests. Coding models will read the Markdown files in a strict order. This helps to predict an agent's next move and to debug. When you send a prompt like Build me an iOS/SwiftUI messaging app using the swift-skills, the following will happen in order.
- Go to the Entry Point: When your prompt matches the
swift-skills, the coding agent will first visit the skills' entry point to read SKILL.md. - Point to Rules: SKILL.md then points the agent to RULES.md and instructs it to load it once per session.
- Classification of Intent: Before the agent invokes any tool, it maps the user's request to a track using this signal table.
12345678910| Signal in the prompt | Track |
|---|---|
| Explicit product token: _Chat SwiftUI_, _Video iOS_, _Feeds Swift_, _Livestream SwiftUI_ | **C — Reference** |
| "Docs" / "documentation" around Stream Swift | **C — Reference** |
| "How do I X in SwiftUI/UIKit/Xcode?" | **C — Reference** |
| "Build me a new iOS app" + Stream product | **A — New app** |
| "Livestream app", "creator and viewer mode", "go live" | **A — New app** (loads `LIVESTREAM-SWIFTUI.md`) |
| "Add/integrate Stream into this app" | **B — Existing app** |
| "Install Stream packages", "wire auth" | **D — Bootstrap** |
| Ambiguous between build and lookup | Ask exactly one question, then proceed |
- Credentials Bootstrap: At this point, the agent will ask you questions about credentials, users, and token expiry. Once you answer those questions, the agent will proceed to build/integrate/set up the specific tracks.
- Project Detection: After answering questions about the credentials, the agent will run a read-only shell probe to detect
.xcodeproj/.xcworkspace/Package.swift/ Podfile in your Xcode project. - Delegate to builder.md: At this step, the agent delegates the task to
builder.mdto use a six-step ladder to:- Detect the Xcode workspace.
- Select an integration lane for the project.
- SDK Installation with SPM: After selecting the integration lane, the agent installs the Stream Chat or Video SDK, based on the user's request, using Swift Package Manager.
- Configure the App: It uses
sdk.mdto set up the client lifetime, auth, state, and main actor boundaries. - References: The agent retrieves only reference documents that match the user intent.
- Verification: It finally verifies package resolution, view rendering, client lifetime, and more.
- Load sdk.md: The file is loaded at this step for building and integration flows.
- Load References: Only needed references (those matching the request) will be pulled at this point. For a prompt involving Chat SwiftUI, the agent will retrieve CHAT-SWIFTUI.md and CHAT-SWIFTUI-blueprints.md. For combined Chat + Video, it will additionally load COMBINED-CHAT-VIDEO.md.
Coding Agent's Internal Flow
For a prompt like Build a SwiftUI messaging app with Stream and seed a few chat channels, the agent's internal flow will look like this:
1234567891011121314PROMPT: Build a SwiftUI messaging app with Stream and seed a few chat channels
  └─► read SKILL.md
        ├─► read RULES.md (once per session)
        ├─► Step 0: classify intent → Track A (New app, Chat + SwiftUI)
        ├─► Step 0.5: ask the one consolidated credentials question
        │     └─► on reply: stream config get-app → stream token → stream chat channel create
        ├─► Project signals probe → "SwiftUI app detected — ready for Stream wiring"
        └─► open builder.md
              ├─► detect workspace, choose lane, install Stream Chat SwiftUI via SPM
              ├─► open sdk.md → wire ChatClient in App.init(), main-actor login flow
              ├─► open references/CHAT-SWIFTUI.md + CHAT-SWIFTUI-blueprints.md
              ├─► generate ChatWithSkillsApp.swift, RootView.swift, LoginView.swift,
              │     ChannelListScreen.swift, StreamConfig.swift
              └─► verify checklist → done
What Can the Swift Agent Skills Do?
The Skills give coding agents the ability to build new Stream chat and video apps with activity feeds and moderation integration. You can build your apps from scratch or add in-app features to an existing product.
- Create New Stream Apps: Use these skills to build Stream apps from scratch without digging deep into our APIs. This is useful for PMs and developers wanting to see quickly how Stream integration will perform. You can, for example, scaffold an iOS app in SwiftUI or UIKit and integrate chat, livestreaming, AI moderation, and video calling.
- Add to Existing SwiftUI or UIKit App: The skills can detect
.xcodeproj,.xcworkspace,Package.swift, or Podfile in your Xcode project to implement a Stream service. - Bootstrap Credential and Seed User Data: You can use the skills along with the Stream CLI to bootstrap user credentials by reading your Stream dashboard app's API key for token generation. It can also be used to generate 3-5 chat channels with random users to display real data.
- Respond to Question: Use the skills to look up specific Stream-related SwiftUI or UIKit type, component, etc.
Build Your First Chat Messaging App With Stream Swift Skills
Using the swift-skills to add chat, voice/video calling, or livestreaming to an Xcode project is straightforward.
Step 1: Add the Skill To Your Coding Tool
You can install it by running this command.
1npx skills add https://github.com/getstream/agent-skills --skill stream-swift
Running the above will pull the skills from skills.sh and install it into the .agents hidden folder in your machine's HOME directory. To reveal the installation location, run the following.
open ~/.agents/skills/stream-swift/
It will display the content of the swift-skills root directory.

Alternatively, you can clone the repo and add/copy the skill manually to your HOME directory.
12git clone https://github.com/getstream/agent-skills.git
cp -R agent-skills/skills/stream-swift ~/.agents/skills/
Agentic coding tools (Cursor, Claude Code, Codex, Antigravity, etc.) that respect skills installation in ~/.agents/skills/ will pick it up automatically. To confirm whether the skills installation is successful or not in Cursor, click the gear () button on the top-right of the toolbar and select Rules, Skills, Subagents. This action will display all the skills you have installed as illustrated in the image below.

In addition to the swift-skills installation, you should install the Stream CLI Skills for credential fetching, random user, and token generation.
1npx skills add https://github.com/getstream/agent-skills --skill stream-cli
Step 2: Begin With a New Xcode Project
The two skills won't scaffold .xcodeproj for you, so you should manually create a new SwiftUI project in Xcode and tell your coding model to use the swift-skills to modify it to build your app.
Step 3: Use Your Favorite Agentic Coding Tool To Add a Prompt
After verifying the availability of the Stream CLI and Swift Skills in your AI-assisted coding tool, you are ready to build Stream-powered iOS apps using prompts. Select Opus 4.7 in Cursor or an equivalent model you prefer in your chosen AI coding platform, and specify your prompt. Try modifying the prompt to suit your project's needs.
1Use the stream-swift skills to create a fully functional iOS/SwiftUI chat messaging app I can run out of the box by modifying this codebase.
Once you add a prompt similar to this one, the agent will invoke the Stream CLI and ask some follow-up questions for user authentication and token generation. The CLI will automatically install the specific platform SDK you have requested in the prompt. For the above prompt, the Chat SDK for SwiftUI will be installed. When you request both chat and video in your prompt, the SDKs for both will be installed in your Xcode project. Finally the agent will pull the Swift Skills and follow all the steps in the **How It Works section above.
When the coding agent finishes creating the app, the Xcode project's folders and files structure will be similar to this.
123456ChatWithSkills/
├── ChatWithSkillsApp.swift
├── RootView.swift
├── LoginView.swift
├── ChannelListScreen.swift
└── StreamConfig.swift
You can clone the entire project from GitHub to test the messaging app or explore the individual Swift files generated. In the generated files, the coding agent has already configured the Chat SDK for iOS to work seamlessly with the SwiftUI app, so it runs out of the box with no further setup required.
- ChatWithSkillsApp.swift: This Swift file serves as the app's entry point and manages the
ChatClient's lifetime.
12345678910111213141516171819202122232425262728293031//
//  ChatWithSkillsApp.swift
//  ChatWithSkills
//
//  Created by Amos Gyamfi on 13.5.2026.
//

import SwiftUI
import StreamChat
import StreamChatSwiftUI

@main
struct ChatWithSkillsApp: App {
    @State private var streamChat: StreamChat

    init() {
        var config = ChatClientConfig(apiKey: .init(StreamConfig.apiKey))
        config.isLocalStorageEnabled = true
        config.isAutomaticSyncOnReconnectEnabled = true
        config.staysConnectedInBackground = true

        let chatClient = ChatClient(config: config)
        _streamChat = State(wrappedValue: StreamChat(chatClient: chatClient))
    }

    var body: some Scene {
        WindowGroup {
            RootView()
        }
    }
}
- RootView.swift: The root view gates the SwiftUI app on Stream Chat login state. It displays a login picker when no user is connected, then switches to the channel list once
connectUsersucceeds.
1234567891011121314151617181920212223242526272829303132333435363738394041//
//  RootView.swift
//  ChatWithSkills
//
//

import SwiftUI
import StreamChat
import StreamChatSwiftUI

struct RootView: View {
    @Injected(\.chatClient) private var chatClient
    @State private var isConnected = false

    var body: some View {
        Group {
            if isConnected {
                ChannelListScreen(onLogout: handleLogout)
            } else {
                LoginView(onConnected: {
                    isConnected = true
                })
            }
        }
        .onAppear {
            isConnected = chatClient.currentUserId != nil
        }
    }

    private func handleLogout() {
        chatClient.logout {
            DispatchQueue.main.async {
                isConnected = false
            }
        }
    }
}

#Preview {
    RootView()
}
- LoginView.swift: This view implements a login picker for the demo. For production apps, you should consider swapping this for a backend-issued
TokenProviderinstead of bundled JWTs. - ChannelListScreen.swift: This view displays the Stream Chat channel list for signed-in users. The
ChatChannelListViewincludes its own navigation container, message list, composer, threads, reactions, and attachments, all configured and working out of the box.
123456789101112131415161718192021222324252627282930313233343536373839404142434445464748495051//
//  ChannelListScreen.swift
//  ChatWithSkills
//

import SwiftUI
import StreamChat
import StreamChatSwiftUI

struct ChannelListScreen: View {
    @Injected(\.chatClient) private var chatClient
    @State private var channelListController: ChatChannelListController?
    let onLogout: () -> Void

    var body: some View {
        ZStack {
            if let channelListController {
                ChatChannelListView(
                    channelListController: channelListController,
                    title: "Messages"
                )
            } else {
                ProgressView("Loading conversations...")
            }
        }
        .task {
            guard channelListController == nil,
                  let userId = chatClient.currentUserId else { return }
            channelListController = chatClient.channelListController(
                query: .init(
                    filter: .containMembers(userIds: [userId]),
                    sort: [.init(key: .lastMessageAt, isAscending: false)],
                    pageSize: 20
                )
            )
        }
        .overlay(alignment: .topTrailing) {
            Button {
                onLogout()
            } label: {
                Image(systemName: "rectangle.portrait.and.arrow.right")
                    .font(.body.weight(.semibold))
                    .padding(10)
                    .background(.thinMaterial, in: Circle())
            }
            .padding(.trailing, 16)
            .padding(.top, 8)
            .accessibilityLabel("Sign out")
        }
    }
}
- StreamConfig.swift: This Swift file consists of a centralized Stream Chat configuration for the demo messaging app. It uses your Stream API key to API key to generate a token. For a production
authsystem, it must be swapped with aTokenProviderfrom your backend.
123456789101112131415161718192021222324252627282930313233343536373839404142434445464748495051525354555657585960//
//  StreamConfig.swift
//  ChatWithSkills
//

import Foundation

enum StreamConfig {
    /// Stream Chat API key for this app.
    /// Find or regenerate at https://dashboard.getstream.io
    static let apiKey = "hd8szvscpxvd"

    /// Demo users seeded into the Stream backend.
    /// All tokens are non-expiring JWTs generated via `stream token <user_id>`.
    static let demoUsers: [DemoUser] = [
        DemoUser(
            id: "amos",
            name: "Amos",
            imageURL: URL(string: "https://i.pravatar.cc/200?u=amos"),
            token: "eyJhbGciOiJIUzI1NiIsInR5cCI6IkpXVCJ9.eyJ1c2VyX2lkIjoiYW1vcyJ9.fTdyTe6edyGaQifbhZ_EM_ELpmEAMD6-DVw98Iq_3x8"
        ),
        DemoUser(
            id: "alice",
            name: "Alice Johnson",
            imageURL: URL(string: "https://i.pravatar.cc/200?u=alice"),
            token: "eyJhbGciOiJIUzI1NiIsInR5cCI6IkpXVCJ9.eyJ1c2VyX2lkIjoiYWxpY2UifQ.sfyLiwhlCbjKu5gfJOxYxObU-UVazO1YKvc0xeV9su0"
        ),
        DemoUser(
            id: "bob",
            name: "Bob Martinez",
            imageURL: URL(string: "https://i.pravatar.cc/200?u=bob"),
            token: "eyJhbGciOiJIUzI1NiIsInR5cCI6IkpXVCJ9.eyJ1c2VyX2lkIjoiYm9iIn0._MF_Oshp05Rd9FxLXk2e4qqMzkSV7FmwgAgcquQJCxg"
        ),
        DemoUser(
            id: "carol",
            name: "Carol Smith",
            imageURL: URL(string: "https://i.pravatar.cc/200?u=carol"),
            token: "eyJhbGciOiJIUzI1NiIsInR5cCI6IkpXVCJ9.eyJ1c2VyX2lkIjoiY2Fyb2wifQ.c7ZDX2c3tMF39u_krBGApjByqnDKDGqA0Z4OBvcKxoY"
        ),
        DemoUser(
            id: "dave",
            name: "Dave Chen",
            imageURL: URL(string: "https://i.pravatar.cc/200?u=dave"),
            token: "eyJhbGciOiJIUzI1NiIsInR5cCI6IkpXVCJ9.eyJ1c2VyX2lkIjoiZGF2ZSJ9.-bIS13zP3w_gWrZ0L9aOhs4gBBjqK5Eq4BsxPA0FjKQ"
        ),
        DemoUser(
            id: "eve",
            name: "Eve Patel",
            imageURL: URL(string: "https://i.pravatar.cc/200?u=eve"),
            token: "eyJhbGciOiJIUzI1NiIsInR5cCI6IkpXVCJ9.eyJ1c2VyX2lkIjoiZXZlIn0.mSl31TaRHILy3iBjBr-_fHCmDgy2N7Q7HF6tF1H9CCE"
        )
    ]
}

struct DemoUser: Identifiable, Hashable {
    let id: String
    let name: String
    let imageURL: URL?
    let token: String
}
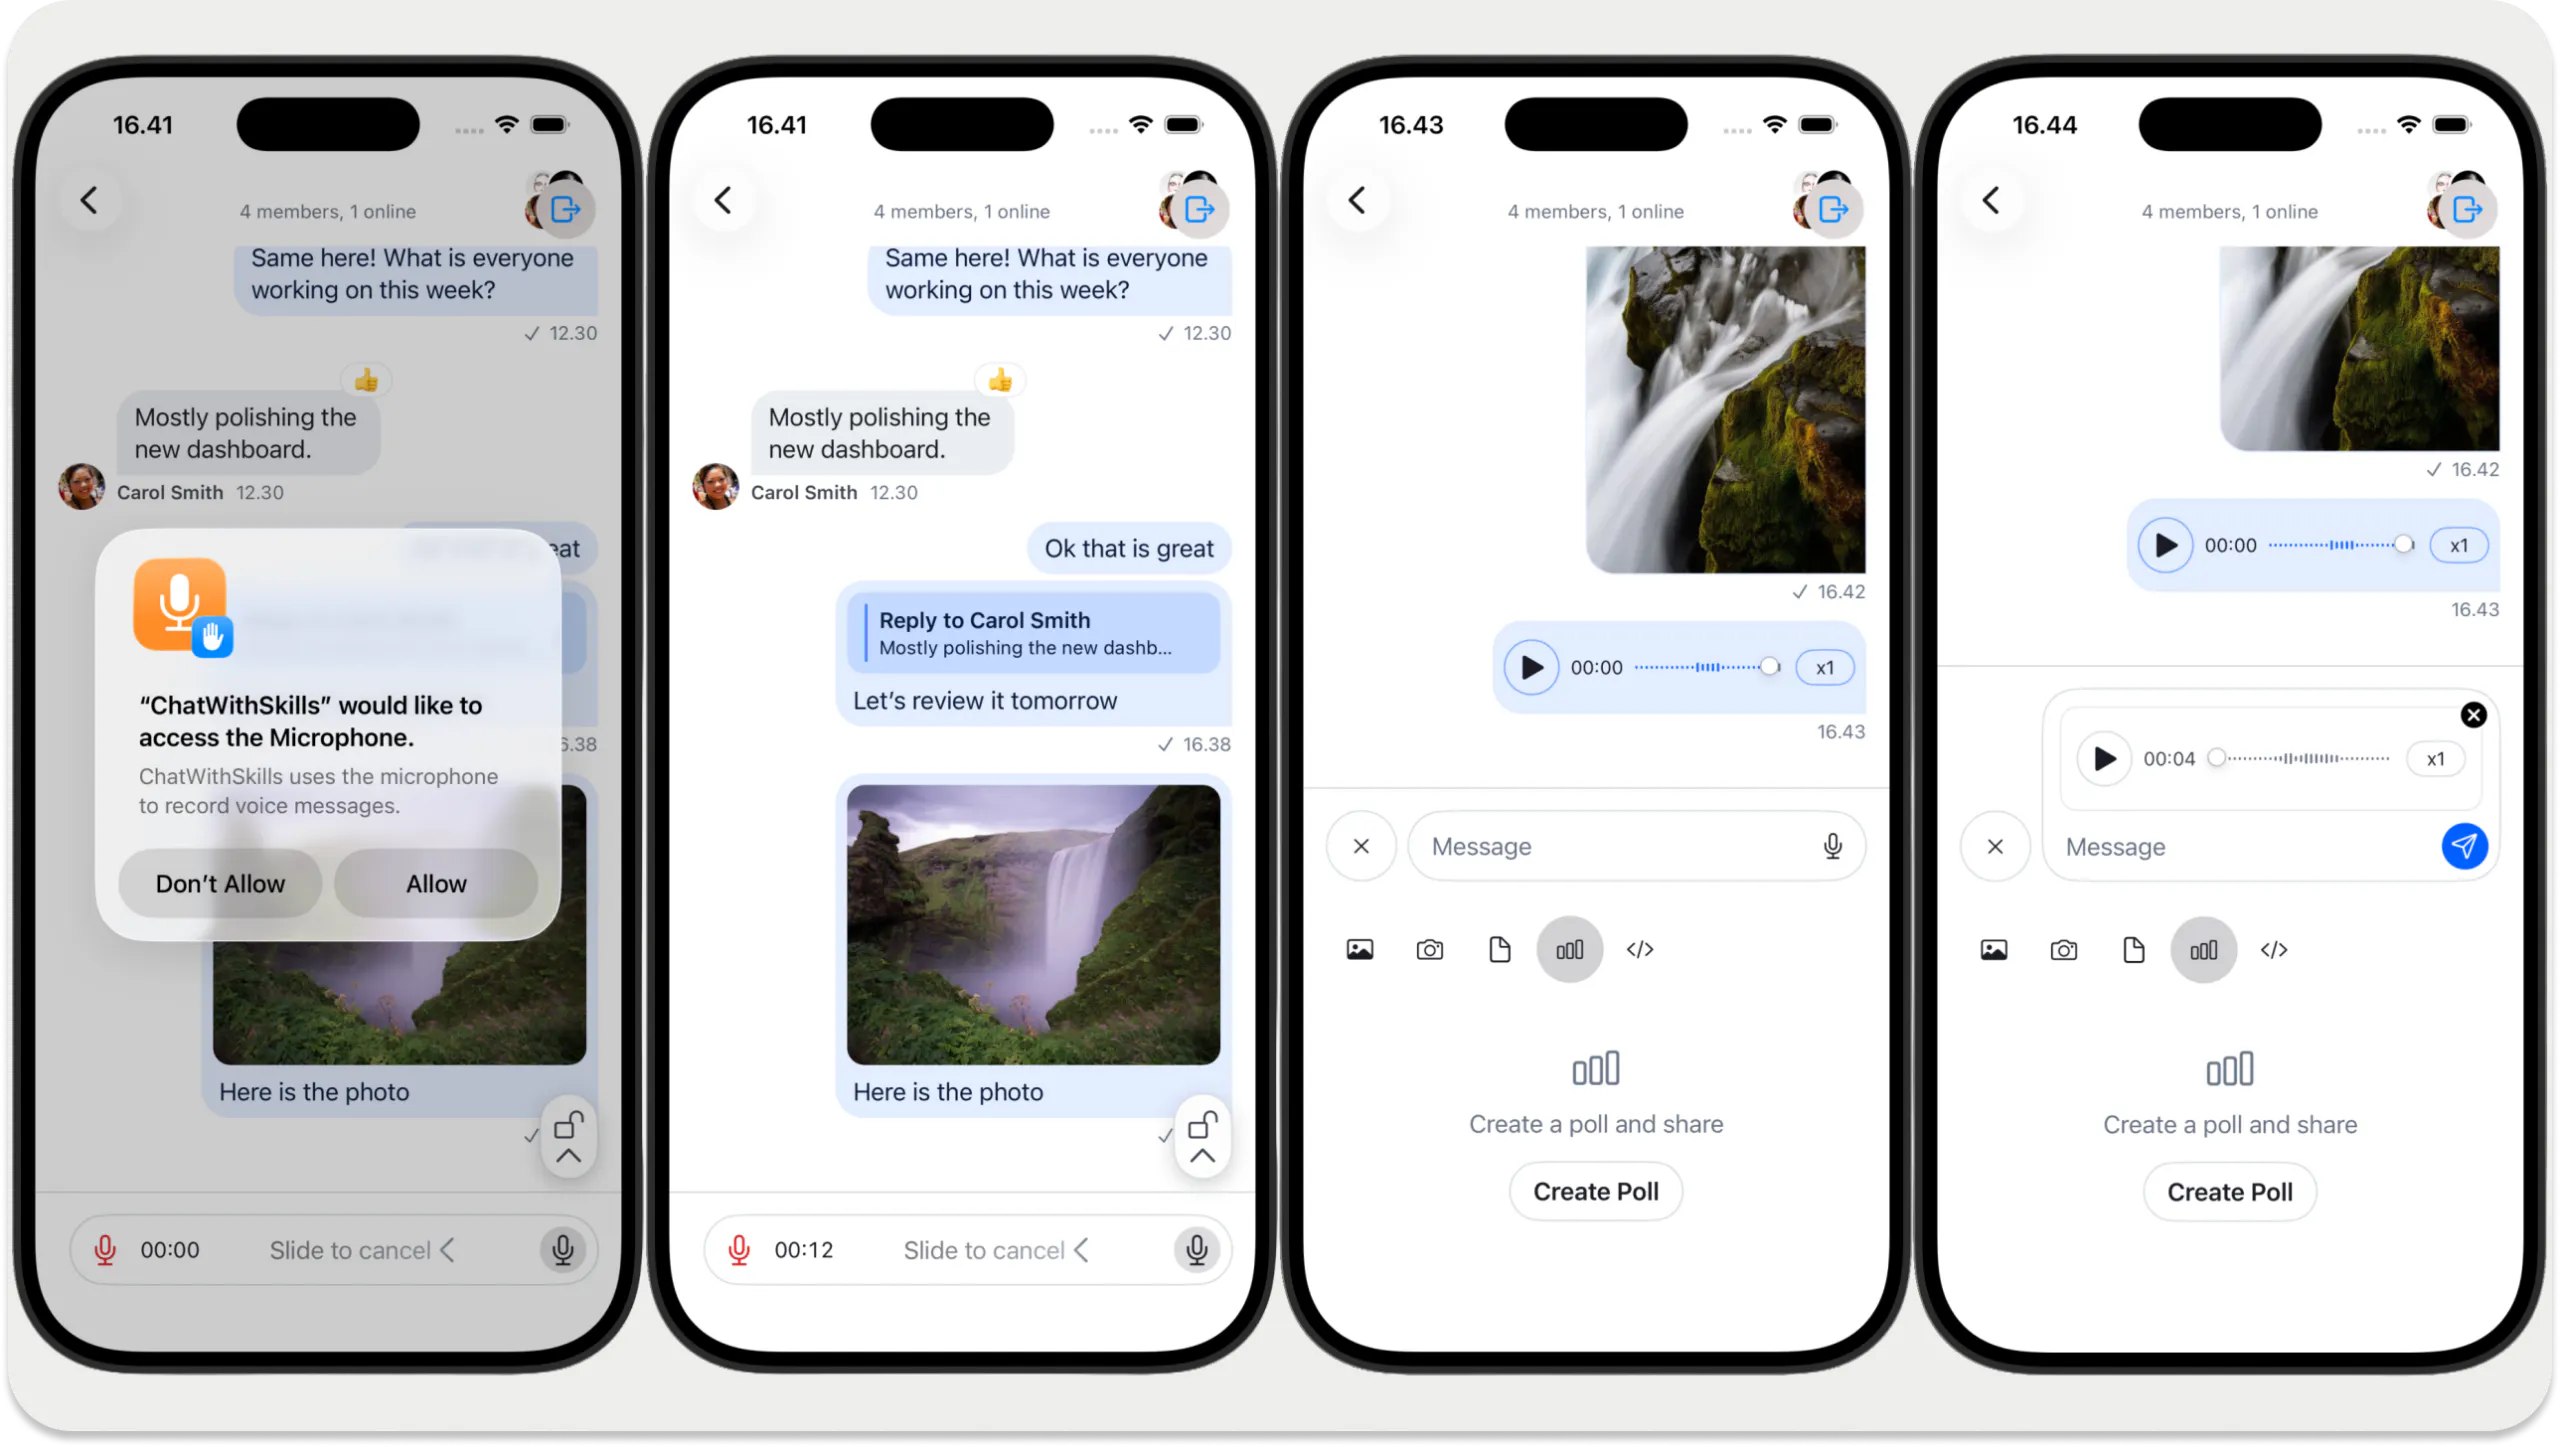
Step 4: Run the Chat Messaging App
Since we used Swift Skills to build the app, privacy descriptions for the iOS Photos Library and the microphone have already been enabled for you. Run it on a simulated iOS device or an actual iPhone to test its features, including texting, image and video attachments, message reactions, polls, Giphy, threads, and voice messaging.
Use Other Stream Skills
Using AI agent skills, app and product ideas that take hours to build can now be created in minutes. The Swift Skills used for the demo project in this tutorial help prompt coding models to build Stream-based chat, video, feeds, and in-app moderation features into large-scale, real-world products. Using Stream Skills with a single prompt, development teams can quickly turn any idea into a production-ready social and community-based app quickly. Stream Skills are AI models and agentic coding tools agnostic. This means you can use them with both CLI and GUI-based AI-assisted coding platforms.
Aside from the Swift one, Stream has skills for Android, React Native, and Next.js. Additionally, we have a skill developers can install to query information in our docs for all the APIs and SDKs we support.