// 1.
final class CustomChatMessageLayoutOptionsResolver: ChatMessageLayoutOptionsResolver {
    // 2.
    override func optionsForMessage(
        at indexPath: IndexPath,
        in channel: ChatChannel,
        with messages: AnyRandomAccessCollection<ChatMessage>,
        appearance: Appearance
    ) -> ChatMessageLayoutOptions {
        var layoutOptions = super.optionsForMessage(at: indexPath, in: channel, with: messages, appearance: appearance)

        layoutOptions.remove(.deliveryStatusIndicator)

        return layoutOptions
    }
}

// 3.
Components.default.messageLayoutOptionsResolver = CustomChatMessageLayoutOptionsResolver()Message Read Indicators
For messages sent by the current user, the read indicators represent the read state of the message. It is shown below the message bubble, by default.
Read indicators states
The possible states of the read indicators are:
- sent: The message has been sent to the server successfully. It is shown as a gray checkmark.
- delivered: The message has been delivered to at least one of the channel members devices. It is shown as double gray checkmark.
- read: The message has been read by at least one of the channel members. It is shown as double blue checkmark.
The delivered state is only available since version 4.92.0 and it needs to be enabled in the Dashboard for each channel type.
| Sent | Delivered | Read | Read by many |
|---|---|---|---|
 | 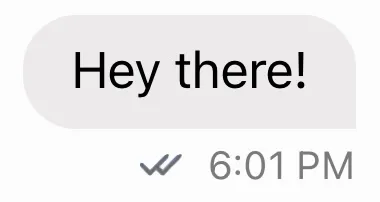 | 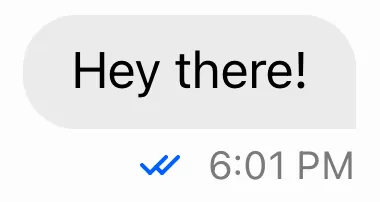 | 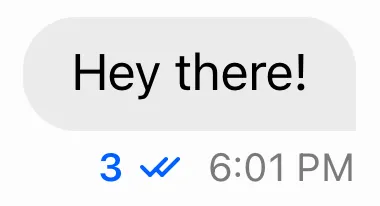 |
If read_events are turned OFF for the channel, read indicators are hidden.
Basic Customization
Hide read indicators
The read indicators can be hidden in the UI by creating a custom layout options resolver and exclude the deliveryStatusIndicator from the options.
Steps:
- Subclass
ChatMessageLayoutOptionsResolver - Override
optionsForMessageand excludedeliveryStatusIndicatoroption` - Inject the custom subclass into
Components
| Before | After |
|---|---|
 |  |
You can find more information on how the components configuration works here.
Advanced Customization
The UI component responsible for showing the read indicators is the ChatMessageDeliveryStatusView. This component is shown inside ChatMessageContentView when the message view is configured with layout options that include the deliveryStatusIndicator option.
open class ChatMessageContentView: _View, ThemeProvider {
    public private(set) var deliveryStatusView: ChatMessageDeliveryStatusView?

    open func layout(options: ChatMessageLayoutOptions) {
        if options.contains(.deliveryStatusIndicator) {
            metadataSubviews.append(createDeliveryStatusView())
        }
        ...
    }
}
Display last read members avatars
By default, when a message sent by the current user to a group channel has the read delivery state, it displays the number of members who have viewed it. To change this behavior and show the avatars of the last read members, you need to create a custom subclass of ChatMessageDeliveryStatusView.
Here is an example implementation:
// 1. Subclass `ChatMessageDeliveryStatusView`
final class CustomChatMessageDeliveryStatusView: ChatMessageDeliveryStatusView {
    // 2. Declare configuration variables for max # of avatars shown & the avatar size
    private let maxNumberOfAvatars = 3
    private let avatarSize = CGSize(width: 15, height: 15)

    // 3. Declare a container for avatars and array of `ChatAvatarView` to have easy access to avatar views.
    private let avatarsStackView = UIStackView()
    private var avatarViews: [ChatAvatarView] = []

    // 4. Override `setUpLayout` to make layout customizations.
    override func setUpLayout() {
        // Call `super` to get default layout in place.
        super.setUpLayout()

        // Setup the stack view showing avatars.
        avatarsStackView.translatesAutoresizingMaskIntoConstraints = false
        avatarsStackView.axis = .horizontal
        avatarsStackView.distribution = .fill
        avatarsStackView.alignment = .fill
        stackView.addArrangedSubview(avatarsStackView)

        // Create avatar views and add them to both the container and the array.
        (0..<maxNumberOfAvatars).forEach { _ in
            let avatarView = components.avatarView.init()
            avatarView.translatesAutoresizingMaskIntoConstraints = false
            avatarView.heightAnchor.constraint(equalToConstant: avatarSize.height).isActive = true
            avatarView.widthAnchor.constraint(equalToConstant: avatarSize.width).isActive = true

            avatarsStackView.addArrangedSubview(avatarView)
            avatarViews.append(avatarView)
        }

        // Make `messageReadСountsLabel` the last in the root container.
        // This label will be used to show `and N more` and should go after the avatars in the UI.
        stackView.addArrangedSubview(messageReadСountsLabel)
    }

    // 5. Override `updateContent` to configure avatars when content is updated.
    override func updateContent() {
        super.updateContent()

        guard let content = content else {
            return
        }

        // Get array of members who have seen the message.
        let readBy = content.channel.reads(for: content.message)
            .sorted {
                $0.lastReadAt < $1.lastReadAt
                && $0.user.id < $1.user.id
            }
            .map(\.user)

        avatarsStackView.isHidden = readBy.count == 0

        // Iterate and configure avatar views, hide those ones that don't have a user to show.
        for index in 0..<avatarViews.count {
            let user = readBy.indices.contains(index) ? readBy[index] : nil

            let avatarView = avatarViews[index]
            avatarView.isHidden = user == nil
            components.imageLoader.loadImage(
                into: avatarView.imageView,
                url: user?.imageURL,
                imageCDN: components.imageCDN,
                placeholder: appearance.images.userAvatarPlaceholder4,
                preferredSize: avatarSize
            )
        }

        // Calculate how many members are not shown.
        let leftUsers = readBy.count - avatarViews.count
        messageReadСountsLabel.text = leftUsers > 0 ? "and \(leftUsers) more" : nil
        messageReadСountsLabel.isHidden = messageReadСountsLabel.text == nil
    }
}
Let's take some final touches to make the UI a bit nicer:
override func setUpLayout() {
    // 1. Use negative spacing in the stack view making the next avatar overlapping the previous one.
    avatarsStackView.spacing = -avatarSize.width / 2

    (0..<maxNumberOfAvatars).forEach { _ in
        // 2. Add a border to each avatar view.
        avatarView.imageView.layer.borderColor = appearance.colorPalette.background6.cgColor
        avatarView.imageView.layer.borderWidth = 1
    }
}
The last step is to register custom subclass in Components so it is injected into the UI SDK and used instead of the default component:
Components.default.messageDeliveryStatusView = CustomChatMessageDeliveryStatusView.self| Before | After |
|---|---|
 |  |
Show all read and delivered members
To show all the read and delivered members, we can create a custom screen that shows the members that have read the message and the ones that were delivered but not read yet.
Let's explore how to handle taps on the reads indicator and implement a custom tap handler.
Steps:
- Enable user interaction for custom delivery indicator status view
- Subclass
ChatMessageListVCand overridemessageContentViewDidTapOnDeliveryStatusIndicator() - Register the custom
ChatMessageListVCcomponent
The ChatMessageDeliveryStatusView is a UIControl so it can be made tappable just by setting isUserInteractionEnabled = true:
// 1.
final class CustomChatMessageDeliveryStatusView: ChatMessageDeliveryStatusView {
    override func updateContent() {
        ...
        // Allow interaction when message is in `read` state.
        isUserInteractionEnabled = readBy.count > 0
    }
}
Tapping the delivery indicator view, it will call the messageContentViewDidTapOnDeliveryStatusIndicator() method on ChatMessageListVC. You can override this method to implement custom logic. In this case, let's present a screen that shows the members that have read the message, and the ones that were delivered but not read yet.
// 2.
final class CustomChatMessageListVC: ChatMessageListVC {
    override func messageContentViewDidTapOnDeliveryStatusIndicator(_ indexPath: IndexPath?) {
        guard
            let indexPath = indexPath,
            let message = dataSource?.chatMessageListVC(self, messageAt: indexPath),
            let channel = dataSource?.channel(for: self)
        else { return }

        let readBy = channel.reads(for: message)
            .sorted {
                $0.lastReadAt < $1.lastReadAt
                && $0.user.id < $1.user.id
            }
            .map(\.user)

        let deliveredTo = channel.deliveredReads(for: message)
            .sorted {
                $0.lastDeliveredAt ?? Date.distantPast < $1.lastDeliveredAt ?? Date.distantPast
                && $0.user.id < $1.user.id
            }
            .map(\.user)

        // Create a custom view controller to show the read and delivered members.
        let messageReadersViewController = CustomMessageReadersViewController(
            readBy: readBy,
            deliveredTo: deliveredTo
        )

        present(messageReadersViewController, animated: true, completion: nil)
    }
}
CustomMessageReadersViewController is your custom view controller that renders the read/delivered lists.
Don't forget to inject the custom ChatMessageListVC component into Components:
// 3.
Components.default.messageListVC = CustomChatMessageListVC.self
You can check a real-world example of showing the read and delivered members in our demo app here. It looks something like this:
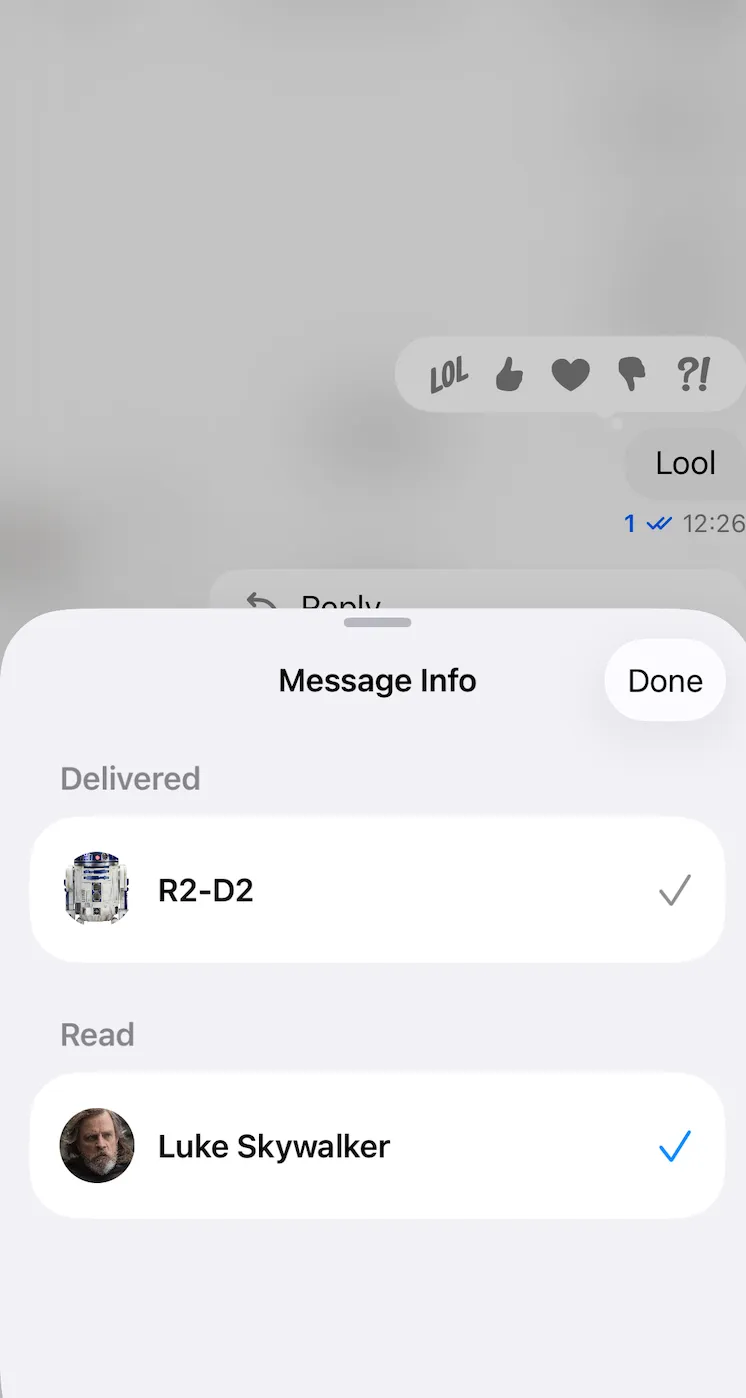
At the moment, showing the timestamps of the read and delivered members is not recommended since the timestamp is always related to the latest message in the channel, and not for each message individually.