

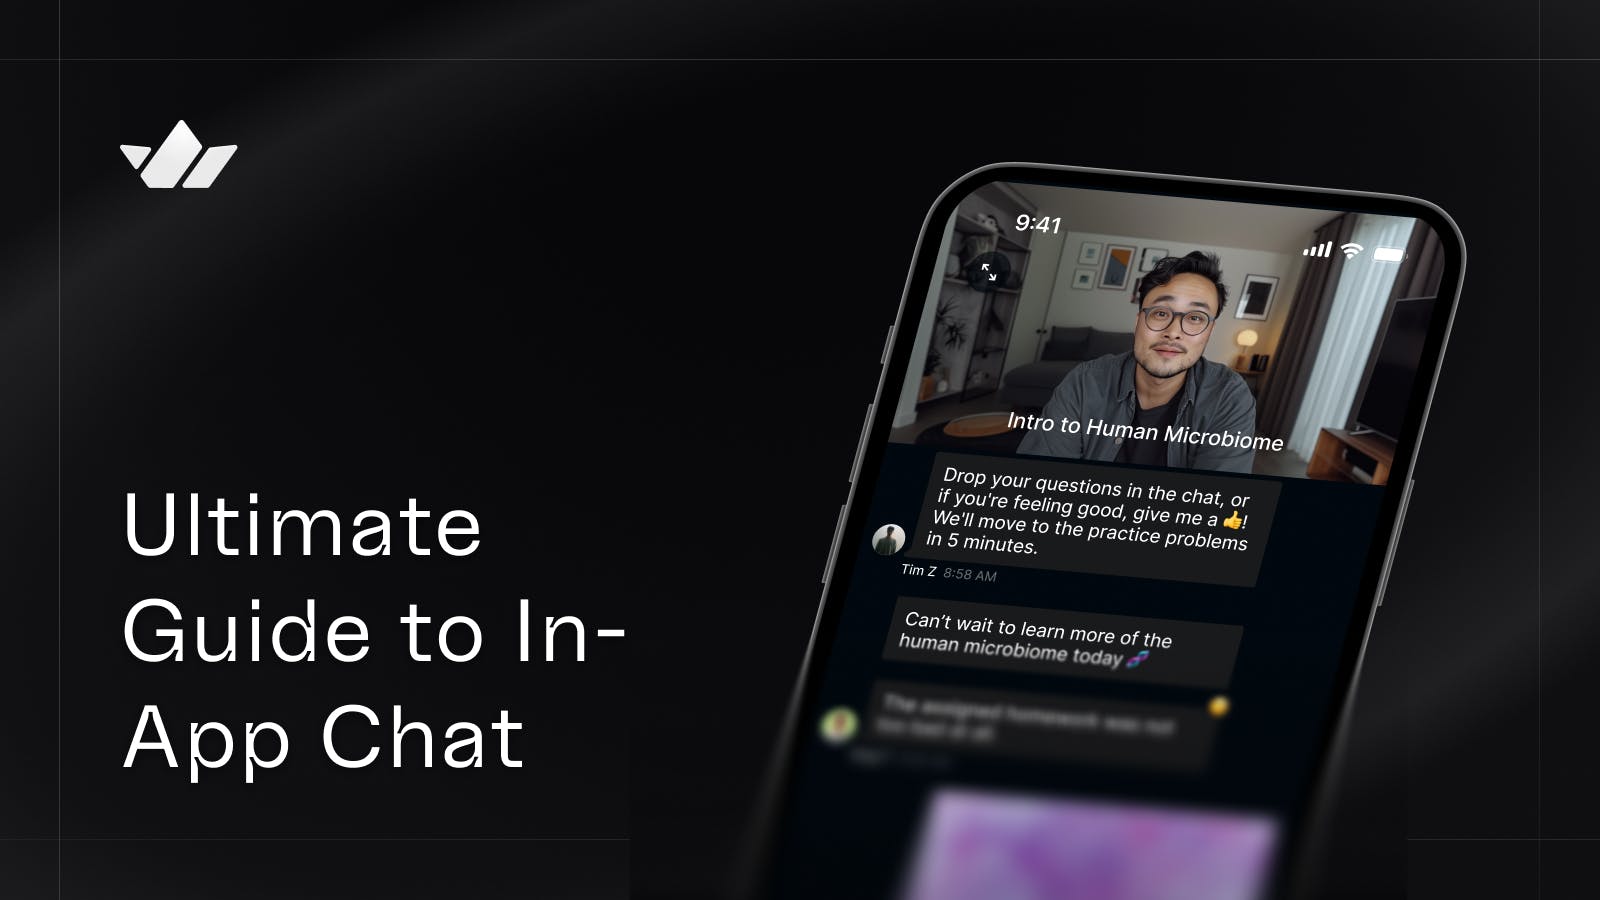
In-app chat is precisely one of those features that becomes essential the moment your users expect it. You've seen it everywhere: the little chat bubble in your banking app, the messaging thread in your marketplace, the team channel in your project management tool. It's how users talk to support without leaving your app, how buyers and sellers negotiate deals, and how communities form around your product.
But here's what's interesting: while chat feels simple to users (just type and send, right?), the decision to add it touches nearly every part of your product. It affects your engagement metrics, your support costs, your technical architecture, and potentially your entire user retention strategy.
Yet despite these clear benefits, many product teams still hesitate. They worry about the implementation complexity, the cost of scaling, or simply don't know where to start. Should you build it yourself? Use a chat API like Stream's? What about Intercom for support-focused chat? How do you handle offline messages, moderation, or multi-device sync?
This guide answers those questions. We'll show you exactly how in-app chat works under the hood, compare the top platforms with real pricing and implementation details, and help you choose the right approach for your specific use case. Whether you're a PM evaluating the business case or a developer planning the technical implementation, you'll find what you need here.
Let's start with why in-app chat has become non-negotiable for modern apps.
Why You Need In-App Chat
Does in-app chat actually move the needle on business metrics?
Engagement rates are 131% higher among users who receive in-app messages compared to those who don't. And with a 75% impression rate, in-app messaging outperforms email by 45x and push notifications by nearly 3x.
But engagement is just the starting point. The real value often comes from what happens after that initial interaction.
Your users' expectations around response time have fundamentally shifted. According to HubSpot, 90% of customers rate an immediate response as important for service questions, and 60% define "immediate" as 10 minutes or less.

Users are counting the minutes.
The Efficiency Multiplier for Support Teams
Zendesk's 2023 data reinforces this urgency. 72% of customers want immediate service, and 64% will spend more if issues are resolved without channel switching. That last part is crucial. When users have to leave your app to email support or call a help line, you're not just creating friction. You're pushing them out of your product experience.
Here's where chat becomes a CFO's best friend. While a support agent can handle one phone call at a time, skilled agents can manage multiple concurrent chat conversations. Even conservative implementations typically see agents handling 2-3 chats simultaneously. Same headcount, 2-4x the customer interactions handled.
Resolution times tell a similar story. Freshworks shows average chat resolution times of 3-5 minutes with proper routing and macros. Compare that to the typical 15-20 minute phone call, and you're looking at both faster resolution for customers and higher throughput for your team.
Beyond Support: Chat as a Product Feature
The most successful implementations treat chat as more than a support channel. They recognize it as core product functionality that enables entirely new use cases:
-
Marketplaces use chat to build trust between buyers and sellers. When users can ask questions about a product directly, negotiate prices, or arrange pickup times, transaction rates increase. Research shows that live chat has a statistically significant positive effect on conversion, especially when product information is limited. The chat fills the information gap.
-
SaaS platforms use chat for user onboarding and feature adoption. Instead of hoping users discover features on their own, chat becomes a channel for contextual guidance. Apps using targeted in-app messaging see 61-74% higher 28-day retention rates compared to those without.
-
Gaming and social apps use chat to create community. When users can connect with each other, they stay longer, engage more, and become advocates for your product. The chat isn't just a feature; it becomes the reason people keep coming back.
Every product decision involves trade-offs, but the cost of not implementing chat is becoming increasingly clear:
-
Lost conversions: Those 2.8x higher conversion rates for chat users? That's revenue walking away.
-
Channel fragmentation: Without in-app chat, users resort to email, phone, or social media. Each channel switch increases the chance they'll abandon the interaction entirely.
-
Competitive disadvantage: When users see that chat bubble in your competitor's app but not yours, what message does that send about your commitment to customer experience?
-
Support inefficiency: Your team handles one phone call while your competitor's team handles four chat conversations. Who has the cost advantage?
The question isn't really whether you need in-app chat anymore. The data is too compelling, the user expectations too clear. The real questions are:
-
What type of chat fits your use case? (support, community, or transactional)
-
Should you build or buy?
-
How will you handle scale?
-
What's your moderation strategy?
Before we get to those, let's first look at how chat works, from both the product manager's view and the developer's perspective.
How Does In-App Chat Work?
At its simplest, in-app chat is a real-time event system wrapped in a messaging interface. When a user types "Hey, is this item still available?" and hits send, a complex chain of events fires off in milliseconds.
First, your app authenticates the user and what they're allowed to see. Then it opens a persistent connection (usually a WebSocket) to a chat service. The message gets validated, assigned a unique ID and sequence number, saved to a database, and broadcast to everyone in that conversation. If some recipients are offline, they get push notifications. Meanwhile, the system tracks who's typing, who's read what, and whether anyone's reacting with an emoji.
Here's the flow for an in-app chat service:
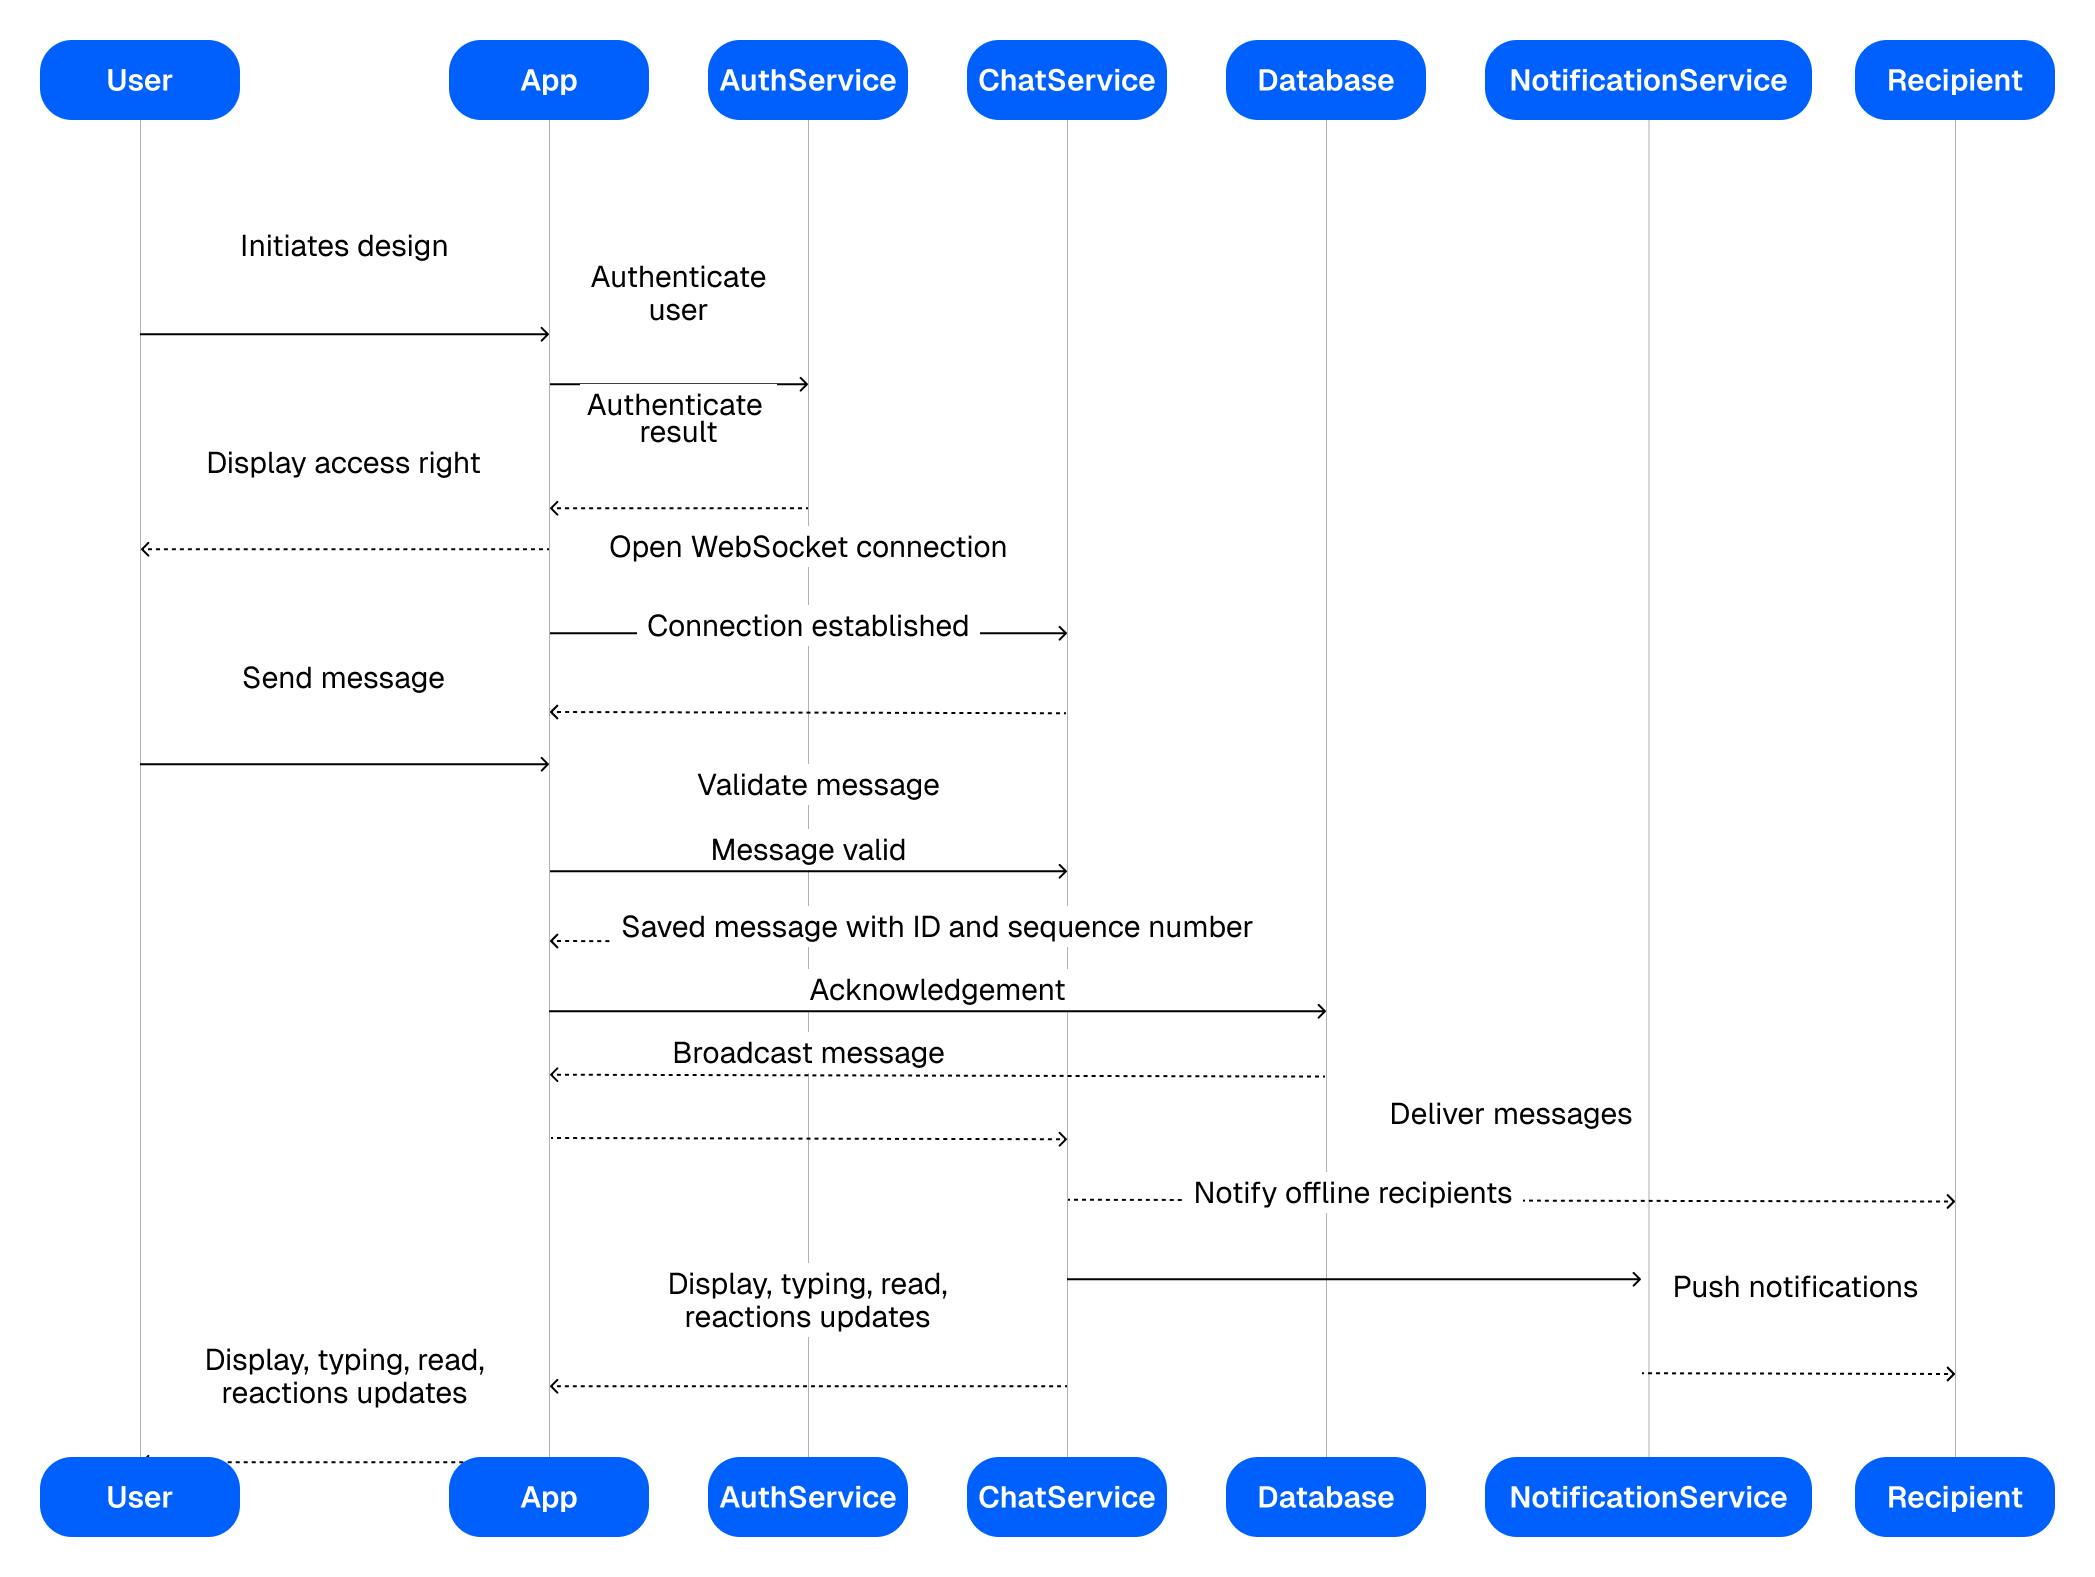
All of this happens fast enough that it feels instant. But getting there requires careful orchestration of multiple systems.
What Are the Core Components of a Chat System?
You need:
-
Client applications (web, iOS, Android) that handle the user interface and maintain local message caches.
-
Edge gateways that manage millions of WebSocket connections and authenticate users.
-
The messaging service itself, which validates messages, assigns IDs, and ensures everything gets delivered in the correct order.
-
Data storage comes in layers: hot storage (Redis, memory cache) for recent messages and presence data, durable storage (PostgreSQL, DynamoDB) for message history, and blob storage (S3, Cloud Storage) for images and files.
-
The notification system handles push notifications through Apple and Google's services when users are offline. Consider this your special delivery service for urgent packages.
What Makes Chat Feel "Real-Time"?
The magic of real-time chat comes from WebSockets, a protocol that maintains an open two-way connection between your app and the server. Unlike traditional HTTP, where your app has to constantly ask "any new messages?", WebSockets let the server push updates instantly.
Here's the typical connection flow:
-
Your app requests a short-lived token from your backend after login
-
It opens a WebSocket connection using that token
-
The server sends any missed messages since you were last online
-
New messages flow both ways without additional handshakes
-
If the connection drops, your app automatically reconnects and catches up
Most production systems also implement fallbacks. If WebSockets are blocked (some corporate firewalls do this), the system might fall back to long-polling or Server-Sent Events. Users never notice the difference.
How Can Developers Implement Chat?
From a developer's perspective, implementing chat typically follows this path. First, you create an authentication endpoint in your backend that mints chat tokens after verifying user identity. This keeps your secret keys secure while letting the client authenticate with the chat service.
1234567891011import  stream_chat

server_client  =  stream_chat.StreamChat(

api_key="{{ api_key }}",

api_secret="{{ api_secret }}"

)

token  =  server_client.create_token("john")
Next, you integrate the chat SDK into your client app. This handles the WebSocket connection, message queuing, and offline synchronization. A typical initialization looks like:
12345678910111213const chatClient = new ChatClient({
  apiKey: "your-public-key",

  token: await fetchTokenFromYourBackend(),

  user: { id: "user-123", name: "Jane" },
});

await chatClient.connectUser();

const channel = chatClient.channel("messaging", "room-456");

await channel.watch(); //  Join  and  start  receiving  messages
Then you build your UI, either using pre-built components from the chat provider or creating custom interfaces that interact with the SDK. You'll handle sending messages, displaying typing indicators, and updating read status.
1234567891011121314151617181920212223242526272829const App = () => {
  const client = useCreateChatClient({
    apiKey,

    tokenOrProvider: token,

    userData: { id: userId },
  });

  if (!client) return <div>Loading...</div>;

  return (
    <Chat client={client}>
      <ChannelList sort={sort} filters={filters} options={options} />

      <Channel>
        <Window>
          <ChannelHeader />

          <MessageList />

          <MessageInput />
        </Window>

        <Thread />
      </Channel>
    </Chat>
  );
};
Finally, you implement push notifications by registering device tokens and handling notification payloads to deep-link users to the right conversation.
-
What about typing indicators? When you start typing, your client sends a "typing.start" event with a 5-10 second expiration. If you stop typing or the timer expires, the indicator disappears. This prevents "stuck" typing indicators when someone closes the app mid-typing.
-
What about read receipts? Read receipts track the highest sequence number you've seen in each conversation. When you scroll through messages, your client periodically updates the server with your latest "last_read_seq". The server then notifies other participants so they can update their UI to show which messages have been read.
-
What about presence? Presence (online/away/offline status) works similarly, with the server maintaining a time-to-live record of when each user was last active. Miss a heartbeat for 30 seconds? You're marked as away. Miss it for 5 minutes? You're offline.
-
What about images and files? Sending media is more complex than text because you're dealing with large binary data that needs preprocessing for safety and performance. When you select an image, your app typically:
-
Requests a pre-signed upload URL from the chat service
-
Uploads the image directly to object storage (S3, Cloud Storage)
-
Sends a message with metadata about the file (type, size, dimensions)
-
The server then asynchronously scans the image for viruses, runs it through content moderation, and generates thumbnails
-
How Does Chat Stay Secure?
Security in chat happens at multiple layers, starting with the transport. Everything uses TLS encryption, and mobile apps often implement certificate pinning for extra protection.
Authentication relies on short-lived tokens (usually JWTs) that your backend mints after verifying the user. These tokens include claims about what the user can access, and they expire quickly (typically 15-60 minutes) to limit damage if compromised.
Access control happens at the channel level. Before delivering any message, the system verifies the user is a member of that conversation. Roles (owner, admin, member, guest) determine what actions are allowed.
Some implementations add end-to-end encryption (E2EE), where messages are encrypted on the sender's device and only decrypted on recipients' devices. While this provides maximum privacy, it also means the server can't index messages for search or scan for malicious content. It's a trade-off most consumer apps avoid but that security-focused apps embrace.
What About Moderation and Safety for In-App Chat?
Every successful chat system eventually faces abuse, spam, and toxic behavior. Modern platforms handle this through multiple defensive layers.
-
Pre-send filtering catches obvious problems: rate limiting prevents spam, regex filters block known bad content, and message length limits prevent abuse. If someone tries to send 100 messages per second or a 50,000-character message, they're blocked before the message is stored.
-
Post-send analysis handles nuanced moderation. Messages get analyzed by machine learning models that detect toxicity, spam, and illegal content. Suspicious messages might be quarantined for human review or silently hidden from other users.
-
User-driven moderation empowers communities. Users can report messages, block other users, or (with appropriate roles) mute or ban problematic members. The system maintains audit logs of all moderation actions for accountability.
What Are the Common Pitfalls?
Even experienced teams hit these issues:
-
Duplicate messages appear when network flakiness causes retries. Solution: implement idempotency using client-generated message IDs.
-
Messages appear out of order when relying on client timestamps. Solution: always sort by server-assigned sequence numbers.
-
Typing indicators get stuck when the "stop typing" event is lost. Solution: implement client-side timeouts as a fallback.
-
Push notification storms annoy users when every message triggers a notification. Solution: implement notification preferences and collapse multiple notifications per conversation.
-
Performance degrades in large channels when broadcasting every update to thousands of users. Solution: switch to fan-out-on-read patterns or sample presence updates for massive channels.
Now that you understand how chat works under the hood, let's look at the practical question every team faces: should you build this yourself or use one of the existing platforms?
Common Use Cases for In-App Chat
Understanding your primary use case shapes every decision about chat implementation, from choosing a platform to designing the user experience. Here are the most common scenarios and what each requires for success.
Customer Support Inside the App
Successful in-app support keeps users in their product context while enabling agents to handle multiple conversations efficiently.
Key requirements:
-
Agent handoff and assignment logic
-
Macros and quick replies for common questions
-
Push notifications to bring users back for responses
-
File and image upload for screenshots
-
Full conversation history and audit logs
-
Escalation paths to ticketing systems when needed
The metrics that matter here are first-response time (ideally under 30 seconds), resolution time, and customer satisfaction scores. Skilled agents can handle up to 4 concurrent chats, making this far more efficient than phone support.
Buyer-Seller Messaging for Marketplaces
Chat builds trust in marketplaces by letting buyers ask questions, negotiate prices, and coordinate logistics without leaving the listing. The conversation becomes part of the transaction flow, not a separate channel.
Key requirements:
-
Identity and role awareness (buyer vs. seller badges)
-
Safe attachment sharing with virus scanning
-
Rate limits and anti-spam measures
-
Content moderation for safety
-
Dispute resolution and audit trails
-
Mobile-first UX (remember, 77.9% of chats are on mobile)
Success metrics focus on conversion rate per conversation and time-to-transaction. Research shows live chat has a statistically significant positive effect on conversion, especially when product information is limited.
Onboarding and Feature Adoption in SaaS
Instead of hoping users discover features on their own, chat becomes a channel for contextual guidance. This goes beyond support to proactive engagement that drives product adoption.
You'll need targeted in-app messaging triggered by user behavior, message threads for follow-up questions, and deep links that take users directly to relevant features. Read receipts confirm users saw important messages. Apps using this approach see 61-74% higher 28-day retention rates.
Communities in Social and Gaming Apps
Creating channels, squads, and discussion threads keeps people coming back to your app. This is where chat transforms from a feature to the core value proposition.
Key requirements:
-
Presence indicators and typing notifications
-
Reactions and threaded conversations
-
Roles and permissions (admins, moderators, members)
-
Robust moderation tools for community safety
-
Scalable fan-out patterns for large rooms
Gaming apps particularly benefit from Unity or Unreal SDK support, while social apps need the infrastructure to handle viral growth. As discussed earlier, you might need to switch from push-based to pull-based fan-out patterns when channels grow beyond a few thousand active participants.
Healthcare and Fintech (Regulated Industries)
Secure patient consultations and financial advisory conversations require chat that meets strict compliance requirements while remaining user-friendly.
Key requirements:
-
Short-lived authentication tokens
-
Fine-grained channel access controls
-
Configurable message retention policies
-
Complete audit logs and export capabilities
-
Optional end-to-end encryption
-
Automated PHI/PII detection and redaction
HIPAA compliance for healthcare or SOC 2 for financial services aren't just checkboxes: they require specific architectural decisions about data residency, encryption, and access logging that need to be built in from the start.
Education and Tutoring
Whether it's one-on-one tutoring or cohort discussions, educational chat needs to support both structured learning and informal collaboration.
Essential features include threaded discussions for assignment feedback, clear role distinctions (instructor, teaching assistant, student), file attachments for homework submission, moderation tools for maintaining appropriate discussion, and searchable message history for referencing past lessons.
The Essential Features of In-App Chat
When evaluating chat platforms or planning your implementation, use this comprehensive checklist to ensure you're covering the fundamentals.
Reliability and Transport
The foundation of any chat system is reliable message delivery. Your implementation needs:
-
WebSocket connections with graceful fallbacks. When WebSockets are blocked, the system should automatically fall back to Server-Sent Events or long polling. Users shouldn't notice the difference.
-
Message ordering guarantees through server-assigned sequence numbers, not client timestamps. As we covered earlier, this prevents the out-of-order messages that plague naive implementations.
-
Idempotent message handling using client-generated IDs prevents duplicates when networks are flaky. This is one of the most common pitfalls teams encounter.
-
Offline sync and local caching ensures users see their recent conversations instantly when opening the app, with automatic backfill of missed messages on reconnect.
Core Messaging UX
These features define the modern chat experience:
-
Typing indicators with automatic TTL to prevent "stuck typing" states
-
Read receipts using last-read sequence tracking
-
Presence status with heartbeat-based transitions
-
Message threads for organizing conversations
-
Reactions for lightweight responses
-
Mentions with notifications
-
Edit and delete capabilities with proper audit trails
-
Message delivery states for sent, delivered, and failed messages
-
Link previews with metadata rendering
-
Push notifications for re-engagement across devices
-
Role-based permissions for admins and members
Each feature requires careful implementation. Typing indicators need cleanup logic. Read receipts must handle multi-device scenarios. Presence requires efficient heartbeat management.
Media and Attachments
Modern chat isn't just text. Your media pipeline needs:
-
Pre-signed upload URLs direct to object storage (S3, Cloud Storage)
-
Asynchronous virus scanning before making files available
-
Automatic thumbnail generation for images and videos
-
Content moderation for inappropriate material
-
Metadata extraction and validation
-
CDN distribution for global performance
This pipeline runs in the background while showing users optimistic upload progress, maintaining the illusion of instant sharing while ensuring safety.
Moderation and Safety
A multi-layered approach to content safety requires controls at different stages of the message lifecycle.
-
Pre-send controls act as the first line of defense. Rate limiting per user and channel prevents spam floods. Message length restrictions stop abuse through massive text walls. Regex filters catch known problematic content before it's stored. File type and size restrictions prevent malicious uploads and resource exhaustion.
-
Post-send analysis handles the nuanced moderation that can't be caught by simple rules. AI-based toxicity detection identifies harmful content that might slip past keyword filters. Spam classification catches sophisticated spam patterns. Illegal content scanning protects your platform from serious liability. When the system isn't certain, it can quarantine suspicious content for human review rather than making a binary decision.
-
User controls recognize that your community members are often the best judges of appropriate behavior. Report functionality lets users flag problems that automated systems miss. Block and mute capabilities give users control over their own experience. Clear community guidelines set expectations upfront. Transparent moderation actions with audit trails build trust that the system is fair and accountable.
Each layer serves a purpose. Pre-send controls handle obvious abuse efficiently. Post-send analysis catches sophisticated bad actors. User tools handle the edge cases and community-specific norms that no automated system can fully understand.
Making Your In-App Chat Decision
Choosing the right chat platform isn't just about features and pricing. It's about finding the solution that aligns with your product roadmap, technical capabilities, and user expectations. After evaluating dozens of implementations, we've found that successful teams follow a similar decision process.
Start With Your Core Use Case
The first question isn't "which platform is best?" but rather "what kind of chat do we actually need?" Your answer fundamentally shapes which platforms make sense:
-
User-to-user messaging points toward dedicated chat infrastructure. Stream, CometChat, and Sendbird are built for this, with APIs designed around conversations between peers. These platforms assume users create content, not just consume it.
-
Customer support scenarios require different tools entirely. If chat means helping users solve problems, dedicated support platforms offer ticket management, agent routing, and knowledge base integration that pure chat APIs lack.
-
Omnichannel requirements are increasingly common. If your users need to continue conversations across SMS, WhatsApp, and your app, Stream and Twilio Conversations are uniquely positioned for this. No other platform handles channel-switching as seamlessly.
-
Highly custom needs might justify building on Firebase, but be honest about whether your requirements are truly unique or just unfamiliar. Most "custom" chat needs can be met by configuring existing platforms.
Calculate Your Real Costs
Every platform has a different pricing model, and the cheapest option at 100 users might be the most expensive at 10,000. Build a simple spreadsheet with three scenarios:
-
Today: Your current active user count
-
Six months: Realistic growth projection
-
18 months: Optimistic but possible scale
For each scenario, calculate:
-
Monthly platform fees
-
Development time (in dollars)
-
Maintenance overhead
-
Migration costs if you outgrow the solution
Stream's $399/month paid plan might seem high for a 500-user app, but if it saves two months of developer time, it pays for itself in year one. Firebase might cost just $30/month in infrastructure, but if you spend six months building and maintaining features that come standard elsewhere, was it really cheaper?
Evaluate Your Team's Capabilities
Your dev team's experience matters more than most comparison charts acknowledge. Consider these factors:
-
Development resources: Do you have developers available for a multi-month chat project, or do you need something that ships in a week? Platforms like Stream that offer UI kits can go live in days. Firebase requires months for comparable functionality.
-
Real-time experience: Building reliable real-time systems is specialized work. If your team hasn't dealt with WebSocket reconnection logic, message ordering, or presence systems before, expect a learning curve with Firebase. Managed services handle these complexities for you.
-
Maintenance bandwidth: Every line of code you write needs maintenance. Security patches, performance optimization, and feature additions all take time. With managed services, that's someone else's job. With Firebase, it's yours forever.
Consider Your Growth Trajectory
Where you are today matters less than where you'll be when changing platforms becomes painful. Migration is always more complex than expected, as users have conversation history, integrations are deeply embedded, and downtime during switching costs customer trust.
If you're building a marketplace that might explode, choosing based solely on current costs could force an expensive migration just as you're growing fastest. If you're adding chat to an enterprise SaaS product, compliance and reliability matter more than saving $200/month.
Some patterns we've observed:
-
Startups pre-product-market fit: Often start with Firebase or similar, then migrate to Stream after finding traction
-
Funded startups: Usually skip the DIY phase and go straight to a premium service for faster deployment
-
Enterprise products: Prioritize Sendbird or Stream's enterprise plans for SLAs and compliance
-
Regulated industries: Focus on platforms with specific certifications (HIPAA, SOC 2)
No platform has everything, and the missing features matter more than the included ones. Create two lists:
Must-haves (deal-breakers if missing):
-
Message ordering and delivery guarantees
-
Push notifications
-
File sharing
-
Basic moderation tools
-
Mobile SDKs for your platforms
Nice-to-haves (would improve UX but aren't critical):
-
Message reactions
-
Threading
-
Translation
-
Voice/video calling
Now check each platform against these lists. Stream hits most of these features out of the box, and CometChat does well too, but you might find CometChat lacking if you need unlimited group chat participants or access to SDKs like Unity and Unreal. Twilio sacrifices some chat richness for channel flexibility. Firebase gives you whatever you build yourself.
The Practical Recommendations
Based on hundreds of implementations we've seen, here's what typically works:
-
For most teams building user-to-user chat: Stream or CometChat offer the best balance. Both provide comprehensive SDKs, reasonable pricing, and fast implementation. Stream edges ahead on performance metrics and gaming support, while some find CometChat's no-code widget helpful.
-
For massive scale from day one: Stream and Sendbird have proven infrastructure for millions of concurrent users. If you're launching something that might go viral or already has a vast user base, their architecture handles the load.
-
For connecting online and offline worlds: Twilio Conversations and Stream can bridge in-app chat with SMS and WhatsApp. Perfect for field services, healthcare, or any scenario where not everyone has your app.
-
For complete control or extreme budget constraints: Firebase lets you build exactly what you need for minimal infrastructure cost. Just budget realistically for development time and ongoing maintenance.
Remember that the best chat platform is the one that ships. A working solution using Stream's UI kit beats a perfect custom system that takes six months to build. Your users care about sending messages, not your infrastructure choices.
The good news is that most of these platforms offer free trials or developer accounts. Build a prototype with your top two choices and see which feels right for your team. The implementation experience often reveals issues that comparison charts miss.
Choosing the Right In-App Chat
In-app chat has evolved from a nice-to-have feature to a fundamental expectation. Users expect to communicate without leaving your app, whether they're negotiating in a marketplace, collaborating with teammates, or getting support. The data backs this up: chat drives higher conversions, enables support teams to handle more conversations, and keeps users engaged in your product experience.
The technical complexity of building reliable, scalable chat from scratch makes partnering with a specialized provider the practical choice for most teams.
With comprehensive SDKs across all major platforms, proven performance at scale, reasonable pricing that grows with your business, and the flexibility to customize without starting from scratch, Stream provides the optimal combination of developer experience, feature completeness, and long-term viability for most teams implementing chat within their apps.