This tutorial teaches you how to build Zoom/Whatsapp style video calling experience for your app.
- Calls run on Stream's global edge network for optimal latency & reliability.
- Permissions give you fine grained control over who can do what.
- Video quality and codecs are automatically optimized.
- Powered by Stream's Video Calling API.
Step 0 - Prepare your environment
For this tutorial, you'll need a few tools to be installed on your device. You can skip this step in case you already have them installed.
Step 1 - Set up an app and install React Video SDK
In this step, we will create a new React application using the Vite CLI, and install Stream's React Video SDK. We recommend using Vite because it is fast and easy to use.
123yarn create vite video-call --template react-ts
cd video-call
yarn add @stream-io/video-react-sdk
Step 2 - Create & Join a call
Open up src/App.tsx and replace it with this code:
123456789101112131415161718192021222324252627282930313233343536373839404142434445import { CallingState, StreamCall, StreamVideo, StreamVideoClient, useCall, useCallStateHooks, User } from '@stream-io/video-react-sdk';

const apiKey = 'REPLACE_WITH_API_KEY';
const token = 'REPLACE_WITH_TOKEN';
const userId = 'REPLACE_WITH_USER_ID';
const callId = 'REPLACE_WITH_CALL_ID';

// set up the user object
const user: User = {
  id: userId,
  name: 'Oliver',
  image: 'https://getstream.io/random_svg/?id=oliver&name=Oliver',
};

const client = new StreamVideoClient({ apiKey, user, token });
const call = client.call('default', callId);
call.join({ create: true });

export default function App() {
  return (
    <StreamVideo client={client}>
      <StreamCall call={call}>
        <MyUILayout />
      </StreamCall>
    </StreamVideo>
  );
}

export const MyUILayout = () => {
  const call = useCall();

  const { useCallCallingState, useParticipantCount } = useCallStateHooks();
  const callingState = useCallCallingState();
  const participantCount = useParticipantCount();

  if (callingState !== CallingState.JOINED) {
    return <div>Loading...</div>;
  }

  return (
    <div>
      Call "{call.id}" has {participantCount} participants
    </div>
  );
};
To actually run this sample, we need a valid user token. The user token is typically generated by your server side API. When a user logs in to your app you return the user token that gives them access to the call. To make this tutorial easier to follow, we've generated the credentails for you.
Now you are ready to run your app. In your terminal, run:
1yarn run dev
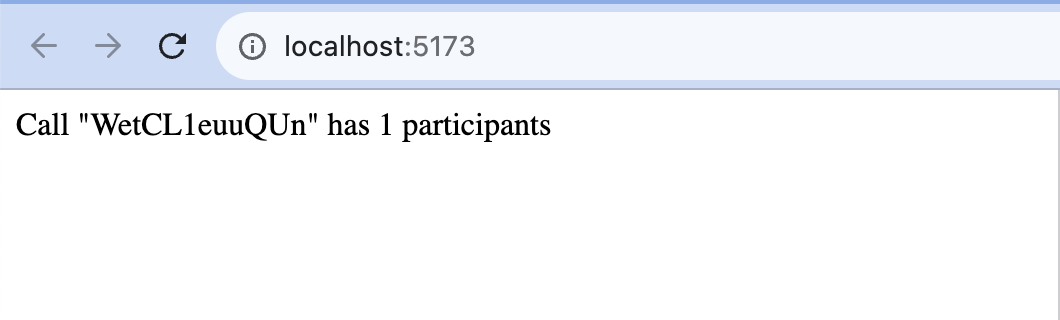
Once you open the browser and run the app, it will connect successfully to our systems. The text will say "Call ... has 1 participant" (yourself).
Let's review what we did in the above code
User setup
First, we create a user object. You typically sync these users via a server side integration from your own backend. Alternatively, you can also use guest or anonymous users.
1234567import type { User } from '@stream-io/video-react-sdk';

const user: User = {
  id: userId,
  name: 'Oliver',
  image: 'https://getstream.io/random_svg/?id=oliver&name=Oliver',
};
Client setup
Next we initialize the client by passing the API Key, user and user token.
123import { StreamVideoClient } from '@stream-io/video-react-sdk';

const client = new StreamVideoClient({ apiKey, user, token });
Create and join call
After the user and client are created, we create a call like this:
12const call = client.call('default', callId);
await call.join({ create: true });
As soon as you use call.join() the connection for video & audio is setup.
In production grade apps, you'd typically store the
callinstance in a state variable and take care of correctly disposing it. Read more in our Joining and Creating Calls guide.
Rendering the UI
Lastly, the UI is rendered by observing the call state through the call state hooks:
12345678import { useCallStateHooks } from '@stream-io/video-react-sdk';

// all call state hooks are available in the useCallStateHooks() object
// your IDE should help you to explore all of them
const { useCallCallingState, useParticipantCount } = useCallStateHooks();

const callingState = useCallCallingState();
const participantCount = useParticipantCount();
You'll find all relevant state for the call in call.state - also exposed through a set of SDK provided hooks.
The documentation on Call and Participant state explains this in further detail.
To render the UI, you can either use SDK provided components or build your own on top of our Core Components and Call State Hooks.
Step 3 - Joining from the web
To make this a little more interactive, let's join the call from your browser.
In your browser, you'll see the text update to: Call <call-id> has 2 participants.
Let's keep the browser tab open as you go through the tutorial.
Step 4 - Rendering Video
In this next step, we're going to render your local & remote participants video.
Let's update our UILayout component to load the predefined SDK stylesheet,
apply the default theme and render the participant's video and play their audio.
1234567891011121314151617181920212223242526272829import { CallingState, StreamTheme, useCallStateHooks } from '@stream-io/video-react-sdk';

import '@stream-io/video-react-sdk/dist/css/styles.css';

// ... rest of the App.tsx code

export const MyUILayout = () => {
  const {
    useCallCallingState,
    useLocalParticipant,
    useRemoteParticipants,
    // ... other hooks
  } = useCallStateHooks();

  const callingState = useCallCallingState();
  const localParticipant = useLocalParticipant();
  const remoteParticipants = useRemoteParticipants();

  if (callingState !== CallingState.JOINED) {
    return <div>Loading...</div>;
  }

  return (
    <StreamTheme>
      <MyParticipantList participants={remoteParticipants} />
      <MyFloatingLocalParticipant participant={localParticipant} />
    </StreamTheme>
  );
};
We will now create a MyParticipantList component that will render the remote participants video and play the participant's audio.
We are going to use the SDK-provided ParticipantView component. We'll learn a bit more about it later in this tutorial.
1234567891011121314import { ParticipantView, StreamVideoParticipant } from '@stream-io/video-react-sdk';

// ... rest of the App.tsx code

export const MyParticipantList = (props: { participants: StreamVideoParticipant[] }) => {
  const { participants } = props;
  return (
    <div style={{ display: 'flex', flexDirection: 'row', gap: '8px' }}>
      {participants.map((participant) => (
        <ParticipantView participant={participant} key={participant.sessionId} />
      ))}
    </div>
  );
};
With this, we have a simple grid layout for the remote participants.
Let's add a floating video (MyFloatingLocalParticipant) for the local participant:
12345678910111213141516171819202122import { ParticipantView, StreamVideoParticipant } from '@stream-io/video-react-sdk';

// ... rest of the App.tsx code

export const MyFloatingLocalParticipant = (props: { participant?: StreamVideoParticipant }) => {
  const { participant } = props;
  return (
    <div
      style={{
        position: 'absolute',
        top: '15px',
        left: '15px',
        width: '240px',
        height: '135px',
        boxShadow: 'rgba(0, 0, 0, 0.1) 0px 0px 10px 3px',
        borderRadius: '12px',
      }}
    >
      <ParticipantView participant={participant} />
    </div>
  );
};
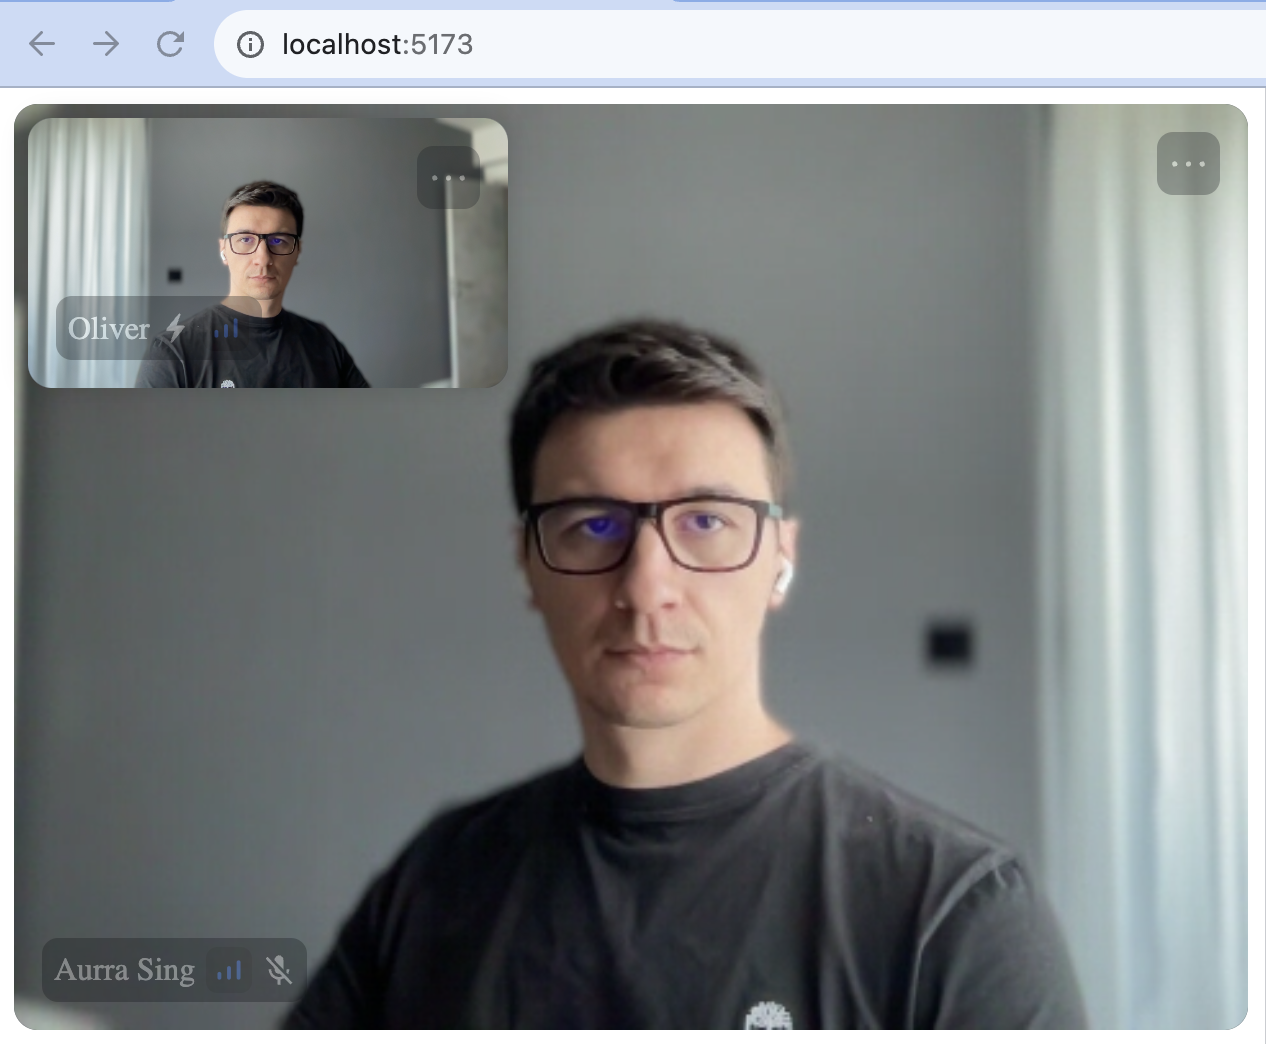
Now when you run the app (yarn run dev), you'll see your local video in a floating video element and the video from your other browser tab.
The final result should look somewhat like this:
Let's review the changes we made
ParticipantView is one of our primary low-level components.
123import { ParticipantView } from '@stream-io/video-react-sdk';

<ParticipantView participant={participant} key={participant.sessionId} />;
It only displays the video comes with some default UI elements, such as participant's name. The video is lazily loaded, and only requested from the video infrastructure if you're actually displaying it. So if you have a video call with 200 participants, and you show only 10 of them, you'll only receive video for 10 participants. This is how software like Zoom and Google Meet make large calls work.
MyFloatingLocalParticipant renders a display of your own video.
1234const { useLocalParticipant } = useCallStateHooks();
const localParticipant = useLocalParticipant();

<MyFloatingLocalParticipant participant={useLocalParticipant} />;
MyParticipantList renders a list of remote participants.
1234const { useRemoteParticipants } = useCallStateHooks();
const remoteParticipants = useRemoteParticipants();

<MyParticipantList participants={remoteParticipants} />;
Step 5 - A Full Video Calling UI
The above example showed how to use the call state and React to build a basic video UI. For a production version app, you'd want a few more UI elements:
- Indicators of when someone is speaking
- Quality of their network connection
- Layout support for more than two participants
- Labels for the participant names
- Call controls
Stream React Video SDK ships with several React components to make this easy. You can customize the components with theming, arguments and swapping parts of them. This is convenient if you want to quickly build a production ready calling experience for you app. (and if you need more flexibility, many customers use the above low level approach to build a UI from scratch).
To render a full calling UI, we'll leverage the SpeakerLayout component for arranging the video elements, and the CallControls component for rendering the call controls. Also, we are going to introduce a minimalistic CSS file to make the UI look a bit nicer.
123456789101112131415161718body,
html {
  height: 100%;
  width: 100%;
  margin: 0;
  font-family: sans-serif;
}

.str-video {
  background-color: #272a30;
  color: #ffffff;
  height: 100dvh;
  width: 100%;
  display: flex;
  flex-direction: column;
  min-width: 0;
  max-width: 100%;
}
12345678910111213141516171819202122232425262728293031323334353637383940414243444546474849505152535455import {
  CallControls,
  CallingState,
  SpeakerLayout,
  StreamCall,
  StreamTheme,
  StreamVideo,
  StreamVideoClient,
  useCallStateHooks,
  User,
} from '@stream-io/video-react-sdk';

import '@stream-io/video-react-sdk/dist/css/styles.css';
import './style.css';

const apiKey = 'REPLACE_WITH_API_KEY';
const token = 'REPLACE_WITH_TOKEN';
const userId = 'REPLACE_WITH_USER_ID';
const callId = 'REPLACE_WITH_CALL_ID';

const user: User = {
  id: userId,
  name: 'Oliver',
  image: 'https://getstream.io/random_svg/?id=oliver&name=Oliver',
};

const client = new StreamVideoClient({ apiKey, user, token });
const call = client.call('default', callId);
call.join({ create: true });

export default function App() {
  return (
    <StreamVideo client={client}>
      <StreamCall call={call}>
        <MyUILayout />
      </StreamCall>
    </StreamVideo>
  );
}

export const MyUILayout = () => {
  const { useCallCallingState } = useCallStateHooks();
  const callingState = useCallCallingState();

  if (callingState !== CallingState.JOINED) {
    return <div>Loading...</div>;
  }

  return (
    <StreamTheme>
      <SpeakerLayout participantsBarPosition='bottom' />
      <CallControls />
    </StreamTheme>
  );
};
The final UI should look like this:
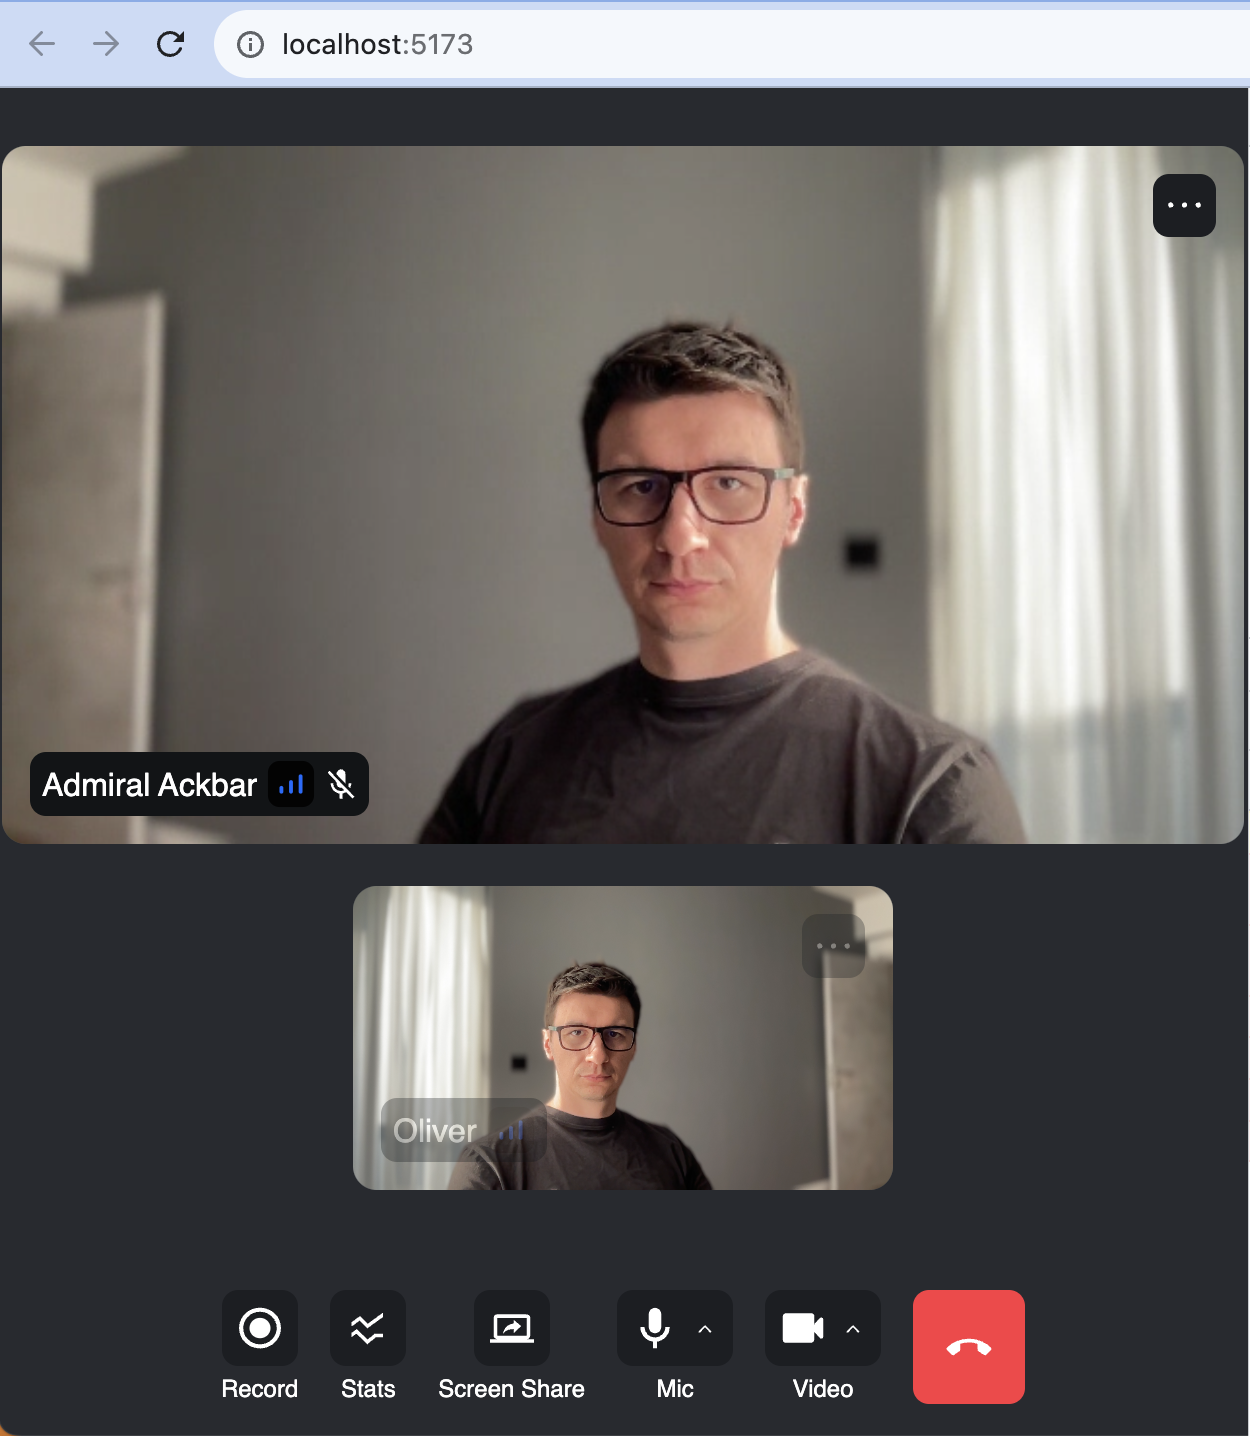
When you now run your app, you'll see a more polished video UI. It supports reactions, screensharing, active speaker detection, network quality indicators etc. The most commonly used UI components are:
- ParticipantView: For rendering video and automatically requesting video tracks when needed. Most of the Video components are built on top of this.
- DefaultParticipantViewUI: The participant's video + some UI elements for network quality, reactions, speaking etc.
ParticipantViewuses this UI by default. - PaginatedGridLayout: A grid of participants. Support pagination out of the box.
- SpeakerLayout: A layout that shows the active speaker in a large video, and the rest of the participants a scrollable bar.
- CallControls: A set of buttons for controlling your call, such as changing audio and video mute state, switching mic or a camera.
The full list of UI components is available in the docs.
Because of simplicity, in this tutorial, we are skipping some of the best practices for building a production ready app. Take a look at our sample app linked at the end of this tutorial for a more complete example.
Step 6 - Customizing the UI
You can customize the UI by:
- Building your own UI components (the most flexibility, build anything).
- Mixing and matching with Stream's UI Components (speeds up how quickly you can build custom video UIs).
- Theming (basic customization of colors, fonts etc).
You can find many examples on how to build your own custom UI components in our UI Cookbook docs.
Step 7 - Enable Noise Cancellation
Background noise during a call session is never pleasant for the call participants.
Our SDK provides a plugin that helps to greatly reduce the unwanted noise caught by your microphone. Read more on how to enable it here.
Recap
Please do let us know if you ran into any issues while building an video calling app with React Video SDK. Our team is also happy to review your UI designs and offer recommendations on how to achieve it with Stream.
To recap what we've learned:
- To set up a call:
const call = client.call('default', '123');. - The call type (
'default'in the above case) controls which features are enabled and how permissions are setup. - When you join a call, realtime communication is setup for audio & video calling:
call.join(). - Call state
call.stateand helper state access hooks exposed throughuseCallStateHooks()make it easy to build your own UI ParticipantViewis the low level component that renders video, plays audio and by default, it utilizesDefaultParticipantViewUIthat adds UI elements as participant name, network quality, etc...
We've used Stream's Video Calling API, which means calls run on a global edge network of video servers. By being closer to your users the latency and reliability of calls are better. The React SDK enables you to build in-app video calling, audio rooms and livestreaming in days.
The source code for the final app can be found in our GitHub repository.
We hope you've enjoyed this tutorial and please do feel free to reach out if you have any suggestions or questions.
Final Thoughts
In this video app tutorial we built a fully functioning React messaging app with our React SDK component library. We also showed how easy it is to customize the behavior and the style of the React video app components with minimal code changes.
Both the video SDK for React and the API have plenty more features available to support more advanced use-cases.