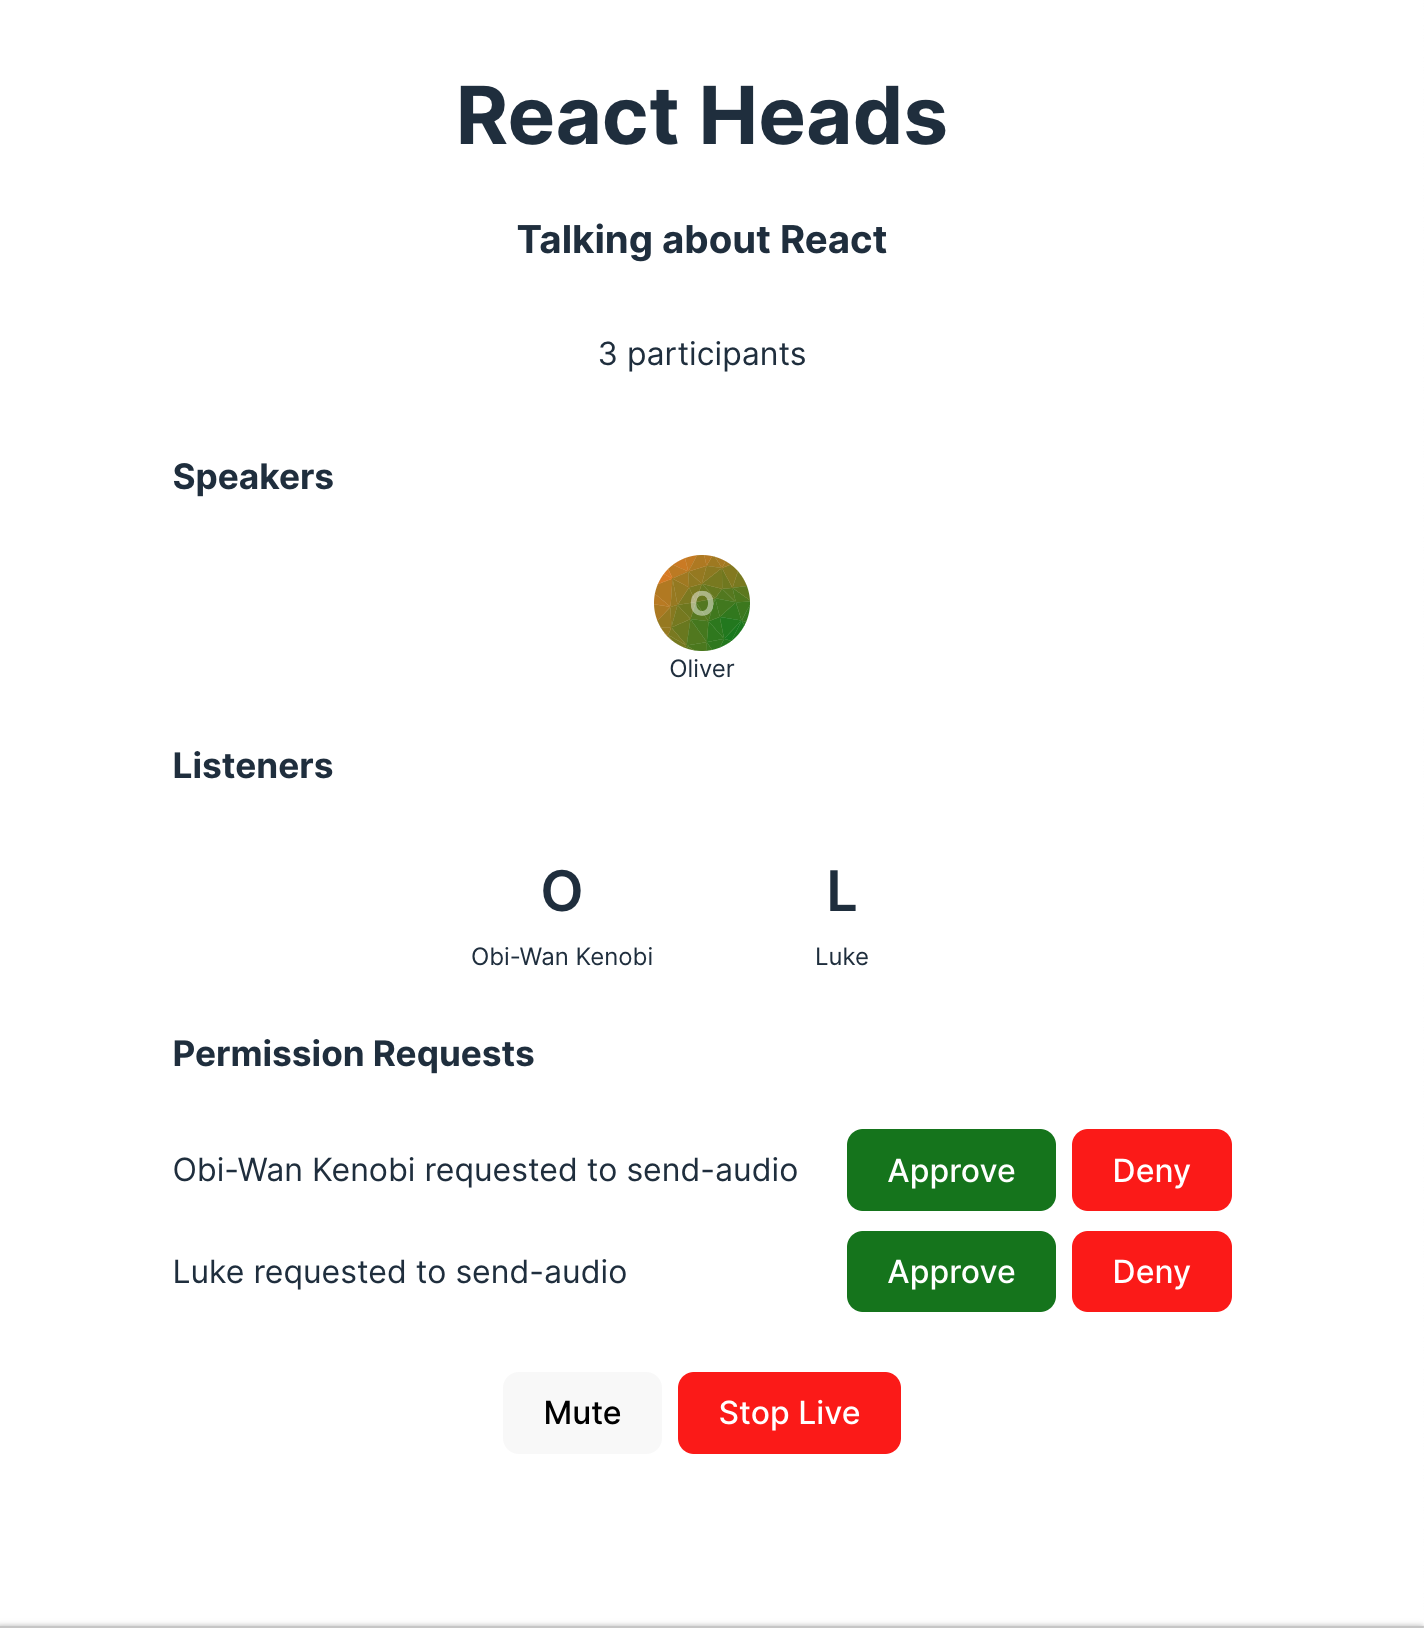
This tutorial will teach you how to build an audio room experience like Twitter Spaces or Clubhouse. The end result will look like the image below and will support the following features:
- Backstage mode. You can start the call with your co-hosts and chat a bit before going live
- Calls run on Stream's global edge network for optimal latency and scalability
- There is no cap to how many listeners you can have in a room
- Listeners can raise their hand, and be invited to speak by the host
- Audio tracks are sent multiple times for optimal reliability
Time to get started building an audio-room for your app.
Step 0 - Prepare your environment
For this tutorial, you'll need a few tools to be installed on your device. You can skip this step in case you already have them installed.
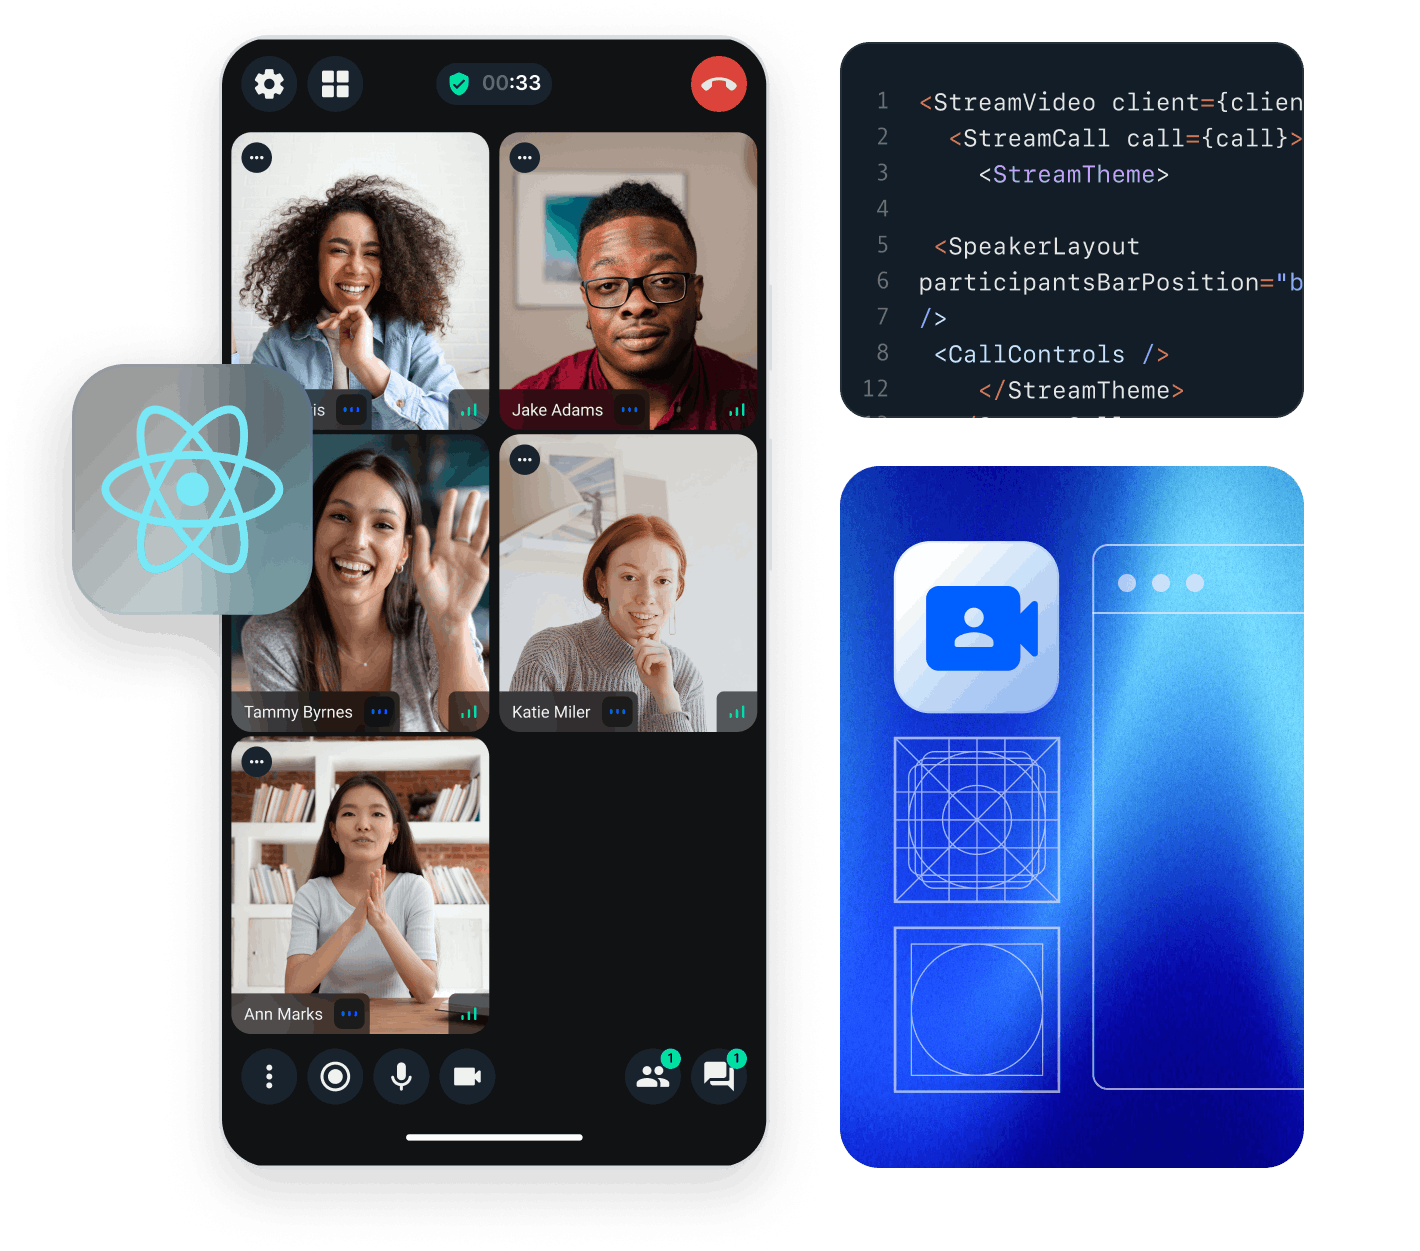
Step 1 - Create a new React app and install the React Video & Audio SDK
In this step, we will create a new React application using the Vite CLI, and install Stream's React Video & Audio SDK. We recommend using Vite because its fast and easy to use.
123yarn create vite audio-rooms --template react-ts
cd audio-rooms
yarn add @stream-io/video-react-sdk
Step 2 - Create & Join a call
Open up src/App.tsx and replace it with this code:
12345678910111213141516171819202122232425262728293031323334353637import { StreamCall, StreamVideo, StreamVideoClient, User } from '@stream-io/video-react-sdk';
import '@stream-io/video-react-sdk/dist/css/styles.css';

const apiKey = 'REPLACE_WITH_API_KEY';
const token = 'REPLACE_WITH_TOKEN';
const userId = 'REPLACE_WITH_USER_ID';
const callId = 'REPLACE_WITH_CALL_ID';
// initialize the user object
const user: User = {
  id: userId,
  name: 'Oliver',
  image: 'https://getstream.io/random_svg/?id=oliver&name=Oliver',
};

const client = new StreamVideoClient({ apiKey, user, token });
const call = client.call('audio_room', callId);
call.join({
  create: true,
  data: {
    members: [/* { user_id: 'john_smith' }, { user_id: 'jane_doe' } */],
    custom: {
      title: 'React Rooms',
      description: 'Talking about React',
    },
  },
});

export default function App() {
  return (
    <StreamVideo client={client}>
      <StreamCall call={call}>
        {/** We will introduce the <MyUILayout /> component later */}
        {/** <MyUILayout /> */}
      </StreamCall>
    </StreamVideo>
  );
};
Let's review the example above and go over the details.
User setup
First we create a user object. You typically sync your users via a server side integration from your own backend. Alternatively, you can also use guest or anonymous users.
1234567import type { User } from '@stream-io/video-react-sdk';

const user: User = {
  id: userId,
  name: 'Oliver',
  image: 'https://getstream.io/random_svg/?id=oliver&name=Oliver',
};
Client setup
Next, we initialize the client by passing the API Key, user and user token.
123import { StreamVideoClient } from '@stream-io/video-react-sdk';

const client = new StreamVideoClient({ apiKey, user, token });
Create and join call
After the user and client are created, we create a call like this:
1234567891011const call = client.call('audio_room', callId);
await call.join({
  create: true,
  data: {
    members: [{ user_id: 'john_smith' }, { user_id: 'jane_doe' }],
    custom: {
      title: 'React Rooms',
      description: 'Talking about React',
    },
  },
});
- This joins and creates a call with the type:
audio_roomand the specifiedcallId - The users with id
john_smithandjane_doeare added as members to the call - And we set the
titleanddescriptioncustom field on the call object
In production grade apps, you'd typically store the
callinstance in a state variable and take care of correctly disposing it. Read more in our Joining and Creating Calls guide.
To actually run this sample, we need a valid user token. The user token is typically generated by your server side API. When a user logs in to your app you return the user token that gives them access to the call. To make this tutorial easier to follow, we've generated the credentails for you.
Step 3 - Adding audio room UI elements
In this next step we'll add:
- Room title and description
- Controls to toggle live mode on/off
- A list of participants with their speaking status
Room Title & Description
Let's create the components we need to render this and add them to the main app
1234567891011121314import { useCallStateHooks } from '@stream-io/video-react-sdk';

export const MyDescriptionPanel = () => {
  const { useCallCustomData, useParticipants } = useCallStateHooks();
  const custom = useCallCustomData();
  const participants = useParticipants();
  return (
    <div className='description-panel'>
      <h2 className='title'>{custom?.title ?? '<Title>'}</h2>
      <h3 className='description'>{custom?.description ?? '<Description>'}</h3>
      <p className='participant-count'>{participants.length} participants</p>
    </div>
  );
};
12345678910111213141516171819import { Avatar, useCallStateHooks } from '@stream-io/video-react-sdk';

export const MyParticipantsPanel = () => {
  const { useParticipants } = useCallStateHooks();
  const participants = useParticipants();
  return (
    <div className='participants-panel'>
      <h4>Participants</h4>
      {participants.map((participant) => {
        return (
          <div className='participant' key={participant.sessionId}>
            <Avatar imageSrc={participant.image} />
            <div className='name'>{participant.name}</div>
          </div>
        );
      })}
    </div>
  );
};
12345678export const MyControlsPanel = () => {
  return (
    <div className='controls-panel'>
      <MyMicButton /> // we'll add this later
      <MyLiveButton /> // we'll add this later
    </div>
  );
};
That's it for the basics, here's how the app MyUILayout should look like now:
123456789export const MyUILayout = () => {
  return (
    <div className='ui-layout'>
      <MyDescriptionPanel />
      <MyParticipantsPanel />
      <MyControlsPanel />
    </div>
  );
};
Finally, let's add the UILayout to the main app component:
12345678910111213// ... omitted imports
import { MyUILayout } from './UILayout';

export const App = () => {
  // ... omitted code
  return (
    <StreamVideo client={client}>
      <StreamCall call={call}>
        <MyUILayout />
      </StreamCall>
    </StreamVideo>
  );
};
The approach is the same for all components.
We take the states of the call by observing call.state updates through the SDK provided hooks,
such as useParticipants() or useCallCustomData() and use it to power our UI.
These two hooks and many others are available in the useCallStateHooks utility.
In React, all
call.stateproperties can be accessed via a set of hooks, all exposed by theuseCallStateHooksutility hook. This makes it easier to build UI components that react to changes in the call state.Read more about it at Call & Participant State.
To make this a little more interactive, let's join the audio room from the browser.
Backstage & Live mode control
As you probably noticed by opening the same room from the browser, audio rooms by default are not live.
Regular users can only join an audio room when it is in live mode.
Let's expand the ControlPanel and add a button that controls the backstage of the room.
123456789101112131415161718192021222324import { useCall, useCallStateHooks } from '@stream-io/video-react-sdk';

export const MyLiveButton = () => {
  // this utility hook returns the call object from the <StreamCall /> context
  const call = useCall();
  // will emit a new value whenever the call goes live or stops being live.
  // we can use it to update the button text or adjust any other UI elements
  const { useIsCallLive } = useCallStateHooks();
  const isLive = useIsCallLive();
  return (
    <button
      className={`live-button ${isLive ? 'live' : ''}`}
      onClick={async () => {
        if (isLive) {
          await call?.stopLive();
        } else {
          await call?.goLive();
        }
      }}
    >
      {isLive ? 'Stop Live' : 'Go Live'}
    </button>
  );
};
While we're at it, let's also add a button that allows to mute/unmute the local audio track:
1234567891011121314151617181920import { useCallStateHooks } from '@stream-io/video-react-sdk';

export const MyMicButton = () => {
  const { useMicrophoneState } = useCallStateHooks();
  const { microphone, isMute } = useMicrophoneState();
  return (
    <button
      className='mic-button'
      onClick={async () => {
        if (isMute) {
          await microphone.enable();
        } else {
          await microphone.disable();
        }
      }}
    >
      {isMute ? 'Unmute' : 'Mute'}
    </button>
  );
};
Now the app exposes a mic control button and a button that allows to toggle live mode on/off. If you try the web demo of the audio room you should be able to join as a regular user.
List Participants
As a next step, let's render the actual list of participants and show an indicator when they are speaking.
To do this we are going to create a Participant component and render it from the ParticipantsPanel
12345678910111213import { Avatar, StreamVideoParticipant } from '@stream-io/video-react-sdk';

export const MyParticipant = ({ participant }: { participant: StreamVideoParticipant }) => {
  // `isSpeaking` information is available on the participant object,
  // and it is automatically detected by our system and updated by our SDK.
  const { isSpeaking } = participant;
  return (
    <div className={`participant ${isSpeaking ? 'speaking' : ''}`}>
      <Avatar imageSrc={participant.image} />
      <div className='name'>{participant.name}</div>
    </div>
  );
};
123456789101112131415161718import { useCallStateHooks } from '@stream-io/video-react-sdk';
import { MyParticipant } from './MyParticipant';

export const MyParticipantsPanel = () => {
  const { useParticipants } = useCallStateHooks();
  // whenever a participant receives an update, this hook will re-render
  // this component with the updated list of participants, ensuring that
  // the UI is always in sync with the call state.
  const participants = useParticipants();
  return (
    <div className='participants-panel'>
      <h4>Participants</h4>
      {participants.map((p) => (
        <MyParticipant participant={p} key={p.sessionId} />
      ))}
    </div>
  );
};
With these changes things get more interesting, the app is now showing a list of all participants connected to the call and displays a green frame around the ones that are speaking.
However, you might have noticed that you can't hear the audio from the browser.
To enable this, you need to render the audio track of every participant.
Our SDK provides a special component for this purpose, called <ParticipantsAudio />.
Let's add it to MyParticipantsPanel:
12345678910111213141516171819import { ParticipantsAudio, useCallStateHooks } from '@stream-io/video-react-sdk';
import { MyParticipant } from './MyParticipant';

export const MyParticipantsPanel = () => {
  const { useParticipants } = useCallStateHooks();
  // whenever a participant receives an update, this hook will re-render
  // this component with the updated list of participants, ensuring that
  // the UI is always in sync with the call state.
  const participants = useParticipants();
  return (
    <div className='participants-panel'>
      <h4>Participants</h4>
      <ParticipantsAudio participants={participants} />
      {participants.map((p) => (
        <MyParticipant participant={p} key={p.sessionId} />
      ))}
    </div>
  );
};
Step 4 - Go live and join from the browser
If you now join the call from the browser, you will see that the participant list updates as you open/close the browser tab.
Note how the web interface won't allow you to share your audio/video. The reason for this is that by default the
audio_roomcall type only allows moderators or admins to speak. Regular participants can request permission. And if different defaults make sense for your app you can edit the call type in the dashboard or create your own.
Step 4.1 - Enable Noise Cancellation
Background noise in an audio session is never a pleasant experience for the listeners and the speaker.
Our SDK provides a plugin that helps to greatly reduce the unwanted noise caught by your microphone. Read more on how to enable it here.
Step 5 - Requesting permission to speak
Requesting permission to speak is easy. Let's first have a quick look at how the SDK call object exposes this:
Requesting permission to speak
12345import { OwnCapability } from '@stream-io/video-react-sdk';

await call.requestPermissions({
  permissions: [OwnCapability.SEND_AUDIO],
});
Handling permission requests
Permission requests are delivered to the call object in a form of an event one can subscribe to:
123456789101112131415import type { PermissionRequestEvent } from '@stream-io/video-react-sdk';

const unsubscribe = call.on('call.permission_requested', async (request: PermissionRequestEvent) => {
  // get the permission request data
  const { user, permissions } = request;

  // reject it
  await call.revokePermissions(user.id, permissions);

  // grant it
  await call.grantPermissions(user.id, permissions);
});

// remember to unsubscribe when you're done
unsubscribe();
Let's add another view that shows the last incoming request as well as the buttons to grant / reject it
12345678910111213141516171819202122232425262728293031323334353637383940414243444546474849import { useCall, PermissionRequestEvent } from '@stream-io/video-react-sdk';
import { useCallback, useEffect, useState } from 'react';

export const MyPermissionRequestsPanel = () => {
  // this hook will take the call instance from the <StreamCall /> context.
  const call = useCall();
  const [permissionRequests, setPermissionRequests] = useState<PermissionRequestEvent[]>([]);

  useEffect(() => {
    return call?.on('call.permission_request', (event) => {
      const request = event as PermissionRequestEvent;
      setPermissionRequests((reqs) => [...reqs, request]);
    });
  }, [call]);

  const handlePermissionRequest = useCallback(
    async (request: PermissionRequestEvent, accept: boolean) => {
      const { user, permissions } = request;
      try {
        if (accept) {
          await call?.grantPermissions(user.id, permissions);
        } else {
          await call?.revokePermissions(user.id, permissions);
        }
        setPermissionRequests((reqs) => reqs.filter((req) => req !== request));
      } catch (err) {
        console.error(`Error granting or revoking permissions`, err);
      }
    },
    [call],
  );

  if (!permissionRequests.length) return null;

  return (
    <div className='permission-requests'>
      <h4>Permission Requests</h4>
      {permissionRequests.map((request) => (
        <div className='permission-request' key={request.user.id}>
          <span>
            {request.user.name} requested to {request.permissions.join(', ')}
          </span>
          <button onClick={() => handlePermissionRequest(request, true)}>Approve</button>
          <button onClick={() => handlePermissionRequest(request, false)}>Deny</button>
        </div>
      ))}
    </div>
  );
};
And here is the updated UILayout code that includes it:
12345678910export const MyUILayout = () => {
  return (
    <div className='ui-layout'>
      <MyDescriptionPanel />
      <MyParticipantsPanel />
      <MyPermissionRequestsPanel />
      <MyControlsPanel />
    </div>
  );
};
Step 6 - Group participants
It is common for audio rooms and similar interactive audio/video experiences to show users in separate groups. Let's see how we can update this application to render participants in two separate sections: speakers and listeners.
Building custom layouts is very simple, all we need to do is to apply some filtering to the result of useParticipants() hook.
1234567891011121314151617import { SfuModels, StreamVideoParticipant, useCallStateHooks } from '@stream-io/video-react-sdk';

// grab a reference to the useParticipants hook
const { useParticipants } = useCallStateHooks();

// a list of participants, by default this is list is ordered by the ID of the user
const participants = useParticipants();

const hasAudio = (p: StreamVideoParticipant) =>
  p.publishedTracks.includes(SfuModels.TrackType.AUDIO);

// Speakers: participants that have an audio track
// (i.e., are allowed to speak and have a mic configured)
const speakers = participants.filter((p) => hasAudio(p));

// Listeners: participants that do not have an audio track
const listeners = participants.filter((p) => !hasAudio(p));
We already have a view to display participants so all we need to do is to update it to use the new speakers and listeners arrays.
1234567891011121314151617181920212223242526272829303132333435import {
  ParticipantsAudio,
  SfuModels,
  StreamVideoParticipant,
  useCallStateHooks,
} from '@stream-io/video-react-sdk';
import { MyParticipant } from './MyParticipant';

export const MyParticipantsPanel = () => {
  const hasAudio = (p: StreamVideoParticipant) =>
    p.publishedTracks.includes(SfuModels.TrackType.AUDIO);

  const { useParticipants } = useCallStateHooks();
  const participants = useParticipants();
  const speakers = participants.filter((p) => hasAudio(p));
  const listeners = participants.filter((p) => !hasAudio(p));

  return (
    <>
      <h4>Speakers</h4>
      <ParticipantsAudio participants={speakers} />
      <div className='participants-panel'>
        {speakers.map((p) => (
          <MyParticipant participant={p} key={p.sessionId} />
        ))}
      </div>
      <h4>Listeners</h4>
      <div className='participants-panel'>
        {listeners.map((p) => (
          <MyParticipant participant={p} key={p.sessionId} />
        ))}
      </div>
    </>
  );
};
For simplicity, in this tutorial, we are skipping some of the best practices for building a production ready app. Take a look at our sample app linked at the end of this tutorial for a more complete example.
Other built-in features
There are a few more exciting features that you can use to build audio rooms
- Query Calls: You can query calls to easily show upcoming calls, calls that recently finished as well as call previews.
- Reactions & Custom events: Reactions and custom events are supported.
- Recording & Broadcasting: You can record and broadcast your calls.
- Chat: Stream's Chat SDKs are fully featured and you can integrate them in the call
- Moderation: Moderation capabilities are built-in to the product
- Transcriptions: Transcriptions aren't available yet, but they are due to launch soon
Recap
It was fun to see just how quickly you can build an audio-room for your app. Please do let us know if you ran into any issues. Our team is also happy to review your UI designs and offer recommendations on how to achieve it with Stream.
To recap what we've learned:
- You set up a call with
const call = client.call('audio_room', '123') - The call type
audio_roomcontrols which features are enabled and how permissions are set up - The
audio_roomby default enablesbackstagemode, and only allows admins and the creator of the call to join before the call goes live - When you join a call, realtime communication is set up for audio:
await call.join() - Call state
call.stateand utility state access hooks exposed throughuseCallStateHooks()make it easy to build your own UI - For audio rooms, we use Opus RED and Opus DTX for optimal audio quality.
We've used Stream's Audio Rooms API, which means calls run on a global edge network of video servers. By being closer to your users the latency and reliability of calls are better. The React SDK enables you to build in-app video calling, audio rooms and livestreaming in days.
We hope you've enjoyed this tutorial and please do feel free to reach out if you have any suggestions or questions. You can find the code and the stylesheet for this tutorial in this CodeSandbox.
The source code for the companion audio room app, together with all of its features, is available on GitHub.
Final Thoughts
In this video app tutorial we built a fully functioning React messaging app with our React SDK component library. We also showed how easy it is to customize the behavior and the style of the React video app components with minimal code changes.
Both the video SDK for React and the API have plenty more features available to support more advanced use-cases.