npm install @stream-io/video-react-sdk stream-chat-react stream-chatChat Integration
Embed video calling into a chat application with ring call support.
Best Practices
- Use the same API key for both chat and video clients - no separate apps needed.
- Use unique call IDs for ring calls (UUID recommended).
- Filter
useCalls()bycall.ringingto show pending calls only. - Use
call.isCreatedByMeto distinguish incoming vs outgoing calls. - Handle all calling states:
RINGING,JOINING,JOINED. - Clean up call instances properly with
call.leave()in useEffect cleanup.
See the demo application for complete implementation.
Project setup and prerequisites
Make sure you have the following prerequisites checked:
- Registered Stream account
- Have an app created in the Stream's dashboard to obtain app API key and secret.
- Initiate the project (you can follow our introductory tutorial setup guide)
- Have installed the Stream video and chat SDKs in the project:
yarn add @stream-io/video-react-sdk stream-chat-react stream-chatWhen implementing a ring call scenario as we do in this demo, it is important to have a good understanding of our ring call lifecycle. You can learn more about the topic in the Joinging & Creating Calls guide.
App boilerplate
We have prepared a demo application to accompany this guide. We do not aim to explain the whole demo application source code. The demo application will serve us to demonstrate the main concepts behind the video-in-chat integration.
To initiate chat and video clients you are encouraged to use the same API key. The user tokens should be generated with the same secret. There is no need to create separate apps for chat and video.
note
Initiating chat and video clients
import type { UserResponse } from "stream-chat";
import { Chat } from "stream-chat-react";
import { StreamVideo, StreamVideoClient } from "@stream-io/video-react-sdk";
import { Channel } from "./components/Channel";
import { Sidebar } from "./components/Sidebar";
import { Video } from "./components/Video";
import { useCreateChatClient } from "./hooks";

import { useState } from "react";

const Root = ({
  apiKey,
  user,
  userToken,
}: {
  apiKey: string;
  user: UserResponse;
  userToken: string;
}) => {
  const chatClient = useCreateChatClient({
    apiKey,
    tokenOrProvider: userToken,
    userData: user,
  });
  const [videoClient, setVideoClient] = useState<StreamVideoClient>();

  useEffect(() => {
    const _client = new StreamVideoClient({ apiKey, user, token: userToken });
    setVideoClient(_client);

    return () => {
      _client.disconnectUser();
      setVideoClient(undefined);
    };
  }, []);

  if (!chatClient || !videoClient) return null;

  return (
    <Chat client={chatClient}>
      <StreamVideo client={videoClient}>
        <Sidebar user={user} />
        <Channel />
        <Video />
      </StreamVideo>
    </Chat>
  );
};
Initiating a ring call
In the ring call scenario we recommend to first create a call without immediately joining it. Use the Call method getOrCreate() to accomplish this. An example can be found in CreateCallButton component in the demo app:
import { useCallback } from "react";
import {
  type MemberRequest,
  useStreamVideoClient,
} from "@stream-io/video-react-sdk";
import { useChannelStateContext } from "stream-chat-react";
import { LocalPhone } from "@mui/icons-material";
import { meetingId } from "../../utils/meetingId";

export const CreateCallButton = () => {
  const videoClient = useStreamVideoClient();
  const { channel } = useChannelStateContext();

  const createCall = () => {
    videoClient?.call("default", meetingId()).getOrCreate({
      ring: true,
      data: {
        custom: { channelCid: channel.cid },
        members: Object.values(channel.state.members).map<MemberRequest>(
          (member) => ({ user_id: member.user_id! }),
        ),
      },
    });
  };

  const disableCreateCall = !videoClient;
  return (
    <button
      className="rmc__button rmc__button--green"
      disabled={disableCreateCall}
      onClick={createCall}
    >
      <LocalPhone />
    </button>
  );
};
There is a flexibility in what channel members will be included in the call. And so the call can be a 1:1 or a group call. In our implementation we include all channel members.
Handling the ring call states
Once a ring call is initiated, call members start to receive ring call events (call.created, call.accepted, call.rejected, call.ended) over the WebSocket maintained by the video client. The video client updates the calls pool state and calling state of individual affected Call in response to these events.
Observing the calls pool state
The array of all Call objects representing created pending (not accepted, rejected, neither ended) calls is continuously updated in response to each new call creation. You can use this array of Call objects to display incoming or outgoing calls in your application's UI. In our app the top-level Video component observes the changes using the useCalls hook and re-renders the UI to reflect the changes:
import { StreamCall, useCalls } from "@stream-io/video-react-sdk";
import { CallPanel } from "./CallPanel";

export const Video = () => {
  const calls = useCalls().filter((call) => call.ringing);
  return (
    <>
      {calls.map((call) => (
        <StreamCall call={call} key={call.cid}>
          <CallPanel />
        </StreamCall>
      ))}
    </>
  );
};
To identify an outgoing call, use the call.isCreatedByMe flag.
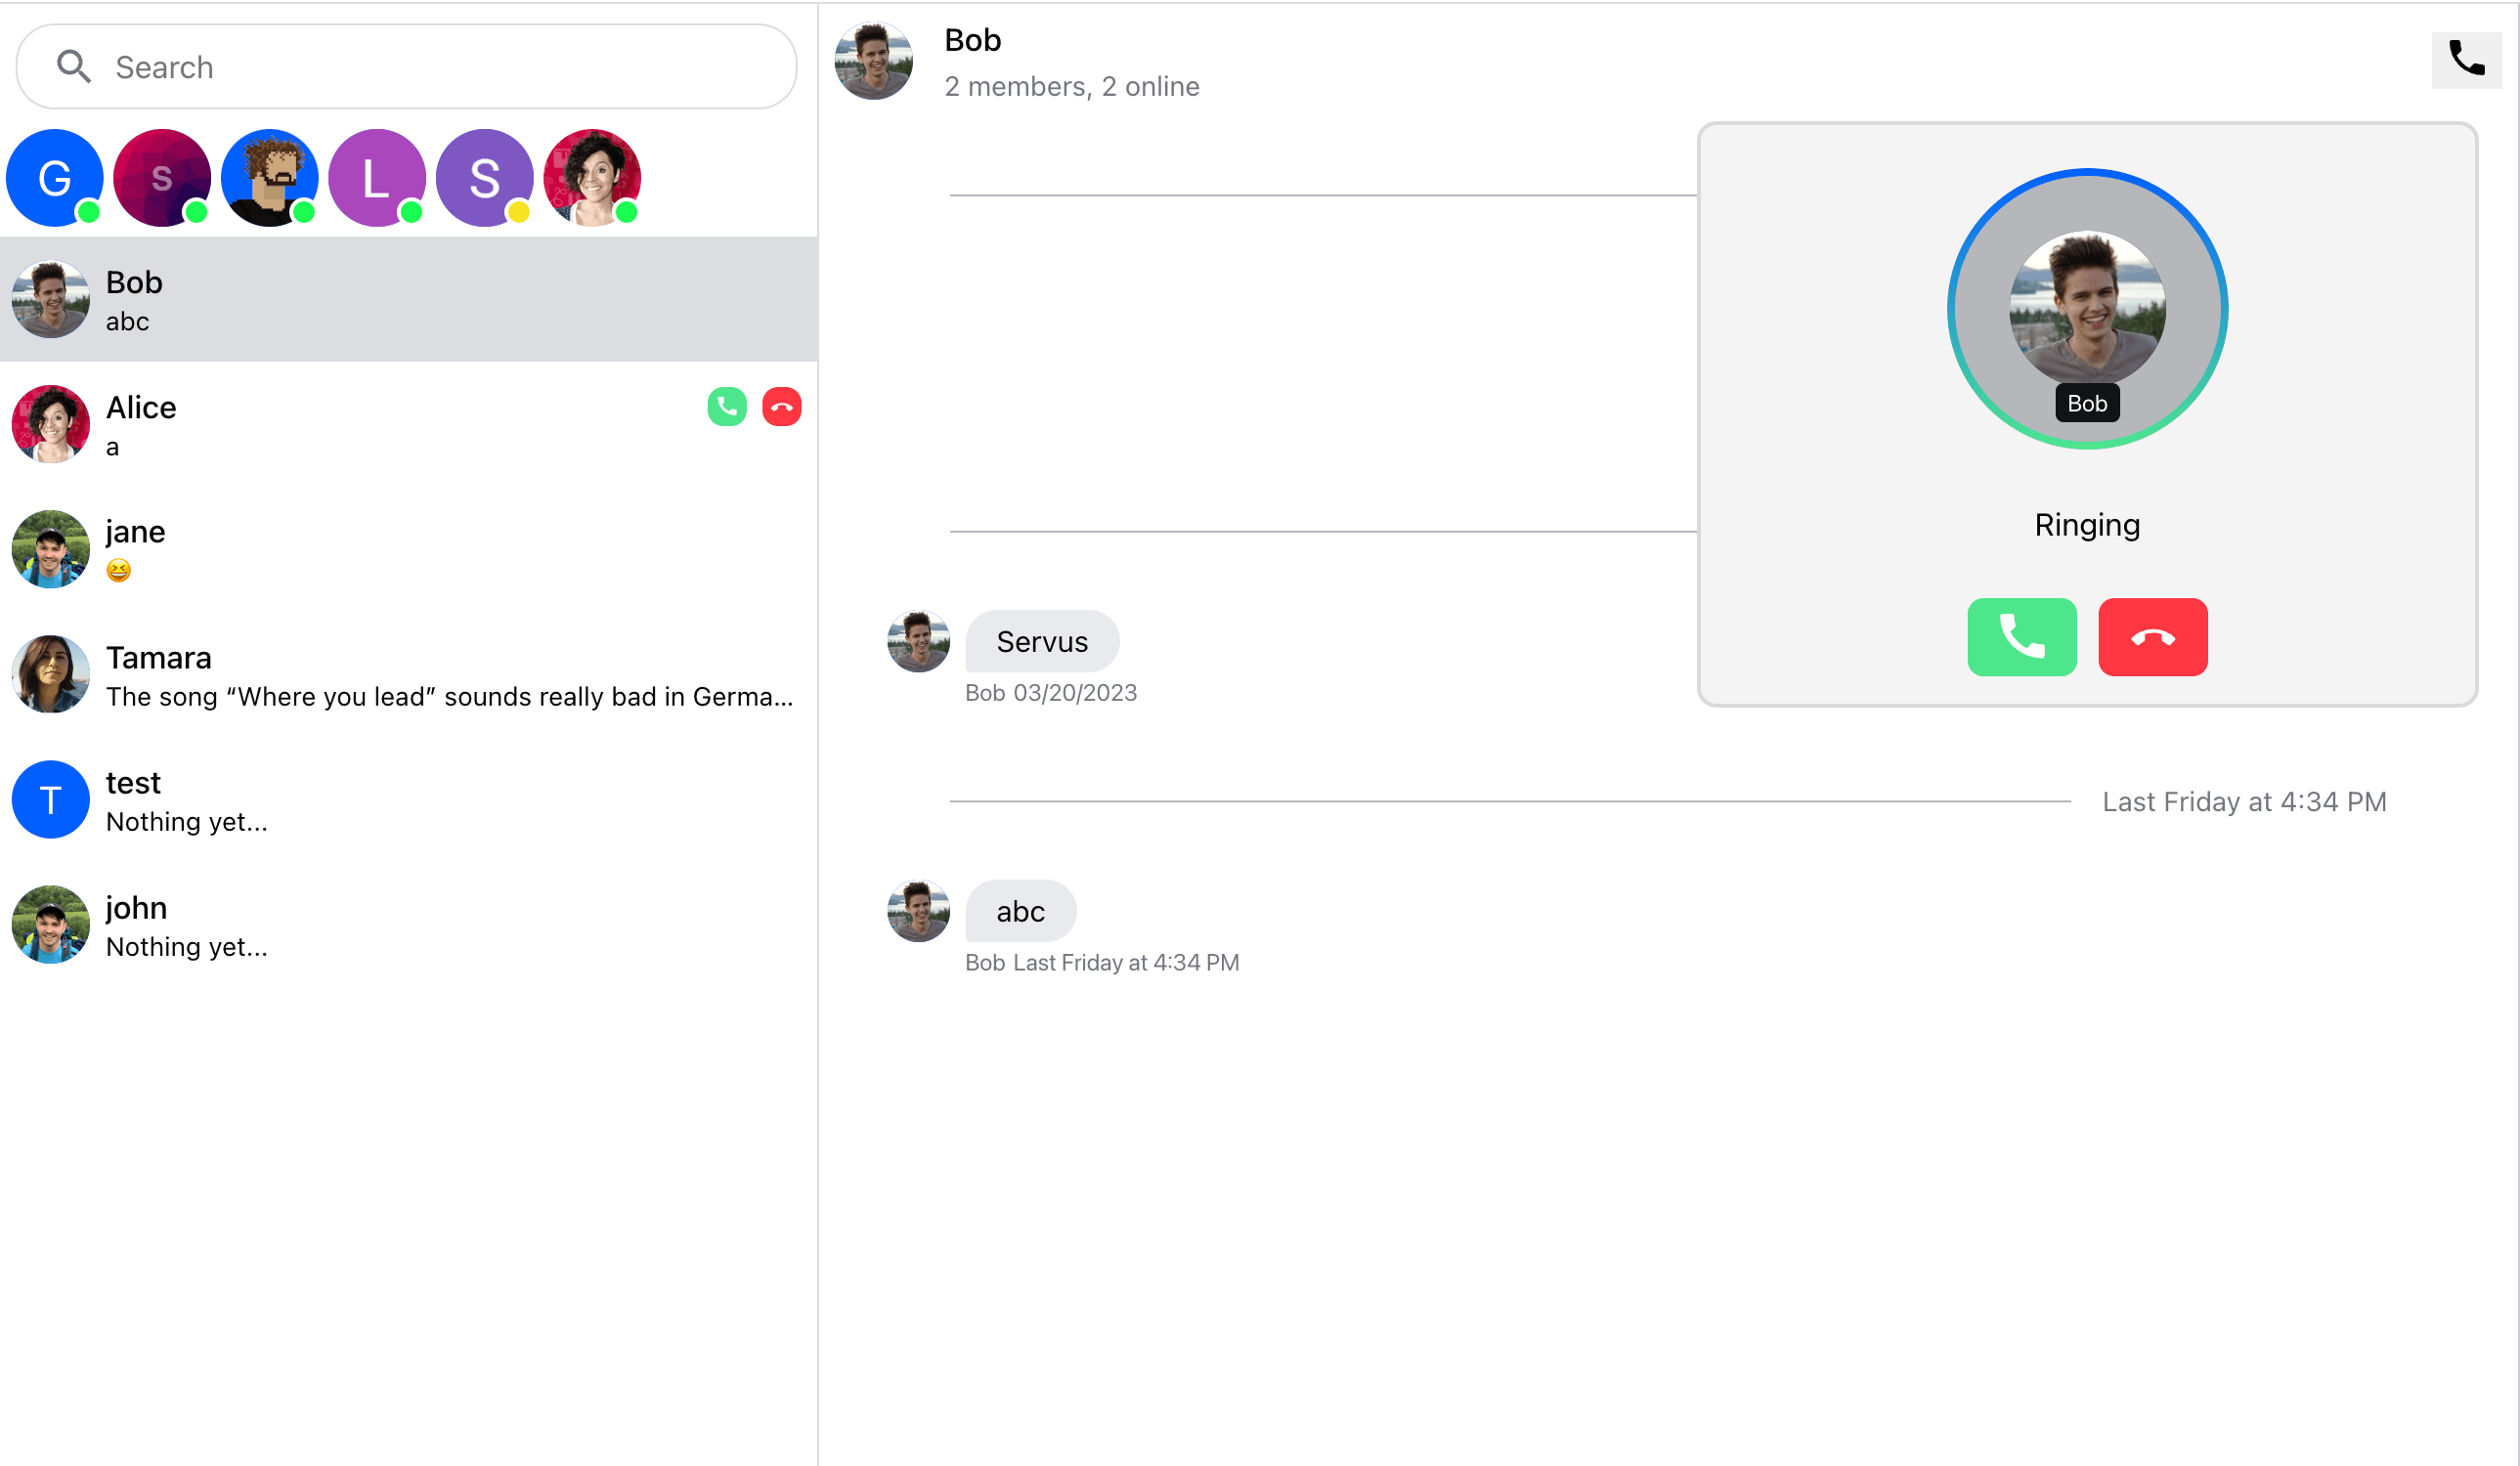
In our demo app, we reflect the incoming calls state in channel list. Channel preview shows buttons to accept or reject the incoming call. The outgoing call or incoming call in an active channel is represented by a CallPanel component floating above the chat UI:
This is done by embedding custom component ChannelPreviewCallControls in a ChannelPreview component:
import {
  AcceptCallButton,
  CallingState,
  CancelCallButton,
  useCall,
  useCallStateHooks,
} from "@stream-io/video-react-sdk";
import { useChatContext } from "stream-chat-react";

export const ChannelPreviewCallControls = () => {
  const { channel: activeChannel } = useChatContext();
  // the Call instance is passed down from StreamCallProvider located in StreamCall
  const call = useCall();
  const { useCallCallingState } = useCallStateHooks();
  const callingState = useCallCallingState();

  const callingToActiveChannel =
    activeChannel && call && activeChannel.cid === call.state.custom.channelCid;

  const isRinging = callingState === CallingState.RINGING;

  if (call && isRinging && !callingToActiveChannel) {
    return (
      <div className="rmc__channel-preview__call-controls">
        <AcceptCallButton onClick={() => call.join()} />
        <CancelCallButton
          onClick={(e) => {
            const reason = call.isCreatedByMe ? "cancel" : "decline";
            call.leave({ reject: true, reason });
          }}
        />
      </div>
    );
  }
  return null;
};
Observing the state of a specific call
Each call can pass through different states. The call calling state is made available through useCallCallingState hook. Therefore, our custom CallPanel component displays different UI (pending call, active call) based on the information provided by the hook:
import {
  RingingCall,
  CallingState,
  SpeakerLayout,
  useCall,
  ScreenShareButton,
  SpeakingWhileMutedNotification,
  ToggleAudioPublishingButton,
  ToggleVideoPublishingButton,
  CancelCallButton,
  useCallStateHooks,
} from "@stream-io/video-react-sdk";
import { useChatContext } from "stream-chat-react";
import { useState } from "react";
import { useDraggable } from "../../hooks";

export const CallPanel = () => {
  const call = useCall();
  const { useCallCallingState, useCallCustomData } = useCallStateHooks();
  const callingState = useCallCallingState();
  const customData = useCallCustomData();

  const { channel: activeChannel } = useChatContext();
  const [panelElement, setPanelElement] = useState<HTMLDivElement | null>(null);
  useDraggable(panelElement);

  if (!call) return null;

  const callingToActiveChannel = activeChannel?.cid === customData.channelCid;

  if (CallingState.RINGING === callingState && !callingToActiveChannel)
    return null;

  if (callingState === CallingState.JOINED) {
    return (
      <div
        className="str-video__call-panel rmc__call-panel-wrapper"
        ref={setPanelElement}
      >
        <SpeakerLayout />
        <div className="rmc__active-call-controls">
          <ScreenShareButton />
          <SpeakingWhileMutedNotification>
            <ToggleAudioPublishingButton />
          </SpeakingWhileMutedNotification>
          <ToggleVideoPublishingButton />
          <CancelCallButton />
        </div>
      </div>
    );
  }

  if ([CallingState.RINGING, CallingState.JOINING].includes(callingState)) {
    return (
      <div className="rmc__call-panel-wrapper" ref={setPanelElement}>
        <RingingCall />
      </div>
    );
  }

  return null;
};
Terminating a call
What call termination means depends on the perspective:
- A user can reject an incoming pending call.
- A user can end / cancel own outgoing pending call.
- A call participant (who joined a call) can leave a call.
In case of the group call scenario, a single user rejecting an incoming call or participant leaving a call does not terminate the call for anybody else. However, a user who initiated a pending call will end it for everybody if it has not been joined by others yet. Call is ended also, if the last member rejected the incoming call.
A user who rejected or left a call can re-join the same call again as long as the call has not been ended. The call cannot be re-joined only if ended.
So depending on the context, we associate a bit different click handlers with the button, that terminates the call for the current user:
Reject an incoming call
Our RingingCallControls attaches the following callback to the CancelCallButton button that rejects the incoming call:
<CancelCallButton
  onClick={() => call.leave({ reject: true, reason: "decline" })}
/>
End/Cancel an outgoing call
Our RingingCallControls attaches the following callback to the CancelCallButton button that cancels the outgoing call:
<CancelCallButton
  onClick={() => call.leave({ reject: true, reason: "cancel" })}
/>
Leave already joined call
The default callback of the CancelCallButton button is pure call.leave() without any parameters. Again the RingingCallControls as well as the demo's active call panel components make use of this by not overriding the default onClick:
<CancelCallButton />Adding default styles
In order the default styles that come with both the chat and video SDKs can be applied, we import them into the file index.scss:
@layer default-chat-sdk {
  @import "stream-chat-react/dist/scss/v2/index.scss";
}

@import "@stream-io/video-react-sdk/dist/css/styles.css"
  layer(default-video-sdk);
File index.scss is then imported into App.tsx. Additionally, we add StreamTheme component to wrap the app in an element carrying CSS class str-video. This will make sure all the variables and styles are applied to the child components:
import type { UserResponse } from "stream-chat";
import { Chat } from "stream-chat-react";
import { StreamTheme, StreamVideo } from "@stream-io/video-react-sdk";
import { Channel } from "./components/Channel";
import { Sidebar } from "./components/Sidebar";
import { Video } from "./components/Video";
import { useCreateChatClient } from "./hooks";

import "./styles/index.scss";

const Root = ({
  apiKey,
  user,
  userToken,
}: {
  apiKey: string;
  user: UserResponse;
  userToken: string;
}) => {
  // create clients and connect users

  return (
    <StreamTheme as="main" className="main-container">
      <Chat client={chatClient}>
        <StreamVideo client={videoClient}>
          <Sidebar user={user} />
          <Channel />
          <Video />
        </StreamVideo>
      </Chat>
    </StreamTheme>
  );
};On this page: