// will load the default styling for the React Video SDK
import "@stream-io/video-styling/dist/css/styles.css";
import "./SpeakerView.scss";

import {
  StreamTheme,
  ParticipantView,
  useCall,
  useCallStateHooks,
} from "@stream-io/video-react-sdk";

const { useParticipants } = useCallStateHooks();Video Layout
Build custom call layouts using Stream React Video SDK. This guide covers connecting to Stream's edge infrastructure, joining a call, and building the layout.
Best Practices
- Use
ParticipantViewfor rendering - it handles video subscriptions and dynascale automatically. - Call
setViewport()on scrollable containers to optimize bandwidth (only subscribe to visible videos). - Use
setSortParticipantsBy()for custom participant ordering. - Keep sorting logic stateless or memoized to avoid unnecessary re-renders.
About the sample application
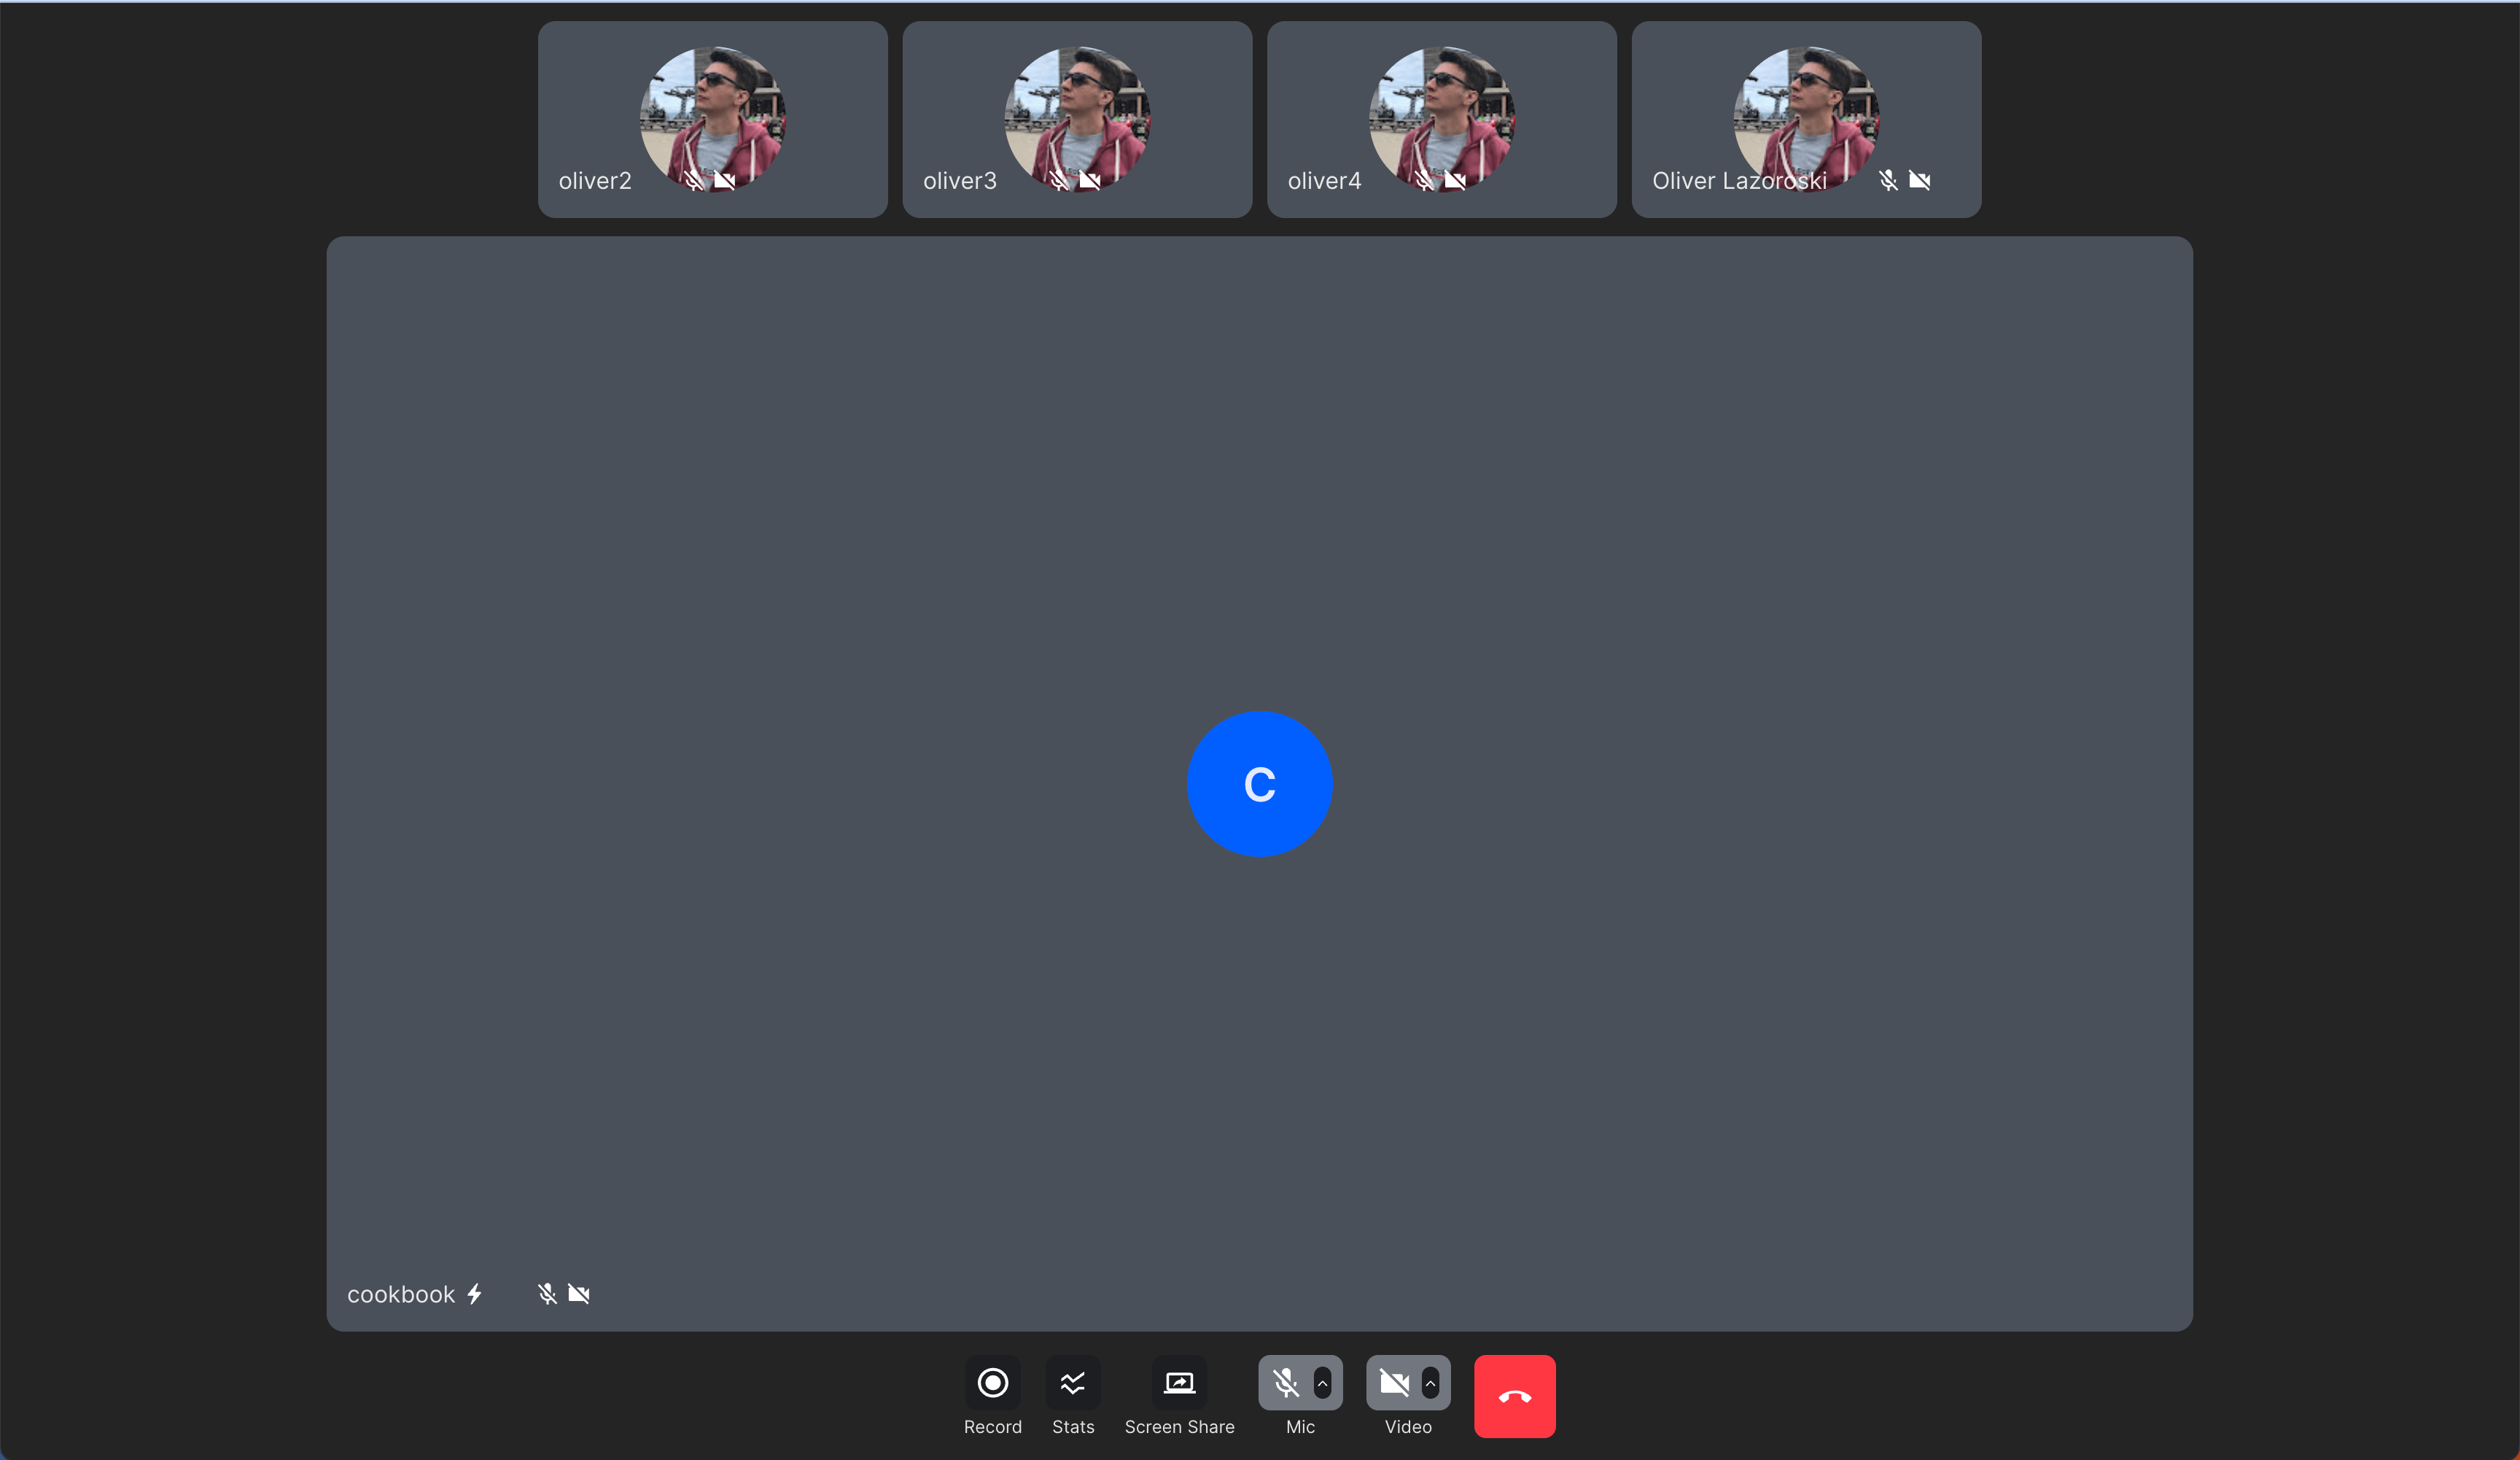
We'll build a custom layout similar to Zoom's Speaker View using Vite + TS. Full code here.
The final layout:
Prerequisites
Before we can join a call, we need to connect to Stream's edge infrastructure. To do that, we follow these steps:
- Register for a Stream account and obtain our API key and secret.
- Install the Stream React Video SDK:
npm install @stream-io/video-react-sdkyarn add @stream-io/video-react-sdk- Initialize the SDK by passing in your API key, token and user information
- Create and join a call
Building and rendering the layout
Now that we have successfully set up the React Video SDK and joined the call, we can start building our custom layout. For that purpose, we are going to utilize some fundamental React Video SDK components and hooks.
<ParticipantView />- A component that renders a video stream of a participant.useCall()- A hook that returns the current call instance. You can use this hook to access the call state and call methods.useCallStateHooks()- A hook-alike function that wraps all call-state hooks. You can use this hook to access the list of all participants in the call, the local participant, and the dominant speaker.useParticipants()- A hook that returns the list of all participants in the call.
import {
  hasScreenShare,
  useCall,
  useCallStateHooks,
  ParticipantView,
} from "@stream-io/video-react-sdk";

export const SpeakerView = () => {
  const call = useCall();
  const { useParticipants } = useCallStateHooks();
  const [participantInSpotlight, ...otherParticipants] = useParticipants();

  return (
    // enables the default styling for the video SDK
    <div className="speaker-view">
      {call && otherParticipants.length > 0 && (
        <div className="participants-bar">
          {otherParticipants.map((participant) => (
            <div className="participant-tile" key={participant.sessionId}>
              <ParticipantView participant={participant} />
            </div>
          ))}
        </div>
      )}

      <div className="spotlight">
        {call && participantInSpotlight && (
          <ParticipantView
            participant={participantInSpotlight}
            trackType={
              hasScreenShare(participantInSpotlight)
                ? "screenShareTrack"
                : "videoTrack"
            }
          />
        )}
      </div>
    </div>
  );
};
Sorting the participants
The React SDK comes with some default sorting logic for the participants in the call.
You can read more about this in the Sorting API.
The Participant Sorting API is customizable and allows us to define our custom sorting logic in case the default one doesn't fit your use case.
In this example, let's assume that we want to have a custom sorting logic for the participants in the call that would follow the following rules:
- In 1:1 calls, the remote participant will be displayed in the largest space in the layout.
- In group calls, we want this custom participant sorting:
- Presenter will be displayed first
- Dominant speaker will be displayed next
- Pinned participants will be displayed after, as we want them to be pinned at the beginning of the participant list
- The rest of the participants will be sorted at the top of the screen according to the following criteria:
- Participants who are speaking or have their hand raised
- Participants with audio and video will be displayed next
- Followed by video-only participants
- Followed by audio-only participants
- Muted participants will be displayed last
Configure the sorting logic
Having the rules set, let's go and configure the sorting function:
const getCustomSortingPreset = (
  isOneToOneCall: boolean = false,
): Comparator<StreamVideoParticipant> => {
  // 1:1 calls are a special case, where we want to always show the other
  // participant in the spotlight, and not show them in the participants bar.
  if (isOneToOneCall) {
    return (a: StreamVideoParticipant, b: StreamVideoParticipant) => {
      if (a.isLocalParticipant) return 1;
      if (b.isLocalParticipant) return -1;
      return 0;
    };
  }

  // a comparator decorator which applies the decorated comparator only if the
  // participant is invisible.
  // This ensures stable sorting when all participants are visible.
  const ifInvisibleBy = conditional(
    (a: StreamVideoParticipant, b: StreamVideoParticipant) =>
      a.viewportVisibilityState === VisibilityState.INVISIBLE ||
      b.viewportVisibilityState === VisibilityState.INVISIBLE,
  );

  // the custom sorting preset
  return combineComparators(
    screenSharing,
    dominantSpeaker,
    pinned,
    ifInvisibleBy(speaking),
    ifInvisibleBy(reactionType("raised-hand")),
    ifInvisibleBy(publishingVideo),
    ifInvisibleBy(publishingAudio),
  );
};
Apply sorting to the call
Now that we have the sorting function, let's go ahead and apply it to the call.
We can do that by calling the call.setSortParticipantsBy() method
in a useEffect hook (see full code here):
import {
  hasScreenShare,
  useCall,
  useCallStateHooks,
  ParticipantView,
} from "@stream-io/video-react-sdk";

export const SpeakerView = () => {
  const call = useCall();
  const { useParticipants } = useCallStateHooks();
  const [participantInSpotlight, ...otherParticipants] = useParticipants();

  // determine whether the call is a 1:1 call
  const isOneToOneCall = otherParticipants.length === 1;
  useEffect(() => {
    if (!call) return;
    const customSortingPreset = getCustomSortingPreset(isOneToOneCall);
    call.setSortParticipantsBy(customSortingPreset);
  }, [call, isOneToOneCall]);

  return (
    <div className="speaker-view">
      {call && otherParticipants.length > 0 && (
        <div className="participants-bar">
          {otherParticipants.map((participant) => (
            <div className="participant-tile" key={participant.sessionId}>
              <ParticipantView participant={participant} />
            </div>
          ))}
        </div>
      )}

      <div className="spotlight">
        {call && participantInSpotlight && (
          <ParticipantView
            participant={participantInSpotlight}
            trackType={
              hasScreenShare(participantInSpotlight)
                ? "screenShareTrack"
                : "videoTrack"
            }
          />
        )}
      </div>
    </div>
  );
};

// the sorting code goes here
Bandwidth and CPU optimization
In calls with a large number of participants, your horizontal list will grow past viewable boundaries.
Each of these ParticipantView components will keep subscribing to the video stream
and will keep playing it even if they're not visible to the user which is wasteful because of heavy CPU and bandwidth usage.
To mitigate this issue each Call instance utilizes one ViewportTracker instance (call.dynascaleManager.viewportTracker) with observe and setViewport methods.
The ParticipantView component already utilizes this functionality under the hood (observe) so all we need to do is to call setViewport with your horizontal list element as an argument and we're set.
import {
  hasScreenShare,
  useCall,
  useCallStateHooks,
  ParticipantView,
} from "@stream-io/video-react-sdk";

export const SpeakerView = () => {
  const call = useCall();
  const { useParticipants } = useCallStateHooks();
  const [participantInSpotlight, ...otherParticipants] = useParticipants();
  const [participantsBar, setParticipantsBar] = useState<HTMLDivElement | null>(
    null,
  );

  // determine whether the call is a 1:1 call
  const isOneToOneCall = otherParticipants.length === 1;
  useEffect(() => {
    if (!call) return;
    const customSortingPreset = getCustomSortingPreset(isOneToOneCall);
    call.setSortParticipantsBy(customSortingPreset);
  }, [call, isOneToOneCall]);

  useEffect(() => {
    if (!participantsBar || !call) return;

    const cleanup = call.dynascaleManager.setViewport(participantsBar);

    return () => cleanup();
  }, [participantsBar, call]);

  return (
    <div className="speaker-view">
      {call && otherParticipants.length > 0 && (
        <div ref={setParticipantsBar} className="participants-bar">
          {otherParticipants.map((participant) => (
            <div className="participant-tile" key={participant.sessionId}>
              <ParticipantView participant={participant} />
            </div>
          ))}
        </div>
      )}

      <div className="spotlight">
        {call && participantInSpotlight && (
          <ParticipantView
            participant={participantInSpotlight}
            trackType={
              hasScreenShare(participantInSpotlight)
                ? "screenShareTrack"
                : "videoTrack"
            }
          />
        )}
      </div>
    </div>
  );
};
Now these changes will ensure that we only subscribe to the video streams users actually see on their screens.
Final steps
Let's add one last component which is just a custom combination of call control buttons and finalize our application by composing the components we just created:
import {
  SpeakingWhileMutedNotification,
  ToggleAudioPublishingButton,
  ToggleVideoPublishingButton,
  CancelCallButton,
  ScreenShareButton,
  StreamTheme,
} from "@stream-io/video-react-sdk";

const CustomCallControls = () => {
  const call = useCall();

  return (
    <div className="str-video__call-controls">
      <ScreenShareButton />
      <SpeakingWhileMutedNotification>
        <ToggleAudioPublishingButton />
      </SpeakingWhileMutedNotification>
      <ToggleVideoPublishingButton />
      <CancelCallButton
        onLeave={() => {
          console.log("onLeave callback called");
        }}
      />
    </div>
  );
};

export const App = () => {
  return (
    // enables the default styling for the video SDK
    <StreamTheme>
      <SpeakerView />
      <CustomCallControls />
    </StreamTheme>
  );
};
And that's it. We have successfully built our custom layout. At last, you can find the running example of this guide here.
The tutorial does not include the styling of the component, but you can find the full code in the SpeakerView.scss file.
Further customization
You can use our data model to build your own custom layouts.
You can go further and build your own custom components, but we advise you to use some of our core components (e.g. ParticipantView) and hooks to make sure that you wouldn't have to re-implement some baked-in functionality like:
- Simulcast,
- DynaScale,
- Track Subscription handling,
- muting/unmuting, etc.
Thanks for following this guide and always feel free to reach out to us at the bottom of this page or let us know when you build up something cool with our SDK on X.
On this page: