Livestream Quickstart
In this tutorial we'll quickly build a low-latency in-app livestreaming experience. The livestream is broadcasted using Stream's edge network of servers around the world.
This tutorial is structured into two parts:
Part 1: Build an iOS Livestreaming App
- Create a livestream on the Stream dashboard.
- Set up an RTMP input with OBS Studio.
- View the livestream on an iOS device.
- Build a custom livestream viewer UI.
Part 2: Create an Interactive Livestreaming App
- Publish a livestream from an iOS device with WebRTC.
- Implement backstage and "go live" functionalities.
Before we start, if you have any questions or feedback, please let us know via the feedback button.
Step 1 - Create a Livestream in the Dashboard
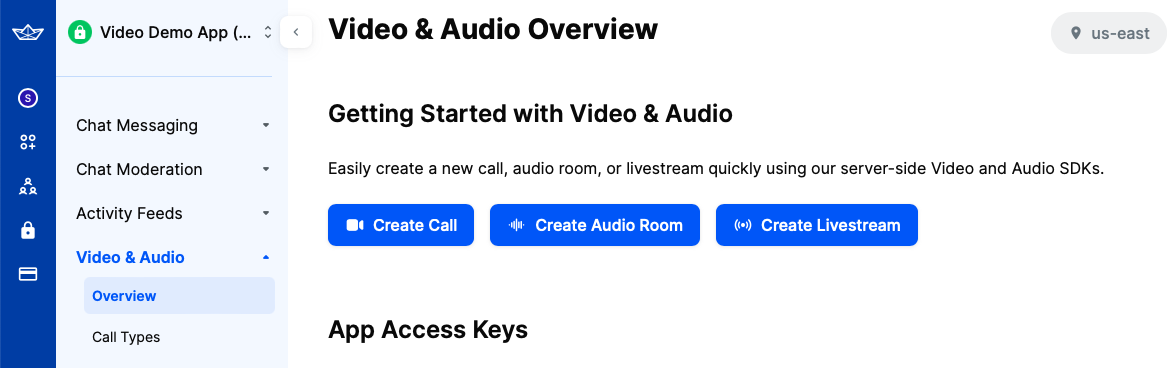
First, let's create our livestream using the dashboard. To do this, open the dashboard and select "Video & Audio" -> "Overview".
In that screen, you will see three buttons that allow you to create different types of calls, as shown in the image below.
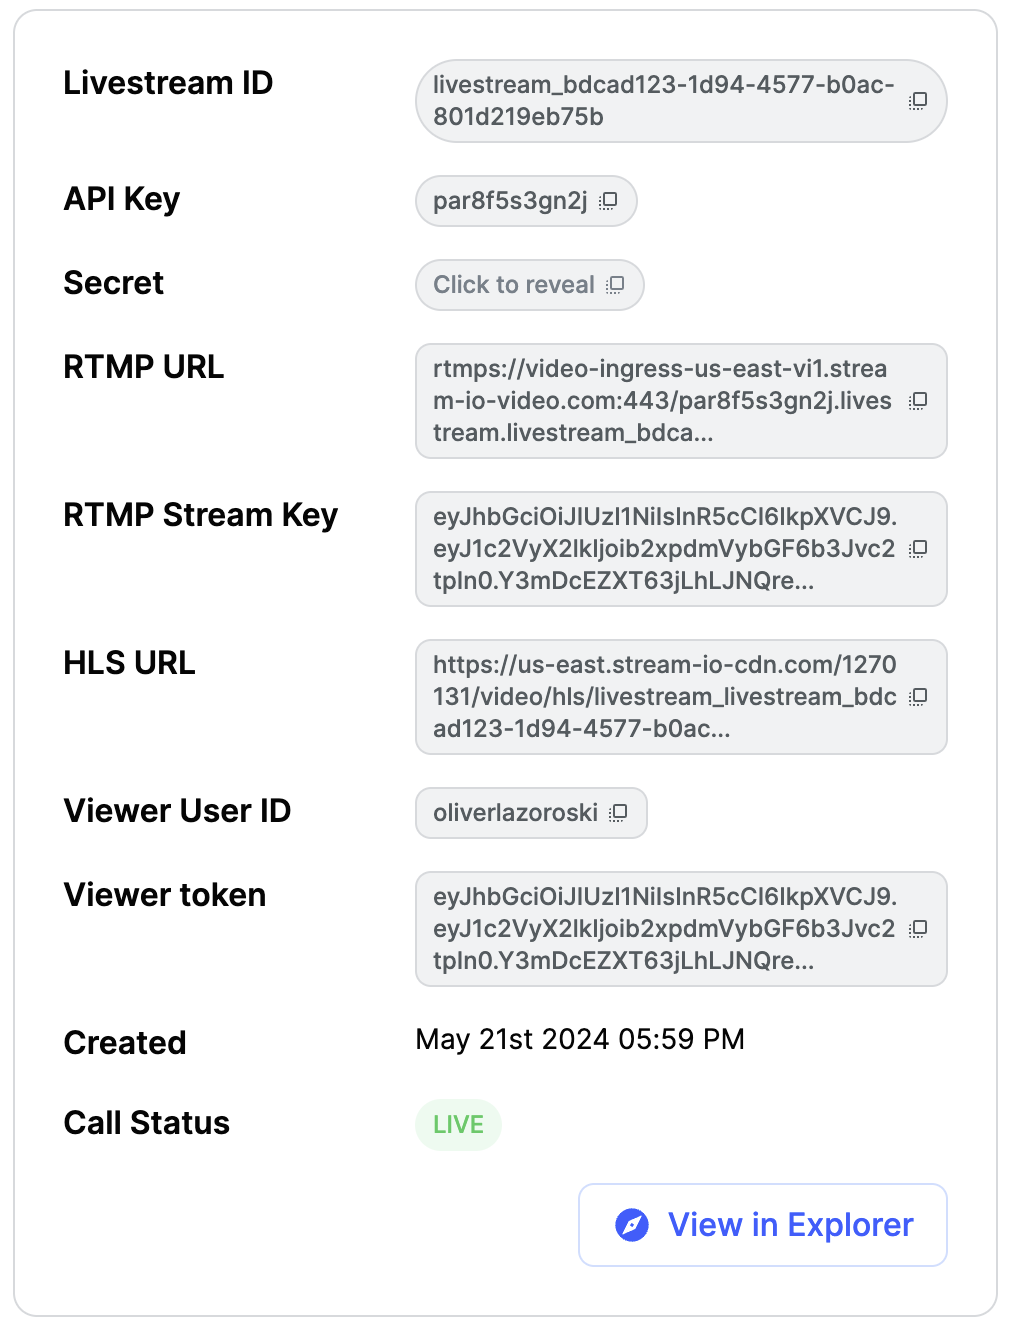
Click on the third one, the "Create Livestream" option. After you do this, you will be shown the following screen containing information about the livestream.
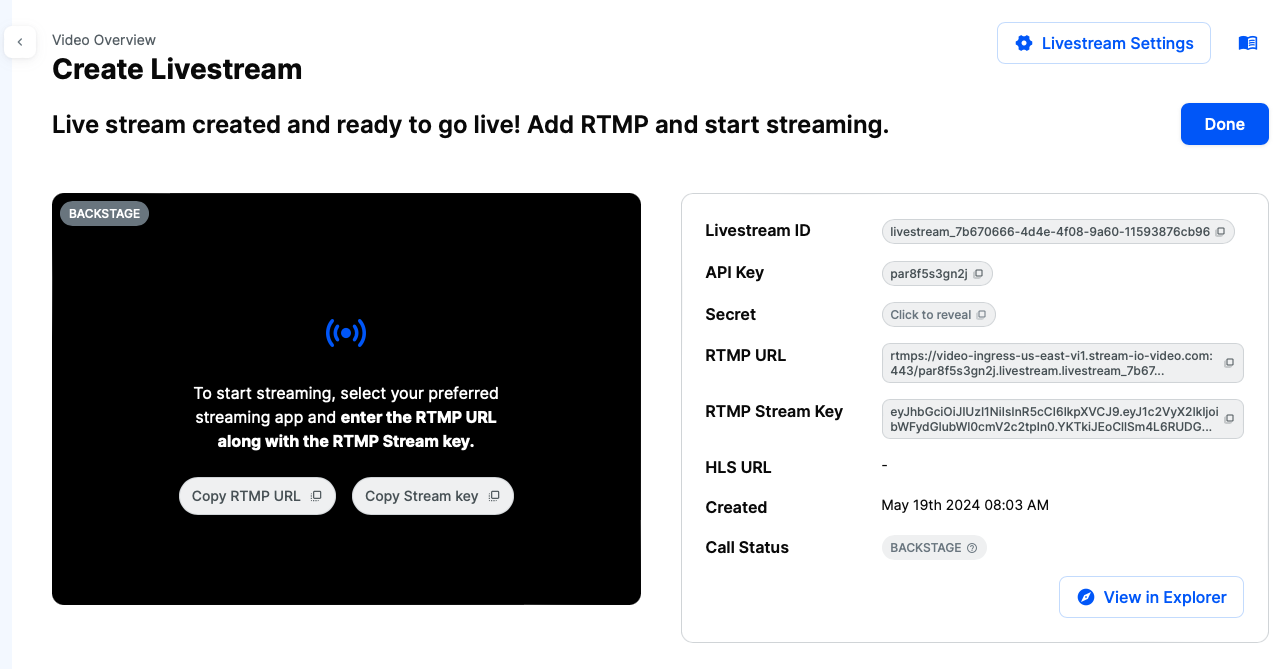
To set up the livestream in OBS Studio, you will need the RTMP URL and RTMP Stream Key from this page.
Copy these values for now, and we will return to the dashboard later.
Step 2 - Setup the Livestream in OBS
OBS is one of the most popular livestreaming software packages, and we'll use it to explain how to publish videos with RTMP.
After downloading and installing the software using the instructions provided on the link, you should set up the capturing device and the livestream data.
First, let's set the capturing device. You can find it in the sources section.
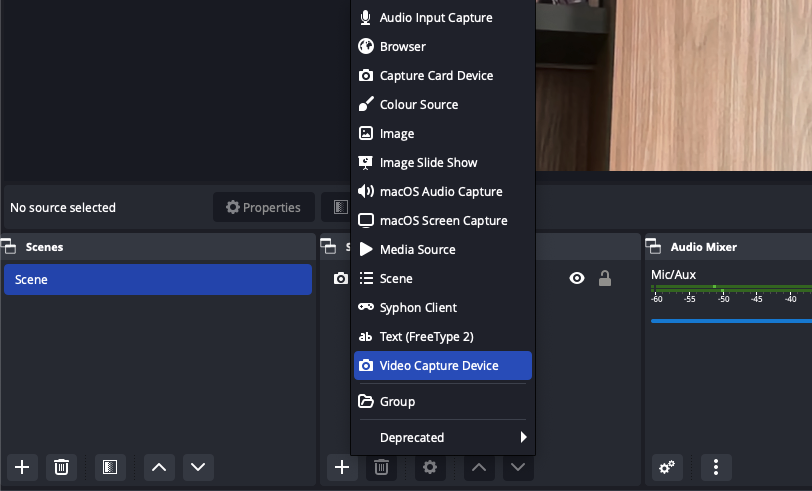
Select the "Video Capture Device" option to stream from your computer's camera. Alternatively, you can choose other options, such as "macOS Screen Capture," to stream your screen.
Next, we must provide the livestream credentials from our dashboard to OBS. To do this, click the "Settings" button in the "Controls" section at the bottom right corner of OBS.
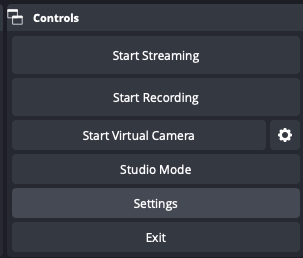
This will open a popup. Select the second option, "Stream". For the "Service" option, choose "Custom". In the "Server" and "Stream Key" fields, enter the values you copied from the dashboard in Step 1.

Our live stream setup is complete. Before returning to the dashboard, press the "Start Streaming" button in the "Controls" section.
Now, let's go back to the dashboard. If everything is correctly set up, you should see the OBS livestream in the dashboard, as shown in this screenshot.
Note: The live stream starts immediately by default. However, you can change this setting in the dashboard and enable backstage for the "Livestream" call type.
Step 3 - Show the Livestream in an iOS App
Now that the livestream is started, let's see how we can watch it from a native iOS app. First, configure the project and install the required StreamVideo dependencies.
Step 3.1 - Create a new Project in Xcode
- Ensure you have Xcode installed and you are running 15.0 or later.
- Open Xcode and select "Create New Project...".
- Select "iOS" as the platform and "App" as the type of Application.
- Name your project LivestreamSample and select "SwiftUI" as the interface.
Step 3.2 - Install the SDK & Configure the Client
Next, you need to add our SDK dependencies to your project using Swift Package Manager from Xcode.
- Click on "Add Package Dependencies..." from the File menu.
- Add https://github.com/GetStream/stream-video-swift in the search bar.
- Select "StreamVideo" and "StreamVideoSwiftUI" and then click Add Package.
Step 3.3 - View the livestream from an iOS Device
The following code shows you how to create a livestream player that will play the stream we created above on iOS. Let's open LivestreamSampleApp.swift and replace the LivestreamSampleApp struct with the following code:
123456789101112131415161718192021222324252627282930import SwiftUI
import StreamVideo
import StreamVideoSwiftUI

@main
struct LivestreamSampleApp: App {

    var body: some Scene {
        WindowGroup {
            LivestreamView()
        }
    }
}

struct LivestreamView: View {

    static let apiKey = "REPLACE_WITH_API_KEY"
    static let token = "REPLACE_WITH_TOKEN"
    static let callId = "REPLACE_WITH_LIVESTREAM_ID"

    @StateObject var streamVideo = StreamVideo(
        apiKey: apiKey,
        user: .anonymous,
        token: .init(rawValue: token)
    )

    var body: some View {
        LivestreamPlayer(type: "livestream", id: Self.callId)
    }
}
Before running the app, you should replace the placeholders with values from the dashboard. For the apiKey, use the API Key value from your livestream page in the dashboard. Replace the token value with the Viewer Token value in the dashboard, and the callId with Livestream ID.
That is everything needed to play a livestream on iOS. The LivestreamPlayer component from the StreamVideo SwiftUI SDK allows you to play livestreams easily, specifying the call id and call type.
If you now run the app, you will see the livestream published from OBS Studio.
You can find more details about the LivestreamPlayer on the following page.
Step 3.4 - Customize the Livestream UI
Based on your app's requirements, you might want to have a different user interface for your livestream. In those cases, you can build your custom UI, while reusing some of Stream's components and the state layer.
State & Participants
If you want to build more advanced user interfaces that include filtering the participants by various criteria or different sorting, you can use the CallState of a Call, accessible via call.state.
A common feature in livestreams is to show their duration. To do this, you can use the observable value state.duration, which returns an Int value of the duration in seconds.
You can use it with a DateComponentsFormatter to show a user-friendly duration.
12345678// Declare the formatter in your class.
private let formatter = DateComponentsFormatter()

// Define a method for creating a string from the duration.
func duration(from state: CallState) -> String? {
    guard state.duration > 0 else { return nil }
    return formatter.string(from: state.duration)
}
Filtering of the participants is also supported. You can get all the participants with the role "host" with the following code:
123var hosts: [CallParticipant] {
    call.state.participants.filter { $0.roles.contains("host") }
}
The participant state docs show all the available fields.
You can build your own comparators and sort participants based on your criteria for sorting. The StreamVideo SDK provides a set of comparators you can use as building blocks or create your own as needed.
Here's an example of a possible livestream-related sorting comparator.
123456789let livestreamComparators: [StreamSortComparator<CallParticipant>] = [
    roles(["host"]),
    dominantSpeaker,
    isSpeaking,
    publishingVideo,
    publishingAudio,
    joinedAt,
    userId
]
These comparators will prioritize users who are the hosts and then participants who speak and publish video and audio.
To apply the sorting, you can use the following code.
123var sortedParticipants: [CallParticipant] {
    call.state.participants.sorted(by: livestreamComparators)
}
For example, let's build a custom player that will display the livestream and the number of viewers.
To achieve this, create a new view called CustomLivestreamPlayer and add the following code.
1234567891011121314151617181920212223242526272829303132333435363738394041424344454647484950515253545556struct CustomLivestreamPlayer: View {

    @Injected(\.streamVideo) var streamVideo

    @State var call: Call
    @ObservedObject var state: CallState

    public init(
        type: String,
        id: String
    ) {
        let call = InjectedValues[\.streamVideo].call(callType: type, callId: id)
        self.call = call
        _state = ObservedObject(wrappedValue: call.state)
    }

    public var body: some View {
        ZStack {
            GeometryReader { reader in
                if let participant = state.participants.first {
                    VideoCallParticipantView(
                        participant: participant,
                        availableFrame: reader.frame(in: .global),
                        contentMode: .scaleAspectFit,
                        customData: [:],
                        call: call
                    )
                } else {
                    Text("No livestream available")
                }
            }
        }
        .overlay(
            VStack {
                Spacer()
                HStack {
                    Image(systemName: "eye")
                    Text("\(state.participantCount)")
                        .font(.headline)
                }
                .foregroundColor(Color.blue)
                .padding(.all, 8)
                .cornerRadius(8)
                .padding()
            }
        )
        .onAppear {
            Task {
                try await call.join(callSettings: CallSettings(audioOn: false, videoOn: false))
            }
        }
        .onDisappear {
            call.leave()
        }
    }
}
In the code above, we're checking if we have a participant in our CallState. If yes, we use the VideoCallParticipantView to display the participant and their stream. If no participant is available, we show a text view with a message that the livestream is unavailable.
We are also adding an overlay in the bottom right corner that displays the participant count. This information is available via the state.participantCount property.
Finally, for simplicity, we are using the onAppear and onDisappear modifiers to join and leave the livestream. Based on your app's logic, you might invoke these actions based on user input (for example, buttons for joining and leaving a livestream).
To test the new implementation, replace LivestreamPlayer with CustomLivestreamPlayer in the LivestreamView above.
Part 2 - Build Your Own Youtube Live
In the first part of this tutorial, we built a simple livestream app and published a live stream using RTMP. The authentication was done using the Dashboard. In a real application, you want to generate tokens programmatically using a server-side SDK.
The second part of this tutorial expands our app to include interactive functionality, such as streaming from end-user devices.
Step 4 - Livestream from iOS Devices
We will send video from an iOS device directly using WebRTC and use the backstage functionality. Note that you will need a real iOS device for this part of the tutorial.
Step 4.1 - Configure Permissions
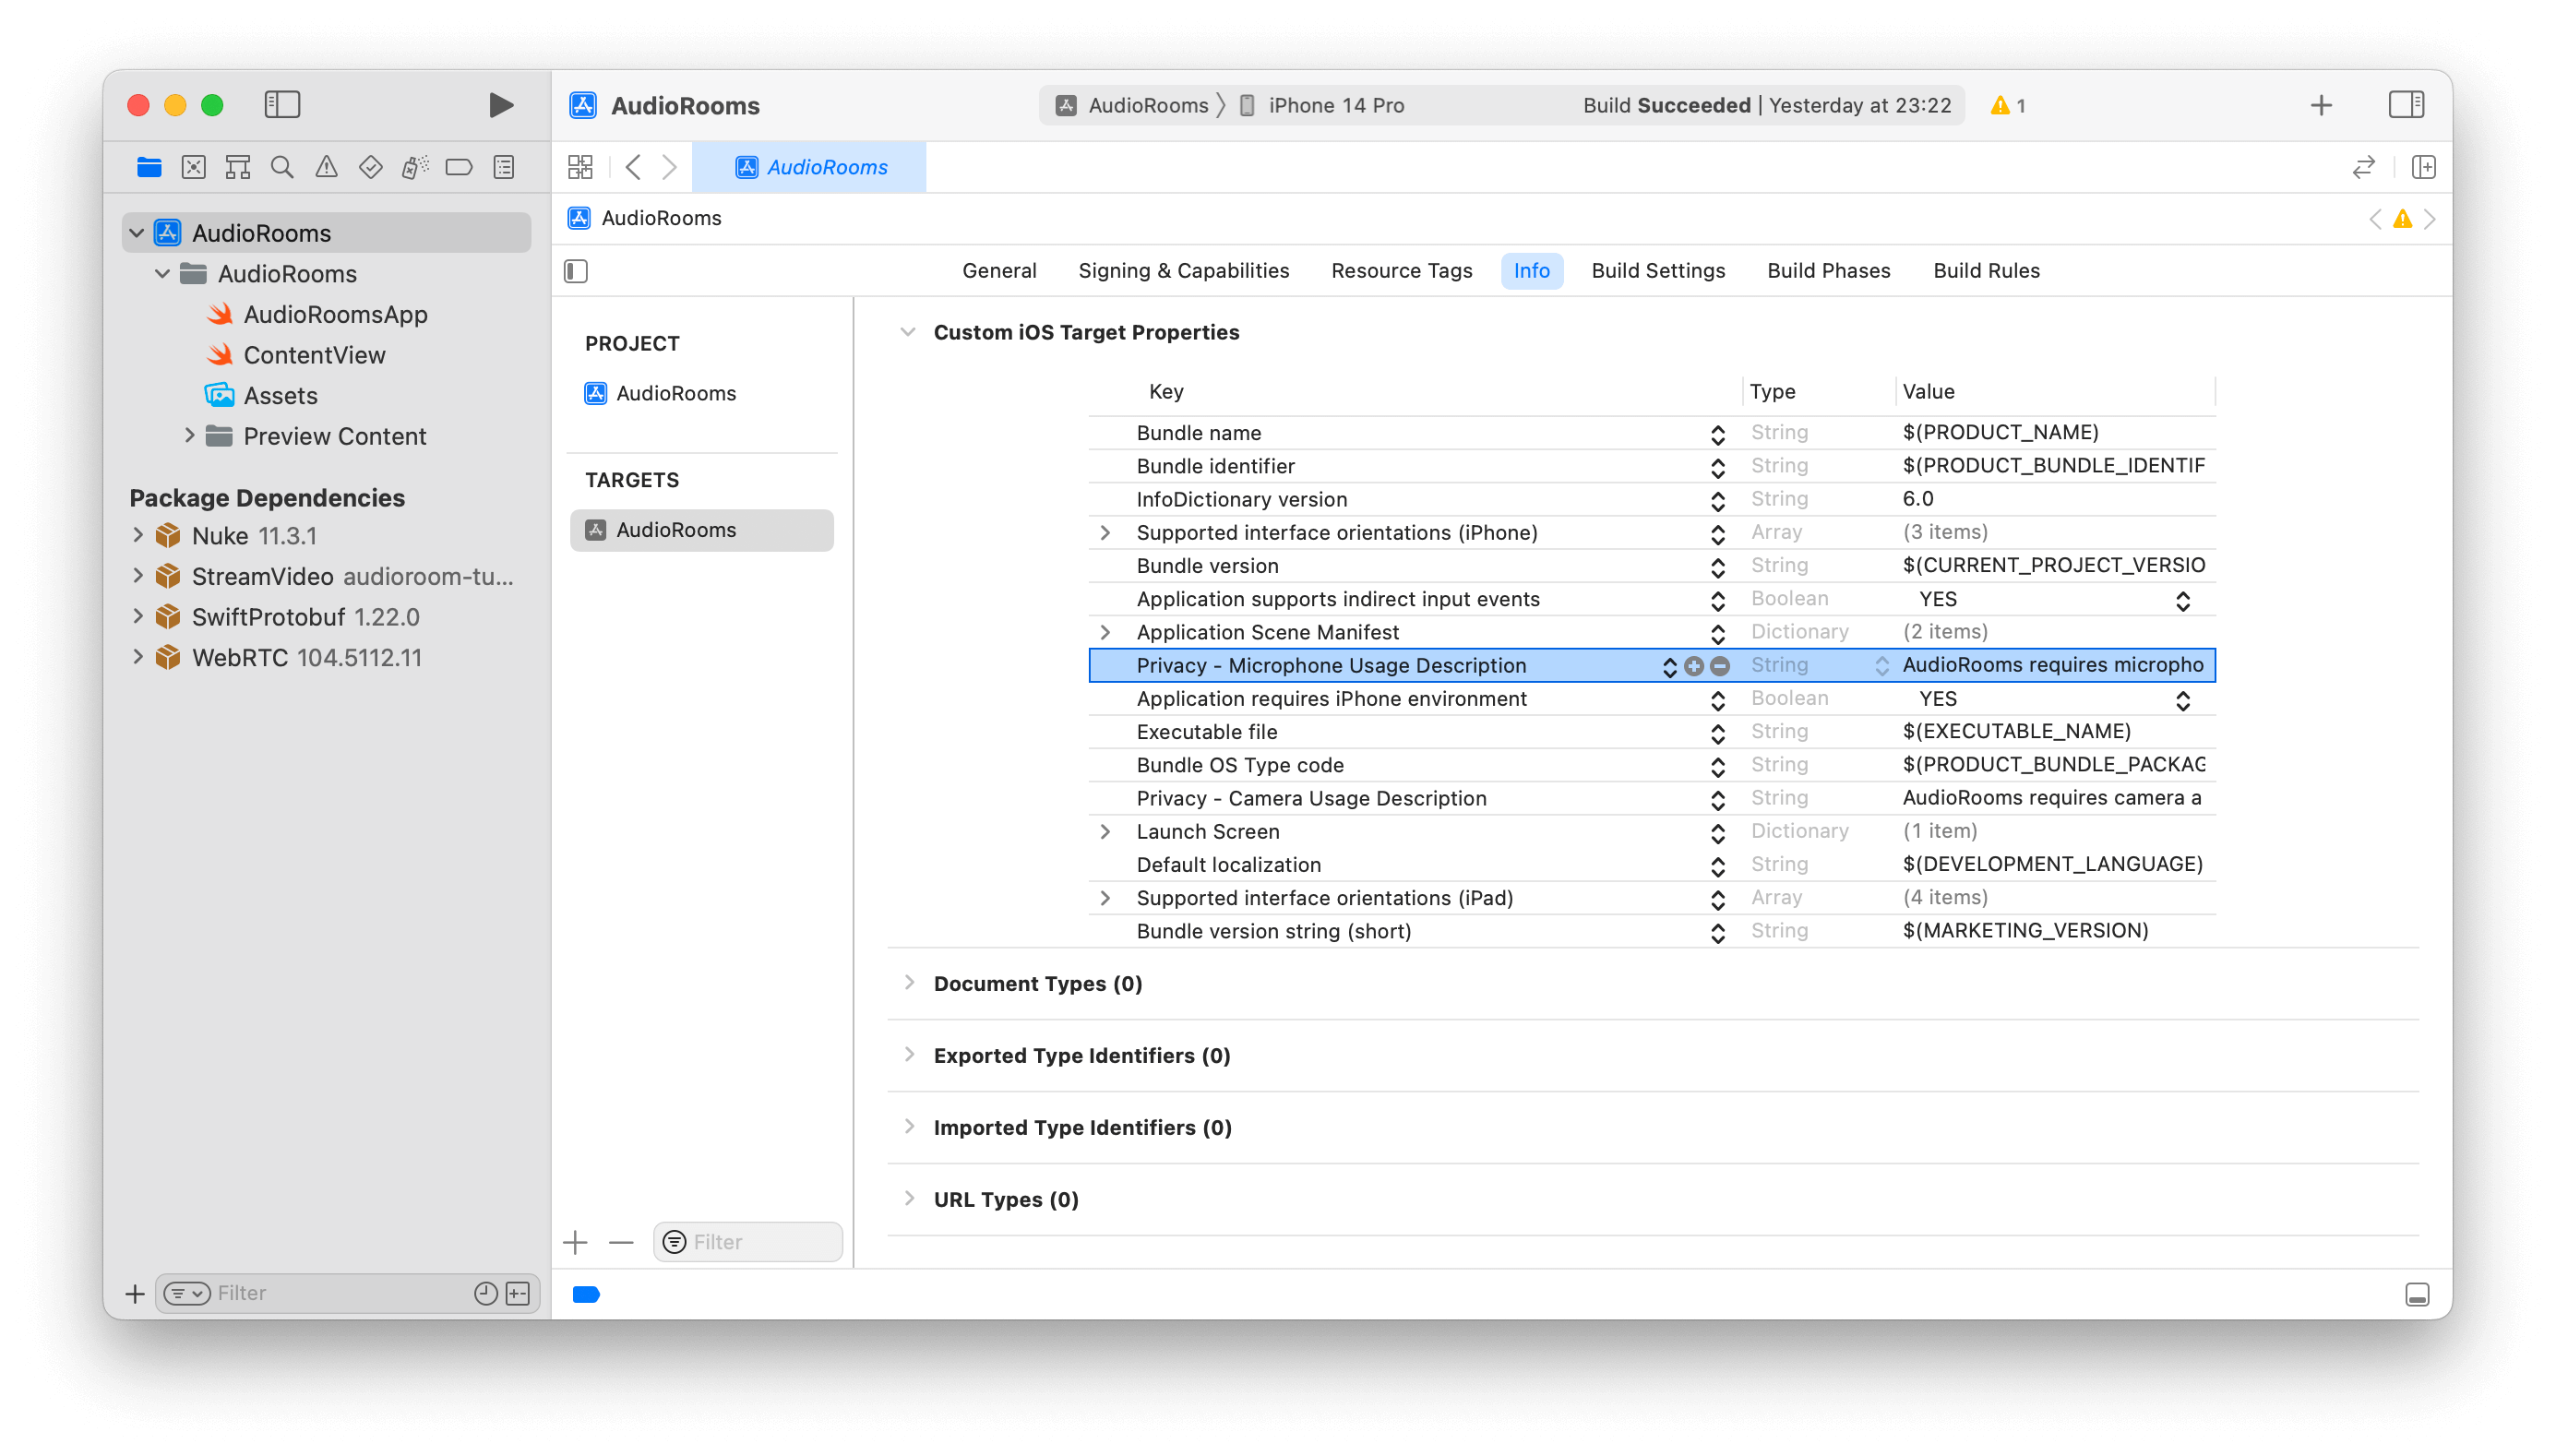
Publishing a live stream requires access to the camera and microphone. You must request permission to use these in your app. To do this, you must add the following keys under the Info tab by selecting your project's root folder in Xcode.
- Privacy - Microphone Usage Description: "LivestreamSampleApp requires microphone access to capture and transmit audio".
- Privacy - Camera Usage Description: "LivestreamSampleApp needs camera access for broadcasting".
Step 4.2 - How To Broadcast a livestream
Replace all the existing code we had for the viewer experience in the LivestreamSampleApp (or create a new project) with the following code.
12345678910111213141516171819202122232425262728293031323334353637383940414243@main
struct LivestreamSampleApp: App {

    @State var streamVideo: StreamVideo
    @State var call: Call

    init() {
        let apiKey = "REPLACE_WITH_API_KEY"
        let userId = "REPLACE_WITH_USER_ID"
        let userToken = "REPLACE_WITH_TOKEN"
        let callId = "REPLACE_WITH_CALL_ID"

        let user = User(id: userId, name: "tutorial")

        let streamVideo = StreamVideo(
            apiKey: apiKey,
            user: user,
            token: .init(rawValue: userToken)
        )
        self.streamVideo = streamVideo
        let call = streamVideo.call(callType: "livestream", callId: callId)
        self.call = call
        Task {
            try await call.join(create: true)
        }
    }

    var body: some Scene {
        WindowGroup {
            LivestreamView(call: call)
        }
    }
}

struct LivestreamView: View {

    let call: Call

    var body: some View {
        Text("TODO: render video")
    }

}
When you run the app now, you'll see a text message: "TODO: render video". Before we get around to rendering the video, let's review the code above.
In the first step, we set up the user.
1let user = User(id: userId, name: "tutorial")
Next, we create the client.
12345let streamVideo = StreamVideo(
    apiKey: "YOUR_API_KEY",
    user: user,
    token: .init(rawValue: userToken)
)
You'll see the userToken variable. Your backend typically generates the user token on signup or login.
The most important step to review is how we create the call. Stream uses the same call object for livestreaming, audio rooms, and video calling. Have a look at the code snippet below.
1234let call = streamVideo.call(callType: "livestream", callId: callId)
Task {
    try await call.join(create: true)
}
To create the call object, specify the call type as livestream and provide a unique callId. The livestream call type comes with default settings that are usually suitable for livestreams, but you can customize the dashboard's features, permissions, and settings. Additionally, the dashboard allows you to create new call types as required.
Finally, using call.join(create: true) will create the call object on our servers and initiate the real-time transport for audio and video. This allows for seamless and immediate engagement in the livestream.
You can also add members to a call and assign them different roles. For more information, see the call creation docs.
Step 4.3 - Render Your Local Video
In this step, we will build a UI for showing your local video with a button to start the livestream. This example uses SwiftUI, but you could also use UIKit.
In LivestreamSampleApp.swift, replace the LivestreamView with the following code.
1234567891011121314151617181920212223242526272829303132333435363738394041424344454647484950515253545556575859606162636465666768697071727374757677787980struct LivestreamView: View {

    @Injected(\.streamVideo) var streamVideo

    let call: Call

    @StateObject var state: CallState

    let formatter = DateComponentsFormatter()

    init(call: Call) {
        self.call = call
        _state = StateObject(wrappedValue: call.state)
        formatter.unitsStyle = .full
    }

    var duration: String? {
        guard call.state.duration > 0  else { return nil }
        return formatter.string(from: call.state.duration)
    }

    var body: some View {
        VStack {
            HStack {
                if let duration {
                    Text("Live for \(duration)")
                        .font(.headline)
                        .padding(.horizontal)
                }

                Spacer()

                Text("Live \(state.participantCount)")
                    .bold()
                    .padding(.all, 4)
                    .padding(.horizontal, 2)
                    .foregroundColor(.white)
                    .background(Color.blue)
                    .cornerRadius(8)
                    .opacity(call.state.backstage ? 0 : 1)
                    .padding(.horizontal)
            }

            GeometryReader { reader in
                if let first = state.participants.first {
                    VideoRendererView(id: first.id, size: reader.size) { renderer in
                        renderer.handleViewRendering(for: first) { size, participant in }
                    }
                } else {
                    Color(UIColor.secondarySystemBackground)
                }
            }
            .padding()

            ZStack {
                if call.state.backstage {
                    Button {
                        Task {
                            try await call.goLive()
                        }
                    } label: {
                        Text("Go Live")
                    }
                } else {
                    Button {
                        Task {
                            try await call.stopLive()
                        }
                    } label: {
                        Text("Stop Livestream")
                    }
                }
            }
            .padding()
        }
        .background(Color(UIColor.systemBackground))
        .navigationBarHidden(true)
    }

}
Step 5 - Backstage and GoLive
The backstage functionality makes it easy to build a flow where you and your co-hosts can set up your camera and equipment before going live. Only after you call call.goLive() will regular users be allowed to join the livestream.
This is convenient for many livestreaming and audio-room use cases. If you want calls to start immediately when you join them, that's also possible. Simply go to the Stream dashboard, click the livestream call type, and disable the backstage mode.
Step 6 - Preview Using React
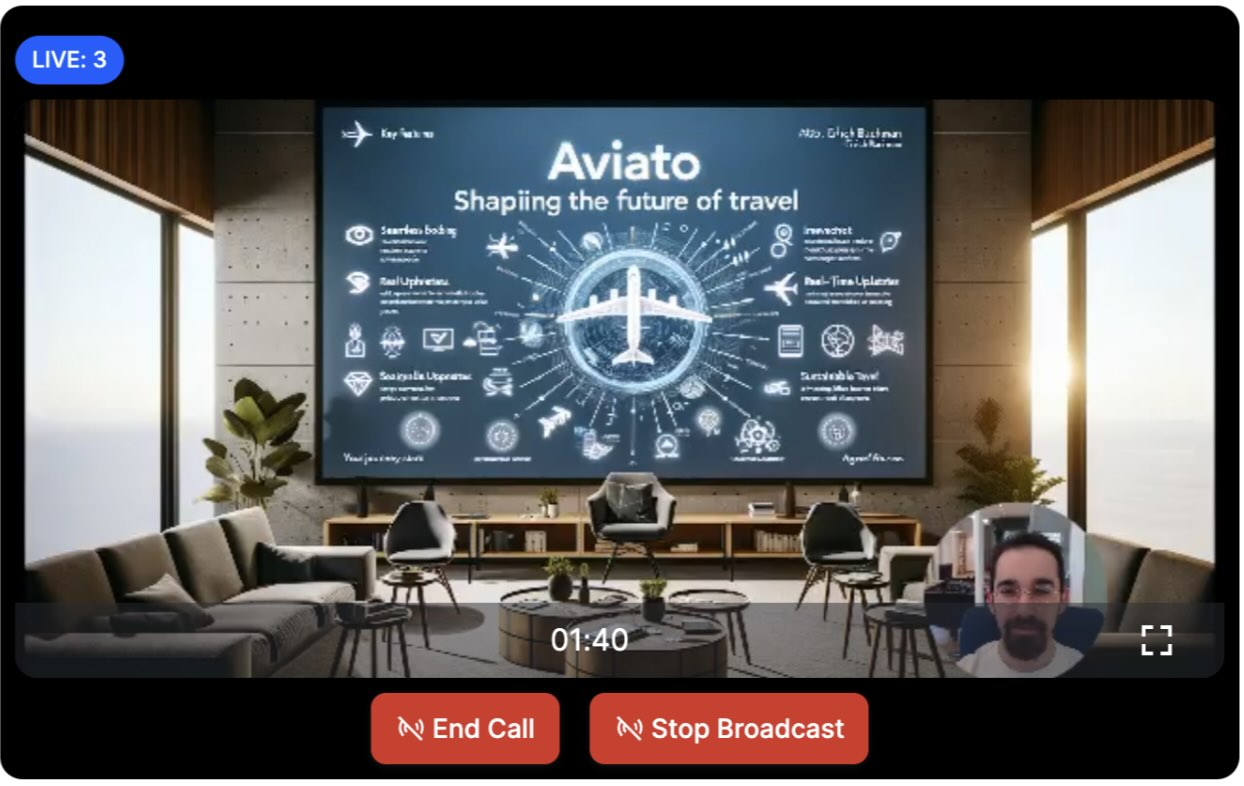
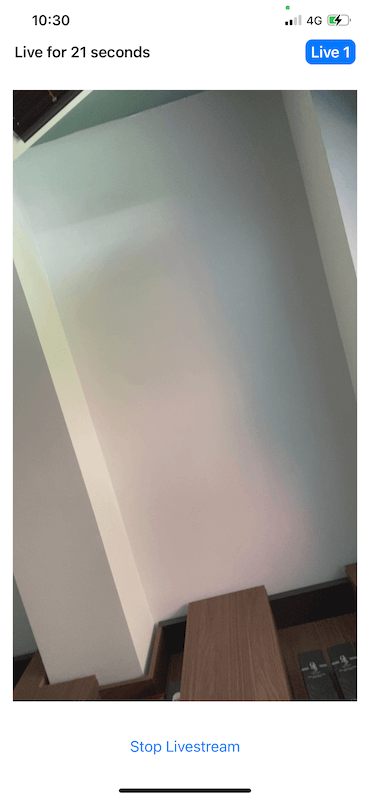
Now, let's press Go live in the iOS app. Upon going live, you will be greeted with an interface like this.
You can also click the link below to watch the video in your browser.
Advanced Features
This tutorial covered the steps required to watch a live stream using RTMP-in and OBS Studio and how to publish a live stream from an iOS device. Several advanced features can improve the live streaming experience.
- Co-hosts You can add members to your livestream with elevated permissions. So you can have co-hosts, moderators, etc. You can see how to render multiple video tracks in our video calling tutorial.
- Permissions and Moderation. You can set up different permissions for different types of users and grant additional access using a request-based approach.
- Custom events: You can use custom events on the call to share any additional data. For example, you could show the score for a game or any other realtime use case.
- Reactions & Chat Users can react to the livestream, and you can add chat. This makes for a more engaging experience.
- Notifications You can notify users via push notifications when the livestream starts
- Recording The call recording functionality allows you to record the call with various options and layouts
- Transcriptions Transcriptions can be a great addition to livestreams, especially for users that have muted their audio.
- Noise cancellation Noise cancellation can enhance the quality of the livestreaming experience.
- HLS Another way to watch a livestream is using HLS. HLS tends to have a 10 to 20-second delay, while the WebRTC approach is realtime. The benefit that HLS offers is better buffering under poor network conditions.
Recap
It was fun seeing how quickly you can build in-app low-latency livestreaming. Please do let us know if you run into any issues. Our team is also happy to review your UI designs and offer recommendations on how to achieve this with Stream.
The following are what we learned.
- WebRTC is optimal for latency, HLS is slower but buffers better for users with poor connections.
- You set up a call: (
let call = streamVideo.call(callType: "livestream", callId: callId)). - The call type "livestream" controls which features are enabled and how permissions are set up.
- When you join a call, realtime communication is set up for audio & video: (call.join()).
- Observable objects in
call.stateandcall.state.participantsmake it easy to build your UI. - You can easily publish your video from an iOS device.
Calls run on Stream's global edge network of video servers. Being closer to your users improves the latency and reliability of calls. The SDKs enable you to build livestreaming, audio rooms and video calling in days.
We hope you've enjoyed this tutorial. Please feel free to contact us if you have any suggestions or questions.
Final Thoughts
In this video app tutorial, we built a fully functioning iOS messaging app with our iOS SDK component library. We also showed how easy it is to customize the behavior and the style of the iOS video app components with minimal code changes.
Both the video SDK for iOS and the API have plenty more features available to support more advanced use cases.