

Adding image uploads to your live streams or chats increases engagement and interactivity. It allows your users to share visual content with the community, express themselves through photos and memes, and create more dynamic conversations in real time.
But it also introduces the challenge of bad actors uploading inappropriate content and exposing your community to harmful and offensive material. This upsets users and damages your platform's reputation and user trust. The answer is image moderation, which has become a more straightforward system to implement with new AI tools.
Behind the scenes, Stream uses AWS Rekognition to perform image moderation. Here, you’ll build a similar setup using AWS APIs and CLI to understand how AI image moderation works.
Understanding AWS Rekognition
Let’s start with a quick introduction to AWS Rekognition.
AWS Rekognition is Amazon's machine-learning computer vision service. Developers can use Rekognition to build their own ML vision models or use built-in capabilities, including facial analysis, object detection, and text recognition. Here, we’re interested in one of its most powerful features–content moderation–that allows users to automatically detect inappropriate or offensive content.
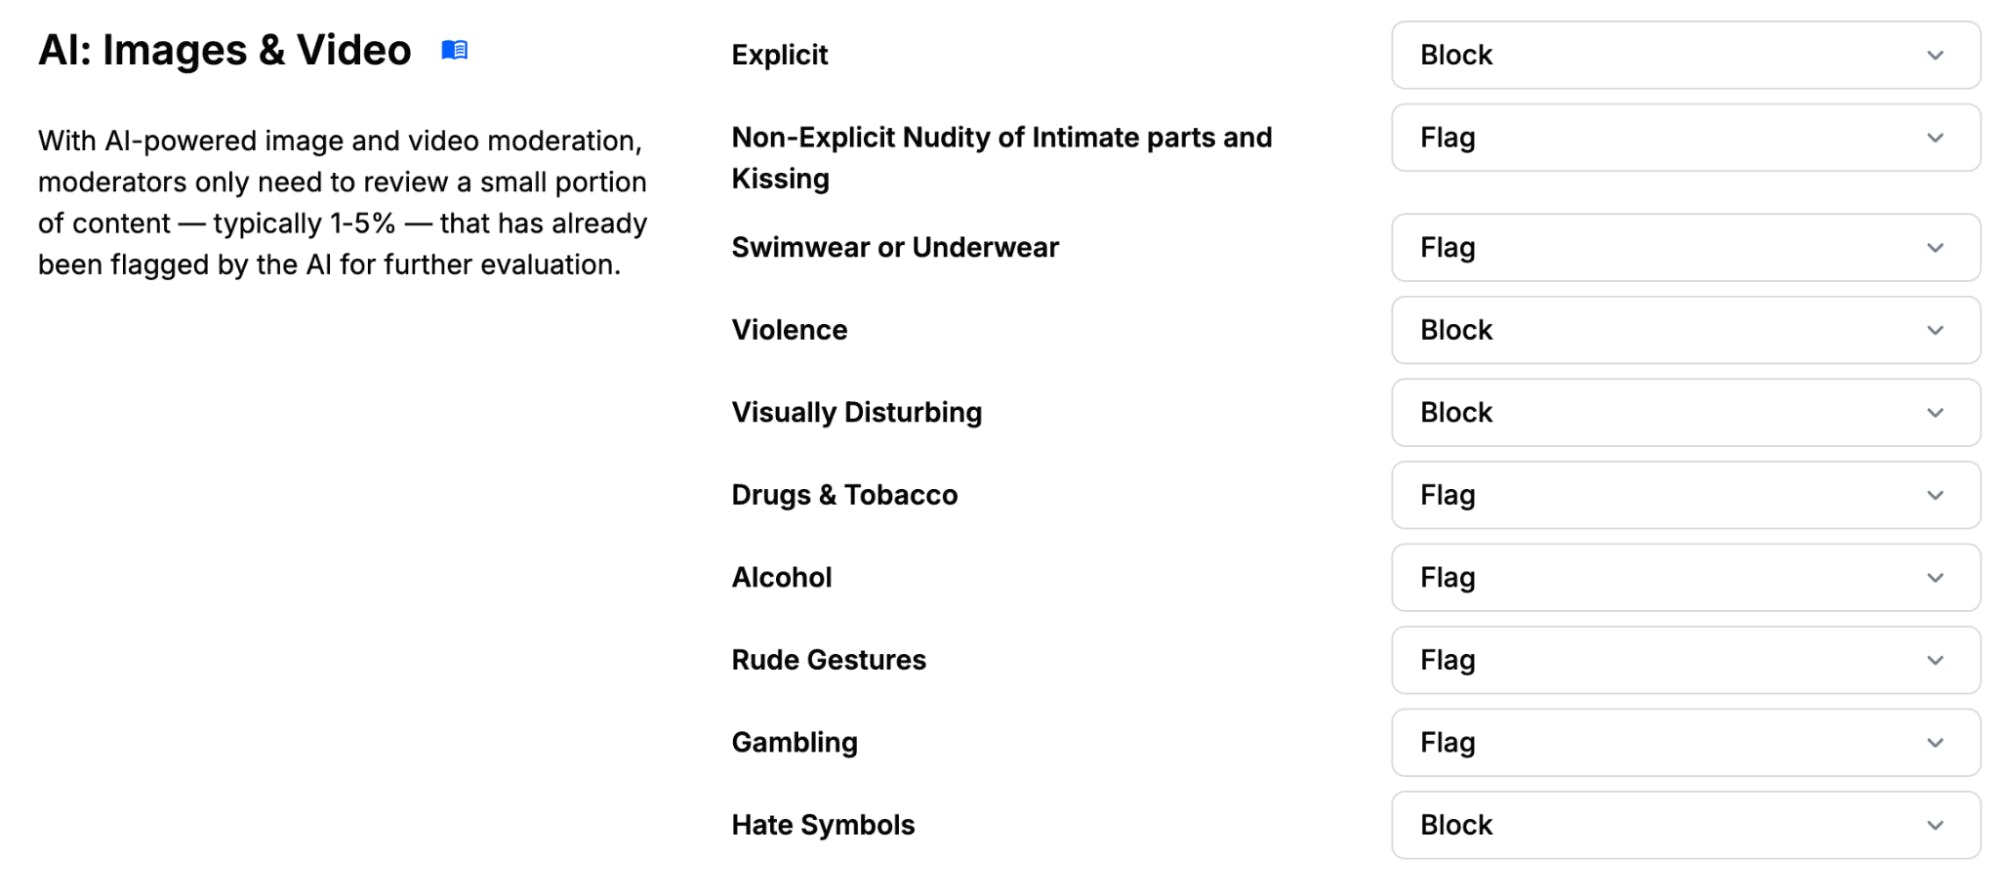
At its core, Rekognition's moderation API can detect inappropriate content across several key categories:
- Explicit Nudity and Suggestive Content
- Violence and Gore
- Weapons
- Drugs and Controlled Substances
- Hate Symbols
- Gambling Content
What sets Rekognition apart is its confidence-based approach. Rather than providing simple yes/no answers, it returns confidence scores (0-100) for each category, giving developers fine-grained control over moderation thresholds. This allows you to tune the sensitivity based on your community guidelines and risk tolerance. You’ll see this in action within the application.
The flow of the application will be:
- Intercept each image as it is added by the user
- Upload that image to an AWS S3 bucket
- Pass the S3 image URL to a server endpoint
- Within that endpoint, call the AWS Rekognition API with the image URL to analysis
- Pass the moderation results (label and confidence) back to the client
- Decide on the client whether to show the image or an alert
Let’s start building.
Moderation is only one part of the equation. To keep your platform safe and compliant, you also need clear legal and policy frameworks. Learn how to build those in our Guide on Content Compliance.
Developer Setup
This application will be based on the Stream React chat tutorial. Follow the instructions there to build an application with the React Chat SDK, and then all the other code here will build on that.
Create a Stream Account
To get started, you'll need a Stream account and API credentials. Head over to the signup page to create your free account.
Once you've created your account, follow these steps to set up your project:
- Log into the Stream Dashboard
- Click the "Create App" button in the top right corner
- Give your app a name (e.g., "Image Moderation Demo")
- Choose "Development" mode - this provides free API calls for testing
- Click "Create App" to generate your project
After creating your app, you'll land on the app dashboard, where you can find your API credentials:
- The Stream API Key - Used to initialize the Stream client
- The API Secret - Required for backend token generation
Keep these credentials handy, as you'll need them throughout this tutorial. The API Secret should be kept secure and never exposed in your frontend code.
With your Stream account set up, let's continue configuring AWS.
Setting Up AWS Rekognition
There are two components you have to think about when setting up AWS Rekognition.
First, set up your AWS account and the AWS CLI and SDKs. Follow the AWS Rekognition documentation to do this. You will also need your access key ID and secret access key in both the client (for image upload) and server (for image moderation).
Next, you need to set up an S3 bucket. Go to S3 in AWS and click “Create bucket.” On the bucket creation page, name your bucket (e.g., stream-image-moderation). The main change here is to uncheck the “Block all public access” option. Since you want the public to be able to view our images, you must give general permissions here.
After creating the bucket, you will set two policies to restrict access to the bucket, specifically to our server and client. Under the “permissions” tab for your new bucket, you will change the bucket policy and the CORS configuration.
First, CORS:
123456789101112131415161718192021[
    {
        "AllowedHeaders": [
            "*"
        ],
        "AllowedMethods": [
            "PUT",
            "POST",
            "GET",
            "HEAD"
        ],
        "AllowedOrigins": [
            "http://localhost:5173",
            "http://localhost:3000"
        ],
        "ExposeHeaders": [
            "ETag"
        ],
        "MaxAgeSeconds": 3600
    }
]
CORS (Cross-Origin Resource Sharing) is a security feature that controls how web browsers request resources from different domains. This configuration allows your frontend and backend applications running on localhost to interact with your S3 bucket by permitting specific HTTP methods (PUT, POST, GET, HEAD) and exposing the ETag header, which helps manage file uploads.
Then, our bucket policy:
123456789101112131415161718192021222324{
    "Version": "2012-10-17",
    "Statement": [
        {
            "Sid": "PublicReadGetObject",
            "Effect": "Allow",
            "Principal": "*",
            "Action": [
                "s3:GetObject",
                "s3:PutObject"
            ],
            "Resource": "arn:aws:s3:::stream-image-moderation/*"
        },
        {
            "Sid": "AllowRekognitionRead",
            "Effect": "Allow",
            "Principal": {
                "Service": "rekognition.amazonaws.com"
            },
            "Action": "s3:GetObject",
            "Resource": "arn:aws:s3:::stream-image-moderation/*"
        }
    ]
}
An S3 bucket policy is a JSON document that defines who can access the bucket and what actions they can perform. This policy has two main parts:
- First, it allows public read and write access to objects in the bucket through the
s3:GetObjectands3:PutObjectpermissions, which enables users to upload and view images. - Second, it explicitly grants the AWS Rekognition service permission to read objects from the bucket through the
s3:GetObjectpermission, which is necessary for performing content moderation on the uploaded images.
Once AWS configures, you can move on to the client code.
Adding S3 Uploads to Your Stream React Client
By default, Stream takes care of all image uploads for you. However, you want to bypass that system and upload your images to use with your image moderation service. To do so, first install the AWS S3 SDK:
1npm install @aws-sdk/client-s3
You can then import it at the top of your App.tsx along with the Stream imports:
1import { S3Client, PutObjectCommand } from "@aws-sdk/client-s3";
Now, you can add the S3-specific code to your Stream React chat app. Start with the configuration and types:
1234567891011121314151617181920// Add S3 configuration
const s3Client = new S3Client({
 region: "us-east-1",
 credentials: {
   accessKeyId: "accessKeyId",
   secretAccessKey: "secretAccessKey"
 }
});

interface ModerationLabel {
 name: string;
 confidence: number;
 parent_name: string;
}

interface ModerationResponse {
 success: boolean;
 moderation_results: ModerationLabel[];
 labels_detected: number;
}
This sets up the AWS S3 client with your credentials and region configuration. The interfaces define the expected structure of the moderation response from AWS Rekognition, with ModerationLabel representing individual content warnings and ModerationResponse wrapping the overall results.
Then, move on to the functions you’ll need. You can start with the function that will upload the image to S3:
123456789101112131415161718192021222324252627282930313233343536373839const uploadToS3 = async (file: File) => {
 console.log('Uploading file to S3...');
 try {
   const fileName = `${Date.now()}-${file.name}`;

   const command = new PutObjectCommand({
     Bucket: "stream-image-moderation",
     Key: fileName,
     ContentType: file.type,
     Body: file
   });

   // Upload directly using the AWS SDK
   await s3Client.send(command);

   // Get the public URL
   const publicUrl = `https://stream-image-moderation.s3.us-east-1.amazonaws.com/${fileName}`;

   // Get moderation results from Flask backend
   const moderationResponse = await fetch('http://127.0.0.1:5000/process-image', {
     method: 'POST',
     headers: {
       'Content-Type': 'application/json',
     },
     body: JSON.stringify({
       fileName,
       url: publicUrl
     }),
   });

   const moderationData: ModerationResponse = await moderationResponse.json();
   checkModeration(moderationData);

   return publicUrl;
 } catch (error) {
   console.error('Error uploading to S3:', error);
   throw error;
 }
};
The uploadToS3 function handles the complete flow of image processing. It generates a unique filename using a timestamp, uploads the file to your S3 bucket using the AWS SDK, and constructs the public URL for the uploaded image. Once uploaded, it calls your Flask server to perform content moderation on the image, passing both the filename and public URL.
The moderation results are then checked against your defined criteria in checkModeration before returning the public URL for use in the chat message.
Let’s see checkModeration:
1234567891011121314151617const checkModeration = (moderationData: ModerationResponse) => {
 // You can customize these thresholds
 const CONFIDENCE_THRESHOLD = 60;
  const inappropriateContent = moderationData.moderation_results.some(label => {
   // Add specific label checks based on your needs
   console.log(label.name);
   const isInappropriate = [
     'Gambling'
   ].includes(label.name);

   return isInappropriate && label.confidence > CONFIDENCE_THRESHOLD;
 });

 if (inappropriateContent) {
   throw new Error('Image contains inappropriate content: ' + moderationData.moderation_results.map(label => label.name).join(', '));
 }
};
The checkModeration function implements your content moderation rules. It takes the moderation results from AWS Rekognition and checks if any detected labels match your list of inappropriate content categories (in this example, just 'Gambling' as that is what the images you’ll test will show) and exceeds your confidence threshold of 60%. If inappropriate content is detected, it throws an error with the specific labels that were flagged.
With those complete, you can call the uploadToS3 function within the main App function:
123456789101112131415161718192021222324252627282930313233343536373839404142434445464748495051525354555657585960616263const App = () => {
 const [channel, setChannel] = useState<StreamChannel>();

 const chatClient = StreamChat.getInstance(apiKey);

 const devToken = chatClient.devToken(userId);
  const client = useCreateChatClient({
   apiKey,
   tokenOrProvider: devToken,
   userData: user,
 });

 useEffect(() => {
   if (!client) return;

   const channel = client.channel('messaging', 'image-moderation', {
     image: 'https://getstream.io/random_png/?name=react',
     name: 'Image Moderator',
     members: [userId],
   });

   setChannel(channel);
 }, [client]);

 const handleFileUpload: MessageInputProps['doImageUploadRequest'] = async (file, channel) => {
   try {
     if (!file) throw new Error('No file provided');

     const s3Url = await uploadToS3(file);

     await channel.sendMessage({
       text: '',
       attachments: [
         {
           type: 'image',
           image_url: s3Url,
           fallback: file.name,
         }
       ],
     });

     return { status: 'success', clearEditingState: true };
   } catch (error) {
     alert(error instanceof Error ? error.message : 'Upload failed');
     return { status: 'error', clearEditingState: true };
   }
 };

 if (!client) return <div>Setting up client & connection...</div>;

 return (
   <Chat client={client}>
     <Channel channel={channel}>
       <Window>
         <ChannelHeader />
         <MessageList />
         <MessageInput doImageUploadRequest={handleFileUpload} />
       </Window>
       <Thread />
     </Channel>
   </Chat>
 );
};
The App component brings everything together into a complete Stream Chat implementation. It initializes the Stream client with your API key and user information, creates a messaging channel, and sets up the image upload handler.
The handleFileUpload function integrates with Stream's MessageInput component, processing uploaded files through your S3 and moderation pipeline before adding them to the chat. If moderation passes, the image is attached to a new message; if it fails, the user receives an alert. The component renders the standard Stream Chat UI components with your custom image upload handler.
You can now run this with:
1npm run dev
However, uploading any images will throw an error, as the server is not ready to process the moderation. Let’s now build that.
Running Image Moderation With AWS Rekognition & Python
The server will be a simple Flask app exposing a single endpoint, the /process-image your client above is calling.
Install the prerequisites with:
1pip install flask flask-cors boto3
Flask is a lightweight web framework for Python that makes it easy to create API endpoints. Flask-CORS is a Flask extension that handles Cross-Origin Resource Sharing, allowing your React frontend to communicate with this Flask backend. Boto3 is the AWS SDK for Python, providing the interface to interact with AWS services like Rekognition. (Why is it called Boto? Boto is another name for the Amazon river dolphin)
The app is genuinely simple. Here it is:
12345678910111213141516171819202122232425262728293031323334353637383940414243444546from flask import Flask, request, jsonify
from flask_cors import CORS
import boto3
from urllib.parse import urlparse

app = Flask(__name__)
CORS(app)

@app.route('/process-image', methods=['POST'])
def process_image():
   try:
       data = request.json
       file_name = data['fileName']
       file_url = data['url']

       # Parse the S3 URL to get bucket and key
       parsed_url = urlparse(file_url)
       bucket = parsed_url.netloc.split('.')[0]  # Gets bucket name from S3 URL

       # Initialize Rekognition client
       session = boto3.Session()
       client = session.client('rekognition')

       # Call Rekognition to detect moderation labels
       response = client.detect_moderation_labels(
           Image={'S3Object': {'Bucket': bucket, 'Name': file_name}}
       )

       # Process the moderation results
       moderation_labels = [{
           'name': label['Name'],
           'confidence': label['Confidence'],
           'parent_name': label['ParentName']
       } for label in response['ModerationLabels']]

       print(moderation_labels)
       return jsonify({
           'success': True,
           'moderation_results': moderation_labels,
           'labels_detected': len(moderation_labels)
       })
   except Exception as e:
       return jsonify({'error': str(e)}), 500

if __name__ == '__main__':
   app.run(debug=True)
What does this do:
- Setup and Configuration: First, you import the libraries for the web server (Flask), cross-origin requests (CORS), and AWS interaction (boto3). Then, you create a Flask application instance and enable CORS support.
- The
/process-imageEndpoint: Then you create an endpoint that accepts POST requests with JSON data containing the fileName and URL of the uploaded image. This parses the S3 URL to extract the bucket name using urllib.parse. - AWS Rekognition Integration: You initialize a boto3 session and create a Rekognition client. You call the
detect_moderation_labelsRekognition method with the S3 bucket and file information. This function analyzes the image for inappropriate content across multiple categories. - Processing Results: You then transform the Rekognition response into a simplified format, with the name of content detected and confidence (how certain Rekognition is about the detection (0-100)).
- Response: Finally, you return a JSON object containing success status, an array of moderation results, and the total number of labels detected.
It is this JSON that you use in checkModeration on the client to determine whether to show the image or not. Run this with:
1python app.py
Now, if you run your client, it should work. To test, you can use some images from Unsplash. In our testing, we have chosen these three images:
- A person standing on top of a snow covered mountain. This is our control image. It should not require any moderation.
- man in green dress shirt sitting on chair. This is an example of a gambling image that AWS Rekognition should moderate.
- person in white long sleeve shirt holding white and red box. This is a less obvious gambling image that AWS Rekognition will have less confidence in.
First, we upload our control image:
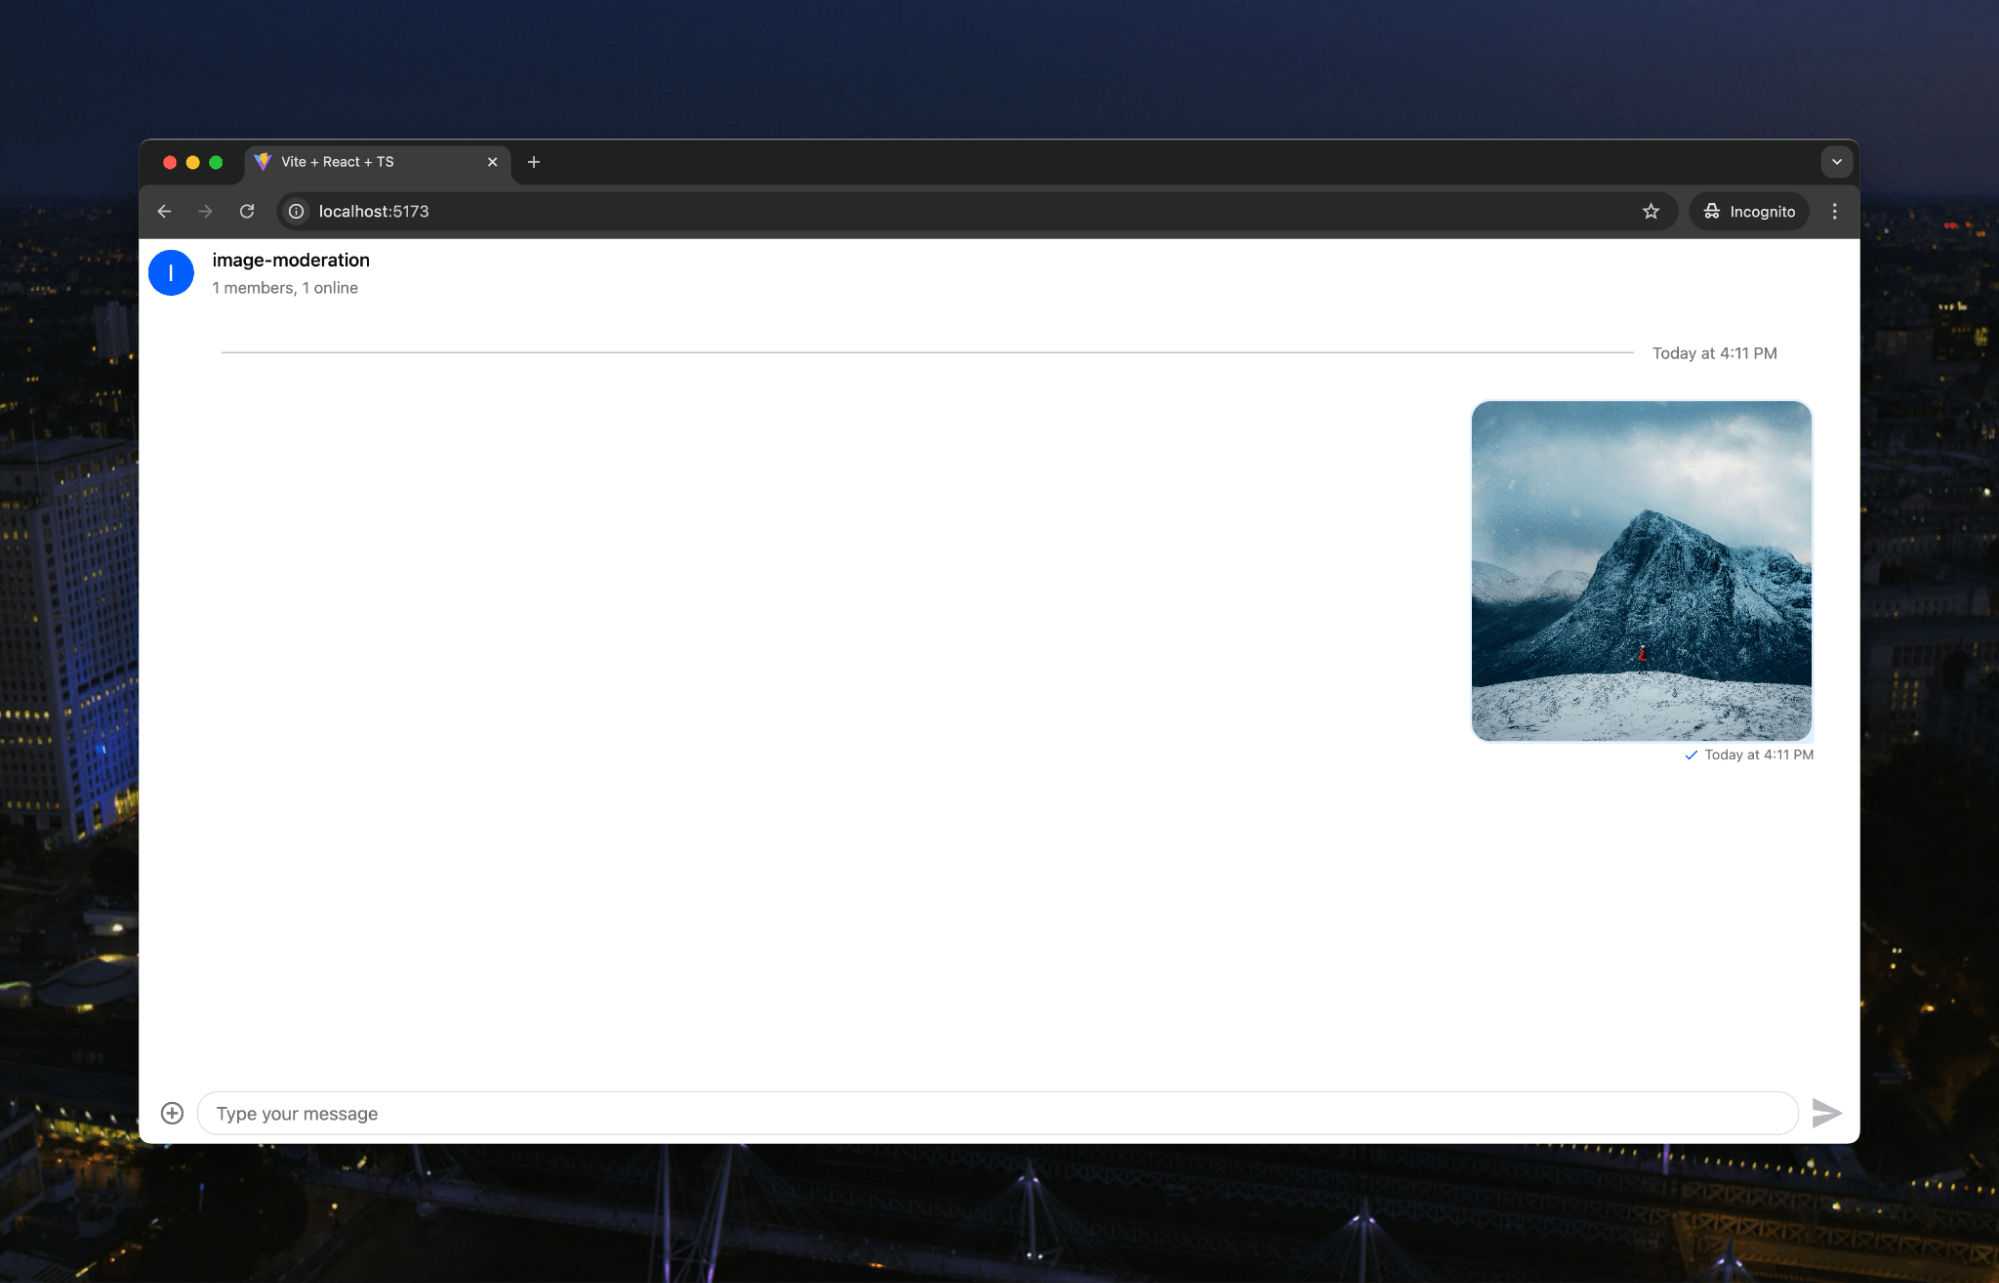
As suggested, this image shows no issues. Next, we’ll try our “Gambling” image:
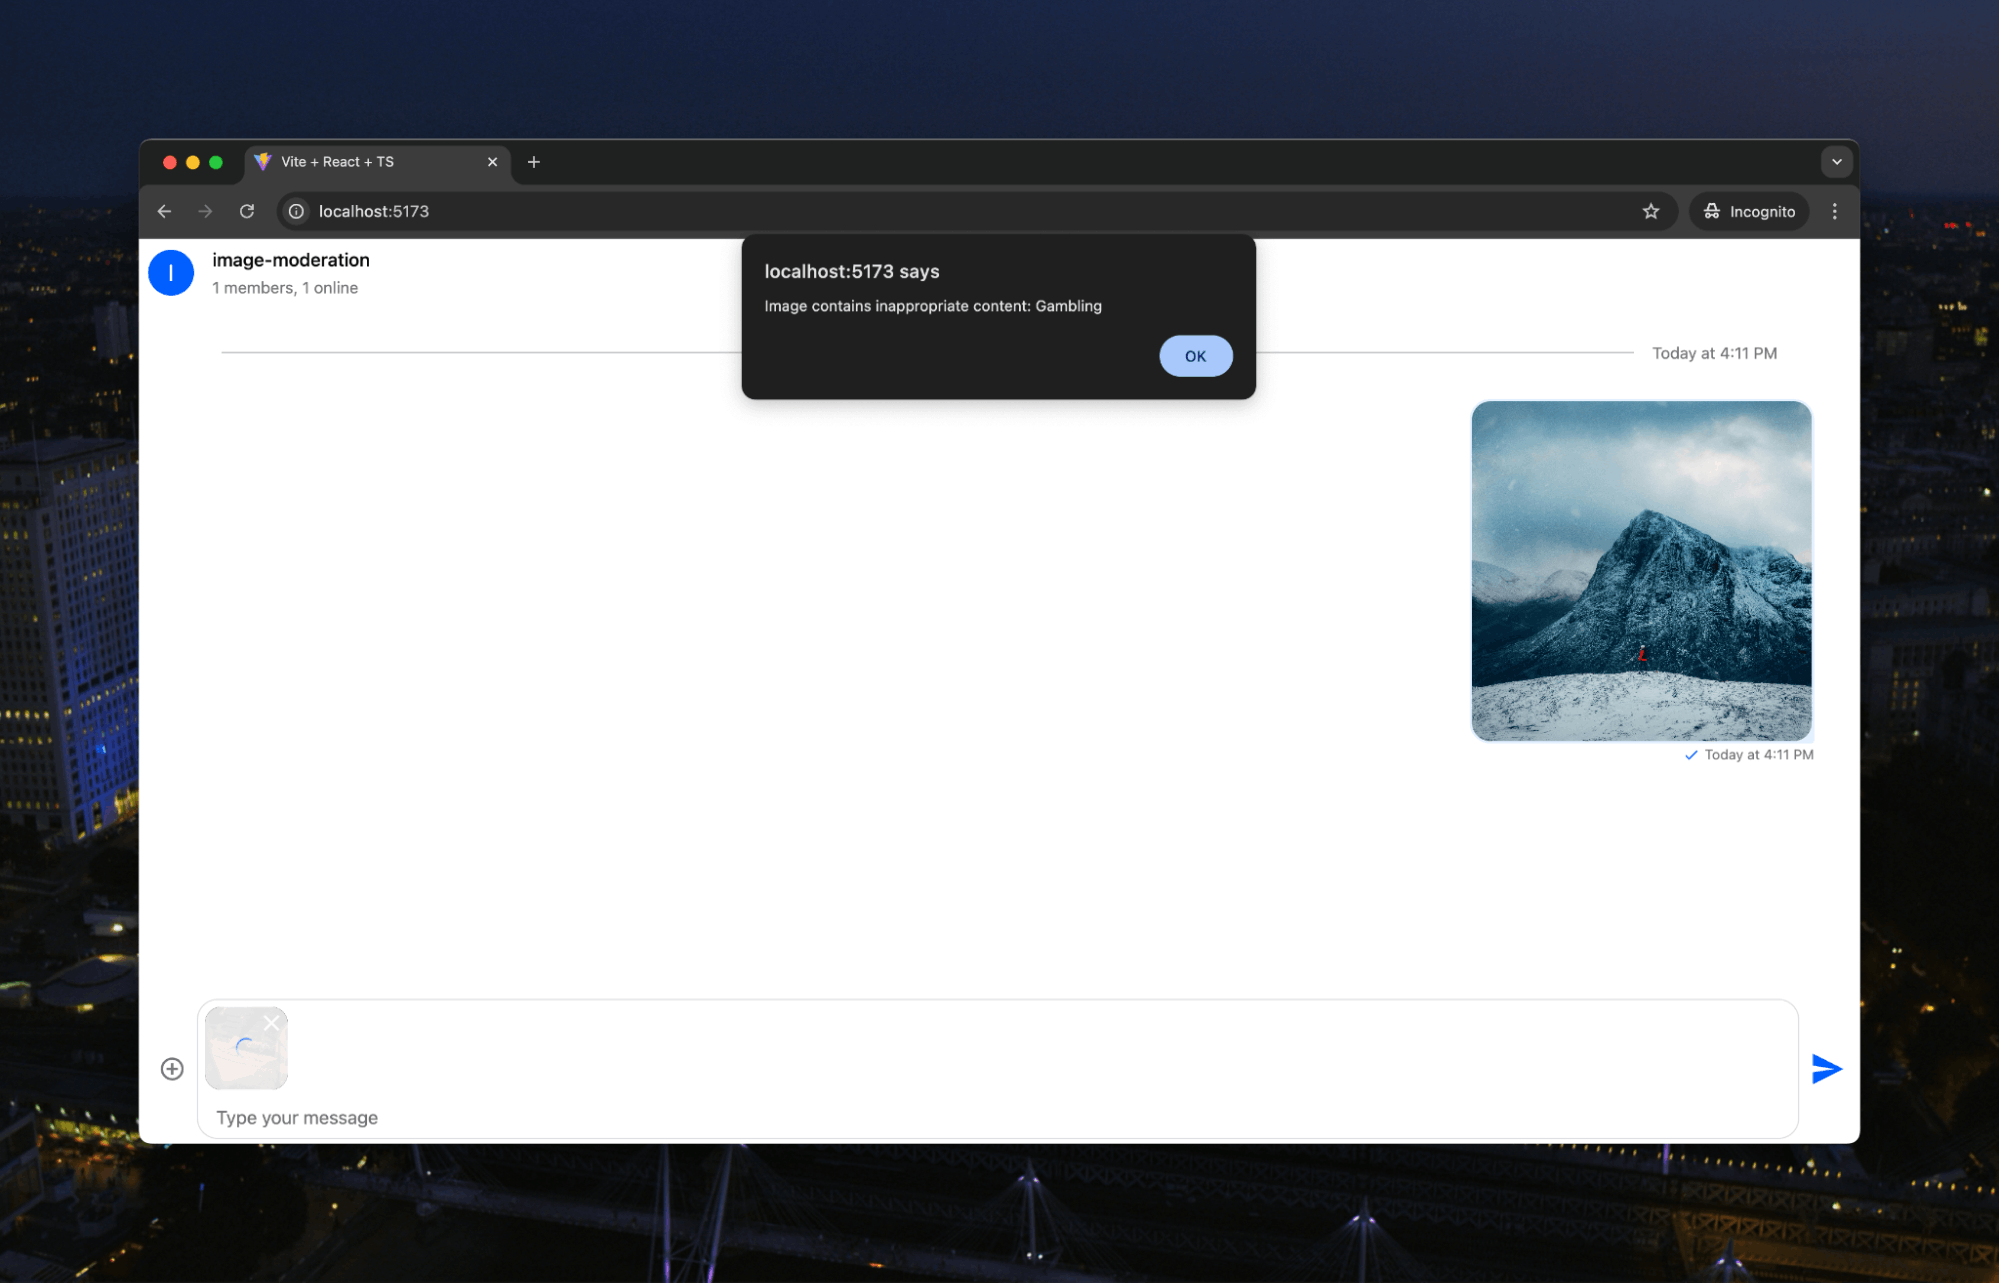
Now, the image isn’t shown in the message thread. Instead, the user gets an error message telling them it is inappropriate content and the reason for the moderation.
If we look on our server, we see this image has just sneaked over the 60% confidence level:
1[{'name': 'Gambling', 'confidence': 60.01390075683594}]
Finally, we’ll see if our app will moderate a less controversial image:
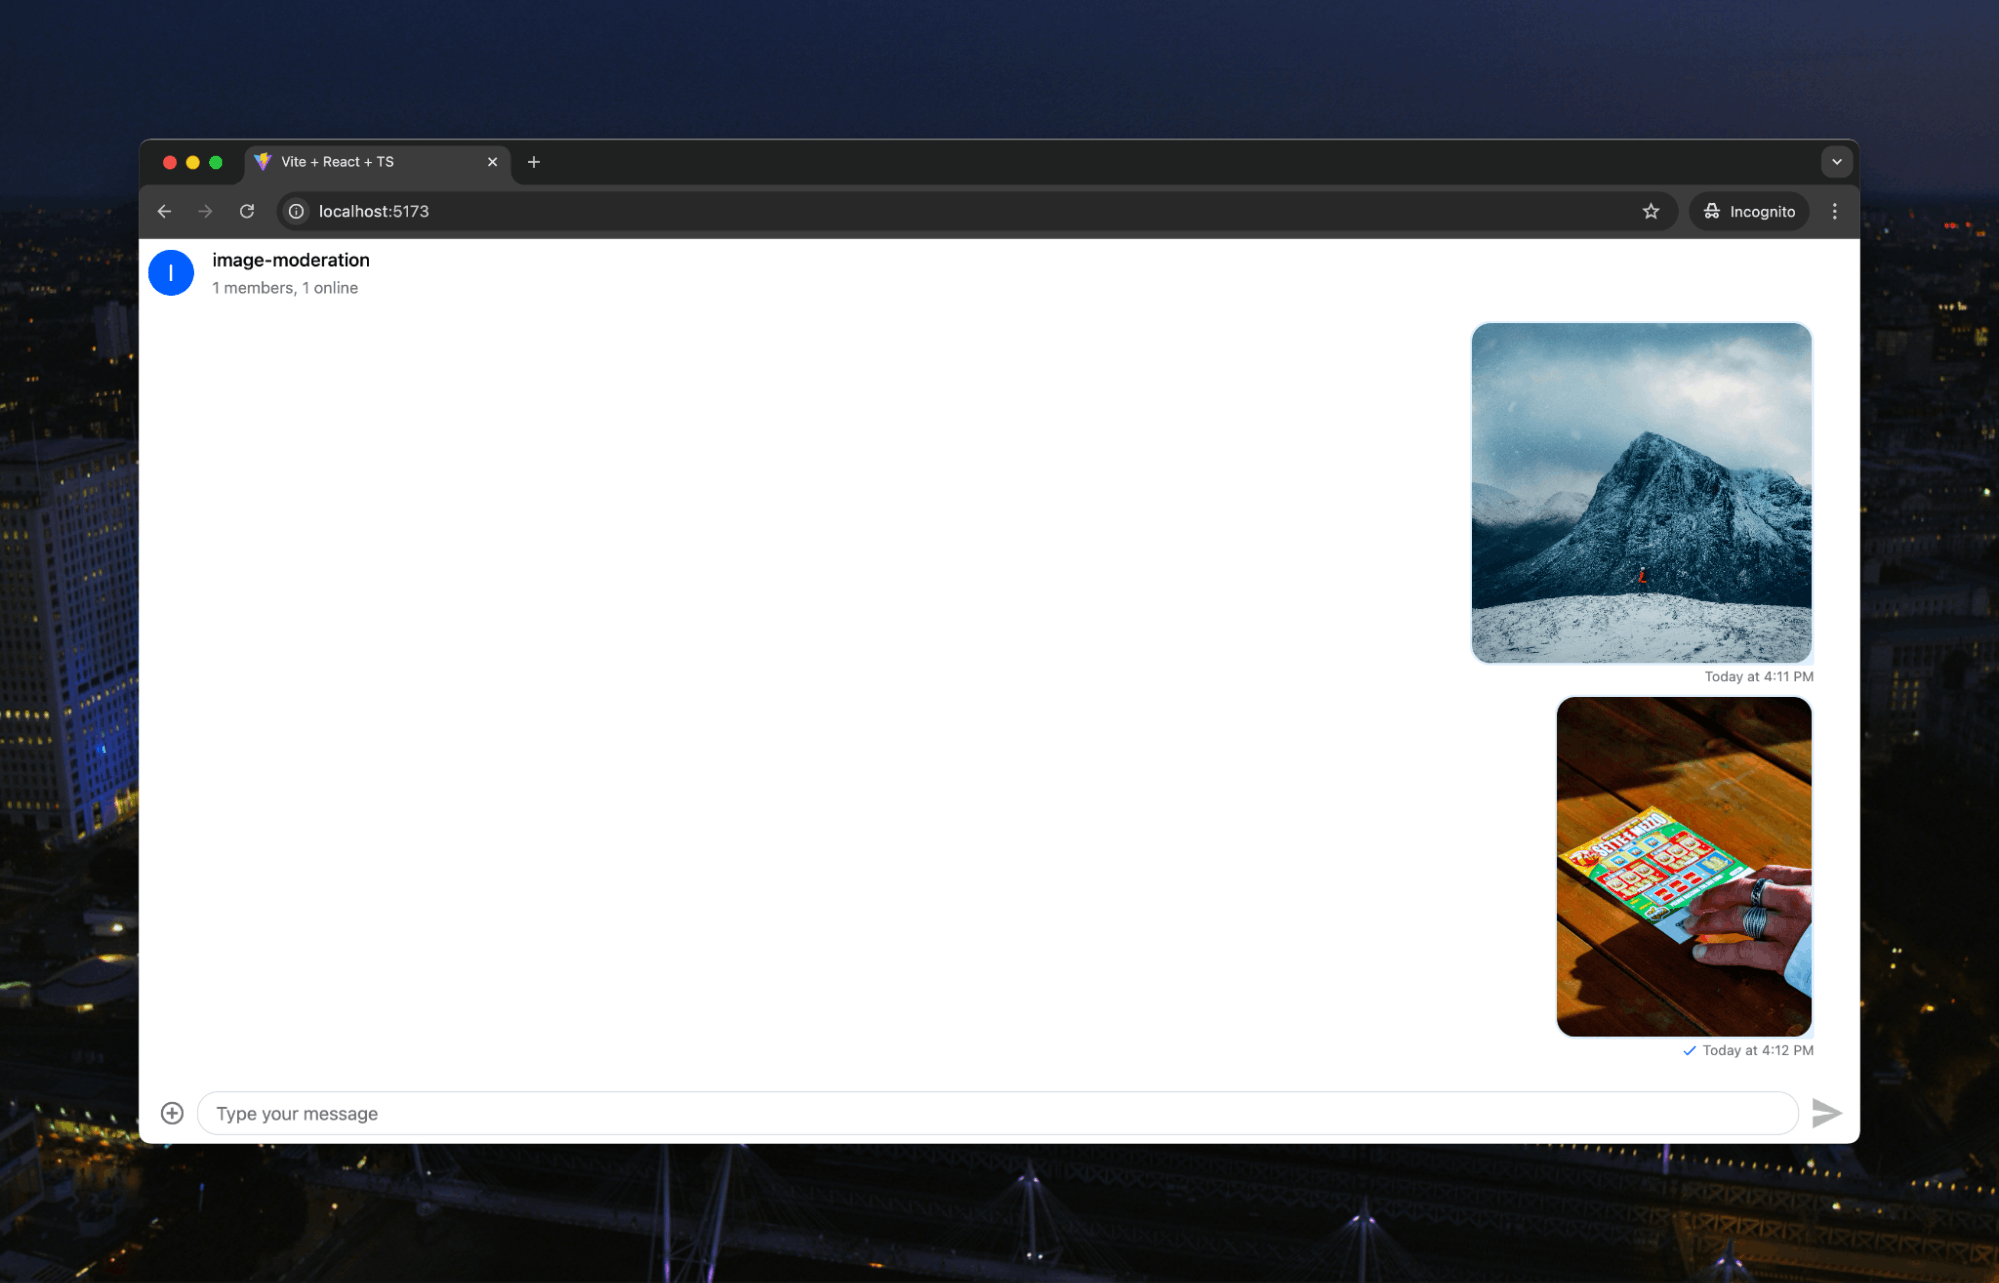
No. As suspected, this image doesn’t raise the moderation alarm bells within AWS Rekognition.
What next? If you want to build out a complete image moderation platform, here are some key features to consider:
- Expanded Moderation Categories–While gambling is a good test case, you'll want to implement checks for all of Rekognition's categories, including nudity, violence, and hate symbols. You can set different confidence thresholds for various types of content.
- Human Moderation Queue–AI isn't perfect, so build a system where borderline cases (say, confidence between 40-60%) get flagged for human review. This could include features for moderators to confirm or override AI decisions.
- User Trust System–Implement a user reputation system where users who repeatedly attempt to upload inappropriate content get flagged or temporarily banned. Conversely, trusted users might get higher thresholds or faster upload times.
- Reporting and Analytics–Build dashboards to track moderation metrics like number of uploads, rejection rates, false positive rates, and most common violation types. This helps tune your thresholds and identify emerging problems.
The good news is that you don't need to build all this yourself if you use Stream's chat platform. Stream's chat API includes built-in image moderation powered by AWS Rekognition and many of the advanced features we've discussed.