

We've broken down our 2022 Android developer roadmap into a multi-part series. Each section dives deep into important Android fundamentals and the current Android ecosystem.
In the last post, we discussed important elements of Android's primary components, including Intents and App Entry Points.
In part three, we'll cover the next four sections of our Android Roadmap:
- Fragments
- App Navigation
- Architecture Components
- Android Jetpack
If you'd like to be notified as we release future posts, join the watchers on GitHub or follow Stream on Twitter.
Let's get started!
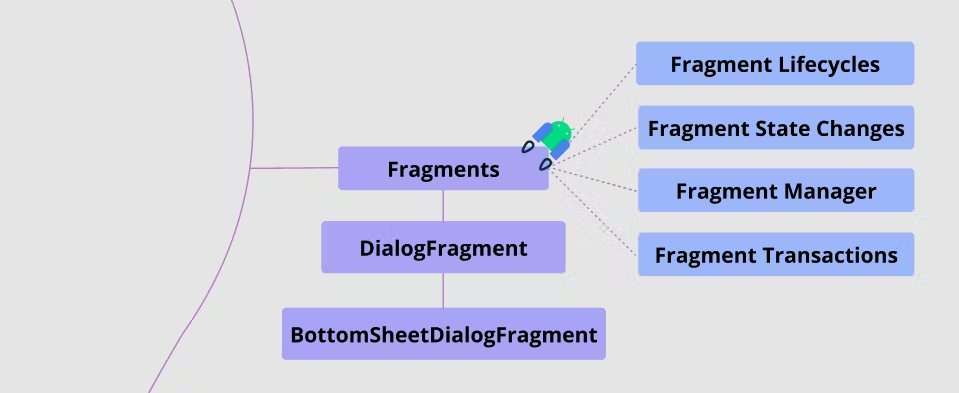
Fragments
In Part 2, we discussed App Components, like Activities, that build entry points that allow systems and users to interact with your application.
A Fragment is a reusable part of your UI that interacts with users by providing UI elements on top of activities. Typically, fragments belong to activities and are managed by a Fragment manager.
Fragment Lifecycles
All fragments have their own lifecycle, which is an essential concept to manage the lifespan of views and resources correctly. The Fragment class provides a core set of callbacks that tells a fragment that a lifecycle state has changed and has been attached to an activity.
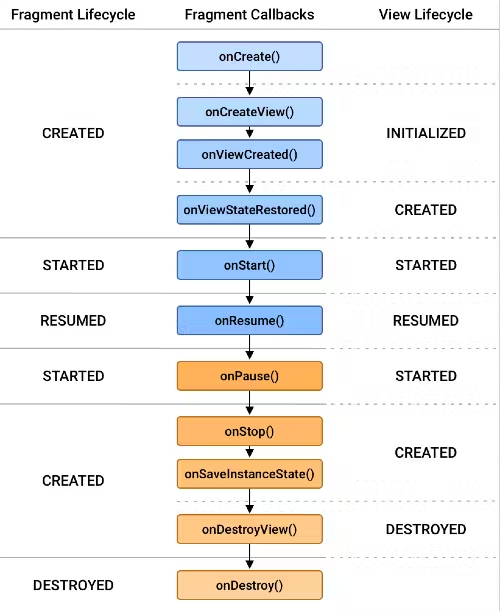
You can create your layouts and declare how your fragment behaves with lifecycle callback methods. In this section, we will discuss the fragment's lifecycle changes and associated view lifecycle with the nine core callback methods below:
-
onCreate(): This callback is invoked after the onAttached() has been called, which means your fragment is created and added to a FragmentManager. This callback can be invoked while the fragment's activity is being created, so you must not perform activity-based work here such as calling the getActivity() method.
-
onCreateView(): Most of the view creations of a fragment are handled here. If you provide a valid View instance on this callback, the fragment's view lifecycle will be created. You can also provide an id of a content layout to the fragment constructors that inflates the view at the appropriate time.
-
onViewCreated(): This callback will be invoked after you return a proper View instance in the
onCreateView(). TheonViewCreated()receives an inflated View as a parameter, which means the view hierarchy and view lifecycle has been completely initialized. You can execute UI-related work in this callback. -
onStart(): This callback will be invoked when the fragment becomes visible to the user, and is generally tied to the Activity.onStart lifecycle method (it may run more than once if you switch between multiple activities or applications).
-
onResume(): This callback will be invoked when the fragment is ready to come to the foreground and interact with users. The
onResume()callback is generally tied to the Activity.onResume lifecycle method. -
onPause(): This callback will be invoked when the user begins to leave the fragment, and may still be partially visible (for instance, if the user is in multi-window mode). This callback is generally tied to the Activity.onPause lifecycle method.
-
onStop(): This callback will be invoked when the fragment is no longer visible to the user, and is generally tied to the Activity.onStop lifecycle method.
-
onDestroyView(): This callback will be invoked when the view previously created has been detached from the fragment. That means the fragment's view lifecycle moves into the destroyed state and the view is no longer available.
-
onDestroy(): This callback will be invoked when the fragment is removed, or if the FragmentManager is destroyed. Before detaching it from the activity, you can release or dismiss all remaining resources in this callback.
For more details, check out Fragment lifecycles. Now, let's learn how to create a fragment.
Create a Fragment
In modern Android development, the Jetpack library provides fragment classes and their associated extensions. So first, add the dependency below to your app-level build.gradle file:
1implementation "androidx.fragment:fragment-ktx:1.4.1"
Next, you must create a class as a subclass of the Fragment class. You can create a basic fragment with the following code:
12345678910class MyFragment: Fragment() {

  override fun onCreateView(
    inflater: LayoutInflater,
    container: ViewGroup?,
    savedInstanceState: Bundle?
  ): View? {
    return inflater.inflate(R.layout.fragment_my, container, false)
  }
}
If you want an easier way to create a fragment, you can provide a layout resource to the base constructor instead of inflating a layout in the onCreateView method as seen in the following example:
1class MyFragment : Fragment(R.layout.fragment_my)
Next, you can directly add a fragment to your activity by defining a name tag on FragmentContainerView :
https://gist.github.com/skydoves/47aad0dd72913edfc847321a337244b7#file-fragment_container_view_example-xml
You can also add a fragment dynamically on your activity class as seen in the following example:
12345supportFragmentManager.commit {
    setReorderingAllowed(true)
    // Replace whatever is in the fragment_container_view with this fragment
    replace<MyFragment>(R.id.fragment_container_view)
}
For more information, check out the Create a fragment guide.
DialogFragment
A DialogFragment is a subclass of the fragment that is designed for displaying dialogs as seen in the example below:
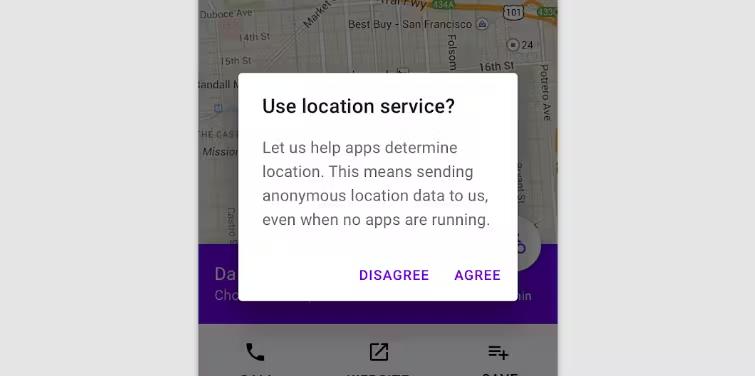
With the DialogFragment, you can manage the lifecycle state of the dialog and automatically restore the states of the dialog when a configuration changes.
To implement a DialogFragment you must create a class that extends DialogFragment:
123456789101112class LocationServiceConfirmationDialogFragment : DialogFragment() {
    override fun onCreateDialog(savedInstanceState: Bundle?): Dialog =
            AlertDialog.Builder(requireContext())
                .setMessage(getString(R.string.location_service_confirmation))
                .setPositiveButton(getString(R.string.agree)) { _, _ -> }
                .setNegativeButton(getString(R.string.disagree)) { _, _ -> }
                .create()

    companion object {
        const val TAG = "LocationServiceConfirmationDialogFragment"
    }
}
Next, create your DialogFragment and call the show() method to display your dialog. You must pass a FragmentManager and a String tag as parameters:
12LocationServiceConfirmationDialogFragment().show(
        supportFragmentManager, LocationServiceConfirmationDialogFragment.TAG)
For more information, check out the Displaying dialogs with DialogFragment guide.
BottomSheetDialogFragment
A BottomSheetDialogFragment is a subclass of the DialogFragment that is designed to display a bottom sheet modal.
To implement a BottomSheetDialogFragment, create an XML layout file to display the contents of the bottom sheet:
12345678910111213141516171819<?xml version="1.0" encoding="utf-8"?>
<androidx.constraintlayout.widget.ConstraintLayout
  xmlns:android="http://schemas.android.com/apk/res/android"
  xmlns:app="http://schemas.android.com/apk/res-auto"
  android:layout_width="match_parent"
  android:layout_height="wrap_content">

  <Button
    android:id="@+id/button"
    android:layout_width="wrap_content"
    android:layout_height="wrap_content"
    android:text="button"
    app:layout_constraintBottom_toBottomOf="parent"
    app:layout_constraintStart_toStartOf="parent"
    app:layout_constraintTop_toTopOf="parent" />

  ...

</androidx.constraintlayout.widget.ConstraintLayout>
Next, create a class that extends BottomSheetDialogFragment:
1234567891011121314class MyBottomSheetDialogFragment: BottomSheetDialogFragment() {

    override fun onCreateView(
        inflater: LayoutInflater,
        container: ViewGroup?,
        savedInstanceState: Bundle?
    ): View? {
        return inflater.inflate(R.layout.my_bottom_sheet_fragment, container, false)
    }

    companion object {
        const val TAG = "MyBottomSheetDialogFragment"
    }
}
Lastly, create your MyBottomSheetDialogFragment and call the show() method to display your dialog. You should pass a FragmentManager and a String tag as parameters:
1MyBottomSheetDialogFragment().show(supportFragmentManager, MyBottomSheetDialogFragment.TAG)
In this section, we've discussed the fragment and how to create various types of fragments. Next, let's learn how to navigate between different fragments and activities with App Navigation.
App Navigation

Modern Android applications consist of many screens, so navigating between them smoothly is essential to the user experience.
App Navigation is the act of transitioning between an app's screens. You can determine how users navigate your app by defining explicit behaviors using the following components:
- Tabs
- Navigation Drawer
- Bottom Navigation
Let's see how to implement each of these components below.
Tabs
Tabs organize content and navigate to specific screens with user interactions. Typically, tabs are placed at the top of the screen and consist of different selectable menus and indicators as seen in the image below:

You can implement the tabs above with the following two UI components; TabLayout and TabItem:
123456789101112131415161718<com.google.android.material.tabs.TabLayout
    ...>

    <com.google.android.material.tabs.TabItem
        android:layout_width="wrap_content"
        android:layout_height="wrap_content"
        android:text="@string/text_label_1"
        />

    <com.google.android.material.tabs.TabItem
        android:layout_width="wrap_content"
        android:layout_height="wrap_content"
        android:text="@string/text_label_2"
        />

    ...

</com.google.android.material.tabs.TabLayout>
You can also observe selections of tabs as seen below:
1234567891011121314tabLayout.addOnTabSelectedListener(object : TabLayout.OnTabSelectedListener {

    override fun onTabSelected(tab: TabLayout.Tab?) {
        // Handle tab select
    }

    override fun onTabReselected(tab: TabLayout.Tab?) {
        // Handle tab reselect
    }

    override fun onTabUnselected(tab: TabLayout.Tab?) {
        // Handle tab unselect
    }
})
Tabs navigate to different screens when users touch a menu, and you can combine swipeable behaviors with ViewPager. For more information, check out the Create swipe views with tabs using ViewPager guide.
Navigation Drawer
Navigation Drawer organizes a list of menus, which perform specific actions and provide access to destinations. According to the Material Design Guide, navigation drawers are recommended for:
- Apps with five or more top-level destinations.
- Apps with two or more levels of navigation hierarchy.
- Quick navigation between unrelated destinations.
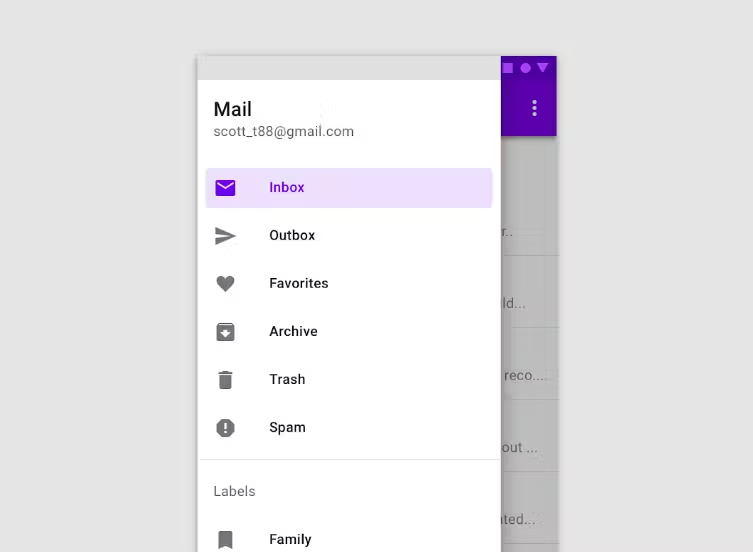
Let's implement the navigation drawer step by step.
Step 1 - Create a menu XML
First, you must create an XML file, which consists of menu and item tags under the res/menu folder:
1234567891011<menu xmlns:android="http://schemas.android.com/apk/res/android">
    <item
        android:id="@+id/movie_fragment"
        android:title="@string/movie" />
    <item
        android:id="@+id/tv_fragment"
        android:title="@string/tv" />
    <item
        android:id="@+id/people_fragment"
        android:title="@string/people" />
</menu>
Step 2 - Create a navigation graph XML
Next, you must create a nav_graph.xml file under the res/navigation folder. You can define navigation actions and fragment destinations in the navigation file:
12345678910111213141516171819202122232425262728<navigation
    xmlns:android="http://schemas.android.com/apk/res/android"
    xmlns:app="http://schemas.android.com/apk/res-auto"
    android:id="@+id/nav_graph"
    app:startDestination="@id/home_fragment">

    <fragment
        android:id="@+id/home_fragment"
        android:name="io.getstream.HomeFragment">

        <action
            android:id="@+id/action_home_to_movie"
            app:destination="@id/movie_fragment" />

        <action
            android:id="@+id/action_home_to_tv"
            app:destination="@id/tv_fragment" />
    </fragment>

    <fragment
        android:id="@+id/movie_fragment"
        android:name="io.getstream.MovieFragment" />

      <fragment
        android:id="@+id/tv_fragment"
        android:name="io.getstream.TvFragment" />

</navigation>
Step 3 - Add a Navigation Drawer on Your Activity's XML
Next, you can implement a navigation drawer with the following three UI components: DrawerLayout, NavHostFragment, and NavigationView. Add the components below to your activity's XML:
1234567891011121314151617181920212223<androidx.drawerlayout.widget.DrawerLayout xmlns:android="http://schemas.android.com/apk/res/android"
    xmlns:app="http://schemas.android.com/apk/res-auto"
    android:id="@+id/drawerLayout"
    android:layout_width="match_parent"
    android:layout_height="match_parent">

    <androidx.fragment.app.FragmentContainerView
        android:id="@+id/nav_host_fragment"
        android:name="androidx.navigation.fragment.NavHostFragment"
        android:layout_width="match_parent"
        android:layout_height="match_parent"
        app:defaultNavHost="true"
        app:navGraph="@navigation/nav_graph" />

    <com.google.android.material.navigation.NavigationView
        android:id="@+id/navView"
        android:layout_width="wrap_content"
        android:layout_height="match_parent"
        android:layout_gravity="start"
        android:fitsSystemWindows="true"
        app:menu="@menu/menu_navigation" />

</androidx.drawerlayout.widget.DrawerLayout>
Step 4 - Setup the Navigation Drawer
Finally, you must setup the navigation drawer on your activity:
1234val navHostFragment = supportFragmentManager.findFragmentById(R.id.nav_host_fragment) as NavHostFragment
val navController = navHostFragment.navController
navView.setupWithNavController(navController)
appBarConfiguration = AppBarConfiguration(navController.graph, drawerLayout)
Now, you can open and close the navigation drawer with the openDrawer and closeDrawer methods. For more information, check out the Add a navigation drawer guide.
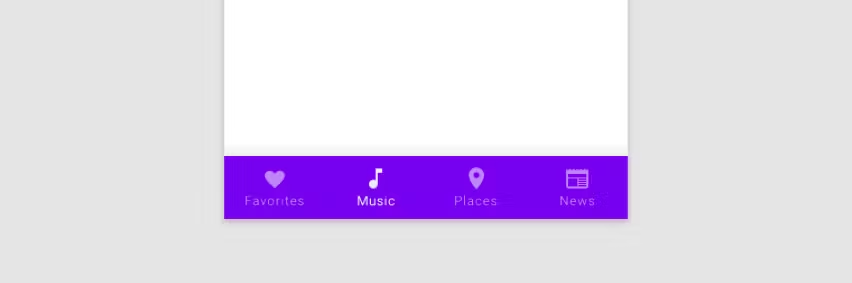
Bottom Navigation
Bottom navigation provides access to 3-to-5 top-level destinations at the bottom of the screen and allows users to navigate between unrelated destinations.
You can implement the bottom navigation with the following steps:
Step 1 - Create a menu XML
First, you must create an XML file, which includes menu and item tags under the res/menu folder:
1234567891011<menu xmlns:android="http://schemas.android.com/apk/res/android">
    <item
        android:id="@+id/movie_fragment"
        android:title="@string/movie" />
    <item
        android:id="@+id/tv_fragment"
        android:title="@string/tv" />
    <item
        android:id="@+id/people_fragment"
        android:title="@string/people" />
</menu>
Step 2 - Create a navigation graph XML
Next, you must create a nav_graph.xml file under the res/navigation folder:
12345678910111213141516171819202122232425262728<navigation
    xmlns:android="http://schemas.android.com/apk/res/android"
    xmlns:app="http://schemas.android.com/apk/res-auto"
    android:id="@+id/nav_graph"
    app:startDestination="@id/home_fragment">

    <fragment
        android:id="@+id/home_fragment"
        android:name="io.getstream.HomeFragment">

        <action
            android:id="@+id/action_home_to_movie"
            app:destination="@id/movie_fragment" />

        <action
            android:id="@+id/action_home_to_tv"
            app:destination="@id/tv_fragment" />
    </fragment>

    <fragment
        android:id="@+id/movie_fragment"
        android:name="io.getstream.MovieFragment" />

      <fragment
        android:id="@+id/tv_fragment"
        android:name="io.getstream.TvFragment" />

</navigation>
Step 3 - Add a Bottom Navigation on Your Activity's XML
Next, you can implement the bottom navigation with the following two UI components: BottomNavigationView and NavHostFragment. Add the components below to your activity's XML:
1234567891011<androidx.fragment.app.FragmentContainerView
    android:id="@+id/nav_host_fragment"
    android:name="androidx.navigation.fragment.NavHostFragment"
    android:layout_width="match_parent"
    android:layout_height="match_parent"
    app:defaultNavHost="true"
    app:navGraph="@navigation/nav_graph" />

<com.google.android.material.bottomnavigation.BottomNavigationView
    android:id="@+id/bottom_nav"
    app:menu="@menu/menu_bottom_nav" />
Step 4 - Set up the Bottom Navigation
Finally, you must set up the bottom navigation on your activity:
1234val navHostFragment =
        supportFragmentManager.findFragmentById(R.id.nav_host_fragment) as NavHostFragment
val navController = navHostFragment.navController
findViewById<BottomNavigationView>(R.id.bottom_nav).setupWithNavController(navController)
For more information, check out the Bottom Navigation guide.
We discussed how each App Navigation component above works. Now, let's learn Architecture Components and Android Jetpack libraries.
Architecture Components
At Google I/O '17, Google announced Architecture Components, which is a suite of libraries to help solve fundamental Android problems and guide app architecture.
The architecture components are included in the Android Jetpack suite of libraries. Google supports lots of real-world solutions to help developers build robust applications with the Jetpack libraries.
Before exploring the Jetpack libraries, let's discuss the recommended app architecture by Google.
App Architecture
In Android development, app architecture determines how you scale, test, and maintain your app.
Google's recommended app architecture below allows apps to scale, improves quality and robustness, and makes apps easier to test following Google's architectural principles.
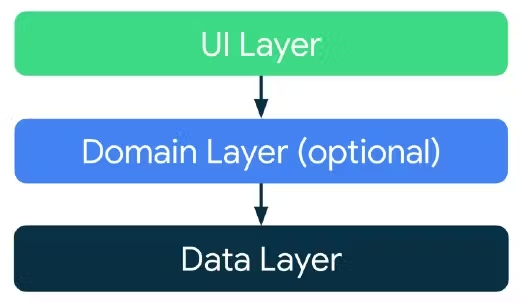
The recommended app architecture consists of three layers:
-
UI Layer: The responsibility of the UI layer is to render the application data on the screen. UI elements must be updated whenever the application data changes from user interaction or external communication with the network and database. You can also call this layer the Presentation layer as it contains UI elements and state holders like the ViewModel.
-
Domain Layer: The domain layer is responsible for abstracting complex business logic and improving its reusability. This layer transforms the complex application data into suitable types for UI layers and groups similar business logic as a single feature. This layer is useful in scaling projects that contain lots of similar features and require frequent data processes. In general, this layer is optional.
-
Data Layer: The responsibility of the data layer is to deliver the result of business logic executions, such as CRUD operations (Create, Retrieve, Update, Delete - all system events). This layer can be designed with various strategies, like Repository or DataSource, for dividing the responsibility of executions.
If you'd like to learn more about app architecture, check out the materials below:
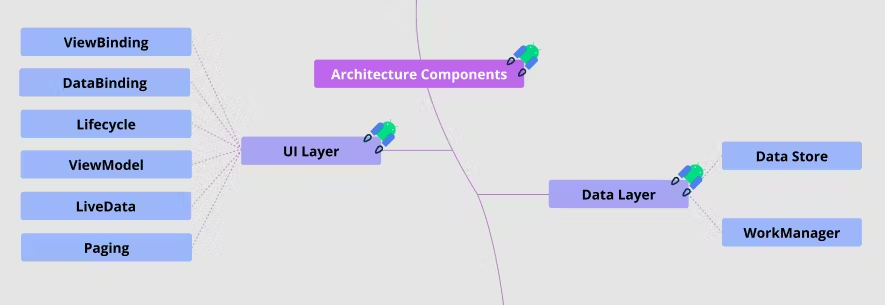
Android Jetpack

Google supports a suite of libraries to achieve the app architecture defined under Android Jetpack. Let's explore the most used libraries in Android Jetpack for each layer:
UI Layer Libraries
Android Jetpack supports the following useful UI-related libraries to help you in creating the right app architecture:
-
ViewBinding: According to the Android docs, view binding generates a binding class for each XML layout file, which contains direct references to all views that have an ID in the corresponding layout. View binding is a substitute for findViewById() to solve a performance issue and some troubles in finding the corresponding views.
-
DataBinding: Data Binding lets you generate a binding class for XML layouts that includes a
layouttag based on the annotation processor. Data binding is an essential part of the MVVM architecture that links the View and ViewModel with observer patterns, properties, and event callbacks. It supports two-way data binding, and layout variables or layout expressions to declare dynamic UI content straight from XML layout files. -
ViewModel: ViewModel is a state holder to store and manage UI-related data in configuration changes. It follows the lifespan of the Activity or Fragment. Typically, the ViewModel is used to delegate application data from the other layers, such as the domain and data layer, and it notifies UI layers (data binding observers, activities, or fragments) of data changes.
-
LiveData: LiveData is a lifecycle-aware data holder, which can be observed by multiple Observers. The observers are notified of data changes depending on the state of the LifecycleOwner. Typically, LiveData can be used with the ViewModel to implement observer patterns and a state holder for configuring UI elements.
-
Lifecycle: Jetpack's Lifecycle allows you to build independent components, which observe the lifecycle changes of lifecycle owners such as activities and fragments. This means you can build your own lifecycle-aware components, which helps you write cleaner and lighter-weight code. For more information, check out the Handling Lifecycles with Lifecycle-Aware Components guide.
Data Layer Libraries
Android Jetpack supports data layer libraries that handle tasks like persisting data to the database or performing background tasks:
-
DataStore: DataSource is a storage library that allows you to store lightweight key-value pairs in local storage. DataSource works with Coroutines and Flow to store data asynchronously, and it supports RxJava as well. You can consider replacing the SharePreferences with DataSoure to store key-value pairs.
-
Room: Room persistence provides an abstraction layer over SQLite Databases that simplifies querying and accessing the database without complicated SQL statements. You can easily construct the room database and query with the database class, Data entities, and Data access objects (DAOs). For more details, check out the Save data in a local database using Room guide.
-
WorkManager: WorkManager is a background processing API, which runs deferrable, guaranteed background work by scheduling works. You can schedule three types of persistent work: immediate, long-running, and deferrable. For more details, check out Schedule tasks with WorkManager guide.
Conclusion
This concludes part three of the 2022 Android Developer Roadmap. This installment covered the essential parts of modern Android development, including Fragments, App Navigation, Architecture Components, and Android Jetpack, so now you have a better grasp of how comprehensive app architecture works.
If you missed the previous sections of the Android Roadmap, it would be helpful to read the other parts:
- The Android Platform: The 2022 Android Developer Roadmap - Part 1
- App Components: The Android Developer Roadmap - Part 2
- Design Patterns and Architecture: The Android Developer Roadmap - Part4
- Jetpack Compose: The Android Developer Roadmap - Part 5
The next post will continue to be updated on our blog. If you'd like to stay up to date with Stream, follow us on Twitter @getstream_io or the author @github_skydoves for more great technical content.
And as always, happy coding!