


We've broken down the Android developer roadmap into five modules, each covering different aspects of the Android development ecosystem. In the last post, we discussed important elements of Android's architecture, including the primary Android languages, the OS, the Android Platform, and the App Manifest.
In part two, we'll cover the next three sections of our Android Roadmap:
- App Components
- Intents
- App Entry Points
If you'd like to be notified as we release future posts, join the watchers on GitHub or follow Stream on Twitter.
Let's get started!
App Components
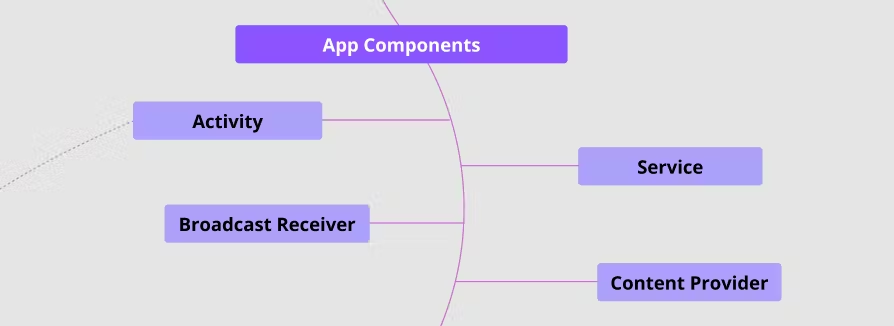
In Android development, app components are like entry points that allow systems and users to interact with your application. Each component has a distinct function and lifecycle that determines how it's created and destroyed.
Let's discuss each component:
Activities
An activity is an independent and reusable component that interacts with the user by providing UI-relevant resources. All Android applications must have at least one activity to enter the app and interact with users.
Activity Lifecycles
All activities have their own lifecycle, which is an important concept to manage activities and resources. The Activity class provides a core set of callback methods that tells an activity that a lifecycle state has changed.
The callback method will be called following the lifecycle sequence seen in the figure below:
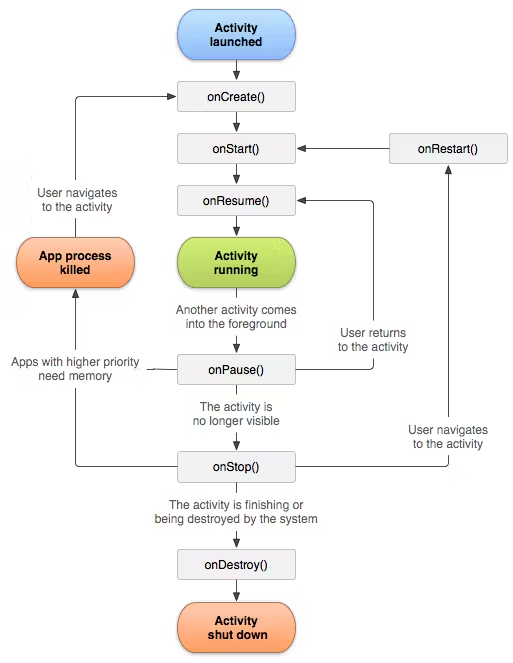
You can declare how your activity behaves and efficiently manage your resources with lifecycle callback methods. In this section, we'll discuss the six core callback methods below:
- onCreate(): This callback is invoked when the system creates your activity. Most of the initialization logic, which should occur only once during an Activity's lifespan, should be placed here (like creating views or binding data).
- onStart(): This callback is invoked after calling the
onCreate()method as the activity becomes visible to the user. This may happen more than once if you switch between multiple Activities or applications. - onResume(): This means the activity is ready to come to the foreground and interact with users.
- onPause(): This means the activity is no longer in the foreground, and may still be partially visible (for instance, if the user is in multi-window mode). In most cases, it indicates the user is leaving the activity, and the activity will enter the next state.
- onStop(): This callback is invoked when the activity is no longer visible to the user. This may happen more than once if you switch between multiple Activities or applications.
- onDestroy(): This callback is invoked before an activity is destroyed. The system invokes this callback when the activity is finishing or the system is temporarily destroying the activity due to a configuration change. This callback can be utilized when you need to release or dismiss all remaining resources and allow the Garbage Collector to withdraw all allocated memories.
For more details, check out the activity lifecycle.
Creating an Activity
To create an activity, you must create a class as a subclass of the Activity class. In modern Android development, the Jetpack library provides advanced Activity classes, such as AppCompatActivity, FragmentActivity, and ComponentActivity, to support compatibility with Themes, Fragments, and more. You can create a basic activity with the following code:
1234567class MainActivity : AppCompatActivity() {

    override fun onCreate(savedInstanceState: Bundle?) {
        super.onCreate(savedInstanceState)
        setContentView(R.layout.activity_main)
    }
}
For your app to use activities, you must declare them on the App Manifest as seen in the following example:
1234567<manifest ... >
  <application ... >
      <activity android:name=".MainActivity" />
      ...
  </application ... >
  ...
</manifest >
For more information, check out Android's Introduction to Activities.
Services
A service is an entry point that is designed to perform functions for remote processes and to run longer-running operations in the background, such as a music player or Youtube video player.
Service Lifecycles
A service has its own dedicated lifecycles and provides two types that tell the system how to start and manage services:
- startService: Another component can run a service by calling startService(). This service will run in the background and another component can also stop the service by calling stopService().
- bindService: Another component or a client can run a service by calling bindService(). The
bindService()function provides a IBinder interface, which allows the client to communicate with the service consistently. This service will run in the background. Another component or client can also cancel the connection by calling unbindService.
As you can see in the figure below, a service's lifecycle depends on how it was created:
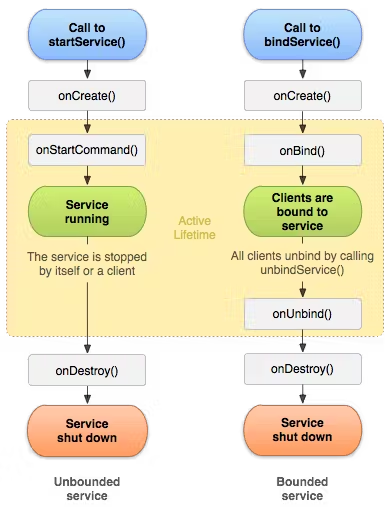
According to the Android docs, the figure above "separates services that are created by startService() from those created by bindService()", but regardless of how services are started, they can potentially allow clients to bind to them.
Creating a Service
To create a service, you must create a class as a subclass of the Service class as shown in the example below:
12345678910111213141516171819202122232425class MyService : Service() {

    private var binder: IBinder? = null

    override fun onCreate() {
        // The service is being created
    }

    override fun onStartCommand(intent: Intent?, flags: Int, startId: Int): Int {
        return super.onStartCommand(
            intent,
            flags,
            startId
        ) // indicates how to behave if the service is killed
    }

    override fun onBind(intent: Intent?): IBinder? {
        // A client is binding to the service with bindService()
        return binder
    }

    override fun onDestroy() {
        // The service is no longer used and is being destroyed
    }
}
Next, for your app to be able to use the service, you must declare it on the App Manifest:
1234567<manifest ... >
  <application ... >
      <service android:name=".MyService" />
      ...
  </application ... >
  ...
</manifest >
For more details, check out the service overview.
Broadcast Receiver
Broadcast receiver is a registerable listener that listens to broadcast messages from the Android system and other Android applications. According to the Android docs, broadcasts are used to send messages across apps and outside of the normal user flow, such as when the system boots up or the device starts charging.
Unlike activities and services, the broadcast receiver doesn't have dedicated lifecycles. Instead, it will listen to all assigned event messages until unregistered.
Creating a Broadcast Receiver
To create a broadcast receiver, you must create a class as a subclass of the Broadcast Receiver class as seen in the example below:
123456class MyBroadcastReceiver : BroadcastReceiver() {

    override fun onReceive(context: Context, intent: Intent) {
        // do something
    }
}
Next, for your app to be able to use the service, you must declare it on the App Manifest:
123456<receiver android:name=".MyBroadcastReceiver"  android:exported="true">
    <intent-filter>
        <action android:name="android.intent.action.BOOT_COMPLETED"/>
        <action android:name="android.intent.action.INPUT_METHOD_CHANGED" />
    </intent-filter>
</receiver>
Content Providers
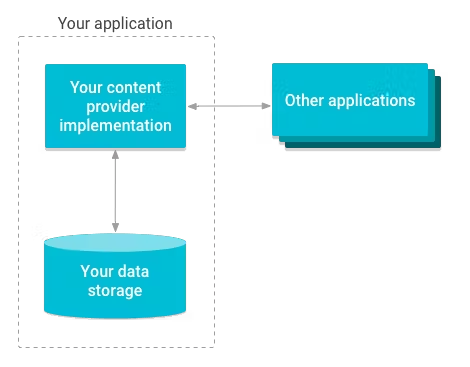
A content provider manages how your application's data is accessed and shared with other applications. According to the Android Docs, a content provider enables your app to share any kind of persistent data, be it stored in a file system, a SQLite database, a Jetpack Room, or on the web.
Content providers secure data by requiring specific permissions. If a requesting application doesn't have the required permissions, it can't query the content provider's data.
For more information, check out creating a content provider.
Intents
An intent is an abstract description of an action that will execute at a later time. For example, it allows you to trigger the entry points of app components or to send messages to broadcast receivers.
Use Cases of Intents
According to the Android Docs, these are the most common use cases of intents:
-
Starting an activity: You can launch a new activity by passing an intent to the startActivity() method. The intent defines the activity's behavior and delivers the necessary data that should be used in a new activity.
-
Starting a service: You can run a new service by passing an intent to the startService() method. The intent defines the service's behavior and delivers the necessary data that should be used in a new service.
-
Delivering messages to a broadcast receiver: You can deliver messages to a broadcast receiver by passing an intent to sendBroadcast() or the sendOrderedBroadcast() method. You can deliver an intent as a broadcast message to your app or other apps from other app components.
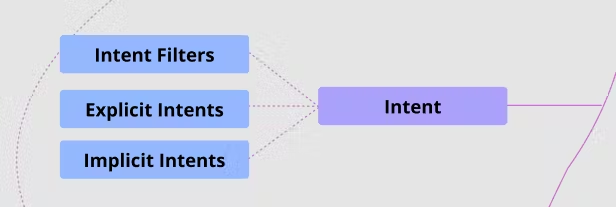
Intent Types
There are two types of intents:
- Explicit Intents: Explicit intent includes specified information, which targets an application's package name or a fully-qualified component class name. For example, you can start an Activity/Service or send a message to a Broadcast Receiver with an Intent that includes an explicit target class or package information.
- Implicit Intents: Implicit Intent does not include specified target information, but instead declares a general action to perform. For example, if you want to show the user images in a gallery or open a URL on a web browser, you can use an implicit intent to request action to the Android system. Then, the Android system searches all installed applications for intent filters and compares the appropriate component to start the implicit intent. If the Android system finds an appropriate component, it will show you the available list of components, but if not, you can't perform the implicit intent.

The figure below describes how implicit intents work. For further information, check out Intents and Intent Filters.
App Entry Points

There are two essential app entry points in Android: activities and app shortcuts. We've already discussed activities in the previous section. If you would like to learn more about activities (such as state changes and back stack), you can check out the materials below:
Now, we'll discuss app shortcuts.
App Shortcuts
App shortcuts allow you to launch a specific action in your app. You can display shortcuts by long-pressing the app icon and you can start tasks by clicking on an item on the list like in the figure below:

There are three types of shortcuts:
- Static shortcuts: Static shortcuts provide links to consistent actions within your app and perform static tasks, which are not dependent on user context. For example: Displaying recent messages, writing a post, or searching for a keyword.
- Dynamic shortcuts: Dynamic shortcuts provide links to specific actions, which are based on user context within your app. For example: Sending a message to a specific person or navigating to a specific location.
- Pinned shortcuts: Pinned shortcuts (supported on Android 8.0 and higher) allow you to pin a shortcut onto a supported launcher. You can run a specific task by clicking on the pinned shortcuts on the home screen.
We discussed three types of shortcuts. In the following section, you'll cover creating static shortcuts.
Creating Static Shortcuts
To create a static shortcut, first create a new resource file res/xml/shortcuts.xml:
12345678910111213141516<shortcuts xmlns:android="http://schemas.android.com/apk/res/android">
  <shortcut
    android:shortcutId="message"
    android:enabled="true"
    android:icon="@drawable/ic_message"
    android:shortcutShortLabel="@string/short_label"
    android:shortcutLongLabel="@string/long_label"
    android:shortcutDisabledMessage="@string/message_shortcut_disabled">
    <intent
      android:action="android.intent.action.VIEW"
      android:targetPackage="com.example.myapplication"
      android:targetClass="com.example.myapplication.ComposeActivity" />
    <categories android:name="android.shortcut.conversation" />
    <capability-binding android:key="actions.intent.CREATE_MESSAGE" />
  </shortcut>
</shortcuts>
Next, for your app to be able to display the shortcut, you must declare it on the App Manifest as seen in the example below:
1234567891011121314<manifest xmlns:android="http://schemas.android.com/apk/res/android"
          package="io.getstream.example">
  <application ... >
    <activity android:name="Main">
      <intent-filter>
        <action android:name="android.intent.action.MAIN" />
        <category android:name="android.intent.category.LAUNCHER" />
      </intent-filter>

      <meta-data android:name="android.app.shortcuts"
                 android:resource="@xml/shortcuts" />
    </activity>
  </application>
</manifest>
For more details, check out the App shortcuts overview.
Conclusion
This concludes part two of the 2022 Android Developer Roadmap. This section covered the important parts of the App components, lifecycles, and App entry points so you have a better grasp of how Android components and their lifecycles work.
Again, don't be intimidated by the amount of information on this roadmap. Check out the sections that seem like the most helpful to you to understand Android development.
The next post will continue to be updated on our blog. If you'd like to stay up to date with Stream, follow us on Twitter @getstream_io or the author @github_skydoves for more great technical content.
And as always, happy coding!