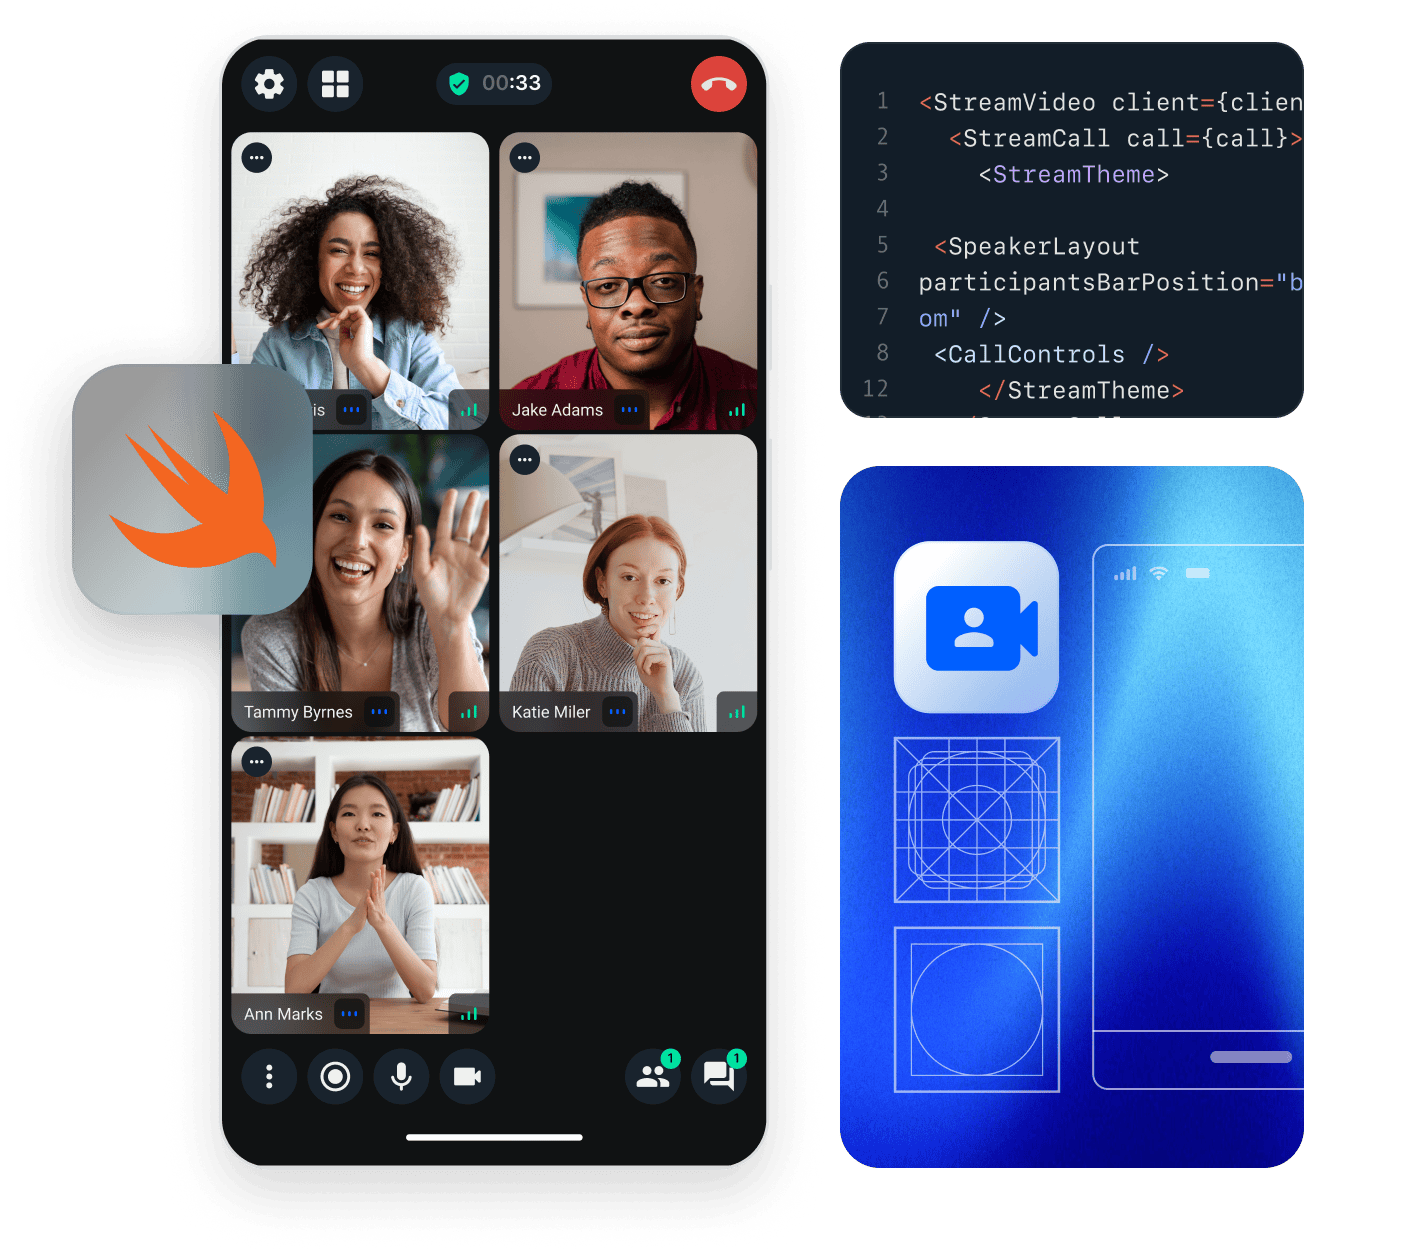
This tutorial teaches you how to build a Zoom/Whatsapp-style video calling app in SwiftUI.
- All calls run on Stream's Global Edge Network for optimal latency & reliability.
- Permissions give you fine-grained control over who can do what.
- Video quality and codecs are automatically optimized.
- Powered by Stream's Video Calling API.
Step 1 - Create a New SwiftUI Application in Xcode
- Ensure you have Xcode installed and are running 14.3 or later.
- Open Xcode and select "Create a new Project".
- Select "iOS" as the platform and "App" as the type of Application.
- Name your project "VideoCall" and select "SwiftUI" as the interface.
Step 2 - Install the SDK & Setup Permissions
Next, you must add our SDK dependencies to your project using Swift Package Manager in Xcode.
- Click "Add packages..." from the File menu
- Add https://github.com/GetStream/stream-video-swift in the search bar.
- Select "StreamVideo" and "StreamVideoSwiftUI" and click Add Package.
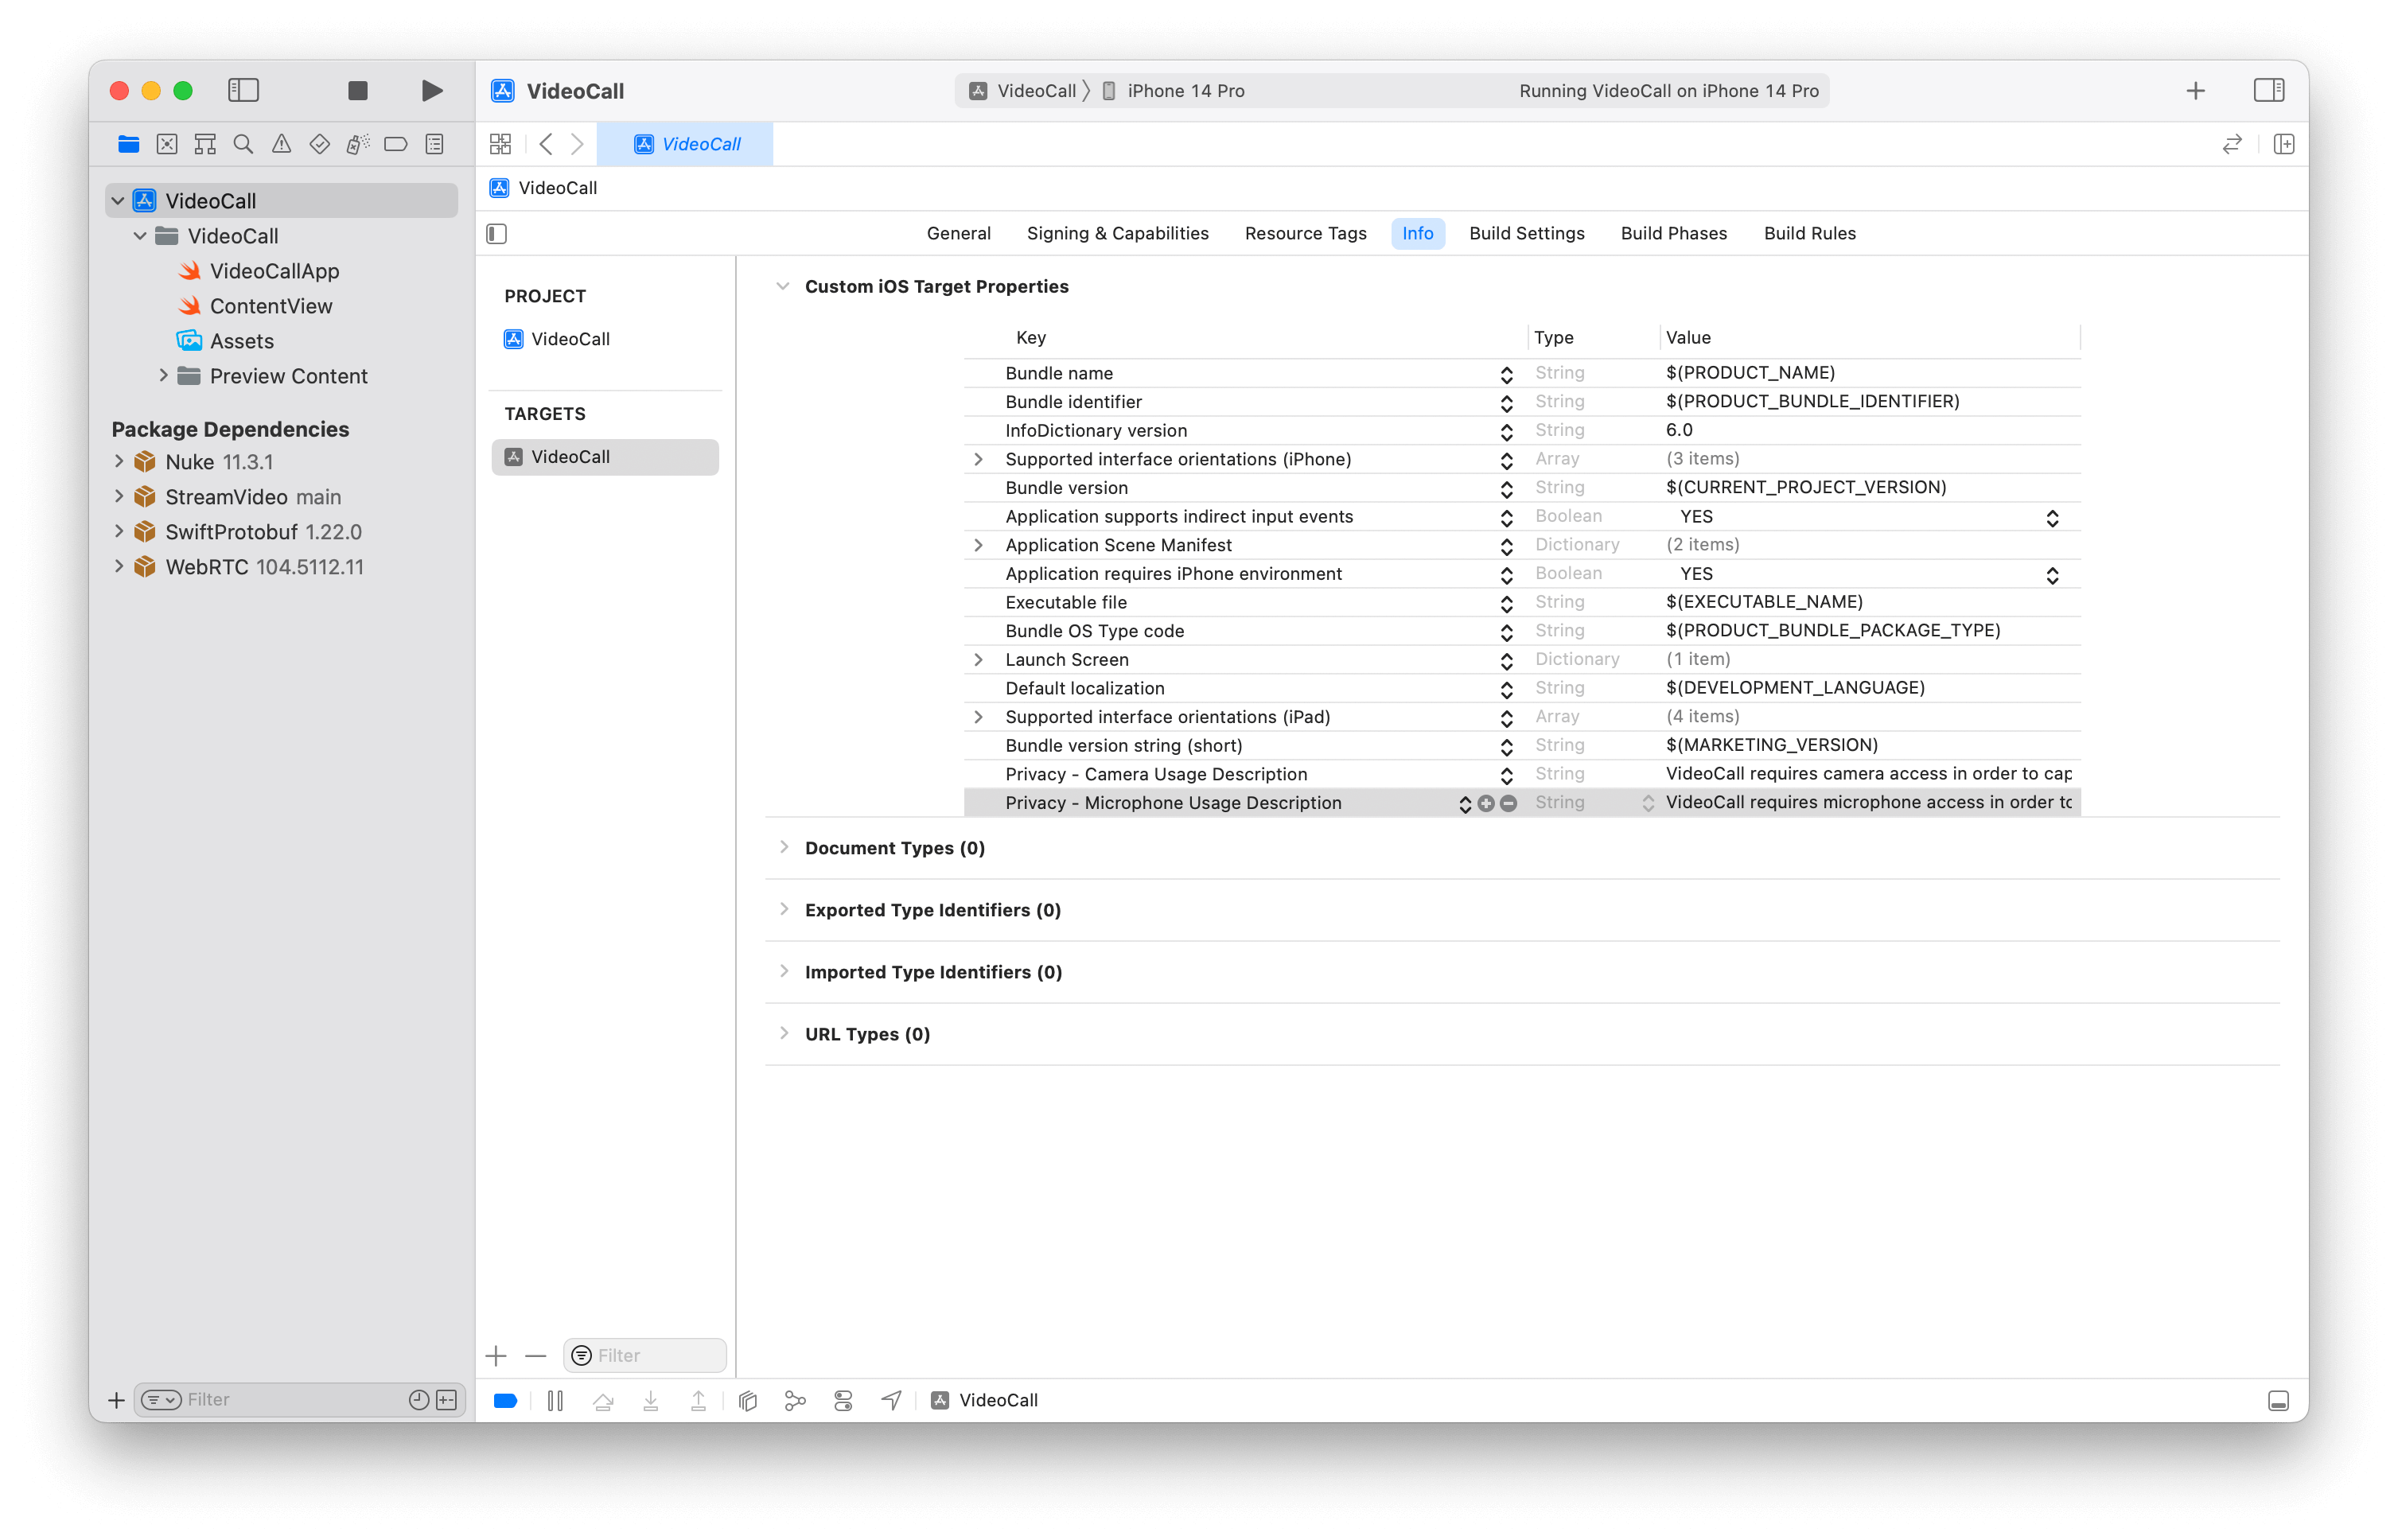
Set Mic & Camera Permissions
Making a video call requires using the device's camera and microphone. Therefore, you need to request permission to use them in your app. You must add the following keys and values by selecting your project's root folder in Xcode and clicking the Info tab.
Privacy - Camera Usage Description- "VideoCall requires camera access to capture and transmit video".Privacy - Microphone Usage Description- "VideoCall requires microphone access to capture and transmit audio".
Step 3 - Create & Join a Call
Open up VideoCall/VideoCallApp.swift and replace it with this code:
12345678910111213141516171819202122232425262728293031323334353637383940414243444546474849505152535455565758import SwiftUI
import StreamVideo
import StreamVideoSwiftUI

@main
struct VideoCallApp: App {
    @State var call: Call
    @ObservedObject var state: CallState
    @State var callCreated: Bool = false

    private var client: StreamVideo

    private let apiKey: String = "REPLACE_WITH_API_KEY"
    private let token: String = "REPLACE_WITH_TOKEN"
    private let userId: String = "REPLACE_WITH_USER_ID"
    private let callId: String = "REPLACE_WITH_CALL_ID"

    init() {
        let user = User(
            id: userId,
            name: "Martin", // name and imageURL are used in the UI
            imageURL: .init(string: "https://getstream.io/static/2796a305dd07651fcceb4721a94f4505/a3911/martin-mitrevski.webp")
        )

        // Initialize Stream Video client
        self.client = StreamVideo(
            apiKey: apiKey,
            user: user,
            token: .init(stringLiteral: token)
        )

        // Initialize the call object
        let call = client.call(callType: "default", callId: callId)

        self.call = call
        self.state = call.state
    }

    var body: some Scene {
        WindowGroup {
            VStack {
                if callCreated {
                    Text("Call \(call.callId) has \(call.state.participants.count) participants")
                        .font(.system(size: 30))
                        .foregroundColor(.blue)
                } else {
                    Text("loading...")
                }
            }.onAppear {
                Task {
                    guard !callCreated else { return }
                    try await call.join(create: true)
                    callCreated = true
                }
            }
        }
    }
}
Your server-side API typically generates the user token. When a user logs in to your app, you return the user token, which gives them access to the call. We have generated the token for you in the code sample above to make this tutorial easier to follow.
Now, when you run the sample app, it will connect successfully. The text will say, "Call ... has 1 participant" (yourself). Let's review what we did in the above code.
Create a user. First, we create a user object. You typically sync these users via a server-side integration from your own backend. Alternatively, you can also use guest or anonymous users.
1234let user = User(
    id: userId,
    name: "Martin"
)
Initialize the Stream Client: Next, we initialize the client by passing the API Key, user and token.
12345self.client = StreamVideo(
    apiKey: apiKey,
    user: user,
    token: .init(stringLiteral: token)
)
Create and join a call: After the user and client are created, we create a call like this:
123self.call = client.call(callType: "default", callId: callId)

try await call.join(create: true)
As soon as you use call.join, the connection for video & audio sets up.
Lastly, the UI is rendered by observing call.state and participants state:
1call.state.participants.count
You'll find all relevant states for the call in call.state and call.state.participants. The documentation on Call state and Participant state explains this further.
Step 4 - Joining a Call from the Web
Let's join the call from your browser to make this a little more interactive.
On your iOS device, you'll see the text update to 2 participants. Let's keep the browser tab open as you go through the tutorial.
Step 5 - Rendering Video
In this next step, we will render your local & remote participant video.
Let's update the body of our VideoCallApp View with the following code.
1234567891011121314151617181920212223242526272829303132333435var body: some Scene {
    WindowGroup {
        VStack {
            if callCreated {
                ZStack {
                    ParticipantsView(
                        call: call,
                        participants: call.state.remoteParticipants,
                        onChangeTrackVisibility: changeTrackVisibility(_:isVisible:)
                    )
                    FloatingParticipantView(participant: call.state.localParticipant)
                }
            } else {
                Text("loading...")
            }
        }.onAppear {
            Task {
                guard callCreated == false else { return }
                try await call.join(create: true)
                callCreated = true
            }
        }
    }
}

/// Changes the track visibility for a participant (not visible if they go off-screen).
/// - Parameters:
///  - participant: the participant whose track visibility would be changed.
///  - isVisible: whether the track should be visible.
private func changeTrackVisibility(_ participant: CallParticipant?, isVisible: Bool) {
    guard let participant else { return }
    Task {
        await call.changeTrackVisibility(for: participant, isVisible: isVisible)
    }
}
We will now create the ParticipantsView. It will contain a vertical list of all participants in the call, apart from the current user. Add a new Swift file ParticipantsView.swift, replace its content with the following sample code and import StreamVideo and import StreamVideoSwiftUI.
The video feeds of the users will be presented with the UI component from our SwiftUI SDK, called VideoCallParticipantView.
123456789101112131415161718192021222324252627282930313233343536373839404142struct ParticipantsView: View {

    var call: Call
    var participants: [CallParticipant]
    var onChangeTrackVisibility: (CallParticipant?, Bool) -> Void

    var body: some View {
        GeometryReader { proxy in
            if !participants.isEmpty {
                ScrollView {
                    LazyVStack {
                        if participants.count == 1, let participant = participants.first {
                            makeCallParticipantView(participant, frame: proxy.frame(in: .global))
                                .frame(width: proxy.size.width, height: proxy.size.height)
                        } else {
                            ForEach(participants) { participant in
                                makeCallParticipantView(participant, frame: proxy.frame(in: .global))
                                    .frame(width: proxy.size.width, height: proxy.size.height / 2)
                            }
                        }
                    }
                }
            } else {
                Color.black
            }
        }
        .edgesIgnoringSafeArea(.all)
    }

    @ViewBuilder
    private func makeCallParticipantView(_ participant: CallParticipant, frame: CGRect) -> some View {
        VideoCallParticipantView(
            participant: participant,
            availableFrame: frame,
            contentMode: .scaleAspectFit,
            customData: [:],
            call: call
        )
        .onAppear { onChangeTrackVisibility(participant, true) }
        .onDisappear{ onChangeTrackVisibility(participant, false) }
    }
}
Like in most video calling apps, the current user will appear in a floating view in the top right corner. Add another Swift file, FloatingParticipantView.swift to the project. Use this sample code for its content and import StreamVideoSwiftUI and import StreamVideo.
1234567891011121314151617181920212223struct FloatingParticipantView: View {

    var participant: CallParticipant?
    var size: CGSize = .init(width: 120, height: 120)

    var body: some View {
        if let participant = participant {
            VStack {
                HStack {
                    Spacer()

                    VideoRendererView(id: participant.id, size: size) { videoRenderer in
                        videoRenderer.handleViewRendering(for: participant, onTrackSizeUpdate: { _, _ in })
                    }
                    .frame(width: size.width, height: size.height)
                    .clipShape(RoundedRectangle(cornerRadius: 8))
                }
                Spacer()
            }
            .padding()
        }
    }
}
When you run the app, you'll see your local video in a floating video element and the video from your browser. The result should look somewhat like this:
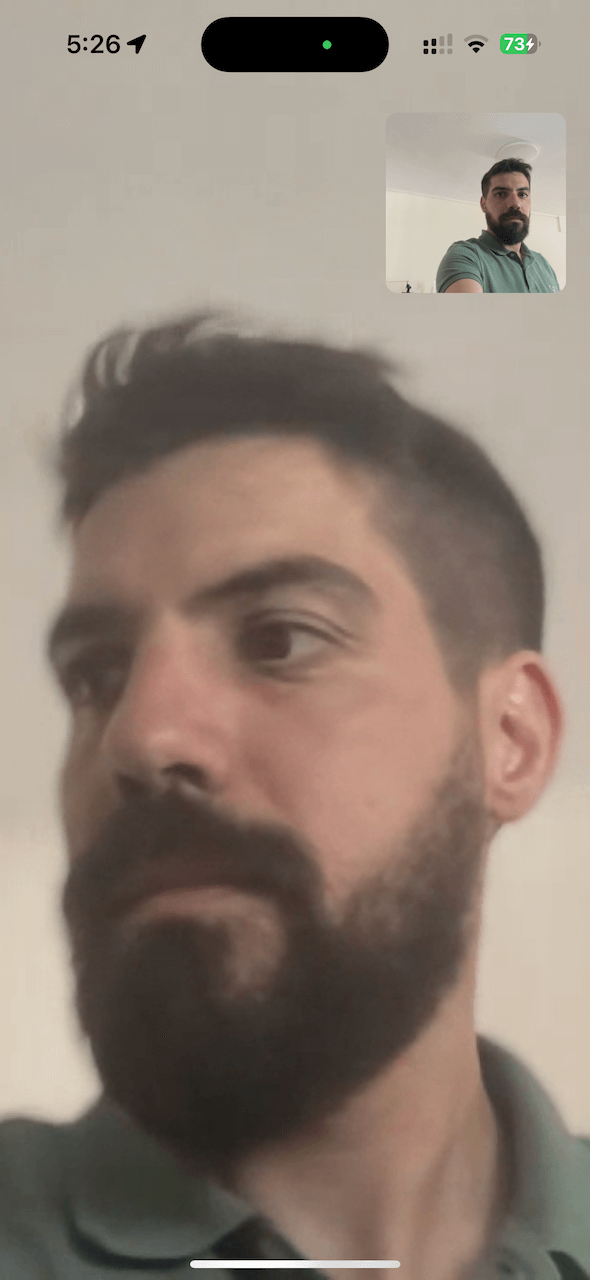
Note that you should use an actual device to see your local video.
Let's review the changes we made.
We added the changeTrackVisibility in our app and propagated its call to the other subviews we created. When this method is called, we ask the Call object to make the participant's track visible or not visible. This is important when the view goes off-screen (e.g., while scrolling through participants during a call) to reduce energy and data consumption.
123456789VideoCallParticipantView(
    participant: participant,
    availableFrame: frame,
    contentMode: .scaleAspectFit,
    customData: [:],
    call: call
)
.onAppear { onChangeTrackVisibility(participant, true) }
.onDisappear{ onChangeTrackVisibility(participant, false) }
It only displays the video and doesn't add any other UI elements. The video is lazily loaded, and only requested from the video infrastructure if you're actually displaying it. So if you have a video call with 200 participants, and you show only 10 of them, you'll only receive video for 10 participants. This is how software like Zoom and Google Meet make large calls work.
1FloatingParticipantView(participant: call.state.localParticipant)
FloatingParticipantView renders a display of your own video. It uses VideoRendererView which is the component used by VideoCallParticipantView to simply display the video without adding any other UI elements.
ParticipantsView renders a scrollview of all remoteParticipants.
1ParticipantsView(participants: call.state.remoteParticipants, onChangeTrackVisibility: changeTrackVisibility(_:isVisible:))
Step 6 - Render a Full Video Calling UI
The above example showed how to use the call state object and SwiftUI to build a basic video UI. For a production version of calling, you'd want a few more UI elements:
- Indicators of when someone is speaking.
- Quality of their network.
- Layout support for >2 participants.
- Labels for the participant names.
- Call header and controls.
Stream ships with several SwiftUI components to make this easy. You can customize the UI to:
- Build your UI components (the most flexible, build anything).
- Mix and match with Stream's UI Components (speed up how quickly you can build common video UIs).
- Do basic theming and customization of colors, fonts, etc. This is convenient if you want to build a production-ready calling experience for your app quickly.
The [UI Cookbook related section] (https://getstream.io/video/docs/ios/ui-cookbook/replacing-call-controls/) provides an example of how to swap out the call controls for your own.
The most commonly used UI components are:
- VideoRendererView: For rendering video and automatically requesting video tracks when needed. Most of the Video components are built on top of this.
- VideoCallParticipantView: The participant's video + some UI elements for network quality, reactions, speaking etc.
- ParticipantsGridLayout: A grid of participant video elements.
- CallControls: A set of buttons for controlling your call, such as changing audio and video states.
- IncomingCall: UI for displaying incoming and outgoing calls.
The complete list of UI components is available in the docs.
To render a complete calling UI, we'll leverage the CallContainer component. This includes sensible defaults for a call header, video grid, call controls, picture-in-picture, and everything you need to build a video call screen.
Let's update the code in our VideoCall/VideoCallApp.swift.
12345678910111213141516171819202122232425262728293031323334353637383940414243444546474849import SwiftUI
import StreamVideo
import StreamVideoSwiftUI

@main
struct VideoCallApp: App {
    @ObservedObject var viewModel: CallViewModel

    private var client: StreamVideo

    private let apiKey: String = "REPLACE_WITH_API_KEY"
    private let token: String = "REPLACE_WITH_TOKEN"
    private let userId: String = "REPLACE_WITH_USER_ID"
    private let callId: String = "REPLACE_WITH_CALL_ID"

    init() {
        let user = User(
            id: userId,
            name: "Martin", // name and imageURL are used in the UI
            imageURL: .init(string: "https://getstream.io/static/2796a305dd07651fcceb4721a94f4505/a3911/martin-mitrevski.webp")
        )

        // Initialize Stream Video client
        self.client = StreamVideo(
            apiKey: apiKey,
            user: user,
            token: .init(stringLiteral: token)
        )

        self.viewModel = .init()
    }

    var body: some Scene {
        WindowGroup {
            VStack {
                if viewModel.call != nil {
                    CallContainer(viewFactory: DefaultViewFactory.shared, viewModel: viewModel)
                } else {
                    Text("loading...")
                }
            }.onAppear {
                Task {
                    guard viewModel.call == nil else { return }
                    viewModel.joinCall(callType: .default, callId: callId)
                }
            }
        }
    }
}
The result will be:
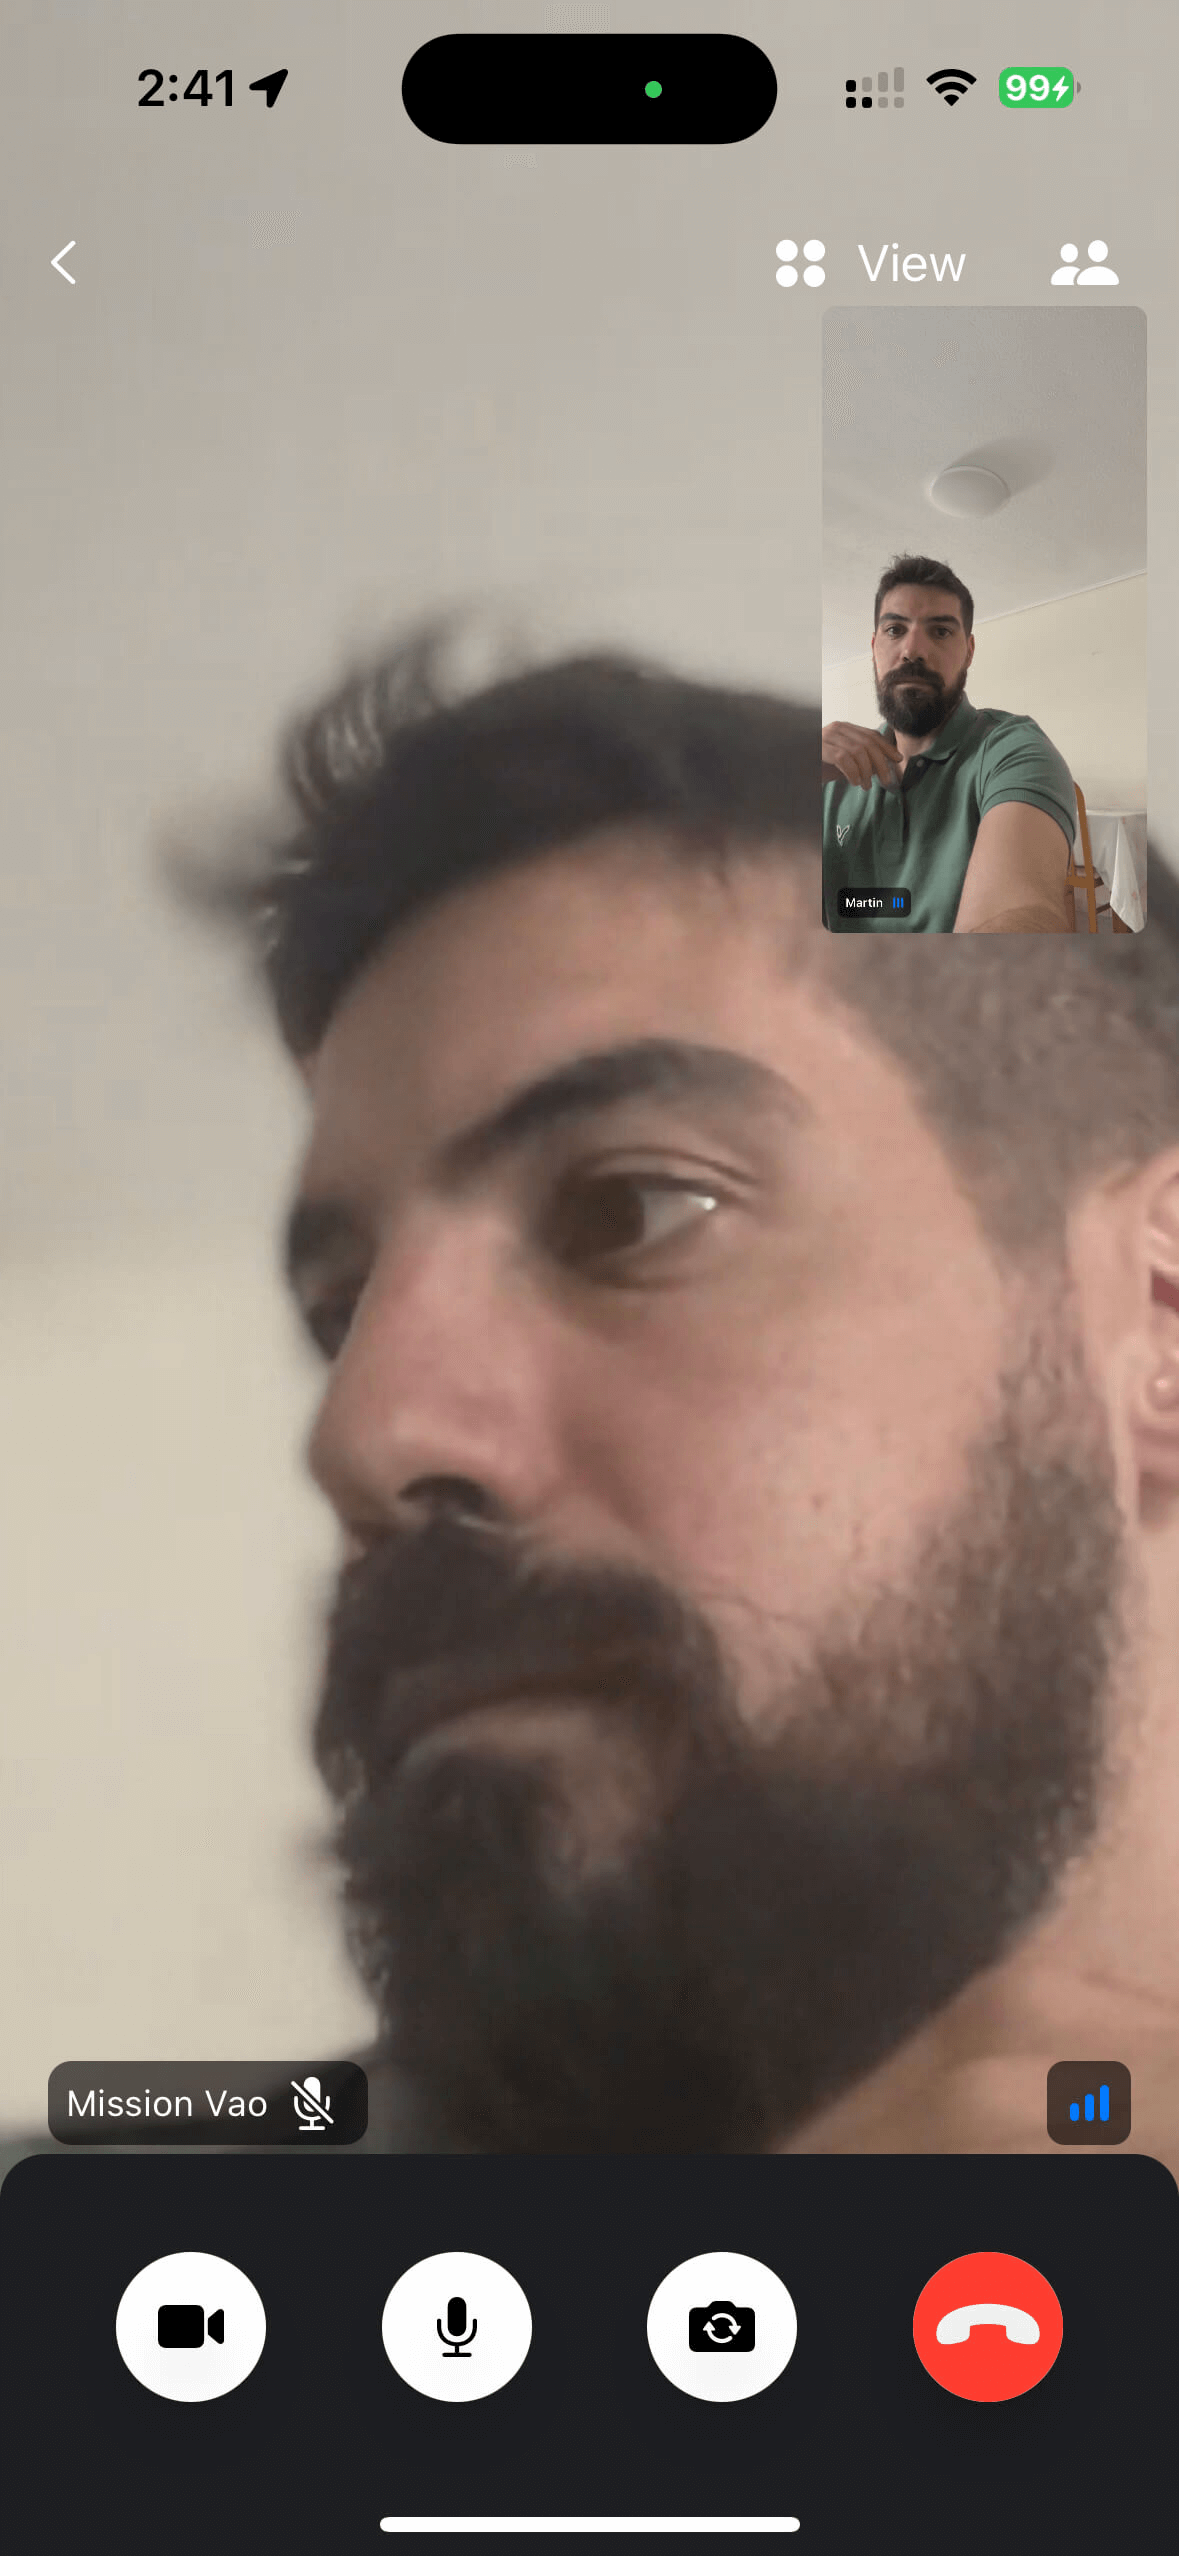
When you run your app now, you'll see a more polished video UI. It supports reactions, screen sharing, active speaker detection, network quality indicators, etc.
Recap
Please let us know if you encounter issues building a video calling app with our Swift SDK. Our team is also happy to review your UI designs and recommend achieving them with Stream.
To recap what we've learned:
- You set up a call: (
let call = streamVideo.call(callType: "default", called: "123")). - The call type ("default" in the above case) controls which features are enabled and how permissions are set up.
- When you join a call, real-time communication is set up for audio & video calling: (call.join()).
- Published objects in
call.stateandcall.state.participantsmake it easy to build your UI. - VideoRendererView is the low-level component that renders video.
- We've used Stream's Video Calling API, which means calls run on a global edge network of video servers. Being closer to your users improves the latency and reliability of calls. The Swift SDK enables you to build in-app video calling, audio rooms and livestreaming in days.
We hope you've enjoyed this tutorial. Please feel free to contact us if you have any suggestions or questions.
Final Thoughts
In this video app tutorial, we built a fully functioning iOS messaging app with our iOS SDK component library. We also showed how easy it is to customize the behavior and the style of the iOS video app components with minimal code changes.
Both the video SDK for iOS and the API have plenty more features available to support more advanced use cases.