Set up your development environment
In this tutorial, we will use the Stream Chat API and the Unity SDK Plugin to add in-game chat to a new Unity Engine project.
Before you start: Make sure you have Unity Editor installed on your system. If not you can download it here.
We'll be using the latest at the time of writing version - 2022.1.23f1 but any version starting from 2020.1 up to the most recent ones should work fine as well.
Create a new Unity project
Open Unity Hub and create a new project using the 3D template.
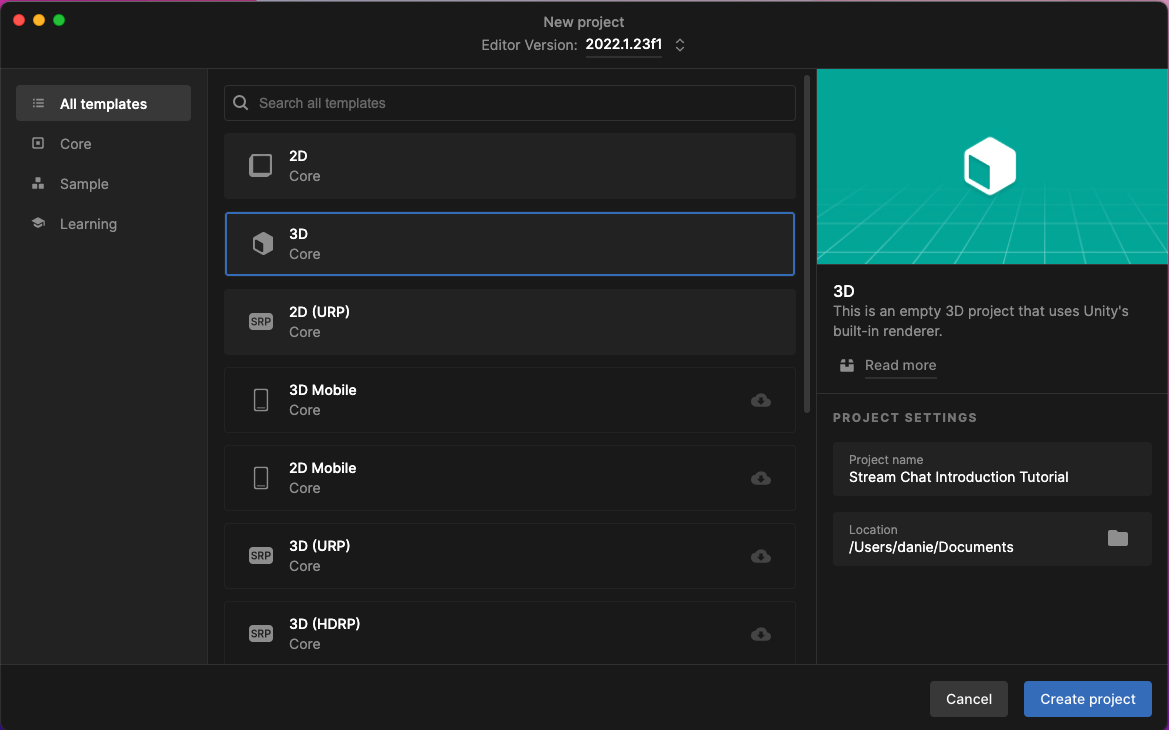
We'll name our project Stream Chat Introduction Tutorial.
Download the Unity Chat Assets
The Unity Chat SDK includes a fully stateful client that enables you to easily interact with the Stream Chat API and automatically handles state updates.
First, you want to make sure you've downloaded the latest release of the Stream Chat Unity Package from the Releases page of the GitHub repository and imported it into the project.
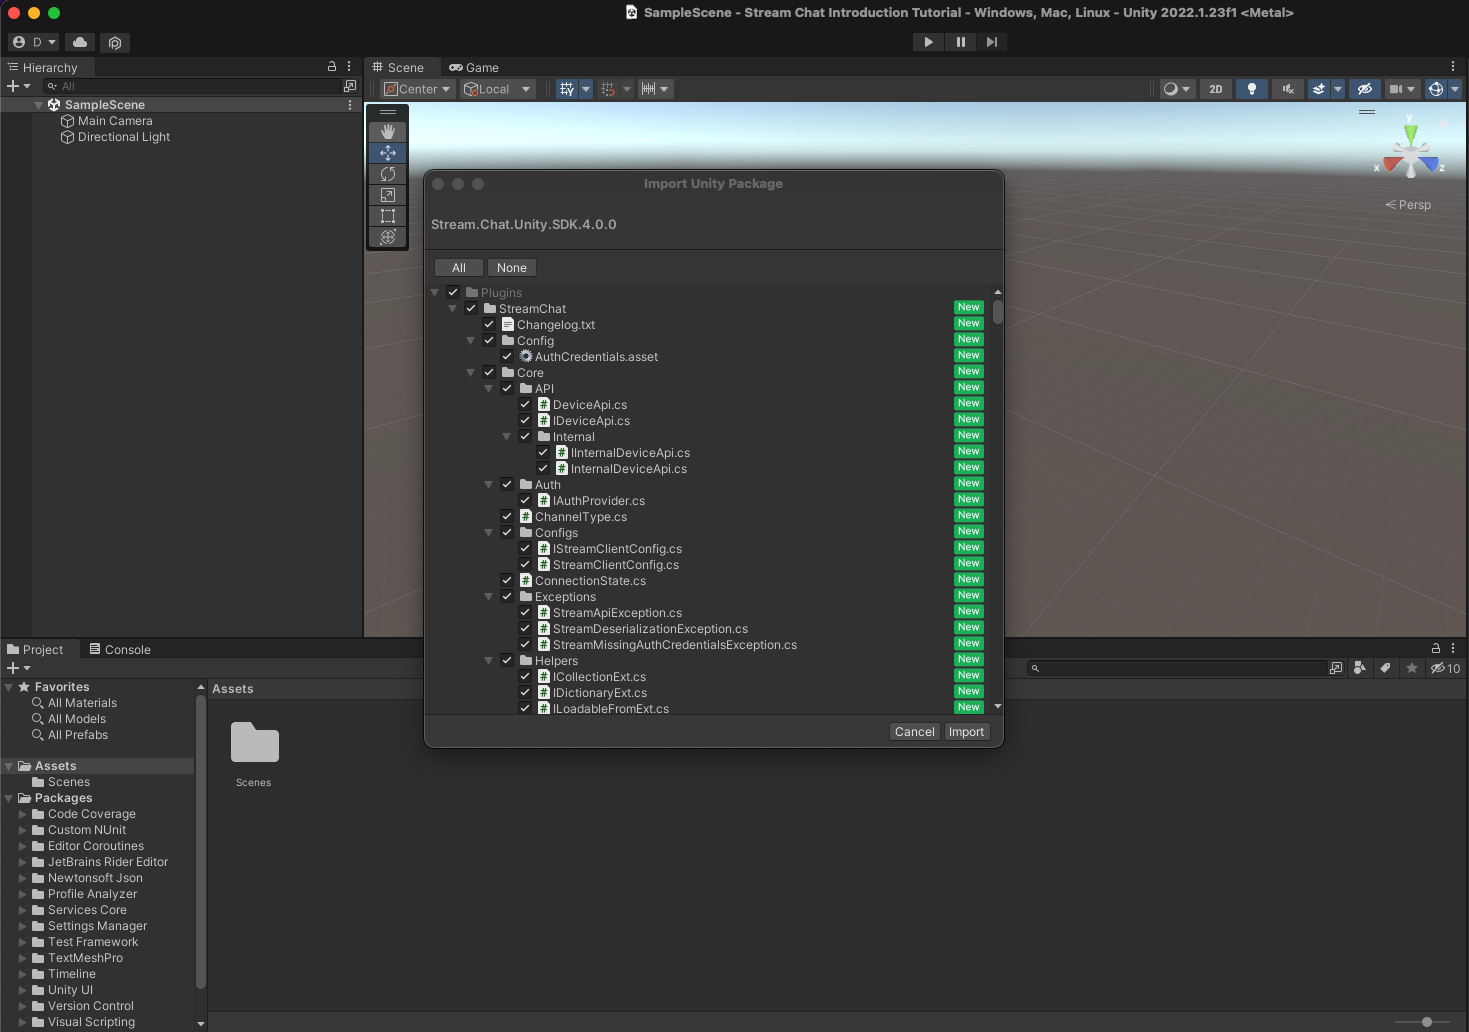
Newtonsoft Json Conflict Resolution
Stream Chat SDK uses a Unity's Newtonsoft Json package for the internal web requests serialization. Since Json is a one of the most commonly used libraries, it is quite likely that you already have this library in your project, or you might be using a Unity Editor version that has Newtonsoft Json package pre-installed.
In such case you might notice that Unity has already excluded this folder from import as shown below.
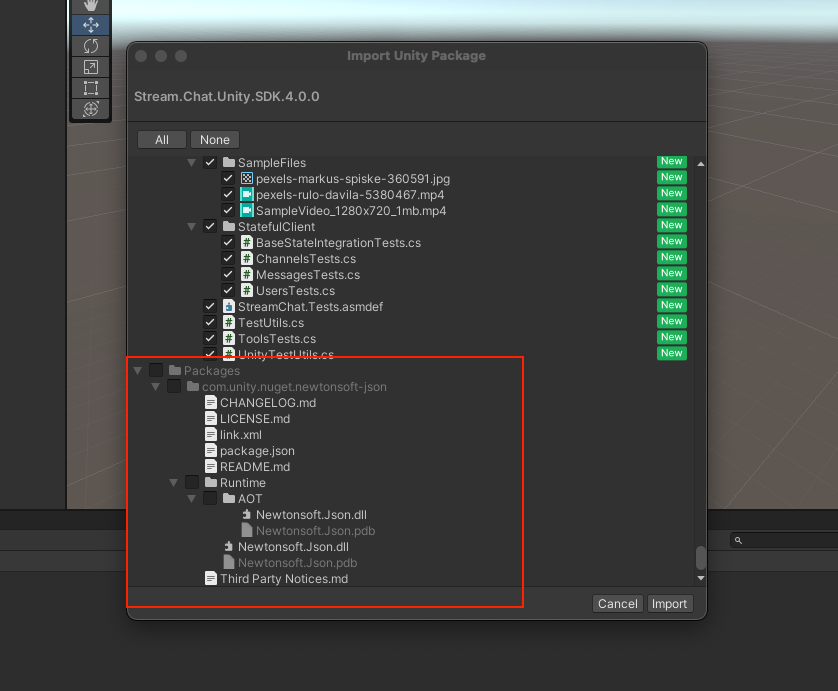
Alternatively, you may find a "Multiple precompiled assemblies with same name Newtonsoft.Json.dll..." error showing in the Unity Editor's console as shown below.

In this case you can simply delete the com.unity.nuget.newtonsoft-json@3.0.2 folder located in the StreamChat/Libs/Serialization path or delete the other Json library already present in your project and use Unity's Json package contained within the Stream SDK.
Once you have the Chat SDK imported and there are no errors in Unity's Console, we can move forward.
Create new Scene
Open the Scenes folder, create a new scene and rename it to Stream Chat Tutorial
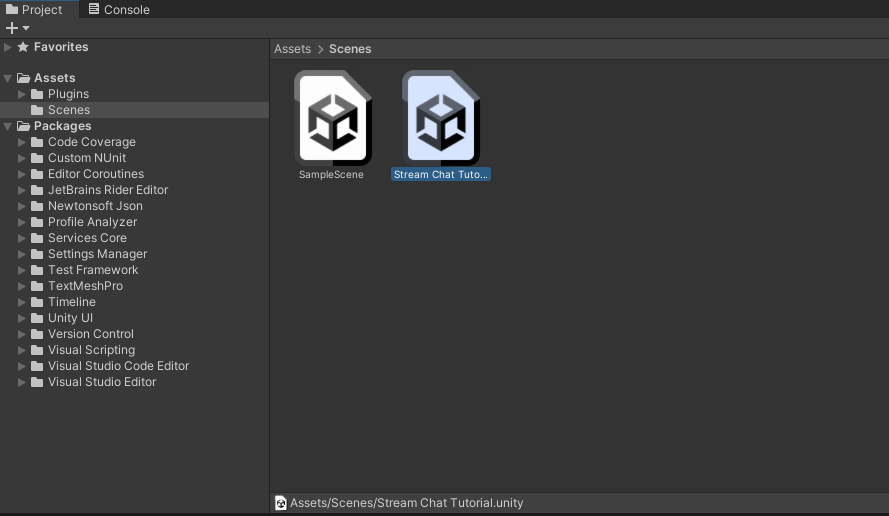
Now open the newly created Stream Chat Tutorial scene.
Add new Game Object
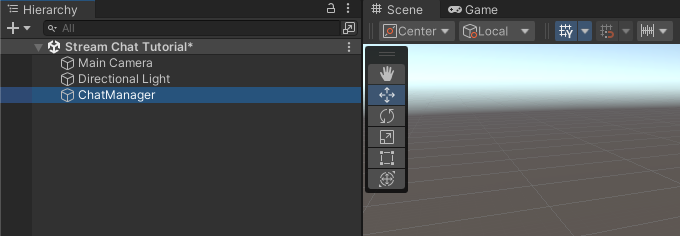
Go to the Hierarchy window, create a new Game Object and rename it to ChatManager. This Game Object will initialize the Stream Chat SDK Client.
Add new Script
Go to the Project window, create a new C# script and rename it to ChatManager.cs and open it in an editor of your choice (in this tutorial we'll be using JetBrain's Rider) and paste in the following code:
123456789101112131415161718using System;
using System.Linq;
using System.Threading.Tasks;
using StreamChat.Core;
using StreamChat.Core.Helpers;
using StreamChat.Core.Models;
using StreamChat.Core.StatefulModels;
using UnityEngine;

public class ChatManager : MonoBehaviour
{
    private IStreamChatClient _chatClient;

    private void Start()
    {
        _chatClient = StreamChatClient.CreateDefaultClient();
    }
}
In the above script, we've defined a private variable private IStreamChatClient _chatClient; to hold a reference to our chat client instance. Next in the Unity's special Start method we've called the _chatClient = StreamChatClient.CreateDefaultClient(); factory method that creates and configures the chat client instance.
You should always have only single instance of the Stream Chat Client
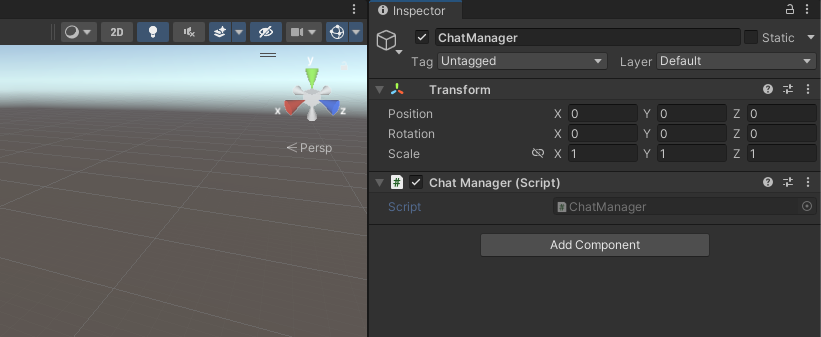
Now add the StreamChatBehaviour.cs to the StreamChatClient Game Object as a component:
Connect a User
First, let's define an async method that will connect our user to the Stream Chat server and print a log once the connection is established.
12345private async Task StartChatAsync() { var localUserData = await _chatClient.ConnectUserAsync("YOUR_API_KEY", "USER_ID", "USER_TOKEN"); Debug.Log($"User {localUserData.User.Id} is now connected!"); }
Now, in the Start method, add this line after creating the chat client:
1StartChatAsync().LogExceptionsOnFailed();
Because we're calling an asynchronous method from a synchronous Start method, we might not catch an exception if thrown by the StartChatAsync method. We can cover this by chaining the Stream's LogExceptionsOnFailed extension method at the end.
1234567891011121314151617181920212223242526using System;
using System.Linq;
using System.Threading.Tasks;
using StreamChat.Core;
using StreamChat.Core.Helpers;
using StreamChat.Core.Models;
using StreamChat.Core.StatefulModels;
using UnityEngine;

public class ChatManager : MonoBehaviour
{
    private IStreamChatClient _chatClient;
    private IStreamChannel _mainChannel;

    private void Start()
    {
        _chatClient = StreamChatClient.CreateDefaultClient();
        StartChatAsync().LogExceptionsOnFailed();
    }

    private async Task StartChatAsync()
    {
        var localUserData = await _chatClient.ConnectUserAsync("YOUR_API_KEY", "USER_ID", "USER_TOKEN");
        Debug.Log($"User {localUserData.User.Id} is now connected!");
    }
}
In a production scenario, user tokens should be generated using a backend and our server SDK.
Test Connection!
Go ahead and play the scene. You should now see logs confirming that we have established a valid connection with the Stream Server.

Create a new channel
Now that our connection is established we can create a new channel to which our logged user will send messages.
We'll create a channel of type "messaging" which has preconfigured permissions for a messaging application. Channel types are configurable and you can create your own types as well in our Dashboard. You can read more on our permissions system and predefined channel types here.
First, let's add a private variable to hold the reference to our channel:
1private IStreamChannel _mainChannel;
Next, add this line to the end of StartChatAsync method:
123// Lets create channel with "main" ID
_mainChannel = await _chatClient.GetOrCreateChannelWithIdAsync(ChannelType.Messaging, "main");
Debug.Log($"channel with ID: {_mainChannel.Id} created");
123456789101112131415161718192021222324252627282930using System;
using System.Linq;
using System.Threading.Tasks;
using StreamChat.Core;
using StreamChat.Core.Helpers;
using StreamChat.Core.Models;
using StreamChat.Core.StatefulModels;
using UnityEngine;

public class ChatManager : MonoBehaviour
{
    private IStreamChatClient _chatClient;
    private IStreamChannel _mainChannel;

    private void Start()
    {
        _chatClient = StreamChatClient.CreateDefaultClient();
        StartChatAsync().LogExceptionsOnFailed();
    }

    private async Task StartChatAsync()
    {
        var localUserData = await _chatClient.ConnectUserAsync("YOUR_API_KEY", "USER_ID", "USER_TOKEN");
        Debug.Log($"User {localUserData.User.Id} is now connected!");

        // Create a channel with "main" ID
        _mainChannel = await _chatClient.GetOrCreateChannelWithIdAsync(ChannelType.Messaging, "main");
        Debug.Log($"channel with ID: {_mainChannel.Id} created");
    }
}
Once you save the script and play the scene you should now see a log confirming that we now have a channel with "main" ID.

This ensures that the requested channel is created on the server and we can start sending messages.
Observe changes in the channel
Before we send any message we should subscribe to IStreamChannel events in order to be notified on any updates. Let's create 3 methods that will be triggered by the Chat Client instance when:
- a new message is received
- a message is deleted
- a reaction is added to a message
1234567891011121314private void OnMessageReceived(IStreamChannel channel, IStreamMessage message)
{
    Debug.Log($"Message {message.Text} was sent by {message.User.Id} to {channel.Id} channel");
}

private void OnMessageDeleted(IStreamChannel channel, IStreamMessage message, bool isHardDelete)
{
    Debug.Log($"Message with ID {message.Id} was deleted from {channel.Id} channel.");
}

private void OnReactionAdded(IStreamChannel channel, IStreamMessage message, StreamReaction reaction)
{
    Debug.Log($"Reaction {reaction.Type} was added by {reaction.User.Id}");
}
Now we can subscribe above methods in the StartChatAsync method:
1234// Subscribe to channel events so we can react to new messages, reactions, etc.
_mainChannel.MessageReceived += OnMessageReceived;
_mainChannel.MessageDeleted += OnMessageDeleted;
_mainChannel.ReactionAdded += OnReactionAdded;
Also, it's a good practice to unsubscribe from the subscribed events. This will avoid cases where our object cannot be garbage collected due to being subscribed to a different object if their lifetimes differ. We can do it in the Unity's special OnDestroy method:
123456789private void OnDestroy()
{
    if (_mainChannel != null)
    {
        _mainChannel.MessageReceived += OnMessageReceived;
        _mainChannel.MessageDeleted += OnMessageDeleted;
        _mainChannel.ReactionAdded += OnReactionAdded;
    }
}
12345678910111213141516171819202122232425262728293031323334353637383940414243444546474849505152535455565758596061using System;
using System.Linq;
using System.Threading.Tasks;
using StreamChat.Core;
using StreamChat.Core.Helpers;
using StreamChat.Core.Models;
using StreamChat.Core.StatefulModels;
using UnityEngine;

public class ChatManager : MonoBehaviour
{
    private IStreamChatClient _chatClient;
    private IStreamChannel _mainChannel;

    private void Start()
    {
        _chatClient = StreamChatClient.CreateDefaultClient();
        StartChatAsync().LogExceptionsOnFailed();
    }

    private async Task StartChatAsync()
    {
        // Connect user
        var localUserData = await _chatClient.ConnectUserAsync("YOUR_API_KEY", "USER_ID", "USER_TOKEN");
        Debug.Log($"User {localUserData.User.Id} is now connected!");

        // Create channel with "main" ID
        _mainChannel = await _chatClient.GetOrCreateChannelWithIdAsync(ChannelType.Messaging, "main");
        Debug.Log($"channel with ID: {_mainChannel.Id} created");

        // Subscribe to channel events so we can react to new messages, reactions, etc.
        _mainChannel.MessageReceived += OnMessageReceived;
        _mainChannel.MessageDeleted += OnMessageDeleted;
        _mainChannel.ReactionAdded += OnReactionAdded;
    }

    private void OnMessageReceived(IStreamChannel channel, IStreamMessage message)
    {
        Debug.Log($"Message {message.Text} was sent by {message.User.Id} to {channel.Id} channel");
    }

    private void OnMessageDeleted(IStreamChannel channel, IStreamMessage message, bool isHardDelete)
    {
        Debug.Log($"Message with ID {message.Id} was deleted from {channel.Id} channel.");
    }

    private void OnReactionAdded(IStreamChannel channel, IStreamMessage message, StreamReaction reaction)
    {
        Debug.Log($"Reaction {reaction.Type} was added by {reaction.User.Id}");
    }

    private void OnDestroy()
    {
        if (_mainChannel != null)
        {
            _mainChannel.MessageReceived += OnMessageReceived;
            _mainChannel.MessageDeleted += OnMessageDeleted;
            _mainChannel.ReactionAdded += OnReactionAdded;
        }
    }
}
Send new message
Finally, we can start sending messages! To simplify things, we'll skip the UI integration and send a new message every time you press the letter S on your keyboard.
First, add this method to the ChatManager class:
12345private async Task SendMessageAsync(string text)
{
    var message = await _mainChannel.SendNewMessageAsync(text);
    Debug.Log($"Message sent: {message.Text}");
}
To keep things organized, we'll add it right after the StartChatAsync method.
Next we'll use the Unity's special Update method, that gets automatically called by the Unity Engine every frame. Add this piece of code right after the Start method:
12345678910111213private void Update() { if (!_chatClient.IsConnected || _mainChannel == null) { return; } if (Input.GetKeyDown(KeyCode.S)) { var messageText = "Hello, world! Current local time is: " + DateTime.Now; SendMessageAsync(messageText).LogExceptionsOnFailed(); } }
Let's go through what's going on here. We only want to send message if we're both connected and have the main channel created. Therefore at the beginning of the Update method, if we're not connected !_chatClient.IsConnected or our main channel is not created _mainChannel == null we early exit the method.
Once both of these conditions are met we check if the player pressed the S key with Input.GetKeyDown(KeyCode.S) and everytime he does, we'll execute our SendMessageAsync method that we've added previously to our class. Please note that we're chaining the async method with LogExceptionsOnFailed() extension. This will log errors in case our message sending fails.
Finally, in our SendMessageAsync method, we execute await _mainChannel.SendNewMessageAsync(text); to send the message.
123456789101112131415161718192021222324252627282930313233343536373839404142434445464748495051525354555657585960616263646566676869707172737475767778798081using System;
using System.Linq;
using System.Threading.Tasks;
using StreamChat.Core;
using StreamChat.Core.Helpers;
using StreamChat.Core.Models;
using StreamChat.Core.StatefulModels;
using UnityEngine;

public class ChatManager : MonoBehaviour
{
    private IStreamChatClient _chatClient;
    private IStreamChannel _mainChannel;

    private void Start()
    {
        _chatClient = StreamChatClient.CreateDefaultClient();
        StartChatAsync().LogExceptionsOnFailed();
    }

    private void Update()
    {
        if (!_chatClient.IsConnected || _mainChannel == null)
        {
            return;
        }

        if (Input.GetKeyDown(KeyCode.S))
        {
            var messageText = "Hello, world! Current local time is: " + DateTime.Now;
            SendMessageAsync(messageText).LogExceptionsOnFailed();
        }
    }

    private async Task StartChatAsync()
    {
        // Connect user
        var localUserData = await _chatClient.ConnectUserAsync("YOUR_API_KEY", "USER_ID", "USER_TOKEN");
        Debug.Log($"User {localUserData.User.Id} is now connected!");

        // Create channel with "main" ID
        _mainChannel = await _chatClient.GetOrCreateChannelWithIdAsync(ChannelType.Messaging, "main");
        Debug.Log($"channel with ID: {_mainChannel.Id} created");

        // Subscribe to channel events so we can react to new messages, reactions, etc.
        _mainChannel.MessageReceived += OnMessageReceived;
        _mainChannel.MessageDeleted += OnMessageDeleted;
        _mainChannel.ReactionAdded += OnReactionAdded;
    }

    private async Task SendMessageAsync(string text)
    {
        var message = await _mainChannel.SendNewMessageAsync(text);
        Debug.Log($"Message sent: {message.Text}");
    }

    private void OnMessageReceived(IStreamChannel channel, IStreamMessage message)
    {
        Debug.Log($"Message {message.Text} was sent by {message.User.Id} to {channel.Id} channel");
    }

    private void OnMessageDeleted(IStreamChannel channel, IStreamMessage message, bool isHardDelete)
    {
        Debug.Log($"Message with ID {message.Id} was deleted from {channel.Id} channel.");
    }

    private void OnReactionAdded(IStreamChannel channel, IStreamMessage message, StreamReaction reaction)
    {
        Debug.Log($"Reaction {reaction.Type} was added by {reaction.User.Id}");
    }

    private void OnDestroy()
    {
        if (_mainChannel != null)
        {
            _mainChannel.MessageReceived += OnMessageReceived;
            _mainChannel.MessageDeleted += OnMessageDeleted;
            _mainChannel.ReactionAdded += OnReactionAdded;
        }
    }
}
Test sending messages
Now, hit the play button and press the S key few times on your keyboard. You should now see new logs that confirm both that our message was sent and received by the channel.

Print channel messages
What good is sending messages if you can't read them, right? Let's iterate and print all of the channel messages when the channel is loaded. Paste this code at the end of StartChatAsync method:
1234foreach (var message in _mainChannel.Messages)
{
    Debug.Log($"Channel message: {message.Text}, sent by: {message.User.Id} on {message.CreatedAt}");
}
12345678910111213141516171819private async Task StartChatAsync()
{
    // Connect user
    var localUserData = await _chatClient.ConnectUserAsync("YOUR_API_KEY", "USER_ID", "USER_TOKEN");
    Debug.Log($"User {localUserData.User.Id} is now connected!");

    // Create channel with "main" ID
    _mainChannel = await _chatClient.GetOrCreateChannelWithIdAsync(ChannelType.Messaging, "main");

    foreach (var message in _mainChannel.Messages)
    {
        Debug.Log($"Channel message: {message.Text}, sent by: {message.User.Id} on {message.CreatedAt}");
    }

    // Subscribe to channel events so we can react to new messages, reactions, etc.
    _mainChannel.MessageReceived += OnMessageReceived;
    _mainChannel.MessageDeleted += OnMessageDeleted;
    _mainChannel.ReactionAdded += OnReactionAdded;
}
If you press the play button now, you should see messages that you've sent in the previous steps.

Delete messages
Lastly, let's see how easy it is to delete a message. We'll add a simple feature that tries to delete the last message on a key press.
Add this piece of code to the end of the Update method:
123456789101112if (Input.GetKeyDown(KeyCode.D))
{
    if (_mainChannel.Messages.Count == 0)
    {
        Debug.LogWarning("No message to delete");
    }
    else
    {
        var lastMessage = _mainChannel.Messages.Last();
        lastMessage.HardDeleteAsync().LogExceptionsOnFailed();
    }
}
When a user presses the D key, we check whether there are any messages in the channel. If channel has not messages we print the No message to delete log, otherwise we take the last message with _mainChannel.Messages.Last() and hard delete it with lastMessage.HardDeleteAsync(). Again, because we're not awaiting the HardDeleteAsync() we add the LogExceptionsOnFailed() extension method to the end in order to print any errors if the delete request fails.
123456789101112131415161718192021222324252627282930313233343536373839404142434445464748495051525354555657585960616263646566676869707172737475767778798081828384858687888990919293949596979899using System;
using System.Linq;
using System.Threading.Tasks;
using StreamChat.Core;
using StreamChat.Core.Helpers;
using StreamChat.Core.Models;
using StreamChat.Core.StatefulModels;
using UnityEngine;

public class ChatManager : MonoBehaviour
{
    private IStreamChatClient _chatClient;
    private IStreamChannel _mainChannel;

    private void Start()
    {
        _chatClient = StreamChatClient.CreateDefaultClient();
        StartChatAsync().LogExceptionsOnFailed();
    }

    private void Update()
    {
        if (!_chatClient.IsConnected || _mainChannel == null)
        {
            return;
        }

        if (Input.GetKeyDown(KeyCode.S))
        {
            var messageText = "Hello, world! Current local time is: " + DateTime.Now;
            SendMessageAsync(messageText).LogExceptionsOnFailed();
        }

        if (Input.GetKeyDown(KeyCode.D))
        {
            if (_mainChannel.Messages.Count == 0)
            {
                Debug.LogWarning("No message to delete");
            }
            else
            {
                var lastMessage = _mainChannel.Messages.Last();
                lastMessage.HardDeleteAsync().LogExceptionsOnFailed();
            }
        }
    }

    private async Task StartChatAsync()
    {
        // Connect user
        var localUserData = await _chatClient.ConnectUserAsync("YOUR_API_KEY", "USER_ID", "USER_TOKEN");
        Debug.Log($"User {localUserData.User.Id} is now connected!");

        // Create channel with "main" ID
        _mainChannel = await _chatClient.GetOrCreateChannelWithIdAsync(ChannelType.Messaging, "main");
        Debug.Log($"channel with ID: {_mainChannel.Id} created");

        // Subscribe to channel events so we can react to new messages, reactions, etc.
        _mainChannel.MessageReceived += OnMessageReceived;
        _mainChannel.MessageDeleted += OnMessageDeleted;
        _mainChannel.ReactionAdded += OnReactionAdded;

        foreach (var message in _mainChannel.Messages)
        {
            Debug.Log($"Channel message: {message.Text}, sent by: {message.User.Id} on {message.CreatedAt}");
        }
    }

    private async Task SendMessageAsync(string text)
    {
        var message = await _mainChannel.SendNewMessageAsync(text);
        Debug.Log($"Message sent: {message.Text}");
    }

    private void OnMessageReceived(IStreamChannel channel, IStreamMessage message)
    {
        Debug.Log($"Message {message.Text} was received from {message.User.Id} in {channel.Id} channel");
    }

    private void OnMessageDeleted(IStreamChannel channel, IStreamMessage message, bool isHardDelete)
    {
        Debug.Log($"Message with ID {message.Id} was deleted from {channel.Id} channel.");
    }

    private void OnReactionAdded(IStreamChannel channel, IStreamMessage message, StreamReaction reaction)
    {
        Debug.Log($"Reaction {reaction.Type} was added by {reaction.User.Id}");
    }

    private void OnDestroy()
    {
        if (_mainChannel != null)
        {
            _mainChannel.MessageReceived += OnMessageReceived;
            _mainChannel.MessageDeleted += OnMessageDeleted;
            _mainChannel.ReactionAdded += OnReactionAdded;
        }
    }
}
Congratulations!
We hope that you've enjoyed this tutorial on gaming chat with Unity. By using Stream’s chat components, you and your team will be able to get your Unity Game or Application up and running with in-game chat in minutes.
Now that you’ve completed the tutorial on Unity Chat, you can build anything chat related with our components. If you have a use-case that doesn’t quite seem to work, or simply have questions, please don’t hesitate to reach out here.
Final Thoughts
In this chat tutorial we've covered the most basic interaction with the low-level SDK.
The API has plenty more features available to support more advanced use-cases such as push notifications, content moderation, rich messages and more, and the chat SDK for Unity is undergoing heavy development to include all functionality.
