


Head over to our previous article Enhancing Patient-Care: Combining Nylas' Calendar API with Stream's Chat API to learn more about Nylas and Stream.
Understanding Key Features of the Care Appointment App
A remote healthcare provider has the following functions:
- Log in to the application and specify availability for booking through Nylas' appointment scheduler
- Check notifications and have direct messaging chats with patients
- Modify: Edit availability, reschedule, and cancel appointments
People who need virtual healthcare can:
- Search for available telehealth providers
- Book appointments based on their preference and availability of online healthcare providers
- Chat with digital care providers to reschedule or cancel appointments.
Setting Up the Project
To set up an iOS sample app for this project, we used a backend server built with Node.js. Check out the two-sided-marketplace GitHub repository from Nylas for setup instructions. The repository contains the server integration code for running the iOS sample app. First, clone the two-sided-marketplace repository on GitHub and follow the steps below to get the backend server running.
After cloning the Nylas' server from GitHub:
- Launch your favorite command line tool, cd into the backend folder in the two-sided-marketplace folder. This folder contains server.js.
- Run
npm start. If the server runs successfully, you will see "App listening on port 9000", as shown in the image below.

iOS Frontend: Generate a Fresh Xcode Project
To get up and running with the iOS front end in this project, we used Tuist to handle and automate the development workflow effortlessly. Check the Tuist website to find instructions on how to set it up and get started. To create a local copy of the project and workspaces, we used Tuist commands. Entering tuist fetch followed by tuist generate launches Xcode and creates a fresh copy of the project, as shown in the image below.

Building the UI For Patients and Doctors
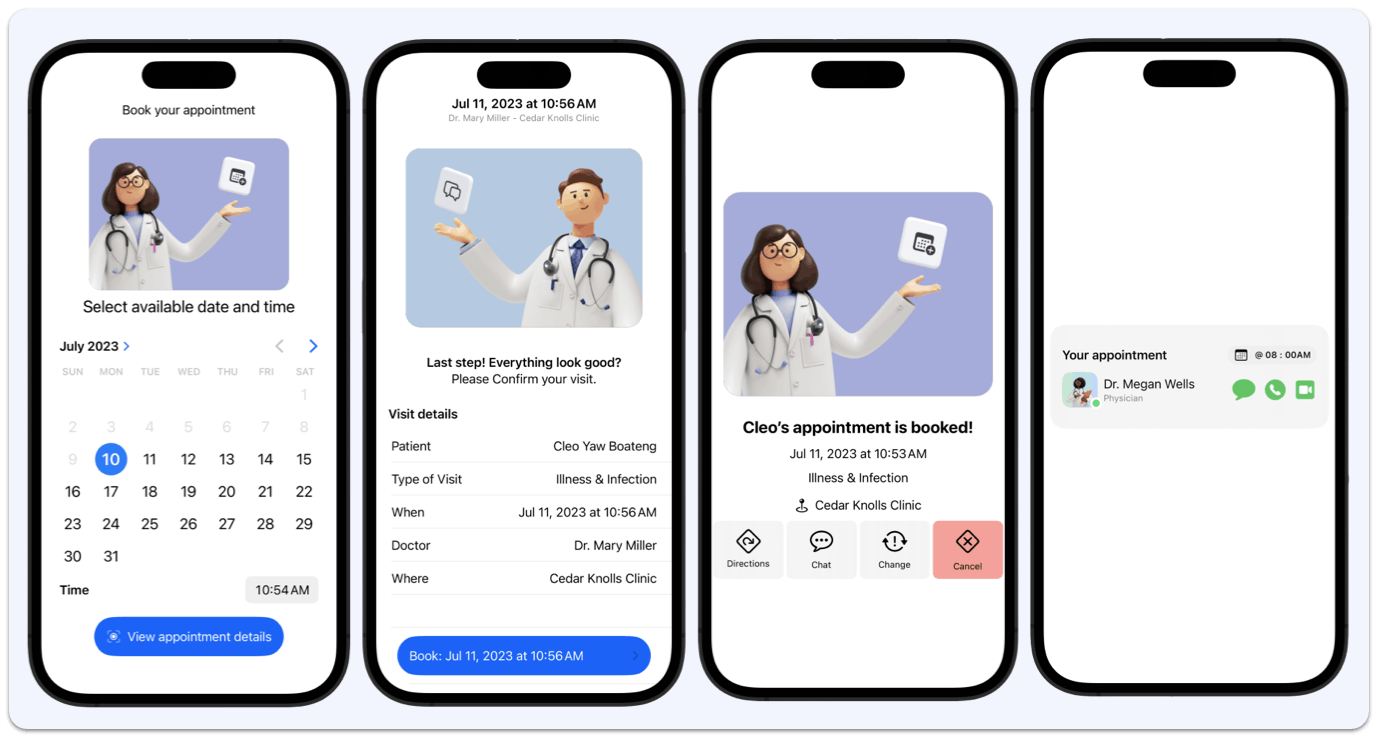
The app has two distinct user groups, doctors and patients. When care providers log in to it, they see an interface different from what patients see. The primary UI for doctors affords to create and specify availability and chat with patients seamlessly.

On the other hand, the UI for patients affords to book the doctor's specified appointments and chat with them.

Authentication and Networking
In the codebase of the Care Appointment app, part of our network request, like MultipartRequest.swift, provides a convenient way to construct and generate form-data requests for sending data, including files, over HTTP. See the implementation code below.
1234567891011121314151617181920212223242526272829303132333435363738394041424344454647484950515253545556575859import Foundation
public struct MultipartRequest {
    public let boundary: String
    private let separator: String = "\r\n"
    private var data: Data
    public init(boundary: String = UUID().uuidString) {
        self.boundary = boundary
        self.data = .init()
    }
    private mutating func appendBoundarySeparator() {
        data.append("--\(boundary)\(separator)")
    }
    private mutating func appendSeparator() {
        data.append(separator)
    }
    private func disposition(_ key: String) -> String {
        "Content-Disposition: form-data; name=\"\(key)\""
    }
    public mutating func add(
        key: String,
        value: String
    ) {
        appendBoundarySeparator()
        data.append(disposition(key) + separator)
        appendSeparator()
        data.append(value + separator)
    }
    public mutating func add(
        key: String,
        fileName: String,
        fileMimeType: String,
        fileData: Data
    ) {
        appendBoundarySeparator()
        data.append(disposition(key) + "; filename=\"\(fileName)\"" + separator)
        data.append("Content-Type: \(fileMimeType)" + separator + separator)
        data.append(fileData)
        appendSeparator()
    }
    public var httpContentTypeHeadeValue: String {
        "multipart/form-data; charset=utf-8; boundary=\(boundary)"
    }
    public var httpBody: Data {
        var bodyData = data
        bodyData.append("--\(boundary)--")
        return bodyData
    }
}
private extension Data {
    mutating func append(
        _ string: String,
        encoding: String.Encoding = .utf8
    ) {
        guard let data = string.data(using: encoding) else {
            return
        }
        append(data)
    }
}
There is also Route.swift that provides a convenient way to define and manage Nylas's API routes in the Care Appointment app. It supports dynamic path generation and determines authentication requirements.
12345678910111213141516171819202122232425262728293031323334353637383940414243444546474849505152535455565758596061626364656667686970717273747576777879import Foundation
public enum Route: String {
    public enum Verb: String {
        case POST
        case GET
        case DELETE
        case PATCH
    }
    case appointment = "/appointments/:id"
    case userAppointments = "/users/:userId/appointments"
    case user = "/users/:userId"
    case userProviders = "/providers/:userId"
    case providers = "/providers"
    case appointments = "/appointments"
    case signup = "/signup"
    case login = "/auth/login"
    case logout = "/auth/logout"

    case providerAvailability = "/providers/availability"
    case providerEvents = "/providers/:id/availability"
    case specialtyProvidersAvailability = "/providers/availability/:specialty"
    case providerApointments = "/providers/:id/appointments"

    public func path(for context: RouteContext) throws -> String {
        var basePath = rawValue

        let regex = /:[a-zA-Z-]*/
        if let match = try regex.firstMatch(in: basePath) {
            guard let value = context[match.description] else {
                throw ClientError.contextMissingKey(match.description)
            }
            basePath = basePath.replacingOccurrences(of: match.description, with: value)
        }

        return basePath
    }

    public static func requiresAuthHeader(for route: Route) -> Bool {
        switch route {
        case .signup, .login:
            return false
        default:
            return true
        }
    }

    public static func allowedVerbs(for route: Route) -> [Verb] {
        switch route {

        case .appointment:
            return [.GET]
        case .userAppointments:
            return [.GET]
        case .signup:
            return [.POST]
        case .login:
            return [.POST]
        case .logout:
            return [.POST]
        case .appointments:
            return [.POST, .DELETE, .PATCH]
        case .providerAvailability:
            return [.POST, .PATCH]
        case .providerEvents:
            return [.GET]
        case .specialtyProvidersAvailability:
            return [.GET]
        case .providerApointments:
            return [.GET]
        case .user:
            return [.GET, .DELETE]
        case .userProviders:
            return [.GET]
        case .providers:
            return [.GET]
        }

    }
}
Setting Up the Network Request Component
We created a network component in CareClient.swift that has a CareClient and encapsulates the logic for making network requests in the Care Appointment app. It handles serialization, deserialization, and error management. In addition, it offers convenient methods for HTTP operations and allows customization using the Route objects and a context dictionary.
1234567891011121314151617181920212223242526272829303132333435363738394041424344454647484950515253545556575859606162636465666768697071727374757677787980import Foundation
import os.log
public typealias RouteContext = [String: String]
@MainActor
open class CareClient {
    private let baseUrl: URL
    private let encoder = CareNetworkKit.jsonEncoder
    private let decoder = CareNetworkKit.jsonDecoder
    public init(baseUrl baseUrlString: String) throws {
        guard let baseUrl = URL(string: baseUrlString) else {
            throw ClientError.urlInvalid
        }
        self.baseUrl = baseUrl
    }

    public func get<Response: Decodable>(route: Route, context: RouteContext) async throws -> Response {
        let request = try createRequest(route: route, verb: .GET, context: context)
        let responseData = try await send(request)
        return try decoder.decode(Response.self, from: responseData)
    }

    public func post<Request: Encodable, Response: Decodable>(route: Route, context: RouteContext, request: Request) async throws -> Response {
        let requestData = try encoder.encode(request)
        let request = try createRequest(route: route, verb: .POST, context: context, httpBody: requestData)
        let responseData = try await send(request)
        return try decoder.decode(Response.self, from: responseData)
    }
    /// send a POST request without returning a response
    public func post<Request: Encodable>(route: Route, context: RouteContext, request: Request) async throws {
        let requestData = try encoder.encode(request)
        let request = try createRequest(route: route, verb: .POST, context: context, httpBody: requestData)
        try await send(request)
    }

    public func delete<Request: Encodable, Response: Decodable>(route: Route, context: RouteContext, request: Request) async throws -> Response {
        let requestData = try encoder.encode(request)
        let request = try createRequest(route: route, verb: .DELETE, context: context, httpBody: requestData)
        let responseData = try await send(request)
        return try decoder.decode(Response.self, from: responseData)
    }

    private func createRequest(route: Route, verb: Route.Verb, context: RouteContext, httpBody: Data? = nil) throws -> URLRequest {

        guard Route.allowedVerbs(for: route).contains(verb) else {
            throw ClientError.pathDoesNotSupportVerb(verb)
        }

        let url = baseUrl.appending(path: try route.path(for: context))
        var request = URLRequest(url: url)

        if Route.requiresAuthHeader(for: route) {
            guard let authorizationValue = context["Authorization"] else {
                throw ClientError.contextMissingKey("Authorization")
            }
            request.addValue(authorizationValue, forHTTPHeaderField: "Authorization")
        }
        request.httpMethod = verb.rawValue
        request.addValue("application/json", forHTTPHeaderField: "Content-Type")
        request.httpBody = httpBody

        return request
    }

    @discardableResult
    private func send(_ request: URLRequest) async throws -> Data {
        let (responseData, response) = try await URLSession.shared.data(for: request)
        if OSLog.networkPayloadLog.isEnabled(type: .debug) {
            os_log(.debug, "Response: %{public}@", String(data: responseData, encoding: .utf8) ?? "")
        }

        let statusCode = (response as? HTTPURLResponse)?.statusCode
        try CareNetworkKit.checkStatusCode(statusCode: statusCode)
        return responseData
    }
}
public enum ClientError: Error {
    case urlInvalid
    case pathDoesNotSupportVerb(Route.Verb)
    case contextMissingKey(String)
}
The CareClient class serves as a client for making all network requests. It has properties for a base URL, an encoder, and a decoder for JSON serialization and deserialization. We implemented various methods in the class to perform HTTP requests, including GET, POST, and DELETE. These methods accept a Route object representing the endpoint, a RouteContext dictionary containing additional context information, and optional request and response types.
To create a network request, the class combines the base URL, the route path, and the provided context. It sets the appropriate HTTP method, adds headers such as the authorization header if required, and serializes the request body if provided. It uses a send method to perform the request using URLSession.shared.data(for:) and returns the response data. It also checks the response and throws errors if they occur.
To catch network errors, we implemented an enum called ClientError which defines possible errors that can occur during network requests. One is an invalid URL, a path that does not match a specific HTTP phrase, or a missing key in the request context.
Overview of the Nylas Calendar API
The Nylas Calendar API connects to your users' calendars allowing developers to seamlessly integrate scheduling workflows into their apps to manage events, tasks, and meetings. The Calendar API consists of the following:
- Universal API: Use one API to connect to all major calendar providers with the whole Create, Read, Update, Delete (CRUD). Visit the Nylas Calendar API docs to learn more.
- Customizable UI: Quickly deploy a scheduling interface unique to your brand. Head to the Nylas´ scheduler webpage to learn more.
Integration Process and Guidelines
Making API requests to the Nylas' servers requires you to create an account. Nylas provides two servers, a back-end server and a front-end server. To get your app running, you should set up both servers. Visit this quickstart page to get started.
Displaying a List of Specified Schedules and Booking Appointments
To open Nylas' calendar when creating a service, use the showNylas property. When a care provider shares availability by adding a new schedule on a calendar, the backend stores the information in Superbase. From the patient's perspective, when you select an available schedule, the information is retrieved from Superbase using the property getAvailableServices. This uses a persistent layer.
Overview of Stream Chat SwiftUI SDK

Stream Chat SwiftUI provides developers with efficient ways to add real-time chat messaging as an in-app solution to improve user engagement and retention. Developers can use Stream Chat in telemedicine apps to strengthen and provide streamlined conversations between care providers and patients seeking telecare services.
Main Features and Capabilities
In this care appointment app, we used Stream Chat to enhance and ensure seamless communication between people seeking telehealth and care service providers. It allows doctors to initiate chat conversations with patients about scheduled appointment cancellations or rescheduling. On the other hand, patients can start direct chats with doctors concerning appointment bookings.
The built-in support for attachments allows patients to attach and send information relating to their health to care providers. This feature helps patients send documents such as files, images, screen recordings, and videos to doctors.
1234567891011121314151617181920212223242526272829303132333435struct CareAppointmentAttachment: View {
    let message: ChatMessage
    let width: CGFloat
    let isFirst: Bool
    @State var selectedAttachments: [PhotosPickerItem] = []
    @State var data: Data?

    var body: some View {
        VStack {
            if let data = data, let uiimage = UIImage(data: data) {
                Image(uiImage: uiimage)
                    .resizable()
            }

            Spacer()

            HStack {
                PhotosPicker(
                    selection: $selectedAttachments,
                    // marching: .images
                    matching: .all(of: [.images, .videos, .screenshots, .screenRecordings])
                ) {
                    Image(systemName: "Envelope")
                        .accessibilityLabel("Attachments picker")
                        .accessibilityAddTraits(.isButton)
                }

                Text(message.text)
            }
            .padding()
            .frame(maxWidth: width)
            .messageBubble(for: message, isFirst: isFirst)
        }
    }
}
Integrating Stream Chat SwiftUI
You can add the Stream Chat SwiftUI SDK to Xcode projects using Swift Package Manager by fetching it from GitHub. In this article, we do not cover the installation process. If you are new to Stream Chat SwiftUI, refer to the Getting Started tutorial to discover how to integrate it with your project.
Our Chat SDK also provides advanced customization options, such as swapping standard SwiftUI views with complete custom UI implementations through its view factory protocol. The care appointment project leverages the flexibility of the view factory to build a custom attachment type for assisting patients and care providers to easily upload and send various media and file types via direct chat messaging. See the implementation in the sample code below.
12345678910111213141516import Foundation
import SwiftUI
import StreamChat
import StreamChatSwiftUI
class CareAppointmentsViewFactory: ViewFactory {
    @Injected(\.chatClient) public var chatClient
    private init() {}
    public static let shared = CareAppointmentsViewFactory()
    func makeCustomAttachmentViewType(for message: ChatMessage, isFirst: Bool, availableWidth: CGFloat, scrolledId: Binding<String?>) -> some View {
        return CareAppointmentAttachment(message: message, width: availableWidth, isFirst: isFirst)
    }

    public func makeChannelListHeaderViewModifier(title: String) -> some ChannelListHeaderViewModifier {
        CustomChannelModifier(title: title)
    }
}
Selecting and sending attachments can be done through a simple interface using the code below.
12345678910111213141516171819202122232425262728293031323334353637383940import Foundation
import SwiftUI
import PhotosUI
import StreamChat
import StreamChatSwiftUI
struct CareAppointmentAttachment: View {
    let message: ChatMessage
    let width: CGFloat
    let isFirst: Bool
    @State var selectedAttachments: [PhotosPickerItem] = []
    @State var data: Data?

    var body: some View {
        VStack {
            if let data = data, let uiimage = UIImage(data: data) {
                Image(uiImage: uiimage)
                    .resizable()
            }

            Spacer()

            HStack {
                PhotosPicker(
                    selection: $selectedAttachments,
                    // marching: .images
                    matching: .all(of: [.images, .videos, .screenshots, .screenRecordings])
                ) {
                    Image(systemName: "Envelope")
                        .accessibilityLabel("Attachments picker")
                        .accessibilityAddTraits(.isButton)
                }

                Text(message.text)
            }
            .padding()
            .frame(maxWidth: width)
            .messageBubble(for: message, isFirst: isFirst)
        }
    }
}
Many aspects of Stream Chat implementation are not covered in this article. The above focuses only on the custom attachment implementation. Check out the iOS documentation to learn more.
The Key Takeaways
Stream Chat and Nylas Scheduling APIs integration in an iOS app can provide efficient doctor and patient communication via direct messaging and improved care appointment scheduling.
Additionally, booking appointments and chatting directly with care professionals removes the difficulties people face in finding private care professionals for treatment.
We imagined a seamless and painless way for patients and doctors to send and receive health information and other related documents through the attachments feature of the app.