

An updated version of this tutorial exists! Angular devs can now use our dedicated Angular Chat SDK to build in-app messaging experiences faster than ever. You can still skim the post below for inspiration, but our new official Angular Chat App Tutorial is the place to find up-to-date info and a much simpler approach.
For personal dev projects and early stage startups, all of our chat SDKs (Angular included) are free to use indefinitely with the Stream Maker Account. Larger companies can prototype and evaluate with Stream's APIs and SDKs for 30 days, no payment info required, by activating a free Stream Chat trial.
In this tutorial, we will go through the process of creating a realtime messaging application using Django and Angular. We'll build a custom chat interface and then use Stream's client to allow realtime messaging in our application.
The gif below shows how the final application will look:

The code for the application can be found on GitHub.
Prerequisites
To prepare yourself to follow along with this tutorial, you'll need the following:
You can follow this guide to install Python and Django; it also shows the Python versions supported by Django.
Setting Up Stream
We'll be making use of the Stream client in both the backend and frontend applications; to start using Stream, we have to create an account and an application. Creating an app will provide the API key and token needed to initialize the Stream clients.
Visit the signup page to create a Stream account, if you don't have one already; if you do have an account, you can log in here. After authentication, you will get redirected to the dashboard where you can access your apps and the associated private keys.

Copy the KEY and SECRET of your application; we'll be making use of these in the coming sections. It is essential to keep your keys private; we'll look at where you can securely keep them in the next section!
Setting Up the Server
Our application will have a view where users signup using a username. To allow this, we'll set up a Django server to store the usernames and authorize users using the Stream Client. The Stream Client will be useful for token generation for new and existing users to get access to the chat application. To get started, we'll have to install the Django CLI using pip.
The Django CLI will come in handy when bootstrapping a new project. Run any of the following commands to install the CLI...
For Linux and Mac users:
1$ python -m pip install Django
For Windows users:
1$ py -m pip install Django
Once the command runs to completion, you can test the installation using one of the commands below:
For Linux and macOS users:
1$ python -m django --version
For Windows users:
1$ py -m django --version
If Django was installed successfully, you should see the version of your installation. If it isn't, you'll get an error that reads "No module named django".
Initializing a New Project
Now that we have Django installed, let's create a new project and application. First, you'll need to create a directory to house both the frontend and server applications.
Create a directory named chat-app in your code directory. You can use the command below, once you've cded into the directory where you store your code:
1$ mkdir chat-app && cd chat-app
The command creates a new directory and cd's into the created directory
Inside the chat-app directory, initialize a new Django project by running the command below:
1$ django-admin startproject django-stream-server
The command will create a directory named django-stream-server. All commands relating to the server should be run inside your new django-stream-server directory. Within this directory, you'll find the files also generated by the above command. The project directory should look something like this:
django-stream-server/
    manage.py
    django-stream-server/
        __init__.py
        settings.py
        urls.py
        asgi.py
        wsgi.py
You can read more about the purpose of each of the auto-generated files here
After creating the files, we'll still need to create an app within the project before we begin building. To create a new app, run the command below. This time, we will be using the manage.py file to run the commands; it is easier to use manage.py other than django-admin when working within a single project.
To generate a new app named "chat" run the following command in the root of the django-stream-server directory:
1$ python manage.py startapp chat
This command should generate a new chat directory within the django-stream-server directory. The directory structure should look like this:
chat/
    __init__.py
    admin.py
    apps.py
    migrations/
        __init__.py
    models.py
    tests.py
    views.py
Our project is now ready! In the next section, we will create a model to hold unique members in our chat application. Then, we'll create a view and map it to a URL that the frontend application can make requests to.
Creating the Model
To keep track of the users in the application, we'll create a model to keep a record of the users joining the application. Open the models.py file in the django-stream-server/chat directory and add update it with the content below:
from django.db import models

class Member(models.Model):
    username = models.CharField(max_length=100)
    def __str__(self):
        return self.username.capitalize()
The Member model has a single username field and a str method that is used to return a formatted, human-readable representation of the model.
After creating a new model, we need to tell Django that we've created a new model; we can do this by running the makemigrations command:
1$ python manage.py makemigrations chat
You should see the following output when the command runs to completion:
123Migrations for 'chat':
  chat/migrations/0001_initial.py
    - Create model Member
Next, we'll run the migrate command to run the migrations and manage the database schema:
1$ python manage.py migrate
Which should give an output similar to:
https://gist.github.com/BrightnBubbly/dad9eb991bc9408411f56a2dffa59b2b
Our model is now ready, and we can start creating members. In the next section, we'll create a view where users can join the application and a record will be created for each member!
Creating the View and URLs
We will create a single view for the application. Before we do that, we'll need to install two packages:
- stream-chat: the Python client for Stream
- django-cors-headers: Django app for handling the server headers required for Cross-Origin Resource Sharing (CORS)
Run the following command to install the packages:
1$ pip install stream-chat django-cors-headers
After installing both packages, open the settings.py file and make the changes listed below.
First, add the django-cors-headers app to the list of INSTALLED_APPS:
...

INSTALLED_APPS = [
    'chat.apps.ChatConfig',
    'django.contrib.admin',
    'django.contrib.auth',
    'django.contrib.contenttypes',
    'django.contrib.sessions',
    'django.contrib.messages',
    'django.contrib.staticfiles',
    'corsheaders' #add this new line for the django-cors-headers app
]
CORS_ORIGIN_ALLOW_ALL = True

...
We add corheaders to the INSTALLED_APPS list and then add a new variable "CORS_ORIGIN_ALLOW_ALL", setting the value to "True". Setting this value to "True" allows requests from all origins to your application; in a production application, it would be better to set up a whitelist of allowed origins for your application.
Next, copy the API KEY and SECRET of your Stream app from the Stream dashboard and replace the placeholder values below:
123456...

STREAM_API_KEY = 'YOUR_API_KEY'
STREAM_API_SECRET = 'YOUR_API_SECRET'

...
Now, we can head back and begin creating our view! Open the chat/views.py file and update the contents with the snippet below:
We'll start with the imports:
import json
from django.conf import settings
from django.views.decorators.csrf import csrf_exempt
from django.http import JsonResponse
from stream_chat import StreamChat

from .models import Member
We'll use the json import to parse the request body, the settings import gives access to the Stream API-key and secret values we declared, and, finally, the view will be decorated with the csrf_exempt decorator. The decorator allows access to the view using external RESTful services. With that said, you'll want to remove this decorator in a production app, to avoid leaving your views vulnerable to CSRF.
The main view function should now look like this:
@csrf_exempt
def init(request):
    if not request.body:
        return JsonResponse(status=200, data={'message': 'No request body'})
    body = json.loads(bytes(request.body).decode('utf-8'))

    if 'username' not in body:
        return JsonResponse(status=400, data={'message': 'Username is required to join the channel'})

    username = body['username']
    ...
First, we check if there's a request body, and return a response if the body isn't available. When there is a request body, we parse it and check for the username, which is required for the view.
Once we're sure that we have a request body and a username sent from the client, the rest of the view will be populated as such:
@csrf_exempt
def init(request):
    ...
    username = body['username']
    client = StreamChat(api_key=settings.STREAM_API_KEY,
                        api_secret=settings.STREAM_API_SECRET)
    channel = client.channel('messaging', 'General')

    try:
        member = Member.objects.get(username=username)
        token = bytes(client.create_token(
            user_id=member.username)).decode('utf-8')
        return JsonResponse(status=200, data={"username": member.username, "token": token, "apiKey": settings.STREAM_API_KEY})

    except Member.DoesNotExist:
        member = Member(username=username)
        member.save()
        token = bytes(client.create_token(
            user_id=username)).decode('utf-8')
        client.update_user({"id": username, "role": "admin"})
        channel.add_members([username])

        return JsonResponse(status=200, data={"username": member.username, "token": token, "apiKey": settings.STREAM_API_KEY})
After passing the checks, we initialize the Stream client using the API_KEY and SECRET, and a messaging channel is created with a General identifier. In the try/except block, we attempt to get an existing Member using the username value; if the user exists, a token is generated and decoded (the returned token is a byte) using the username as the identifier. Finally, the response with data containing the username, token, and API_KEY is curated and returned.
If the username doesn't return an existing Member when queried, the execution jumps to the except block, and a new member record is created and saved using the username. A token is then generated for the member, and the new user is added to the Stream record and the messaging channel.
After completing the view, we'll need to map it to a URL, so we'll need to create a URL conf. The first thing to do is to create a new file named urls.py in the chat directory.
After creating the file, the chat directory should have the following structure:
chat/
    __init__.py
    admin.py
    apps.py
    migrations/
        __init__.py
    models.py
    tests.py
    urls.py
    views.py
Now, open the urls.py file and add the snippet below into it:
from django.urls import path
from . import views

urlpatterns = [
    path('join', views.init, name='join'),
]
The next step is to point the root URLconf at the chat.urls module. Open the root django-stream-server/urls.py, add an import for django.urls.include and insert an include() in the urlpatterns list, so you have:
from django.contrib import admin
from django.urls import include, path

urlpatterns = [
    path('', include('chat.urls')),
    path('admin/', admin.site.urls),
]
At last, we have the server ready; start it up by running the following command:
1$ python manage.py runserver
You should see the following output when the command runs to completion:
Watching for file changes with StatReloader
Performing system checks...

System check identified no issues (0 silenced).
April 28, 2020 - 13:45:31
Django version 2.2.12, using settings 'django-chat-server.settings'
Starting development server at http://127.0.0.1:8000/
Quit the server with CONTROL-C.
Remember, all
manage.pycommands should be run in the root of thedjango-stream-serverdirectory
In the next section, we'll bootstrap our frontend application using the Angular CLI!
Creating the Frontend Application
The frontend application will be built using Angular; we can bootstrap a new Angular project using the Angular CLI. If you don't have the CLI installed already, run one of the following commands to install it:
NPM
1$ npm install -g @angular/cli
OR
Yarn
1$ yarn global add @angular/cli
After installing the CLI, we can use it to bootstrap a new Angular application. Go to the root of the chat-app directory and run the command below to create a new project named angular-chat.
1$ ng new angular-chat --style=scss
Once the command has run to completion, the structure of the chat-app directory should look like this:
chat-app/
  django-chat-server/
    ...
  angular-chat/
    ...
cd into the angular-chat directory and install the Stream Chat client library for Javascript, stream-chat, using the command below:
NPM
1$ npm install stream-chat
yarn
1$ yarn add stream-chat
Before starting the application, we'll need to add some external assets to the application. We'll be making use of the Raleway font and the FeatherIcons icon-set in the application.
Update the index.html to add links to the assets; your updates should look like the snippet below:
...
<head>
  ...
  <link
      href="https://fonts.googleapis.com/css2?family=Raleway:wght@300;400;500;600;700&display=swap"
      rel="stylesheet"
    />
  <script src="https://unpkg.com/feather-icons/dist/feather.min.js"></script>
</head>
...
Next, we'll make use of the Raleway font application-wide. Open the src/styles.scss file and update it with the following:
* {
  font-family: 'Raleway', sans-serif;
}

body{
  background-color: black;
}
After completing the setup, run npm start to start the development server. Then, navigate to http://localhost:4200 in your browser.
In the next section, we will begin work on the signup view!
Creating the Signup View
For the signup view, we'll first create a new component using the CLI. After signing up, we'll also need a service to manage the state of the application. Run the following commands to generate a component and a service using the CLI:
First, the component:
1$ ng generate component join
Then, the service:
1$ ng generate service state
Be sure to run both commands in the root of the
angular-chatdirectory.
After running both commands, a new directory named join should be created alongside a new file named state.service.ts. The structure of the join directory should look like the following:
join/
  join.component.html
  join.component.scss
  join.component.spec.ts
  join.component.ts
Now, we'll need to flush out the join component...
First, the stylesheet; open the join.component.scss file and copy the content below into it:
#join-area {
  width: 40%;
  margin: 12% auto;
  header {
    display: flex;
    flex-direction: column;
    justify-content: center;
    align-items: center;
    img {
      width: 200px;
    }
    h3 {
      color: whitesmoke;
      font-size: 18px;
    }
  }
  section {
    display: flex;
    flex-direction: column;
    align-items: center;
    margin-top: 15px;
    input {
      background-color: rgb(222, 222, 240);
      color: rgba(0, 0, 0, 0.7);
      font-weight: 600;
      font-size: 14px;
      padding: 12px 10px;
      min-width: 320px;
      border-radius: 3px;
      border: none;
      &:focus {
        outline: none;
      }
    }
    div {
      display: flex;
      justify-content: center;
      button {
        box-shadow: 0 4px 6px -1px rgba(0, 0, 0, 0.1),
          0 2px 4px -1px rgba(0, 0, 0, 0.06);
        display: flex;
        align-items: center;
        margin-top: 15px;
        border: none;
        background-color: #ec3062;
        color: white;
        padding: 12px 45px;
        font-size: 14px;
        font-weight: 600;
        cursor: pointer;
        &:hover {
          transform: scale(1.05);
          svg {
            transform: translateX(10px);
          }
        }
        &:disabled {
          background-color: grey;
          box-shadow: none;
          cursor: not-allowed;
          transform: none;
          svg {
            transform: none;
          }
        }
        svg {
          margin-left: 10px;
          width: 19px;
          height: 19px;
          transition: 0.2s ease-in-out;
        }
      }
    }
  }
}
Open the join.component.html file and update the content of the template file to look like the following:
<div id="join-area">
  <header>
    <img src="/assets/join.svg" alt="" />
    <h3>Join the conversation</h3>
  </header>
  <section>
    <form (submit)="onSubmit()">
      <input
        type="text"
        placeholder="Enter your username"
        name="username"
        id="username"
        [(ngModel)]="username"
      />
      <div>
        <button [disabled]="submitDisabled">
          {{ buttonText }}
          <span data-feather="arrow-right"></span>
        </button>
      </div>
    </form>
  </section>
</div>
You can find the image asset used here. Credit to unDraw for the SVG asset.
The template has a single input element where the user enters the username. The username will be used to identify each user in the application. Below the input element, there's a submit button. On submit of the form, an onSubmit event handler is triggered; let's update the component file with the event handler.
Open the join.component.ts file and make the following changes:
import { Component, OnInit } from '@angular/core';
import { Router } from '@angular/router';
import { Observable } from 'rxjs';
import { HttpClient } from '@angular/common/http';
import { StateService, User } from '../state.service';

declare const feather: any;

@Component({
  selector: 'app-join',
  templateUrl: './join.component.html',
  styleUrls: ['./join.component.scss'],
})
export class JoinComponent implements OnInit {
  constructor(
    private http: HttpClient,
    private stateService: StateService,
    private router: Router
  ) {}

  submitDisabled = false;
  username = '';
  buttonText = 'Enter';

  async onSubmit() {
    if (this.username) {
      this.submitDisabled = true;
      this.buttonText = 'Submitting...';
      const user: User = (await this.join(this.username).toPromise()) as User;
      this.stateService.user = user;
      this.router.navigate(['']);
    }
  }

  public join(username: string): Observable<{}> {
    return this.http.post('http://localhost:8000/join', { username });
  }

  ngOnInit(): void {
    feather.replace();
  }
}
In the onSubmit event handler, we check if the username is populated before updating the disabled state and text content of the submit button. The join method is called with the username as the body of the POST request. The HttpClient typically returns an observable, and calling the toPromise() method on an observable converts it to a promise.
When the response of the request is returned, we set the response to the user property of the state service and navigate to the base route.
A successful response from the server should look like this:
{
  "username": "",
  "token": "",
  "apiKey": ""
}
In the ngOnInit lifecycle, we initialize the feather library by calling the replace method; doing this replaces the placeholder elements with the actual SVG elements.
In the component above, we've referred to the state service and the router service; we'll make changes to the state.service.ts component and the app.module.ts to handle these.
First, open the state.service.ts component and update the file content to look like the snippet below:
import { Injectable } from '@angular/core';

export declare interface User {
  token: string;
  apiKey: string;
  username: string;
}

@Injectable({
  providedIn: 'root',
})

export class StateService {
  constructor() {}

  private _user: User;

  get user(): User {
    return this._user;
  }

  set user(user: User) {
    this._user = user;
  }
}
This service is a pretty simple one; it has a _user property, and setter and getter methods for the property. We'll also make use of the method to check for the auth state of the user; if the _user property exists, the user can interact with the chat interface, if not, the user gets redirected to the join view.
Let's set up the routes next; open the app.module.ts and make the following changes:
import { BrowserModule } from '@angular/platform-browser';
import { NgModule } from '@angular/core';

import { RouterModule } from '@angular/router'; // for routing
import { HttpClientModule } from '@angular/common/http'; // for the http client
import { FormsModule } from '@angular/forms'; // to handle forms

import { AppComponent } from './app.component';
import { JoinComponent } from './join/join.component';

@NgModule({
  declarations: [
    AppComponent,
    JoinComponent,
  ],
  imports: [
    BrowserModule,
    FormsModule,
    HttpClientModule,
    RouterModule.forRoot([
      { path: 'join', component: JoinComponent },
    ]),
  ],
  providers: [],
  bootstrap: [AppComponent],
})
export class AppModule {}
In the update above, we added some modules for routing, forms, and the HTTP client. In addition, we added a single /join route that leads to the join component.
Finally, to view the changes we made, add the router outlet to the template of the base component. Open the app.component.html file and add the outlet:
123<div>
  <router-outlet></router-outlet>
</div>
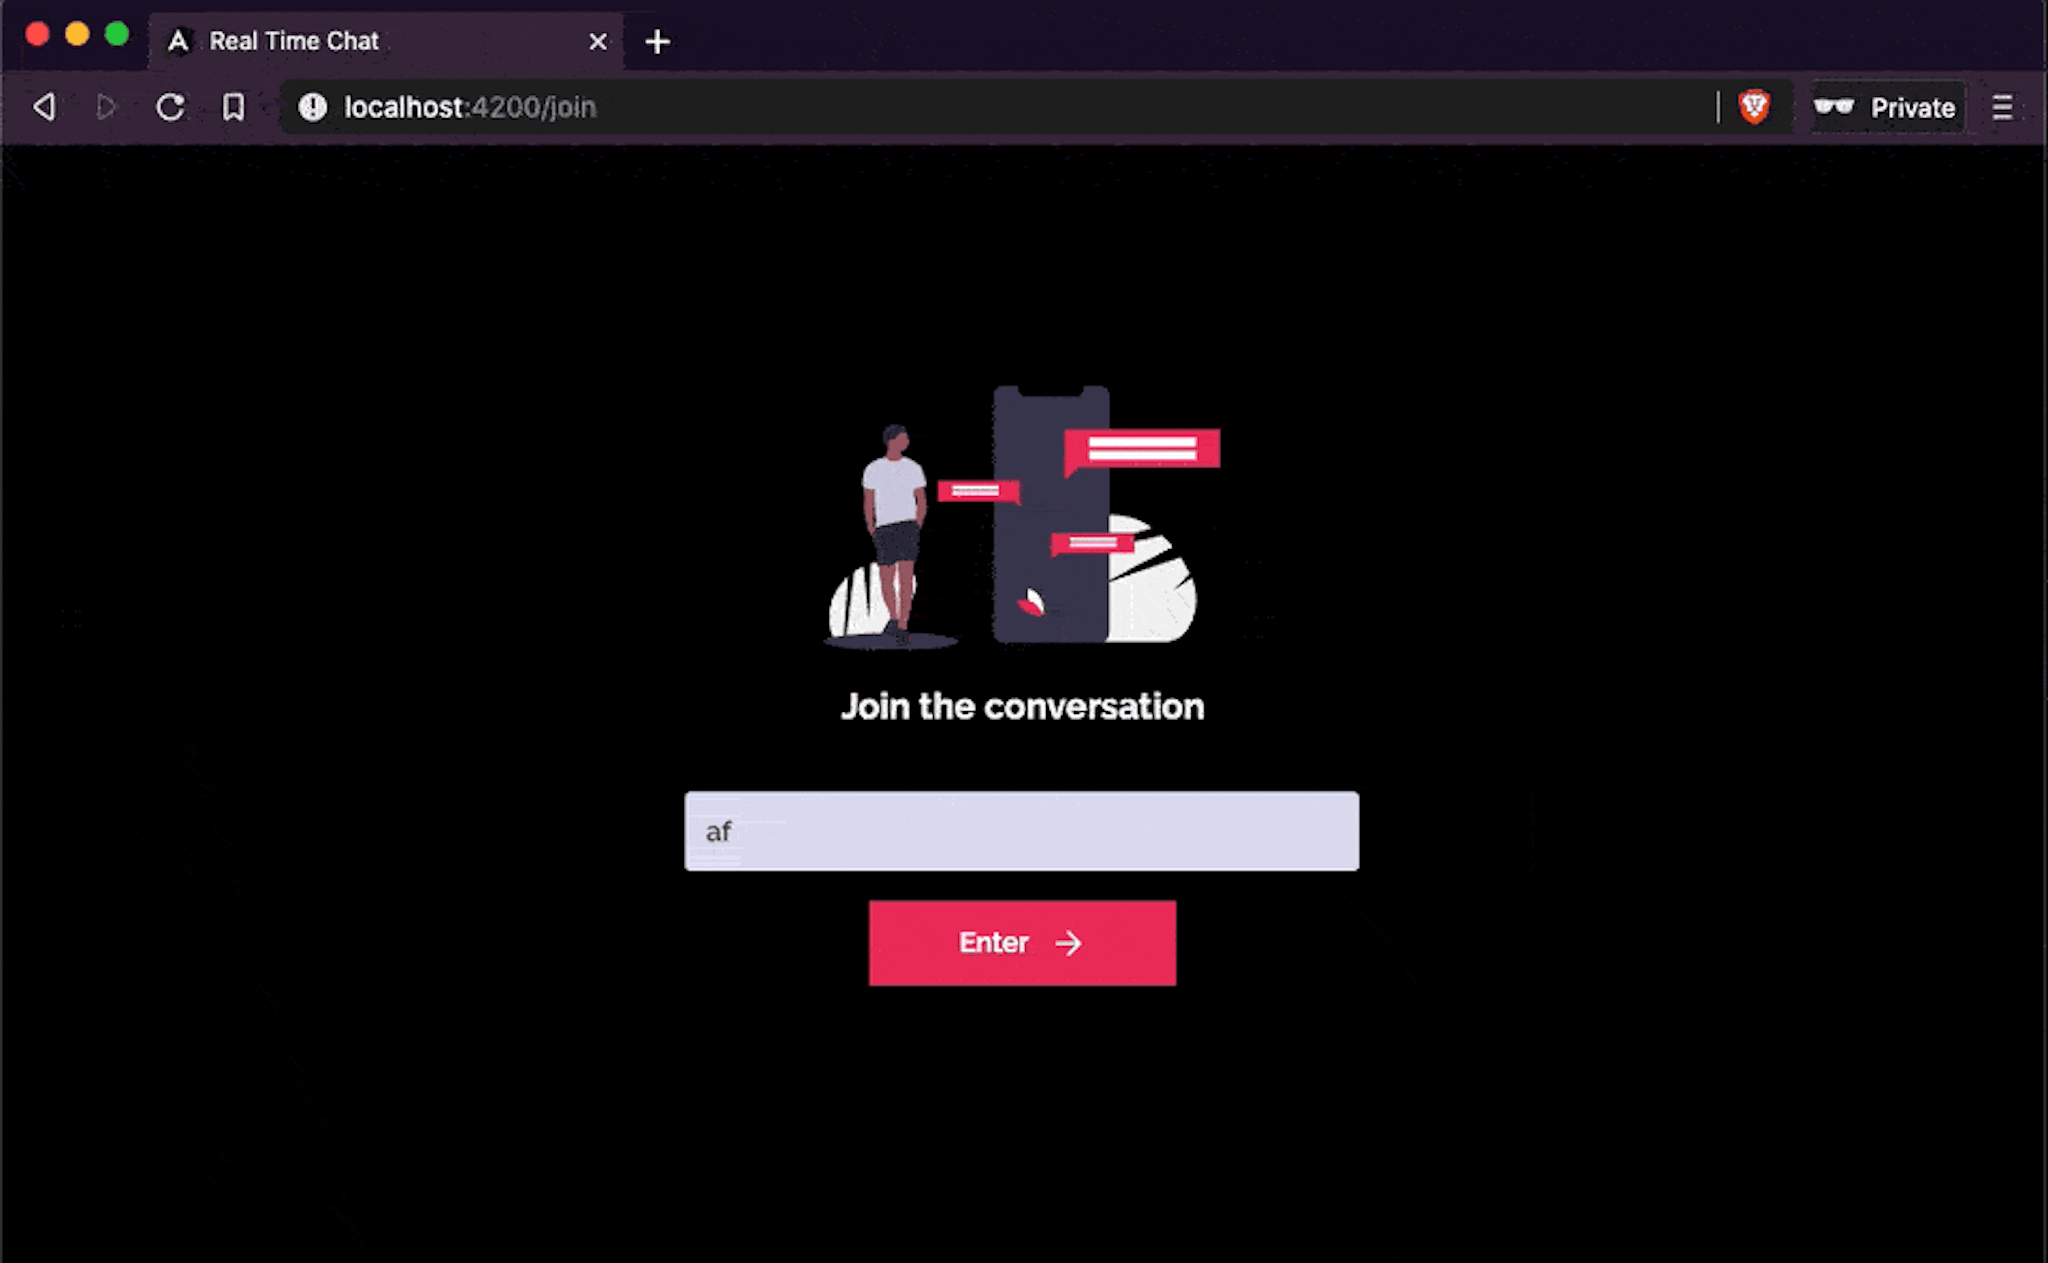
You can now navigate to http://localhost:4200/join in your browser to see the view. It should look like the screenshot below:

Populating the input with a username and submitting the form will take you to a blank page because we're yet to set up the base route. Let's get to it in the next section!
Creating the Chat View
The chat view will feature the chat interface, which will allow for realtime communication between two or more parties. We'll be making use of the Stream Client for realtime messaging; to aid with this, we'll create a service. Run the command below to generate the service:
1$ ng generate service stream
This command should create a file called stream.service.ts in the src/app directory. Open the file and make the following changes:
import { Injectable } from '@angular/core';
import { StreamChat, Channel, ConnectAPIResponse } from 'stream-chat';

declare interface UserInfo {
  token: string;
  apiKey: string;
  username: string;
}

@Injectable({
  providedIn: 'root',
})

export class StreamService {
  constructor() {}
  streamClient: StreamChat;
  currentUser: ConnectAPIResponse;

  public async initClient(user: UserInfo): Promise<Channel> {
    this.streamClient = new StreamChat(user.apiKey);
    this.currentUser = await this.streamClient.setUser(
      {
        id: user.username,
        name: user.username,
      },
      user.token
    );
    return this.streamClient.channel('messaging', 'General');
  }
}
The service has a single method for initializing the Stream client. To initialize the client, we use the apiKey returned after signing up. Once the client is initialized, we call the setUser method on the client to set the current user, passing the username as the first argument and the token returned from the signup flow. A "messaging" channel is returned from the method.
The Stream service is ready for use, so we'll create the chat component next, using the CLI. Run the command below to create the component:
1$ ng generate component chat
A new chat directory should have been generated; within the directory, open the chat.component.scss directory and update the contents with the snippet below:
.main {
  display: flex;
  justify-content: center;
  align-items: center;
  min-height: 90vh;
  .chat-box {
    width: 300px;
    display: flex;
    flex-direction: column;
    .message-area {
      border-radius: 8px 8px 0 0;
      max-height: 450px;
      height: 450px;
      padding: 0 20px 20px 20px;
      overflow: auto;
      background-color: #f2f5e7;
      header {
        display: flex;
        justify-content: space-between;
        align-items: center;
        margin-bottom: 15px;
        padding: 10px 0 0;
        p {
          font-size: 14px;
          font-weight: 600;
        }
        img {
          width: 40px;
          height: 40px;
          border-radius: 50%;
          border: 1px solid #ec3062;
        }
      }
...
For the sake of brevity, the rest of the stylesheet has been omitted. You can find the complete file on Github.
Next is the template file; open the chat.component.html file and update it with the content below:
<div class="main">
  <div class="chat-box">
    <div class="message-area">
      <header>
        <p>{{ channel.id }}</p>
        <img src="https://randomuser.me/api/portraits/lego/8.jpg" alt="" />
      </header>
      <div
        class="message"
        *ngFor="let message of messages"
        [ngClass]="getClasses(message.user.id)"
      >
        <p>{{ message.text }}</p>
      </div>
    </div>
    <div class="input-area">
      <form (submit)="sendMessage()" name="messageForm">
        <button>
          <span data-feather="smile"></span>
        </button>
        <input
          placeholder="Type your message"
          type="text"
          name="message"
          id="message"
          [(ngModel)]="message"
        />
        <button class="send">
          <span data-feather="send"></span>
        </button>
      </form>
    </div>
  </div>
</div>
In the template, we have the input element where messages will be typed. The input element is wrapped by a form element with a submit event handler. To display messages, we loop through the message list from the Stream channel and, for each message, we pass the id of the user to a getClasses function. The function returns a CSS class that positions the message on the "sending" or "receiving" side.
Open the component file (chat.component.ts) and make the following changes:
import { Component, OnInit } from '@angular/core';
import { Router } from '@angular/router';
import { MessageResponse, Channel } from 'stream-chat';

import { StreamService } from '../stream.service';
import { StateService } from '../state.service';

declare const feather: any;

@Component({
  selector: 'app-chat',
  templateUrl: './chat.component.html',
  styleUrls: ['./chat.component.scss'],
})

export class ChatComponent implements OnInit {
  constructor(
    public streamService: StreamService,
    private stateService: StateService,
    private router: Router
  ) {}

  messages: MessageResponse[] = [];
  message = '';
  channel: Channel;

  async sendMessage() {
    ...
  }

  getClasses(userId: string): { outgoing: boolean; incoming: boolean } {
    const userIdMatches = userId === this.streamService.currentUser.me.id;
    return {
      outgoing: userIdMatches,
      incoming: !userIdMatches,
    };
  }

  async ngOnInit() {
   ...
  }
}
In the getClasses method, we return an object with two properties, and we check if the userId of the message matches the id of the current user. In the ngOnInit lifecycle, we check for the user object on the state service before initializing the Stream client.
Update the ngOnInit lifecycle to look like the snippet below:
async ngOnInit() {
  feather.replace();
  if (this.stateService.user) {
    this.channel = await this.streamService.initClient(
      this.stateService.user
    );
    await this.channel.watch();
    this.messages = this.channel.state.messages as any;
    this.channel.on('message.new', (event) => {
      this.messages = this.messages.concat(event.message);
    });
  } else {
    this.router.navigate(['join']);
  }
}
After we initialize the client, we call the watch method on the channel returned; calling the watch method on the channel starts a listener, so we can listen for new messages on the channel. We listen for the message.new event, and we append the message property on the event object to the list of messages.
If the user object doesn't exist on the state service, we navigate the user to the /join route to sign up.
You are probably curious about what happens when a user types a message and clicks the send button... Let's get that set up!
Update the sendMessage method to look like the snippet below:
async sendMessage() {
  if (this.message) {
    try {
      await this.channel.sendMessage({
        text: this.message,
      });
      this.message = '';
    } catch (err) {
      console.log(err);
    }
  }
}
In the method, we now call the sendMessage method with an object containing the message string as an argument. Once this is done, we reset the state of the message property.
The component is now complete, so we can create a new route for the chat view in the app.module.ts file. Open the file and add a new route:
import { BrowserModule } from '@angular/platform-browser';
...
import { ChatComponent } from './chat/chat.component';

@NgModule({
  declarations: [
    ...
    ChatComponent,
  ],
  imports: [
   ...
    RouterModule.forRoot([
      { path: '', component: ChatComponent },
      { path: 'join', component: JoinComponent },
    ]),
  ],
  providers: [],
  bootstrap: [AppComponent],
})
export class AppModule {}
Now, we can go through the whole flow of the application, starting from the signup view. Navigate to http://localhost:4200/join on your browser to get started. The flow should look like the gif below:
Make sure you have both servers running before you attempt the application flow; the Django server should be running on port 8000 and the dev server on port 4200.
Wrapping Up
In this article, we went through the process of creating a Django server and a frontend application using Angular. With the help of Stream's chat API, we were able to enable realtime messaging in our application.
You can improve on the current application by persisting the authentication state of the user, by making use of the local storage to store the response after the user completes signup. Making the application responsive will also make it look great on different screen sizes. Additonally, we only scratched the surface of what is possible with Stream Chat; check out the docs and our previous tutorial on building a live chat app with Angular to learn more! Please feel free to reach out to show us what you create.
Thanks for reading, and happy coding!