Have you ever wondered how to build a mobile cross-platform audio and video calling app that runs seamlessly on iOS and Android using a single code base? Building cross-platform apps with a single code base offers faster development iterations, code maintenance, and updates. It saves the time and effort required for maintaining, for example, Android-only or iOS-only platform apps because your team can write the code once and deploy it to both Android and iOS devices.
Your Takeaway
As the video above demonstrates, the left preview shows the iOS version of the app. The Android version is the one running on the right-side video preview. Download the final React Native project from GitHub, explore the code base and test the app on iOS and Android devices.
Prerequisites
To complete this tutorial successfully, you must install VS Code, Xcode, and Android Studio as development tools. Additionally, you must install React Native and configure it for iOS and Android using the React Native Command Line Interface (CLI) quickstart. If you need a step-by-step guide on how to set up the React Native CLI for iOS and Android, check out our article, Configuring React Native Without Expo. Finally, to provide the video calling functionality, we will use Stream's React Native Video SDK for out-of-the-box features such as picture-in-picture, group calling, and custom reactions.
Step 1: Create a New React Native Project
Launch your favorite command line tool like Terminal and add the following command to create a new React Native project.
npx react-native@latest init Nativecall
The command above uses the official React Native template to create a new NativeCall project.
Step 2: Install the React Native Video SDK
Launch VS Code, navigate to where you saved the project in Step 1, and drag the project’s folder (NativeCall) to the empty VS Code window. What we just did here will open the project in VS Code. Accessing the Video SDK in this React Native project requires the installation of two categories of dependencies. Go to the VS Code's toolbar, click Terminal -> New Terminal, and run the following commands to install the core and peer dependencies below.
Core Dependency
yarn add @stream-io/video-react-native-sdk @stream-io/react-native-webrtc
The command above fetches and installs the official core React Native Video SDK and its ready-made UI components for building video calling experiences.
Peer Dependencies
1234yarn add react-native-incall-manager@4.1.0
yarn add react-native-svg
yarn add @react-native-community/netinfo@9.3.9
yarn add @notifee/react-native@7.7.1
Let's look at what the above commands do.
- React Native Incall Manager: Handles call actions like muting/unmuting, turning the video camera on and off, and playing ringtones during an outgoing or incoming call.
- React Native SVG: An open-source SVG library.
- NetInfo: To provide information about a call connection’s status.
- Notifee: An open-source React Native notification system.
Step 3: Add Settings For iOS and Android
This section will cover performing iOS and Android-specific configurations for the app.
Configure Camera and Microphone Usage Permissions For iOS

In the project's folder structure in VS Code, go to the iOS -> NativeCall folder and open AppDelegate.mm. Add the code snippet below to declare permissions for camera and microphone usage.
Import Section
#import "StreamVideoReactNative.h"
launchOptions Closure
123launchOptions {
    [StreamVideoReactNative setup];
}
Add Message Strings For Camera and Microphone Permissions

From the iOS folder, open info.plist and add the code snippet below. Adding the following message strings will prompt users to allow or disallow their camera and microphone usage when they try to use the app for the first time.

12345<string>$(PRODUCT_NAME) would like to use your camera</string>
    <key>NSLocationWhenInUseUsageDescription</key>
    <string></string>
    <key>NSMicrophoneUsageDescription</key>
    <string>$(PRODUCT_NAME) would like to use your microphone</string>
Configure Camera and Microphone Usage Permissions For Android

In the Android folder, find MainApplication.java and add the following snippet to declare permissions for camera and microphone.
Import Section
import com.streamvideo.reactnative.StreamVideoReactNative;
Below super.onCreate()
StreamVideoReactNative.setup();
Next, open AndroidManifest.xml and add this snippet before the application tag.

12345678910<uses-feature android:name="android.hardware.camera" />
  <uses-feature android:name="android.hardware.camera.autofocus" />
  <uses-feature android:name="android.hardware.audio.output" />
  <uses-feature android:name="android.hardware.microphone" />

  <uses-permission android:name="android.permission.CAMERA" />
  <uses-permission android:name="android.permission.RECORD_AUDIO" />
  <uses-permission android:name="android.permission.ACCESS_NETWORK_STATE" />
  <uses-permission android:name="android.permission.CHANGE_NETWORK_STATE" />
  <uses-permission android:name="android.permission.MODIFY_AUDIO_SETTINGS" />
Specify Java Version For Android

In the Android folder, open the app -> build folder and add the following to the build.gradle? to specify the version of Java to be used. The file's path is shown in the image above.
android {
compileOptions {
sourceCompatibility JavaVersion.VERSION_1_8
targetCompatibility JavaVersion.VERSION_11
}
}
Turn Off Desugaring For Android
Finally, add the following implementation for desugaring in gradle.properties. Setting desugaring to false will turn off the use of newer Java language features.
android.enableDexingArtifactTransform.desugaring=false
Step 4: Add Home and Call Screens

In the app's root folder, NATIVECALL, create another folder called src and add the two TypeScript files CallScreen.tsx and HomeScreen.tsx.

HomeScreen.tsx
Add the following sample code to HomeScreen.tsx.
12345678910111213141516171819202122232425import React from 'react';
import { View, Text, Button, StyleSheet } from 'react-native';

type Props = {
  goToCallScreen: () => void;
};

export const HomeScreen = ({ goToCallScreen }: Props) => {
  return (
    <View>
      <Text style={styles.text}>Welcome to Video Calling Tutorial</Text>
      <Button title="Join Video Call ☎️ 🤙" onPress={goToCallScreen} />
    </View>
  );
};

const styles = StyleSheet.create({
  text: {
    fontSize: 20,
    fontWeight: 'bold',
    marginBottom: 20,
    textAlign: 'center',
    color: '#005fff',
  },
});
HomeScreen.tsx displays the app's welcome screen when it runs. It also shows a button to initiate a video call.
CallScreen.tsx
Add the following sample code as CallScreen.tsx’s content.
12345678910111213141516171819202122232425262728293031323334353637383940414243444546474849505152535455565758596061626364//import React from 'react';
import React, {useEffect} from 'react';
import {Button, StyleSheet, Text, View} from 'react-native';

import {Call, StreamCall, useStreamVideoClient, CallContent} from '@stream-io/video-react-native-sdk';

type Props = {goToHomeScreen: () => void; callId: string};

export const CallScreen = ({goToHomeScreen, callId}: Props) => {
    const [call, setCall] = React.useState<Call | null>(null);
    const client = useStreamVideoClient();

    useEffect(() => {
        if (client) {
            const call = client.call('default', callId);
            call.join({ create: true })
                .then(() => setCall(call));
        }
    }, [client]);

    if (!call) {
        return (
            <View style={joinStyles.container}>
                <Text style={styles.text}>Joining call...</Text>
            </View>
        );
    }

    return (
    <StreamCall call={call}>
    <View style={styles.container}>
        <CallContent
            onHangupCallHandler={goToHomeScreen}
        />
    </View>
    </StreamCall>
  );
};

const styles = StyleSheet.create({
  container: {
    flex: 1,
    justifyContent: 'center',
  },
  text: {
    fontSize: 20,
    fontWeight: 'bold',
    marginBottom: 20,
    textAlign: 'center',
    color: '#005fff',
  },
});

const joinStyles = StyleSheet.create({
    container: {
      flex: 1,
      justifyContent: 'center',
      alignItems: 'center',
    },
    text: {
      padding: 20,
      // Additional styles for the text if needed
    },
  });
We create an instance of the Stream Video client on the call screen. With the help of the useEffect hook, we check to see if the video client is successful, then create and join a call. The call.join({ create: true }) method does not only join the call but also allows real-time transport for audio and video. We display fully featured video calling UIs and call participants on the call screen using the Video SDK's CallContent component. To learn more about this component, please visit our documentation. When a call has more than two participants, the layout of the call screen adjusts automatically to arrange the participants in a grid.
Step 5: Set Up the Video SDK
To access the React Native Video SDK and start making video calls, we need a valid user token. Use a server-side API to generate the token for the production app during the login process. When a user tries to log in to the app, you can return the token to authenticate the user and give access to make a call. You can use the API key of your Stream's dashboard and our token generator service to generate a user token for testing. You can sign up for free if you do not have a Stream dashboard account.
The SDK’s video client must always be available when the app launches. Therefore, you should implement it in the part of the app where life cycle events occur. In the context of this app, we will create and initialize the video client in the App.tsx file. Open App.tsx and replace its content with the sample code below.
123456789101112131415161718192021import React, {useState} from 'react';
import {SafeAreaView, StyleSheet} from 'react-native';
import {HomeScreen} from './src/HomeScreen';
import {CallScreen} from './src/CallScreen';

// 1. Import the StreamVideo and StreamVideoClient components
import {
  StreamVideo,
  StreamVideoClient,
} from '@stream-io/video-react-native-sdk';

// 2. Create a StreamVideoClient instance
const apiKey = 'mmhfdzb5evj2'; // the API key can be found in the "Credentials" section
const token = 'eyJhbGciOiJIUzI1NiIsInR5cCI6IkpXVCJ9.eyJ1c2VyX2lkIjoiQWRtaXJhbF9UaHJhd24iLCJpc3MiOiJodHRwczovL3Byb250by5nZXRzdHJlYW0uaW8iLCJzdWIiOiJ1c2VyL0FkbWlyYWxfVGhyYXduIiwiaWF0IjoxNzAxNzc5NDUzLCJleHAiOjE3MDIzODQyNTh9.JSU4bzdPciBuTPuZ2NRhD0vmopQKRvS8JNAVTiSf37c';
const userId = 'Admiral_Thrawn'; const callId = 'OSFzlJ0NKWZP';

// 3. Create a user object
const user = {
  id: userId,
  name: 'John Malkovich',
  image:
We import the StreamVideo and StreamVideoClient components and define the properties of a user in the code above. Next, we create an object with userId and name. Finally, initialize the video client with an apiKey, the already created user, and token.
To run the app, replace the placeholders of the following properties. The user credentials are in our documentation from the video calling tutorial.
1234const apiKey = 'REPLACE_WITH_API_KEY';
const token = 'REPLACE_WITH_TOKEN';
const userId = 'REPLACE_WITH_flat-term-0';
const callId = 'REPLACE_WITH_CALL_ID';
Step 6: Run the App on iOS: iPhone
To test the audio and video capabilities of the app, you should use actual iOS and Android devices instead of the simulator. To run the app on an iPhone, for example:
- Open the
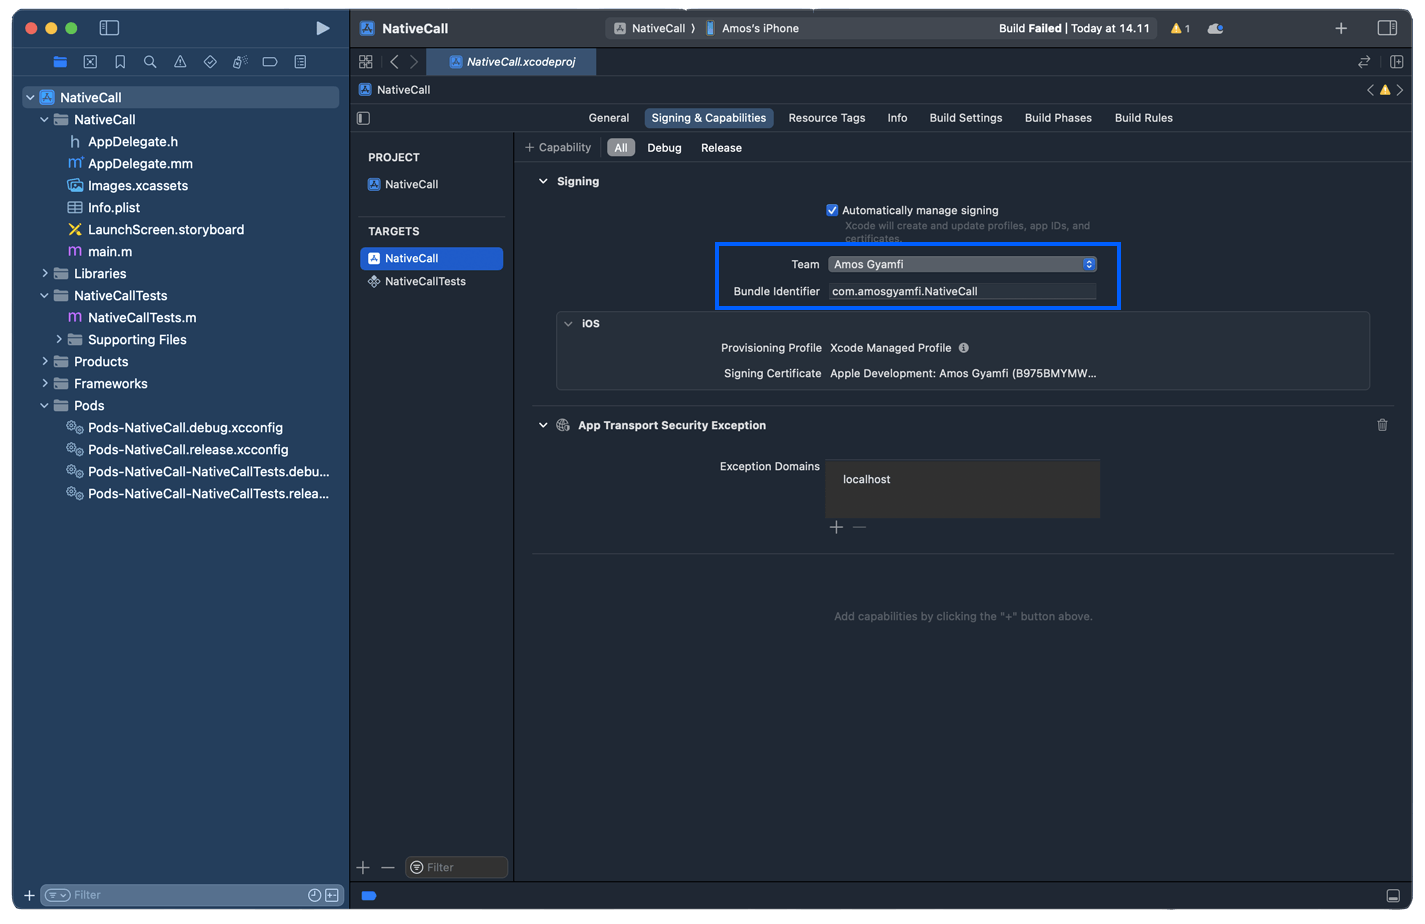
iOSfolder of the app and open the.xcworkspacefile with Xcode. In our demo app, we openNativeCall.xcworkspacein Xcode. - For Xcode to recognize the app and run it successfully, you should set the team and bundle identifier of the app demonstrated in the image below. In this example, the
TeamisAmos Gyamfi, and theBundle Identifieriscom.amosgyamfi.NativeCall.

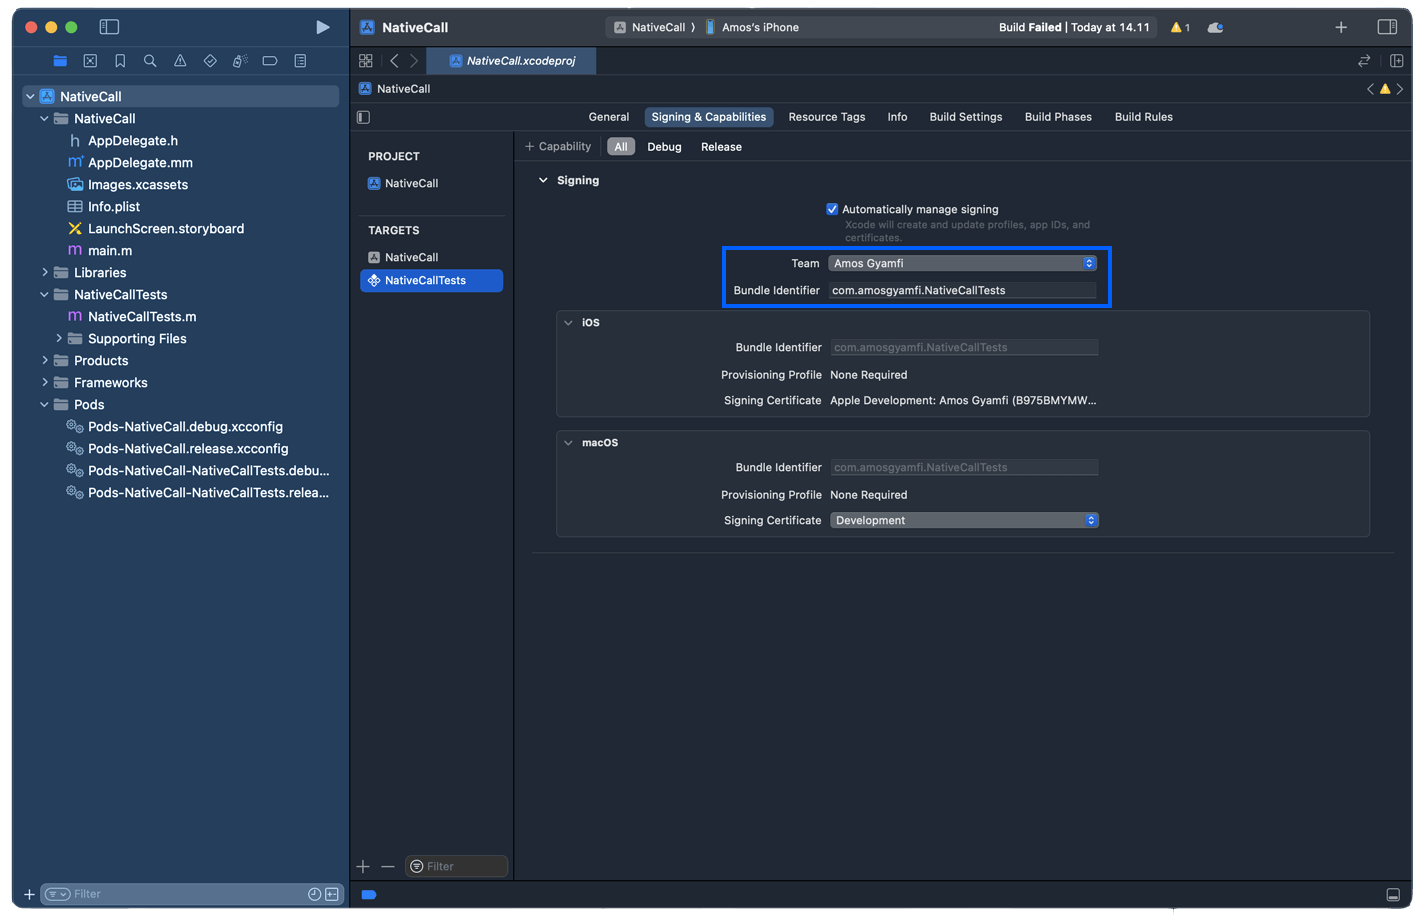
- Select the
Teststarget and set theTeamandBundle Identifierwith the same information above.

Click the Run button on the toolbar's left side and wait a while to see the app on your iPhone. Check out the left video preview in the Wrap Up section to see how the app looks on an iPhone.
Note: Our React Native CLI setup article further prepares your React Native app to run in Xcode. Check it out if you need some help.
Step 7: Run the App on Android: Motorola
Running the app on an actual Android device requires an installation of the Android 13 Tiramisu SDK. Launch Android Studio, click the Menu button on the top-right, and select SDK Manager.

Select Android SDK from the left sidebar and tick the checkboxes for all the highlighted items in the image below. You can now open the Android folder of the app in Android Studio, attach an Android device, and click the Run button from the top-right of the toolbar.

Following the steps above, you should be able to see the app successfully running on your Android device. Head to the Wrap Up section below to see how the app runs on a Motorola phone. It is demonstrated on the right side of the video preview.
Note: You can read the Android setup section of our React Native CLI setup article if there are some problems. It dives into detail about running React Native projects on Android devices.
Wrap Up
We covered many concepts in this article about building a feature-rich React Native audio/video calling app for iOS and Android. We only scratched the surface level of the Video SDK. However, your takeaway from this article is a functional, cross-platform mobile video calling app similar to WhatsApp calls. To go beyond the fundamentals, check out this article's section on video calling customization. Also, read the related links to learn about the React Native Video SDK.

