

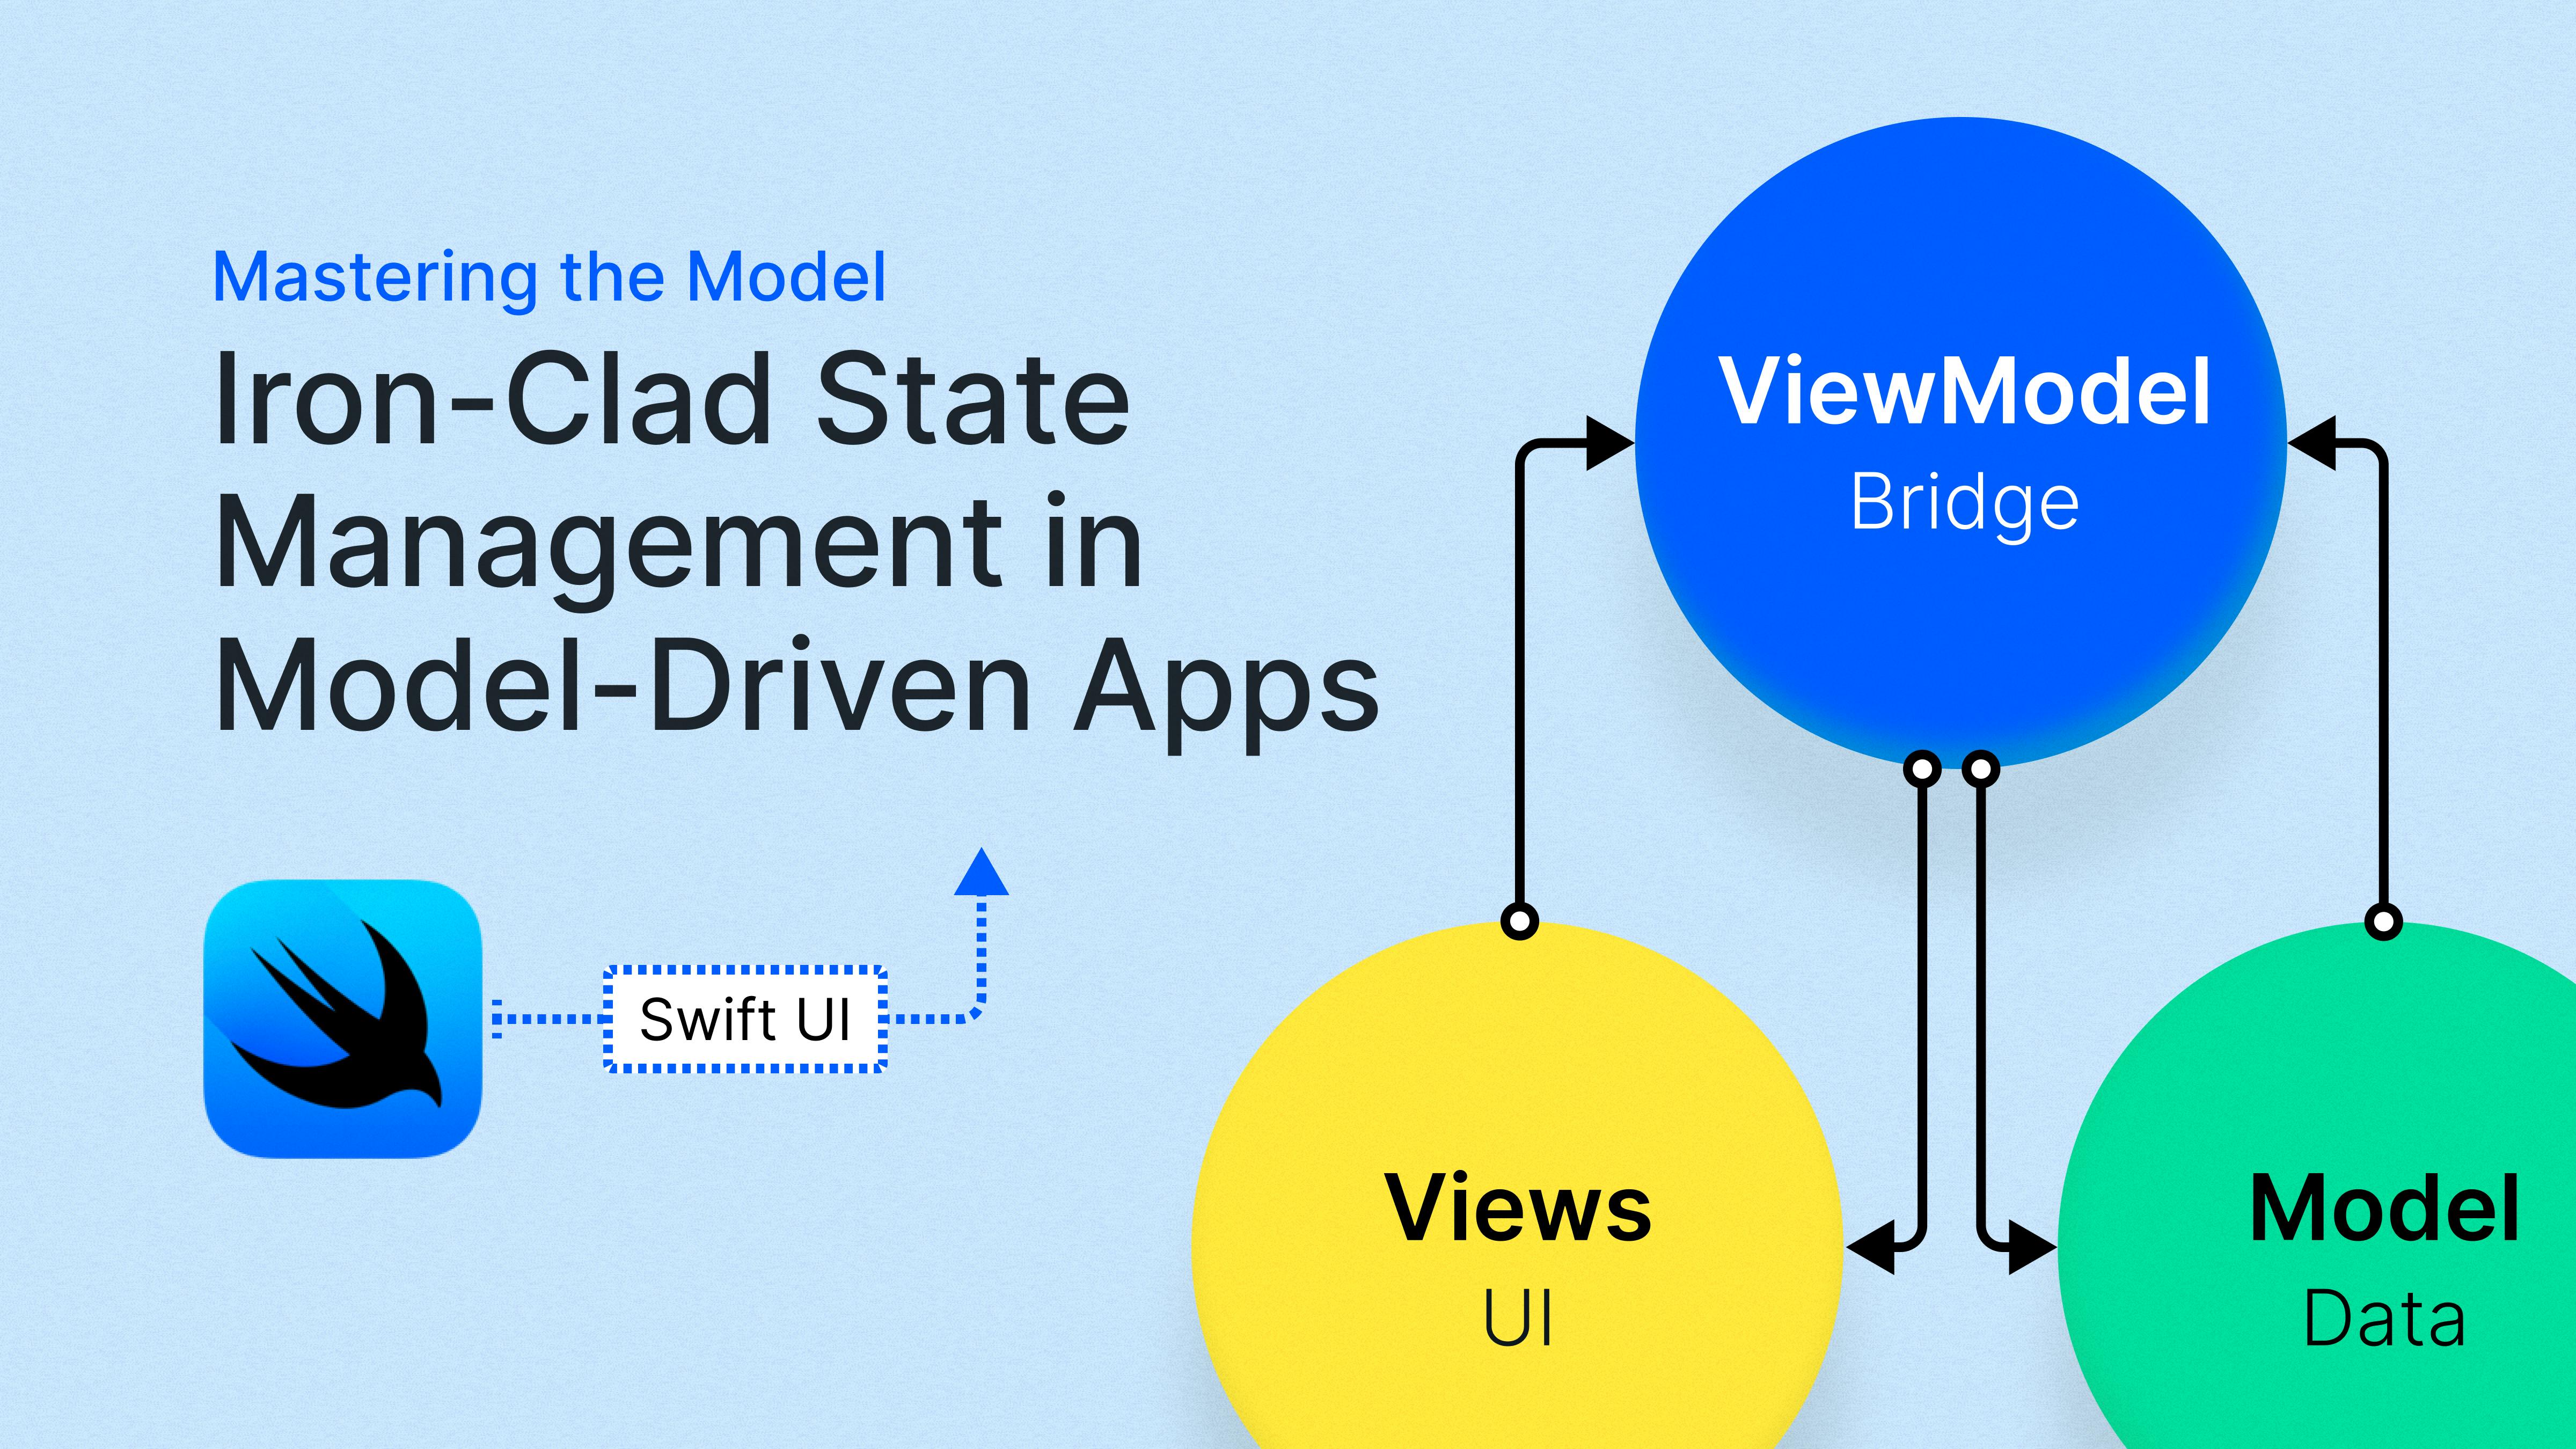
Model-driven architectures like Model-View-ViewModel (MVVM), Model-View-Controller (MVC), or even simply connecting the Model to the View directly in SwiftUI (I know you're out there!) have dominated the iOS development landscape.
MVC, the previously Apple-endorsed pattern, was pushed for UIKit and AppKit apps. SwiftUI, the successor, sees the Model View approach dominating Apple's code examples. These patterns offer a beginner-friendly entry into app development, enabling quick prototyping.
However, when scaling to more complex applications, many developers struggle to keep the State of their apps correct and easy to reason about, especially when these applications involve a lot of external events like push notifications or WebSockets, State restoration, or background tasks.
Today, we will see how we can make your State the core and center of your application and truly start using the Model layer as intended.
Symptoms of Poor State Management
Maintaining your State correctly in an app can become challenging once complexity grows. You might have noticed some of the following anti-patterns when maintaining an app:
- The same values are copied and updated in various places (duplicated State).
- Changes cascade through several nested ViewModels, bucket-brigade style.
- It's hard to update your State from external events like push notifications because it only lives deep inside the View/ViewModel hierarchy.
- Tracing the origin or impact of specific updates becomes complex.
- It's impossible even to start thinking about how you can store and restore the State of your application.
This article is for you if you recognize some of these issues in the code you're working on. Let's review some of the principles and practical code examples to explain how to improve your current or next application.
State Is the Basis for Everything
First, we must promote State to the most important part of our application. I use the word "State" instead of "Model" in this article because the Model layer often becomes a bit of a mixed bag: it is also made responsible for network handling, perhaps some disk or database storage, Firebase, GraphQL, and so on.
But something representing the State, as the Model layer was originally intended for, is often not really there. Instead, the app's State gets shoehorned into and divided over various ViewModels, mixing bits of data structures from the local disk or network responses.
I will explain how to start thinking State-first by showing some examples from a demo app I've built.
The Munchee App
Showcasing our concepts is Munchee, a food order and delivery app for people with an acute craving for something to eat (possibly programmers that have been in the zone for too long and forgot to cook). The idea is simple and well-known. You can select your favorite restaurant, add your favorite food to your order, and finally pay for delivery. After that, we wait for the doorbell.
The Model that is the base for this app's State will be living in its handy Swift package called MuncheeModel; its advantages include:
- I distinctly separate the Model layer.
- I get three levels of access modifiers instead of two:
public,internal(the default), orprivate. - A full set of unit tests executes within a few seconds (well within my distraction limit!)
The nice thing about only sharing my public types and members with the rest of the app is that everything I don't mark explicitly public or private is easily accessible when building tests. Still, it doesn't clutter up the API I present to the rest of the app with implementation details.
What makes the order process of the Munchee app an excellent example is that it's a medium-complexity process that changes its local State several times according to particular business rules before committing anything to a back-end server.
Many apps are basic CRUD (Create, Read, Update, and Delete) platforms, translating backend database values for mobile interfaces. It's your job as a developer to recognize what pattern fits best for your current project.
Thinking State First
After in-depth discussions with stakeholders, we now understand the business processes and how our app will fit in between our hungry users and the restaurants that will satisfy their cravings. But instead of rushing into building the app on a screen-by-screen basis, we figure out what our State is and how it will evolve through the order process.
Here's our step-by-step approach:
- Model our State by defining data structures, their fields, and types
- Analyze the lifecycles of our State's components
- Understand its changes across our business processes
- Write functions that mutate our State
- Fully cover them in unit tests
- Finally, dive into developing the UI
It's not essential to know upfront about every part of the State before we start working on any screens. Many app aspects can be developed independently without impacting others. In the example of the Munchee app, we assume the registration and authentication flows to be done already, and we focus only on the Order State. The Delivery process that follows our successful order is also out of scope for now.
The State gets created at the root of our application, injected through the environment modifier so it's available everywhere.
1234567891011@main
struct MuncheeApp: App {
    private let model = Model()

    var body: some Scene {
        WindowGroup {
            ContentView()
                .environment(model)
        }
    }
}
Certain subsets of our State, like the created Order in our order process will be injected the same way once it's created, coupling the life cycle of the Order to the order process' Views without having to deal with the optionality of the order value from the root State.
123456.navigationDestination(for: OrderRouter.Route.self) { route in
    switch route {
    case let .order(order):
        let viewModel = EditOrderViewModel(order: order, router: orderRouter)
        EditOrderView(viewModel: viewModel)
            .environment(order)
Defining the Order State
Let's outline the business flow first:
- A user picks a Restaurant, creating a new Order.
- They begin adding Products specific to that Restaurant.
- Upon meeting the delivery minimum value with selected Products, they can navigate to the confirmation screen.
- Here, they can modify their address and choose a payment method.
- Payment is made.
- Payment confirmation arrives.
- The Restaurant acknowledges the Order and provides an estimated delivery time.
- When the food is prepared, the delivery person embarks, possibly updating the delivery time.
- Finally, the food is delivered.
One of the most important rules is that it should be impossible to have a State that cannot happen in terms of business rules, like paying for an order with zero product lines, confirming an order without a delivery address, or finalizing an order with products from two different restaurants.
State should only mutate from one valid State into the next valid State; all other mutations should be rejected. We'll show you how in the next examples.
Defining the Order Class
Let's delve into the Order data structure. At its core, it's fairly straightforward:
123456789101112131415161718@Observable
final public class Order {
    public private(set) var state: OrderState = .open
    public private(set) var lines = [OrderLine]()
    public private(set) var address: AddressState = .none

    // ...

    public let restaurant: Restaurant

    // ...

    init(restaurant: Restaurant) {
        self.restaurant = restaurant
    }

    // ...
}
We cannot have an order without selecting a Restaurant first, but there are no other dependencies.
Mutating Our State
As stressed earlier, there should be only one way to change the State, and every change should result in another valid State. We accomplish this by keeping all properties private(set) and doing all of our mutations through functions that handle a specific part of the business logic while safeguarding state integrity.
The reason I'm using a mutating
classin this case is that the@Observedmacro works only with classes. Also, astructwould be completely replaced in memory and trigger updates of all fields instead of just the ones that are changing. A completely reactive application with a large state updating everything at every change would experience severe performance issues.
Adding an Item to your Order
When users add items to their order, the system should not create a new order line for duplicate items but instead increment the order quantity. It's essential to ensure that users can only order items from the selected restaurant. Also, the order should remain locked during the payment process.
Let's see what that looks like:
12345678910111213141516171819202122232425262728293031323334353637var canEditOrder: Bool {
    return state == .open
}

@discardableResult
public func add(
    amount: Int,
    of product: Product
) -> Bool {
    guard canEditOrder else {
        logger.log(error: "Cannot add orderline when order is not open")
        return false
    }

    guard restaurant.sells(product: product) else {
        logger.log(error: "Trying to sell product not sold at restaurant")
        return false
    }

    let existingLine = lines.first(where: {
        $0.product.id == product.id
    })

    switch existingLine {
    case let .some(existingLine):
        let newTotal = existingLine.amount + amount
        existingLine.update(amount: newTotal)
    case .none:
        let newLine = OrderLine(
            product: product,
            amount: amount
        )
        lines.append(newLine)
    }

    return true
}
Test Coverage
Since we rely on our State being valid in all cases, we extensively cover all happy paths and error paths with unit tests. Think of the State as a standalone library; you shouldn't rely on the UI to catch errors like ordering from a different restaurant.
Here's an example of tests I wrote just for the above single function:
12345678910111213141516171819202122232425262728293031323334353637383940414243func testAddingProductToOrder() {
    let expectedAmount = 2
    let expectedProduct = Mocks.hamSandwich

    XCTAssertTrue(order.add(amount: expectedAmount, of: expectedProduct))
    XCTAssertEqual(order.lines.count, 1)
    XCTAssertEqual(order.lines.last?.product, expectedProduct)
    XCTAssertEqual(order.lines.last?.amount, expectedAmount)
}

func testAddingSameProductToOrder() {
    let firstAmount = 2
    let secondAmount = 1
    let expectedAmount = firstAmount + secondAmount

    XCTAssertTrue(order.add(amount: firstAmount, of: Mocks.hamSandwich))
    XCTAssertTrue(order.add(amount: secondAmount, of: Mocks.hamSandwich))
    XCTAssertEqual(order.lines.count, 1, "We should add it to the same orderLine, not duplicate the product")
    XCTAssertEqual(order.lines.last!.amount, expectedAmount, "We expect double the amount")
}

func testFailingToAddProductWhenOrderNotOpen() {
    startPaying()
    XCTAssertFalse(order.add(amount: 2, of: Mocks.cheeseSandwich))
}

func testNotPossibleToOrderFromDifferentRestaurants() {
    // We try to add a product that belongs to a different restaurant
    XCTAssertFalse(order.add(amount: 1, of: Mocks.pizzaRestaurant.products.first!))
    XCTAssertEqual(order.logger.errors.count, 1)
    XCTAssertEqual(order.lines.count, 0, "We should not be able to sell products not for the current restaurant")
    XCTAssertEqual(order.logger.errors.first!, "Trying to sell product not sold at restaurant")
}

// ...

private func startPaying() {
    XCTAssertTrue(order.add(amount: 10, of: Mocks.hamSandwich))
    let sumOfOrder = order.lines.map { Decimal($0.amount) * $0.product.price }.reduce(0, +)
    XCTAssertLessThan(order.restaurant.minimumValueForDelivery, sumOfOrder)
    XCTAssertTrue(order.startPaying())
    XCTAssertEqual(order.state, .paying)
}
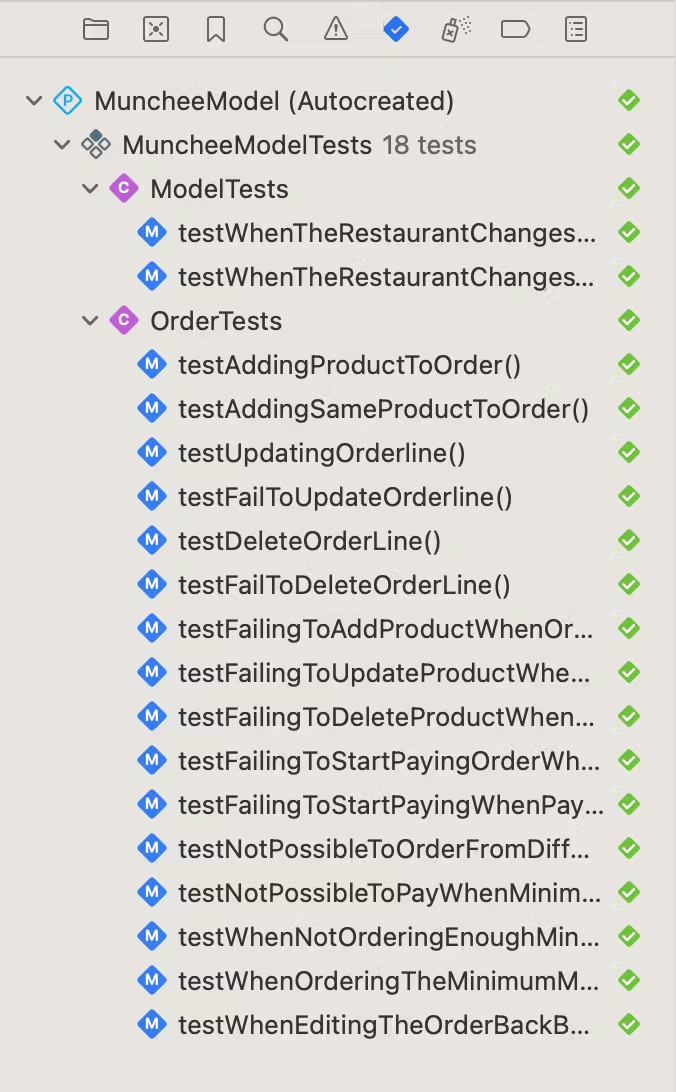
While building this demo application, I did not create the main Munchee app before I finished the MuncheeModel and completely covered it with tests. There are many approaches to test coverage that are also related to the maturity of your application and your team. But I always build the State layer first and do it test-driven because it's faster than relaunching our app repeatedly, even for a small MVP app. Unit tests never forget to test all the edge cases unless you forgot to build a test for them.
Propagating the State Changes
Having thoroughly encapsulated and tested our business process in our State, it's time to start building the screens that rely on and want to manipulate this State. At last, we get to build our Views.
The code examples and some tutorials will use MVVM, as this is the most UI-agnostic Model-driven architecture. MVVM can be used for both UIKit and SwiftUI applications. But all of the examples can easily adapted to MV in SwiftUI or MVC in UIKit.
Most of the time, the ViewModel first observes and transforms the data we see in our Views. This is because all of the data in the State should be UI-agnostic and is not formatted in a way we like to represent it to the user. The State should also not carry screen-specific rules like "show the order total only when we have at least one order line."
The ViewModel formats dates, times, and currencies and translates values from the State to rules obeyed by the UI before we can use it for the particular View we want to show to the user.
Editing an Order
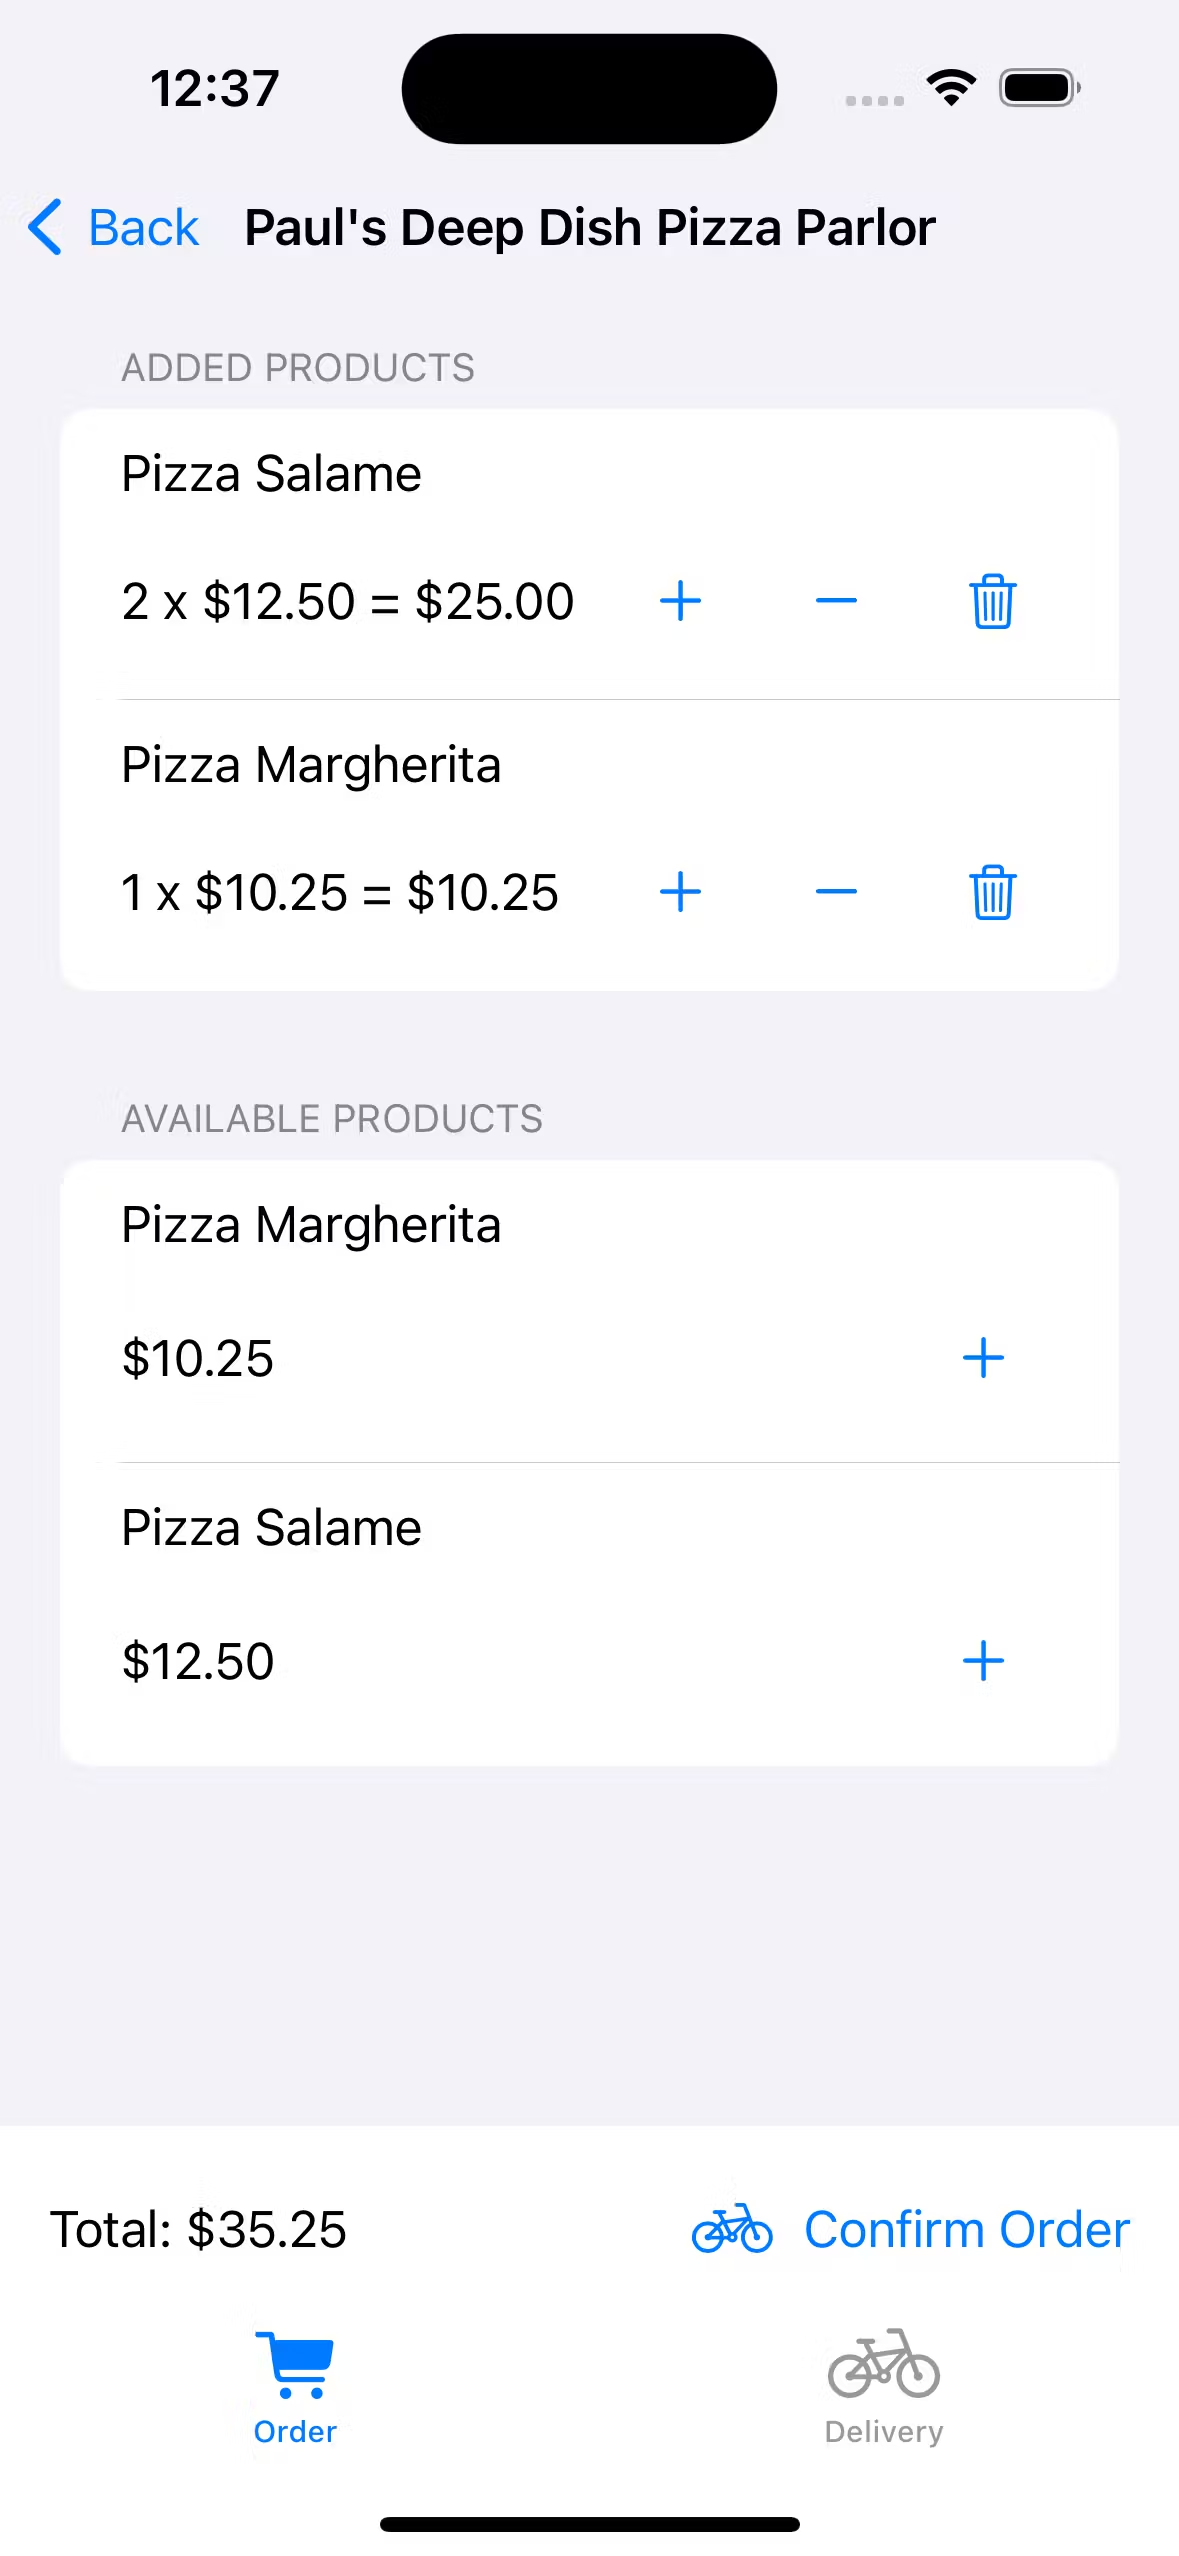
Let's look at our EditOrderViewModel for the EditOrderView. It's where all the action happens when users select their favorite bites for their order. Thanks to the new @Observed macros in Swift, observing the changes in our order is a breeze. We only need to access the changing property in our computed property's block, which propagates automatically:
12345678910111213141516171819202122232425@Observable
final class EditOrderViewModel {
    var restaurantName: String { order.restaurant.name }
    var showsAddedProducts: Bool { !order.lines.isEmpty }
    var showsOrderTotal: Bool { !order.lines.isEmpty }
    var canSubmitOrder: Bool { order.total >= order.restaurant.minimumValueForDelivery }
    var formattedTotal: String { formatter.format(order.total) }
    var formattedMinimumOrderValue: String { formatter.format(order.restaurant.minimumValueForDelivery) }

    private let order: Order
    private let router: OrderRouter
    private let formatter = CurrencyFormatter()

    init(
        order: Order,
        router: OrderRouter
    ) {
        self.order = order
        self.router = router
    }

    func confirmOrder() {
        router.goToConfirmation()
    }
}
There is absolutely no communication between the parent and child ViewModels, EditOrderViewModel is oblivious to the existence AddedProductViewModel, and vice versa. Everything simply happens because we manipulate the state and observe it's changes:
123456789101112131415161718192021222324252627@Observable
final class AddedProductViewModel: OrderAdding, OrderRemoving {
    var amount: String { "\(orderLine.amount)" }
    var productName: String { orderLine.product.name }
    var formattedPrice: String { formatter.format(orderLine.product.price) }
    var formattedTotalPrice: String { formatter.format(Decimal(orderLine.amount) * orderLine.product.price) }

    internal let orderLine: OrderLine
    internal let order: Order
    internal var product: Product { orderLine.product }

    private let formatter = CurrencyFormatter()

    init(
        orderLine: OrderLine,
        order: Order
    ) {
        self.orderLine = orderLine
        self.order = order
    }

    func delete() {
        order.delete(product: orderLine.product)
    }

    // The `add` and `remove` actions are handled in the `OrderAdding` and `OrderRemoving` extensions
}
This is one of the main goals of having a State-driven approach: we keep the data flow unidirectional, and we minimize the dependencies between ViewModels. ViewModels only affect each other either through state changes or through other injected dependencies. This enhances encapsulation and testability but makes it much simpler to follow the flow of our events.
When Not to Use State to Drive Your UI
While a shared, centralized State accessible by numerous Views and ViewModels is powerful, it can become a magnet for all kinds of side concerns. We've already discussed the importance of moving all screen-specific or presentation-related tasks to our ViewModels. Still, there are other anti-patterns we need to avoid. Given the easy access to the state, it's tempting to keep adding one more little thing to it and end up with a "god class" that violates the SOLID principle of Single Responsibility.
Ephemeral State
Certain State elements are transient and relevant only to a specific View, like the input fields on a login screen or the edit fields for a delivery address. This data should only be part of our shared State once an action is taken, such as pressing the login button or confirming a modified delivery address. It's essential to avoid binding these values directly to the state. Instead, they should exist as separate properties within the ViewModel. Otherwise, reversing or canceling these changes could become convoluted.
Navigation State
Another major source of headache can be navigation. It's so tempting to add some kind of navigation State like $isPresented to the model state or bind the NavigationPath to the state. But the current way navigation works in SwiftUI with two-way binding can open up a can of worms if you mix it with your model State.
In the Munchee app, there is a separate OrderRouter dependency that is helping with navigational issues. If our SelectRestaurantView successfully selects a restaurant in our State, then it asks the OrderRouter to show the .order route.
Other concerns that span many different Views should be handled the same way, as a separate dependency.
Summary
I hope you gained fresh insight into the true function of the Model layer, which is maintaining your app's State and how to make it the true driver of your application. Unidirectionality of your event flow and strongly decoupled ViewModels will help you scale your application through the various stages of growth and success.