


This blog post describes an outdated approach to using Javascript against our Chat platform. Javascript developers can now use SDKs specific to their tech stack, like our dedicated Angular Chat SDK. It allows you to build chat experiences with ease. You can still refer to the post below for its concepts and ideas, but our Angular Chat App Tutorial is where you should go to get started with ease. Also, have a look at our React Chat Tutorial when React is your technology of choice.
To help make this task seem less daunting, let me introduce Stream's Chat API. Stream Chat can help you implement a chat solution in your application in minutes!
Test the Final Project
You can get the original source code for this tutorial on GitHub. Clone it and follow the instructions in the repository to run it on your machine. Alternatively, you can download the updated version below.
To run the updated version of the project on your machine, you can download it from GitHub. Before running the app, ensure to replace the user credential in the files custom.js and server.js with those obtained from your Stream's Dashboard account.
Prerequisites
To follow along with this tutorial, you'll need to have a basic understanding
of JavaScript.
You'll also want to make sure your system has Node (version 8 or above) installed.
To check if you have Node installed on your system, enter the command below in your terminal:
node -v
If Node is installed, you will see the version installed displayed in response to the above command; otherwise, you will receive output similar to "command not found: node".
Also, we recommend that you install the nodemon package, which will automatically restart the node application when it detects file changes in your directory (no more reloading!):
npm install -g nodemon
Once you've confirmed you have the necessary tools installed, let's dive in!
Create a Stream Account
Let's create a Stream account to use the Stream API. We can do this by navigating the Stream website and clicking the SIGNUP button.
On the modal that pops up, fill in your USERNAME, EMAIL ADDRESS, and PASSWORD and click the CREATE FREE ACCOUNT button:

On your Stream Dashboard (where you'll be directed after creating an account), you'll find your APP ID, API KEY, and API SECRET, which we'll use in a bit:

Take note of these keys; we will use them in the next steps. Also, keep them safe and private.
Create a New JavaScript Project
To begin creating our project, initiate the directory for it in the directory where you store your code, and name it stream-chat-javascript:
mkdir stream-chat-javascript
Inside of your new stream-chat-javascript directory, create the following directory and file:
- public - this houses all our client-side files.
- server.js - contains our server-side code.
Then, inside the public directory, create the following files:
- custom.js
- index.html
- style.css
Next, let's initialize NPM, so that we can install packages; open your terminal and cd into your project root directory (stream-chat-javascript), then run:
npm init
On the prompt that appears, press enter through all the prompts; the defaults for each will work for our application.
Create a Node Server
Now, let's install express and the Stream Chat server SDK:
npm install express stream-chat
Now that we have installed express let's spin up a new Node server to serve our files; add the code below to the server.js file:
1234567891011121314151617// server.js
const express = require("express");
const app = express();

// Stream Chat server SDK
const StreamChat = require("stream-chat").StreamChat;
app.use(express.static(__dirname + "/public"));
app.use(express.json());
app.use(express.urlencoded({ extended: false }));

app.get("/", (req, res) => {
  res.sendFile("/index.html");
});

app.listen(8800, () => {
  console.log("Example app listening on port 8800!");
});
Then, start up the server from your terminal by running this command:
nodemon server.js
Here, we have created a Node server that will be running on port 8800. You will see a successful confirmation message about the running server similar to the image below.

You can now access the project on http://localhost:8800.
Get User Credentials
We'll be using the JavaScript SDK on the server, to generate our tokens, and on the client end to get real-time updates of what is happening on the chat, including real-time messages.
To be able to initialize the client, we need to get a valid token, which we can generate from our Node server. Add the below piece of code for generating tokens in the server.js file:
123456789101112// server.js
const serverClient = new StreamChat("<STREAM_API_KEY>", "<STREAM_API_SECRET>");

app.get("/token", (req, res) => {
  const { username } = req.query;
  if (username) {
    const token = serverClient.createToken(username);
    res.status(200).json({ token, status: "sucess" });
  } else {
    res.status(401).json({ message: "invalid request", status: "error" });
  }
});
Make sure to update the
<STREAM_API_KEY>and<STREAM_API_SECRET>placeholders with the ones we grabbed above.
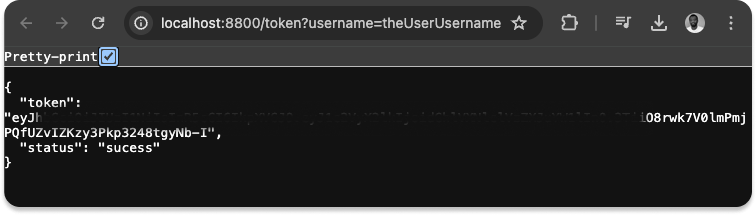
With the above code, we have created a new /token endpoint, to which we can make a request when generating a new token. We just need to pass in the username to the URL via the query string - http://localhost:8800/token?username=theUserUsername when we want to generate a token for a user. The printed token will be similar to the image below.
Create the Chat UI
Add the following code to your public/index.html file to create your chat interface:
123456789101112131415161718192021222324252627282930313233343536373839<html lang="en">
  <head>
    <meta charset="UTF-8" />
    <meta name="viewport" content="width=device-width, initial-scale=1.0" />
    <meta http-equiv="X-UA-Compatible" content="ie=edge" />
    <link rel="stylesheet" href="./style.css" />
    <title>Vanilla PHP and JavaScript Stream Group Chat</title>
  </head>
  <body>
    <div class="main-container">
      <div class="login" id="login-block">
        <input
          type="text"
          id="user-login-input"
          placeholder="Enter your username (should be unique)"
        />
      </div>
      <div class="chat-container">
        <div class="users" id="users"></div>
        <div class="message-container">
          <div class="chat-body" id="messages"></div>
          <div class="message-box">
            <input
              type="text"
              id="message-input"
              placeholder="Enter your message..."
            />
          </div>
        </div>
      </div>
    </div>
    <!-- JavaScipt Stream SDK -->
    <script src="https://cdn.jsdelivr.net/npm/stream-chat@1.2.2/dist/browser.full-bundle.min.js"></script>
    <!-- for making http requests -->
    <script src="https://cdn.jsdelivr.net/npm/axios/dist/axios.min.js"></script>
    <!-- Our custom JavaScript code -->
    <script src="./custom.js"></script>
  </body>
</html>
The three <script>s at the end of this code allow us to connect into Stream, make HTTP requests (using Axios), and connect into the actions for the page, from our custom.js file.
Style the App
The initial screen of the chat app we added in the previous section has no style. Let's get our styling started by inserting the following into style.css:
123456789101112131415161718192021222324252627282930313233343536373839404142434445464748495051525354555657585960616263646566676869707172737475767778798081828384858687888990919293949596979899100101102103104105106107* {
  margin: 0;
  padding: 0;
  box-sizing: border-box;
}
body,
html {
  max-width: 100vw;
  max-height: 100vh;
  overflow: hidden;
  background-color: #f5f5f5;
}
.main-container {
  display: grid;
}
#login-block {
  display: grid;
}
.chat-container {
  display: grid;
  border: 1px solid #c4c4c4;
  min-height: 95vh;
  width: 70vw;
  display: none;
  margin: auto;
  overflow-y: hidden;
  margin-top: 20px;
  grid-template-columns: 150px auto;
}
.users {
  height: 95vh;
  overflow-y: auto;
}
.user {
  padding: 15px;
  border-bottom: 1px solid green;
}
.user:hover {
  background-color: #4e4747;
  color: whitesmoke;
  cursor: pointer;
}
.user.active {
  background-color: rgb(93, 88, 88);
  color: #eae8e8;
}
.message-container {
  display: grid;
  /* grid-template-rows: 92% auto; */
  border: 1px solid #c4c4c4;
}
.chat-body {
  height: 85vh;
  overflow-y: auto;
}
.message-box {
  /* position: absolute;
        bottom: 0; */
  align-self: bottom;
  /* border: 1px solid green; */
}
.message {
  background: rgb(225, 235, 225);
  color: rgb(77, 73, 73);
  padding: 7px;
  margin: 5px;
  font-size: 18px;
  width: auto;
  max-width: 50%;
  display: table;
  clear: both;
  border: 1px solid #ababab;
}
.message-left {
  float: left;
  background-color: #dcdcdc;
  color: #252121;
  border-radius: 3px;
}
.message-right {
  float: right;
  border-radius: 3px;
}
.message-username {
  font-weight: bold;
  color: #494949;
  font-size: medium;
}
#message-input {
  width: 95%;
  height: 55px;
  padding: 4px;
  font-size: 19px;
  margin-left: 28px;
  border-radius: 5px;
  border: 1px solid grey;
  outline: none;
}
#user-login-input {
  width: 400px;
  height: 50px;
  padding: 4px;
  font-size: 20px;
  margin: auto;
  margin-top: 50vh;
  padding-left: 20px;
}
Initialize the JavaScript SDK
The first step for creating the client-side of the app is to initialize the Javascript SDK. Add the code below to your public/custom.js file.
12345678910// custom.js
// global vairables....
let client, channel, username, activeUser;

client = new StreamChat("<STREAM_APP_KEY>");

async function generateToken(username) {
  const { token } = (await axios.get(`/token?username=${username}`)).data;
  return token;
}
Before we can start using the client SDK, we must first set the current user. Add the function below to the public/custom.js file to do that:
123456789101112131415// custom.js
async function initializeClient() {
  const token = await generateToken(username);

  await client.setUser(
    {
      id: username,
      name: "The user name", // Update this name dynamically
      image: "https://bit.ly/2u9Vc0r", // user image
    },
    token,
  ); // token generated from our Node server

  return client;
}
Remember to replace the app's access key placeholder with yours from your Stream dashboard.
client = new StreamChat('<STREAM_APP_KEY>');
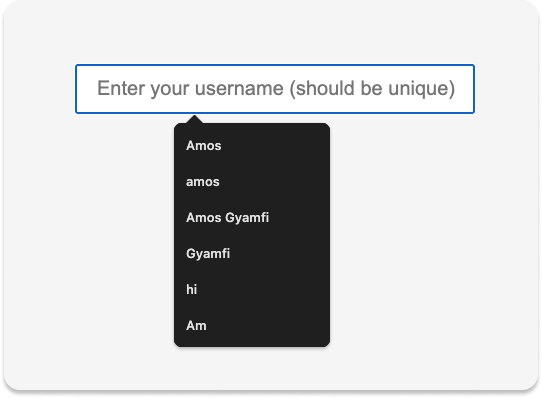
When you load the app, the first page that shows up displays a form to input a username before proceeding. Currently, it does not do anything when you hit enter. Let's fix that!

Add the code below to the public/custom.js file, so we can listen to the input for when a user hits enter so we can display their message in the chat area:
123456789101112131415161718192021222324// custom.js
const user = document.getElementById("user-login-input");

user.addEventListener("keyup", function (event) {
  if (event.key === "Enter") {
    checkAuthState();
  }
});

checkAuthState();

async function checkAuthState() {
  if (!user.value) {
    document.getElementById("login-block").style.display = "grid";
    document.getElementsByClassName("chat-container")[0].style.display = "none";
  } else {
    username = user.value;

    await initializeClient();

    document.getElementsByClassName("chat-container")[0].style.display = "grid";
    document.getElementById("login-block").style.display = "none";
  }
}
Once the user hits enter, we call the initializeClient() function to initialize the client.
List Users
If you open the app, and input a username, then hit enter, you may find that the app is almost empty but promising!:

To start to fill things out, let's create a function that takes in an array of users, and then populates them to the DOM by targeting the div with id of users in our public/custom.js file:
12345678910111213141516function populateUsers(users) {
  // remove the current users from the list of users
  const otherUsers = users.filter((user) => user.id !== username);

  const usersElement = document.getElementById("users");
  otherUsers.map((user) => {
    const userElement = document.createElement("div");

    userElement.className = "user";
    userElement.id = user.id;
    userElement.textContent = user.id;
    userElement.onclick = () => selectUserHandler(user);

    usersElement.append(userElement);
  });
}
In the above code, we added a click event to each user which calls the selectUserHandler function when a user is clicked.
Next, let's create the selectUserHandler function. Add the following code to public/custom.js:
123456789101112131415161718192021async function selectUserHandler(userPayload) {
  if (activeUser === userPayload.id) return; // current active user, so do not proceed...

  activeUser = userPayload.id;

  // remove the 'active' class from all users
  const allUsers = document.getElementsByClassName("user");
  Array.from(allUsers).forEach((user) => {
    user.classList.remove("active");
  });

  // add the 'active' class to the current selected user
  const userElement = document.getElementById(userPayload.id);
  userElement.classList.add("active");

  // remove all previous messages in the message container...
  const messageContainer = document.getElementById("messages");
  messageContainer.innerHTML = "";

  // []
}
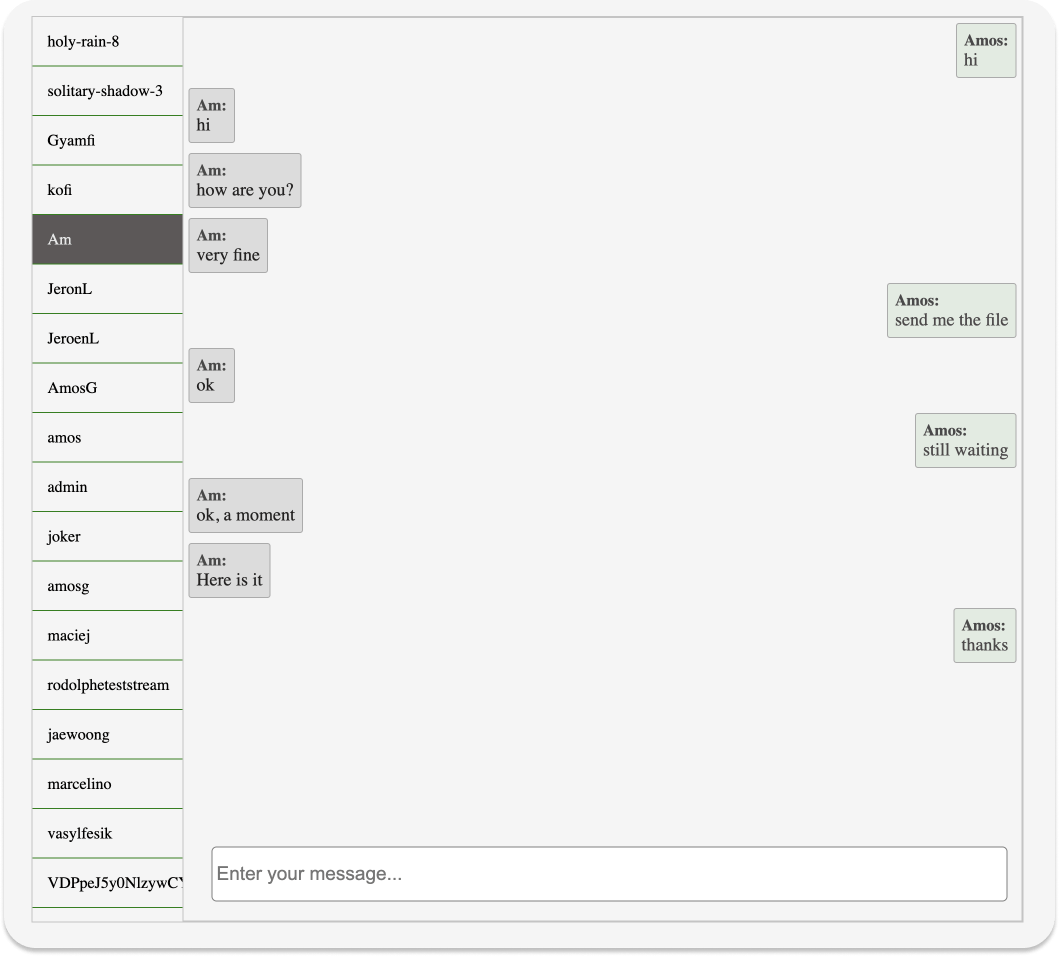
In this function, when we click on a user, we style that user differently so that we can uniquely identify the current user from other users.
Finally, let's fetch and list users! Add the following function to the public/custom.js file:
1234567async function listUsers() {
  const filters = {};
  const response = await client.queryUsers(filters);

  populateUsers(response.users);
  return response;
}
Now call this function in the `initializeClient` function so that we can fetch users as soon as we initialize the chat:
1234567async function initializeClient() {
  // [...]

  await listUsers();

  return client;
}
Initialize a Channel
To set up a channel for a one-to-one chat, we only need to pass in the two users' IDs and not worry about the channel name.
Add the below function to the public/custom.js file for initializing a channel:
123456789async function initializeChannel(members) {
  //members => array of users, [user1, user2]
  channel = client.channel("messaging", {
    members: members,
    session: 8, // custom field, you can add as many as you want
  });

  await channel.watch();
}
Now, let's call this function when we click on a user that we want to chat with. Add the below to the selectUserHandler function:
12345async function selectUserHandler(userPayload) {
  // [...]

  await initializeChannel([username, userPayload.id]);
}
Adding New Messages to the Channel
Now, let's create a function to append messages to the DOM. Add the below function to the public/custom.js file:
1234567891011121314151617181920212223242526272829// [...]

function appendMessage(message) {
  const messageContainer = document.getElementById("messages");

  // Create and append the message div
  const messageDiv = document.createElement("div");
  messageDiv.className = `message ${
    message.user.id === username ? "message-right" : "message-left"
  }`;

  // Create the username div
  const usernameDiv = document.createElement("div");
  usernameDiv.className = "message-username";
  usernameDiv.textContent = `${message.user.id}:`;

  // Append the username div to the MessageDiv
  messageDiv.append(usernameDiv);

  // Create the main message text div
  const messageTextDiv = document.createElement("div");
  messageTextDiv.textContent = message.text;

  // Append the username div to the MessageDiv
  messageDiv.append(messageTextDiv);

  // Then append the messageDiv to the "messages" div
  messageContainer.appendChild(messageDiv);
}
Note: This function will extract the user's username and message values from the payload and create a new DOM element that holds the username and message. Once created, the message will be appended to the DOM using the message ID.
Displaying Both Old and New Messages
By adding the code below to the initializeChannel(members) method, we can listen for new messages to the channel:
123456async function initializeChannel(members) {
  // [...]
  channel.on("message.new", (event) => {
    appendMessage(event.message);
  });
}
We can add the following to the initializeChannel(members) function to render messages already in the channel:
123456async function initializeChannel(members) {
  // [...]
  channel.state.messages.forEach((message) => {
    appendMessage(message);
  });
}
Exchange Messages
We have covered receiving messages, let's now jump into how to handle sending messages. Add the below function to the public/custom.js file:
12345async function sendMessage(message) {
  return await channel.sendMessage({
    text: message,
  });
}
Now that we have the framework set up, we can listen for the message-input and the pressing of the Enter key and add the message to the channel:
12345678const inputElement = document.getElementById("message-input");

inputElement.addEventListener("keyup", function (event) {
  if (event.key === "Enter") {
    sendMessage(inputElement.value);
    inputElement.value = "";
  }
});
Test It Out
To test out the chat:
- Open the application in two different tabs or browsers.
- Type in a username and hit Enter, in each.
- Select the user on the other tabs.
- Exchange messages!
Wrap Up
In this post, we walked through how to create a web app to allow two users to converse in real-time, using Chat Docs. These are just the basics of what is possible. Check out the Stream Chat SDK to learn about even more ways you can improve the form and function of your app!
We can't wait to see what you create! Thanks for reading, and happy coding!