

This is the first thing one sees on the Flutter website, and rightly so. Apart from the conventional form factors like mobile, tablet, and desktop, Flutter has also been run on gaming consoles, IoT devices and unconventional displays which is a testament to how flexible the framework is. This article will explore how to use Flutter to build chrome extensions with the Stream Chat SDK for a fun project.
How Browser Extensions Differ From Webpages
As the name suggests, extensions are supposed to be an "extension" of the functionalities a browser provides. Extensions have access to wide variety of APIs which are not accessible to websites. It is the responsibility of the browser to prevent an extension from abusing this. This makes extensions very similar to how apps work on mobile devices.
There needs to be an intro sentence to these bullets, why are they here?
- An extension project has a
manifest.json. This contains all the necessary information like permissions, service workers etc. - This is very similar to
AndroidManifest.xmlin Android andInfo.plistand other config files in iOS. - Actions - This API decides what to do when user clicks on extension icon, whether to run some code or show a popup.
- Content scripts - These are scripts which can manipulate the DOM of the current website.
- Service workers - Scripts which don't deal with DOM manipulation and can run in background.
For a browser extension, the engine is what Android and iOS is to a mobile app. Most browsers (Google Chrome, Edge, Opera, Brave etc) are Chromium-based. Although Firefox is based on Quantum and Safari is based on Webkit engine.
To keep this article easy to follow all references to browser extensions refer to Chrome extensions (unless specified) and Chrome APIs will be used to make the extension. You can find a comprehensive list of incompatibilities of Chrome APIs with others here.
Overview of the demo extension
In this tutorial you will build a chrome extension called "Webside Chat". Using this simple extension, users who are on the same webpage can chat with each other as easily as clicking a button.
Setting Up the Project
Make a new Flutter project with the usual command.
1flutter create webside_chat
Now open this project in your IDE. You will notice that there are android, iOS , web and perhaps more such platform specific folders. You can delete all such folders except web. The folder structure should look similar to this.

This project can be run as-is on web using the following command.
1flutter run -d Chrome
This opens the default counter app in Chrome.
You need to make modifications to run this as a chrome extension.
Step 1 - index.html
Remove all the code in index.html and replace it with the following.
123456789101112<html style="height: 600px; width: 300px">
  <head>
    <meta charset="UTF-8" />
    <title>Webside Chat</title>
    <head>
      <script src="utils.js" defer></script>
  </head>
  </head>
  <body>
    <script src="main.dart.js" type="application/javascript"></script>
  </body>
</html>
All the script tags are removed, replaced by a single tag loading main.dart.js, this is the Flutter code compiled as Javascript code.
Also note that in html window height and width have been assigned explicitly. This is the size of window that opens on clicking over the extension.
Step 2 - manifest.json
As discussed previously, manifest.json serves an important function in Chrome extensions. Open the file and replace the contents with the following.
123456789101112131415161718192021{
  "name": "Webside chat",

  "description": "Chat with people who are on the same website",

  "version": "1.0.0",

  "content_security_policy": {
    "extension_pages": "script-src 'self' ; object-src 'self'"
  },

  "permissions": ["activeTab"],

  "action": {
    "default_popup": "index.html",

    "default_icon": "icons/Icon-192.png"
  },

  "manifest_version": 3
}
default_popup property defines which .html file to open when user clicks on the icon.
permissions define the permissions an extension requires to function. These are shown to a user before they install the extension. activeTab permission is required for this demo to get URL of the current page the user is on. You can learn more about this permission here.
Note about Content Security Policy
To prevent Cross-site scripting, every mainstream web product follows the same-origin-policy. It means code from a specific website (for eg - google.com) should have access only to data from google.com and not other websites. In the current manifest.json, "extension_pages": "script-src 'self' ; object-src 'self'" means that this extension can only execute scripts of its own and not from other origins. No bad actor can hijack this extension to run suspicious scripts.
Step 3 - Build
Flutter web has two types of renderers
- Canvaskit - Better performance, more pixel-perfect UI, but adds 2 MB to the bundle
- HTML Renderer - Significantly lower bundle size as it uses a combination of HTML, CSS and canvas elements to recreate the UI
Unless specified, Flutter web uses Canvaskit for desktop and html renderer for mobile devices. However currently Canvaskit renderer is not supported in Chrome extensions. So you need to add --web-renderer html flag to the build command.
Build command for flutter web also contains dynamically generated code. This gives CSP errors when loaded in Chrome. To prevent dynamically generated code, add --csp flag to the build command.
Final command to build this Flutter web project as a Chrome extension is.
1flutter build web --web-renderer html --csp
Step 4 - Load Extension in Chrome
Open the following URL in Chrome chrome://extensions/
- First enable Developer Mode
- Then click on Load unpacked, select the
webside_chat/build/webfolder.
- Click on Extensions button in toolbar. It shows the extension.

Clicking on the extension reveals a familiar sight!

Setting up Stream
Create a Stream Chat Account
Sign up for a Stream account, if you don't have one already.
If you are a new user, you will see an app already created for you, by the same name as your organization. If you are an existing user, you can create a new app.

The Stream Chat SDK uses JWT to authenticate users. In production applications, this JWT should always come from the server, as generating a JWT requires a secret key, and it is never a good idea to ship the secret key to client apps. For the purpose of this demo, we can enable development mode for our project with authentication disabled.
To enable development mode, from Apps, click on webside-chat. On the top bar, select App Settings -> Edit App . Then toggle the switch to Development and save.

Next, we need to disable authentication for users. On the same page, scroll down to the Authentication section and toggle Disable Auth Checks switch to on. We also select Enforce Unique Usernames to No because we will be using a simple random username generator for usernames, which may produce non-unique results.

Now open pubspec.yaml and add the following packages.
123stream_chat_flutter: ^5.1.0 unique_name_generator: ^1.0.0 crypto: ^3.0.2
unique_name_generator - This package is used to generate a username for a user. It is generated when a user opens the extension for the first time and is stored in local storage for further use.
crypto - Used to generate unique IDs for creating channels.
Now open main.dart and replace all the code with the following, as mentioned in the tutorial
1234567891011121314151617181920212223242526272829303132333435363738394041424344454647484950515253545556575859606162636465666768697071727374import 'package:flutter/material.dart'; import 'package:stream_chat_flutter/stream_chat_flutter.dart'; const apiKey = 'b67pax5b2wdq'; void main() async { final client = StreamChatClient( apiKey, logLevel: Level.INFO, ); await client.connectUser( User(id: 'tutorial-flutter'), 'eyJhbGciOiJIUzI1NiIsInR5cCI6IkpXVCJ9.eyJ1c2VyX2lkIjoidHV0b3JpYWwtZmx1dHRlciJ9.S-MJpoSwDiqyXpUURgO5wVqJ4vKlIVFLSEyrFYCOE1c', ); final channel = client.channel('messaging', id: 'flutterdevs'); await channel.watch(); runApp( MyApp( client: client, channel: channel, ), ); } class MyApp extends StatelessWidget { const MyApp({ Key? key, required this.client, required this.channel, }) : super(key: key); final StreamChatClient client; final Channel channel; Widget build(BuildContext context) { return MaterialApp( builder: (context, widget) { return StreamChat( client: client, child: widget, ); }, home: StreamChannel( channel: channel, child: const ChannelPage(), ), ); } } class ChannelPage extends StatelessWidget { const ChannelPage({ Key? key, }) : super(key: key); Widget build(BuildContext context) { return Scaffold( appBar: const StreamChannelHeader(), body: Column( children: const <Widget>[ Expanded( child: StreamMessageListView(), ), StreamMessageInput(), ], ), ); } }
Now build this project. Then open chrome://extensions page and refresh the extension. Opening the extension now.

The extension shows a proper chat UI, with some messages already there, which appear to be sent by you. We will address this issue, but first, let's analyse the code above.

Stream Chat Client
1234final client = StreamChatClient( apiKey, logLevel: Level.INFO, );
This creates a client instance of your Stream chat project, in this case webside-chat. In the above example, the apiKey used is that of a demo account, which must have been used by many previously, and hence we see a list of messages already. Replace this apiKey with the API key found in your project details page before proceeding further.
Stream Chat User
1234await client.connectUser(
    User(id: 'tutorial-flutter'),
  'eyJhbGciOiJIUzI1NiIsInR5cCI6IkpXVCJ9.eyJ1c2VyX2lkIjoidHV0b3JpYWwtZmx1dHRlciJ9.S-MJpoSwDiqyXpUURgO5wVqJ4vKlIVFLSEyrFYCOE1c',
  );
This logs a user into the stream chat project. Each User object has an id and a corresponding token, which here is a hardcoded demo token. As discussed previously, this token should always come from server in production apps, but we can use development tokens for the purposes of this tutorial. You can learn more about tokens here.
A token is mapped to a user's id. So different user id's cannot use the same token. Development tokens can be generated using.
1String token = client.devToken(username).rawValue;
Stream Chat Channel
1final channel = client.channel('messaging', id: 'flutterdevs');
All messages in Stream are sent in channels. A channel contains a list of all the members who are permanently associated with it and watchers who are just watching the channel. By default there are five types of channels:
- Livestream
- Messaging
- Team
- Gaming
- Commerce
In the above example, the channel type is messaging and the channel id is flutterdevs. For our purposes, livestream suits the best as it is a channel where everyone has equal access, so we change it to livestream. We also need to generate a different id for different channels as each website a user is on should have a channel of its own. This will be addressed ahead.
Stream chat UI components
1234567891011121314Widget build(BuildContext context) { return MaterialApp( builder: (context, widget) { return StreamChat( client: client, child: widget, ); }, home: StreamChannel( channel: channel, child: const ChannelPage(), ), ); }
Stream Chat does a great job at providing many pre-built UI components required for making a messaging app. In this tutorial, we will be using StreamChannel, StreamMessageListView, StreamMessageInput and StreamChannelHeader. All these widgets are provided the necessary data using InheritedWidget, so it's necessary to wrap the whole app with StreamChat, which is responsible for providing the data to all the child widgets.
StreamChannel takes care of providing all the data and operations necessary pertaining to a channel, like fetching messages, sending messages, pagination, etc.
1234567891011121314Widget build(BuildContext context) { return Scaffold( appBar: const StreamChannelHeader(), body: Column( children: const <Widget>[ Expanded( child: StreamMessageListView(), ), StreamMessageInput(), ], ), ); }
This is the UI for the messaging screen. Because of all the pre-built widgets, it is very simple to implement such a complex messaging UI. Now that the messaging functionality is up and running, let's customize it according to our use case.
Implementing Webside chat
The following flowchart shows the steps we need to follow to achieve our functionality.

Using window.storage as a persistent storage
Why generate random usernames and store usernames in local storage?
- Messages sent by the user appear on the right side, and messages by other users appear on the left hand side.

- If the user name is same for all, the tokens are also going to be same for all. So all the messages will appear only on the left, as seen in this picture before

- If the generated username is not stored locally, every time user reopens the extension, a new token is generated when a new username is generated, and messages which were sent by the user previously appear like they were sent by someone else.
We usually use shared_preferences , hive etc for persistent local storage. But because we are developing on web, we get a nifty feature called localstorage. window is accessible natively in JS. In dart, this is provided by dart:html. This can be used for storing small amounts of data across sessions.
For generating random user names we are using unique_name_generator
12345678910111213141516String getUsername() { if (window.localStorage.containsKey('username')) { return window.localStorage['username']!; } else { String username = UniqueNameGenerator( separator: '-', style: NameStyle.lowerCase, dictionaries: [ adjectives, animals, colors, ]).generate(); window.localStorage['username'] = username; return username; } }
Using JS interoperability to get URL of current window
Let's say the user currently has two windows open, google.com and twitter.com. When a user is on the first website, they should see messages only of people who are on google.com and vice versa. This means that for each website, there should exist a separate channel.
Achieving this in JS is very straightforward.
1234chrome.tabs.query({'active': true, 'currentWindow':true},
function(tabs){
        getCurrentURL(tabs[0].url);
});
All we need is to invoke this function from dart code. There are a couple of methods to achieve this.
- Method 1 - Have this code in a javascript file, then invoke that code from dart as described in this snippet by fireship
- Method 2 - Use JS interoperability capability of dart using
dart:jsto execute this code directly.
We get the current URL using the second method.
1234567891011import 'dart:js' as js;

void getUrl() {
  var queryInfo = js.JsObject.jsify({'active': true, 'currentWindow': true});
  js.context['chrome']['tabs']?.callMethod('query', [
    queryInfo,
    (tabs) async {
      var url = tabs[0]['url'];
    }
  ]);
}
From the API docs of dart:js
- This library provides access to JavaScript objects from Dart, allowing Dart code to get and set properties, and call methods of JavaScript objects and invoke JavaScript functions. The library takes care of converting between Dart and JavaScript objects where possible, or providing proxies if conversion isn't possible.
Data cannot be passed directly between Dart and JS, hence we need to use js.JsObject.jsify to convert data into JS Objects. This package, along with js package are very powerful tools to achieve complex functionalities on Flutter web.
Piecing everything together
For a cleaner structure, create a new file called chat_screen.dart. Now open main.dart and replace all the code with the following.
12345678910111213141516171819202122232425262728293031323334353637383940414243444546474849505152import 'package:flutter/material.dart';
import 'package:stream_chat_flutter/stream_chat_flutter.dart';
import 'package:unique_name_generator/unique_name_generator.dart';
import 'dart:html';
import 'package:webside_chat/chat_screen.dart';

// Replace this with your API key

const apiKey = "my8m32m792hh";

String getUsername() {
  late String username;

  if (window.localStorage.containsKey('username')) {
    username = window.localStorage['username']!;
  } else {
    username = UniqueNameGenerator(
        separator: '-',
        style: NameStyle.lowerCase,

        dictionaries: [
          adjectives,
          animals,
          colors,
        ]).generate();
    window.localStorage['username'] = username;
  }
  return username;
}

void main() async {
  final client = StreamChatClient(
    apiKey,
    logLevel: Level.INFO,
  );

  final username = getUsername();

  await client.connectUser(
    User(id: username),
    client.devToken(username).rawValue,
  );

  runApp(MaterialApp(
    builder: (context, child) {
      return StreamChat(client: client, child: child);
    },
    home: WebsideApp(
      client: client,
    ),
  ));
}
Now open chat_screen.dart and copy the following code.
12345678910111213141516171819202122232425262728293031323334353637383940414243444546474849505152535455565758596061626364656667import 'dart:convert'; import 'package:crypto/crypto.dart'; import 'package:flutter/material.dart'; import 'package:stream_chat_flutter/stream_chat_flutter.dart'; import 'dart:js' as js; class WebsideApp extends StatefulWidget { const WebsideApp({super.key, required this.client}); final StreamChatClient client; State <WebsideApp> createState() => _WebsideAppState(); } class _WebsideAppState extends State<WebsideApp> { Channel? channel; void initState() { super.initState(); getUrl(); } void getUrl() { var queryInfo = js.JsObject.jsify({'active': true, 'currentWindow': true}); js.context['chrome']['tabs']?.callMethod('query', [ queryInfo, (tabs) async { var url = tabs[0]['url']; channel = widget.client.channel( 'livestream', id: md5.convert(utf8.encode(url)).toString(), extraData: { 'name': tabs[0]['title'], }, ); await channel!.watch(); setState(() {}); } ]); } Widget build(BuildContext context) { if (channel == null) { return const Center(child: CircularProgressIndicator()); } return StreamChannel( channel: channel!, child: Scaffold( appBar: const StreamChannelHeader( showBackButton: false, ), body: Column( children: const [ Expanded(child: StreamMessageListView()), StreamMessageInput() ], ), ), ); } }
The URL we get is being converted to a hashed string using crypto package. This is to ensure that each URL has a unique and deterministic ID, which is the same when generated on any device.
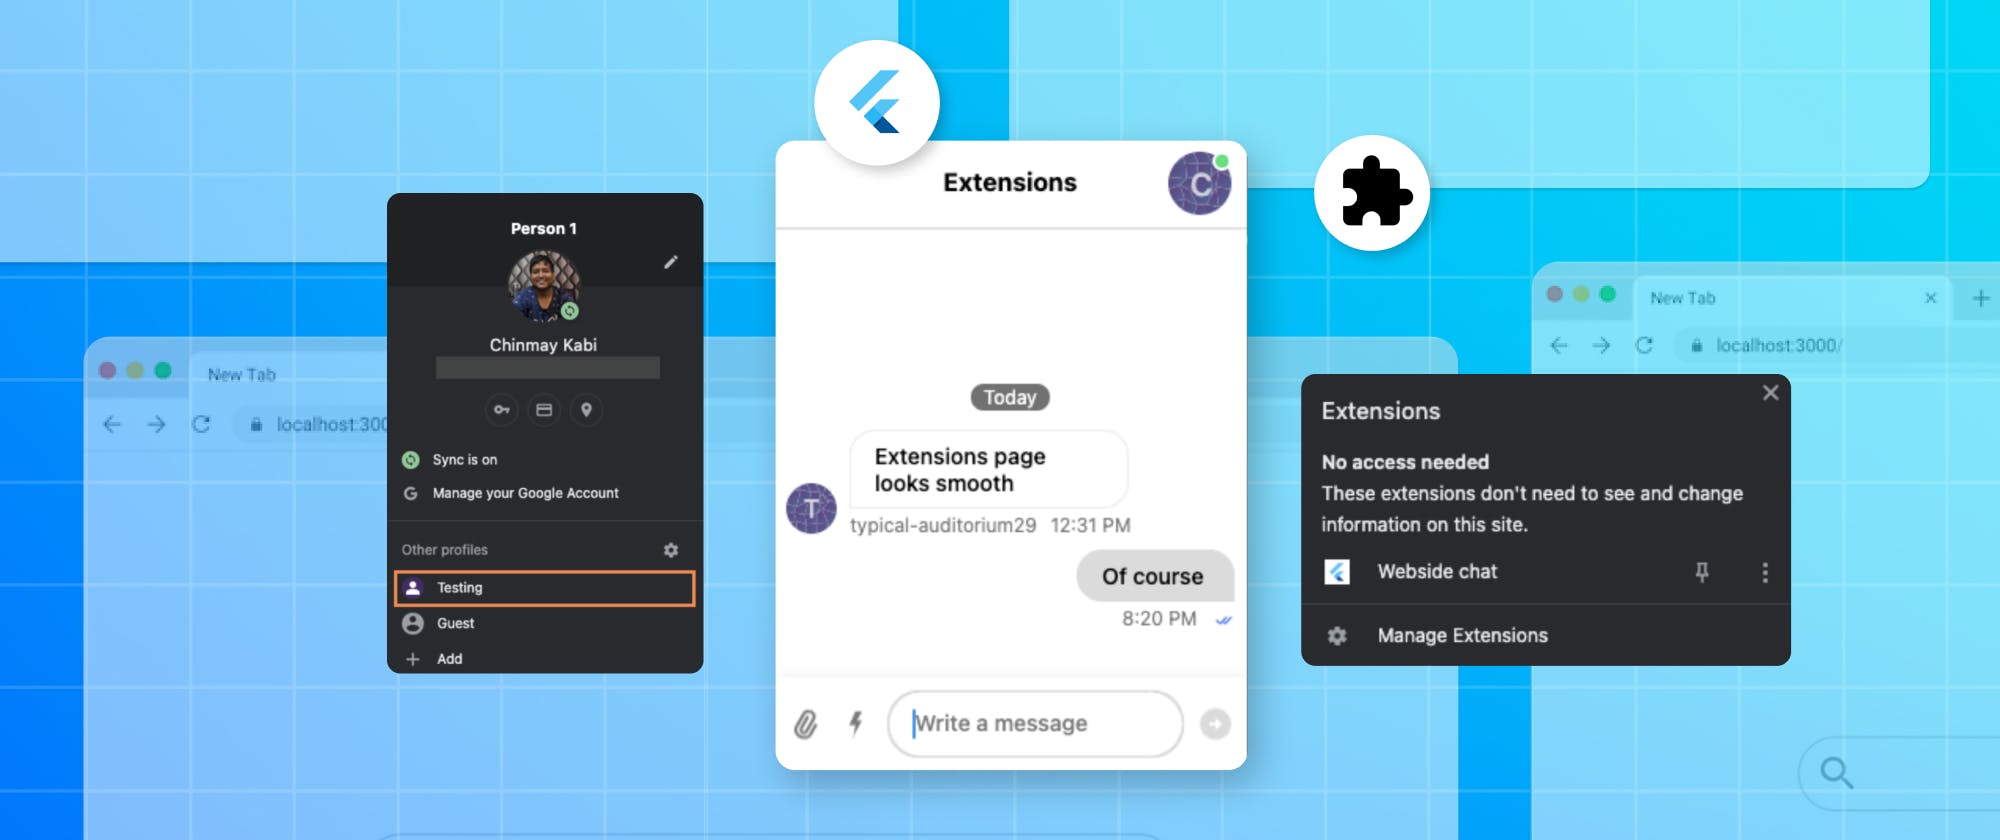
Now build the project and refresh. For testing, I created a new profile in Chrome and loaded the extension there as well.
Open any website on both the windows and open the Webside chat extension and then send a message.
Wrapping up
This article is a practical demonstration of how flexible Flutter is as a framework andhow easy it is to implement complex messaging features using the Stream Chat SDK.