
Launching an app doesn't stop with writing great code or designing a polished interface.
It also requires navigating the complex requirements of the Apple App Store and Google Play Store. Each platform has its own rules, review processes, and quirks, and an overlooked detail can delay your launch.
Plus, if your app uses real-time features like chat, video, or background processing, there are a few extra steps to account for during submission. These capabilities often involve specific permissions, privacy disclosures, and, in some cases, providing examples of their use.
This guide walks you through the submission process for both the App Store and Google Play, step by step. You'll learn how to prepare your app for review, configure permissions and privacy settings, test your app effectively, and respond to reviewer feedback.
How to Publish to App Store
Publishing to the Apple App Store is a structured process, and while Apple's review standards are high, they're predictable if you know what to expect. The key is to prepare your account, app record, and build to meet every requirement before you hit submit.
1. Enroll in the Apple Developer Program
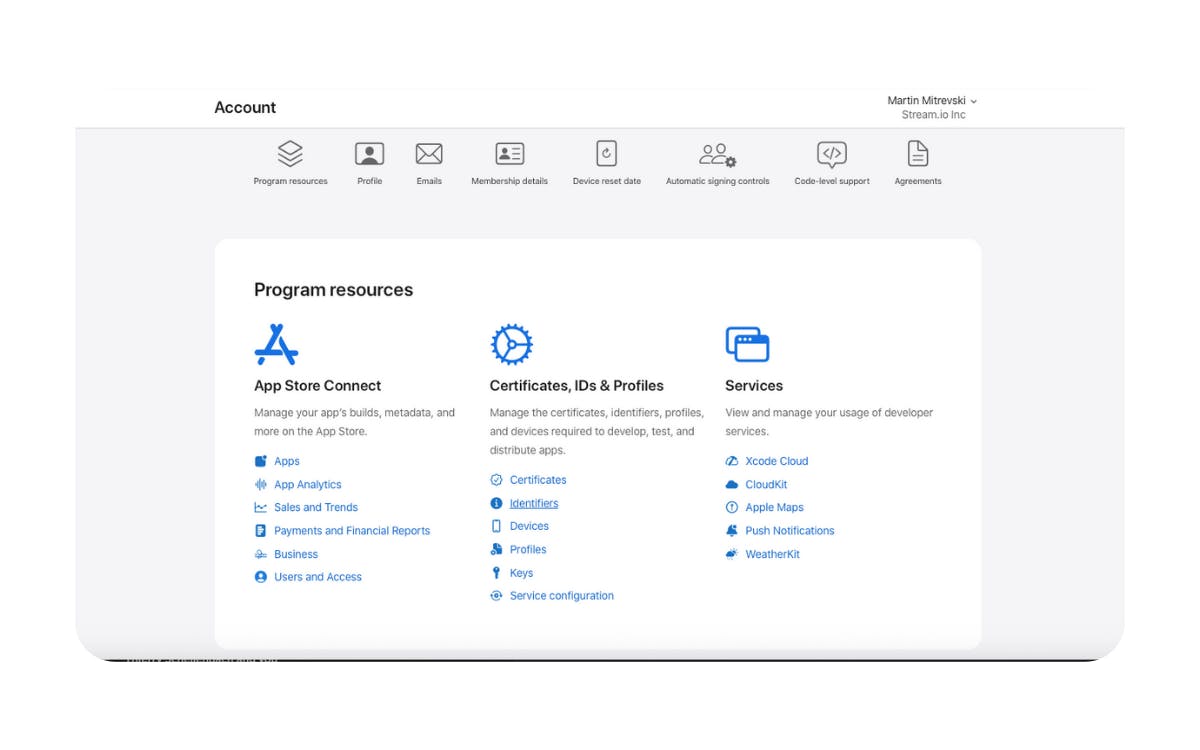
Your Apple Developer account gives you access to App Store Connect, TestFlight, and all the tools required for distribution.
How to Enroll
-
Sign in with your Apple ID (or create one if needed).
-
Choose Individual or Organization.
-
Individual: Tied to your personal Apple ID and displays your legal name on the App Store.
-
Organization: Displays your company name and allows multiple team members to collaborate.
-
Requires a D-U-N-S number (a unique business identifier).
-
You must have legal authority to sign agreements on behalf of your business.
-
-
-
Provide the requested identity and payment information.
-
Agree to the Apple Developer Program License Agreement.
Enrollment costs $99 USD per year, billed through your Apple ID. The fee is the same for both Individual and Organization accounts.
Special Note for EU and UK Developers
If you're enrolling as an organization and are based in the EU or UK, Apple may require you to register as a "trader." In Apple's terms, a trader is anyone (individual or organization) offering goods or services for payment through their app, whether those payments are for digital content, subscriptions, or physical goods.
When you must register as a trader:
-
You offer in-app purchases, subscriptions, or any other paid services.
-
You sell physical goods or services through the app.
-
You operate as a business entity (organization account).
When you can enroll as an individual without trader status:
-
Your app is completely free to use and does not include any paid transactions.
-
You are publishing under your personal name and do not operate as a business.
If you must register as a trader, Apple will request:
-
Company registration details (e.g., Companies House number in the UK)
-
VAT number (optional, but recommended)
-
Legal contact name and phone number
2. Set Up Your App in App Store Connect
An app record is the foundation for your app's listing. It holds your app's metadata, assets, and configuration details for both review and public release.
Before You Start
Make sure you've created an App ID for your app in the Apple Developer portal. This ID uniquely identifies your app across Apple's systems and is required for it to appear in the Bundle ID picker when you create your app record in App Store Connect.
Create a New App Record
-
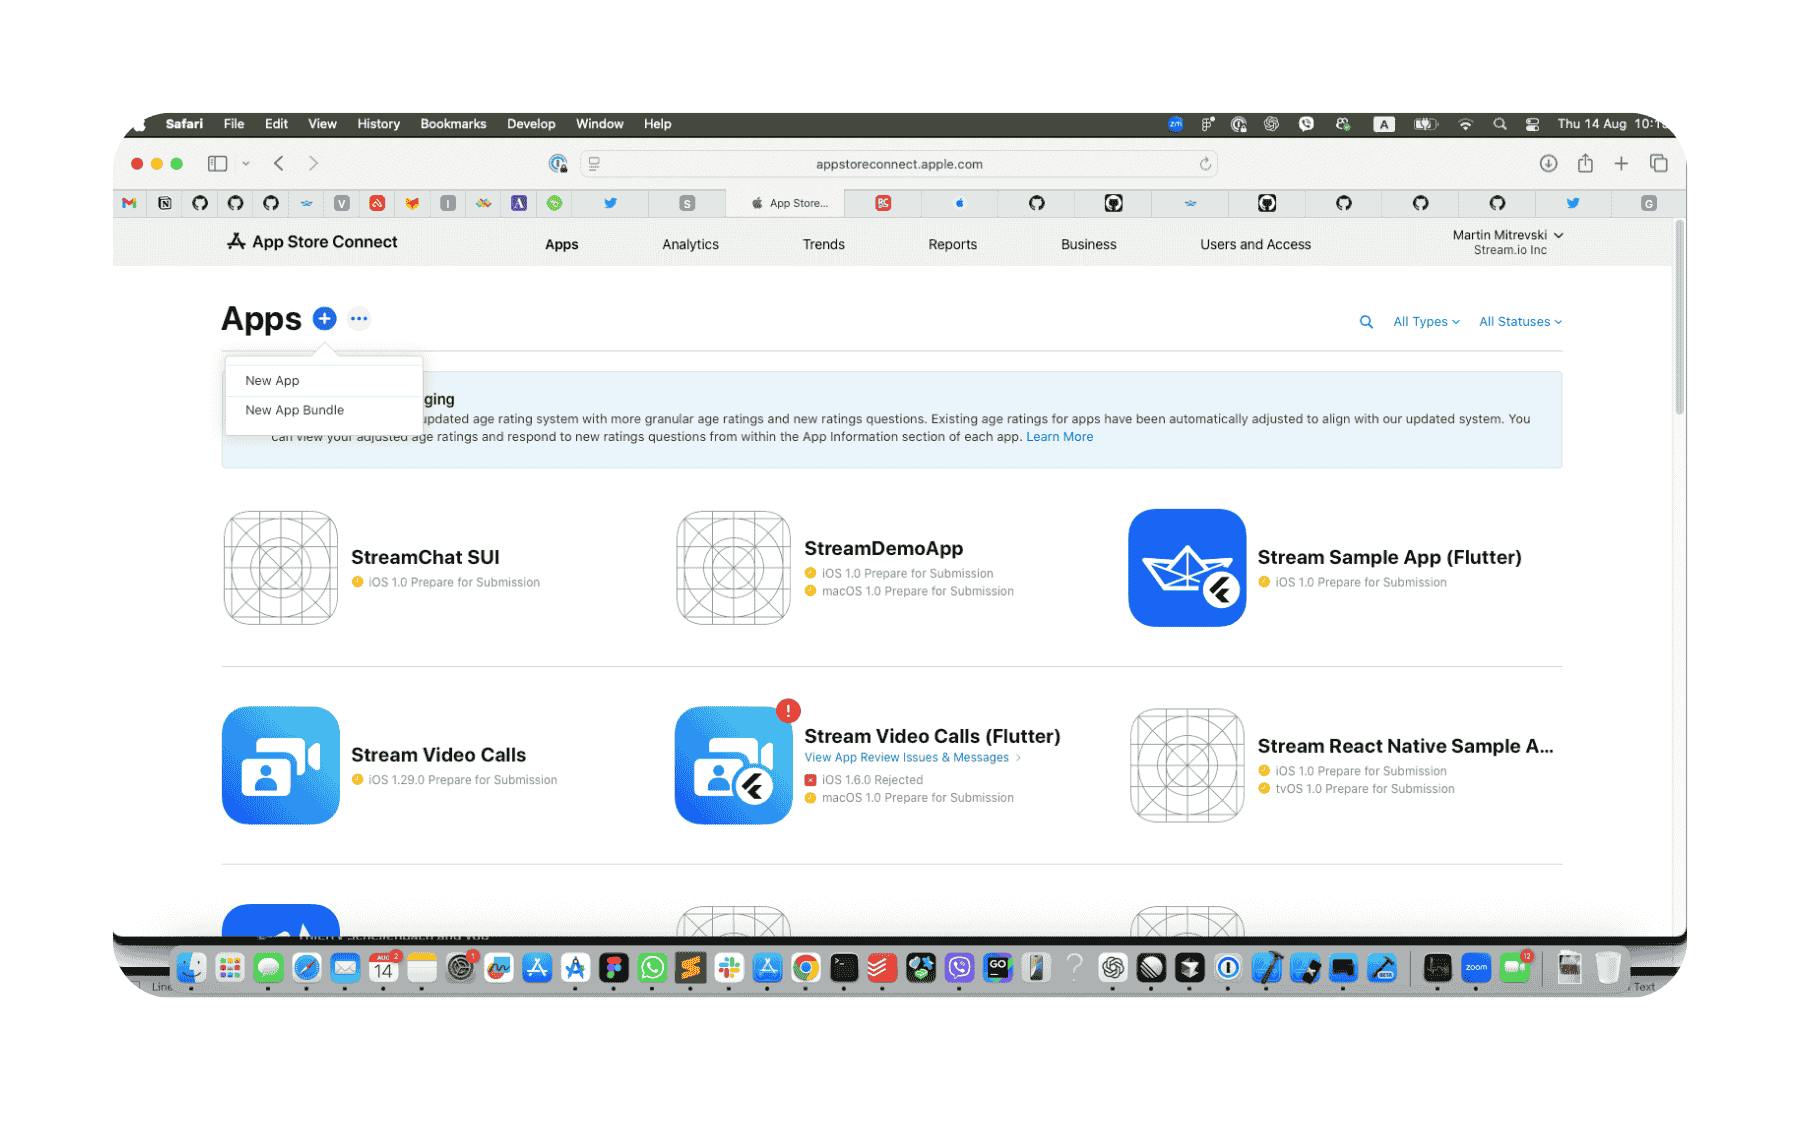
After signing into App Store Connect, navigate to My Apps and click the "+" button to create a new app.
-
Fill in the required details:
-
App name: Must be unique across the App Store.
-
Primary language: The default language for your listing.
-
Bundle ID: Must match the one in your Xcode project and be selected from the list of App IDs you've created in the Apple Developer portal.
-
Platform: iOS or iPadOS.
-
SKU: A unique internal identifier for your app in App Store Connect. The SKU is not visible to users and is used by Apple to track your app across sales reports, analytics, and backend systems. Choose a value that's easy for you or your team to reference (e.g., project code or product number).
-
Pricing and availability: Set your app's price or choose "Free," and select available countries/regions.
-
App icon: This is now included in your app bundle (set in your Xcode project's App Icon asset catalog). It should be 1024×1024 PNG, no transparency.
-
Upload Store Assets

-
Screenshots: Required for all supported device sizes (e.g., 5.5", 6.5", 6.7" iPhones, and any supported iPads).
- Can be custom-designed or captured from a device, but must match Apple's resolution specs.
-
Optional app preview video: Up to 30 seconds, 1080p+, highlighting the core user experience.
Add Metadata
-
Description: Clear, concise explanation of your app's purpose and key features.
-
Keywords: Comma-separated list to help users discover your app in search.
-
Version information: Matches your app's build number.
-
Privacy policy URL: Required for all apps, and should reflect your actual data practices. Include:
-
What data you collect (name, email, location, device identifiers, photos, voice, or video).
-
How and why you collect it (direct user input, background processes, analytics, or third-party SDKs).
-
How the data is used (account creation, personalization, analytics, marketing, etc.).
-
Whether you share data with third parties and who those third parties are by category or name.
-
Data retention policy (how long you keep data before deleting it).
-
User rights (how users can request a copy of their data, update it, or delete it).
-
Contact information (an email or form for privacy-related inquiries).
-
Updates (how users will be notified when the policy changes).
-
-
Support URL: A page where users can get help.
-
Marketing URL (optional): Can point to a landing page or campaign site.
When your app record is complete, you'll be ready to link it to your build once it's uploaded from Xcode later in the process.
3. Configure App Capabilities & Permissions
Configuring your app's capabilities and permissions ensures it can access required system features, and that those features are declared for Apple's review process.
Enable Required Capabilities
In Xcode, open your project's Signing & Capabilities tab and enable the features your app needs.
For apps using real-time communication features, this may include:
-
Push notifications: Required to send alerts and updates to users.
-
Background modes: Select only the modes you need. Common options include:
-
Audio, AirPlay, and Picture in Picture (for background calls or media)
-
Background fetch (for periodic content updates)
-
Remote notifications (to trigger background updates from push messages)
-
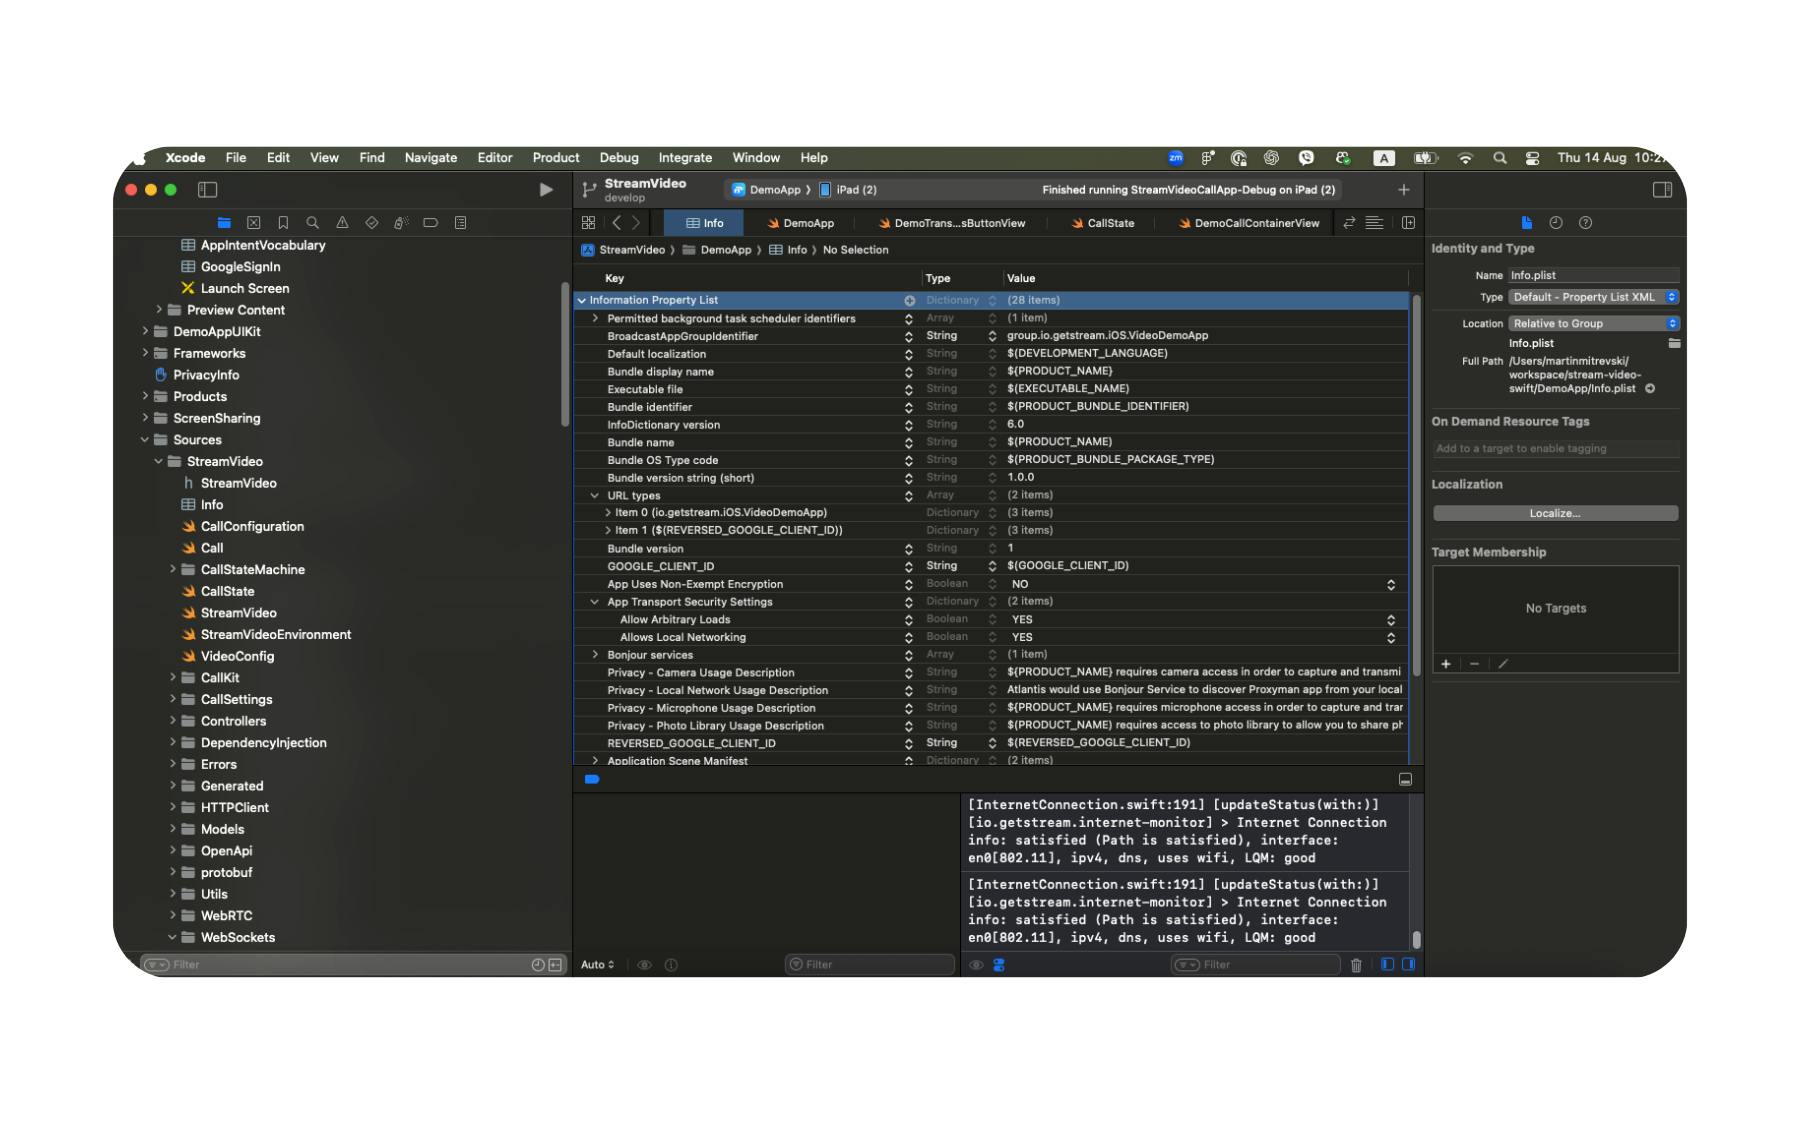
Add Keys to Info.plist
Some features require specific entries in your Info.plist file. For example:
<key>NSUserActivityTypes</key>

<array>

    <string>INStartCallIntent</string>

    <string>INSendMessageIntent</string>

</array>

<key>BGTaskSchedulerPermittedIdentifiers</key>

<array>

    <string>com.yourapp.backgroundsync</string>

</array>
These are needed if you're using VOIP calls, CallKit integration, share extensions, or background message sync.
Don't Forget Other Common Permissions
If your app accesses the camera, microphone, or photo library, you must declare these in Info.plist with a clear explanation:
-
NSCameraUsageDescription -
NSMicrophoneUsageDescription -
NSPhotoLibraryUsageDescription
Configure In-App Purchases & Subscriptions
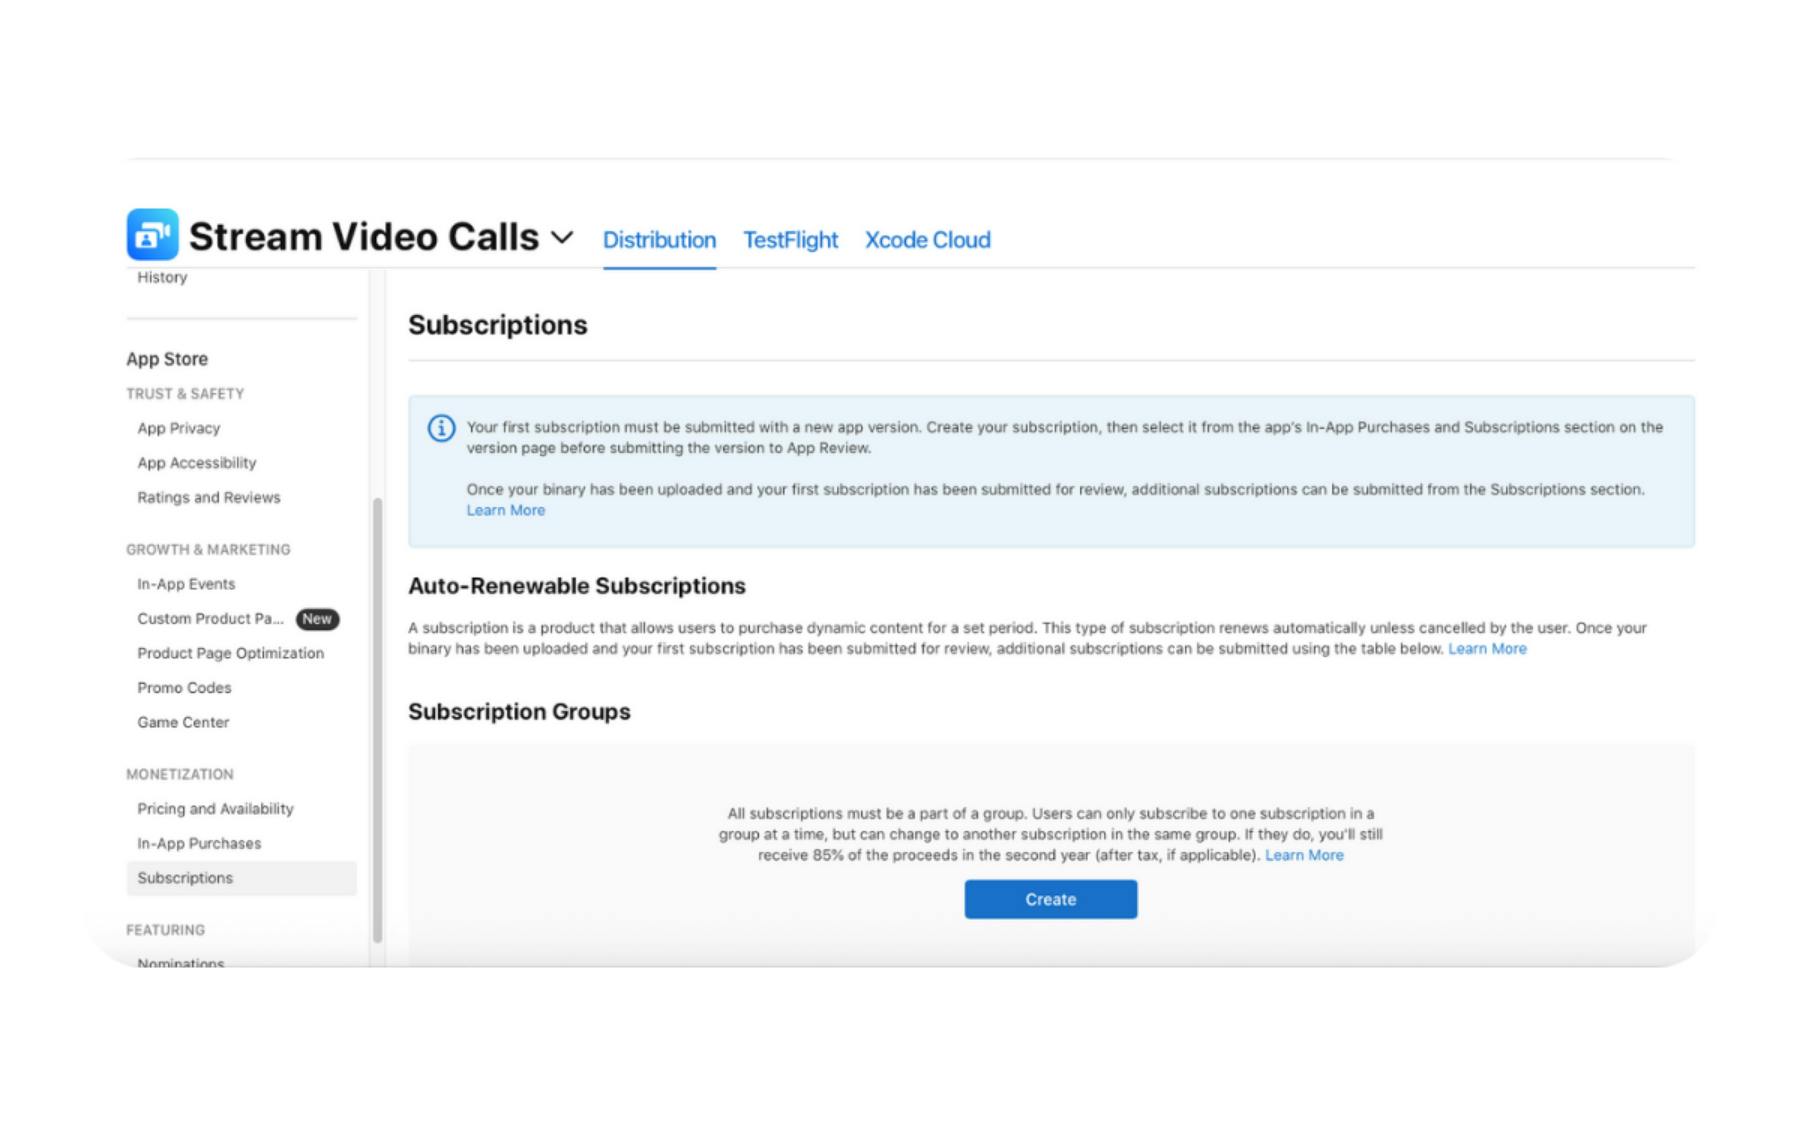
If your app uses Apple's in-app purchase system:
-
In App Store Connect, open your app record.
-
Go to Features → In-App Purchases.
-
Click + to add new products or subscriptions.
-
Provide the product ID (must match what's in your app code), display name, description, and price.
-
Submit each product for review — they will be approved alongside your app's next build submission.
4. Test in Simulator and on Devices
Before you archive and upload, validate the build in both the Xcode simulator and on physical devices. This is where you catch layout issues, permission prompts that read awkwardly, and any edge cases that only appear on real hardware.
What to Test (Quick Pass List)
-
Layouts & safe areas (Simulator): Verify screens across required iPhone and iPad sizes; check notch, Dynamic Island, split‑view, and rotation.
-
Core hardware (Device): Camera, mic, speakers, and photo library flows all work and request permissions with clear copy.
-
Background behavior (Device): If applicable, confirm push‑triggered updates and any background tasks behave as intended (e.g., returning to an ongoing call/session).
-
Performance: Cold start, screen transitions, and heavy UI (lists, media) feel responsive on at least one newer and one older device.
-
Error handling: Airplane mode, flaky network, expired auth, and permission denials show helpful messages.
Build a Small Test Matrix
-
Devices: One recent iPhone + one older (or low‑memory) model; add iPad if supported.
-
OS versions: Latest iOS + your minimum supported version.
-
Locales/modes: Light/Dark Mode, large Dynamic Type, and at least one non‑US locale if you localize.
Once this looks solid on simulator and devices, you're ready to move on to archiving and uploading with Xcode.
5. Record a Compliance Demo (Optional, but Smart)
While not required for every submission, a short, well-structured demo video can help prevent rejections when your app requests sensitive permissions, especially for camera, microphone, screen recording, or any background use of these features.
When to Create One
-
VOIP or video calls that run when the app is backgrounded
-
Background chat sync or message updates triggered by push notifications
-
Media capture (photo/video) inside your app
-
Screen sharing or recording
What to Show
Keep the video short, ideally 30--60 seconds, and clearly demonstrate:
-
Starting the relevant feature in your app (e.g., joining a video call)
-
Switching to the home screen or another app
-
Displaying a persistent system notification (for background calls/sync)
-
Returning to your app and resuming the session or activity without interruption
This video can be referenced in the Review Notes to preempt rejection.
6. Complete the App Privacy Questionnaire
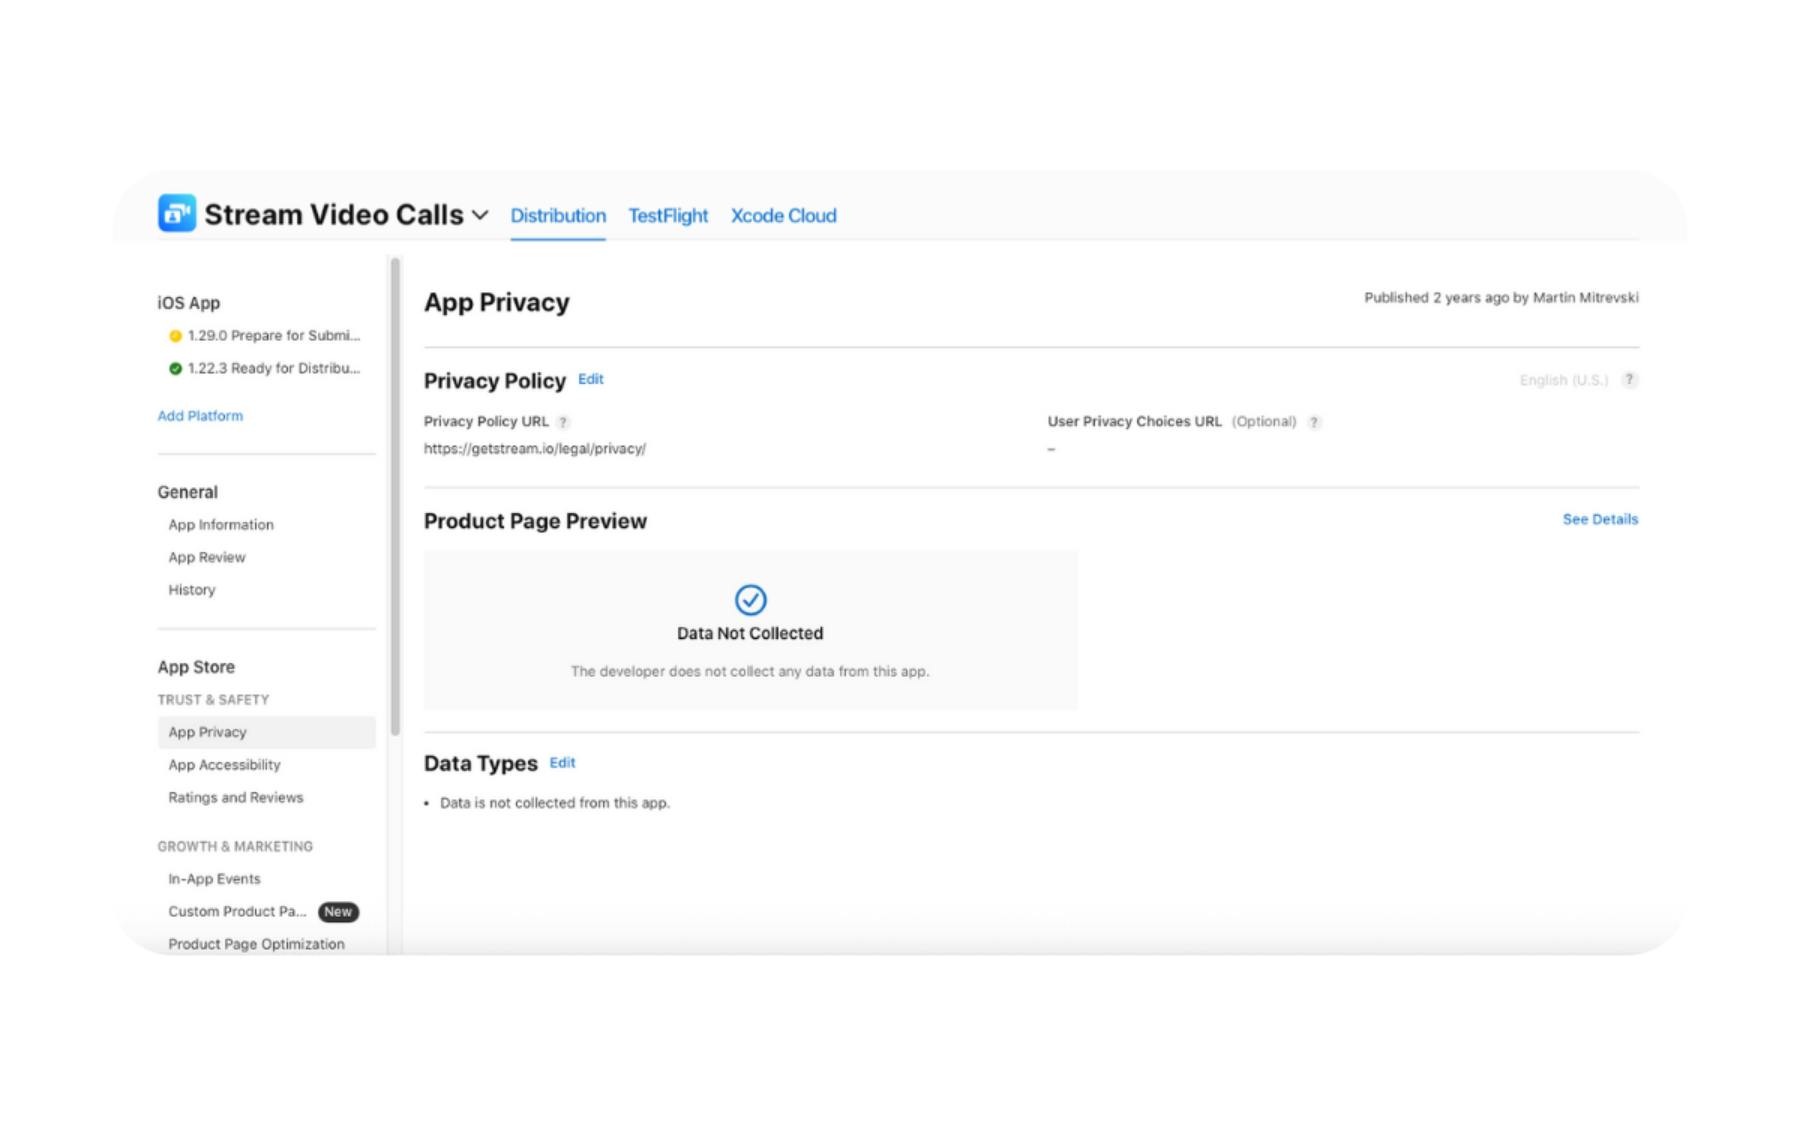
Every app submitted to the App Store must include privacy details in App Store Connect. This is done through the App Privacy Questionnaire, which informs the privacy label displayed on your App Store product page.
Where to Find It
-
In App Store Connect, open your app.
-
Go to App Privacy in the left-hand menu.
-
Click "Get Started" or "Edit" to update your answers.
What You'll Need to Disclose
You must account for all data collected or transmitted by your app, whether directly or through third-party SDKs. This includes:
-
Identifiers: Push notification tokens, user-agent headers (which can include app name and version), device IDs if collected.
-
User content: Photos, videos, audio, chat messages.
-
Diagnostics: Crash logs, performance metrics.
-
Usage data: Interaction events, feature usage analytics.
Tips for Accurate Disclosures
-
Match your Info.plist: If your app requests NSCameraUsageDescription or similar, be sure the questionnaire reflects potential data collection.
-
Include third-party behavior: Even if you don't store data, you must declare collection done by SDKs or services you use.
7. Archive and Upload Your Build via Xcode
The archiving process creates a signed, distributable version of your app that can be uploaded to App Store Connect. Before you begin, make sure you have a valid distribution certificate, used to sign your production build, and a matching provisioning profile, which authorizes the app to run on devices and be distributed via the App Store. Xcode can create this automatically, or you can also create it via developer.apple.com.
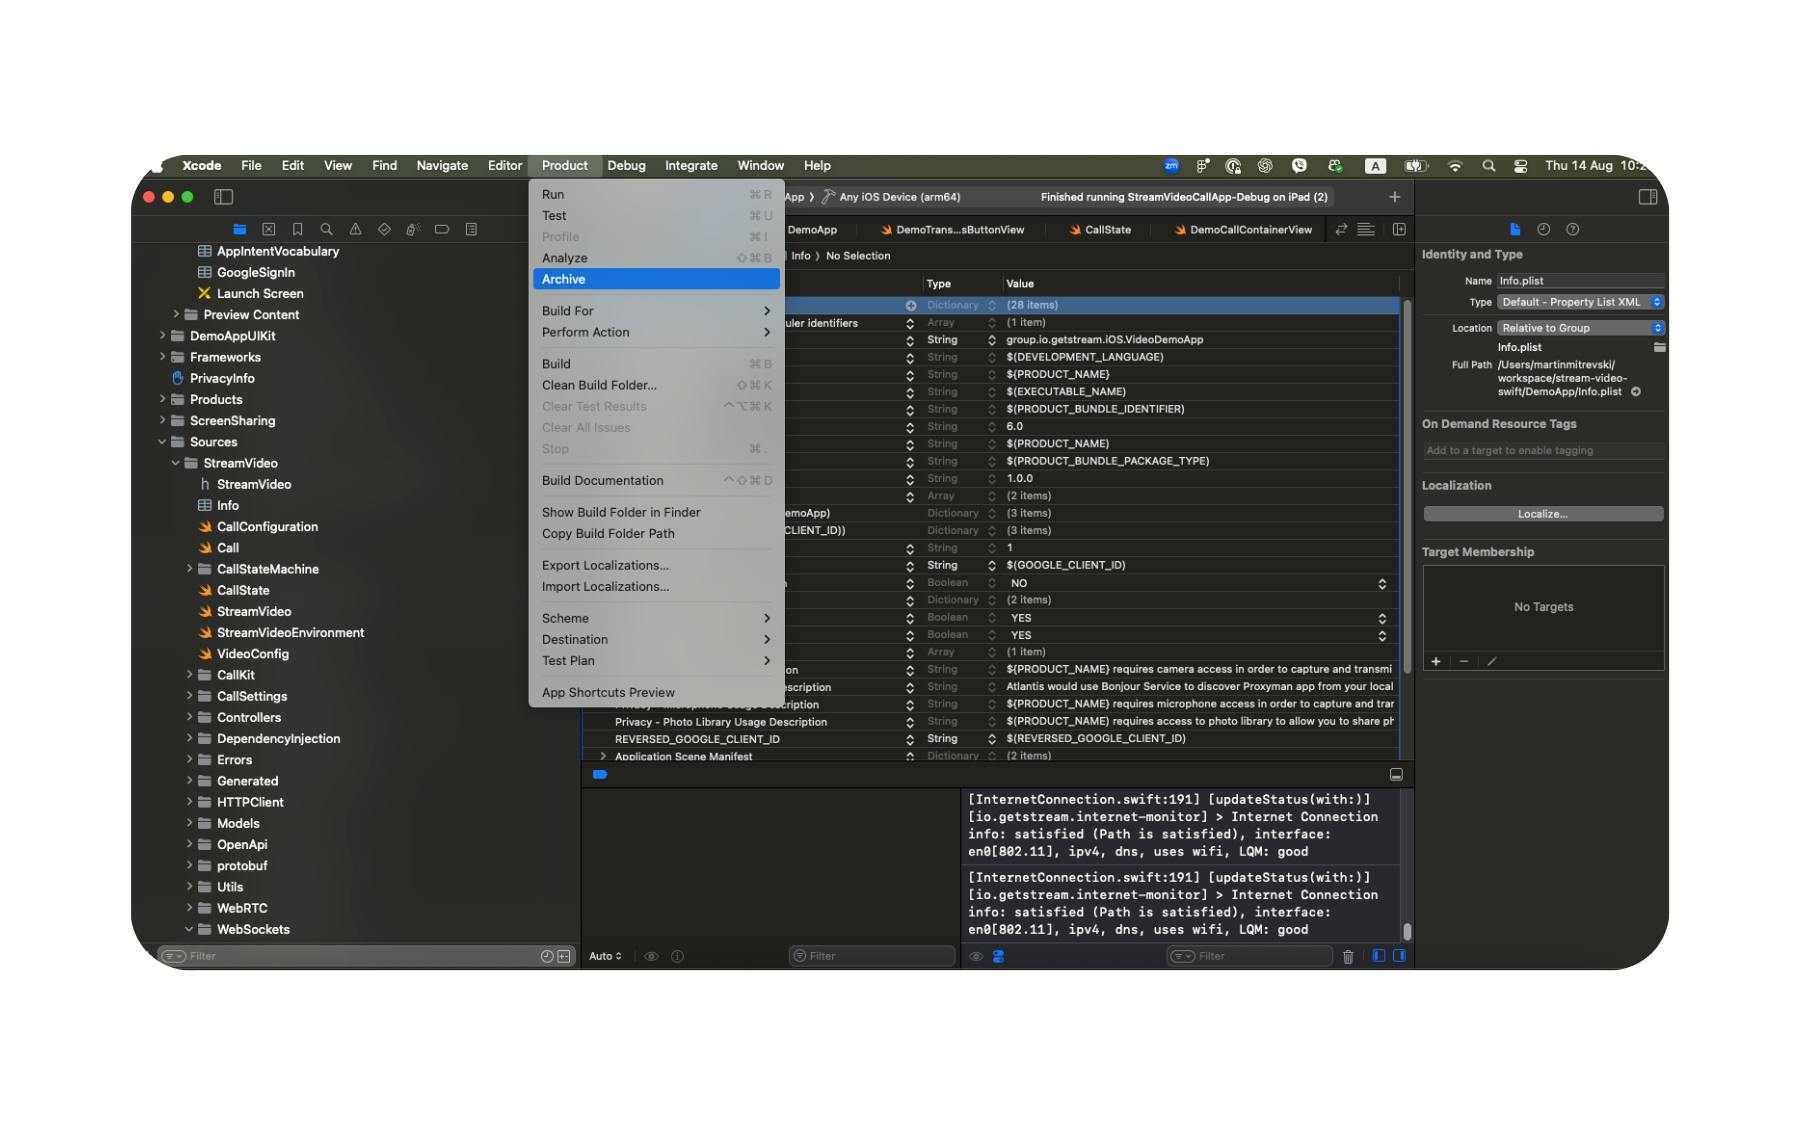
Archive Your App
-
In Xcode, select your app target and set the build scheme to Any iOS Device (arm64) or Generic iOS Device.
-
Go to Product > Archive.
-
Xcode will build and package your app; the Organizer window will open when it's done.
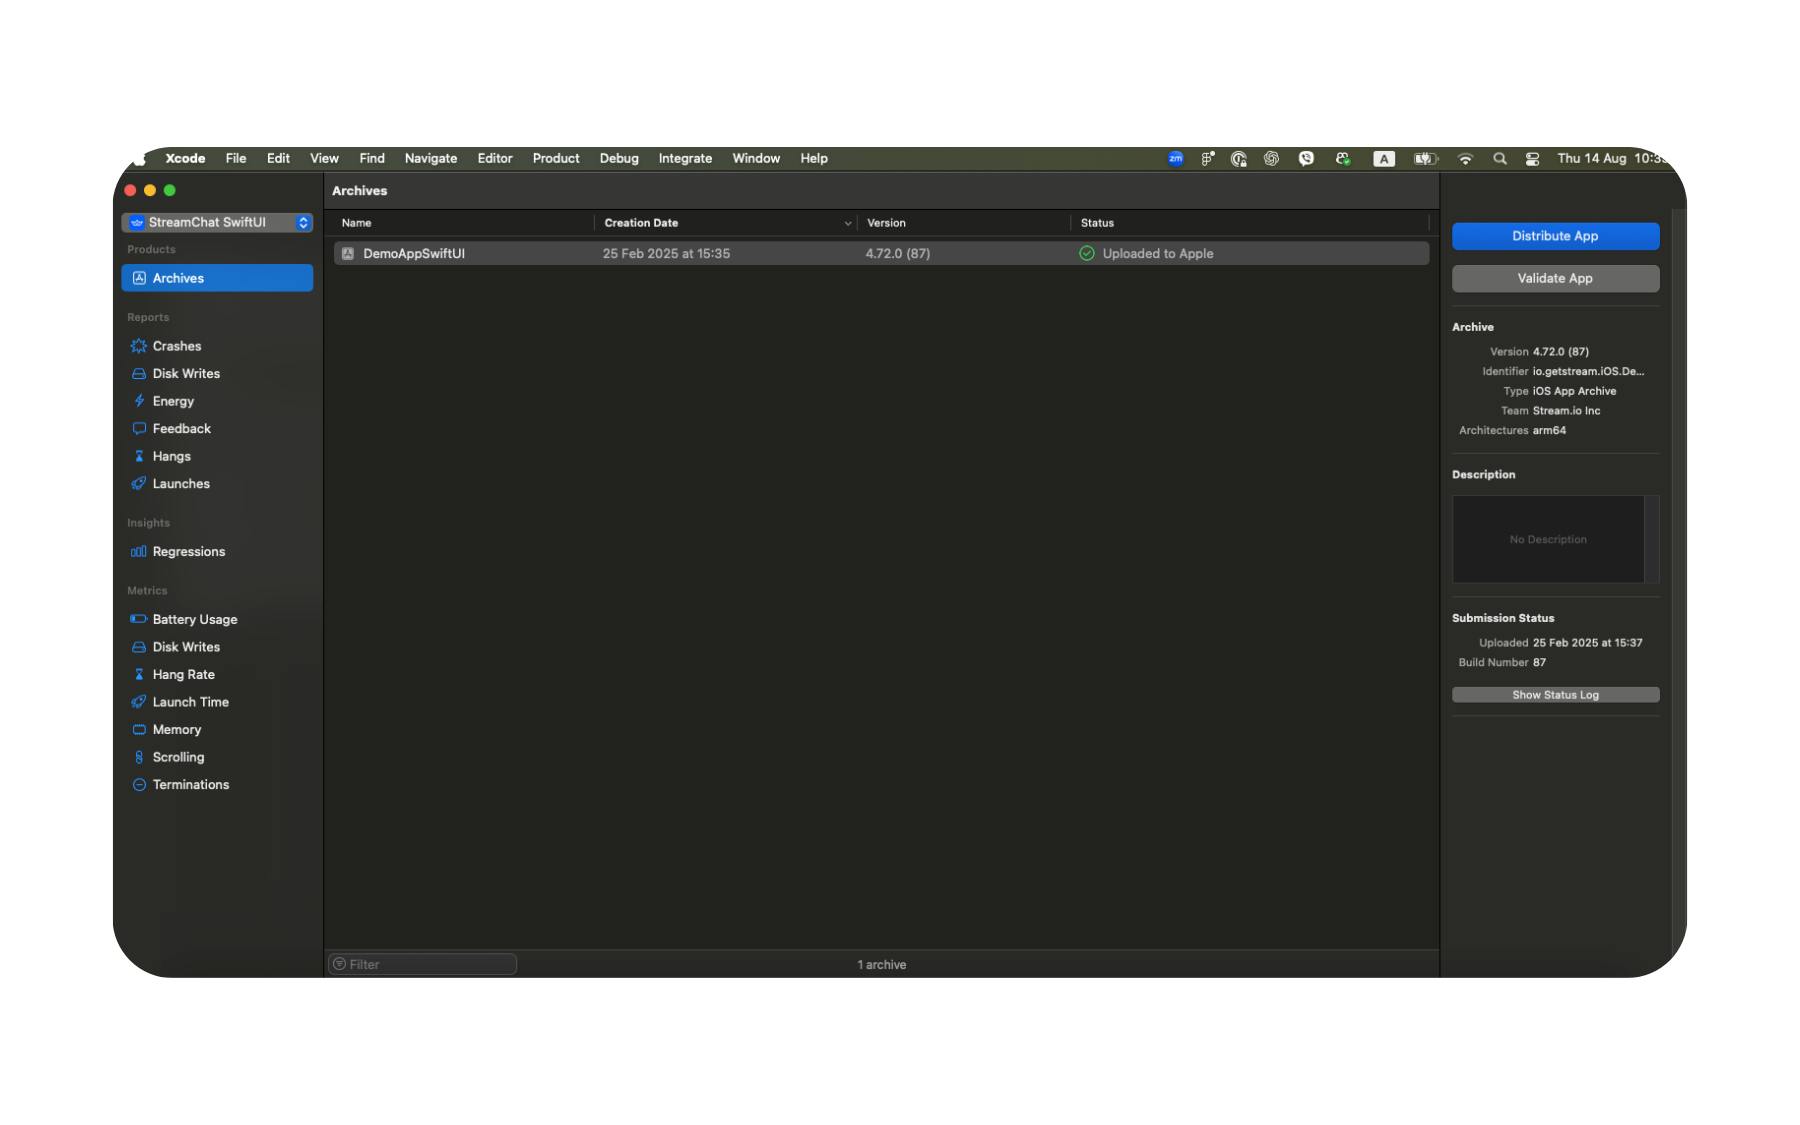
Validate and Upload
In the organizer:
-
Select your archive from the list.
-
Click Distribute App.
-
Choose App Store Connect as the destination.
-
Select Upload and follow the prompts to validate your app.
-
Fix any validation errors (e.g., missing icons, entitlement mismatches) before retrying.
Alternative: Transporter App
If you prefer or need more control, you can export an .ipa file from Xcode and upload it to App Store Connect using Apple's Transporter app (available in the Mac App Store).
Once the upload is complete, your build will appear in App Store Connect within a few minutes.
8. Test Thoroughly with TestFlight
TestFlight is Apple's official beta testing platform and is invaluable for catching issues that might slip past local testing.
Setting Up Testing
-
In App Store Connect, open your app and go to the TestFlight tab.
-
Choose Internal Testing (up to 100 team members) for fast turnaround, or External Testing (up to 10,000 testers) for broader feedback.
-
Add testers by email or share a public invitation link (for external tests).
What to Test
-
Core functionality: All critical workflows (onboarding, payments, media uploads, chat, calls).
-
UI responsiveness across devices: Verify layouts look correct across all supported iPhones and iPads.
- Stick to Apple's Human Interface Guidelines. Apps can be rejected for design accessibility issues (e.g., a white button on a white background).
-
Permissions flows: Ensure camera, microphone, and push notification prompts are shown with clear, user-friendly explanations.
-
Performance: Launch time, smooth animations, and responsive interactions.
-
Background behavior (if applicable): For apps using Stream Chat or Video, test how the app handles push-triggered message sync or ongoing calls when minimized.
-
Error handling: Graceful handling of poor network connections or denied permissions.
9. Submit for Review
Once your app has passed TestFlight testing, it's time to submit it to Apple for review.
Submitting Your App
-
Sign in to App Store Connect.
-
Go to My Apps and select your app.
-
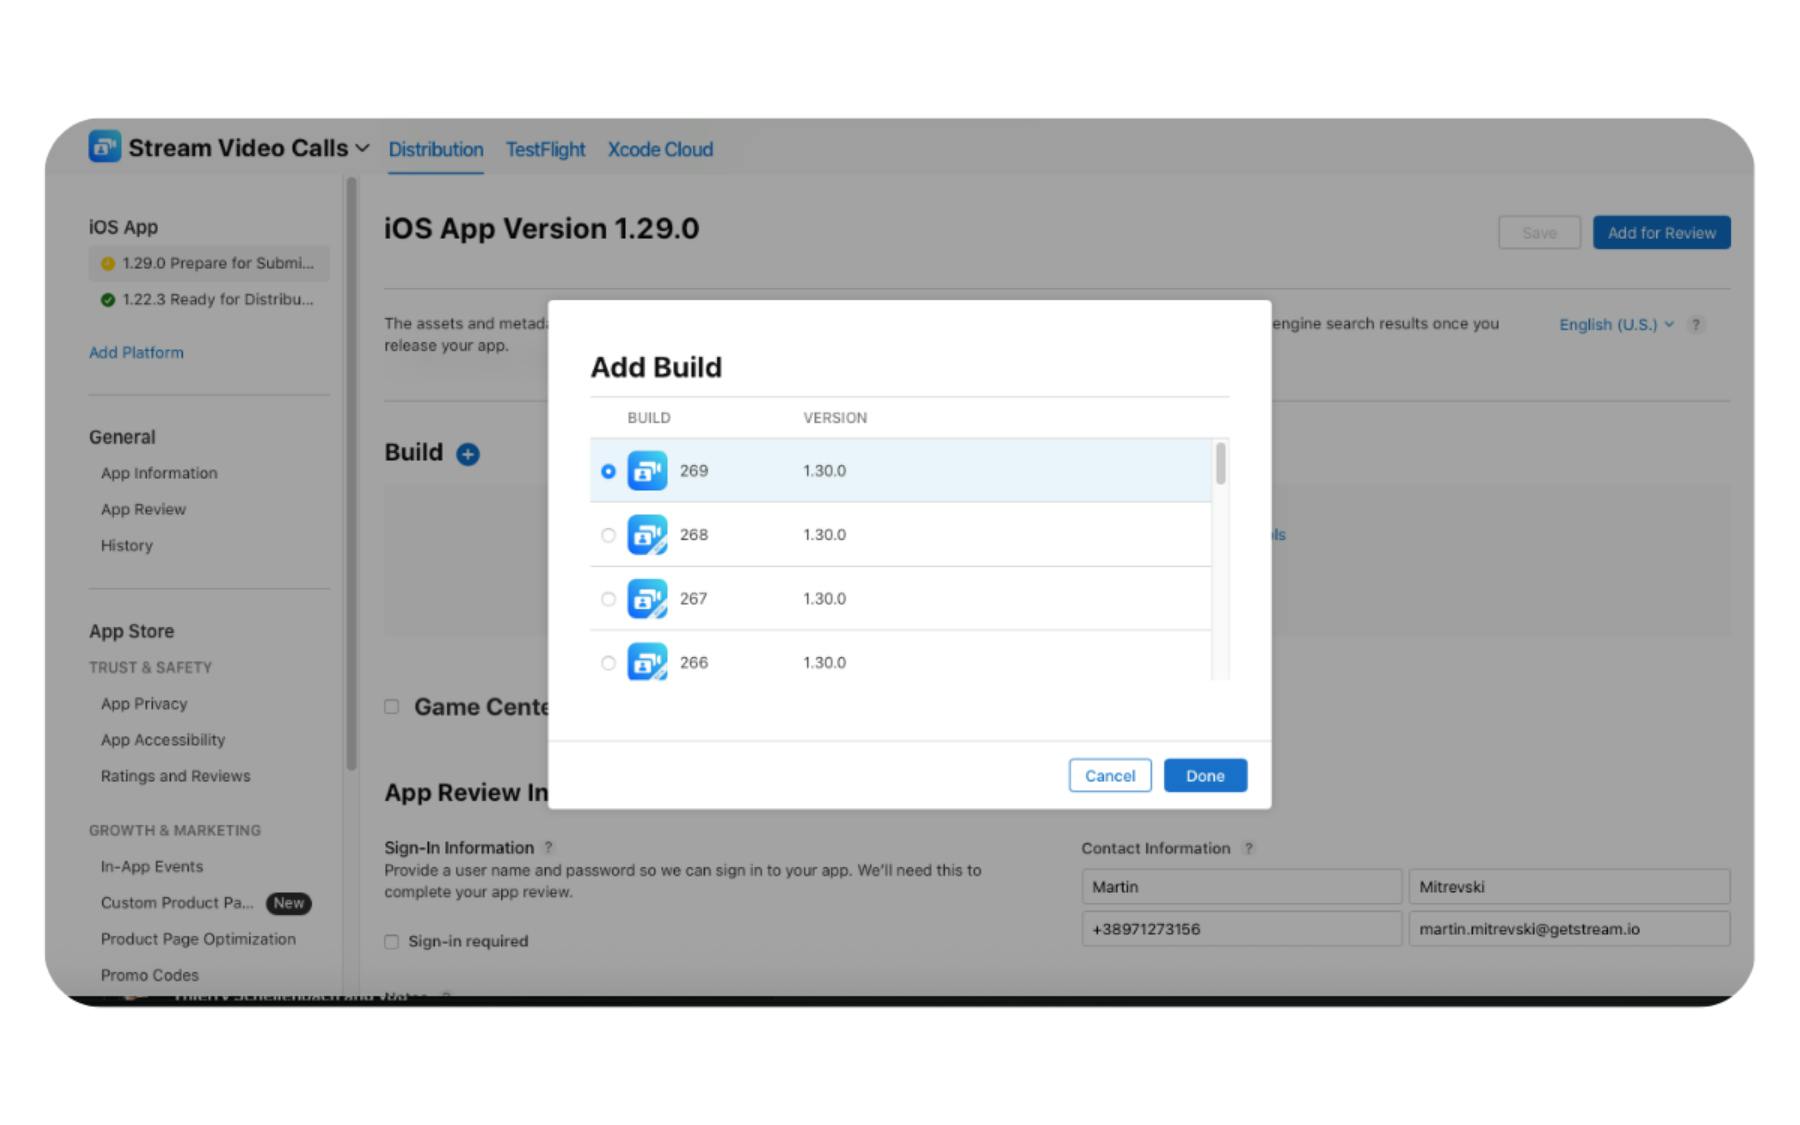
In the left-hand menu, click App Store → Prepare for Submission.
-
Under the Build section, select the build you uploaded from Xcode.
-
Scroll to the App Review Information section and provide:
-
Release notes: Summarize changes or new features.
-
Sign-in credentials (if the app requires login).
-
Review notes: Explain anything that could confuse a reviewer, such as:
-
Why you're requesting camera/mic permissions
-
How background functionality works (e.g., call continuity, message sync)
-
Link to your compliance demo video if applicable
-
-
-
Click Save to avoid losing changes.
-
Click Submit for Review.
Apple will now begin the review process. Most reviews take 1 - 3 business days, but this can vary depending on the complexity of your app or the time of year.
10. Respond to Review Feedback (If Needed)
Even well-prepared apps sometimes receive review feedback from Apple. This doesn't always mean there's a major problem; in many cases, it's simply a request for clarification or a small metadata adjustment.
How You'll Be Notified
-
Apple will send an email to the account's primary contact.
-
A notification will also appear in App Store Connect under Resolution Center for your app.
How to Respond Effectively
-
Provide clear answers: If it's a clarification, respond in plain language and reference your Review Notes or demo video if relevant.
-
Fix and resubmit quickly: If it's a technical issue, update your build in Xcode, upload the new version, and attach it in Prepare for Submission.
How to Publish to Google Play Store
Publishing to Google Play is straightforward if you prepare your account and app details in advance. Google's review process is often faster than Apple's, but it can be equally strict when it comes to permissions, privacy disclosures, and policy compliance.
1. Create a Google Play Developer Account
Your Google Play Developer account gives you access to the Google Play Console, where you'll manage your app's listing, track installs, respond to reviews, and publish updates.
Set Up Your Account
-
Go to play.google.com/console.
-
Sign in with the Google account you want to associate with your developer profile.
-
Accept the Developer Distribution Agreement.
-
Pay the one-time registration fee of $25 USD (non-refundable).
Complete Your Developer Profile
Google will ask for:
-
Developer name: This appears publicly on your Play Store listing.
-
Email address: For user support and Play Store communications.
-
Physical address: Required for certain app categories.
-
Phone number: Used for account verification.
If you're registering as an organization:
-
You may need to provide official business registration documents (e.g., certificate of incorporation).
-
In some regions, Google requires a D-U-N-S number for business verification.
-
An authorized representative may need to submit a government-issued photo ID for identity verification.
Once your account is approved (usually within 24 - 48 hours), you can log in to the Play Console and start creating your first app listing.
2. Build and Sign Your App
Google Play requires all apps to be digitally signed, ensuring that updates can only come from you and that the app hasn't been altered after distribution.
Build Your App
-
Open your project in Android Studio.
-
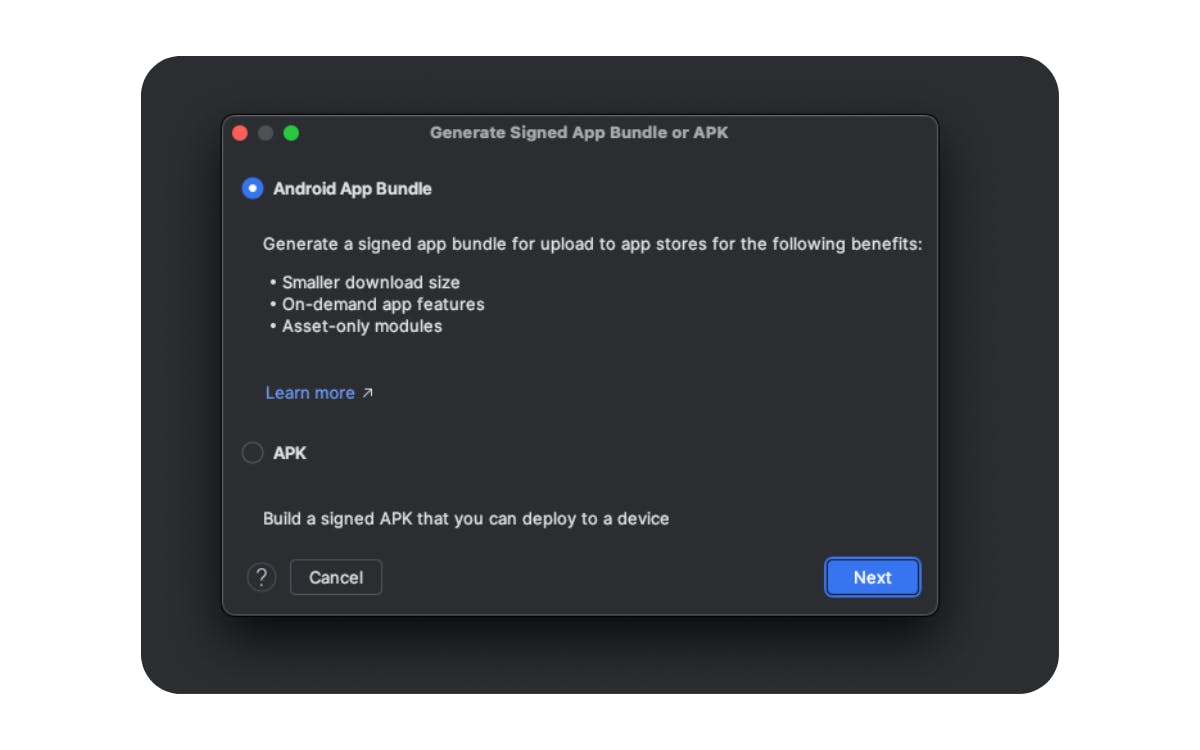
Select Build > Generate Signed Bundle / APK.
-
Choose Android App Bundle (.aab). This is now the required format for all new Play Store submissions.
-
Select your app module and click Next.
Sign with a Keystore
A keystore is a secure file that contains the private key used to sign your Android app. Google Play requires all apps to be digitally signed so it can verify the app's authenticity and ensure that future updates come from the same developer.
Your keystore file:
-
Must be kept secure. Anyone with your keystore and passwords could upload a malicious update as your app.
-
Should be backed up. If you lose it, you won't be able to update your app without going through Google's key reset process (which can take time and isn't always approved).
-
Should never be thrown away. Keep it for as long as you plan to maintain the app.
If you don't already have a keystore:
-
In Android Studio, go to Build > Generate Signed Bundle / APK and choose Android App Bundle.
-
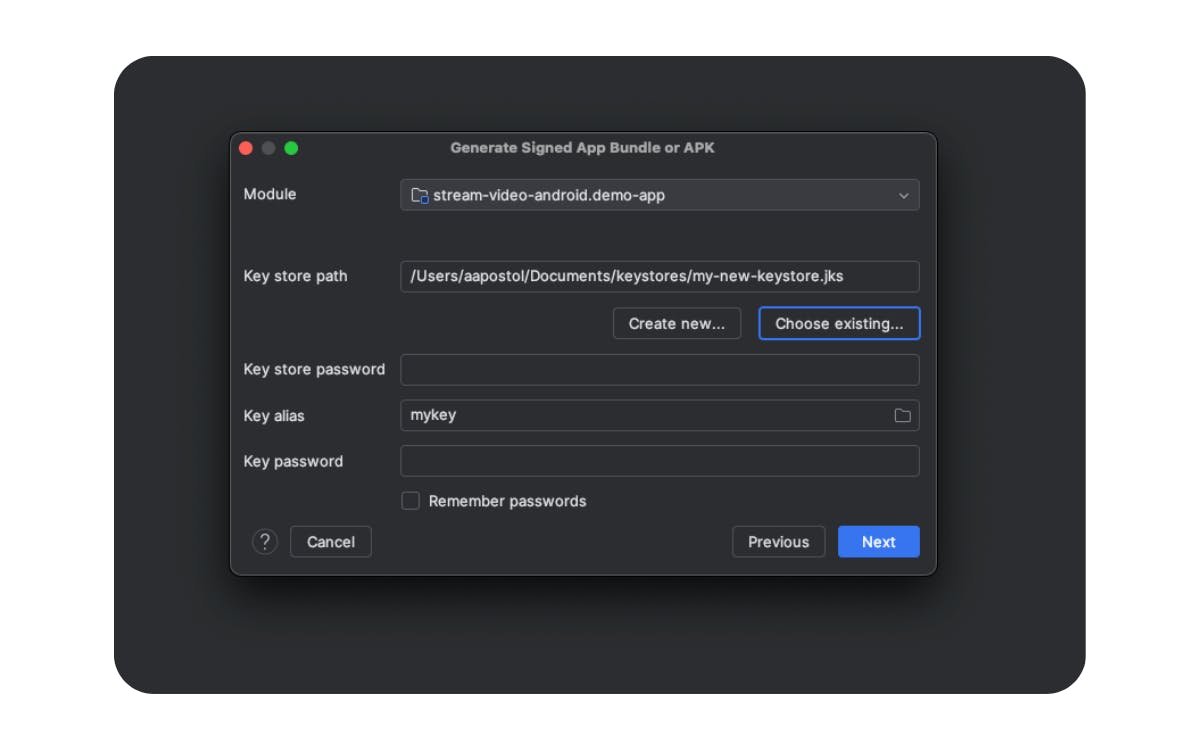
On the Key store path screen (often referred to as the keystore selection screen), you'll see fields to either select an existing keystore file or create a new one.
-
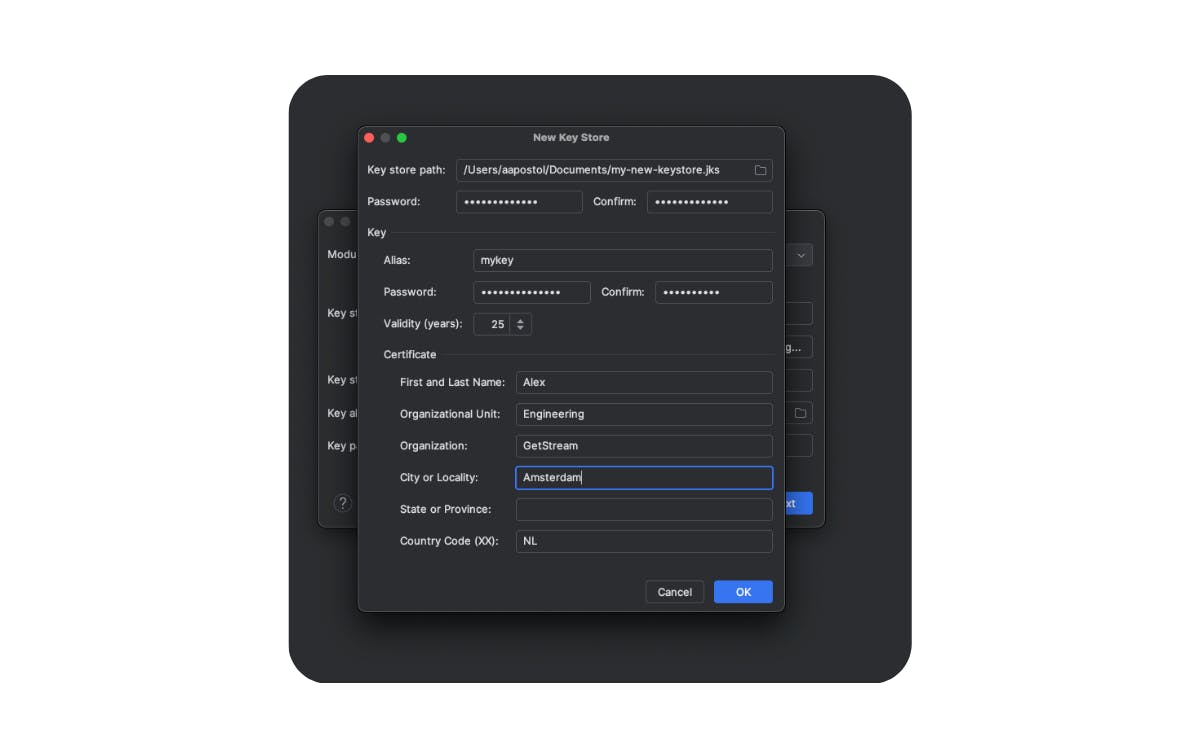
Click Create new... to generate a fresh keystore.
-
Choose a secure location for your .jks or .keystore file.
-
Set a strong password.
-
Fill in the certificate details (name, organization, country code).
If you have an existing keystore:
-
In the Key store path screen, select your existing .jks or .keystore file.
-
Enter the keystore and key passwords, then proceed to generate your signed build.
Note on Google Play App Signing:
Google Play now requires new apps to use Play App Signing, where Google securely stores and manages your app's signing key. You still use your local keystore to sign the upload key, which verifies that future builds come from you.
- If you lose your local keystore, you can request a key reset from Google, but it may delay updates.
- Keep your keystore backed up in a secure location, even with Play App Signing, you need it to upload new versions.
Build the Release Version
-
In Android Studio, set the Build Variant to release.
-
Complete the signing steps and click Finish.
-
Android Studio will generate your .aab file in the app/release folder.
3. Set Up App in Play Console
This step is when you'll define how your app appears in the Play Store, set distribution details, and prepare for upload.
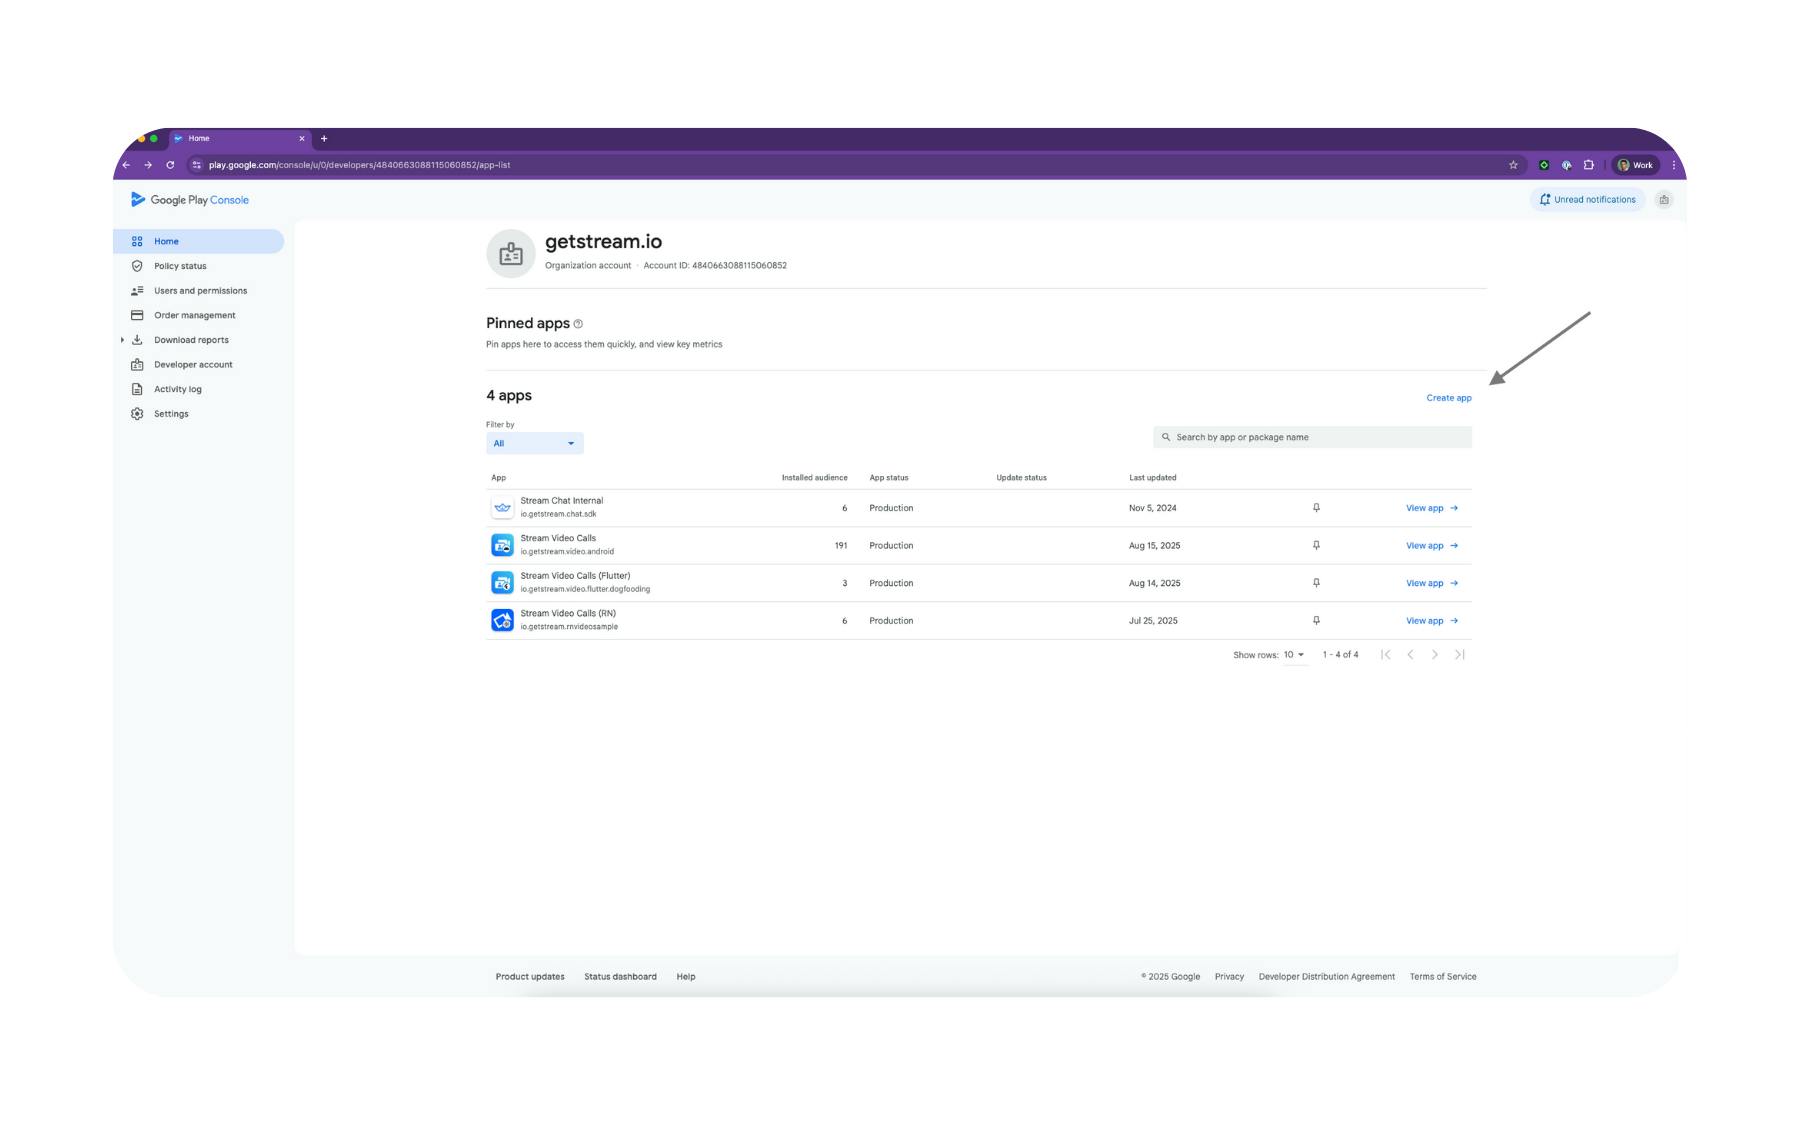
Create a New App Listing
-
Sign in to the Google Play Console.
-
Click Create app.
-
Choose:
-
App name: Must be unique and user-friendly.
-
Default language: The primary language for your listing.
-
App type: Choose App or Game.
-
Free or Paid: Once set, you can't switch from free to paid without creating a new listing.
-
-
Check the compliance confirmations (Google will ask about policies, advertising, and export laws).
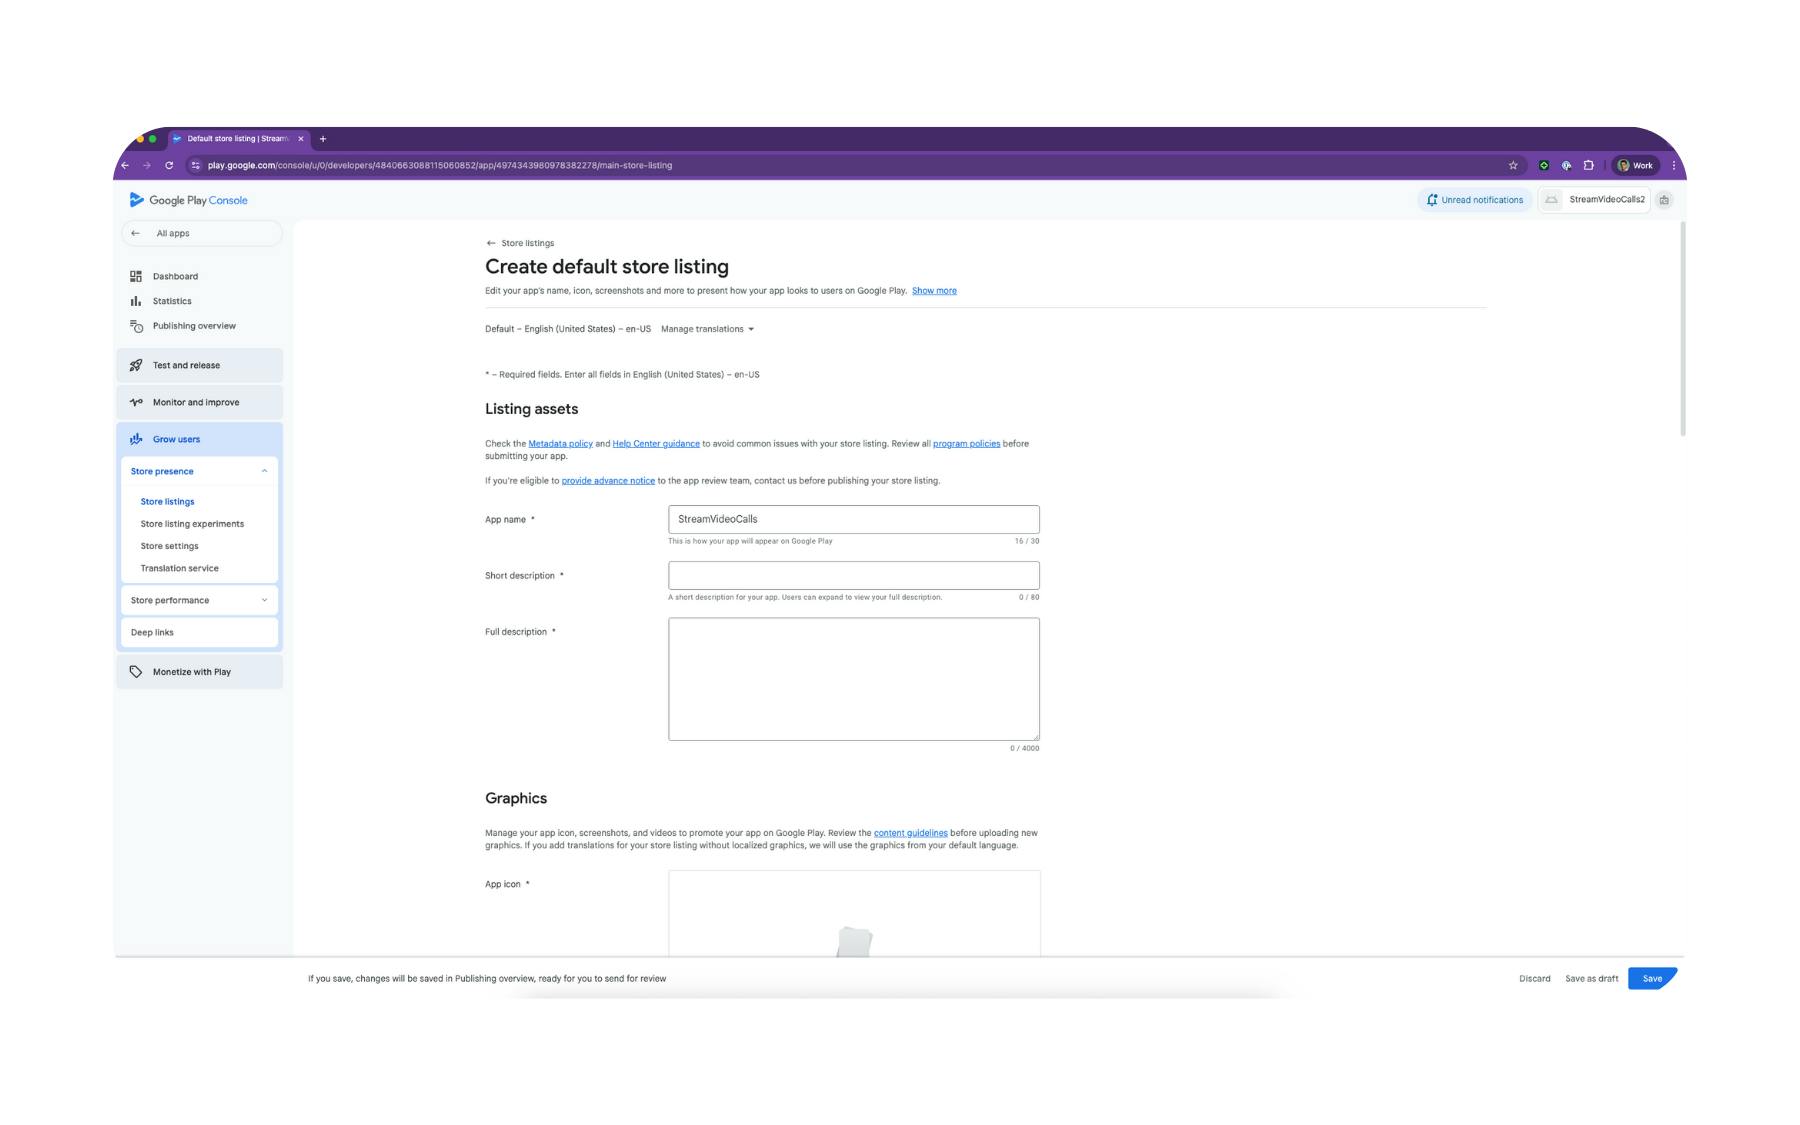
Add Store Listing Details
-
Short description: A one-line summary (80 characters max).
-
Full description: Up to 4,000 characters describing your app's features and benefits.
-
App icon: 512×512 PNG, 32-bit.
-
Feature graphic: 1,024×500 PNG (landscape) for Play Store promotions.
-
Screenshots: At least 2 per device type you support (phone, tablet, etc.).
-
Promo video (optional): Hosted on YouTube, linked in your store listing.
Set Distribution Details
Complete Google's content rating questionnaire now. It's one of the few items you can handle ahead of time and avoids last-minute publishing blocks.
4. Manage Permissions in AndroidManifest.xml
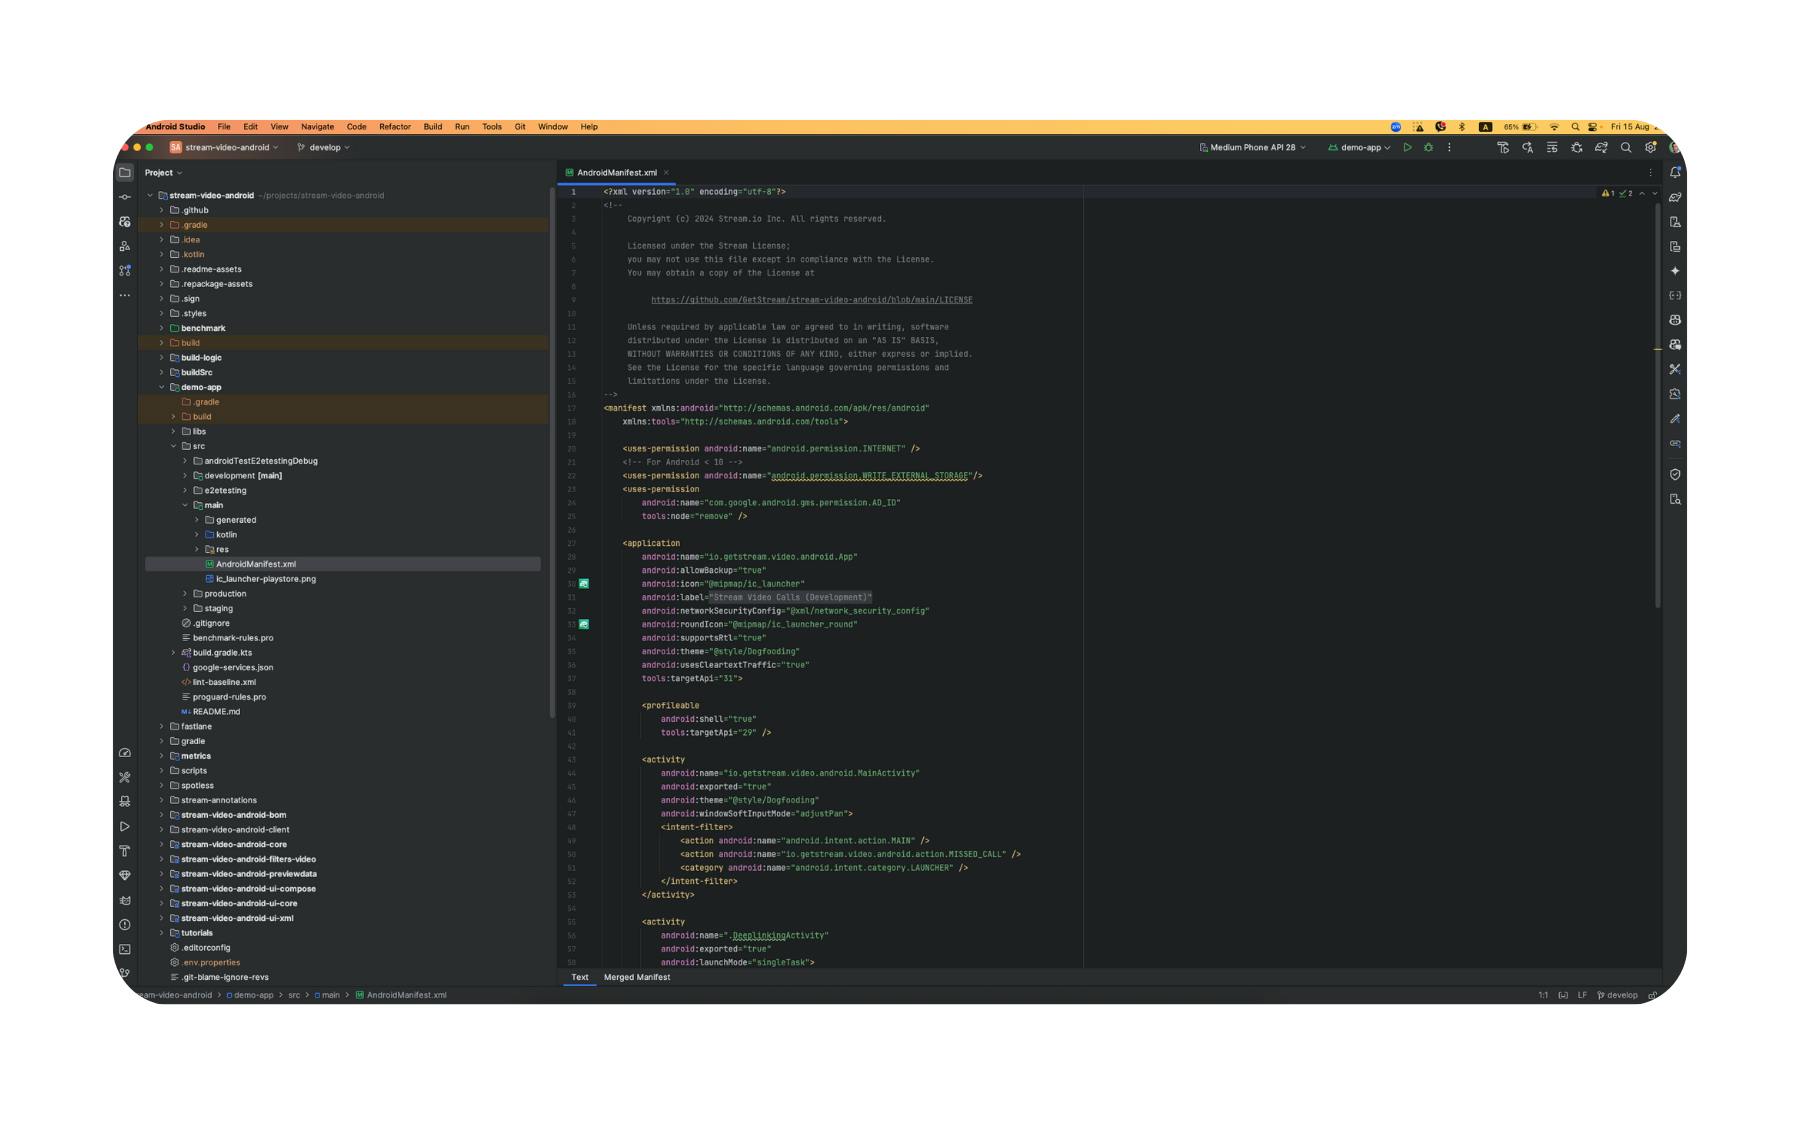
Before you upload, review your app's AndroidManifest.xml
If you're using Stream Chat or Video SDKs, some permissions may be added by default. Remove any you don't need, and make sure any that remain are clearly justified.
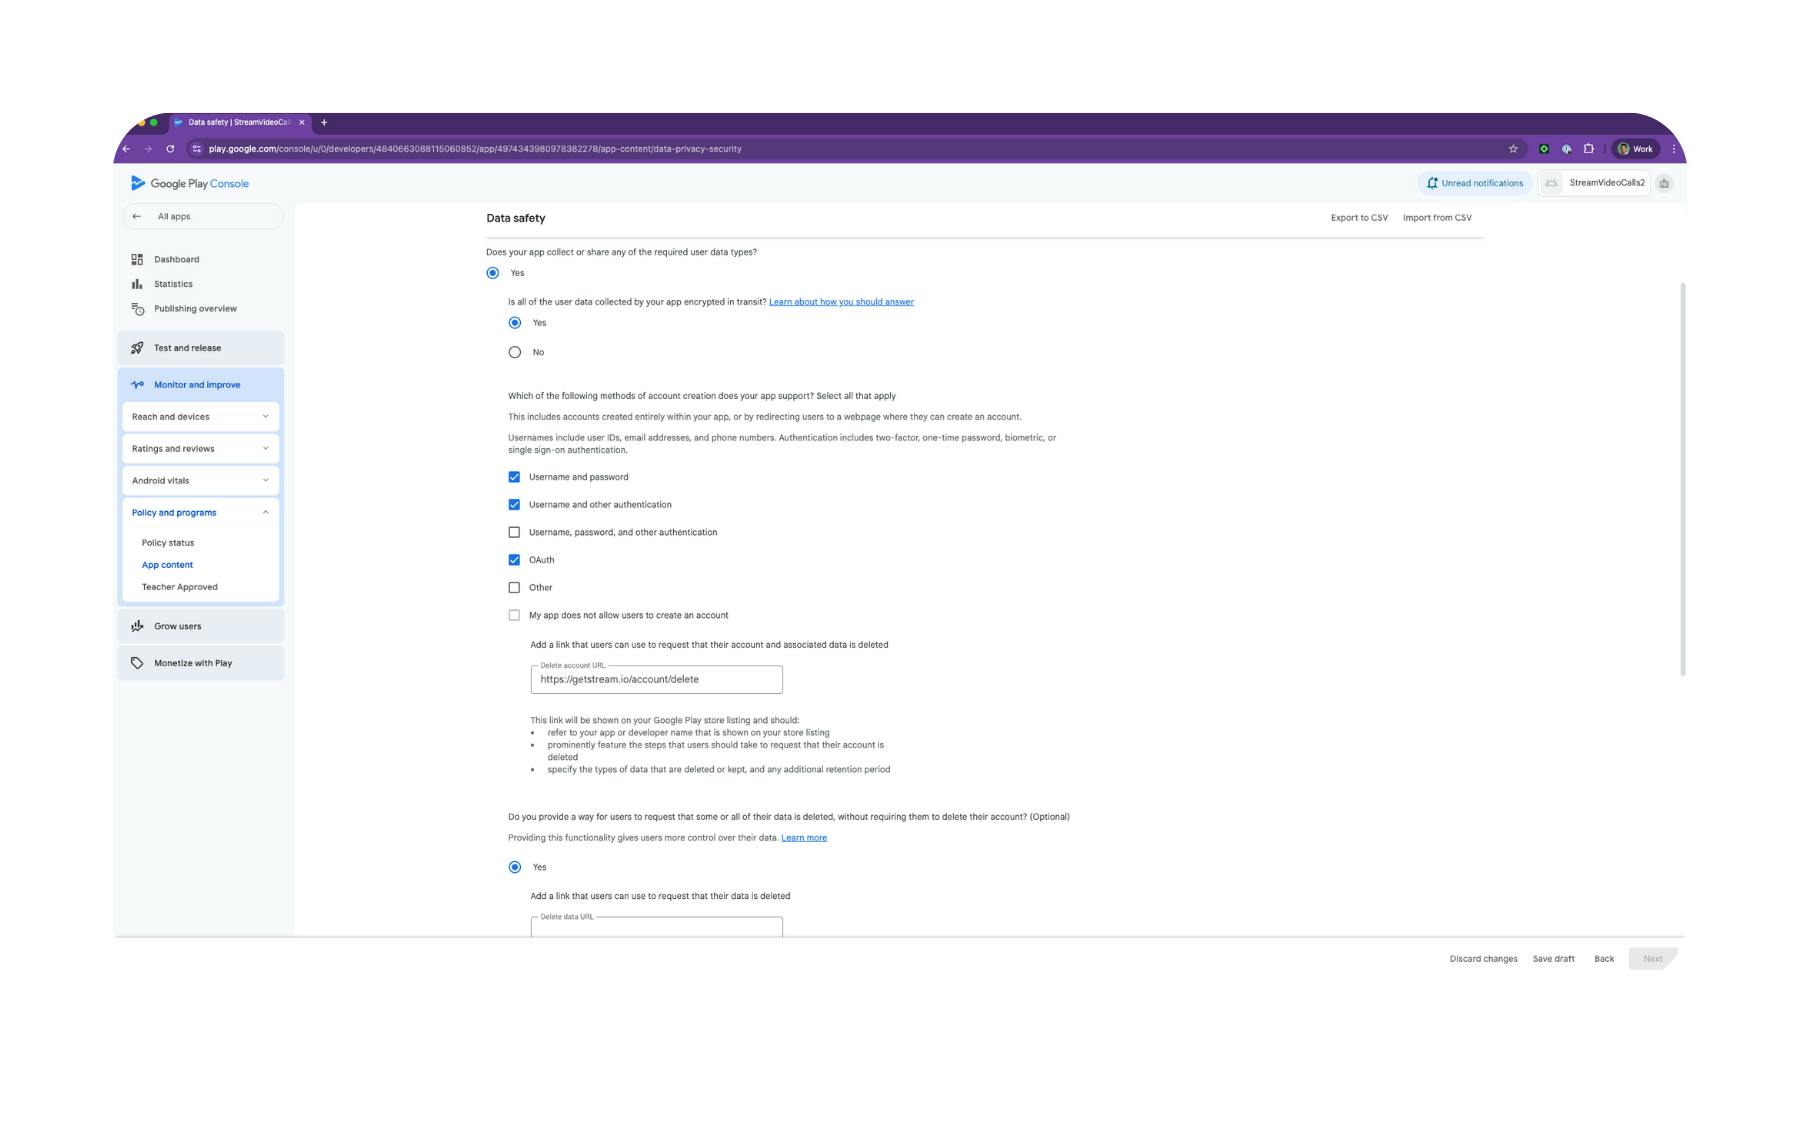
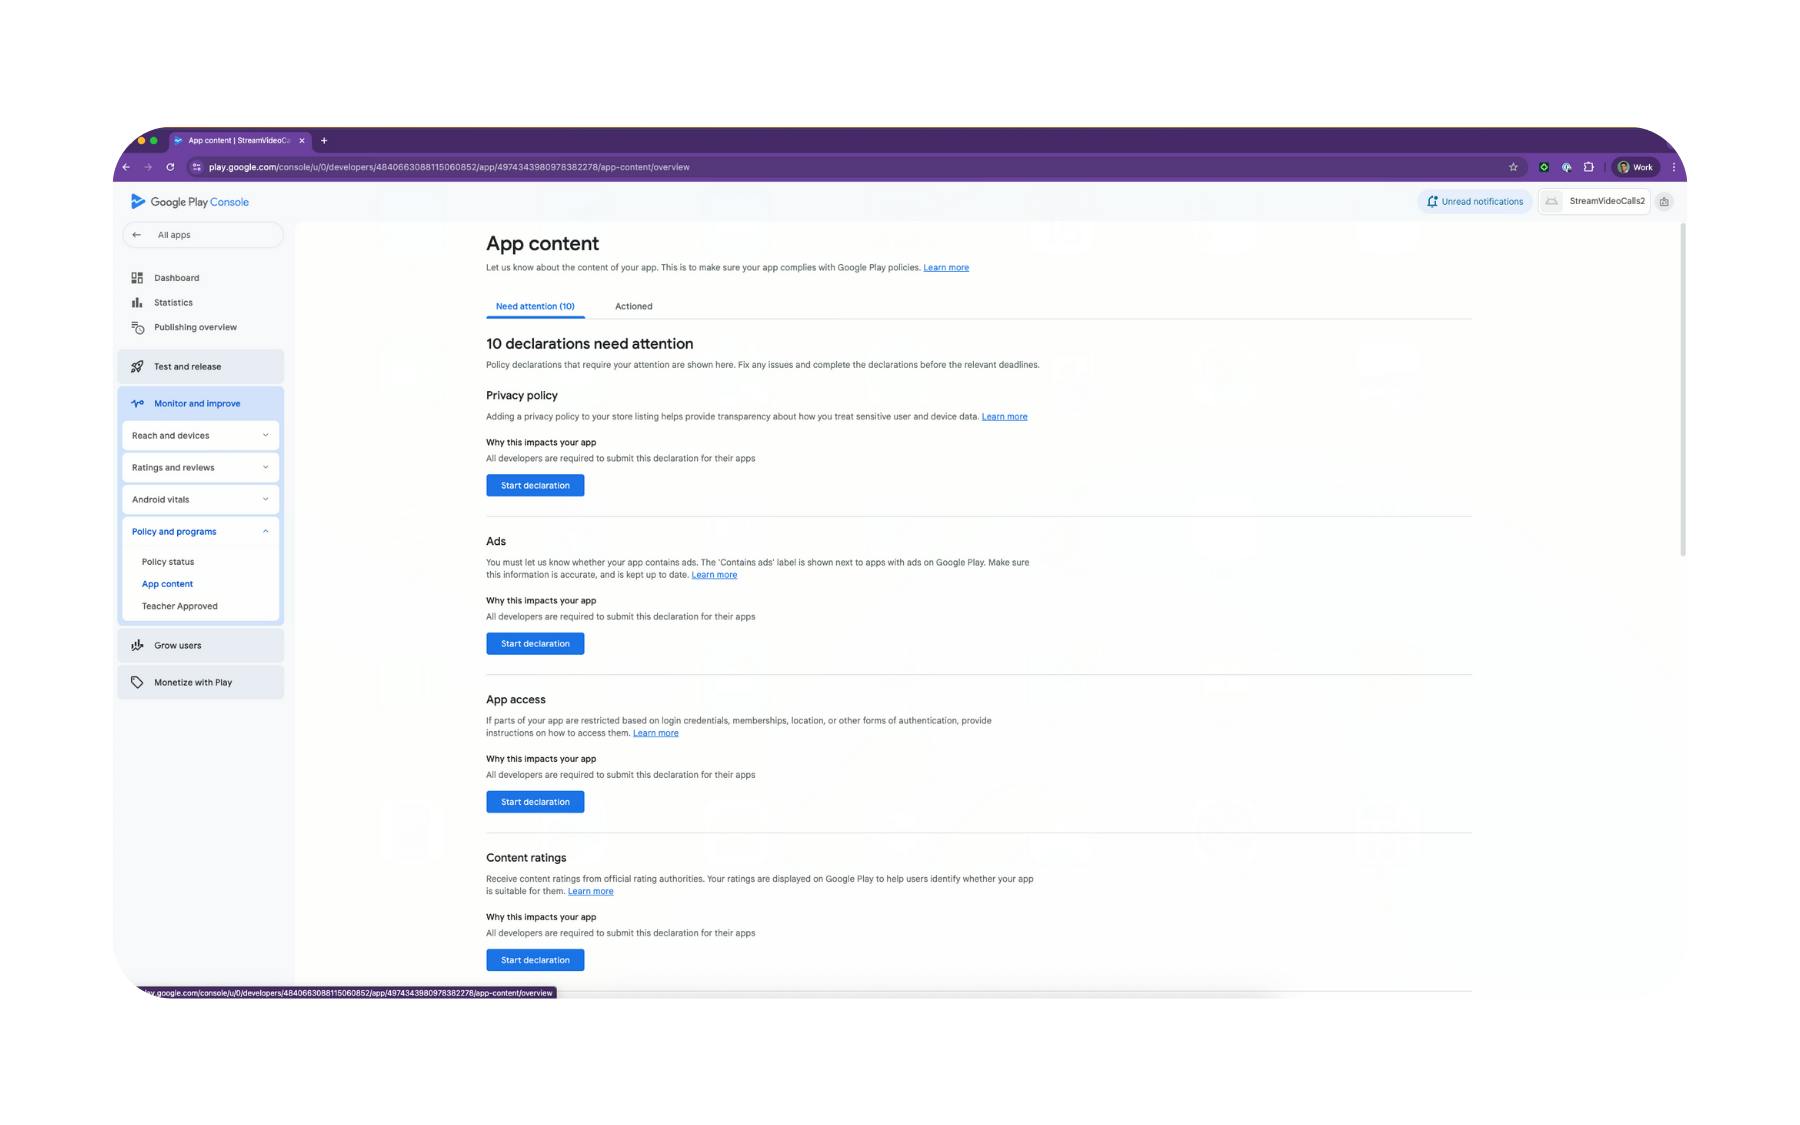
5. Complete App Content Declarations
In the Google Play Console, open your app and go to Policy → App content (under Monitor and Improve). This is where Google gathers all compliance information about your app before it can be published.
You'll need to complete several separate forms here:
Data Safety
-
Declare what data your app collects, how it's used, and whether it's shared with third parties.
-
Be thorough — mismatches between your disclosure and actual behavior are a leading cause of Play Store rejections.
Content Rating
-
Complete Google's questionnaire to determine your app's official age rating.
-
Ratings differ by region, so this step ensures your app is categorized correctly worldwide.
Target Audience & Content
-
Specify your intended age group.
-
Confirm whether your app is directed toward children and comply with COPPA/child safety requirements if so.
App Access
-
If your app requires login, you must provide test credentials (username and password).
-
This allows Google reviewers to log in and test your app without barriers.
Sensitive Permissions Justification (Mandatory if applicable)
-
If your app requests sensitive permissions (e.g.,
FOREGROUND_SERVICE_* -
Keep the video short (30 - 60 seconds) and demonstrate:
-
Opening the app and starting the feature in question
-
Triggering the permission (e.g., enabling mic/camera)
-
Backgrounding the app (or switching away)
-
Persistent notification remaining visible (if foreground service)
-
Returning to the app with the session still active
-
-
This video helps reviewers quickly verify that the permission is necessary and properly implemented.
6. Test the App
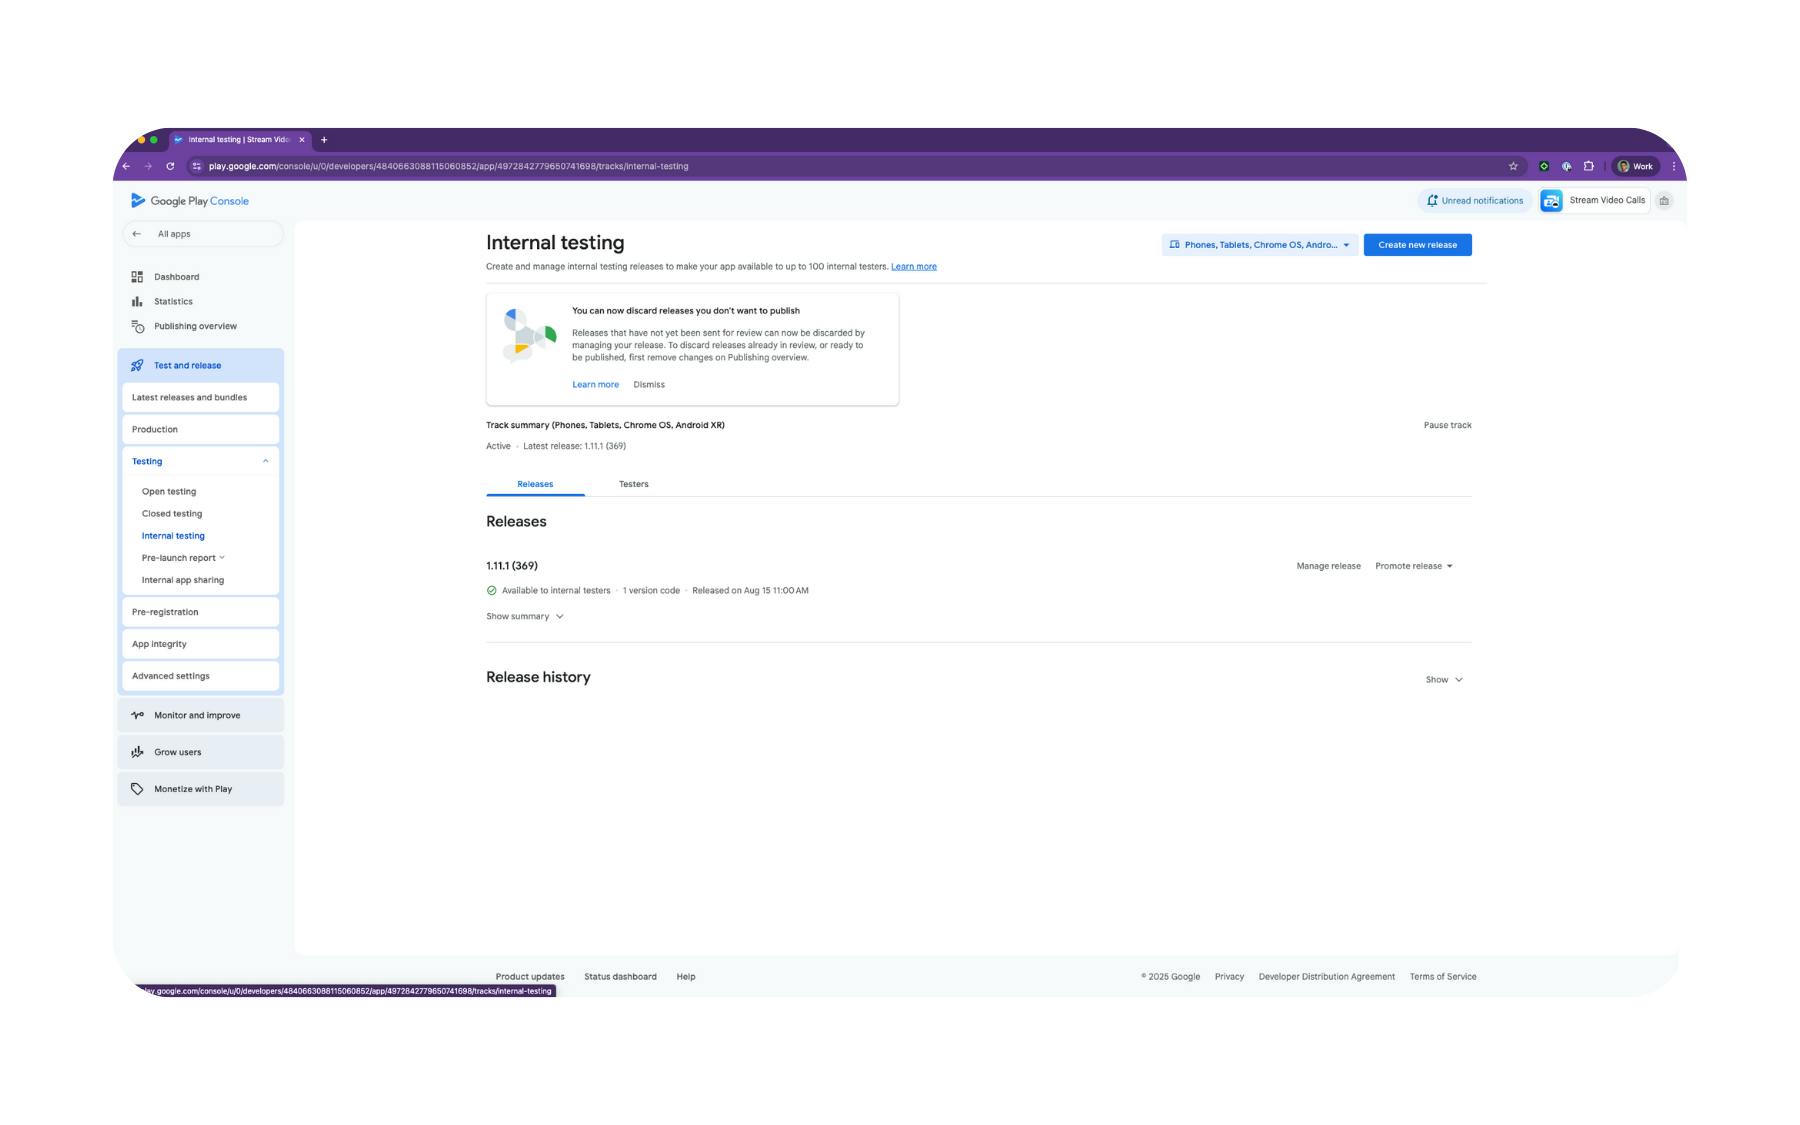
Before going live, run your build through Google Play's testing tracks to catch crashes, permission issues, and policy snags early.
Pick the Right Track
-
Internal testing: Fastest (minutes). Share with your team to validate install, login, and core flows.
-
Closed testing: Larger group (QA, beta users) to exercise real‑world devices and networks.
-
Open testing (optional): Public beta if you need scale.
What to Test
-
Install & upgrade: Fresh install, update from a prior version, and data migration.
-
Permissions flows: Camera/mic prompts, photo picker behavior, and denial/retry paths.
-
Foreground services: If you keep any
FOREGROUND_SERVICE_* -
Media & attachments: Confirm the system photo picker works if you removed
READ_MEDIA_* -
Push notifications: Delivery, deep links, and background handling.
-
Stability & performance: No crashes/ANRs in heavy screens (lists, media, video), smooth cold start.
Use Play Console Tools
-
Ship a test release and review the Pre‑launch report (screenshots, crashes on crawled devices, permission red flags).
-
Monitor early Android vitals (crash/ANR rates) and fix before production.
7. Upload and Submit for Review
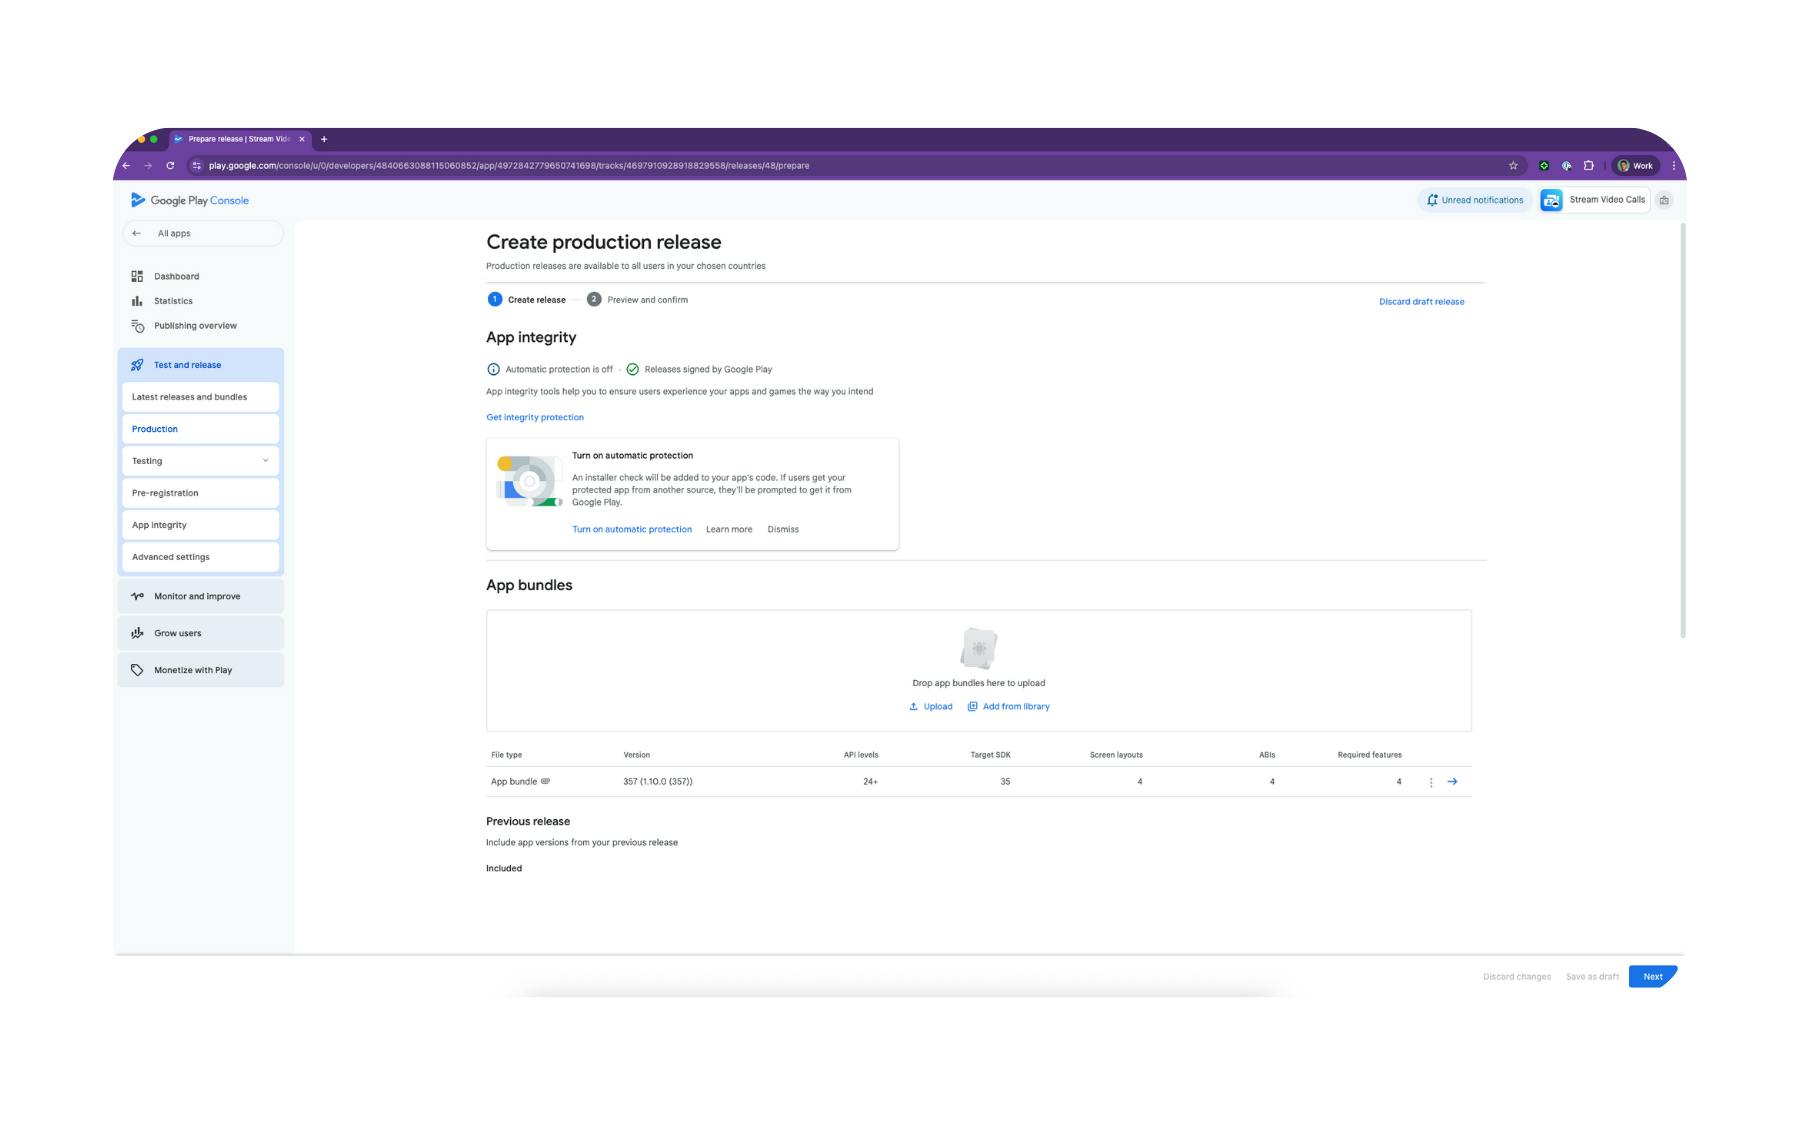
This step is where your .aab file, store listing, and policy forms all come together for approval.
Upload Your Build
-
In the Google Play Console, open your app.
-
Go to Release → Production (or a testing track if you want to stage the rollout).
-
Click Create new release.
-
Upload your signed .aab file.
-
Review any warnings or errors that appear — fix them before continuing.
-
Fill in release details, including:
-
Release name: Often your version number (e.g., 1.0.0).
-
Release notes: Summarize key features, fixes, or changes. Keep it clear for both testers and end users
-
-
Google will prompt you to confirm:
-
Data Safety form is complete and accurate.
-
App content declarations (e.g., ads, age restrictions, sensitive permissions) are correct.
-
Countries/regions and device categories/form factors are tied to your uploaded bundle
-
-
Choose your rollout strategy:
-
Full rollout: App becomes available to all users in selected countries once approved.
-
Staged rollout: Release to a small percentage first to monitor stability before expanding.
-
-
Click Save, then Review release and Start rollout to production.
8. Monitor Review and Respond
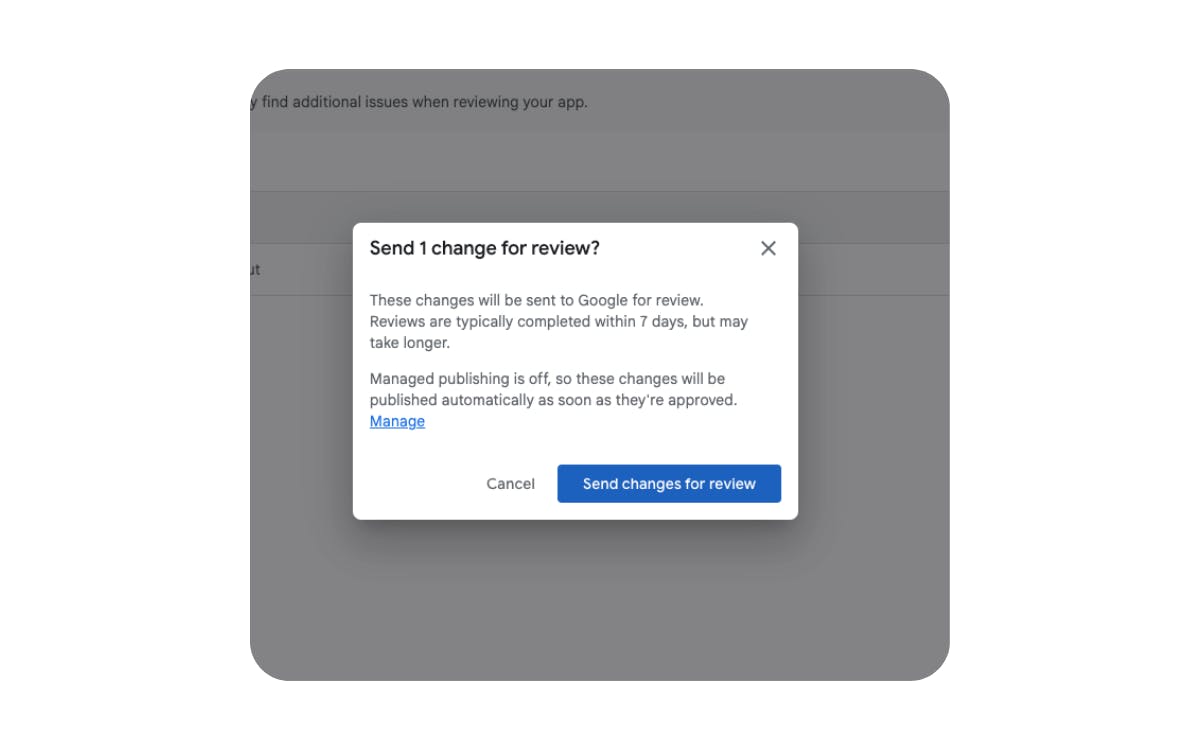
After submission, your app will enter Google's review queue. Most reviews take up to seven days, but the process can be longer if your app uses sensitive permissions or triggers additional policy checks.
Track Your App's Status
-
In the Google Play Console, open your app and check the status on the Dashboard or Publishing overview page.
-
Possible statuses include In review, Approved, or Action required.
If Action Is Required
-
Provide clarifications: If the issue is due to misunderstanding, respond through the Policy status page and supply supporting details (screenshots, demo videos).
-
Update and resubmit: If you need to make code or manifest changes, build a new .aab, increment the version code, and upload again.
Avoiding Common App Store & Google Play Pitfalls
Even polished apps can encounter problems during Apple App Store or Google Play Store review. Many of these issues are not related to code quality but to permissions, privacy, and reviewer expectations.
Below are the most common pitfalls our team has seen, and how to avoid them—based on dozens of real-world support cases.
1. Permissions Misuse
Apple
-
Missing Info.plist keys: e.g.,
INStartCallIntent`,`NSUserActivityTypes`, or`BGTaskSchedulerPermittedIdentifiers- Fix: Ensure every permission is declared in Info.plist with a clear usage description.
-
Unjustified background modes: Enabled but not tied to a clear, active feature.
- Fix: Only enable background modes you use.
-
FOREGROUND_SERVICE_*- Fix: Remove with tools:node="remove". If kept, add a demo video showing the persistent notification in use.
-
READ_MEDIA_*- Fix: Enable
useDefaultSystemMediaPicker = true`or`streamUiMessageComposerAttachmentsPickerSystemPickerEnabled="true"
- Fix: Enable
-
REQUEST_INSTALL_PACKAGES- Fix: Find via merged manifest report and exclude if unnecessary.
-
QUERY_ALL_PACKAGES- Fix: Disclose accurately in the Data Safety form under "Apps on device."
2. Privacy Disclosure Gaps
Apple
-
Incomplete App Privacy Questionnaire: Missing push tokens, user-agent headers, or other collected data.
- Fix: Keep disclosures in sync with both your code and any third-party SDKs.
-
Incomplete or inaccurate Data Safety form: Doesn't match manifest permissions or SDK behavior.
- Fix: Align form responses with your actual app behavior and third-party SDKs (including Stream Chat and Video).
3. No Compliance Demo
-
Missing demo video: Apps requesting sensitive permissions without showing how they're used.
- Fix: Record a 30 - 60 second video showing the permission in use (start → background → persistent notification → return) and link it in Review Notes (Apple) or release notes/policy response (Google).
4. Crashes or Placeholder Content
-
Unfinished or unstable experience: Crashes, slow performance, lorem ipsum text, or unfinished screens.
- Fix: Use TestFlight (Apple) or internal/closed tracks (Google) to test across devices and OS versions. Remove all placeholder data before submission.
5. No Reviewer Context
-
Unclear app behavior: Reviewer can't tell why permissions or background features are needed.
- Fix: Use Review Notes (Apple) or release notes/policy form (Google) to explain why permissions are needed, how background behavior works, and any special testing instructions. Include a demo video link if relevant.
6. Missing UGC Safety Requirements (App Store)
-
If your app includes user-generated content (UGC) or social networking features, Apple requires specific safeguards to be in place before approving your app. These are outlined in the App Store Review Guidelines and are enforced consistently.
-
Your app must include all four of the following:
-
A method for filtering objectionable material
Stream's out-of-the-box moderation suite supports automatic filtering of text, images, and videos based on rules and policies you configure — covering Chat, Feeds, Image, and Video content. -
A mechanism to report offensive content
Stream supports Flagging, which lets any user report a message or user for review. Flagged content is automatically routed to the moderation queue in the Stream Dashboard for moderator action. -
The ability to block abusive users
Stream's block user feature lets users control their 1-on-1 interactions within chat. You can also mute users — muted users' messages still arrive via WebSocket but won't trigger push notifications. -
Published contact information
This needs to be handled on your side (typically via your privacy policy or support URL). Stream's moderation suite also includes an Appeal API, which lets users submit appeals against moderation decisions for moderator review.
-
-
Fix: Before submitting an app with UGC or social features, verify all four of these are implemented and documented. Reference them explicitly in your Review Notes so Apple's reviewers can quickly confirm compliance.
Ready to Ship
Successful App Store and Google Play launches come down to preparation. Keep permissions lean, ensure privacy disclosures match your app's behavior, and provide clear review notes when needed.
If you use SDKs like Stream Chat or Video, account for the capabilities they enable, from required Info.plist` keys on iOS to removing unused `FOREGROUND_SERVICE_*