AI agent chats are mostly a 1:1 experience. But that misses a clear opportunity--having an AI member of your team. If every team member was participating in a chat with AI, you could collaborate as a group, create shared knowledge bases, or solve problems together more efficiently.
So, let's build that. We're going to extend the Stream AI integration with two features:
-
Multiuser functionality will allow us to create group chats where all team members can interact with the AI simultaneously, sharing context and building on each other's questions and insights.
-
Retrieval-augmented generation (RAG) from PDF uploads will allow us to feed our AI system with custom knowledge from PDF documents, providing more accurate and contextual responses based on our team's specific documentation and resources.
The initial code we'll use is our React AI components and our Node.js AI assistant.
Extending Our Client With Multiuser
In the example codebase, the user is a hardcoded Dark Lord. Ideally, we want more people on our team talking to an AI integration than just someone asking for information on Obi-Wan. In a real scenario, each team member will be assigned an ID in the chat when they are onboarded, which will be used to identify them.
Here, we mimic a new user through the use of URL params in our App.tsx:
1234567891011121314151617181920212223242526272829303132333435363738394041// App.tsx

import { useState, useEffect } from 'react';
// other imports stay the same

...
const App = () => {
 const params = new URLSearchParams(window.location.search);
 const userId = params.get('userId');
 if (!userId) {
   throw new Error('userId is required in URL parameters');
 }

 const [userData] = useState<User>({
   id: userId,
   name: userId,

 });
 const [userToken, setUserToken] = useState<string | null>(null);

 useEffect(() => {
   const initUser = async () => {
     try {
       const response = await fetch('http://127.0.0.1:3000/generate-token', {
         method: 'POST',
         headers: {
           'Content-Type': 'application/json',
         },
         body: JSON.stringify({ userId }),
       });

       const { token } = await response.json();
       setUserToken(token);
     } catch (error) {
       console.error("Error initializing user:", error);
     }
   };

   initUser();
 }, [userId]);
...
Here, we extract a userId from URL parameters and use it to create a user object. We then make an API call to our backend to generate a Stream token for this user, storing it in state. You can’t create Stream user tokens on the client, so we then need to add a new endpoint to our Node server within index.js:
12345678910111213141516// index.js

app.post('/generate-token', async (req, res) => {
 const { userId } = req.body;
  try {
   const token = serverClient.createToken(userId);

   await serverClient.upsertUser({
     id: userId,
     role: 'admin',
   });
   res.json({ token });
 } catch (error) {
   res.status(500).json({ error: 'Error generating token' });
 }
});
This endpoint creates a Stream token for the provided userId and ensures the user exists in Stream's system. We also assign them an admin role to make it easy for them to read and create channels. Finally, we return the generated token for client-side use.
So, when we add the user of Alice to the URL, we get a chat window for her:

The same goes for Bob:
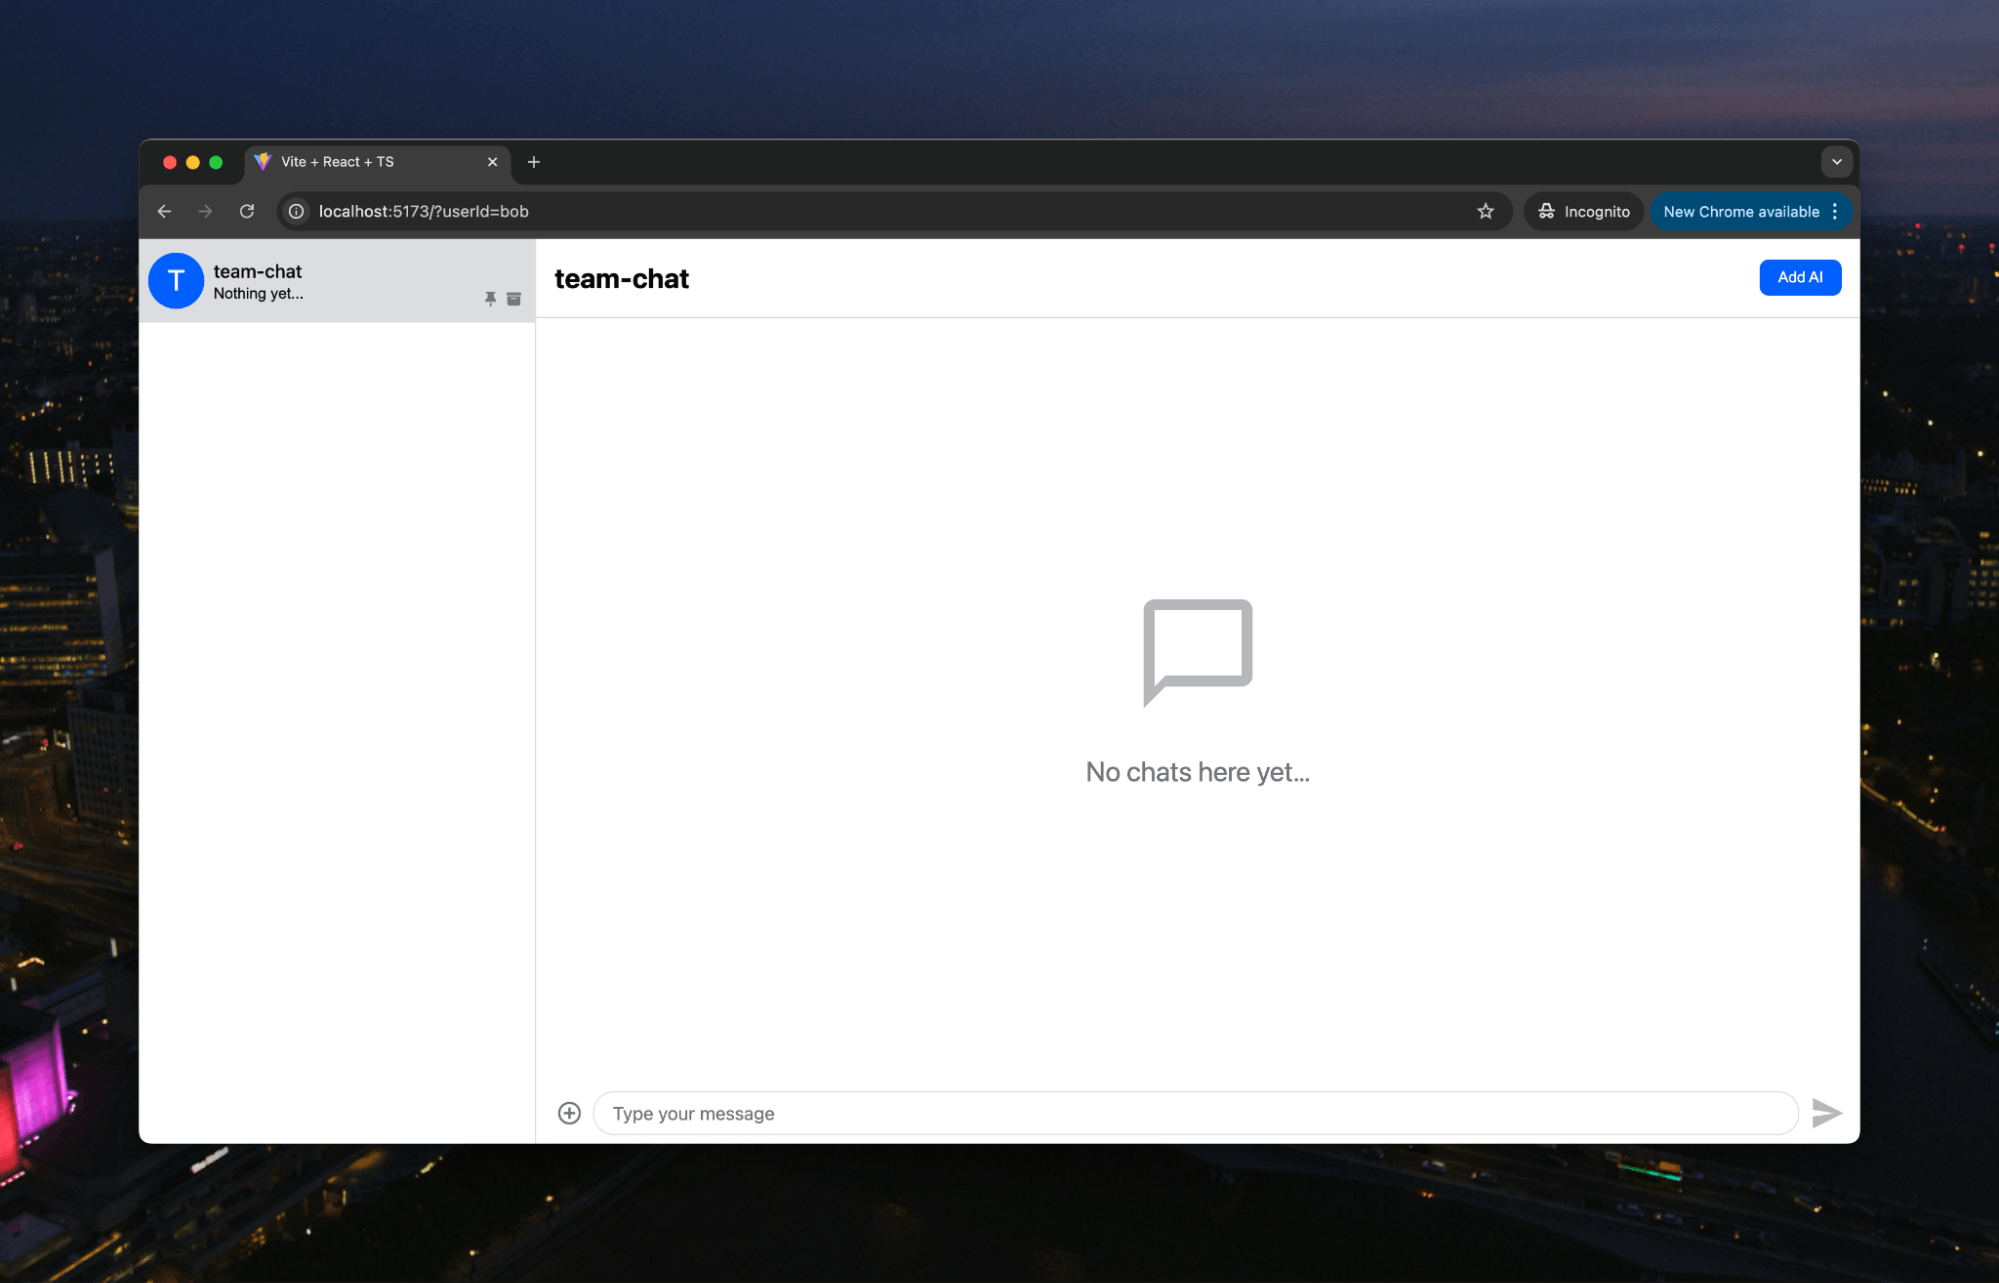
Note two things. First, Alice and Bob can just communicate like a regular team chat:
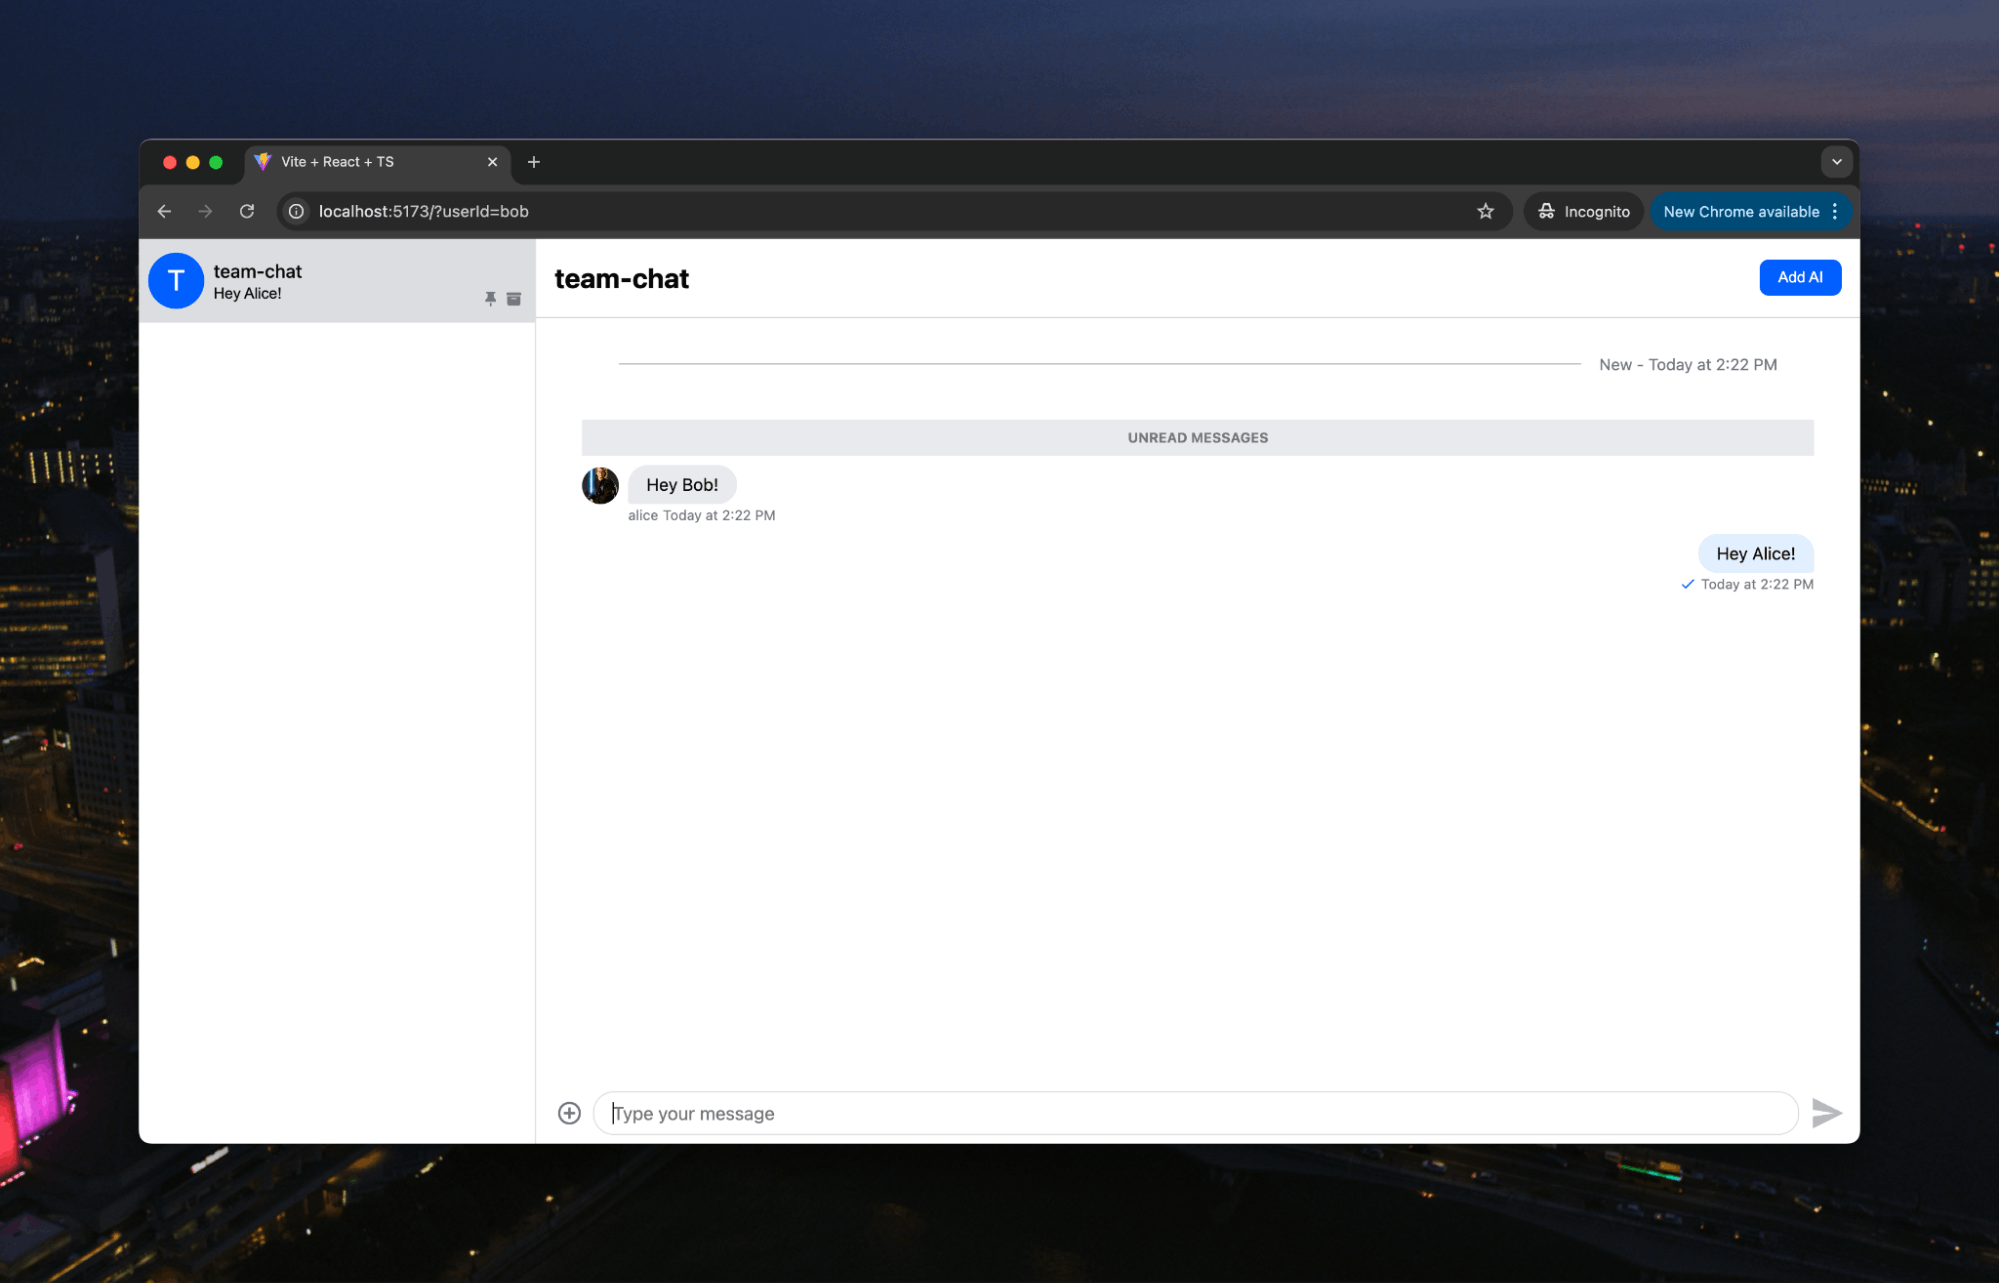
Second, because we are building upon the Stream AI integration, AI is ready to go in the chat as well:

With this simple switch to dynamic users, we could now start using AI in team conversations. However, we want to add RAG to provide more specific context for the AI.
Adding RAG to Our AI
We covered RAG in our previous "AI book chat" tutorial, which involved uploading the PDF before starting the chat. Here, we will use Stream's built-in file upload capabilities to add PDFs to our AI's context within the chat.
Let's start with our client again. Here, we need to do two things. First, override the default file upload request within our
1234567891011121314151617181920// App.tsx
...

 return (
   <Chat client={client}>
     <ChannelList filters={filters} sort={sort} options={options} />
     <Channel>
       <Window>
         <MyChannelHeader />
         <MessageList />
         <MyAIStateIndicator />
         <MessageInput doFileUploadRequest={handleFileUpload} />
       </Window>
       <Thread />
     </Channel>
   </Chat>
 );
};

export default App;
Then, we need to create the upload function this will now call when an attachment is added to the chat:
12345678910111213141516171819// App.tsx
...
 const handleFileUpload = async (file: File, channel: Channel) => {
   const formData = new FormData();
   formData.append('file', file);
   formData.append('channelId', channel.id);

   const response = await fetch('http://127.0.0.1:3000/upload', {
     method: 'POST',
     body: formData
   });

   if (!response.ok) {
     throw new Error('Upload failed');
   }

   return response.json();
 };
...
This sends the uploaded file and channel ID to our backend endpoint as form data.
Let’s now move to the server and that /upload endpoint:
1234567891011121314151617181920212223242526272829303132333435363738394041424344454647484950515253545556575859// index.js

const upload = multer();

app.post('/upload', upload.single('file'), async (req, res) => {
 console.log('uploading file');

 const { PDFEmbeddingSystem } = await import('./lib/PDFEmbeddingSystem');
 const file = req.file;
  if (!file) {
   return res.status(400).json({
     success: false,
     error: 'No file received'
   });
 }

 // Validate file type
 if (file.mimetype !== 'application/pdf') {
   return res.status(400).json({
     success: false,
     error: 'Only PDF files are allowed'
   });
 }

 // Process file
 const buffer = file.buffer;
 const pdfId = randomUUID();
 const timestamp = Date.now();
 const nameWithoutExtension = file.originalname.replace(/\.pdf$/i, '');
 const cleanFileName = `${timestamp}-${nameWithoutExtension.replace(/[^a-zA-Z0-9-]/g, '_')}`;

 try {
   console.log('Initializing embedding system...');

   // Initialize embedding system
   const embedder = new PDFEmbeddingSystem(
     process.env.OPENAI_API_KEY,
     process.env.PINECONE_API_KEY,
     process.env.PINECONE_INDEX
   );

   console.log('Processing PDF...');

   // Process PDF and create embeddings
   await embedder.processPDF(
     buffer,
     'default',
     {
       pdfId,
       originalName: file.originalname,
       uploadedAt: timestamp
     }
   );
   res.status(200).json({ message: 'File uploaded' });
 } catch (error) {
   console.error('Error processing PDF', error);
   res.status(500).json({ error: 'Error processing PDF' });
 }
});
This endpoint handles PDF file uploads using multer middleware for file processing. After validating that the file is a PDF, it generates a unique ID and cleaned filename, then initializes our PDFEmbeddingSystem. We covered the PDFEmbeddingSystem in our previous post, so won't go back over it in detail here. Briefly, the system processes the PDF buffer, creating embeddings stored in Pinecone with metadata about the upload (you'll need a Pinecone API key for this tutorial) and making the document content available for future RAG queries.
When we query the AI in our chat, it has this information to use as context. All we need to do is to add it to our agents. First, we'll create a RAGService on our server to get the embeddings:
123456789101112131415161718192021222324252627282930313233343536373839404142434445464748495051525354// RAGService.ts

import { PDFEmbeddingSystem } from './PDFEmbeddingSystem';
import type { ScoredPineconeRecord, RecordMetadata as PineconeMetadata } from '@pinecone-database/pinecone';

export class RAGService {
 private embedder: PDFEmbeddingSystem;

 constructor(
   openAiApiKey: string,
   pineconeApiKey: string,
   pineconeIndex: string
 ) {
   this.embedder = new PDFEmbeddingSystem(
     openAiApiKey,
     pineconeApiKey,
     pineconeIndex
   );
 }

 async getRelevantContext(query: string, namespace?: string): Promise<string> {
   console.log('Getting relevant context');
   try {
     const matches = (await this.embedder.querySimilar(
       query,
       3,
       null,
       'default'
     ));

     if (!matches || matches.length === 0) {
       console.log('No matches found for query:', query);
       return '';
     }

     // Log matches for debugging
     console.log('Found matches:', matches.map(m => ({
       score: m.score,
       metadata: m.metadata
     })));

     // Combine the relevant text chunks into a single context
     const context = matches
       .map(match => match?.metadata?.text ?? '')
       .filter((text): text is string => typeof text === 'string' && text.length > 0)
       .join('\n\n');

     return context;
   } catch (error) {
     console.error('Error getting relevant context:', error);
     return '';
   }
 }
}
This class wraps our PDFEmbeddingSystem and provides an interface for retrieving relevant context from our document embeddings. The getRelevantContext method takes a query string, generates embeddings, and queries Pinecone for the three most similar text chunks.
These matches are then filtered, combined into a single context string, and returned for use in our AI responses. Here, we’ll add it to the Anthropic agent:
1234567891011121314151617181920212223242526272829303132// AnthropicAgent.ts

// other imports
import { RAGService } from '../../lib/RAGService';

export class AnthropicAgent implements AIAgent {
 private anthropic?: Anthropic;
 private handlers: AnthropicResponseHandler[] = [];
 private lastInteractionTs = Date.now();
 private ragService?: RAGService;

...

init = async () => {
   const apiKey = process.env.ANTHROPIC_API_KEY as string | undefined;
   const pineconeApiKey = process.env.PINECONE_API_KEY as string | undefined;
   const pineconeIndex = process.env.PINECONE_INDEX as string | undefined;

   if (!apiKey) {
     throw new Error('Anthropic API key is required');
   }
   if (pineconeApiKey && pineconeIndex) {
     this.ragService = new RAGService(
       process.env.OPENAI_API_KEY as string,
       pineconeApiKey,
       pineconeIndex
     );
   }

   this.anthropic = new Anthropic({ apiKey });
   this.chatClient.on('message.new', this.handleMessage);
 };
Then, if ragService initializes correctly, we use it to get relevant context and add that to the prompt for our Claude model:
1234567891011121314151617181920212223// AnthropicAgent.ts

...
   if (this.ragService) {
     console.log('RAG service is initialized');
     try {
       console.log('Getting RAG context');
       const context = await this.ragService.getRelevantContext(message);
       console.log('Retrieved context:', context);

       if (context) {
         systemPrompt = `You are an AI assistant with access to a knowledge base.
Use the following relevant information to help answer the user's question:

${context}

If the context is not relevant to the user's question, you can ignore it and answer based on your general knowledge.`;
       }
       console.log('System prompt:', systemPrompt);
     } catch (error) {
       console.error('Error getting RAG context:', error);
     }
   }
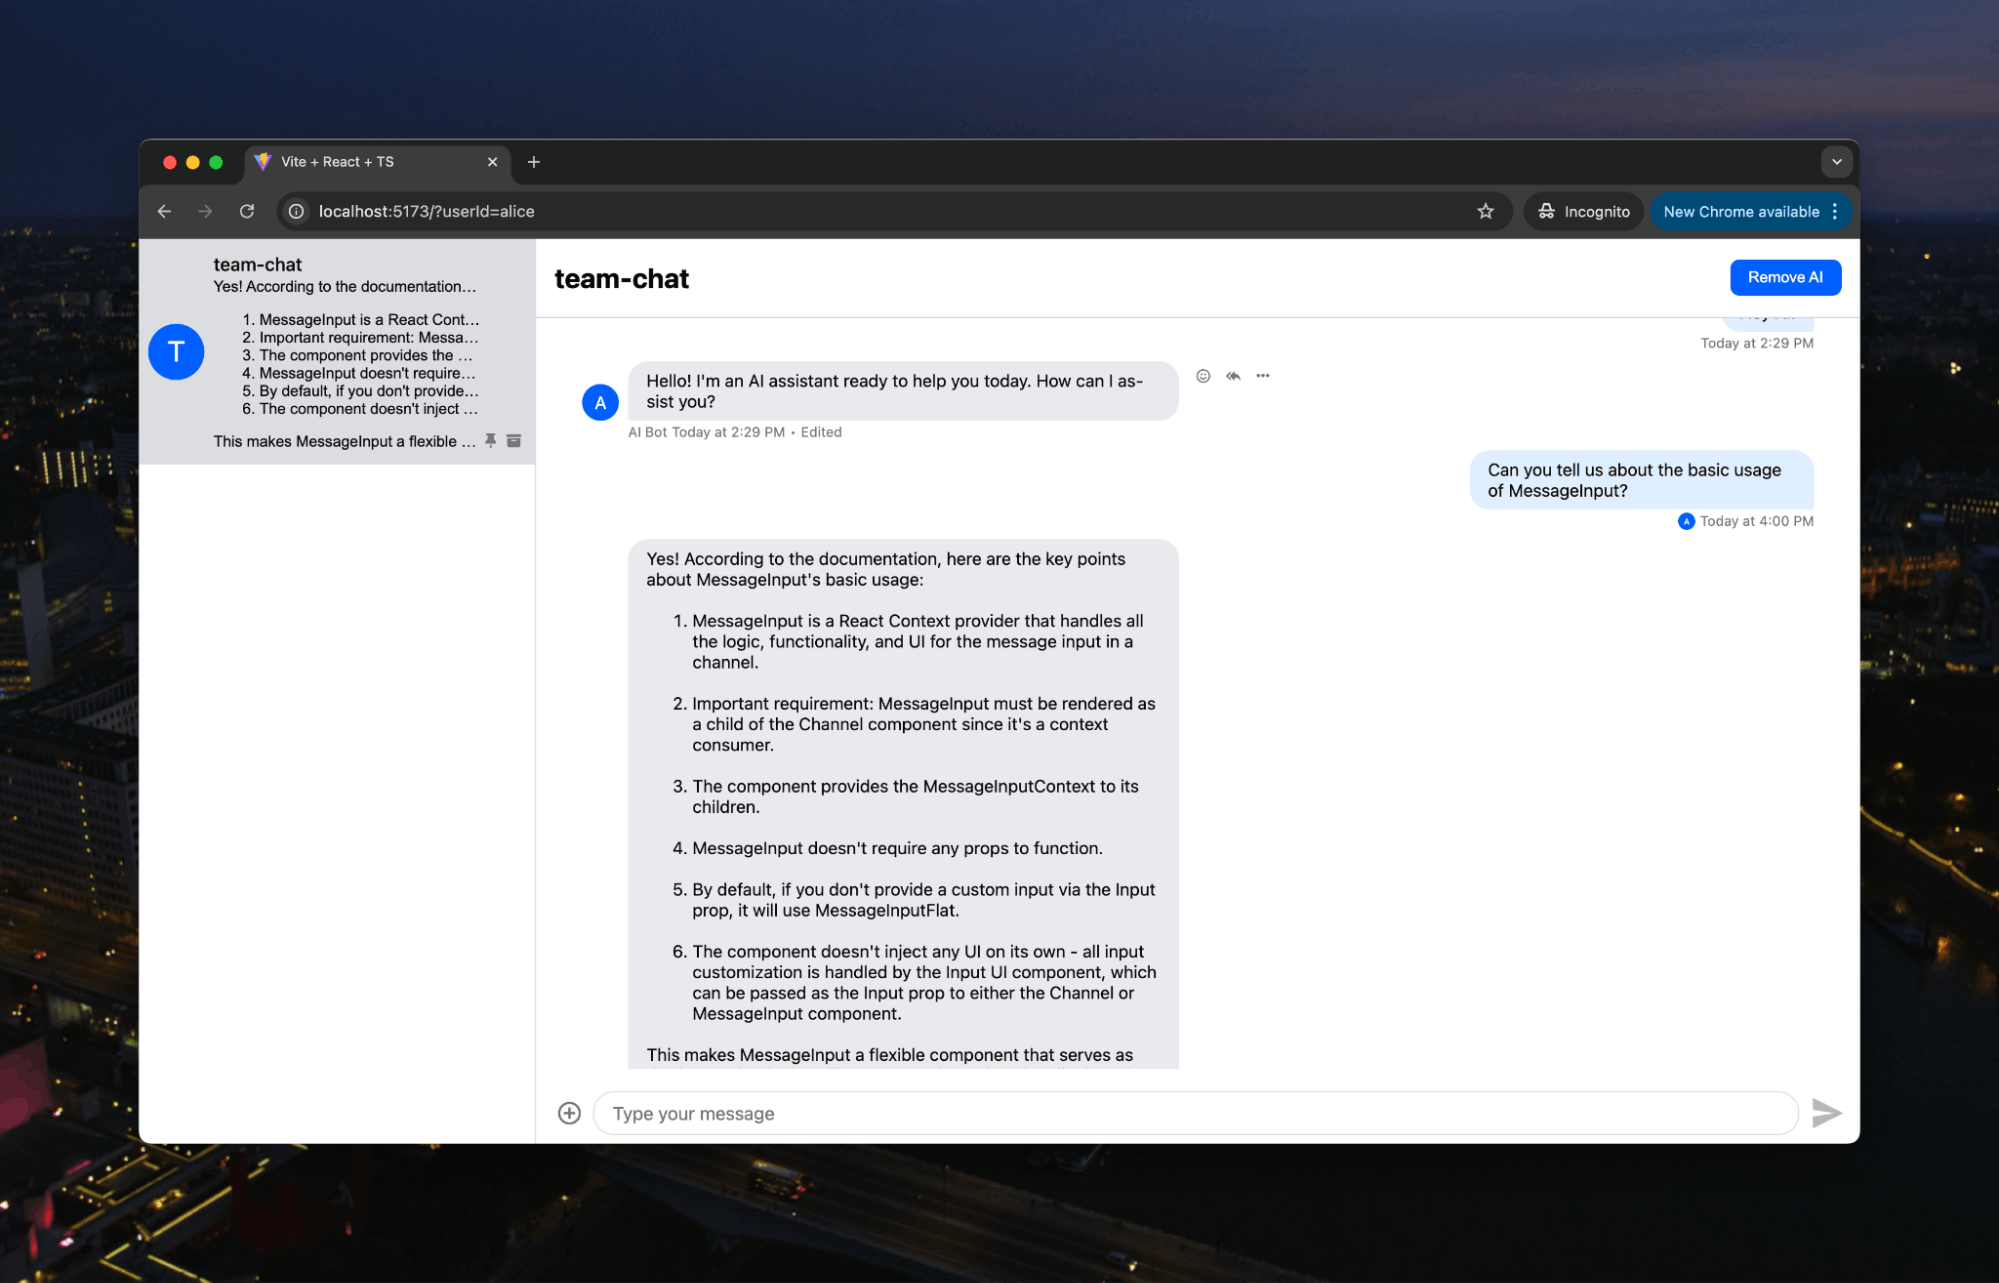
That is all the code required. If we relaunch our server, we can upload a PDF and ask questions. Here, we’ll use a PDF of some Stream docs:
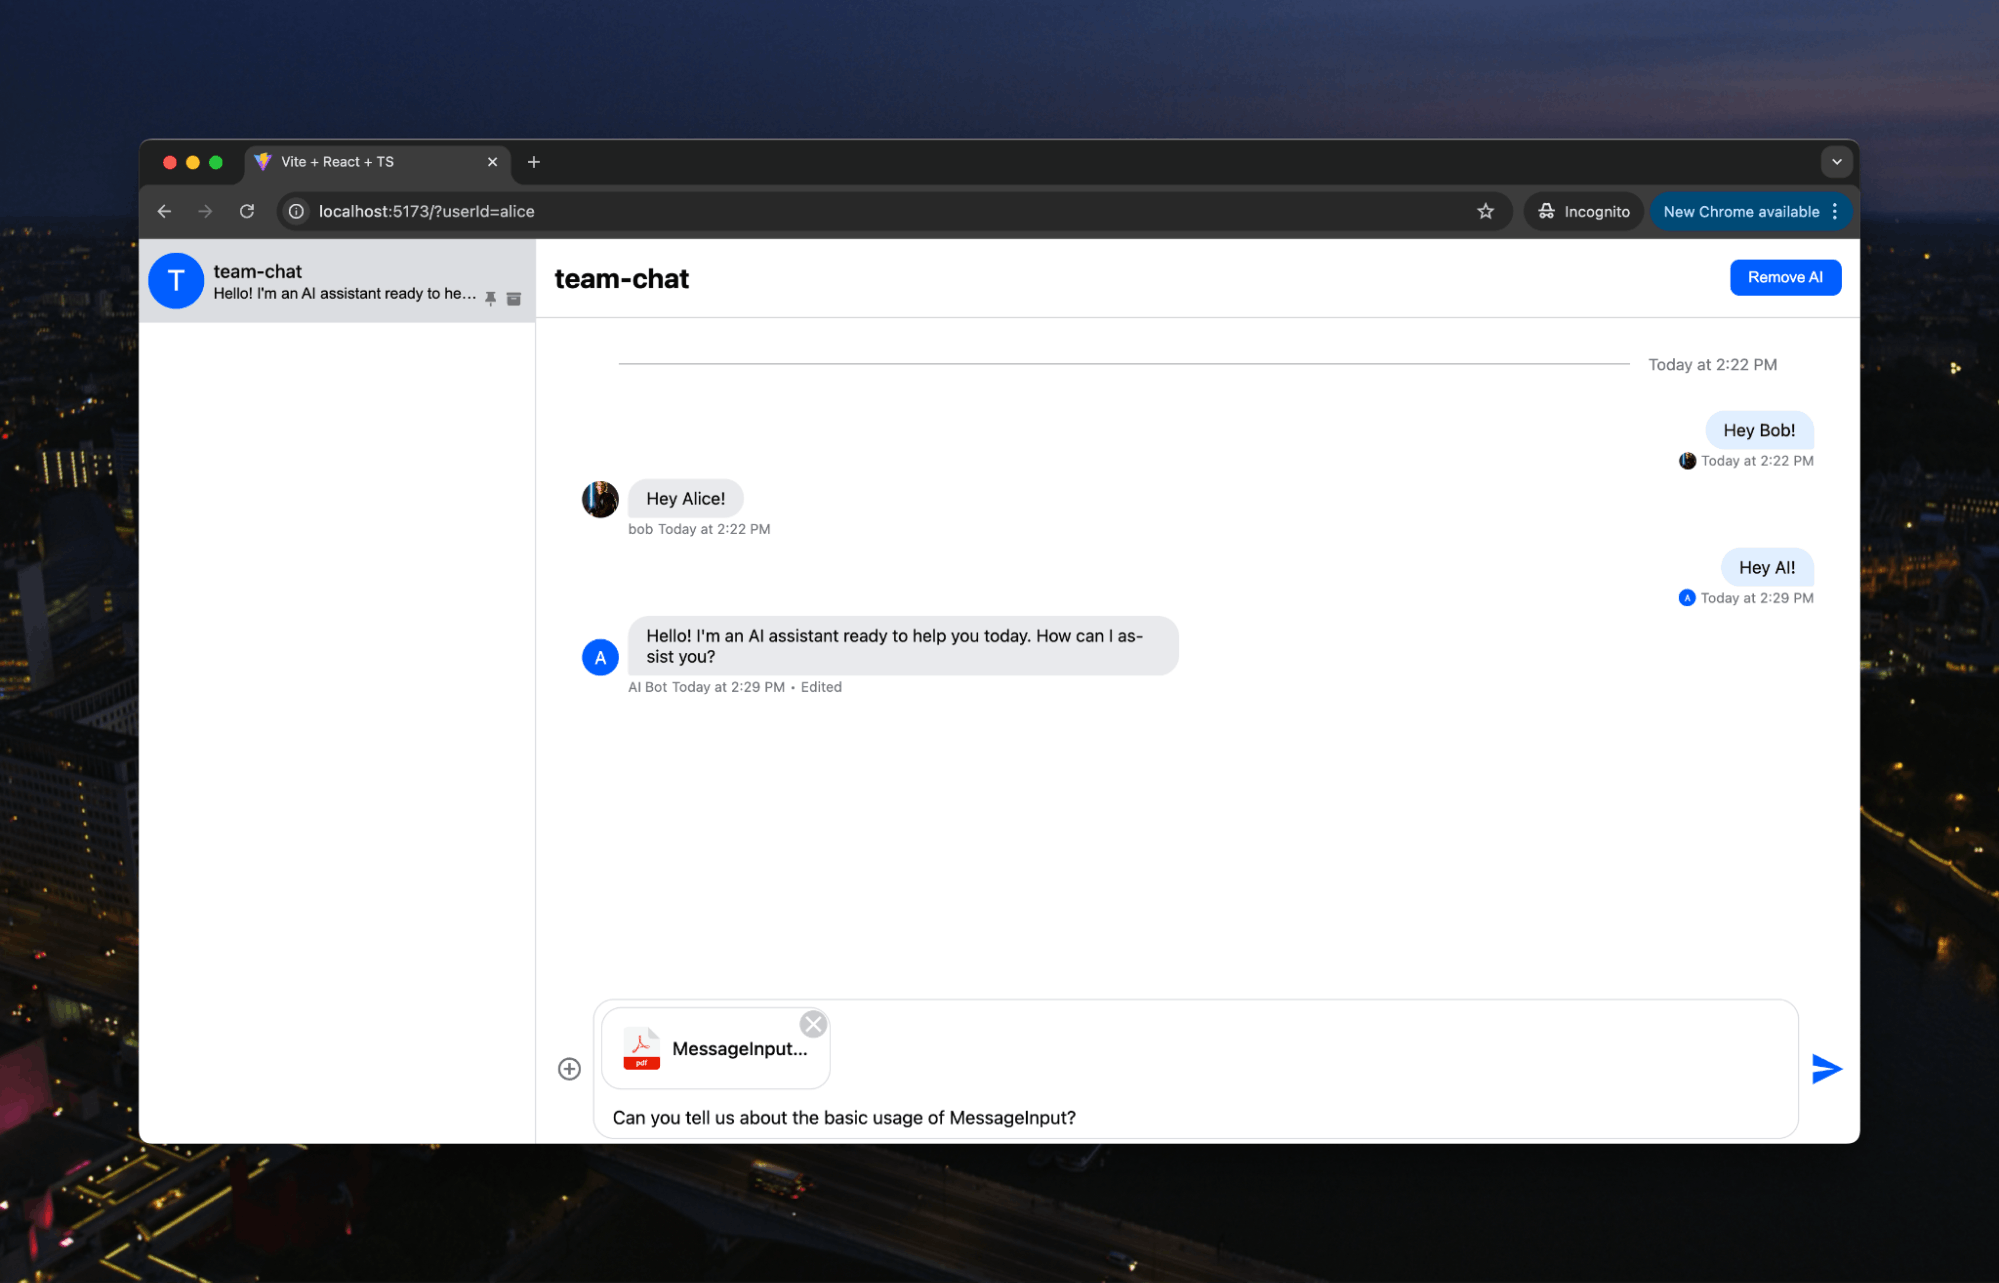
Then, we get an answer explicitly based on the documentation:
We can now chat as a team, but we can also bring in AI when needed and give it relevant context. The next steps might be to expand the data we can pass to the AI, such as URLs or images. Claude might be unable to read URLs, but you could build that functionality here with simple HTML parsing. You could also leverage agentic RAG and integrate this chat into internal systems or other tools to have the AI perform actions that your team needs, just like a real team member.
Check out the Stream AI integration and the other tutorials on AI assistants to learn how to start using Stream with AI to build precisely the AI assistant your team needs.

