Livestream Quickstart
In this tutorial, we'll quickly build a low-latency in-app livestreaming experience. The livestream is broadcast using Stream's edge network of servers around the world.
This tutorial is structured into two parts:
Part 1: Building a Livestreaming React App
- Creating a livestream on the Stream dashboard
- Setting up RTMP input with OBS software
- Viewing the livestream in a browser
- Building custom livestream viewer UI
Part 2: Creating an Interactive Livestreaming App
- Publishing a livestream from a browser with WebRTC
- Implementing backstage and go live functionality
Let's get started! If you have any questions or feedback, please let us know via the feedback button.
Step 1 - Create a Livestream in the Dashboard
First, let's create our livestream using the dashboard. To do this, open the dashboard and select "Video & Audio" -> "Overview".
In that screen, you will see three buttons that allow you to create different types of calls, as shown on the image below.

Click on the third one, the "Create Livestream" option.
After you do this, you will be shown the following screen, which contains information about the livestream:
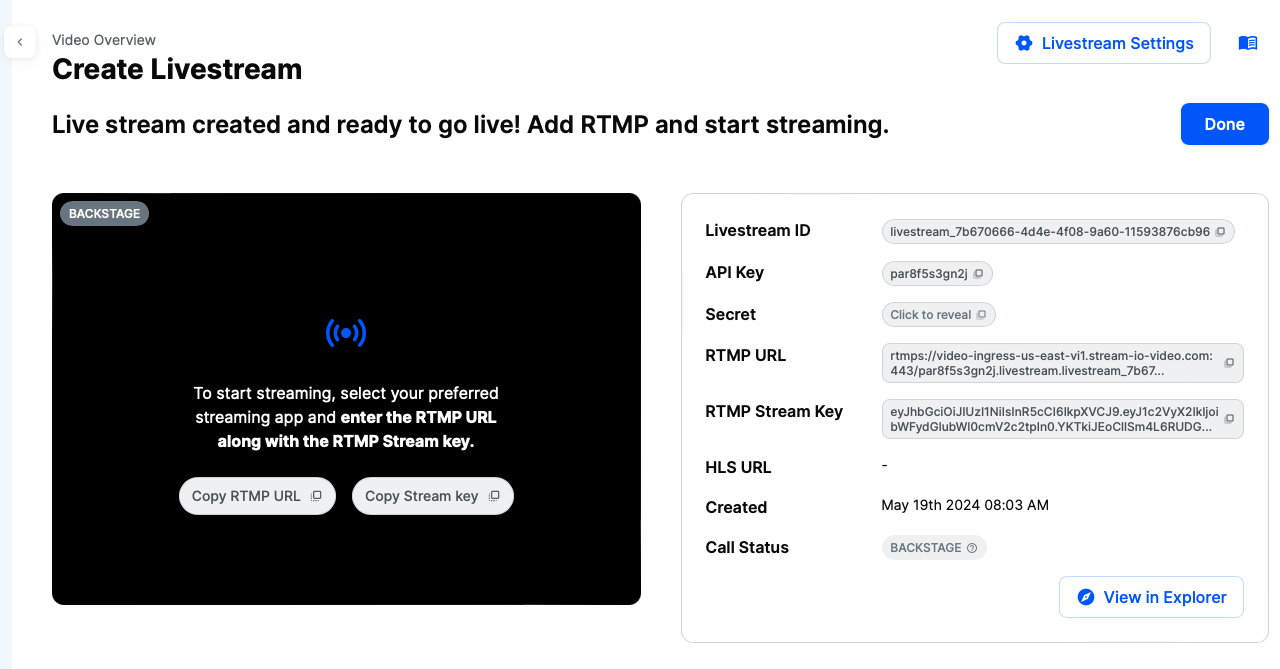
You will need the RTMP URL and RTMP Stream Key from this page, which are needed to set up the livestream in the OBS application.
Copy these values for now, and we will get back to the dashboard a bit later.
Step 2 - Setup the Livestream in OBS
OBS is one of the most popular livestreaming software package, and we'll use it to explain how to publish video with RTMP.
After you download and install the software using the instructions provided on the link, you should set up the capturing device and the livestream data.
First, lets set up the capturing device, which can be found in the sources section:
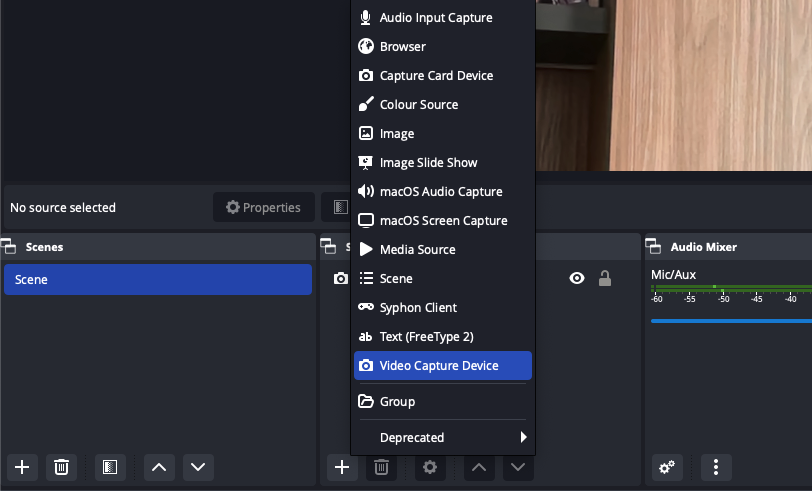
Select the Video Capture Device option to stream from your computer's camera.
Alternatively, you can choose other options, such as macOS Screen Capture to stream your screen.
Next, we need to provide the livestream credentials from our dashboard to OBS.
To do this, click on the Settings button located in the Controls section in the bottom right corner of OBS.
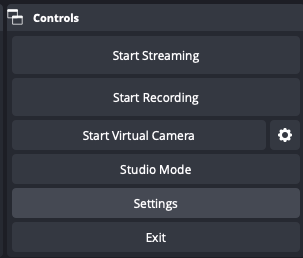
This will open a popup. Select the second option, Stream.
For the Service option, choose Custom. In the Server and Stream Key fields, enter the values you copied from the dashboard in Step 1.
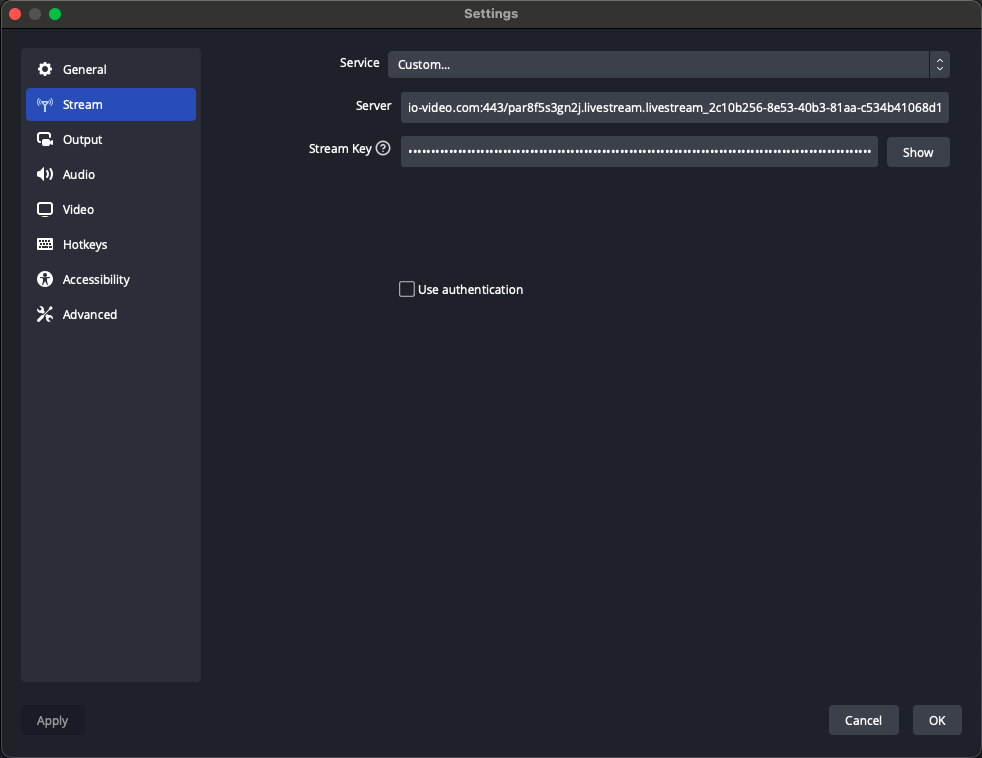
With that, our livestream setup is complete.
Before returning to the dashboard, press the Start Streaming button in the Controls section.
Now, let's go back to the dashboard. If everything is set up correctly, you should see the OBS livestream in the dashboard, as shown in this screenshot:
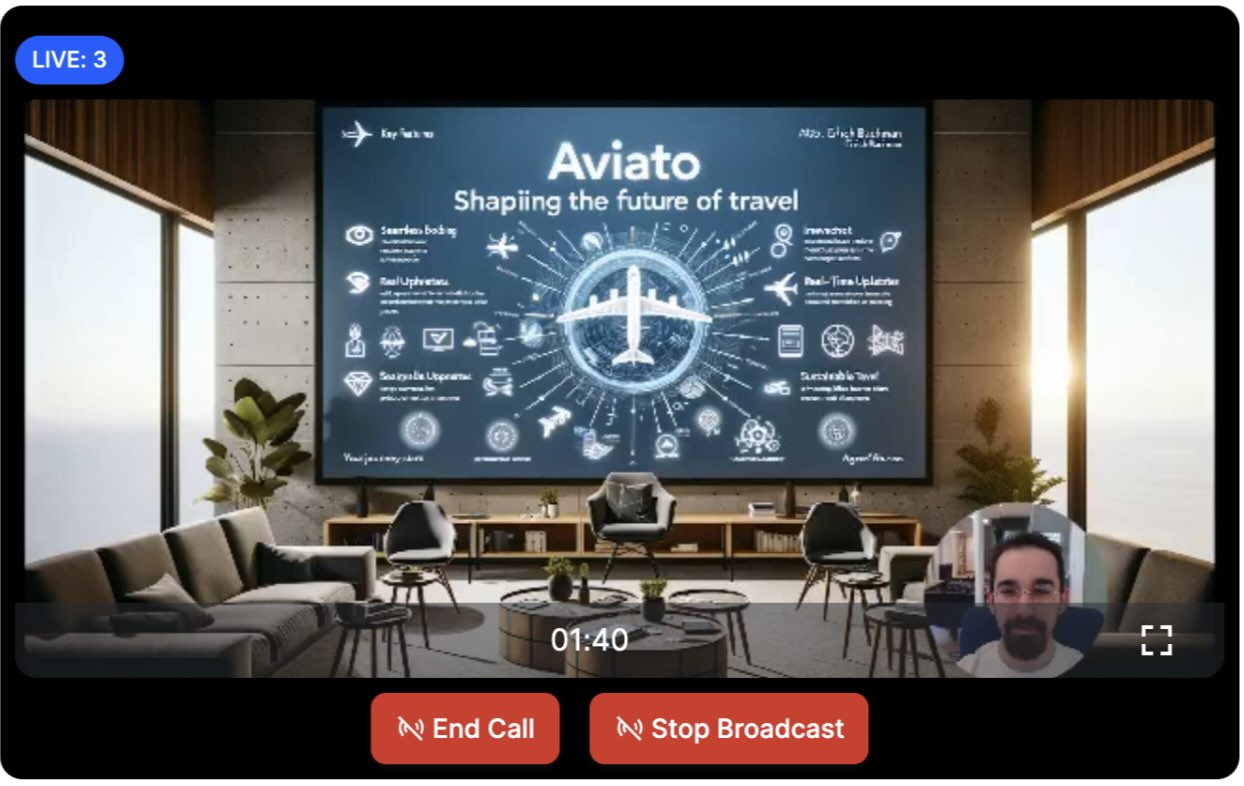
Note that by default, the dashboard will start the livestream immediately.
For your own livestreams, you can configure this behavior in the dashboard by enabling or disabling the backstage for the livestream call type.
Step 3 - Show the livestream in a React app
Now that the livestream is started, let's see how we can watch it in a browser. We are going to use our React Video SDK to build a simple viewer experience. First, set up the project and install the required dependencies. Make sure you have the following tools already installed:
Step 3.1 - Create a New React App Project and Install the SDK
In this example, we will use Vite with the react-ts template to create a new React app as it is a modern and fast build tool with good defaults.
12345678# Bootstrap the a new project named `livestream-app` using Vite
yarn create vite livestream-app --template react-ts

# Change into the project directory
cd livestream-app

# Install the Stream Video SDK
yarn add @stream-io/video-react-sdk
Step 3.2 - View a Livestream From Your Browser
The following code shows you how to create a livestream viewer with React that will play the stream we created above.
First, let's remove some of the boilerplate code generated by Vite from the ./src/main.tsx file and replace it with the following code:
123456789101112import ReactDOM from "react-dom/client";
import App from "./App.tsx";
import { StreamTheme } from "@stream-io/video-react-sdk";

// import the SDK provided styles
import "@stream-io/video-react-sdk/dist/css/styles.css";

ReactDOM.createRoot(document.getElementById("root")!).render(
  <StreamTheme style={{ fontFamily: "sans-serif", color: "white" }}>
    <App />
  </StreamTheme>
);
This code will load the Video SDK styles and will initialize the default theme. You can read more about theming here.
Next, Let's open ./src/App.tsx and replace its contents with the following code:
1234567891011121314151617181920212223import {
  LivestreamPlayer,
  StreamVideo,
  StreamVideoClient,
  User,
  StreamCall,
} from "@stream-io/video-react-sdk";

const apiKey = "REPLACE_WITH_API_KEY";
const token = "REPLACE_WITH_TOKEN";
const callId = "REPLACE_WITH_CALL_ID";

const user: User = { type: "anonymous" };
const client = new StreamVideoClient({ apiKey, user, token });
const call = client.call("livestream", callId);

export default function App() {
  return (
    <StreamVideo client={client}>
      <LivestreamPlayer callType="livestream" callId={callId} />
    </StreamVideo>
  );
}
Before running the app, you should replace the placeholders with values from the dashboard:
- For the
apiKey, use theAPI Keyvalue from your livestream page in the dashboard - Replace the
tokenvalue with theViewer Tokenvalue in the dashboard - Replace the
callIdwithLivestream ID
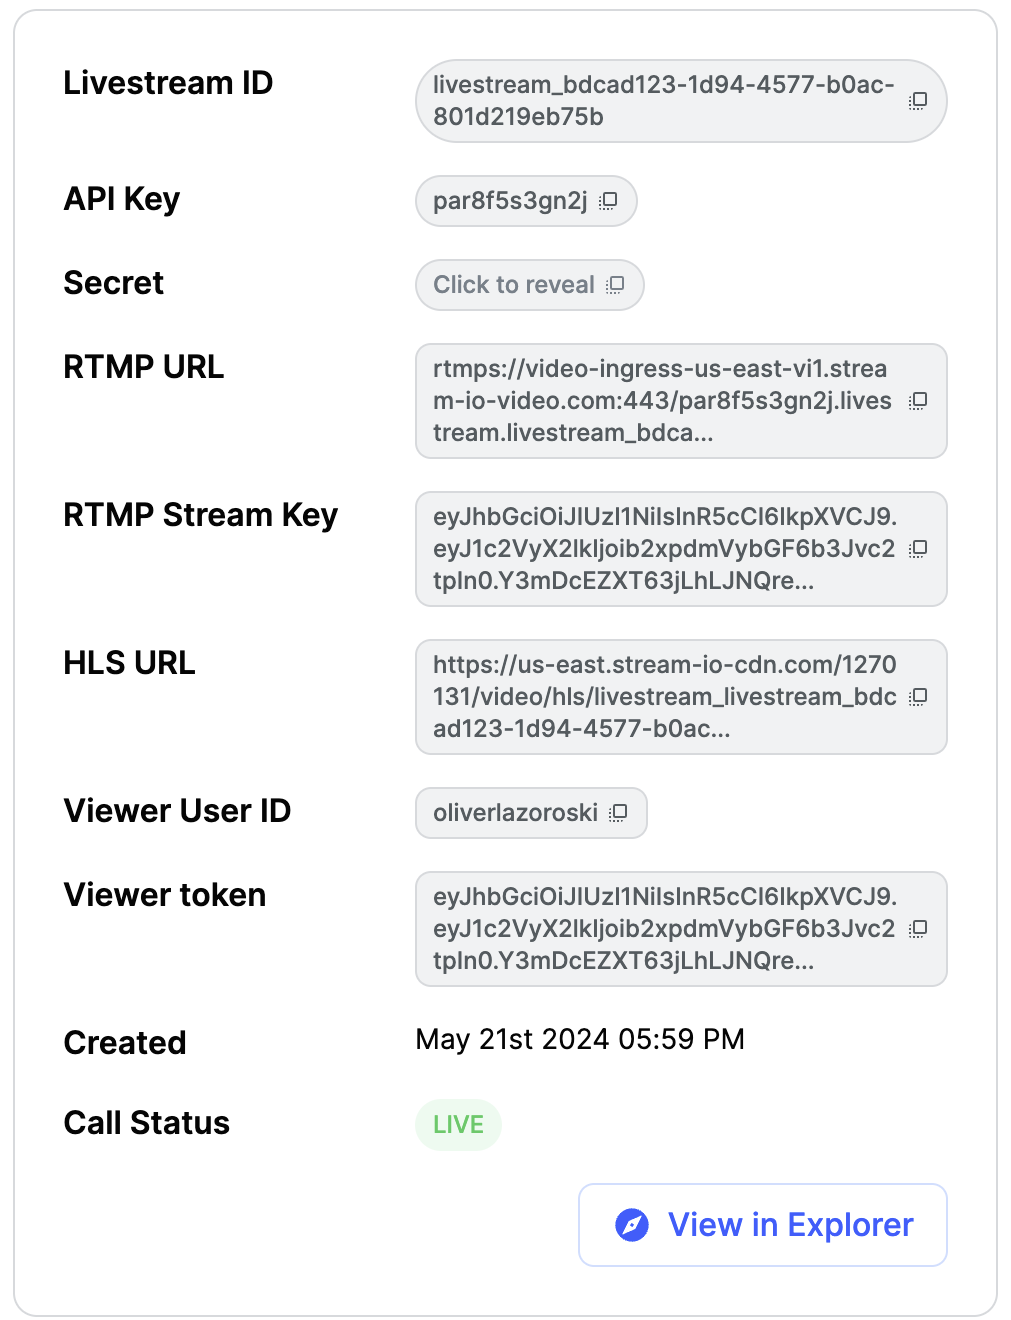
That is everything that's needed to play a livestream with our React SDK.
The LivestreamPlayer component allows you to play livestreams easily, by just specifying the call id and call type.
To run the app execute the following command in your terminal and follow the provided instructions:
1yarn run dev
Once you open the app in your browser, you will see the livestream published from the OBS software.
The LivestreamPlayer uses LivestreamLayout under the hood which is a more advanced component that allows you to customize the layout of the livestream.
You can find more details about the LivestreamLayout in the following page.
LivestreamPlayer accepts layoutProps as a prop, which can be used to customize the layout.
Step 3.4 - Customizing the UI
Based on your app's requirements, you might want to have a different user interface for your livestream. In those cases, you can build your custom UI, while reusing some of the SDK components and the state layer.
State & Participants
If you want to build more advanced user interfaces, that will include filtering of the participants by various criteria or different sorting,
you can access the call state via call.state or through one of our Call State Hooks.
One example is filtering of the participants.
You can get all the participants with role host with the following code:
12345import { useCallStateHooks } from "@stream-io/video-react-sdk";

const { useParticipants } = useCallStateHooks();
const participants = useParticipants();
const hosts = participants.filter((p) => p.roles.includes("host"));
The participant state docs show all the available fields.
For sorting, you can build your own comparators, and sort participants based on your own criteria. The React Video SDK provides a set of comparators that you can use as building blocks, or create your own ones as needed.
Here's an example of a possible livestream related sorting comparator:
12345678910111213141516import {
  combineComparators,
  role,
  dominantSpeaker,
  speaking,
  publishingAudio,
  publishingVideo,
} from "@stream-io/video-react-sdk";

const livestreamComparator = combineComparators(
  role("host", "speaker"),
  dominantSpeaker(),
  speaking(),
  publishingVideo(),
  publishingAudio()
);
These comparators will prioritize users that are the hosts, then participants that are speaking, publishing video and audio.
To apply the sorting, you can use the following code:
1234567import { useCallStateHooks } from "@stream-io/video-react-sdk";

const { useParticipants } = useCallStateHooks();
const sortedParticipants = useParticipants({ sortBy: livestreamComparator });

// alternatively, you can apply the comparator on the whole call:
call.setSortParticipantsBy(livestreamComparator);
To read more about participant sorting, check the participant sorting docs.
Now, let's build a custom player, that will display the livestream and the number of viewers.
To achieve this, create a new component, named CustomLivestreamPlayer.tsx and add the following code:
12345678910111213141516171819202122232425262728293031323334353637383940414243444546474849505152535455import { useEffect, useState } from "react";
import {
  Call,
  ParticipantView,
  StreamCall,
  useCallStateHooks,
  useStreamVideoClient,
} from "@stream-io/video-react-sdk";

export const CustomLivestreamPlayer = (props: {
  callType: string;
  callId: string;
}) => {
  const { callType, callId } = props;
  const client = useStreamVideoClient();

  const [call, setCall] = useState<Call>();
  useEffect(() => {
    if (!client) return;
    const myCall = client.call(callType, callId);
    setCall(myCall);
    myCall.join().catch((e) => {
      console.error("Failed to join call", e);
    });
    return () => {
      myCall.leave().catch((e) => {
        console.error("Failed to leave call", e);
      });
      setCall(undefined);
    };
  }, [client, callId, callType]);

  if (!call) return null;
  return (
    <StreamCall call={call}>
      <CustomLivestreamLayout />
    </StreamCall>
  );
};

const CustomLivestreamLayout = () => {
  const { useParticipants, useParticipantCount } = useCallStateHooks();
  const participantCount = useParticipantCount();
  const [firstParticipant] = useParticipants();
  return (
    <div style={{ display: "flex", flexDirection: "column", gap: "4px" }}>
      <div>Live: {participantCount}</div>
      {firstParticipant ? (
        <ParticipantView participant={firstParticipant} />
      ) : (
        <div>The host hasn't joined yet</div>
      )}
    </div>
  );
};
In the code above, we're checking if we have a participant in our call state.
If yes, we are using the ParticipantView to display the participant and their stream.
If no participant is available, we are simply showing a text view with a message that the livestream is not available.
We are also adding a label in the top corner, that displays the total participant count.
This information is available via the useParticipantCount() call state hook.
Finally, for simplicity, we are using the useEffect lifecycle to join and leave the livestream.
Based on your app's logic, you may invoke these actions on user input, for example, buttons for joining and leaving a livestream.
To test the new implementation, replace the SDK provided LivestreamPlayer with the new CustomLivestreamPlayer in the App component.
12345678// ... the rest of the code
export default function App() {
  return (
    <StreamVideo client={client}>
      <CustomLivestreamPlayer callType="livestream" callId={callId} />
    </StreamVideo>
  );
}
Part 2 - Build Your Own YouTube Live
In the first part of this tutorial, we built a simple livestream app, where we published a livestream using RTMP. The authentication was done using the Dashboard. In a real application, you want to generate tokens programmatically using a server-side SDK.
The second part of this tutorial expands our app to include interactive functionality such as streaming from end-user devices.
Step 4 - Live Streaming From a Browser
We are going to send video and audio from a browser directly using WebRTC and use the backstage functionality.
Step 4.1 - Broadcasting a Livestream
Replace all the existing code we had for the viewer experience in the ./src/App.tsx (or create a new project by following the same steps as above) with the following code:
123456789101112131415161718192021222324252627282930import {
  StreamVideoClient,
  StreamVideo,
  User,
  StreamCall,
} from "@stream-io/video-react-sdk";

const apiKey = "REPLACE_WITH_API_KEY";
const token = "REPLACE_WITH_TOKEN";
const userId = "REPLACE_WITH_USER_ID";
const callId = "REPLACE_WITH_CALL_ID";

const user: User = { id: userId, name: "Tutorial" };
const client = new StreamVideoClient({ apiKey, user, token });
const call = client.call("livestream", callId);
call.join({ create: true });

export default function App() {
  return (
    <StreamVideo client={client}>
      <StreamCall call={call}>
        <LivestreamView />
      </StreamCall>
    </StreamVideo>
  );
}

const LivestreamView = () => {
  return <div>TODO: render video here</div>;
};
To actually run this sample, we need a valid user token. The user token is typically generated by your server side API. When a user logs in to your app you return the user token that gives them access to the call. To make this tutorial easier to follow, we've generated the credentails for you.
When you run the app you'll see a text message saying: TODO: render video.
Before we get around to rendering the video, let's review the code:
In the first step, we set up the user:
123import type { User } from "@stream-io/video-react-sdk";

const user: User = { id: userId, name: "Tutorial" };
Next, we initialize the client:
123import { StreamVideoClient } from "@stream-io/video-react-sdk";

const client = new StreamVideoClient({ apiKey, user, token });
You'll see the token variable. Your backend typically generates the user token on signup or login.
The most important step to review is how we create the call.
Our SDK uses the same Call object for livestreaming, audio rooms and video calling.
Have a look at the code snippet below:
12const call = client.call("livestream", callId);
call.join({ create: true });
To create the call object, specify the call type as livestream and provide a callId. The livestream call type comes with default settings that are usually suitable for livestreams, but you can customize features, permissions, and settings in the dashboard.
Additionally, the dashboard allows you to create new call types as required.
Finally, call.join({ create: true }) will create the call object on our servers but also initiate the real-time transport for audio and video.
This allows for seamless and immediate engagement in the livestream.
Note that you can also add members to a call and assign them different roles. For more information, see the call creation docs.
Step 4.2 - Rendering the Video
In this step, we're going to build a UI for showing your local video with a button to start the livestream.
In ./src/App.tsx replace the LivestreamView component implementation with the following one:
12345678910111213141516171819202122232425262728293031323334353637383940414243import { ParticipantView, useCallStateHooks } from "@stream-io/video-react-sdk";

// ... the rest of the code

const LivestreamView = () => {
  const {
    useCameraState,
    useMicrophoneState,
    useParticipantCount,
    useIsCallLive,
    useParticipants,
  } = useCallStateHooks();

  const { camera: cam, isEnabled: isCamEnabled } = useCameraState();
  const { microphone: mic, isEnabled: isMicEnabled } = useMicrophoneState();

  const participantCount = useParticipantCount();
  const isLive = useIsCallLive();

  const [firstParticipant] = useParticipants();

  return (
    <div style={{ display: "flex", flexDirection: "column", gap: "4px" }}>
      <div>{isLive ? `Live: ${participantCount}` : `In Backstage`}</div>
      {firstParticipant ? (
        <ParticipantView participant={firstParticipant} />
      ) : (
        <div>The host hasn't joined yet</div>
      )}
      <div style={{ display: "flex", gap: "4px" }}>
        <button onClick={() => (isLive ? call.stopLive() : call.goLive())}>
          {isLive ? "Stop Live" : "Go Live"}
        </button>
        <button onClick={() => cam.toggle()}>
          {isCamEnabled ? "Disable camera" : "Enable camera"}
        </button>
        <button onClick={() => mic.toggle()}>
          {isMicEnabled ? "Mute Mic" : "Unmute Mic"}
        </button>
      </div>
    </div>
  );
};
Step 5 - Backstage and GoLive
The backstage functionality makes it easy to build a flow where you and your co-hosts can set up your camera and equipment before going live.
Only after you call call.goLive() regular users will be allowed to join the livestream.
This is convenient for many livestreaming and audio-room use cases.
If you want calls to start immediately when you join them, that's also possible.
Go the Stream dashboard, find the livestream call type and disable the backstage mode.
Step 6 - Preview Using React
Now that we have the livestream set up, let's see how it looks in the browser. To run it, execute the following command in your terminal:
1yarn run dev
When you open the app in your browser, you will see the livestream published from the browser.
Now let's press the Go live button. Upon going live, you will be greeted with an interface that looks like this:
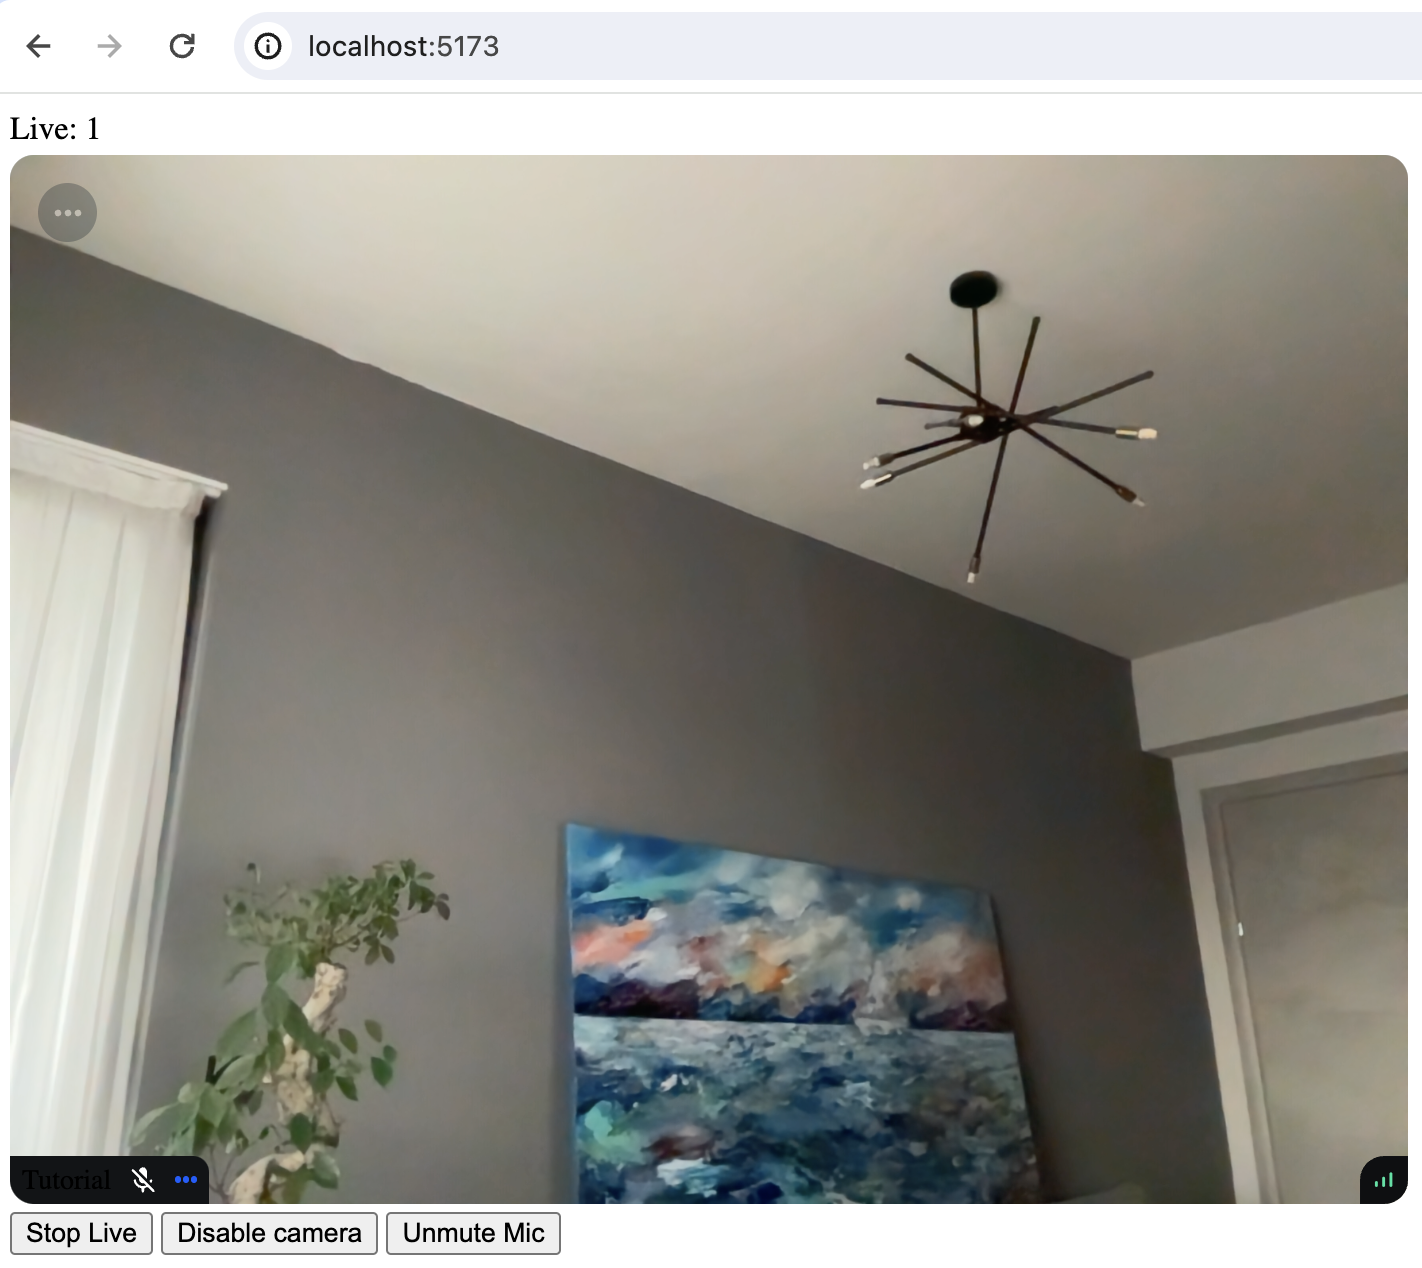
You can also click the link below to watch the video in your browser (as a viewer).
Advanced Features
This tutorial covered the steps required to watch a livestream using RTMP-in and OBS software, as well as how to publish a livestream from a browser.
There are several advanced features that can improve the livestreaming experience:
- Co-hosts You can add members to your livestream with elevated permissions. So you can have co-hosts, moderators etc. You can see how to render multiple video tracks in our video calling tutorial.
- Permissions and Moderation You can set up different types of permissions for different types of users and a request-based approach for granting additional access.
- Custom events You can use custom events on the call to share any additional data. Think about showing the score for a game, or any other realtime use case.
- Reactions & Chat Users can react to the livestream, and you can add chat. This makes for a more engaging experience.
- Notifications You can notify users via push notifications when the livestream starts
- Recording The call recording functionality allows you to record the call with various options and layouts
- Transcriptions can be a great addition to livestreams, especially for users that have muted their audio.
- Noise cancellation enhances the quality of the livestreaming experience.
- HLS Another way to watch a livestream is using HLS. HLS tends to have a 10 to 20 seconds delay, while the WebRTC approach is realtime. The benefit that HLS offers is better buffering under poor network conditions.
Recap
It was fun to see just how quickly you can build in-app low latency livestreaming. Please do let us know if you ran into any issues. Our team is also happy to review your UI designs and offer recommendations on how to achieve it with Stream Video SDKs.
To recap what we've learned:
- WebRTC is optimal for latency, HLS is slower but buffers better for users with poor connections
- You set up a call:
const call = client.call("livestream", callId) - The call type
livestreamcontrols which features are enabled and how permissions are set up - When you join a call, realtime communication is set up for audio & video:
call.join() - Call State Hooks make it easy to build your own UI
- You can easily publish your own video and audio from a browser
Calls run on Stream's global-edge network of video servers. Being closer to your users improves the latency and reliability of calls.
The SDKs enable you to build livestreaming, audio rooms and video calling in days.
We hope you've enjoyed this tutorial and please do feel free to reach out if you have any suggestions or questions.
Final Thoughts
In this video app tutorial we built a fully functioning React video app with our React SDK component library. We also showed how easy it is to customize the behavior and the style of the React video app components with minimal code changes.
Both the video SDK for React and the API have plenty more features available to support more advanced use-cases.
