
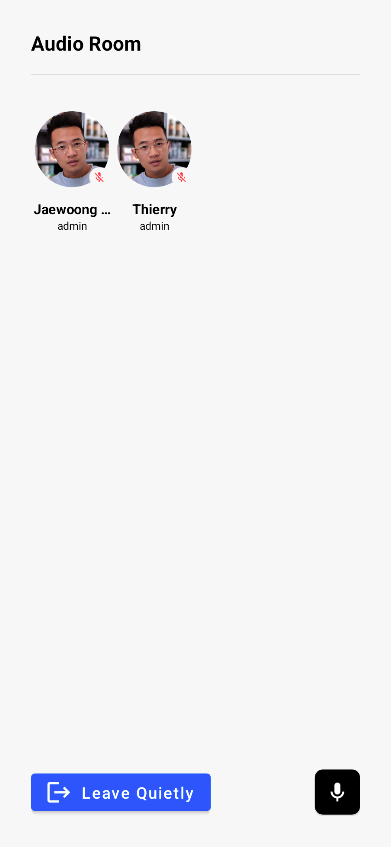
This tutorial will teach you how to build an audio room experience like Twitter Spaces or Clubhouse. The end result will look like the image below and support the following features:
- Backstage mode. You can start the call with your co-hosts and chat a bit before going live.
- Calls run on Stream's global edge network for optimal latency and scalability.
- There is no cap to how many listeners you can have in a room.
- Listeners can raise their hand, and be invited to speak by the host.
- Audio tracks are sent multiple times for optimal reliability.
- UI components are fully customizable, as demonstrated in the Android Video Cookbook.
Time to get started building an audio-room for your app.
Step 1 - Create a new project in Android Studio
Note that this tutorial was written using Android Studio Giraffe. Setup steps can vary slightly across Android Studio versions. We recommend using Android Studio Giraffe or newer.
- Create a new project
- Select Phone & Tablet -> Empty Activity
- Name your project AudioRoom.
⚠️ Note: This tutorial's sample project uses Android Studio Ladybug. The setup steps can vary slightly across Android Studio versions. We recommend using Android Studio Ladybug or newer.
Step 2 - Install the SDK & Setup the client
The Stream Video SDK has two main artifacts:
- Core Client:
io.getstream:stream-video-android-core- includes only the core part of the SDK. - Compose UI Components:
io.getstream:stream-video-android-ui-compose- includes the core + Compose UI components.
For this tutorial, we'll use the Compose UI Components.
Add the Video Compose SDK dependency to the app/build.gradle.kts file.
If you're new to Android, note that there are 2 build.gradle.kts files, you want to open the one located in the app folder.
123456dependencies {
    // Stream Video Compose SDK
    implementation("io.getstream:stream-video-android-ui-compose:<latest-version>")

    // ...
}
⚠️ Replace <latest-version> with the version number indicated below. Also, you can check the Releases page.

⚠️ Make sure compileSdk (or compileSdkVersion - if you're using the older syntax) is set to 35 or newer in your app/build.gradle.kts file.
12345android {
    // ...
    compileSdk = 35
    // ...
}
⚠️ Add the INTERNET permission in the AndroidManifest.xml file, before the application tag:
1<uses-permission android:name="android.permission.INTERNET" />
⚠️ If you get Compose-related errors when building your project, expand the section below and follow the steps.
- Add the following dependencies in the
app/build.gradle.ktsfile, if needed:
1234567891011121314dependencies {
    // ...

    // Jetpack Compose (skip if already added by Android Studio)
    implementation(platform("androidx.compose:compose-bom:2023.10.01"))
    implementation("androidx.activity:activity-compose:1.9.0")
    implementation("androidx.compose.ui:ui")
    implementation("androidx.compose.ui:ui-tooling")
    implementation("androidx.compose.runtime:runtime")
    implementation("androidx.compose.foundation:foundation")
    implementation("androidx.compose.material:material")

    // ...
}
- Add the following lines to the
app/build.gradle.ktsfile, if needed:
12345678910android {
    // ...
    buildFeatures {
        compose = true
    }
    composeOptions {
        kotlinCompilerExtensionVersion = "1.4.3" // or newer
    }
    // ...
}
- Make sure you're using a Kotlin version that's compatible with the Compose compiler version specified by
kotlinCompilerExtensionVersionabove. Check this page to see which Kotlin version is compatible with your Compose Compiler version. If needed, change the Kotlin version in your project'sbuild.gradle.ktsfile:
12345plugins {
    // ...
    id("org.jetbrains.kotlin.android") version "1.8.10" apply false
    // ...
}
⚠️ Make sure you sync the project after doing these changes. Click on the Sync Now button above the file contents.
Step 3 - Create & Join a call
To keep this tutorial short and easy to understand, we'll place all the code in MainActivity.kt. For a production app you'd want to initialize the client in your Application class or DI module. You'd also want to use a View Model.
Open the MainActivity.kt file and replace the MainActivity class with the code below. You can delete the other functions that were created by Android Studio.
Also, expand the section below to view the import statements that are used throughout this tutorial. Replace the already existing import lines in your file to follow along easily.
1234567891011121314151617181920212223242526272829303132333435363738394041424344454647484950515253import android.os.Bundle
import android.widget.Toast
import androidx.activity.ComponentActivity
import androidx.activity.compose.setContent
import androidx.compose.foundation.BorderStroke
import androidx.compose.foundation.background
import androidx.compose.foundation.border
import androidx.compose.foundation.layout.Arrangement
import androidx.compose.foundation.layout.Box
import androidx.compose.foundation.layout.Column
import androidx.compose.foundation.layout.Row
import androidx.compose.foundation.layout.Spacer
import androidx.compose.foundation.layout.fillMaxHeight
import androidx.compose.foundation.layout.fillMaxSize
import androidx.compose.foundation.layout.fillMaxWidth
import androidx.compose.foundation.layout.height
import androidx.compose.foundation.layout.padding
import androidx.compose.foundation.layout.size
import androidx.compose.foundation.lazy.grid.GridCells
import androidx.compose.foundation.lazy.grid.LazyVerticalGrid
import androidx.compose.foundation.lazy.grid.items
import androidx.compose.foundation.shape.CircleShape
import androidx.compose.material3.Button
import androidx.compose.material3.Icon
import androidx.compose.material3.Text
import androidx.compose.runtime.Composable
import androidx.compose.runtime.collectAsState
import androidx.compose.runtime.getValue
import androidx.compose.runtime.rememberCoroutineScope
import androidx.compose.ui.Alignment
import androidx.compose.ui.Modifier
import androidx.compose.ui.draw.clip
import androidx.compose.ui.graphics.Brush
import androidx.compose.ui.graphics.Color
import androidx.compose.ui.res.painterResource
import androidx.compose.ui.text.font.FontWeight
import androidx.compose.ui.text.style.TextAlign
import androidx.compose.ui.unit.dp
import androidx.compose.ui.unit.sp
import androidx.lifecycle.lifecycleScope
import io.getstream.video.android.compose.permission.LaunchMicrophonePermissions
import io.getstream.video.android.compose.theme.VideoTheme
import io.getstream.video.android.compose.ui.components.avatar.UserAvatar
import io.getstream.video.android.compose.ui.components.call.controls.actions.ToggleMicrophoneAction
import io.getstream.video.android.core.Call
import io.getstream.video.android.core.CreateCallOptions
import io.getstream.video.android.core.GEO
import io.getstream.video.android.core.ParticipantState
import io.getstream.video.android.core.RealtimeConnection
import io.getstream.video.android.core.StreamVideoBuilder
import io.getstream.video.android.model.User
import kotlinx.coroutines.launch
import org.openapitools.client.models.MemberRequest
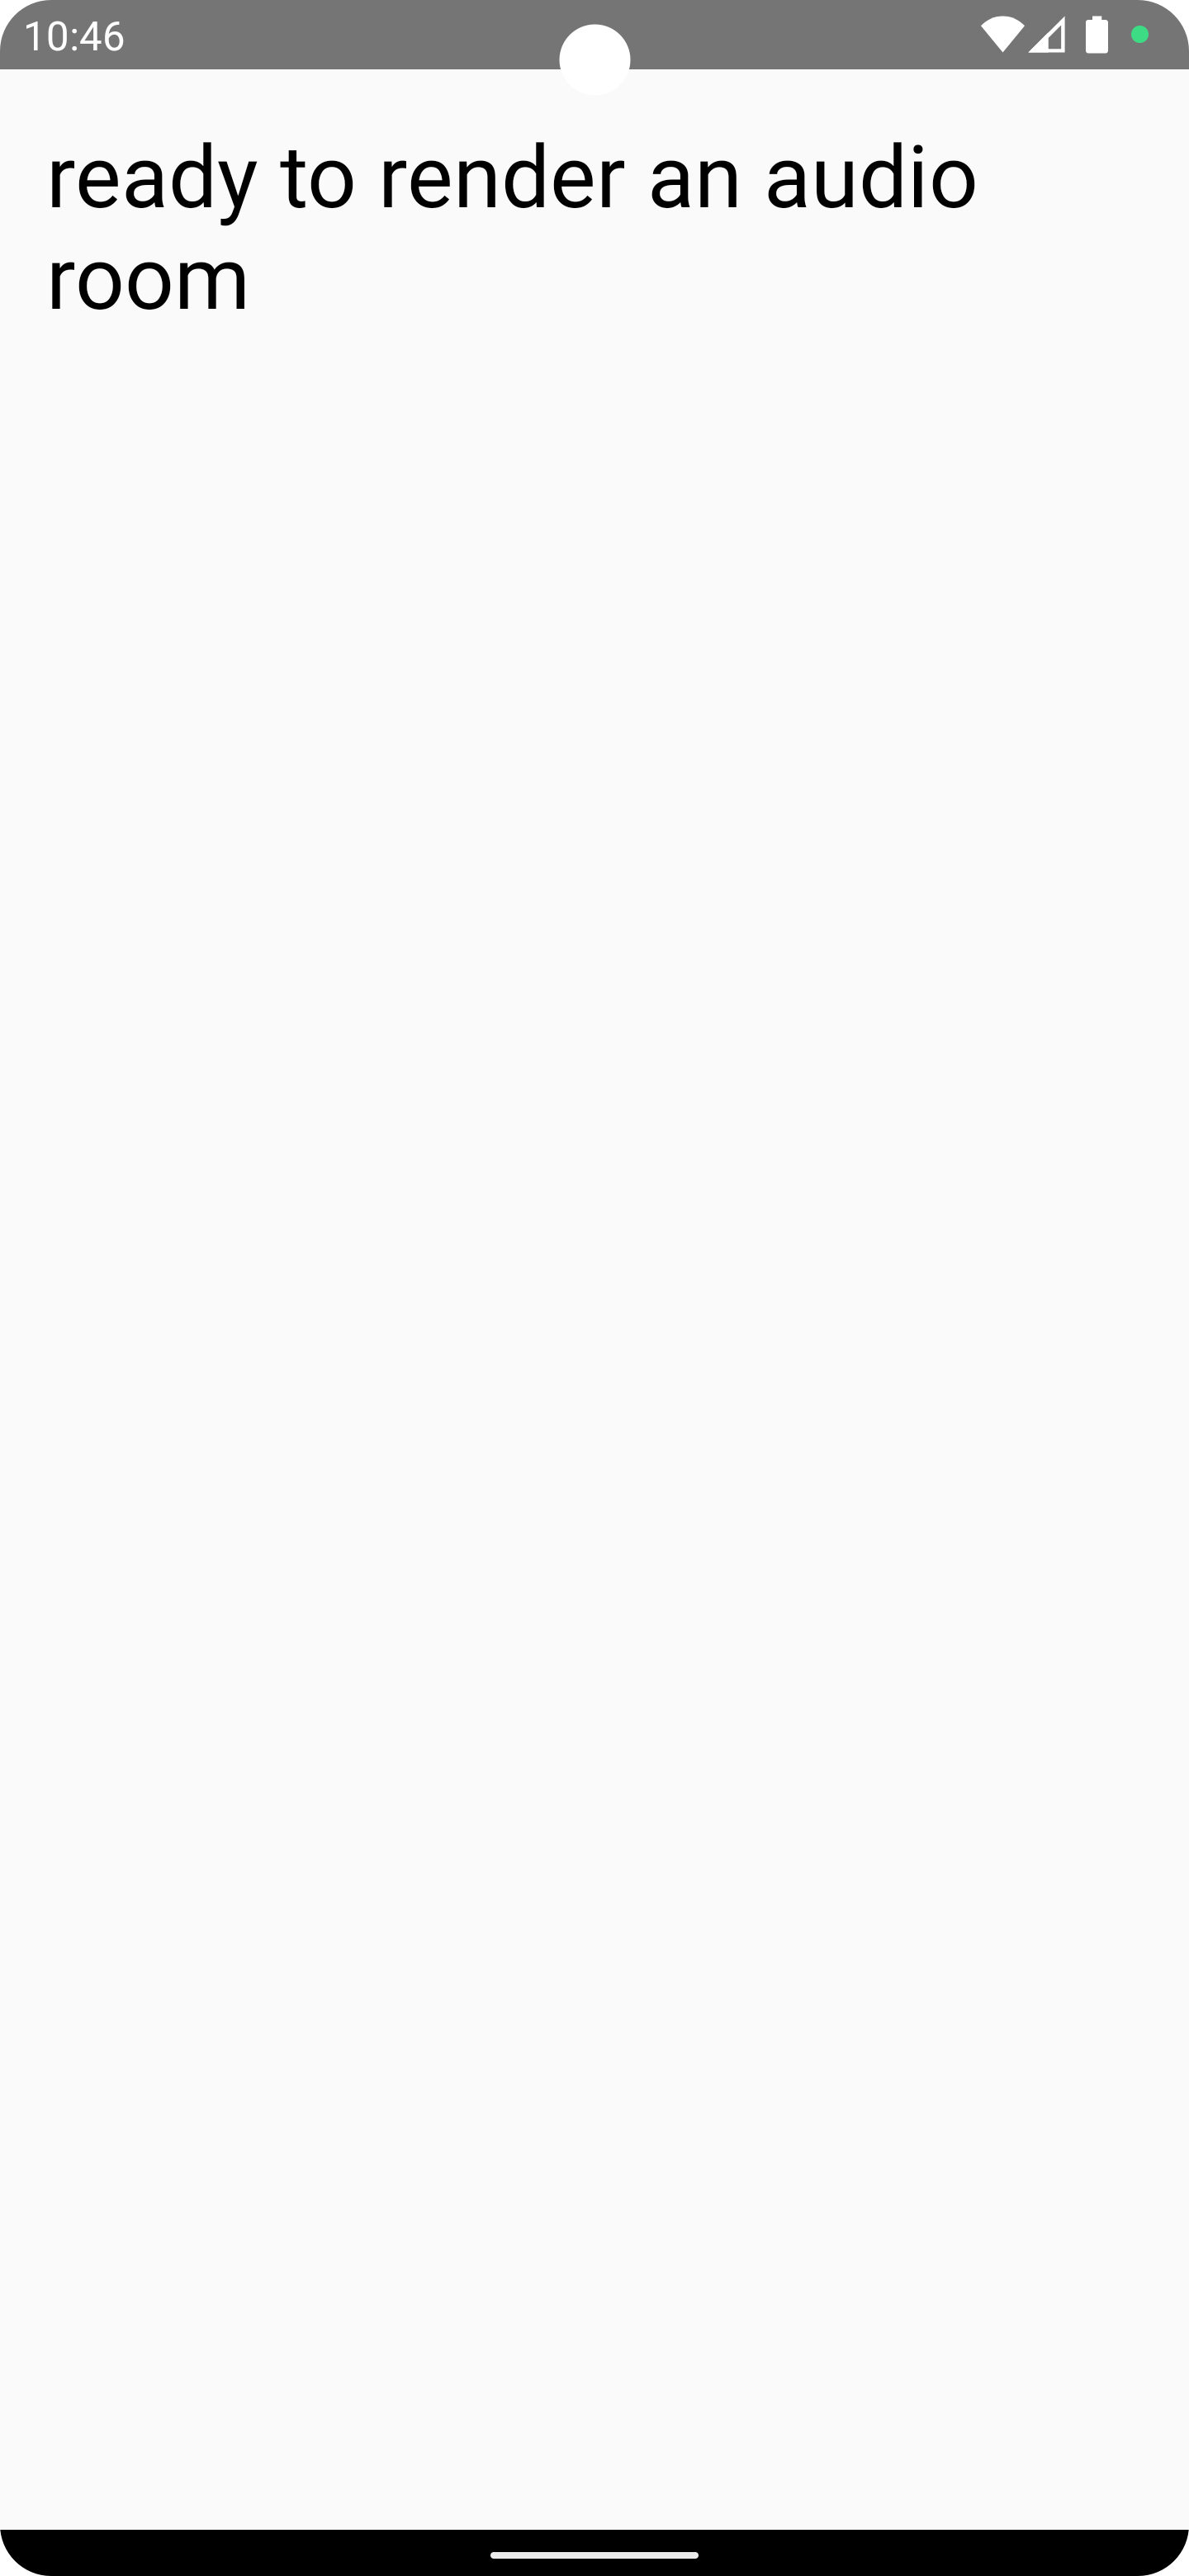
12345678910111213141516171819202122232425262728293031323334353637383940414243444546474849505152535455565758596061626364656667class MainActivity : ComponentActivity() {
    override fun onCreate(savedInstanceState: Bundle?) {
        super.onCreate(savedInstanceState)

        val apiKey = "REPLACE_WITH_API_KEY"
        val userToken = "REPLACE_WITH_TOKEN"
        val userId = "REPLACE_WITH_USER_ID"
        val callId = "REPLACE_WITH_CALL_ID"

        // Create a user
        val user = User(
            id = userId, // any string
            name = "Tutorial" // name and image are used in the UI
        )

        // Initialize StreamVideo. For a production app we recommend adding the client to your Application class or di module
        val client = StreamVideoBuilder(
            context = applicationContext,
            apiKey = apiKey,
            geo = GEO.GlobalEdgeNetwork,
            user = user,
            token = userToken,
        ).build()

        // Create a call with type as `audio_room` and id as callId
        val call = client.call("audio_room", callId)

        setContent {
            // Request microphone permission
            LaunchMicrophonePermissions(
                call = call,
                onPermissionsResult = { granted ->
                    if (granted) {
                        // Mic permissions are granted, so we can join the call.
                        lifecycleScope.launch {
                            val result = call.join(create = true, createOptions = CreateCallOptions(
                                members = listOf(
                                    MemberRequest(userId = userId, role="host", custom = emptyMap())
                                ),
                                custom = mapOf(
                                    "title" to "Compose Trends",
                                    "description" to "Talk about how easy compose makes it to reuse and combine UI"
                                )
                            ))
                            result.onError {
                                Toast.makeText(applicationContext, it.message, Toast.LENGTH_LONG).show()
                            }
                        }
                    }
                }
            )

            // Define the UI
            VideoTheme {
                val connection by call.state.connection.collectAsState()

                Column(horizontalAlignment = Alignment.CenterHorizontally, modifier = Modifier.padding(16.dp)) {
                    if (connection != RealtimeConnection.Connected) {
                        Text("Loading", fontSize = 30.sp)
                    } else {
                        Text("Ready to render an audio room", fontSize = 30.sp)
                    }
                }
            }
        }
    }
}
Let's review the example above and go over the details.
Create a user. First we create a user object. You typically sync these users via a server side integration on your own backend. Alternatively, you can also use guest or anonymous users.
1234val user = User(
    id = userId, // any string
    name = "Tutorial" // name and image are used in the UI
)
Initialize the Stream Client. Next we initialize the client by passing the API Key, user and user token.
1234567val client = StreamVideoBuilder(
    context = applicationContext,
    apiKey = apiKey,
    geo = GEO.GlobalEdgeNetwork,
    user = user,
    token = userToken,
).build()
Create the call. After the user and client are created, we create a call.
1val call = client.call("audio_room", callId)
Request runtime permissions. Before joining the call, we request the microphone runtime permission to capture audio.
123456LaunchMicrophonePermissions(
    call = call,
    onPermissionsResult = {
        // ...
    }
)
Review the permissions docs to learn more about how you can easily request permissions.
Join the call. We join the call in the onPermissionsResult block.
12345678910111213141516171819202122LaunchMicrophonePermissions(
    call = call,
    onPermissionsResult = { granted ->
        if (granted) {
            // Mic permissions are granted, so we can join the call.
            lifecycleScope.launch {
                val result = call.join(create = true, createOptions = CreateCallOptions(
                    members = listOf(
                        MemberRequest(userId = userId, role="host", custom = emptyMap())
                    ),
                    custom = mapOf(
                        "title" to "Compose Trends",
                        "description" to "Talk about how easy compose makes it to reuse and combine UI"
                    )
                ))
                result.onError {
                    Toast.makeText(applicationContext, it.message, Toast.LENGTH_LONG).show()
                }
            }
        }
    }
)
- This creates and joins a call with the type
audio_roomand the specifiedcallId. - You add yourself as a member with the
hostrole. You can create custom roles and grant them permissions to fit your app. - The
titleanddescriptioncustom fields are set on the call object. - Shows an error toast if you fail to join an audio room.
To actually run this sample, we need a valid user token. The user token is typically generated by your server side API. When a user logs in to your app you return the user token that gives them access to the call.
To make this tutorial easier to follow we've generated a user token for you, as you can see in the code snippet.
When you run the app you'll see the following result:
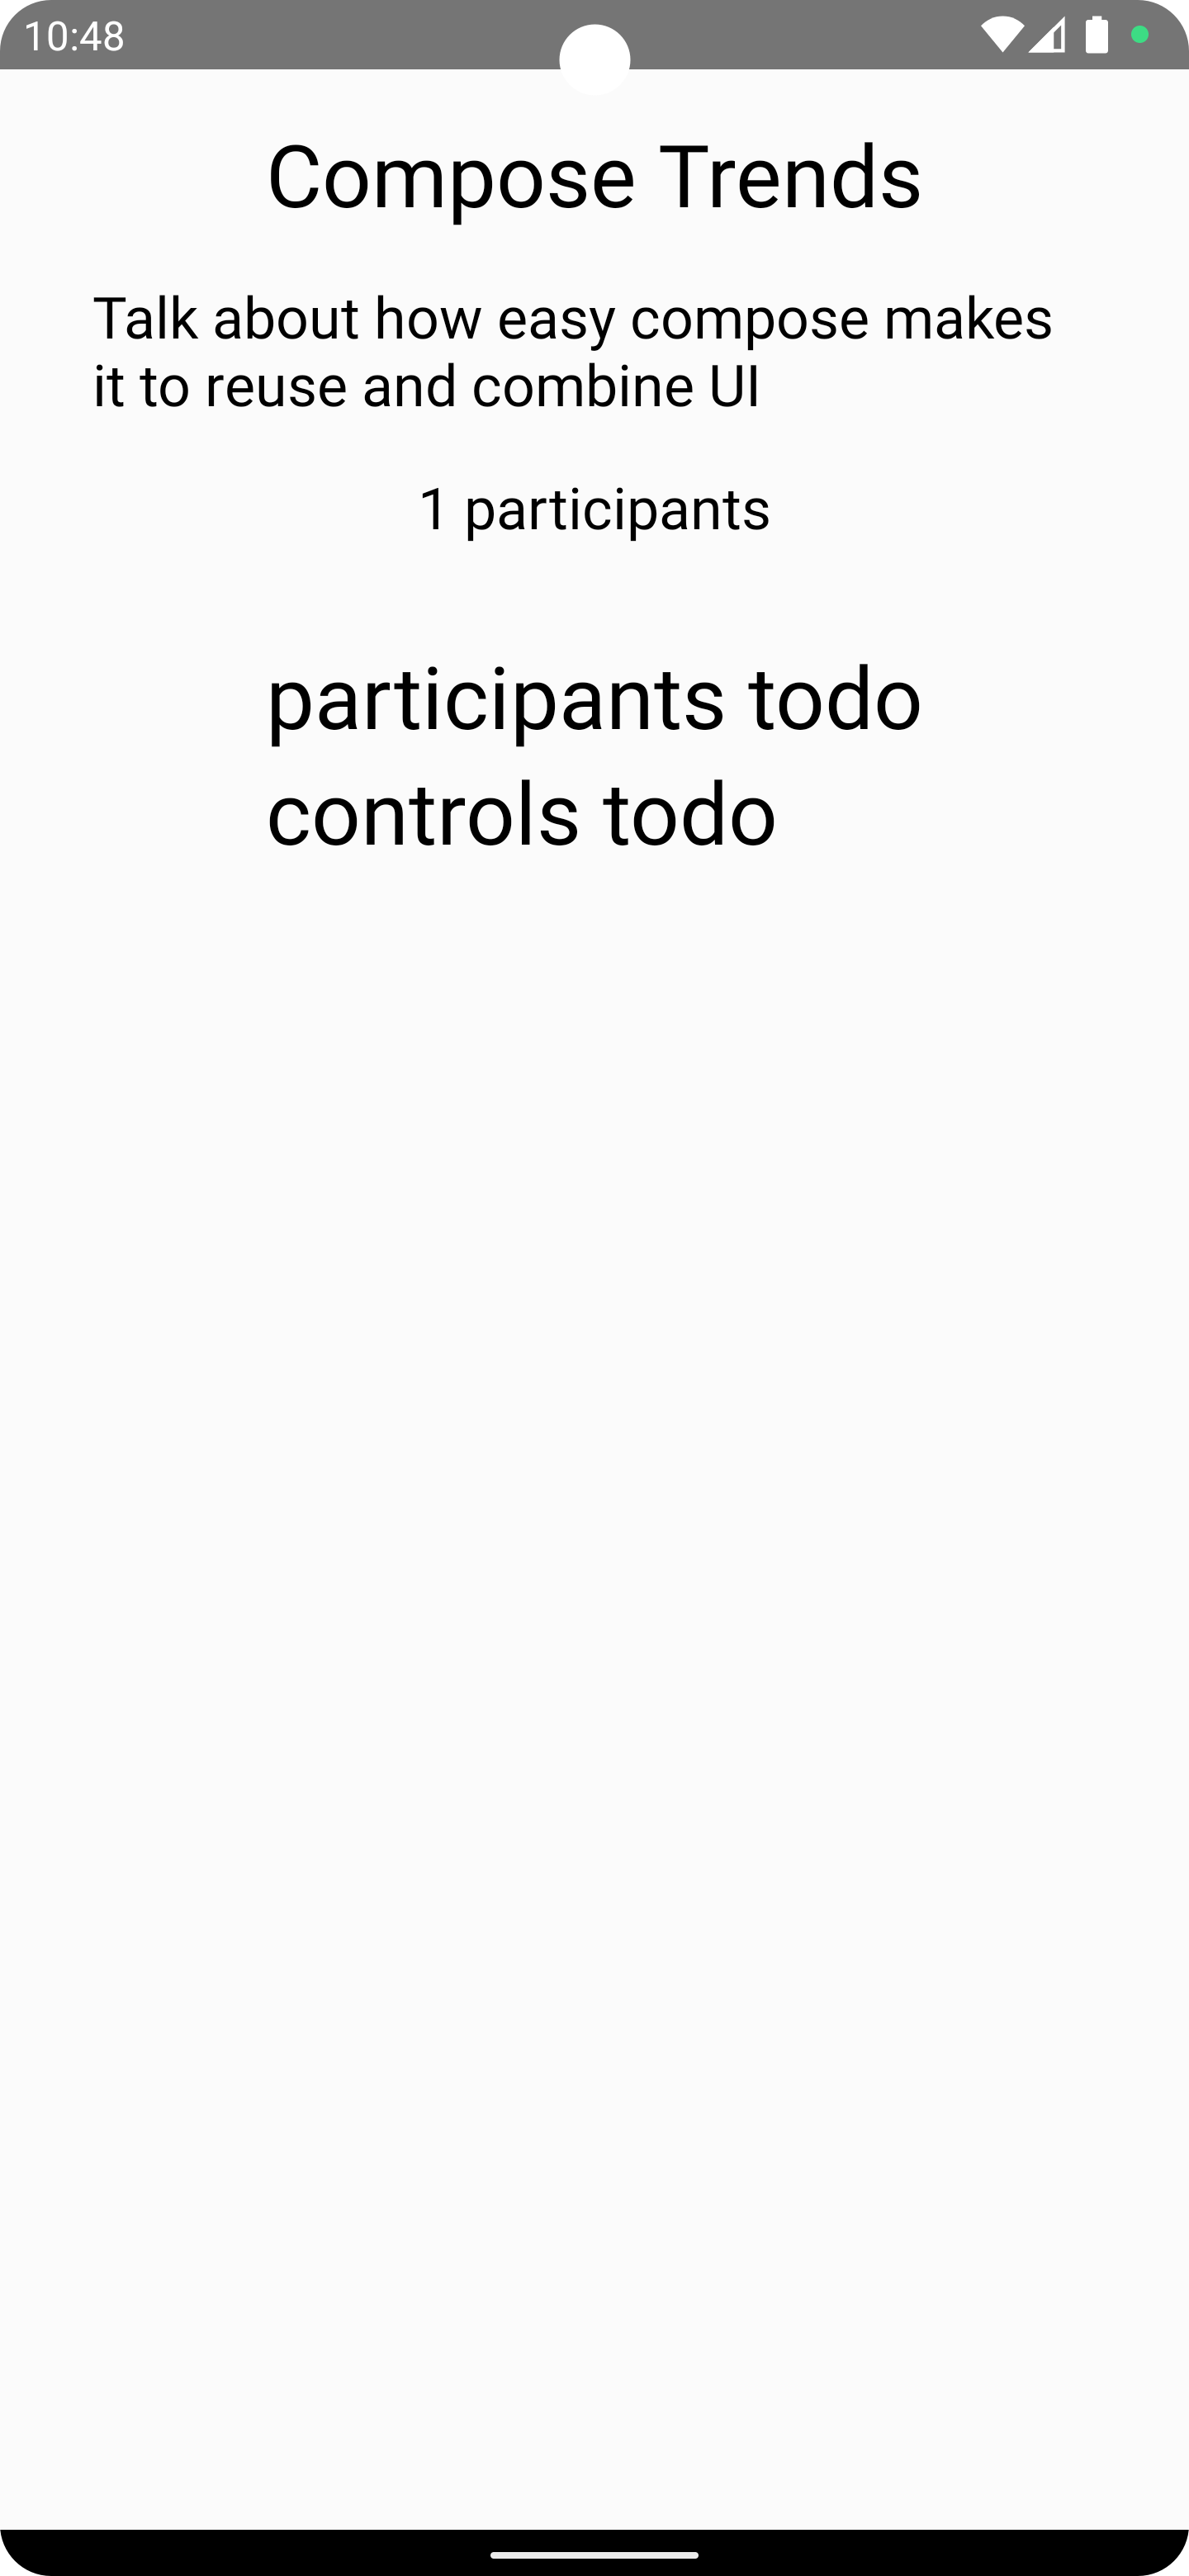
Step 4 - Audio Room & Description
Now that we've successfully connected to the audio room. Let's setup a basic UI and description.
In the MainActivity.kt file, replace the code inside VideoTheme with the example below:
12345678910111213141516171819202122232425VideoTheme {
    val connection by call.state.connection.collectAsState()
    val activeSpeakers by call.state.activeSpeakers.collectAsState()
    val audioLevel = activeSpeakers.firstOrNull()?.audioLevel?.collectAsState()

    val color1 = Color.White.copy(alpha = 0.2f + (audioLevel?.value ?: 0f) * 0.8f)
    val color2 = Color.White.copy(alpha = 0.2f + (audioLevel?.value ?: 0f) * 0.8f)

    Column(
        horizontalAlignment = Alignment.CenterHorizontally,
        verticalArrangement = Arrangement.Top,
        modifier = Modifier
            .background(Brush.linearGradient(listOf(color1, color2)))
            .fillMaxSize()
            .fillMaxHeight()
            .padding(16.dp)
    ) {

        if (connection != RealtimeConnection.Connected) {
            Text("Loading", fontSize = 30.sp)
        } else {
            AudioRoom(call = call)
        }
    }
}
All the state for a call is available in call.state. In the example above we're observing the connection state and the active speakers.
The ParticipantState docs explain the available StateFlow objects.
You'll see that the AudioRoom composable hasn't been implemented yet. In MainActivity, add the following AudioRoom composable:
12345678910111213141516171819202122232425262728293031323334353637383940@Composable
public fun AudioRoom(
    call: Call,
) {
    val custom by call.state.custom.collectAsState()
    val title = custom["title"] as? String
    val description = custom["description"] as? String
    val participants by call.state.participants.collectAsState()
    val activeSpeakers by call.state.activeSpeakers.collectAsState()
    val activeSpeaker = activeSpeakers.firstOrNull()

    val backstage by call.state.backstage.collectAsState()
    val isMicrophoneEnabled by call.microphone.isEnabled.collectAsState()

    Description(title, description, participants)

    activeSpeaker?.let {
        Text("${it.userNameOrId} is speaking")
    }

    Column(
        modifier = Modifier
            .fillMaxHeight()
            .padding(0.dp, 32.dp, 0.dp, 0.dp)
    ) {
        Participants(
            modifier = Modifier.weight(4f),
            participants = participants
        )
        Controls(
            modifier = Modifier
                .weight(1f)
                .fillMaxWidth()
                .padding(16.dp), call = call,
            isMicrophoneEnabled = isMicrophoneEnabled,
            backstage = backstage,
            enableMicrophone = { call.microphone.setEnabled(it) }
        )
    }
}
The code above observes the participants, active speakers and backstage StateFlow objects from call.state.
We still need to implement a Controls, Participants, and Description composables.
Let's add them below the AudioRoom composable.
1234567891011121314151617181920212223242526272829@Composable
public fun Description(
    title: String?,
    description: String?,
    participants: List<ParticipantState>
) {
    Text("$title", fontSize = 30.sp)
    Text("$description", fontSize = 20.sp, modifier = Modifier.padding(16.dp))
    Text("${participants.size} participants", fontSize = 20.sp)
}

@Composable
public fun Participants(
    modifier: Modifier = Modifier,
    participants: List<ParticipantState>
) {
    Text("participants todo", fontSize = 30.sp)
}

@Composable
public fun Controls(
    modifier: Modifier = Modifier,
    call: Call,
    backstage: Boolean = false,
    isMicrophoneEnabled: Boolean = false,
    enableMicrophone: (Boolean) -> Unit = {}
) {
    Text("controls todo", fontSize = 30.sp)
}
That's it for the basics. Now when you run your app, you'll see the following UI:
The approach is the same for all components. We take the states of the call by observing call.state properties, such as call.state.participants and use it to power our UI.
The ParticipantState docs exposes all the state objects we need for the name, avatar, audio levels, speaking, etc.
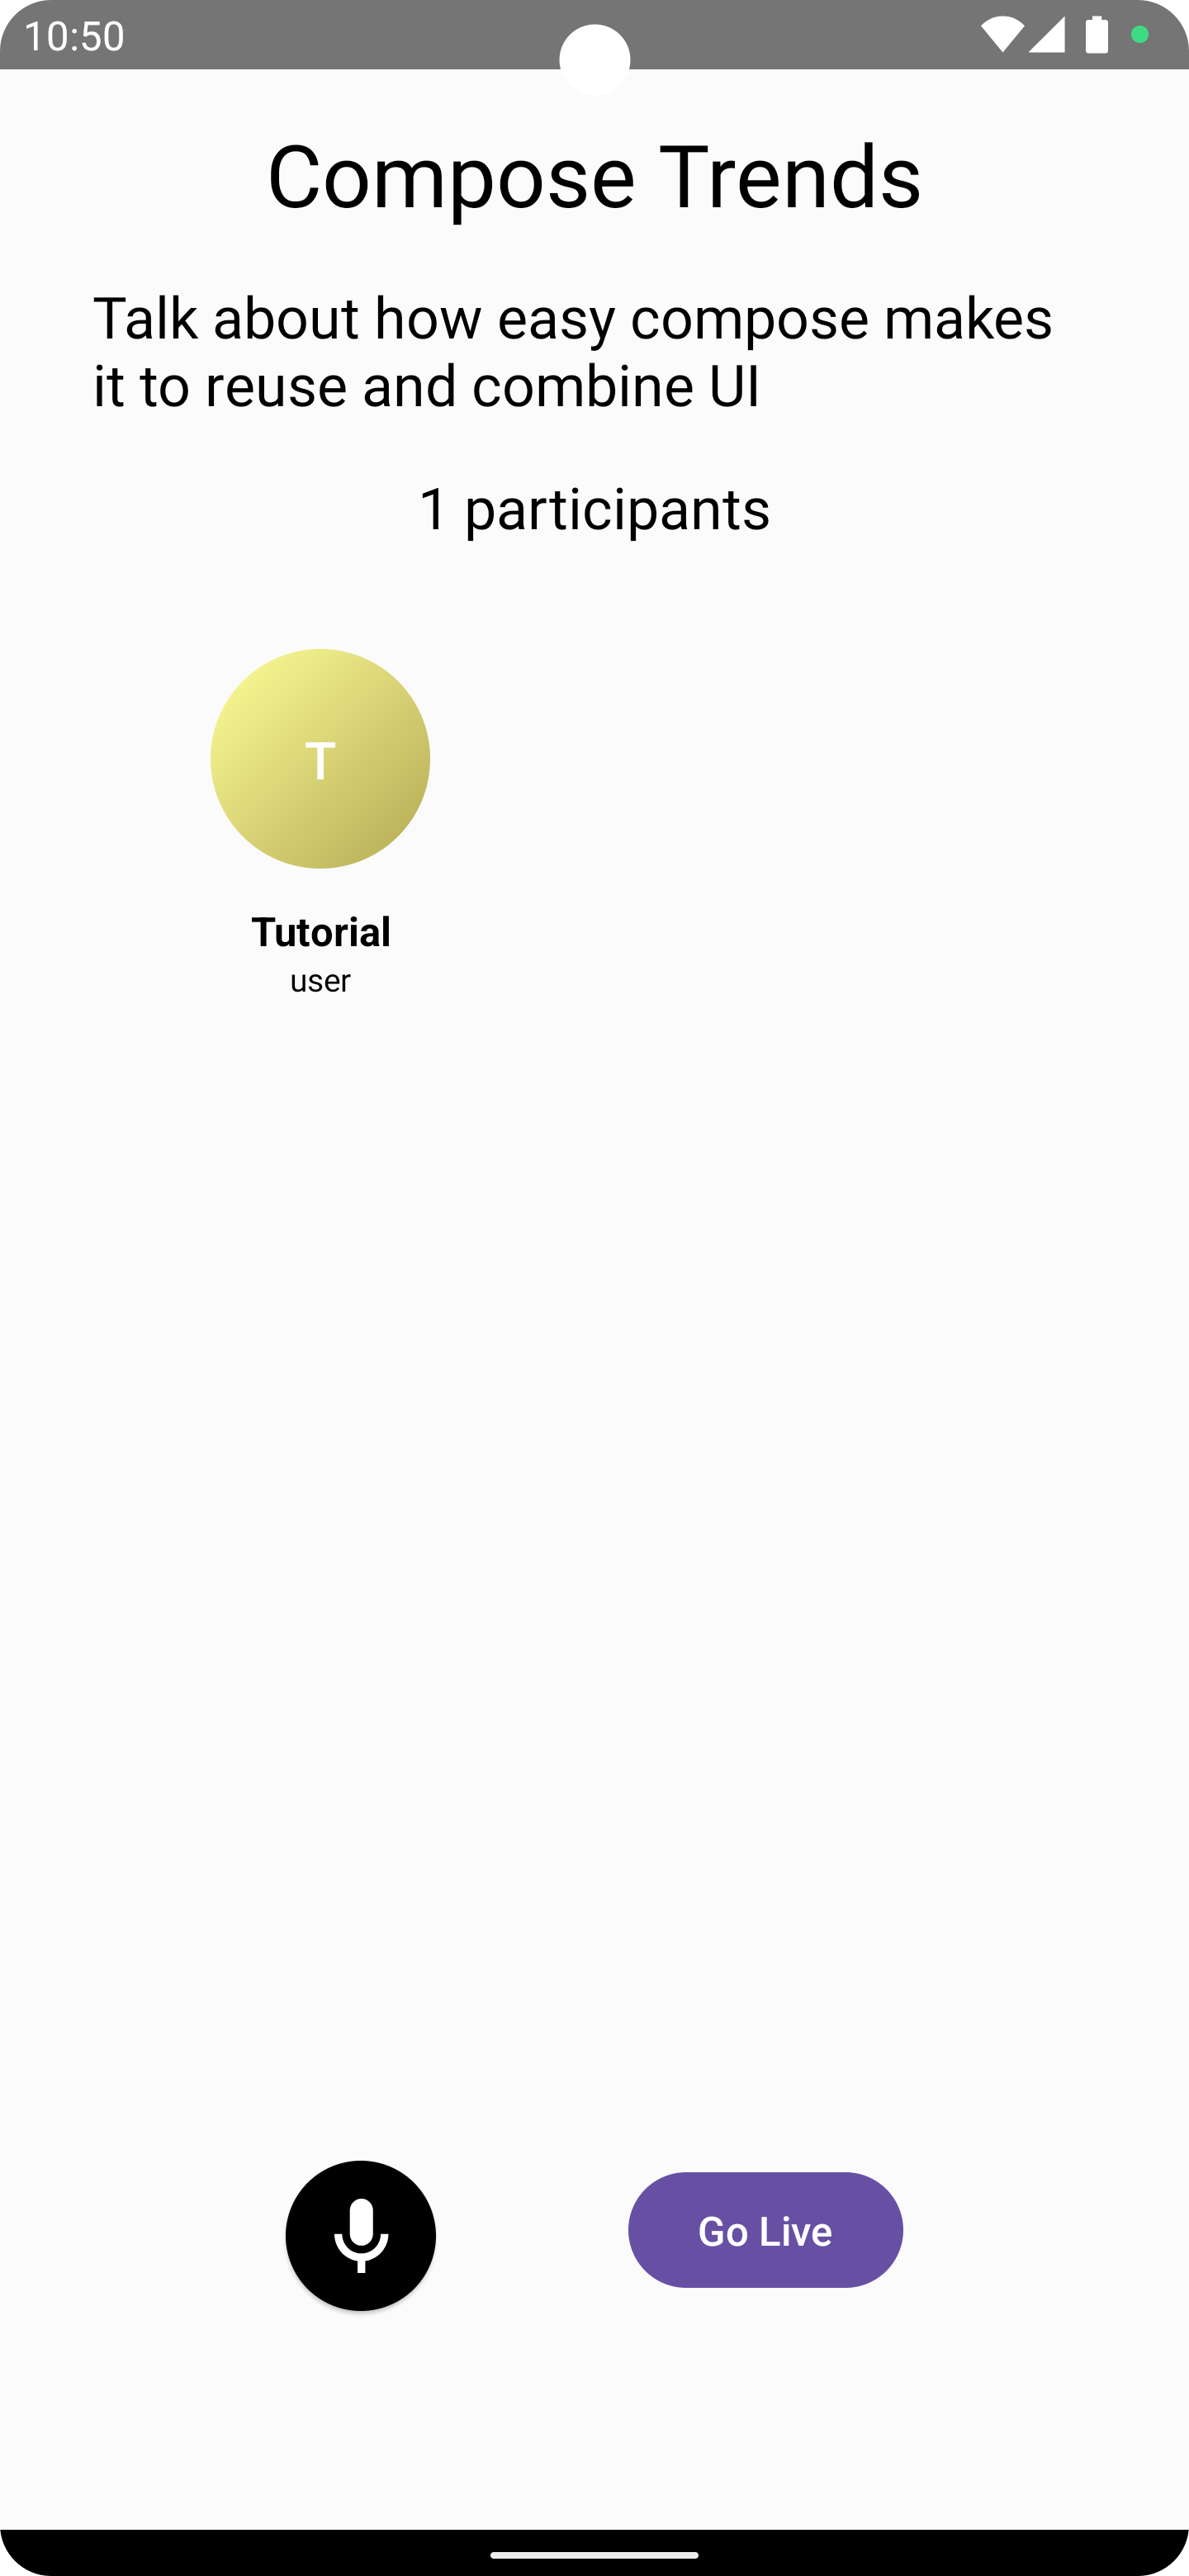
Step 5 - Audio Room Controls
Now let's have a look at the Controls composable. Replace the Controls composable with the following code:
123456789101112131415161718192021222324252627282930@Composable
public fun Controls(
    modifier: Modifier = Modifier,
    call: Call,
    backstage: Boolean = false,
    isMicrophoneEnabled: Boolean = false,
    enableMicrophone: (Boolean) -> Unit = {}
) {
    val scope = rememberCoroutineScope()
    Row(
        modifier = modifier,
        horizontalArrangement = Arrangement.SpaceEvenly
    ) {
        ToggleMicrophoneAction(
            modifier = Modifier.size(52.dp),
            isMicrophoneEnabled = isMicrophoneEnabled,
            onCallAction = { enableMicrophone(it.isEnabled) }
        )

        Button(
            onClick = {
                scope.launch {
                    if (backstage) call.goLive() else call.stopLive()
                }
            }
        ) {
            Text(text = if (backstage) "Go Live" else "End")
        }
    }
}
Now when you run the app, you'll see a button to disable/enable the microphone and to start or end the broadcast.
To make this a little more interactive, let's join the audio room from your browser.
At first you won't be allowed to join the room since it's not live yet.
By default the audio_room call type has backstage mode enabled. This makes it easy to try out your room and talk to your co-hosts before going live.
You can enable/disable the usage of backstage mode in the dashboard.
Let's go live and join the call:
- Click Go Live on Android
- Join the room from the browser
- You'll see the participant count increase to 2
Step 6 - Participants UI
Time to build a pretty UI for the participants. Replace the Participants composable with the following code:
1234567891011121314@Composable
public fun Participants(
    modifier: Modifier = Modifier,
    participants: List<ParticipantState>
) {
    LazyVerticalGrid(
        modifier = modifier,
        columns = GridCells.Adaptive(minSize = 128.dp),
    ) {
        items(items = participants, key = { it.sessionId }) { participant ->
            ParticipantAvatar(participant)
        }
    }
}
The Participants composable is responsible for rendering all participants in the audio room as a grid list.
Now we'll add a ParticipantAvatar composable, which represents a user in the audio room:
12345678910111213141516171819202122232425262728293031323334353637383940414243444546474849505152535455565758596061626364656667686970717273747576@Composable
public fun ParticipantAvatar(
    participant: ParticipantState,
    modifier: Modifier = Modifier
) {
    val image by participant.image.collectAsState()
    val nameOrId by participant.userNameOrId.collectAsState()
    val isSpeaking by participant.speaking.collectAsState()
    val audioEnabled by participant.audioEnabled.collectAsState()

    Column(
        modifier = modifier,
        horizontalAlignment = Alignment.CenterHorizontally,
        verticalArrangement = Arrangement.Center
    ) {

        Box(modifier = Modifier.size(56.dp)) {
            UserAvatar(
                modifier = Modifier
                    .fillMaxSize()
                    .padding(VideoTheme.dimens.componentPaddingFixed),
                userImage = image,
                userName = nameOrId,
            )

            if (isSpeaking) {
                Box(
                    modifier = Modifier
                        .fillMaxSize()
                        .border(BorderStroke(2.dp, Color.Gray), CircleShape)
                )
            } else if (!audioEnabled) {
                Box(
                    modifier = Modifier
                        .fillMaxSize()
                        .padding(8.dp)
                ) {
                    Box(
                        modifier = Modifier
                            .clip(CircleShape)
                            .background(Color.Black)
                            .size(16.dp)
                    ) {
                        Icon(
                            modifier = Modifier
                                .fillMaxSize()
                                .padding(3.dp),
                            painter = painterResource(id = io.getstream.video.android.ui.common.R.drawable.stream_video_ic_mic_off),
                            tint = Color.White,
                            contentDescription = null
                        )
                    }
                }
            }
        }

        Spacer(modifier = Modifier.height(8.dp))

        Text(
            modifier = Modifier.fillMaxWidth(),
            text = nameOrId,
            fontSize = 14.sp,
            fontWeight = FontWeight.Bold,
            color = Color.Black,
            textAlign = TextAlign.Center,
        )

        Text(
            modifier = Modifier.fillMaxWidth(),
            text = participant.roles.value.firstOrNull() ?: "",
            fontSize = 11.sp,
            color = Color.Black,
            textAlign = TextAlign.Center,
        )
    }
}
The ParticipantAvatar composable represents each participant in the audio room. It displays the initials of the user and the status of the microphone.
Now when you run the app, you'll see a pretty UI for the participants.
In the above example, we use the following state flow objects:
1234val image by participant.image.collectAsState()
val nameOrId by participant.userNameOrId.collectAsState()
val isSpeaking by participant.speaking.collectAsState()
val audioEnabled by participant.audioEnabled.collectAsState()
The ParticipantState docs include all the other attributes that are also available.
For audio rooms, participant.audioLevel and participant.audioLevels can be convenient to implement an audio visualizer.
Other built-in features
There are a few more exciting features that you can use to build audio rooms:
- Requesting Permissions: Participants can ask the host for permission to speak, share video etc
- Query Calls: You can query calls to easily show upcoming calls, calls that recently finished etc
- Call Previews: Before you join the call you can observe it and show a preview. IE John, Sarah and 3 others are on this call.
- Reactions & Custom events: Reactions and custom events are supported
- Recording & Broadcasting: You can record your calls, or broadcast them to HLS
- Chat: Stream's chat SDKs are fully featured and you can integrate them in the call
- Moderation: Moderation capabilities are built-in to the product
- Transcriptions: Transcriptions aren't available yet, but are coming soon
Recap
It was fun to see just how quickly you can build an audio-room for your app. Please do let us know if you ran into any issues. Our team is also happy to review your UI designs and offer recommendations on how to achieve it with Stream.
To recap what we've learned:
- You setup a call with
val call = client.call("audio_room", "222"). - The call type
audio_roomcontrols which features are enabled and how permissions are set up. - The
audio_roomby default enables backstage mode, and only allows admins to join before the call goes live. - When you join a call, realtime communication is setup for audio & video calling with
call.join(). Stateflowobjects incall.stateandcall.state.participantsmake it easy to build your own UI.
Calls run on Stream's global edge network of video servers. Being closer to your users improves the latency and reliability of calls. For audio rooms we use Opus RED and Opus DTX for optimal audio quality.
The SDKs enable you to build audio rooms, video calling and livestreaming in days.
We hope you've enjoyed this tutorial, and please do feel free to reach out if you have any suggestions or questions.
Final Thoughts
In this video app tutorial we built a fully functioning Android messaging app with our Android SDK component library. We also showed how easy it is to customize the behavior and the style of the Android video app components with minimal code changes.
Both the video SDK for Android and the API have plenty more features available to support more advanced use-cases.