

This tutorial teaches you how to build an audio room experience like Twitter Spaces or Clubhouse, with Jetpack Compose and the Stream Video SDK.

By the end you'll have an app with:
- Backstage mode — start the call with your co-hosts and chat before going live.
- Creating and joining rooms, running on Stream's global edge network with no cap on listeners.
- A raise-hand flow where listeners can be invited to speak by the host.
- Optimal reliability, sending audio tracks multiple times.
This page works for both humans and AI coding agents: every step is a file operation or shell command, every step has a verification checkpoint, and the few steps that need a human are explicitly marked.
Choose your path
This tutorial has two paths. In Path A you let your AI agent build the app for you. In Path B you build it yourself, step by step. Both paths end with the same working audio room, so pick the one you prefer.
Path A — Let your AI agent build it (recommended)
Install the Stream CLI once, then add the skills. This step is required for Path A — the skills give Claude Code, Cursor, or Codex the Android integration patterns and current SDK APIs, so the agent builds against real docs instead of stale training data.
# Install the getstream CLI
curl -fsSL https://getstream.io/cli.sh | bash

# Install the skills (router, docs, and builder) for your agent. Pick the
# target: --universal for Cursor, Codex, and other AGENTS-ecosystem tools,
# or --claude for Claude Code. The Android pack installs on demand the first
# time it's needed, or add it explicitly:
getstream skills --universal
getstream skills stream-android --universal
Then ask your agent:
/stream-android Add a Stream audio room to my Jetpack Compose app: create and join an
audio_room call with backstage mode, render participants with speaking indicators, and
add mic + go-live controls. Provision credentials with the CLI (create/select my org
and app, mint a token), or fall back to the tutorial demo credentials if I'm not logged in.
Where you come in. The agent writes the code, provisions the credentials, and adds the Gradle dependency itself. It hands back to you three times: when getstream init opens your browser to log in and pick an app, when it's time to create the Android Studio project, and when it's time to run the app and grant microphone access.
Path B — Build it manually
Choose this path if you'd rather write the code yourself. Follow the steps below.
For AI assistants reading this page: append
.mdto any Stream docs URL for a clean Markdown version. A condensed index for the Android Video SDK is athttps://getstream.io/video/docs/android/llms.txt. Prefer these over parsing HTML.
Important Building Blocks
Three pieces, one mental model:
StreamVideo— the low-level client, built withStreamVideoBuilder. Holds the API key, user, token, and websocket connection. Created once, at app launch.Callof typeaudio_room— created withclient.call("audio_room", id). This call type enables backstage mode: hosts join and talk beforecall.goLive()opens the room to listeners.call.state— observableStateFlows:connection,participants,activeSpeakers,backstage,custom. Your Compose UI reads from these.
You'll connect to a room first, then build the description, controls, and participant grid from call.state.
Step 0 — Get your credentials
The code in Step 3 needs four values: an API key, a user token, a user id, and a call id. There are two ways to get them.
Agents: detect the project shape before touching anything, including the CLI (
find . -maxdepth 3 -name "settings.gradle*" -o -name "build.gradle*"). The CLI writes into the project directory, so a Gradle project has to exist first. If the directory is empty, stop and ask the human to create the app in Android Studio (Step 1) - don't scaffold it yourself.
Option 1 — Your own Stream app, via the Stream CLI
The getstream CLI provisions all of it in one flow. Run these from your project directory.
1. Install the CLI (skip if you did this in Path A):
curl -fsSL https://getstream.io/cli.sh | bash2. Initialize the project. This one command authenticates you, lets you create or select an organization and app, and writes the project credentials.
getstream init🧑 Human checkpoint: getstream init opens a browser to authenticate. Agents: run it, then ask the human to finish logging in before continuing. It's required first — env, token, and api commands fail with "stream project is not initialized" until it runs.
3. Grab your API key. getstream env --target android writes it to local.properties (STREAM_API_KEY); copy the value from there (or open the app with getstream open). Paste it into the code in Step 3.
getstream env --target android4. Mint a user token for a user in your app (never-expiring by default; add a TTL for production-like testing):
getstream token tutorial_user
getstream token tutorial_user --ttl 1d
5. Pick a call id. Anything URL-safe works, for example my-audio-room. The room is created the first time somebody joins with create = true.
✅ Checkpoint: you have an API key, a token printed by the CLI, the user id you minted it for, and a call id you chose. All four belong to the same app.
Option 2 — Pre-filled tutorial credentials, no account
Want to skip account setup entirely? The whole-app code block in Step 3 is filled in for you with working credentials against Stream's shared tutorial environment. Copy it as-is and it runs. Swap in your own credentials from Option 1 before building anything real — tutorial credentials are shared and short-lived.
Step 1 — Create a new project in Android Studio
- Create a new project.
- Select Phone & Tablet → Empty Activity (the Compose one).
- Name your project AudioRoom.
Note: This tutorial's sample uses Android Studio Ladybug or newer. Steps can vary slightly across versions.
🧑 Human checkpoint: the project is created in Android Studio's New Project wizard — it can't be scaffolded from the CLI. Agents: detect the project shape first (the find command above). If there's no Gradle project, stop and ask the human to create it before continuing — don't scaffold it yourself.
✅ Checkpoint:
./gradlew :app:assembleDebugStep 2 — Install the SDK & Set Up the Project
The Stream Video SDK has two main artifacts:
- Core Client —
io.getstream:stream-video-android-core: the core part of the SDK. - Compose UI Components —
io.getstream:stream-video-android-ui-compose: the core + Compose UI components.
For this tutorial, we'll use the Compose UI Components. Add the dependency to the app module's build.gradle.kts (use the one in the app folder). Replace <latest_version> with the latest release:
dependencies {
    // Stream Video Compose SDK
    implementation("io.getstream:stream-video-android-ui-compose:<latest_version>")
}
Make sure compileSdk is set to 35 or newer:
android {
    compileSdk = 35
}
Add the INTERNET permission in AndroidManifest.xml, before the application tag:
<uses-permission android:name="android.permission.INTERNET" />Use recent Android Gradle Plugin, Kotlin, and Compose compiler versions so the SDK can target compileSdk = 35. In the root build.gradle.kts:
plugins {
    id("com.android.application") version "8.7.2" apply false
    id("org.jetbrains.kotlin.android") version "2.0.21" apply false
    id("org.jetbrains.kotlin.plugin.compose") version "2.0.21" apply false
}
Apply the Compose plugin in the app module's build.gradle.kts:
plugins {
    id("com.android.application")
    id("org.jetbrains.kotlin.android")
    id("org.jetbrains.kotlin.plugin.compose")
}
Compose config steps (optional)
If you get Compose-related errors when building, add these to the app/build.gradle.kts, if needed:
dependencies {
    // Jetpack Compose (skip if already added by Android Studio)
    implementation(platform("androidx.compose:compose-bom:2024.09.02"))
    implementation("androidx.activity:activity-compose:1.9.0")
    implementation("androidx.compose.ui:ui")
    implementation("androidx.compose.ui:ui-tooling")
    implementation("androidx.compose.runtime:runtime")
    implementation("androidx.compose.foundation:foundation")
    implementation("androidx.compose.material:material")
    implementation("androidx.compose.material3:material3")
}
android {
buildFeatures {
compose = true
}
composeOptions {
kotlinCompilerExtensionVersion = "1.7.5"
}
}For Compose Compiler 1.7.5, use Kotlin 2.0.21 and apply org.jetbrains.kotlin.plugin.compose at both the root and module level. See the compatibility table.
✅ Checkpoint: ./gradlew :app:assembleDebug succeeds and import io.getstream.video.android.core.StreamVideoBuilder resolves. (Sync the project after editing Gradle files.)
Step 3 — Create & Join a call
To keep this tutorial short, we'll place all the code in MainActivity.kt. For a production app, initialize the client in your Application class or a DI module and use a ViewModel.
Open MainActivity.kt and replace the MainActivity class with the code below (you can delete the other functions Android Studio created). The imports for the whole tutorial are included at the top.
package com.example.audioroom

import android.os.Bundle
import android.widget.Toast
import androidx.activity.ComponentActivity
import androidx.activity.compose.setContent
import androidx.compose.foundation.BorderStroke
import androidx.compose.foundation.background
import androidx.compose.foundation.border
import androidx.compose.foundation.layout.Arrangement
import androidx.compose.foundation.layout.Box
import androidx.compose.foundation.layout.Column
import androidx.compose.foundation.layout.Row
import androidx.compose.foundation.layout.Spacer
import androidx.compose.foundation.layout.fillMaxHeight
import androidx.compose.foundation.layout.fillMaxSize
import androidx.compose.foundation.layout.fillMaxWidth
import androidx.compose.foundation.layout.height
import androidx.compose.foundation.layout.padding
import androidx.compose.foundation.layout.size
import androidx.compose.foundation.lazy.grid.GridCells
import androidx.compose.foundation.lazy.grid.LazyVerticalGrid
import androidx.compose.foundation.lazy.grid.items
import androidx.compose.foundation.shape.CircleShape
import androidx.compose.material3.Button
import androidx.compose.material3.Icon
import androidx.compose.material3.Text
import androidx.compose.runtime.Composable
import androidx.compose.runtime.collectAsState
import androidx.compose.runtime.getValue
import androidx.compose.runtime.rememberCoroutineScope
import androidx.compose.ui.Alignment
import androidx.compose.ui.Modifier
import androidx.compose.ui.draw.clip
import androidx.compose.ui.graphics.Brush
import androidx.compose.ui.graphics.Color
import androidx.compose.ui.res.painterResource
import androidx.compose.ui.text.font.FontWeight
import androidx.compose.ui.text.style.TextAlign
import androidx.compose.ui.unit.dp
import androidx.compose.ui.unit.sp
import androidx.lifecycle.lifecycleScope
import io.getstream.video.android.compose.permission.LaunchMicrophonePermissions
import io.getstream.video.android.compose.theme.VideoTheme
import io.getstream.video.android.compose.ui.components.avatar.UserAvatar
import io.getstream.video.android.compose.ui.components.call.controls.actions.ToggleMicrophoneAction
import io.getstream.video.android.core.Call
import io.getstream.video.android.core.CreateCallOptions
import io.getstream.video.android.core.GEO
import io.getstream.video.android.core.ParticipantState
import io.getstream.video.android.core.RealtimeConnection
import io.getstream.video.android.core.StreamVideoBuilder
import io.getstream.video.android.model.User
import kotlinx.coroutines.launch
import io.getstream.android.video.generated.models.MemberRequest

class MainActivity : ComponentActivity() {
    override fun onCreate(savedInstanceState: Bundle?) {
        super.onCreate(savedInstanceState)

        val apiKey = "REPLACE_WITH_API_KEY"
        val userToken = "REPLACE_WITH_TOKEN"
        val userId = "REPLACE_WITH_USER_ID"
        val callId = "REPLACE_WITH_CALL_ID"

        // Create a user
        val user = User(
            id = userId, // any string
            name = "Tutorial" // name and image are used in the UI
        )

        // Initialize StreamVideo. For a production app we recommend adding the client to your Application class or di module
        val client = StreamVideoBuilder(
            context = applicationContext,
            apiKey = apiKey,
            geo = GEO.GlobalEdgeNetwork,
            user = user,
            token = userToken,
        ).build()

        // Create a call with type as `audio_room` and id as callId
        val call = client.call("audio_room", callId)

        setContent {
            // Request microphone permission
            LaunchMicrophonePermissions(
                call = call,
                onPermissionsResult = { granted ->
                    if (granted) {
                        // Mic permissions are granted, so we can join the call.
                        lifecycleScope.launch {
                            val result = call.join(create = true, createOptions = CreateCallOptions(
                                members = listOf(
                                    MemberRequest(userId = userId, role="host", custom = emptyMap())
                                ),
                                custom = mapOf(
                                    "title" to "Compose Trends",
                                    "description" to "Talk about how easy compose makes it to reuse and combine UI"
                                )
                            ))
                            result.onError {
                                Toast.makeText(applicationContext, it.message, Toast.LENGTH_LONG).show()
                            }
                        }
                    }
                }
            )

            // Define the UI
            VideoTheme {
                val connection by call.state.connection.collectAsState()

                Column(horizontalAlignment = Alignment.CenterHorizontally, modifier = Modifier.padding(16.dp)) {
                    if (connection != RealtimeConnection.Connected) {
                        Text("Loading", fontSize = 30.sp)
                    } else {
                        Text("Ready to render an audio room", fontSize = 30.sp)
                    }
                }
            }
        }
    }
}
Using Option 1? Paste your four values into apiKey, userToken, userId, and callId. Using Option 2? The block above is pre-filled with working tutorial credentials.
🧑 Human checkpoint: the microphone permission prompt is an Android system dialog. Agents: install the app, then ask the human to launch it and allow microphone access.
✅ Checkpoint: the screen reads Ready to render an audio room and Logcat is free of auth errors. Stuck on Loading? The call never finished joining — usually the API key and token belong to different apps.
Let's review the example above.
Create a user. You typically sync users via a server-side integration. Guest and anonymous users are also supported.
val user = User(
    id = userId, // any string
    name = "Tutorial" // name and image are used in the UI
)
Initialize the Stream Client with the API key, user, and token.
val client = StreamVideoBuilder(
    context = applicationContext,
    apiKey = apiKey,
    geo = GEO.GlobalEdgeNetwork,
    user = user,
    token = userToken,
).build()
Create the call with type audio_room.
val call = client.call("audio_room", callId)Request runtime permissions for the microphone before joining.
LaunchMicrophonePermissions(
    call = call,
    onPermissionsResult = {
        // ...
    }
)
Review the permissions docs to learn more.
Note: On Android 13+ the SDK also requests
POST_NOTIFICATIONSon launch (for the call's foreground-service notification). You don't need any app-side notification code; the SDK handles it.
Join the call in the onPermissionsResult block.
LaunchMicrophonePermissions(
    call = call,
    onPermissionsResult = { granted ->
        if (granted) {
            // Mic permissions are granted, so we can join the call.
            lifecycleScope.launch {
                val result = call.join(create = true, createOptions = CreateCallOptions(
                    members = listOf(
                        MemberRequest(userId = userId, role="host", custom = emptyMap())
                    ),
                    custom = mapOf(
                        "title" to "Compose Trends",
                        "description" to "Talk about how easy compose makes it to reuse and combine UI"
                    )
                ))
                result.onError {
                    Toast.makeText(applicationContext, it.message, Toast.LENGTH_LONG).show()
                }
            }
        }
    }
)- This creates and joins a call with type
audio_roomand the specifiedcallId. - You add yourself as a member with the
hostrole. You can create custom roles and grant them permissions to fit your app. - The
titleanddescriptioncustom fields are set on the call object. - An error toast shows if you fail to join.
Step 4 — Audio Room & Description
Now that we're connected, let's set up a basic UI and description. In MainActivity.kt, replace the code inside VideoTheme with:
VideoTheme {
    val connection by call.state.connection.collectAsState()
    val activeSpeakers by call.state.activeSpeakers.collectAsState()
    val audioLevel = activeSpeakers.firstOrNull()?.audioLevel?.collectAsState()

    val color1 = Color.White.copy(alpha = 0.2f + (audioLevel?.value ?: 0f) * 0.8f)
    val color2 = Color.White.copy(alpha = 0.2f + (audioLevel?.value ?: 0f) * 0.8f)

    Column(
        horizontalAlignment = Alignment.CenterHorizontally,
        verticalArrangement = Arrangement.Top,
        modifier = Modifier
            .background(Brush.linearGradient(listOf(color1, color2)))
            .fillMaxSize()
            .fillMaxHeight()
            .padding(16.dp)
    ) {

        if (connection != RealtimeConnection.Connected) {
            Text("Loading", fontSize = 30.sp)
        } else {
            AudioRoom(call = call)
        }
    }
}
All the state for a call is in call.state. Above we observe the connection state and the active speakers. The ParticipantState docs explain the available StateFlows.
The AudioRoom composable isn't implemented yet. In MainActivity, add:
@Composable
public fun AudioRoom(
    call: Call,
) {
    val custom by call.state.custom.collectAsState()
    val title = custom["title"] as? String
    val description = custom["description"] as? String
    val participants by call.state.participants.collectAsState()
    val activeSpeakers by call.state.activeSpeakers.collectAsState()
    val activeSpeaker = activeSpeakers.firstOrNull()

    val backstage by call.state.backstage.collectAsState()
    val isMicrophoneEnabled by call.microphone.isEnabled.collectAsState()

    Description(title, description, participants)

    activeSpeaker?.let {
        Text("${it.userNameOrId} is speaking")
    }

    Column(
        modifier = Modifier
            .fillMaxHeight()
            .padding(0.dp, 32.dp, 0.dp, 0.dp)
    ) {
        Participants(
            modifier = Modifier.weight(4f),
            participants = participants
        )
        Controls(
            modifier = Modifier
                .weight(1f)
                .fillMaxWidth()
                .padding(16.dp), call = call,
            isMicrophoneEnabled = isMicrophoneEnabled,
            backstage = backstage,
            enableMicrophone = { call.microphone.setEnabled(it) }
        )
    }
}
This observes the participants, active speakers, and backstage StateFlows. We still need Controls, Participants, and Description. Add them below AudioRoom:
@Composable
public fun Description(
    title: String?,
    description: String?,
    participants: List<ParticipantState>
) {
    Text("$title", fontSize = 30.sp)
    Text("$description", fontSize = 20.sp, modifier = Modifier.padding(16.dp))
    Text("${participants.size} participants", fontSize = 20.sp)
}

@Composable
public fun Participants(
    modifier: Modifier = Modifier,
    participants: List<ParticipantState>
) {
    Text("participants todo", fontSize = 30.sp)
}

@Composable
public fun Controls(
    modifier: Modifier = Modifier,
    call: Call,
    backstage: Boolean = false,
    isMicrophoneEnabled: Boolean = false,
    enableMicrophone: (Boolean) -> Unit = {}
) {
    Text("controls todo", fontSize = 30.sp)
}
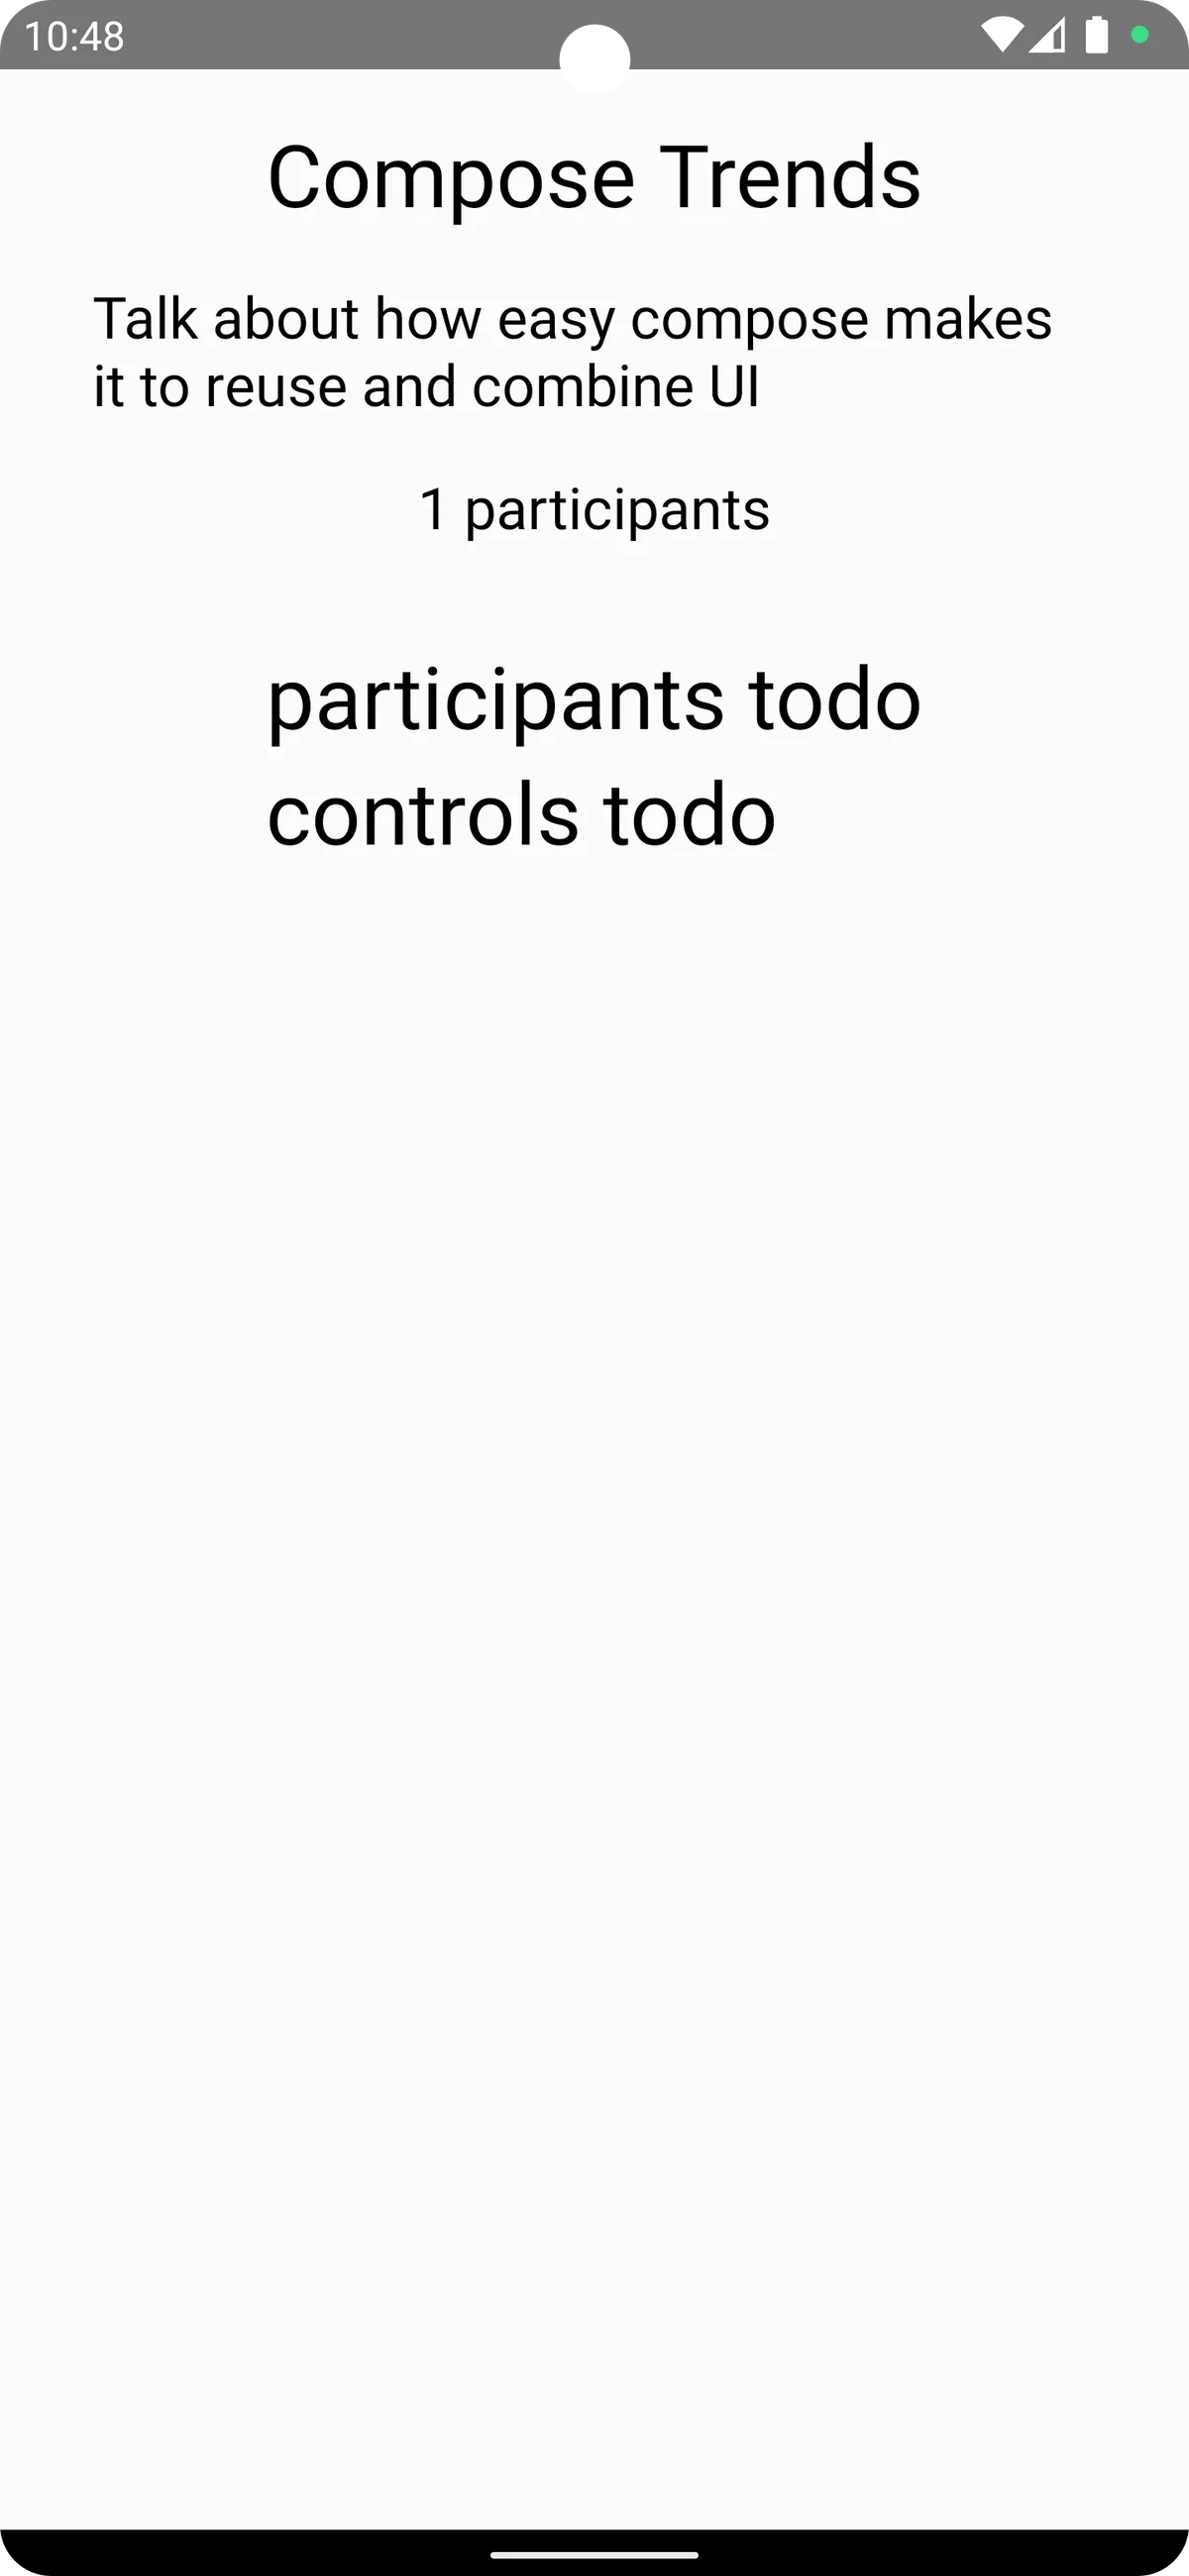
✅ Checkpoint: run the app — you see the room title, description, and participant count, with participants todo and controls todo placeholders. The pattern is the same throughout: observe call.state and render.
Step 5 — Audio Room Controls
Replace the Controls composable with:
@Composable
public fun Controls(
    modifier: Modifier = Modifier,
    call: Call,
    backstage: Boolean = false,
    isMicrophoneEnabled: Boolean = false,
    enableMicrophone: (Boolean) -> Unit = {}
) {
    val scope = rememberCoroutineScope()
    Row(
        modifier = modifier,
        horizontalArrangement = Arrangement.SpaceEvenly
    ) {
        ToggleMicrophoneAction(
            modifier = Modifier.size(52.dp),
            isMicrophoneEnabled = isMicrophoneEnabled,
            onCallAction = { enableMicrophone(it.isEnabled) }
        )

        Button(
            onClick = {
                scope.launch {
                    if (backstage) call.goLive() else call.stopLive()
                }
            }
        ) {
            Text(text = if (backstage) "Go Live" else "End")
        }
    }
}
Now you have a button to toggle the microphone and to start or end the broadcast. Let's join from the browser to make it interactive.
At first you can't join — the room isn't live yet. By default the audio_room call type has backstage mode enabled, so you can talk to co-hosts before going live (configurable in the dashboard).
✅ Checkpoint: click Go Live on Android, then join from the browser — the participant count increases to 2.
Step 6 — Participants UI
Build a proper participant grid. Replace the Participants composable with:
@Composable
public fun Participants(
    modifier: Modifier = Modifier,
    participants: List<ParticipantState>
) {
    LazyVerticalGrid(
        modifier = modifier,
        columns = GridCells.Adaptive(minSize = 128.dp),
    ) {
        items(items = participants, key = { it.sessionId }) { participant ->
            ParticipantAvatar(participant)
        }
    }
}
Then add a ParticipantAvatar composable, which represents a user in the room:
@Composable
public fun ParticipantAvatar(
    participant: ParticipantState,
    modifier: Modifier = Modifier
) {
    val image by participant.image.collectAsState()
    val nameOrId by participant.userNameOrId.collectAsState()
    val isSpeaking by participant.speaking.collectAsState()
    val audioEnabled by participant.audioEnabled.collectAsState()

    Column(
        modifier = modifier,
        horizontalAlignment = Alignment.CenterHorizontally,
        verticalArrangement = Arrangement.Center
    ) {

        Box(modifier = Modifier.size(56.dp)) {
            UserAvatar(
                modifier = Modifier
                    .fillMaxSize()
                    .padding(VideoTheme.dimens.componentPaddingFixed),
                userImage = image,
                userName = nameOrId,
            )

            if (isSpeaking) {
                Box(
                    modifier = Modifier
                        .fillMaxSize()
                        .border(BorderStroke(2.dp, Color.Gray), CircleShape)
                )
            } else if (!audioEnabled) {
                Box(
                    modifier = Modifier
                        .fillMaxSize()
                        .padding(8.dp)
                ) {
                    Box(
                        modifier = Modifier
                            .clip(CircleShape)
                            .background(Color.Black)
                            .size(16.dp)
                    ) {
                        Icon(
                            modifier = Modifier
                                .fillMaxSize()
                                .padding(3.dp),
                            painter = painterResource(id = io.getstream.video.android.ui.common.R.drawable.stream_video_ic_mic_off),
                            tint = Color.White,
                            contentDescription = null
                        )
                    }
                }
            }
        }

        Spacer(modifier = Modifier.height(8.dp))

        Text(
            modifier = Modifier.fillMaxWidth(),
            text = nameOrId,
            fontSize = 14.sp,
            fontWeight = FontWeight.Bold,
            color = Color.Black,
            textAlign = TextAlign.Center,
        )

        Text(
            modifier = Modifier.fillMaxWidth(),
            text = participant.roles.value.firstOrNull() ?: "",
            fontSize = 11.sp,
            color = Color.Black,
            textAlign = TextAlign.Center,
        )
    }
}
✅ Checkpoint: the participant grid renders avatars with names and roles, a speaking ring around active speakers, and a mic-off icon for muted users.

For audio rooms, participant.audioLevel and participant.audioLevels are convenient for an audio visualizer. The ParticipantState docs list all available attributes.
Step 7 — Leaving the call
Once you join a call, the SDK runs it in a foreground service so audio keeps working if the app is backgrounded, posting an ongoing notification. If the user presses back without disconnecting, the activity closes but the service (and notification) keeps running.
Handle back by calling call.leave() before closing the screen. Add a BackHandler inside setContent:
import androidx.activity.compose.BackHandler
import io.getstream.video.android.core.StreamVideo

// Inside setContent { ... }, after LaunchMicrophonePermissions:
BackHandler {
    call.leave()
    StreamVideo.removeClient()
    finish()
}
call.leave() disconnects from the call and stops the foreground service, removing the notification. StreamVideo.removeClient() tears down the SDK singleton so the next launch can build a fresh client.
Note: The End button in
Controlscallscall.stopLive(), which ends the broadcast for listeners but does not disconnect you. You still needcall.leave()when the host actually exits the room.
Other built-in features
A few more features you can add to audio rooms:
- Requesting permissions — listeners ask the host to speak (raise hand).
- Query calls — show upcoming or recent rooms.
- Call previews — show who's in a room before joining.
- Reactions & custom events, recording & HLS broadcasting, chat, moderation, and transcriptions (coming soon).
Verify the whole build
Build and install to a running emulator or connected device:
./gradlew :app:installDebugThen launch, grant microphone access, and confirm the full loop: the room connects → click Go Live → join from the browser (Step 5) and see the participant count reach 2 → toggle your mic and watch the avatar's mic-off indicator update.
Troubleshooting
stream project is not initialized— CLI onboarding not run. Rungetstream initin the project directory first.- Stuck on
Loading/ auth errors in Logcat —call.join()never completed. Confirm the API key, token, and user id all belong to the same app. - Can't join from the browser — the room isn't live. Click Go Live on Android first;
audio_roomuses backstage mode by default. - No microphone prompt, or you can't be heard — permission denied.
LaunchMicrophonePermissionsrequests it; grant microphone in system settings if you dismissed the dialog. - Notification stays after pressing back — you didn't call
call.leave(). Add theBackHandler(Step 7). - Compose build errors — align Kotlin, Compose compiler, and AGP versions (Step 2 config summary).
Next steps
- Video calling — a Zoom-style call app: video calling tutorial
- Livestreaming — broadcast to many viewers: livestreaming tutorial
- Call and participant state — the full state model: guide
- UI components — the full catalog: overview
For audio rooms we use Opus RED and Opus DTX for optimal audio quality. Calls run on Stream's global edge network. Pricing is flexible with multiple tiers.
Final Thoughts
You've built a fully functional audio room with Jetpack Compose — backstage mode, a live participant grid with speaking indicators, and host controls — all driven by call.state. The Video SDK for Android and the API support much more: recording, HLS broadcasting, moderation, and chat integration.
Machine-readable resources
For AI agents and coding assistants working with this SDK:
- CLI + skills:
curl -fsSL https://getstream.io/cli.sh | bash, thengetstream skills --universalandgetstream skills stream-android --universalfor the Android pack (use--claudeinstead for Claude Code). (Alternative:npx skills add GetStream/agent-skills -s stream.) - Provisioning:
getstream init(auth + create/select org & app) →getstream env --target android(API key tolocal.properties) →getstream token <user_id>(mint a token); pick any URL-safe call id - Data & config from the CLI:
getstream api <Endpoint> --request '{...}' - Android integration skill: invoke
/stream-androidin your agent for setup patterns;/stream-docssearches live SDK docs with citations - Docs index for LLMs:
https://getstream.io/video/docs/android/llms.txt - Markdown endpoints: append
.mdto any docs URL for a clean, token-efficient version - Source of truth for APIs: the SDK repository — check the pinned version's source rather than assuming APIs from training data