

In most of the world, if you're YOLO'ing, you're jumping out of a plane, asking out your future spouse, or eating gas station sushi.
In vision AI, You're Only Looking Once. Ultralytics' YOLO is a real-time object detection framework with a simple premise: instead of scanning an image multiple times to find and classify objects, do it all in a single pass. One look at the image, one neural network forward pass, and you get every detected object with its location and class label simultaneously.
This guide walks through YOLO from three angles: what it does and where it's used, how the algorithm actually works under the hood, and how to build something real with it. By the end, you'll have both the conceptual foundation and the working code for a real-time pose detection agent.
What YOLO Does
Most object detection systems work in stages. Older approaches, such as region-based convolutional neural networks (R-CNN), first propose image regions that might contain objects, then classify each region separately. It worked, but it was slow, and "slow" doesn't fly when you're processing live video.
YOLO collapses that into a single pass. Give it an image, and the entire neural network runs once, returning all detected objects with their bounding boxes, class labels, and confidence scores simultaneously. That's what makes it practical for real-time applications that require sub-second response times.
The Ultralytics implementation wraps this core detection engine in a full lifecycle toolkit. You can train models on your own datasets with built-in data augmentation, then evaluate their performance using metrics such as mean average precision (mAP), which measures how accurately the model detects and localizes objects across all classes. Inference runs on static images, video files, webcam feeds, and network video streams. When you're ready to deploy, Ultralytics exports models to optimized runtime formats (ONNX, TensorRT, CoreML, and others) so they run efficiently on your target hardware.
It also ships with multi-object tracking via BoT-SORT and ByteTrack. Where detection tells you "there are three people in this frame," tracking follows each person across frames, maintaining their identity as they move, overlap, and temporarily leave the shot. You get this without bolting on a separate library.
Beyond basic detection, Ultralytics supports multiple vision tasks through model variants that share the same backbone but swap in task-specific prediction heads:
| Task | Model Suffix | Output | Example Dataset |
|---|---|---|---|
| Detection | (default) | Bounding boxes + classes | COCO |
| Instance Segmentation | -seg | Pixel masks + classes | COCO |
| Pose Estimation | -pose | Keypoints (joints, landmarks) | COCO-Pose |
| Classification | -cls | Image-level labels | ImageNet |
| Oriented Bounding Boxes | -obb | Rotated bounding boxes | DOTAv2 |
A pose model, for instance, predicts the same bounding boxes as a detection model and also outputs a set of keypoint coordinates for each detected person. This shared architecture means you can switch tasks by swapping model weights rather than rebuilding your pipeline.
Where Teams Use YOLO
The combination of speed and accuracy makes YOLO practical for a wide range of production scenarios.
- Manufacturing and quality control. Detection and segmentation models identify defects on assembly lines in real time. The speed constraint here is throughput. You need to process frames faster than the line moves.
- Retail and inventory. Object detection tracks products on shelves, counts stock, and identifies misplaced items. When combined with tracking, you can monitor shelf activity over time without re-detecting every frame.
- Sports and fitness analytics. Pose estimation extracts body keypoints from video to analyze form, count reps, and measure joint angles. This is the use case we'll build later in this guide.
- Aerial and satellite imagery. Oriented bounding boxes handle objects at arbitrary rotations, which matters for overhead views of ships, vehicles, and buildings, where standard axis-aligned boxes waste significant area.
- Video surveillance and traffic monitoring. Detection and tracking count vehicles, monitor intersections, and identify anomalies. If you're deploying in this space, consider the privacy and consent implications carefully.
How YOLO Works Under the Hood
Understanding the internals helps you make better decisions about model selection, training configuration, and debugging when things aren't working. We'll walk through what happens when YOLO processes a single image, using the Ultralytics bus as our running example.

The Architecture: Backbone, Neck, Head
YOLO models follow a three-part structure. These aren’t our vague ways of describing the architecture. These are the actual terms Ultralytics use.
Backbone
The backbone is a convolutional neural network that extracts features from the input image at multiple scales. As the image passes through successive layers, spatial resolution shrinks while the number of feature channels grows. Early layers capture fine-grained details such as edges and textures (useful for spotting small objects), while deeper layers capture higher-level patterns such as shapes and object parts (useful for large objects). The backbone's job is to compress raw pixels into rich feature maps that the rest of the model can reason about.
Neck
The neck fuses those multi-scale feature maps together. Without it, each scale would only know about its own level of detail. The neck uses upsampling and concatenation to mix information across scales, so the model can detect a small screw and a large machine in the same image using the same set of features. You'll sometimes see this called a Feature Pyramid Network (FPN).
Head
The head takes the fused feature maps and produces the actual predictions: class probabilities and box geometry at every spatial location. For task variants such as pose estimation, the head adds additional output channels for keypoint coordinates. For segmentation, it adds mask coefficients. The backbone and neck stay the same across tasks; the head is what changes.
Here’s the entire architecture in all its glory:

What the Model Predicts: Anchor Points and Distances
Earlier YOLO versions used predefined "anchor boxes," a set of fixed rectangles at various sizes and aspect ratios baked into the model. Each prediction started from one of these templates and adjusted it to fit the actual object. This worked, but it required you to select good anchor shapes upfront (typically by clustering your training data), and predictions were biased toward those shapes.
Modern Ultralytics models are anchor-free, meaning they start from a much simpler representation: a grid of points. The model lays a regular grid over the image and predicts at each grid point. No templates, no preset shapes. Each point independently predicts whether there's an object nearby and, if so, how far away its edges are.
In practice, the model does this at three scales simultaneously. The backbone produces feature maps at strides of 8, 16, and 32 pixels. A stride-8 feature map puts a grid point every 8 pixels, producing a dense grid of 13,635 points across a 640×640 image. Stride-16 produces 3,350 points. Stride-32 produces 825 points with the widest spacing. The small-stride grid catches small objects; the large-stride grid catches large ones.

Zooming in, you can see the three grids at different densities. The small pink stride-8 dots are packed tightly, giving the model fine-grained coverage. The medium cyan stride-16 dots are spaced wider. The large blue stride-32 dots are the most sparse, but each one has a wider receptive field in the backbone, so it "sees" more of the image.

At each grid point, the model predicts four distances: the extents of the bounding box to the left, top, right, and bottom. The green arrows in the image below show this for several detections. Take the person on the left: the anchor point is roughly centered on them, and the four predicted distances extend to each edge of the bounding box.

The conversion from distances to box coordinates is just addition and subtraction. If an anchor sits at pixel (20, 28) and predicts left=12, top=8, right=15, bottom=20:
top-left:     (20 - 12, 28 - 8)  = (8, 20)
bottom-right: (20 + 15, 28 + 20) = (35, 48)
This is cleaner than predicting absolute coordinates because the model only needs to learn small, local offsets. A prediction near the top-left of the image and one near the bottom-right can use similar distance values for similarly-sized objects.
Distances as Distributions
Rather than predicting each distance as a single number, YOLO predicts a probability distribution over discrete distance bins. If reg_max = 16, each side gets 16 bins where bin 0 means "the edge is 0 stride-units from the anchor" and bin 15 means "15 stride-units away." The predicted distance is the expected value of that distribution.
Why bother? A single number must commit to a single value. A distribution can express confidence. For a sharp, clear object boundary, the distribution spikes on a single bin. For an ambiguous boundary (a partially occluded edge, a blurry frame), it spreads across several bins, hedging its bet. The expected value still lands in a reasonable spot either way.
The chart below shows actual DFL (distribution focal loss) distributions from three detections in our bus scene. Each cluster of four bars represents the left, top, right, and bottom distances of a detection. Notice how some distributions spike sharply (the model is confident about that edge) while others spread wider (less certainty about the exact boundary).

How Training Works: Assignment and Loss
During training, the model produces a prediction at each of the ~17,000 grid points. Most are background. The training pipeline needs to determine which predictions correspond to each ground-truth object, then compute a loss that pushes those predictions toward the ground truth.
- Assignment uses a task-aligned metric that multiplies two signals: the model's class confidence and the IoU (overlap) between the predicted and ground-truth boxes. Both must be strong for a good match. A confident prediction with a terrible box scores low, and so does a well-placed box with random class predictions. For each ground-truth object, the top-k anchors by this score are selected as positive assignments.
- The loss combines three terms: Classification loss (binary cross-entropy) penalizes wrong class predictions. Box loss (Complete IoU) penalizes poor localization, improving on standard IoU by also accounting for center-point distance and aspect ratio mismatch. Distribution loss trains the distance bin distributions described above. The final loss is a weighted sum of all three, with configurable weights in the training config.
Inference: NMS vs. NMS-free
Because the model predicts boxes at every grid point, a single object triggers multiple overlapping detections. Here's what the raw output looks like after confidence filtering but before any deduplication: There are actually 81 boxes here, stacked on top of each other for the same person or bus.

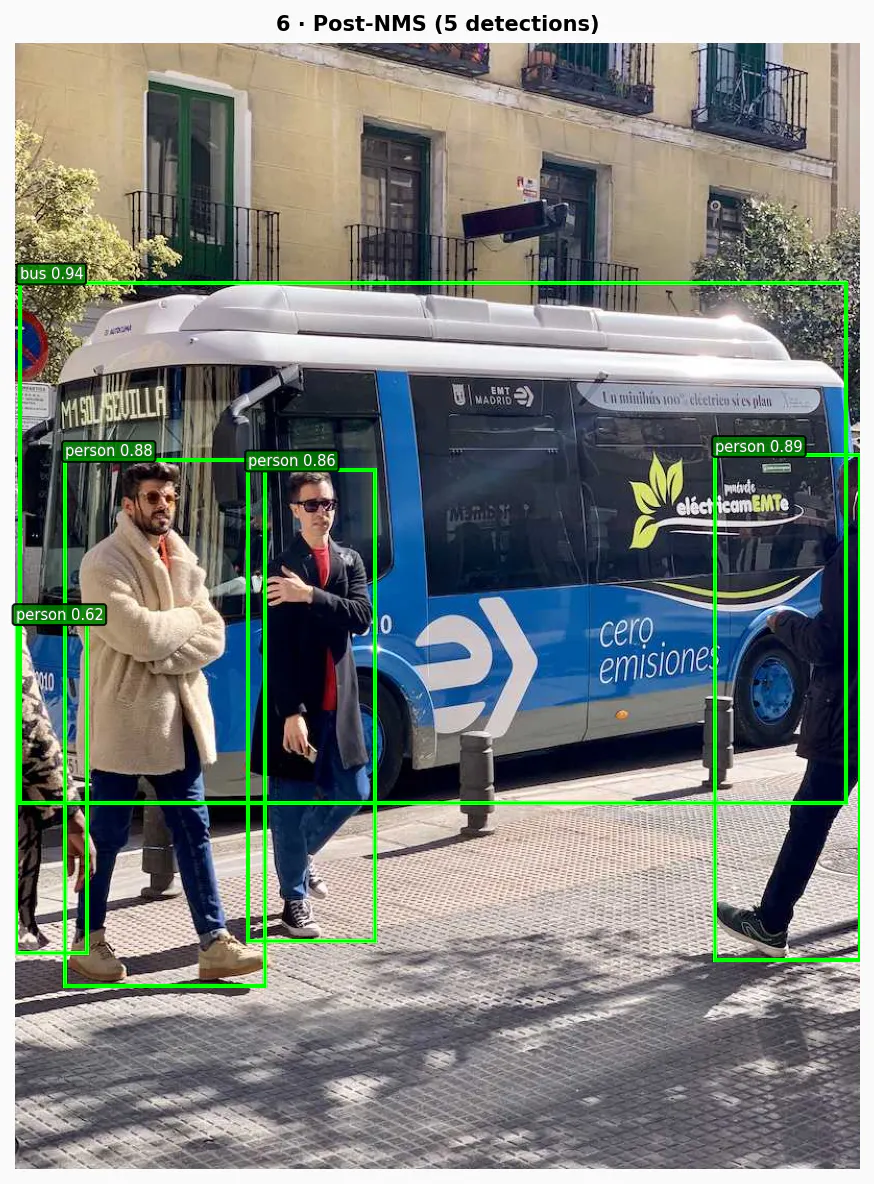
Traditional YOLO models clean this up with Non-Maximum Suppression (NMS): keep the highest-scoring box, suppress nearby boxes that overlap too much, repeat. After NMS, the 81 candidates collapse down to 5 clean detections, each with a class label and confidence score.
NMS works, but it adds latency and can accidentally suppress valid detections when objects are genuinely close together (e.g., two people standing side by side).
Newer architectures (YOLOv10, YOLO26) eliminate NMS with dual-head training. One head assigns multiple anchors per object during training for a richer learning signal. A second head assigns exactly one anchor per object, learning to produce a single clean detection. At inference, only the one-to-one head runs, so each object yields one prediction with no post-processing needed.
Building a Real-Time Pose Coach With YOLO and Vision Agents
Enough theory (and thinking about how nice Madrid looks)—let's build something.
We'll create a real-time golf coaching agent that monitors a user via webcam, detects body keypoints using YOLO pose estimation, and provides verbal feedback on form and posture. This uses Vision Agents, a framework for building AI agents that can see, hear, and speak, with YOLO-native object detection.
Project Setup
The project needs three API keys:
1234567# .env
GEMINI_API_KEY=        # For the Gemini realtime LLM
STREAM_API_KEY=        # For the video transport layer
STREAM_API_SECRET=
EXAMPLE_BASE_URL=https://demo.visionagents.ai # To launch Stream Video

ULTRALYTICS_API_KEY=
Install dependencies:
12uv add vision-agents
uv add "vision-agents[getstream, gemini, ultralytics]"
The vision-agents package handles the video pipeline, LLM integration, and real-time communication. The Ultralytics extra pulls in YOLO.
The Agent Code
Here's the complete agent in agent.py:
123456789101112131415161718192021222324252627282930313233343536373839404142434445464748495051525354import asyncio
from pathlib import Path

from dotenv import load_dotenv
from vision_agents.core import Agent, AgentLauncher, Runner, User
from vision_agents.plugins import gemini, getstream, ultralytics

load_dotenv()

INSTRUCTIONS = (Path(__file__).parent / "instructions.md").read_text()

async def create_agent(**kwargs) -> Agent:
   return Agent(
       edge=getstream.Edge(),
       agent_user=User(name="Golf Coach", id="agent"),
       instructions=INSTRUCTIONS,
       llm=gemini.Realtime(fps=3),
       processors=[
           ultralytics.YOLOPoseProcessor(
               model_path="yolo11n-pose.pt",
               conf_threshold=0.5,
               enable_hand_tracking=True,
           )
       ],
   )

async def join_call(agent: Agent, call_type: str, call_id: str, **kwargs) -> None:
   call = await agent.create_call(call_type, call_id)
   async with agent.join(call):
       # Periodically prompt Gemini to analyze the video and comment
       async def periodic_feedback():
           prompts = [
               "Say hi. You're their golf coach. Look at their stance and give one specific tip.",
               "Check their grip and hand position. Any issues?",
               "Look at their spine angle and knee flex. Give one correction.",
               "Watch their shoulder alignment and hip rotation. What do you see?",
               "Check their weight distribution and balance. Give feedback.",
               "Look at their elbow and wrist position. Anything to fix?",
           ]
           for prompt in prompts:
               await agent.llm.simple_response(text=prompt)
               await asyncio.sleep(6)
           while True:
               await agent.llm.simple_response(
                   text="Watch the user's golf form. Give one new specific coaching tip you haven't said yet."
               )
               await asyncio.sleep(6)

       task = asyncio.create_task(periodic_feedback())
       await agent.finish()
       task.cancel()

if __name__ == "__main__":
   Runner(AgentLauncher(create_agent=create_agent, join_call=join_call)).cli()
Let's walk through the key pieces.
Agent is the central coordinator. It wires together the video transport (getstream.Edge()), the language model (gemini.Realtime(fps=3)), and the vision processors into a single pipeline.
gemini.Realtime(fps=3) is a multimodal LLM connection that processes video frames at 3 frames per second. The model receives annotated frames (with skeleton overlays drawn by the YOLO processor) and generates spoken responses.
YOLOPoseProcessor is where Ultralytics does its work. On every incoming video frame, this processor:
- Runs the
yolo11n-pose.ptmodel to detect people and their keypoints - Draws skeleton overlays on the frame, connecting detected joints (shoulders, elbows, wrists, hips, knees, ankles)
- Passes the annotated frame to the LLM so it can see both the video and the pose data
The conf_threshold=0.5 parameter filters out low-confidence detections. The enable_hand_tracking=True flag adds wrist and finger keypoints to the skeleton.
instructions.md tells the LLM how to behave. This is the system prompt that shapes the agent's coaching personality:
You are a golf swing coach analyzing a live video feed with YOLO skeleton overlays.

## Personality
- Direct, knowledgeable, like a real golf pro on the range
- Keep each response to 1-2 short sentences
- Use golf terminology naturally

## What You Can See
- A live video feed with YOLO pose detection skeleton overlays
- Key body points: head, shoulders, elbows, wrists, hips, knees, ankles
- Skeleton connections showing body alignment and joint angles

## Golf Coaching Focus Areas
- **Grip**: Position in fingers not palms, neutral tension, 2-3 knuckles visible on lead hand
- **Stance**: Shoulder-width feet, slight knee flex, weight on balls of feet
- **Posture**: Spine tilt from hips, chin up, no slouching or excessive knee bend
- **Alignment**: Shoulders, hips, and feet parallel to target line
- **Takeaway**: Low and slow, hands and club moving as one unit
- **Backswing**: Full shoulder turn, left arm straight (for right-hander), club on plane
- **Downswing**: Hip-led rotation, lag maintained, weight shifting to front foot
- **Impact**: Hands ahead of clubhead, flat left wrist, eyes on ball
- **Follow-through**: Full extension, belt buckle facing target, balanced finish

## Common Faults to Watch For
- Slices: weak grip, outside-in path, open clubface
- Hooks: strong grip, excessive inside path
- Topping: standing up through impact, lifting head early
- Fat shots: swaying instead of rotating, low point behind ball

## Rules
- Give ONE specific observation per prompt — do not list multiple things
- Reference what you actually see in the skeleton overlay
- If they are not in a golf stance or swinging, coach them into position
- If you cannot see the user clearly, say so briefly
The LLM sees the YOLO-annotated frames and uses these instructions to generate useful, specific coaching cues.
Run it with:
1python agent.py
The agent connects to a Stream video call, processes frames with YOLO pose detection, and sends the annotated video and audio responses back to the user.
Given my lack of skill and golf club, you can probably tell I’m not a golfer and definitely need this coach. Here’s the golf coach working with someone who knows what they’re doing.
The full data flow looks like this:
- User's webcam → Stream video transport → agent receives frames
- Each frame →
YOLOPoseProcessor→ skeleton overlay drawn - Annotated frame →
gemini.Realtime→ LLM generates spoken coaching - Audio response → Stream transport → user hears feedback
The fps=3 setting is deliberate. Pose coaching doesn't need 30fps analysis. Three frames per second is enough to catch form issues while keeping LLM costs and latency reasonable.
Why YOLO For This
Pose estimation with YOLO is a natural fit here for a few reasons.
- The
yolo11n-pose.ptmodel (the "nano" variant) runs fast enough for real-time processing on modest hardware. The "n" in the model name means it's the smallest architecture, trading some accuracy for speed. For a coaching use case where you need to detect major joint positions rather than sub-pixel precision, that tradeoff works well. - YOLO's keypoint output maps directly to coaching feedback. The model detects 17 body keypoints per person following the COCO keypoint format: nose, eyes, ears, shoulders, elbows, wrists, hips, knees, and ankles. The skeleton connections between these points make alignment issues visually obvious to the LLM.
- The confidence threshold (
conf_threshold=0.5) provides a built-in quality gate. If the user is partially out of frame or poorly lit, low-confidence detections get filtered out rather than producing noisy skeleton overlays that would confuse the LLM.
Frequently Asked Questions
- What programming language is Ultralytics?
Ultralytics is a Python package. You install it via pip (‘pip install ultralytics’) and interact with it through a Python API. The underlying model inference can be exported to runtimes like TensorRT and CoreML for deployment in other environments, but the training, evaluation, and development workflow is Python-native.
- Does YOLO use GPU or CPU?
Both, depending on your hardware. YOLO will automatically use a GPU if one is available, which is where you'll get real-time performance. The nano model (‘yolo11n’) can run on CPU at reduced frame rates, workable for testing and light workloads, but not production video processing. For deployment, exporting to ONNX or TensorRT can significantly improve CPU and GPU performance, respectively.
- How does YOLO tracking work?
Detection tells you what's in a frame. Tracking connects those detections across frames so each object keeps a consistent identity as it moves. Ultralytics bundles two tracking algorithms (BoT-SORT and ByteTrack) so you get this without a separate library. In practice, you swap model.predict() for model.track() and the tracker handles the rest, assigning each detected object a persistent ID across frames.
- What is the best YOLO model for real-time detection?
It depends on your hardware and accuracy requirements, but the nano variant (yolo11n) is the practical starting point for most real-time applications. It's the smallest and fastest architecture in the YOLOv11 family, and it runs on modest hardware without a dedicated GPU, which is why it's used in the pose coach built in this guide. If your hardware can support it, stepping up to the small (yolo11s) or medium (yolo11m) variants gives you meaningfully better accuracy without sacrificing real-time performance on a modern GPU.
- What is the difference between YOLO and YOLOv3?
The biggest architectural difference is how they predict bounding boxes. YOLOv3 used predefined anchor boxes—fixed rectangle templates at various sizes and aspect ratios that predictions were adjusted from. Modern Ultralytics YOLO models are anchor-free, meaning they predict distances from grid points directly, with no templates required. This removes the need to tune anchor shapes to your dataset and makes the model more generalizable out of the box.
YOLOv3 also used Darknet as its underlying framework, which required a separate installation and had limited Python integration. Ultralytics rewrote the stack in PyTorch, which is what makes the current pip-installable package and its training, evaluation, and export workflow possible.
Yolo’ing Your Vision AI
YOLO's value proposition has remained consistent across versions: to make object detection fast enough for real-time applications without sacrificing too much accuracy. The Ultralytics implementation adds the engineering around that core, handling everything from data loading to deployment export.
The interesting development in recent versions is the shift toward end-to-end detection without NMS, and the expansion into multi-task models that share a backbone across detection, segmentation, pose, and oriented bounding boxes. For developers building vision-powered applications, this means you can start with a detection model and add pose estimation or segmentation by swapping model weights, not rewriting your pipeline.
That's what makes the combination with Vision Agents compelling. The pose coach we built earlier uses YOLO as a video processor in a larger pipeline that includes real-time video transport, multimodal LLM reasoning, and spoken responses. YOLO handles the hard part (extracting structured skeleton data from raw frames at speed), and Vision Agents handles the orchestration. If you wanted to swap in a segmentation model for a manufacturing inspection agent or a detection model for a security camera, you'd change the processor and the instructions. The rest of the pipeline remains unchanged.
If you want to go deeper, the Ultralytics source code is well-organized. Start with ultralytics/utils/tal.py for the assignment logic and ultralytics/utils/loss.py for the training losses. These two files contain most of the algorithmic substance.
For building real-time agents around YOLO, check out the Vision Agents cookbook for more examples, including a golf coach, a football commentator, and a security camera with face recognition.