Real-time language translation has become essential for global applications, communities, and businesses to break down language barriers and foster inclusive environments.
In this article, I’ll explain how to implement real-time language translation in Stream applications using large language models (LLMs).
By the end, you will understand how to:
- Authenticate users using a Stream token.
- Create a translation middleware service using LLMs.
- Integrate this service with Stream Chat.
- Implement language preference management on the client side.
Understanding the Problem
The Language Barrier
When users who speak different languages try to communicate in real-time, the experience often breaks down. Traditional solutions include:
-
Manual translation: Requiring users to copy/paste text into translation services
-
Built-in translation buttons: Adding translation options that interrupt the flow of conversation
-
Separate language channels: Segregating users by language, which reduces cross-cultural interaction
These approaches create friction and slow communication, often resulting in fragmented communities.
Why LLMs for Translation?
LLMs offer several advantages over traditional translation APIs:
- Context awareness: LLMs understand conversational context, improving translation accuracy
- Cultural nuance: They handle idioms, slang, and culturally specific expressions more effectively
- Adaptability: They can follow specific translation instructions when prompted
Technical Prerequisite
Before we begin, ensure you have the following:
- A Stream account with an API key and secret.
- Access to an LLM API (e.g., OpenAI, Anthropic, Gemini, etc.).
- Node.js and npm/yarn are installed.
- Basic knowledge of React and Node.js.
Solution Architecture
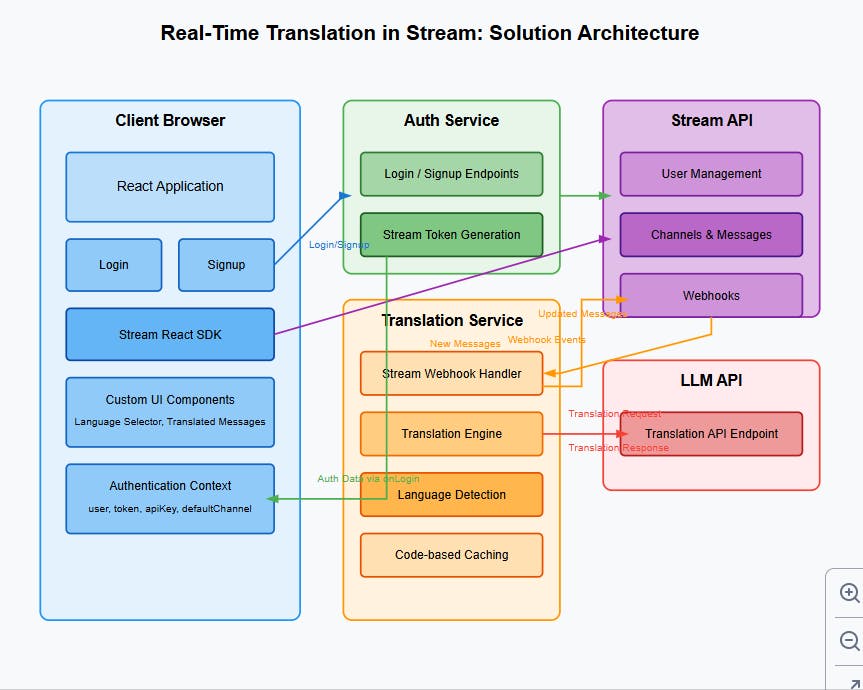
Our solution consists of five main components:
- Stream Chat SDK: Handles the core chat functionality
- Translation Middleware: A Node.js service that intercepts new messages.
- LLM Service: Performs the actual translation.
- Caching Layer: Stores previous translations to improve performance.
- Client Browser: Consumes the translation middleware API.

Message Flow
- The user authenticates and receives a Stream token.
- The user sends a message in their preferred language.
- Stream webhook triggers the translation middleware.
- Middleware verifies the request and checks the cache for existing translations.
- If not cached, the LLM API translates the message.
- Translations are stored in the message metadata.
- An updated message with translations is sent to recipients.
- Client displays a message in the user's preferred language.
Implementation Guide: Backend
Before diving into how to create the translation middleware and connect it to the client, you need to go through a few setup steps.
Setting Up the Translation Server
Start by building your translation middleware service.
- Create a Node.js project and install the necessary dependencies:
1234mkdir stream-translation-service
cd stream-translation-service
npm init
npm install express stream-chat nodemon dotenv cors axios @google/generative-ai
2. Create a .env file for configuration. This will store your Stream credentials and the API key for your chosen LLM provider:
12345STREAM_API_KEY=your_stream_api_key
STREAM_API_SECRET=your_stream_api_secret
LLM_API_KEY=your_llm_api_key
LLM_API_URL="https://generativelanguage.googleapis.com/v1beta"
PORT="3000"
3. Next, create a server.js file to contain your backend logic:
1234567891011// server.js
const express = require('express');
const { StreamChat } = require('stream-chat');
const axios = require('axios');
const cors = require('cors');
require('dotenv').config();
const { GoogleGenerativeAI } = require('@google/generative-ai');

const app = express();
app.use(express.json());
app.use(cors());
Service Initialization
Initialize both the Stream Chat and Gemini AI services:
123456789101112131415// Initialize Gemini AI
const genAI = new GoogleGenerativeAI(process.env.LLM_API_KEY);

// Initialize Stream Chat with configuration
const streamClient = StreamChat.getInstance(
  process.env.STREAM_API_KEY,
  process.env.STREAM_API_SECRET,
  {
    timeout: 10000,
    maxRetries: 3,
    logger: (logLevel, message, extraData) => {
      console.log(message, extraData);
    }
  }
);
Translation Cache System
To optimize performance, implement a caching system for translations:
12345678910111213const translationCache = new Map();

const createCacheKey = (text, sourceLang, targetLang) => {
  return `${text}_${sourceLang}_${targetLang}`.toLowerCase();
};

const setCacheEntry = (text, sourceLang, targetLang, translatedText) => {
  // Cache validation and storage logic
};

const getCacheEntry = (text, sourceLang, targetLang) => {
  // Cache retrieval with 24-hour expiration
};
Core Translation Function
1234567891011121314async function translateText(text, sourceLang, targetLang) {
  try {
    // Translation validation and processing
    const model = genAI.getGenerativeModel({
      model: 'gemini-2.0-flash'
    });

    const prompt = `Translate this text from ${sourceLang} to ${targetLang}...`;
    // Translation logic and cache management
  } catch (error) {
    console.error('Translation error:', error);
    throw error;
  }
}
API Endpoints
Your server should expose several key endpoints:
User Management
POST /signup– User registration and channel assignmentPOST /login– User authenticationPOST /set-language– Language preference setting.
Channel Operations
POST /channel– Channel creation and joiningPOST /webhook– Real-time message translation
Translation Services
POST /direct-translate– Direct translation requests
System Management
-
GET /health– System health check -
DELETE /delete-messages– Message cleanup for users
Real-Time Message Processing
123456789101112131415app.post('/webhook', async (req, res) => {
  try {
    const { type, message } = req.body;
    // Message validation and translation
    // Member language detection
    // Translation distribution
  } catch (error) {
    console.error('Webhook error:', error);
    res.status(500).json({
      success: false,
      translations: {},
      error: 'Translation failed'
    });
  }
});
Server Initialization
Finally, start the server on your configured port:
12345const PORT = process.env.PORT || 3000;

app.listen(PORT, () => {
  console.log(`Translation service running on port ${PORT}`);
});
This configuration sets up a robust server component that handles real-time chat translation, user management, and message processing—while maintaining performance through caching and solid error handling.
Complete Source Code
You can find the complete source code for this implementation in this repository.
Implementation Guide: Frontend
Backend Setup
The code above demonstrates how to set up the backend, which should run on localhost:3000.
Setting Up Your React Application
1234npm create vite@latest stream-chat-front --template react
cd stream-chat-front
npm install axios stream-chat stream-chat-react
npm run dev
Setting Up Environment Variables
In your .env file, add the following:
12VITE_STREAM_API_KEY=your_stream_api_key
VITE_BACKEND_URL=your_backend_url
Authentication Component
This component handles authentication, including both sign-up and login.
1234567891011121314151617181920212223242526272829303132333435363738394041424344454647484950515253545556575859606162636465666768697071727374757677787980818283848586import { useState } from 'react';

export function Auth({ onLogin, error, onError }) {
  const [isLogin, setIsLogin] = useState(true);
  const [username, setUsername] = useState('');
  const [language, setLanguage] = useState('en');

  const handleSubmit = async (e) => {
    e.preventDefault();

    try {
      const endpoint = isLogin ? 'login' : 'signup';
      const response = await fetch(`${import.meta.env.VITE_BACKEND_URL}/${endpoint}`, {
        method: 'POST',
        headers: {
          'Content-Type': 'application/json',
        },
        body: JSON.stringify({
          username,
          language
        }),
      });

      const data = await response.json();

      if (!response.ok) {
        throw new Error(data.error || (isLogin ? 'Login failed' : 'Signup failed'));
      }

      // Pass the user data, token, and channel info to parent component
      onLogin({
        user: data.user,
        token: data.token,
        apiKey: data.apiKey,
        defaultChannel: data.defaultChannel
      });
    } catch (err) {
      console.error(isLogin ? 'Login error:' : 'Signup error:', err);
      // If you have an error handling prop, you might want to call it here
      if (typeof onError === 'function') {
        onError(err.message);
      }
    }
  };

  return (
    <div className="auth-form">
      <h2>{isLogin ? 'Login' : 'Sign Up'}</h2>
      {error && <div className="error-message">{error}</div>}
      <form onSubmit={handleSubmit}>
        <div className="form-group">
          <label htmlFor="username">Username</label>
          <input
            type="text"
            id="username"
            value={username}
            onChange={(e) => setUsername(e.target.value)}
            required
          />
        </div>
        <div className="form-group">
          <label htmlFor="language">Preferred Language</label>
          <select
            id="language"
            value={language}
            onChange={(e) => setLanguage(e.target.value)}
          >
            <option value="en">English</option>
            <option value="es">Spanish</option>
            <option value="fr">French</option>
            {/* Add more language options as needed */}
          </select>
        </div>
        <button type="submit" className="auth-button">
          {isLogin ? 'Login' : 'Sign Up'}
        </button>
      </form>
      <button
        className="toggle-auth-button"
        onClick={() => setIsLogin(!isLogin)}
      >
        {isLogin ? 'Need an account? Sign Up' : 'Already have an account? Login'}
      </button>
    </div>
  );
}
Language Selector Component.
123456789101112131415161718192021222324252627282930// src/components/LanguageSelector.jsx
import React from 'react';

export const LanguageSelector = ({ currentLanguage, onChange }) => {
  const languageOptions = [
    { value: 'en', label: 'English' },
    { value: 'es', label: 'Spanish' },
    { value: 'fr', label: 'French' },
    { value: 'de', label: 'German' },
    { value: 'ja', label: 'Japanese' },
    // Add more languages as needed
  ];

  return (
    <div className="language-selector">
      <label htmlFor="language-select">Select language: </label>
      <select
        id="language-select"
        value={currentLanguage}
        onChange={(e) => onChange(e.target.value)}
      >
        {languageOptions.map((lang) => (
          <option key={lang.value} value={lang.value}>
            {lang.label}
          </option>
        ))}
      </select>
    </div>
  );
};
Translated Message Component
1234567891011121314151617181920212223242526272829303132333435363738394041424344454647484950515253545556575859606162636465666768// src/components/TranslatedMessage.jsx
import React, { useState, useEffect } from 'react';
import { MessageText, useMessageContext } from 'stream-chat-react';

export const TranslatedMessage = ({ userLanguage, onDelete }) => {
  const { message } = useMessageContext();
  const [translatedText, setTranslatedText] = useState(null);
  const [isDeleting, setIsDeleting] = useState(false);

  useEffect(() => {
    if (message) {
      console.log('Translation attempt:', {
        messageId: message.id,
        currentLanguage: userLanguage,
        availableTranslations: message.translations,
        messageText: message.text
      });

      // Try different translation fields in order of preference
      const translation =
        message.translations?.[userLanguage] ||
        message[`text_${userLanguage}`] ||
        message[`translated_${userLanguage}`];

      if (translation) {
        console.log('Translation found:', translation);
        setTranslatedText(translation);
      } else {
        console.log('No translation available for:', userLanguage);
        setTranslatedText(message.text); // Fallback to original text
      }
    }
  }, [message, userLanguage]);

  // Create modified message with translated text
  const modifiedMessage = {
    ...message,
    text: translatedText || message.text,
  };

  const handleDelete = async () => {
    if (!onDelete || isDeleting) return;
    try {
      setIsDeleting(true);
      await onDelete(message.id);
    } catch (error) {
      console.error('Failed to delete message:', error);
    } finally {
      setIsDeleting(false);
    }
  };

  return (
    <div className="str-chat__message-translation-wrapper">
      <div className="message-content">
        <MessageText message={modifiedMessage} />
        <button
          className="delete-message-btn"
          onClick={handleDelete}
          disabled={isDeleting}
          title="Delete message"
        >
          {isDeleting ? '...' : '🗑️'}
        </button>
      </div>
    </div>
  );
};
Configuring the Main App Component
Here's the complete App.js logic broken into key sections:
Initial App Structure
123456789101112// Step 1: The basic app shell
import React from 'react';

function App() {
  return (
    <div className="app">
      <h1>Real-Time Translation Chat</h1>
    </div>
  );
}

export default App;
Initial Setup and Imports
StreamChat—which will be initialized later—is imported in the code below, along with Chat, Channel, ChannelHeader, MessageInput, MessageList, Thread, and Window from the stream-chat-react package.
The Chat and Channel components serve as React context providers. They pass the following to their children via React’s context system:
- UI components
- Channel state data
- Messaging functions
1234567import React, { useState, useEffect } from 'react';
import { StreamChat } from 'stream-chat';
import {
  Chat, Channel, ChannelHeader,
  MessageInput, MessageList,
  Thread, Window
} from 'stream-chat-react';
Key Assignment & Stream Chat Client Configuration
The StreamChat client abstracts API calls into methods and manages state and real-time events.
To prevent the client from being recreated on every render, the instance is initialized outside the component. This instance also handles connection state and real-time updates.
123456// Get API key from environment variable
const API_KEY = import.meta.env.VITE_STREAM_API_KEY;
const BACKEND_URL = import.meta.env.VITE_BACKEND_URL;

// Create the client outside of component to prevent recreating it on renders
const chatClient = StreamChat.getInstance(API_KEY);
State Management
The App.js file uses several state variables to manage the application effectively.
1234567function App() {
  const [channel, setChannel] = useState(null);        // Manages active chat channel
  const [user, setUser] = useState(null);             // Stores user information
  const [userLanguage, setUserLanguage] = useState('en'); // Current language
  const [isConnecting, setIsConnecting] = useState(false);
  const [error, setError] = useState(null);
  const [clientReady, setClientReady] = useState(false);
Authentication and CleanUp Handler
In this section, authentication is handled, and a channel is created using the StreamChat client’s channel() method. The method accepts three arguments:
'messaging': The channel type that determines features and permissions.'translation-demo': A unique channel identifier.- A channel data object for additional configuration.
12345678910111213141516171819202122232425262728293031323334353637383940414243444546474849505152535455565758596061const handleLogin = async (data) => {
    try {
      setIsConnecting(true);

      const { user, token, apiKey } = data;

      // Initialize Stream Chat client
      const chatClient = StreamChat.getInstance(apiKey);

      // Connect user to Stream Chat
      await chatClient.connectUser(
        {
          id: user.id,
          name: user.name,
          language: user.language,
        },
        token
      );

      // Create or join default channel
      const channelName = 'translation-demo';
      const channel = chatClient.channel('messaging', channelName, {
        name: 'Translation Demo Channel',
        members: [user.id],
      });

      await channel.watch();

      setChannel(channel);
      setUser(user);
      setUserLanguage(user.language);
      setClientReady(true);
      setError(null);
    } catch (error) {
      console.error('Login error:', error);
      setError('Login failed. Please try again.');
    } finally {
      setIsConnecting(false);
    }
  };

  const handleLogout = async () => {
    try {
      if (chatClient) {
        await chatClient.disconnectUser();
        setChannel(null);
        setUser(null);
        setClientReady(false);
      }
    } catch (error) {
      console.error('Logout error:', error);
    }
  };
  // Cleanup on unmount
  useEffect(() => {
    return () => {
      if (chatClient.userID) {
        chatClient.disconnectUser();
      }
    };
  }, []);
Language Translation Handler
1234567891011121314151617181920212223242526272829303132333435363738394041424344454647484950515253545556575859const handleLanguageChange = async (language) => {
    if (user) {
      try {
        setIsConnecting(true);
        console.log('Requesting translation to:', language);

        const channelMessages = channel.state.messages || [];
        console.log('Messages to translate:', channelMessages.length);

        // Send all messages for translation, even when target is English
        const response = await fetch(`${BACKEND_URL}/set-language`, {
          method: 'POST',
          headers: {
            'Content-Type': 'application/json',
            'Authorization': `Bearer ${user.token}`
          },
          body: JSON.stringify({
            userId: user.id,
            language,
            channelId: channel.id,
            messages: channelMessages.map(msg => ({
              id: msg.id,
              text: msg.text,
              // Always send source language for better translation
              language: msg.language || detectLanguage(msg.text)
            }))
          }),
        });

        const result = await response.json();
        console.log('Backend response:', result);

        if (!response.ok) {
          throw new Error(`Backend error: ${result.error || response.statusText}`);
        }

        // Process translations regardless of target language
        if (result.translations && Object.keys(result.translations).length > 0) {
          for (const [messageId, translation] of Object.entries(result.translations)) {
            if (translation && translation.trim()) {
              await channel.updateMessage({
                id: messageId,
                translations: {
                  [language]: translation
                }
              });
            }
          }
        }
  setUserLanguage(language);
        await channel.watch();
      } catch (error) {
        console.error('Translation error:', error);
        setError(`Failed to change language: ${error.message}`);
      } finally {
        setIsConnecting(false);
      }
    }
  };
Message Management
12345678910111213141516171819202122232425262728293031// Add message deletion handler
  const handleMessageDelete = async (messageId) => {
    try {
      if (!channel || !user) return;

      const response = await fetch(`${BACKEND_URL}/delete-messages`, {
        method: 'POST',
        headers: {
          'Content-Type': 'application/json',
          'Authorization': `Bearer ${user.token}`
        },
        body: JSON.stringify({
          channelId: channel.id,
          channelType: 'messaging',
          messageIds: [messageId],
          userId: user.id
        }),
      });

      if (!response.ok) {
        const error = await response.json();
        throw new Error(error.message || 'Failed to delete message');
      }

      // Refresh channel to update messages
      await channel.watch();
    } catch (error) {
      console.error('Delete message error:', error);
      setError('Failed to delete message. Please try again.');
    }
  };
UI Rendering
The component renders different views based on the application state:
- Authentication view – Displayed when no user is logged in.
1234567if (!user) {
  return (
    <div className="auth-container">
      <Auth onLogin={handleLogin} error={error} />
    </div>
  );
}
- Loading view – Shown while connecting to the chat service.
1234567if (isConnecting) {
  return (
    <div className="loading-container">
      <div className="loading-indicator">Connecting to chat...</div>
    </div>
  );
}
- Main chat interface – Rendered when the application is fully connected.
In the code below, the Chat and Channel components act as context providers:
-
Chatprovides global chat context to all child components, including:- Connection status
- User information
- Theme settings
Channelprovides channel-specific context, including:- Message list
- Channel state
- Typing indicators
- Message actions
123456789101112131415161718192021222324252627282930313233343536373839return (
  <div className="app">
    <div className="app-header">
      <h1>Real-Time Translation Chat</h1>
      <LanguageSelector
        currentLanguage={userLanguage}
        onChange={handleLanguageChange}
      />
      <div className="user-controls">
        <div className="user-info">Connected as: {user.name}</div>
        <button onClick={handleLogout}>Logout</button>
      </div>
    </div>

    {channel && (
      <div className="chat-container">
        <Chat client={chatClient}>
          <Channel channel={channel}>
            <Window>
              <ChannelHeader />
              <MessageList
                Message={(props) => (
                  <TranslatedMessage
                    {...props}
                    userLanguage={userLanguage}
                    onDelete={handleMessageDelete}
                  />
                )}
              />
              <MessageInput />
            </Window>
            <Thread />
          </Channel>

     </Chat>
      </div>
    )}
  </div>
);
CSS Styles
-
Basic CSS Styles
12345678910111213141516171819202122/* Base layout styles */
.app {
  height: 100vh;
  display: flex;
  flex-direction: column;
}

/* Header section */
.app-header {
  padding: 1rem;
  background: #fff;
  border-bottom: 1px solid #eee;
  display: flex;
  justify-content: space-between;
  align-items: center;
}

/* Chat container */
.chat-container {
  flex: 1;
  overflow: hidden;
}
-
Component Specific Style.
12345678910111213141516171819202122232425/* Auth container */
.auth-container {
  display: flex;
  justify-content: center;
  align-items: center;
  height: 100vh;
  background: #f5f5f5;
}

/* Language selector */
.language-control {
  select {
    padding: 0.5rem;
    border: 1px solid #ddd;
    border-radius: 4px;
    font-size: 14px;
  }
}

/* User controls */
.user-controls {
  display: flex;
  align-items: center;
  gap: 1rem;
}
Note: You should remove the default styles in src/index.css to ensure your custom styles are applied correctly.
Complete Source Code
You can find the complete source code for this implementation in this repository.
Testing Your Implementation
You must run both the backend and frontend code to test your implementation.
Running the Backend
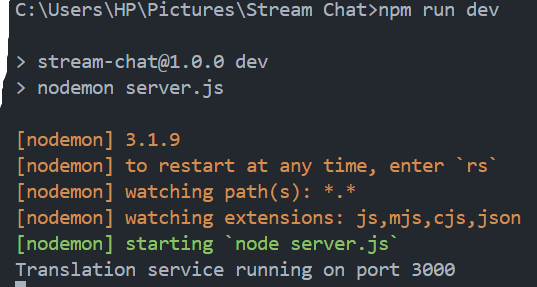
To run the backend code using nodemon, execute the following command:
1npm run dev
You should see an output similar to the screenshot below in your terminal.

Running the Frontend
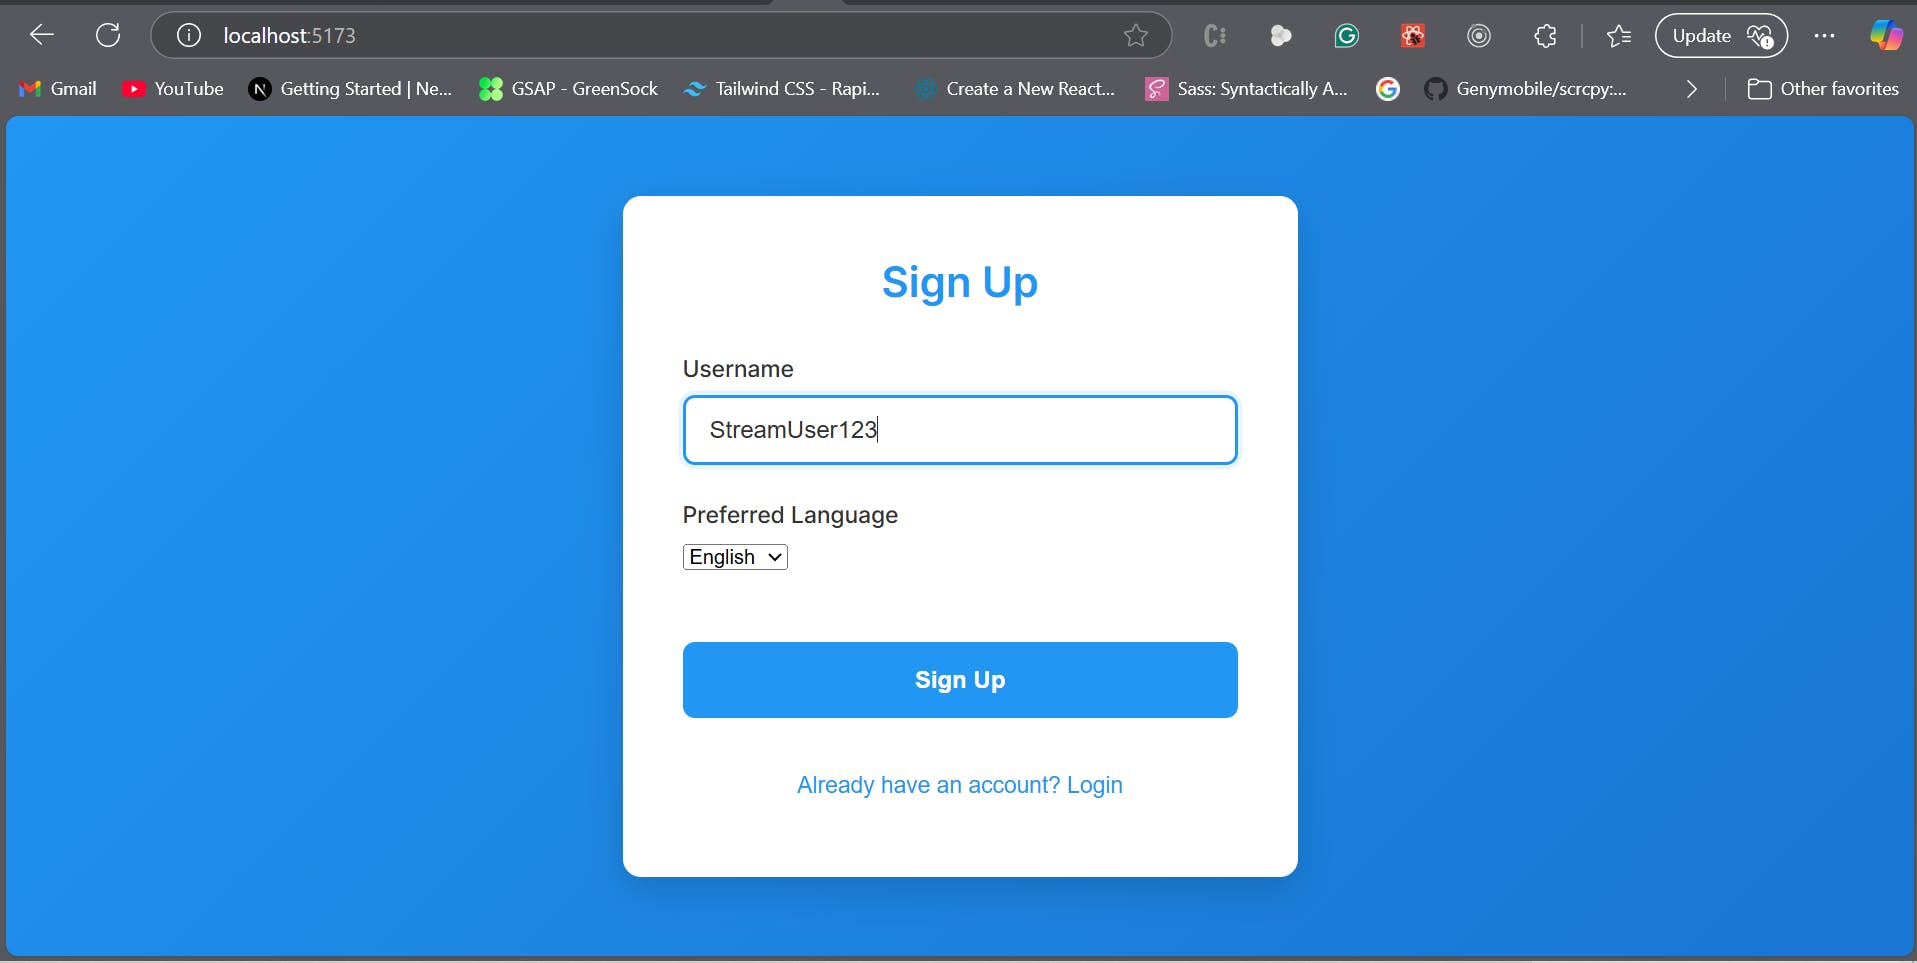
To start the frontend, use a command similar to the one above. You should see the following interface:

Here's the first view: No user is currently signed in.

Signing Up a New User
Now, let's sign up for a new user named StreamUser123.

Signed-In View
Once signed in, you’ll be redirected to the main chat interface.

Sending Messages
Let's try typing some messages in the chat.

Real-Time Language Switching
A user can switch between different languages in seconds without copying the message to a different endpoint.
Conclusion
Implementing real-time language translation in Stream Chat using LLMs creates a more inclusive and connected chat experience. In this guide, we covered:
- Setting up secure authentication with Stream tokens
- Building a translation middleware service
- Integrating with Stream Chat webhooks
- Creating a responsive front end with language preference management
Further Improvements
To take your implementation even further, consider:
- Fine-tuning an LLM specifically for your community’s domain and language pairs
- Implementing user feedback mechanisms to improve translation quality continuously
- Adding role-based access control for different types of users
By leveraging modern LLMs, we can offer more contextually aware and natural translations than traditional translation APIs, significantly enhancing the user experience.
