

Building secure chat applications goes beyond just sending and receiving messages; true privacy requires end-to-end encryption (E2EE). With E2EE, only the intended participants can read the conversation, while even the service provider remains blind to the content.
In this guide, we’ll learn how to implement E2EE in a React Native chat app using Stream’s chat infrastructure. We’ll combine public-key cryptography with efficient symmetric encryption to achieve strong security.
Technical Prerequisites
Before we begin, ensure you have the following:
- Free Stream account
- Node.js 14 or higher installed
- Basic knowledge of React/React Native and Node.js
- Android Studio (for Android development), Xcode (for iOS development), or Expo Go (Real Device)
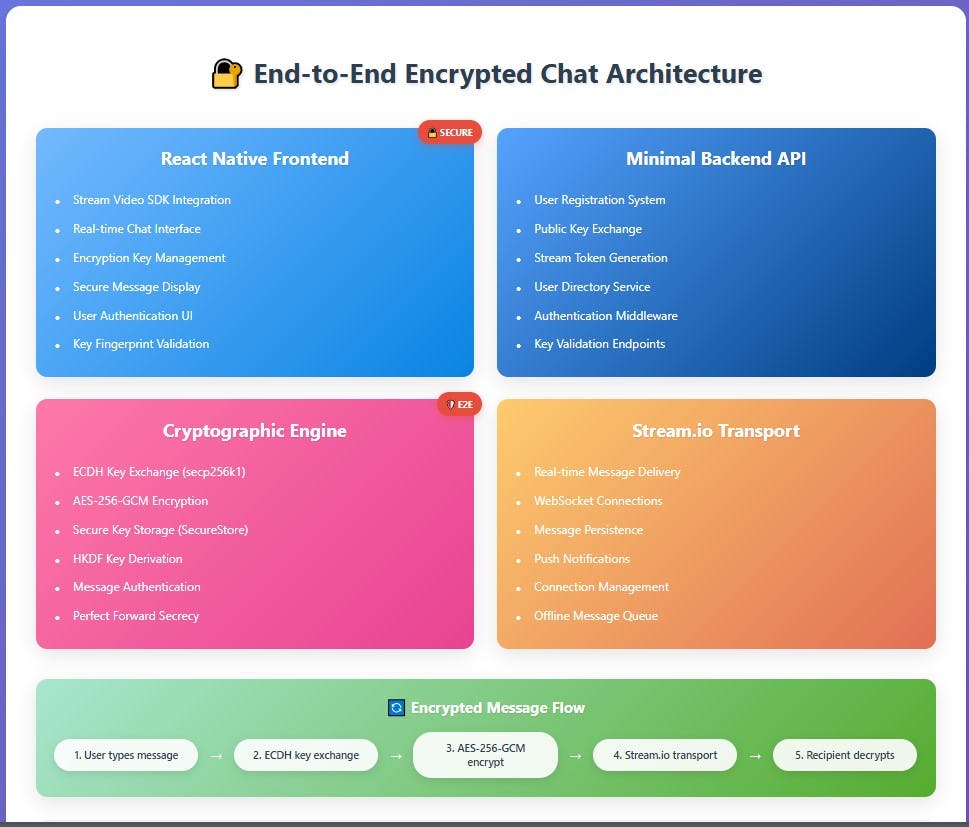
Solution Architecture
Setting Up Your Development Environment
Backend Setup
We’ll start by setting up the backend:
12npm init
npm install express dotenv stream-chat nodemon cors
Now, create a .env file there:
123STREAM_API_KEY=Your_stream_api_key
STREAM_API_SECRET=Your_stream_api_secret_key
PORT=5000
Next, create an `app.js` file with the following configuration:
12345678910111213141516require('dotenv').config();
const express = require('express');
const cors = require('cors');

const app = express();
app.use(cors());
app.use(express.json());

// Health check
app.get('/', (req, res) => {
  res.json({ status: 'ok' });
});

// Auth and Stream routes
const routes = require('./routes');
app.use('/api', routes);
The backend will now run on the configured port:
123const PORT = process.env.PORT || 5000;
app.listen(PORT, () => {
  console.log(
The `routes.js` file defines all the routes required for the application. At the top, the Stream keys are initialized, and the client is configured with an extended timeout to improve reliability and ensure the frontend establishes a stable connection.
123456789101112const express = require('express');
const { StreamChat } = require('stream-chat');

const router = express.Router();

const apiKey = process.env.STREAM_API_KEY;
const apiSecret = process.env.STREAM_API_SECRET;

// Configure Stream client with increased timeout
const streamServerClient = StreamChat.getInstance(apiKey, apiSecret, {
  timeout: 30000, // 30 seconds instead of default 3 seconds
});
This route allows user registration without encryption and is used solely for testing chat functionality in a non-encrypted environment.
123456789101112// Registration without encryption key
router.post('/register-simple', async (req, res) => {
  const { userId, name } = req.body;
  if (!userId || !name) return res.status(400).json({ error: 'Missing fields' });
  try {
    await streamServerClient.upsertUser({ id: userId, name });
    res.json({ success: true });
  } catch (err) {
    console.error('Stream upsertUser error:', err);
    res.status(500).json({ error: 'Stream upsertUser failed', details: err.message });
  }
});
For encrypted registration, the route requires a user’s public key, which is essential for the encryption process.
1234567891011router.post('/register', async (req, res) => {
  const { userId, name, publicKey } = req.body;
  if (!userId || !name || !publicKey) return res.status(400).json({ error: 'Missing fields' });
  try {
    await streamServerClient.upsertUser({ id: userId, name, public_key: publicKey });
    res.json({ success: true });
  } catch (err) {
    console.error('Stream upsertUser error:', err);
    res.status(500).json({ error: 'Stream upsertUser failed', details: err.message });
  }
});
The login routes handle user authentication and issue tokens needed to verify users.
123456789101112131415// Mock login (no password, just userId)
router.post('/login', async (req, res) => {
  const { userId } = req.body;
  if (!userId) return res.status(400).json({ error: 'Missing userId' });
  // In production, check password or OAuth
  res.json({ success: true });
});

// Issue Stream token
router.post('/stream/token', (req, res) => {
  const { userId } = req.body;
  if (!userId) return res.status(400).json({ error: 'Missing userId' });
  const token = streamServerClient.createToken(userId);
  res.json({ token });
});
These routes fetch all registered users so a logged-in user can choose someone to chat with.
1234567891011121314151617// Get users
router.get('/users', async (req, res) => {
  try {
    const result = await streamServerClient.queryUsers({});

    // Ensure public_key is properly formatted
    const users = result.users.map(u => ({
      id: u.id,
      name: u.name,
      public_key: u.public_key || null,
    }));
    res.json({ users });
  } catch (err) {
    console.error('Error fetching users:', err);
    res.status(500).json({ error: err.message });
  }
});
Frontend Setup
To get started, create a new React Native project using Expo with the navigation (TypeScript) template:
123# Create new React Native project
npx create-expo-app --template
# and then select Navigation(Typescript)
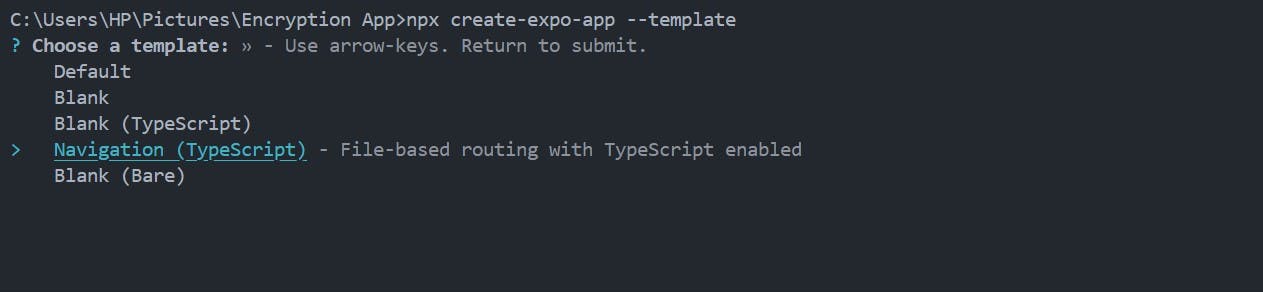
After running the command above, you will have a fully set up React Native application with React Navigation configured for routing.
The structure of the application will look like this:
123456789my-chat-app/
├── app/
│   ├── _layout.tsx
│   └── index.tsx
├── assets/
├── app.json
├── package.json
├── tsconfig.json
└── node_modules/
Now, let's install these packages, which you will need throughout the tutorial.
What do these dependencies do? The `@nobles`, expo-crypto, and `expo-secure-store` packages implement end-to-end encryption. The chat functionalities require stream-chat-expo. React Native's `react-native-gesture-handler` handles complex gestures (swipes, pans, taps, etc.).
1npm install stream-chat-expo @noble/ciphers @noble/curves @noble/hashes expo-crypto expo-secure-store react-native-gesture-handler
To start building our chat app, delete the default `app` folder that comes with the code, then create an `App.tsx` file in the root directory and reference it in your `package.json` as shown below.
1234{
  "name": "navigation",
  "main": "App.tsx",
  "version": "1.0.0",
The `App.tsx` will work as the root file for our React Native application.
12345678910111213141516171819202122// App.tsx
import React from 'react';
import { NavigationContainer } from '@react-navigation/native';
import { createNativeStackNavigator } from '@react-navigation/native-stack';
import { UserProvider } from './context/UserContext';
import { OverlayProvider } from 'stream-chat-expo';
import { GestureHandlerRootView } from 'react-native-gesture-handler';
import AuthScreen from './screens/AuthScreen';
import UsersScreen from './screens/UsersScreen';
import ChatScreen from './screens/ChatScreen';
import { registerRootComponent } from 'expo';

export type RootStackParamList = {
  Auth: undefined;
  Users: undefined;
  Chat: {
    recipientId: string;
    recipientName: string;
  };
};

const Stack = createNativeStackNavigator
Setting Up the Initial Configuration
First, let’s set up the Stream client.
12345//utils/streamClient.ts
import { StreamChat } from 'stream-chat';
import { STREAM_API_KEY } from '../config/constants';

export const streamClient = StreamChat.getInstance(STREAM_API_KEY);
Next, we’ll create a config file containing our API key and backend URL logic.
1234567891011121314151617181920//config/constants.ts
export const STREAM_API_KEY = 'Your_stream_api_key';
// Helper to get the correct backend URL based on environment
export function getBackendUrl() {
  // Uncomment ONE of the following as needed:

  // 1. For Android emulator:
  // return 'http://10.0.2.2:5000/api';

  // 2. For iOS simulator or web:
  // return 'http://localhost:5000/api';

  // 3. For real device (Android or iOS) on same Wi-Fi as your computer:
  // return 'http://192.168.118.229:5000/api';

  // Default: fallback to IP Address
  return 'http://Your_IP_Address:5000/api';
}

export const BACKEND_URL = getBackendUrl();
Managing User Authentication with Context
To avoid passing user authentication details (like `userId` and `token`) through props in every component, we’ll use React Context. This allows us to store and share authentication state globally across the app.
1234567891011// context/UserContext.tsx
import React, { createContext, useContext, useState, ReactNode } from 'react';

interface UserContextType {
  userId: string | null;
  token: string | null;
  setUser: (userId: string, token: string) => void;
  clearUser: () => void;
}

const UserContext = createContext
Creating Screens
Now, create a `screens` folder. This will hold the main pages of our app:
- `AuthScreen.tsx`: Handles user registration and login
- `UsersScreen.tsx`: Lists all available users and allows logout
- `ChatScreen.tsx`: Handles one-to-one messaging
This is the present structure of our project files:
1234567891011121314151617my-chat-app/
├── App.tsx
├──utils/
│   └── streamClient.ts
├── context/
│   └── UserContext.tsx
├── config/
│   └── constants.ts
├── screens/
│   ├── AuthScreen.tsx
│   ├── UserListScreen.tsx
│   └── ChatScreen.tsx
├── assets/
├── app.json
├── package.json
├── tsconfig.json
└── node_modules/
I will highlight each of these screens below.
1. `AuthScreen.tsx` (Login & Registration)
1234567891011121314151617181920//screens/AuthScreen.tsx
import React, { useState } from 'react';
import {
  View,
  Text,
  TextInput,
  TouchableOpacity,
  ActivityIndicator,
  Alert,
  StyleSheet,
  ScrollView
} from 'react-native';
import { NativeStackNavigationProp } from '@react-navigation/native-stack';
import axios from 'axios';
import { streamClient } from '../utils/streamClient';
import { useUser } from '../context/UserContext';
import { BACKEND_URL } from '../config/constants';
import { RootStackParamList } from '../App';

type AuthScreenNavigationProp = NativeStackNavigationProp
2. `UsersScreen.tsx` (User List and Logout)
1234567891011121314151617// src/screens/UsersScreen.tsx -
import React, { useEffect, useState } from 'react';
import {
  View,
  Text,
  FlatList,
  TouchableOpacity,
  ActivityIndicator,
  Alert,
  StyleSheet
} from 'react-native';
import { NativeStackNavigationProp } from '@react-navigation/native-stack';
import { useUser } from '../context/UserContext';
import { streamClient } from '../utils/streamClient';
import { BACKEND_URL } from '../config/constants';
import { RootStackParamList } from '../App';
type UsersScreenNavigationProp = NativeStackNavigationProp
3. `ChatScreen.tsx` (Chat Interface)
12345678910111213141516171819// ChatScreen.tsx - Plaintext chat (no encryption)
import React, { useEffect, useState, useCallback } from 'react';
import {
  ActivityIndicator,
  View,
  TextInput,
  TouchableOpacity,
  Text,
  StyleSheet,
  Alert,
} from 'react-native';
import { NativeStackNavigationProp } from '@react-navigation/native-stack';
import { RouteProp } from '@react-navigation/native';
import { Chat, Channel, MessageList } from 'stream-chat-expo';
import { streamClient } from '../utils/streamClient';
import { useUser } from '../context/UserContext';
import { RootStackParamList } from '../App';

type ChatScreenNavigationProp = NativeStackNavigationProp
Message Security in Stream
When you send a message using Stream, it is encrypted by default at two levels:
-
In transit (TLS 1.2):
Messages are transmitted securely over the internet using TLS, which creates a secure tunnel between your app and Stream’s servers. This prevents attackers from snooping on your messages while they travel over Wi-Fi or mobile networks. -
At rest (AES-256):
Once stored on Stream’s servers, messages are encrypted using AES-256, a tough encryption standard also used by banks and governments. This ensures that even if someone gained access to Stream’s storage, they couldn’t easily read your messages.Important: This is not end-to-end encryption (E2EE).
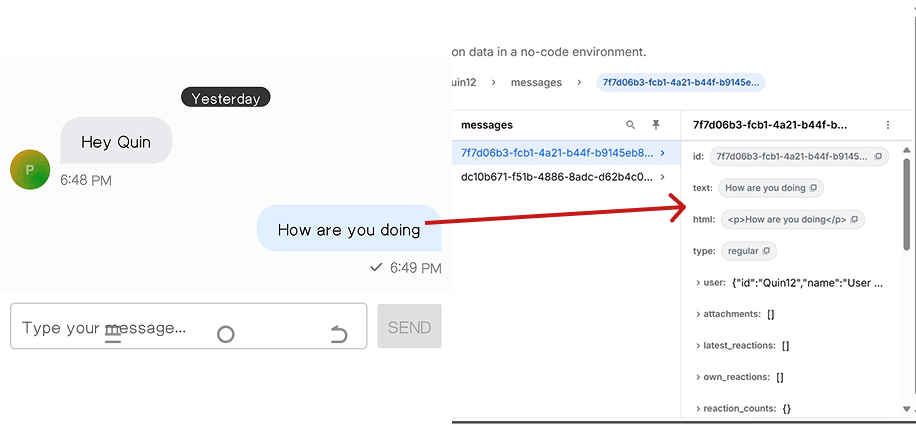
Stream’s default setup still makes messages accessible to Stream’s servers. This is necessary for features like moderation, search, and translations. In true E2EE, only the sender and receiver can read the messages, not even the service provider.
Here’s an example of a message sent in our current app. Notice that the message data is available on Stream’s servers:
Understanding End-to-End Encryption: The Why and How
End-to-end encryption (E2EE) is the gold standard for secure communication, ensuring that only the intended parties can read the exchanged messages. In this React Native chat application, E2EE is implemented using a hybrid cryptographic approach that combines the security of public-key cryptography with the efficiency of symmetric encryption.
The sections below detail the cryptographic foundation, key management, and message flow.
Cryptographic Foundation
Elliptic Curve Cryptography(ECC)
This application uses the `secp256k1` elliptic curve, which is employed by Bitcoin and other major cryptocurrencies.
Why secp256k1?
- Security: 256-bit keys provide equivalent security to 3072-bit RSA keys
- Efficiency: Smaller key sizes result in faster computations and reduced bandwidth
- Proven Track Record: It’s been extensively tested and analysed by the cryptographic community
1234567//utils/encryption.ts -
import { secp256k1 } from '@noble/curves/secp256k1';
import { getRandomBytes } from 'expo-crypto';
import { gcm } from '@noble/ciphers/aes';
import { sha256 } from '@noble/hashes/sha256';
import { hkdf } from '@noble/hashes/hkdf';
import * as SecureStore from 'expo-secure-store';
React Native lacks built-in crypto APIs, so we rely on:
- Polyfills: `react-native-get-random-values` for Web Crypto API support
- Crypto libraries: `@noble/curves` for ECC operation
- Secure storage: `expo-secure-store` for persisting private keys
Key Generation Process
Each user's cryptographic identity is established through a secure key pair generation process:
1234export interface KeyPair {
  publicKey: string;  // Hex-encoded public key
  privateKey: string; // Hex-encoded private key
}
The private key is a 256-bit random number, while the public key is derived mathematically from the private key using elliptic curve point multiplication. For maximum compatibility, the uncompressed format (65 bytes) is used.
12// Generate a secure key pair using secp256k1 (same curve as Bitcoin)
export async function generateKeyPair(): Promise
Key Storage Security
Private keys are never stored in plaintext; instead, they are stored using `expo-secure-store`, which leverages:
- iOS: Keychain Services with hardware security module integration when available
- Android: EncryptedSharedPreferences with Android Keystore backing
12// Store keys securely using Expo SecureStore
export async function storeKeyPair(userId: string, keyPair: KeyPair): Promise
This ensures private keys remain safe even if the app’s storage is compromised.
Note: Avoid `AsyncStorage` for keys; it’s not secure. Always use `expo-secure-store` or a native wrapper.
Key Exchange Protocol
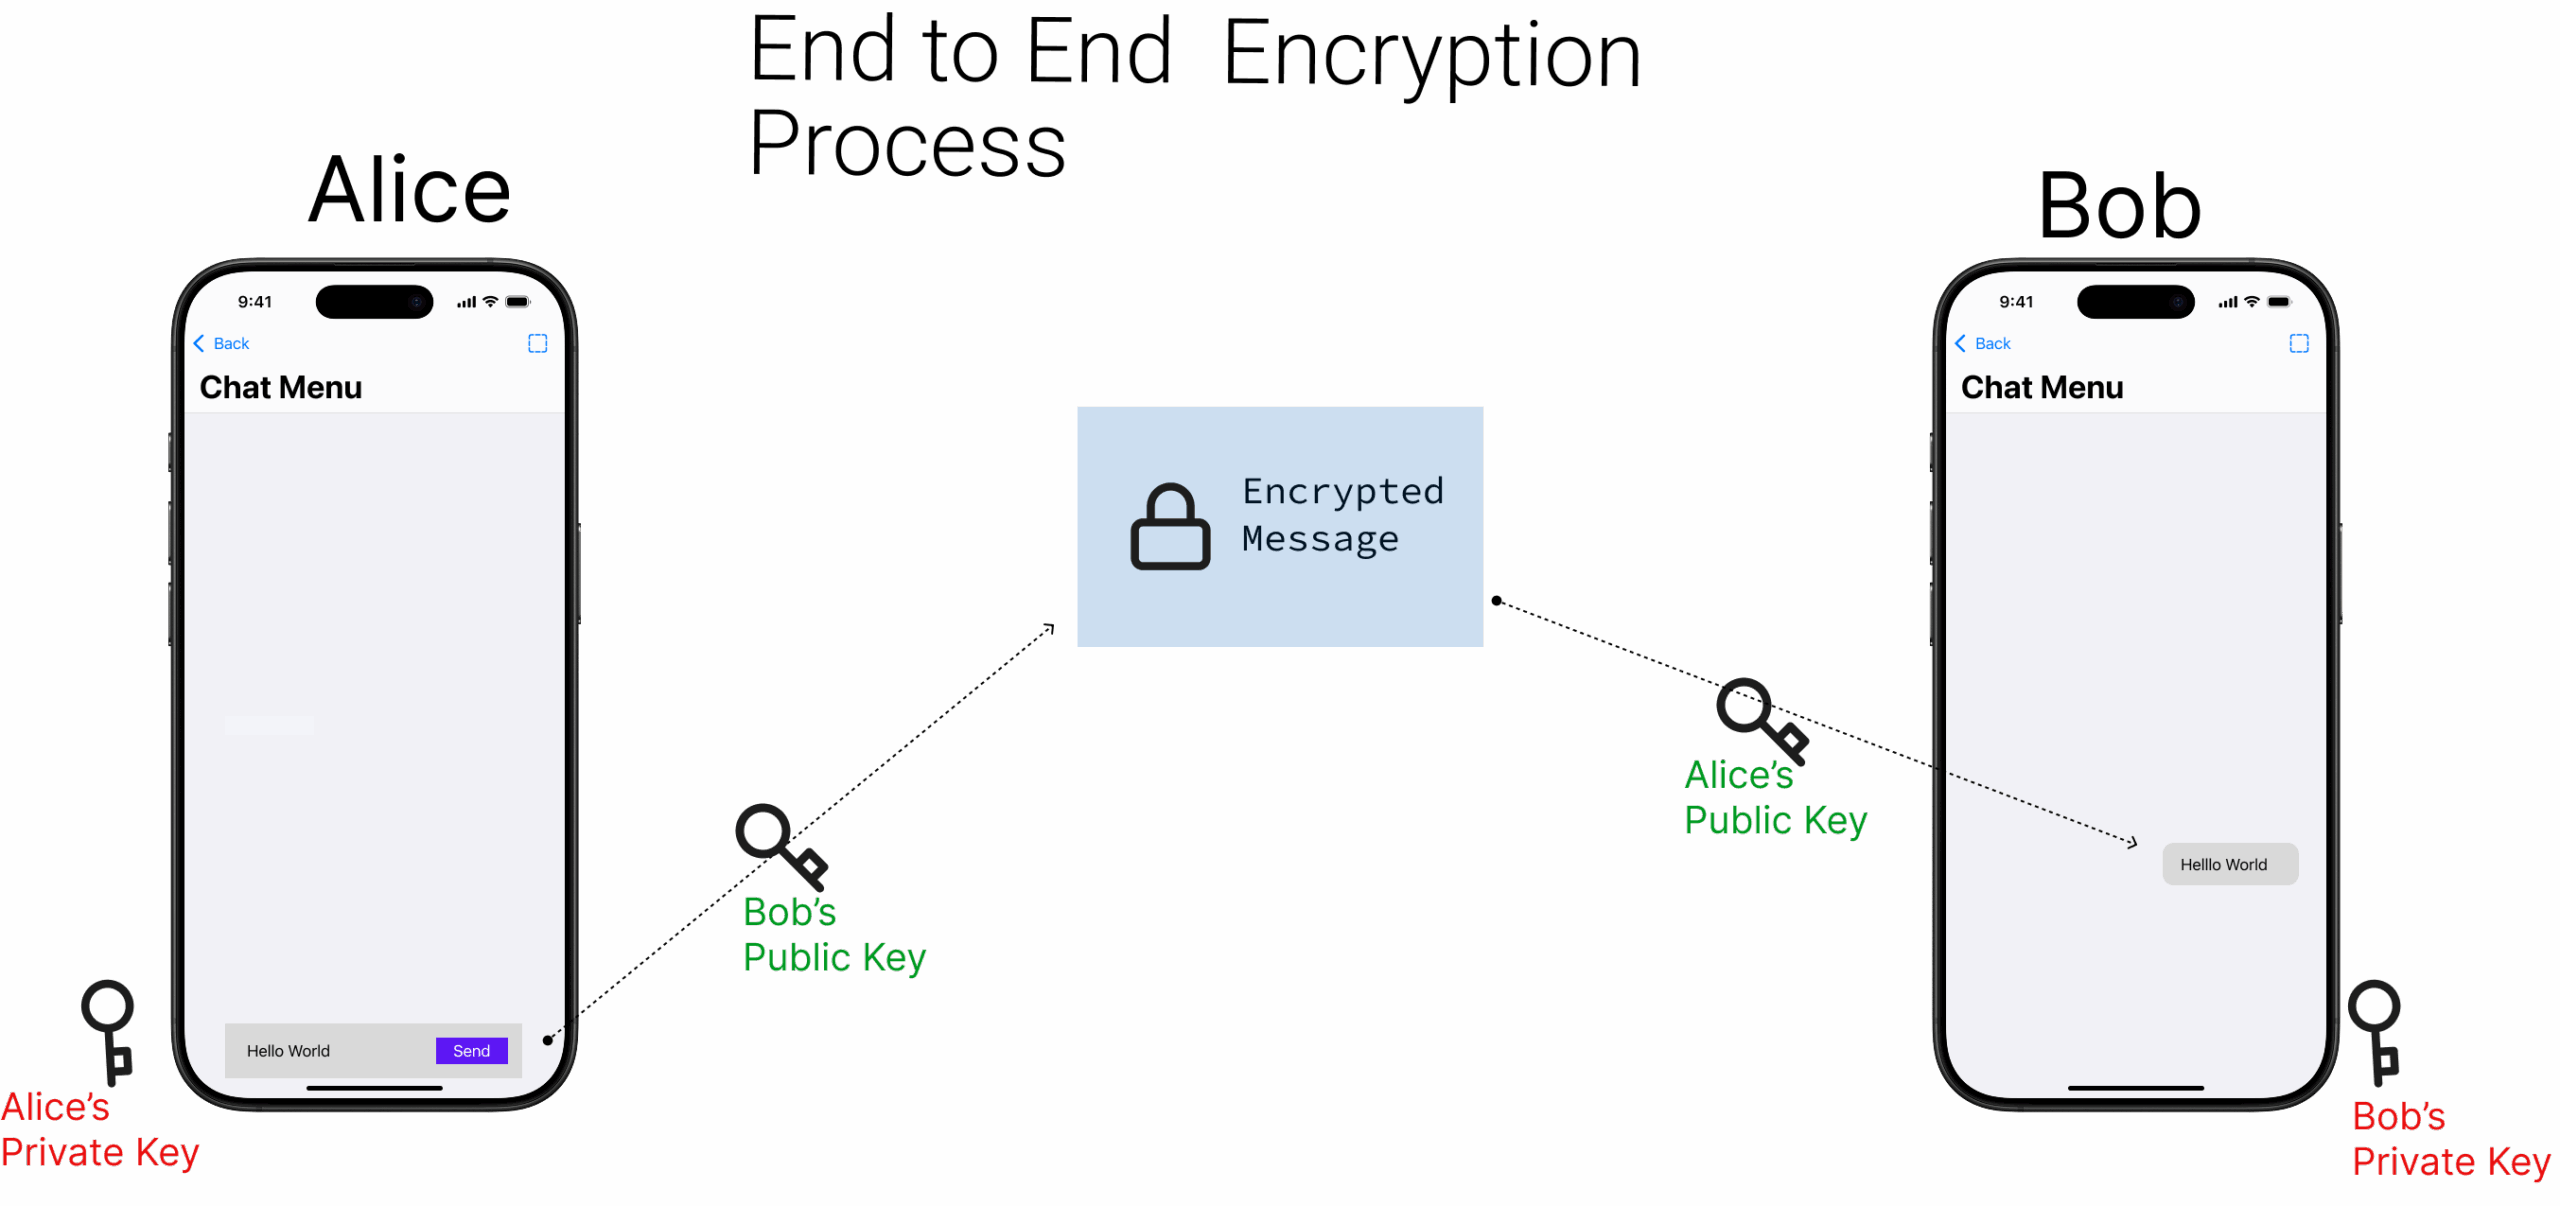
Elliptic Curve Diffie-Hellman (ECDH)
The application implements ECDH key exchange to establish shared secrets between communicating parties:
- Alice has a key pair `(a, A)` where `a` \= private key, `A` \= public key
- Bob has a key pair (`b, B`) where `b` \= private key, `B` \= public key
- Shared Secret \= `a × B = b × A` (due to elliptic curve mathematics)
Key Derivation Function
The raw ECDH secret isn’t used directly. Instead, it’s expanded into a strong AES key using HKDF(HMAC-based Key Derivation Function) with SHA-256.
1const derivedKey = hkdf(sha256, sharedSecret, salt, info, 32);
This step:
- Strengthens entropy
- Ensures forward secrecy
- Produces a consistent 256-bit key
12345678910111213141516171819202122// Perform ECDH key exchange to derive shared secret
export function deriveSharedSecret(privateKey: string, publicKey: string): Uint8Array {
  try {
    const privateKeyBytes = hexToBytes(privateKey);
    const publicKeyBytes = hexToBytes(publicKey);

    // Perform ECDH
    const sharedPoint = secp256k1.getSharedSecret(privateKeyBytes, publicKeyBytes, false);

    // Use HKDF to derive a proper encryption key from the shared secret
    // This adds forward secrecy and proper key derivation
    const salt = new Uint8Array(32); // Zero salt for simplicity, could be random
    const info = new TextEncoder().encode('ChatAppE2E');

    const derivedKey = hkdf(sha256, sharedPoint.slice(1, 33), salt, info, 32);

    return derivedKey;
  } catch (error) {
    console.error('Shared secret derivation error:', error);
    throw new Error('Failed to derive shared secret');
  }
}
Message Encryption Process
AES-256-GCM Symmetric Encryption
Once the shared key is established, messages are encrypted using AES-256 in Galois/Counter Mode (GCM):
AES-256: Advanced Encryption Standard with 256-bit keys.
GCM Mode: Provides both confidentiality and authenticity.
Encryption flow
For each message, the following process occurs:
- Shared Secret Derivation: ECDH between the sender's private key and the recipient's public key
- Key Derivation: HKDF transforms the shared secret into an AES key
- IV Generation: A random 96-bit initialisation vector is generated
- Encryption: AES-GCM encrypts the plaintext message
- Authentication: GCM automatically generates a 128-bit authentication tag
- Packaging: All cryptographic components are combined into a structured JSON format for transmission
Example JSON output:
123456789101112131415161718{
  "ciphertext": "hex-encoded encrypted data",
  "iv": "hex-encoded initialization vector",
  "authTag": "hex-encoded authentication tag"
}

export interface EncryptedMessage {
  ciphertext: string;  // Hex-encoded encrypted data
  iv: string;          // Hex-encoded initialization vector
  authTag: string;     // Hex-encoded authentication tag
}

// Encrypt a message using AES-GCM
export async function encryptMessage(
  message: string,
  senderPrivateKey: string,
  recipientPublicKey: string
): Promise
This guarantees:
- Confidentiality: Only intended parties can decrypt
- Integrity: Tampering is detected
- Authenticity: Sender identity is verifiable
- Forward secrecy: Every message gets a fresh key
Message Decryption Process
Decryption Workflow
The reverse process recovers the plaintext:
- Parse encrypted JSON
- Derive shared secret (ECDH)
- Run HKDF → AES key
- Validate the auth tag
- Decrypt ciphertext → UTF-8 message
123456// Decrypt a message using AES-GCM
export async function decryptMessage(
  encryptedData: string,
  recipientPrivateKey: string,
  senderPublicKey: string
): Promise
Key Management Architecture
Key Lifecycle
Generate: Random key pairs per user
Store: Securely in Keychain / Keystore
Exchange: Public keys shared via backend
Use: Private keys never leave device
Delete: Secure wipe on logout or reset
Key Fingerprinting
Each public key is fingerprinted using SHA-256 to prevent impersonation or tampering.
1234567891011// Generate a fingerprint for a public key (for verification)
export function generateKeyFingerprint(publicKey: string): string {
  try {
    const pubKeyBytes = hexToBytes(publicKey);
    const hash = sha256(pubKeyBytes);
    return bytesToHex(hash.slice(0, 8)); // First 8 bytes as hex
  } catch (error) {
    console.error('Fingerprint generation error:', error);
    return 'invalid';
  }
}
Fingerprints give users a human-verifiable way to confirm they’re communicating with the right person.
Integrating E2EE Into the Chat App
In the typical chat application we built earlier, the text sent between users is visible to the Stream server in plaintext. With E2EE applied, the server only relays encrypted payloads; it never sees message contents.
After implementing the encryption process, coding it, and storing the logic in `encryption.ts`, the functions are exported into a React Context. This centralizes all end-to-end encryption states and operations, so UI screens can call simple methods without handling cryptographic details or private keys directly.
12345678910111213141516171819// context/RealEncryptionContext.tsx
import React, { createContext, useContext, useState, ReactNode } from 'react';
import {
  KeyPair,
  generateKeyPair,
  storeKeyPair,
  loadKeyPair,
  deleteKeyPair,
  encryptMessage,
  decryptMessage,
  isValidPublicKey,
  generateKeyFingerprint,
  checkKeysExist
} from '../utils/encryption';

interface EncryptionContextType {
  keyPair: KeyPair | null;
  isKeysLoaded: boolean;
  generateKeys: (userId: string) => Promise
Wrapping the App in the Encryption Provider
To integrate E2EE into the chat:
- Remember that each user has two keys:
- The private key, stored securely on the device.
- The public key, generated during registration and stored in Stream for others.
- Wrap your screens in the `RealEncryptionProvider`.
- Use `react-native-get-random-values` as a polyfill for generating secure random values (must be imported first).
123// in App.tsx
import 'react-native-get-random-values'; // Must be first import
import { RealEncryptionProvider } from './context/EncryptionContext';
User Registration with Keys
After registration, the user logs in using the normal process, after checking for the keys. When registering a user, keys must be generated before connecting to the backend (`/register`). If keys already exist, they are loaded instead of regenerated.
12345678910111213141516171819202122232425262728293031323334353637383940// AuthScreen.tsx
const handleRegister = async () => {
    if (!userId || !name) {
      Alert.alert('Error', 'Please enter user ID and name');
      return;
    }

    setLoading(true);
    try {
      // Clear any existing keys first
      clearKeys();

      // Check if user already has keys
      const hasExistingKeys = await checkUserHasKeys(userId);

      if (hasExistingKeys) {
        // Load existing keys instead of generating new ones
        const keysLoaded = await loadKeys(userId);
        if (!keysLoaded) {
          throw new Error('Failed to load existing keys');
        }

        Alert.alert(
          'Existing Keys Found',
          'This user already has encryption keys. Using existing keys for registration.',
          [{ text: 'Continue', onPress: () => proceedWithRegistration() }]
        );
        return;
      }

      // Generate new encryption keys for this user
      await generateKeys(userId);
      await proceedWithRegistration();

    } catch (error) {
      console.error('Registration error:', error);
      Alert.alert('Error', 'Registration failed. Please try again.');
    }
    setLoading(false);
  };
Encrypting Messages Before Sending
ChatScreen fetches the partner’s public key, then calls encryptMessage before sending and decryptMessage on receive.
When sending a message, the `ChatScreen.tsx` fetches the recipient’s public key, encrypts the message locally, and sends only the encrypted payload to Stream.
12345678910111213141516171819202122232425262728293031323334353637// Add to ChatScreen.tsx
const handleSendMessage = useCallback(async (messageText: string) => {
    if (!messageText.trim() || !channel || !recipientPublicKey) return;

    try {
      console.log('🔒 Encrypting message...');

      // Encrypt the message using real E2E encryption
      const encryptedMessage = await encryptMessage(messageText, recipientPublicKey);

      console.log('📤 Sending encrypted message...');

      // Send the encrypted message
      const messageData = {
        text: encryptedMessage,  // Only encrypted JSON goes to Stream
        encrypted: true,
      };

      const sentMessage = await channel.sendMessage(messageData);

      // Cache the original text for immediate display
      if (sentMessage.message?.id) {
        decryptedMessagesRef.current.set(sentMessage.message.id, messageText);

        // Update the display immediately for the sender
        sentMessage.message.text = messageText;
        sentMessage.message.processed = true;
        processedMessagesRef.current.add(sentMessage.message.id);
      }

      console.log('✅ Message sent and encrypted successfully');

    } catch (error) {
      console.error('❌ Failed to send encrypted message:', error);
      Alert.alert('Error', 'Failed to send message. Please try again.');
    }
  }, [channel, recipientPublicKey, encryptMessage]);
Decrypting Messages Upon Receiving
Messages received from Stream are decrypted before being displayed. If decryption fails, the user sees a placeholder.
1234567891011121314151617181920212223242526272829303132333435363738394041424344454647484950515253545556575859606162636465666768697071727374757677// Add to ChatScreen.tsx
const processMessageForDisplay = async (message: any, senderPublicKey: string) => {
    // Add comprehensive null/undefined checks
    if (!message || !message.user || !message.id) {
      console.log('Skipping invalid message:', message);
      return;
    }

    // Skip if already processing or processed
    if (isProcessingRef.current.has(message.id) || processedMessagesRef.current.has(message.id)) {
      return;
    }

    // Ensure message has required properties
    if (!message.text || typeof message.text !== 'string') {
      console.log('Message missing text property:', message);
      processedMessagesRef.current.add(message.id);
      return;
    }

    console.log('🔍 Processing message:', {
      id: message.id,
      userId: message.user?.id,
      encrypted: message.encrypted,
      textLength: message.text.length
    });

    // Mark as processing
    isProcessingRef.current.add(message.id);

    try {
      // If it's an encrypted message, decrypt it
      if (message.encrypted) {
        // Check if we already have a decrypted version cached
        if (decryptedMessagesRef.current.has(message.id)) {
          message.text = decryptedMessagesRef.current.get(message.id)!;
          console.log('✅ Using cached decrypted message');
        } else {
          // Only decrypt if this looks like encrypted JSON data
          const isEncryptedData = message.text.startsWith('{"ciphertext"');

          if (isEncryptedData) {
            let decryptedText: string;

            if (message.user.id === userId) {
              // Our own message - decrypt using recipient's public key
              console.log('🔓 Decrypting own message...');
              decryptedText = await decryptMessage(message.text, senderPublicKey!);
            } else {
              // Message from other person - decrypt using their public key
              console.log('🔓 Decrypting received message...');
              decryptedText = await decryptMessage(message.text, senderPublicKey);
            }

            // Cache the decrypted text
            decryptedMessagesRef.current.set(message.id, decryptedText);
            message.text = decryptedText;
            console.log('✅ Message decrypted and cached successfully');
          } else {
            // This might be a message that was already processed but lost its decrypted state
            message.text = '[🔒 Message needs refresh - reopen chat]';
          }
        }
      }

      message.processed = true;
      processedMessagesRef.current.add(message.id);

    } catch (error) {
      console.error('❌ Failed to decrypt message:', error);
      message.text = '[🔒 Failed to decrypt - may be corrupted]';
      processedMessagesRef.current.add(message.id);
    } finally {
      // Remove from processing set
      isProcessingRef.current.delete(message.id);
    }
  };
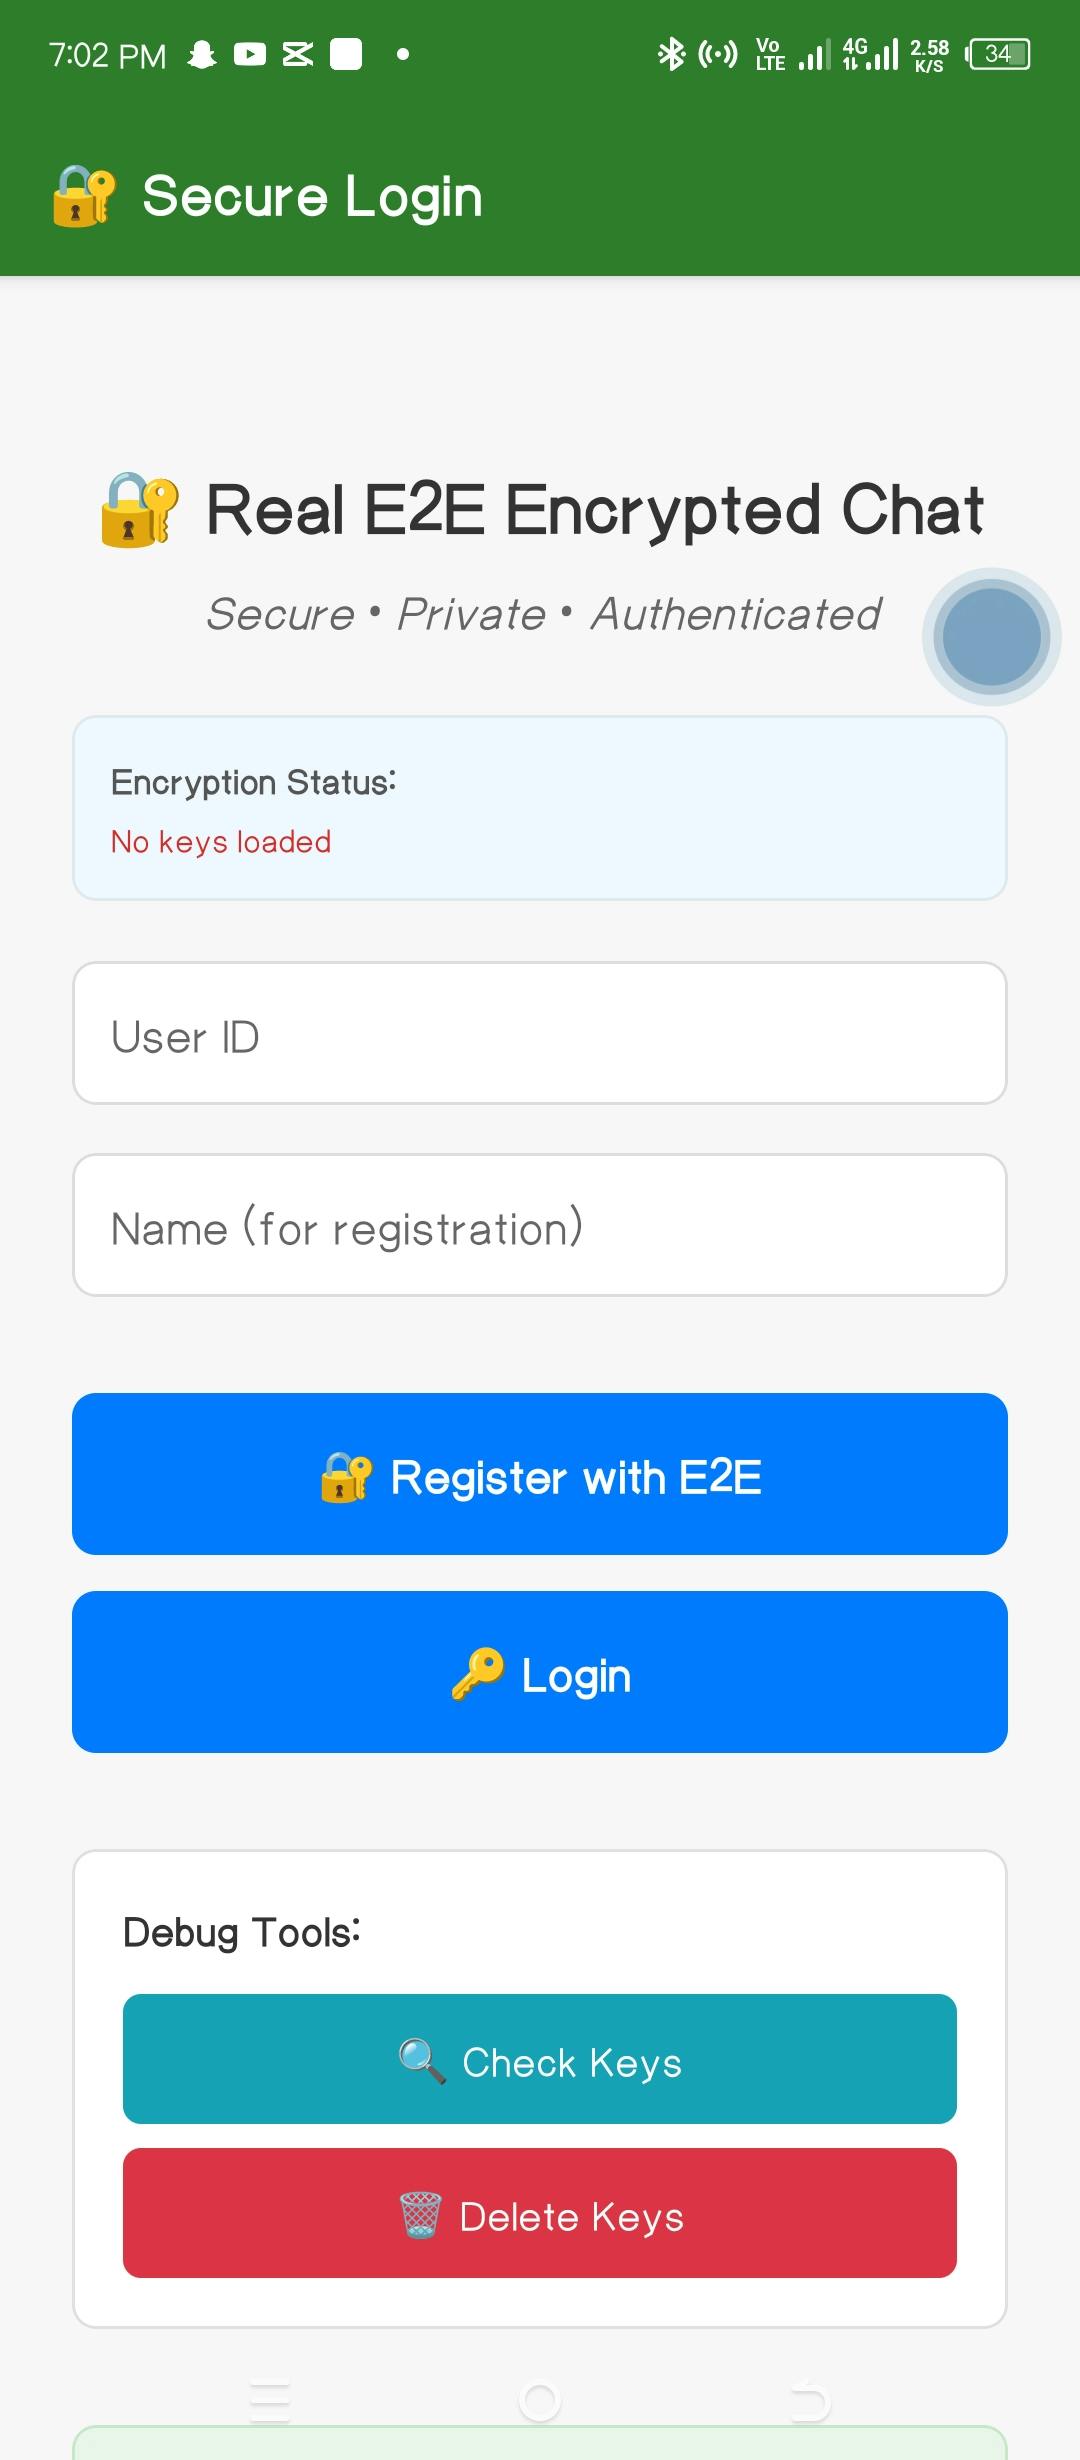
App in Action
When two users (`Momo12` and `Spice12`) chat (as seen in the images below), the messages are displayed differently depending on where they’re viewed:
- On their devices: messages appear as normal plaintext
- On Stream’s servers: only ciphertext is visible, in the following format:
12345{
"ciphertext":"3d82a8cf09",
"Iv":"dda8821c49bd8e945fdac36f",
"authTag":"15d6aa9921245c21d765f84f8ec47e99"
}


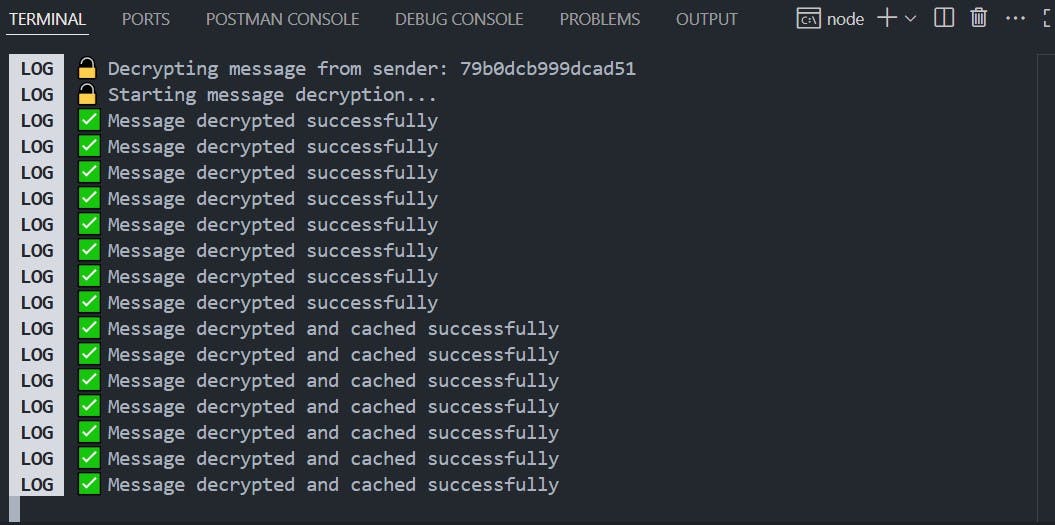
The terminal output below shows the encrypted messages being exchanged between two users during a chat session:
This is the final structure of the app:
12345678910111213141516171819my-chat-app/
├── App.tsx
├──utils/
│   ├── encryption.ts
│   └── streamClient.ts
├── context/
│   ├── EncryptionContext.tsx
│   └── UserContext.tsx
├── config/
│   └── constants.ts
├── screens/
│   ├── AuthScreen.tsx
│   ├── UserListScreen.tsx
│   └── ChatScreen.tsx
├── assets/
├── app.json
├── package.json
├── tsconfig.json
└── node_modules/
You can explore the full implementation of the chat app in this repository.
Conclusion
This React Native chat application demonstrates a robust end-to-end encryption (E2EE) design built with well-established cryptographic primitives. The system keeps messages private and secure by using ECDH for key exchange and AES-GCM for encryption, while maintaining ease of use on mobile.
With a zero-knowledge setup, no third party (not even the service provider) can read messages. Keys are stored securely and managed carefully to prevent leaks or misuse.
However, E2EE impacts moderation and observability:
- Since payloads are encrypted, the server cannot inspect them.
- This disables standard tools such as:
- Block lists (preventing specific words/phrases)
- Advanced filters (domains, emails, regex rules)
- AI moderation (behavioral analysis)
- Pre-send hooks (no access to plaintext)
Instead, developers must adopt new approaches such as client-side filtering, metadata-based heuristics, or opt-in reporting flows.
Despite some trade-offs, end-to-end encryption gives mobile apps bank-level privacy while limiting moderation options—a balance developers must account for when building real-world chat.