

PushKit helps to handle push notifications in apps that support VoIP services, watchOS complications, and more. The PushKit framework relies on the Apple Push Notification Service (APNs) to deliver incoming VoIP notifications. This tutorial focuses mainly on receiving incoming Voice-over-IP (VoIP) calls with the PushKit framework.
Prerequisite
To use PushKit notifications for your iOS app, Apple requires you to join the paid service called the Apple Developer Program. A one-year membership costs $99. You need a membership to see the final result in this tutorial. Feel free to follow the tutorial to learn the concepts of PushKit without a paid membership account.
Also, you will need an installation of Xcode to complete the tutorial. The project accompanying this tutorial uses Xcode 14.2, but you can use 13.0 or later.
Resources
Find the demo and the finished Xcode project on GitHub. You may start this tutorial with a new SwiftUI project or grab the CallKit project from the same repository above.
Are you considering building real-time audio and video apps? Head to our video product page and sign up for early access.
Using PushKit Notification With CallKit
This article is part 2 of Using CallKit: How to Integrate Voice and Video Calling Into iOS Apps, which demonstrates how to establish basic incoming and outgoing calls and implement custom ring tones with CallKit. Check out the article to learn more about the architecture of CallKit and building a basic audio/video calling app for iOS using the CallKit framework.
The demo CallKit app in the previous article displays the incoming call screen using an alert and a custom ringtone. The sample VoIP app you will build in this tutorial integrates a PushKit notification with a CallKit app to update and respond to push notifications to show an incoming call.
What is PushKit?
Note: Managing PushKit notifications is different from how to handle visible alert notifications on iOS and other platforms. The following outlines the differences.
| PushKit Notifications | Visible Alert Notifications |
|---|---|
| Wakes up your app and displays through the background. | Displays alert, badge, and ringtone for VoIP calls |
| Used for communication and time-sensitive notifications, such as incoming calls. | Used for general purposes and a wide range of notifications, such as messaging and reminders. |
| It is non-interactive and non-customizable | It is customizable and can receive a user interaction |
Why PushKit?
Managing iOS VoIP push notifications, specifically for incoming calls, can be difficult because it involves several user scenarios. For example, the calling app on the user's device may not be running when the other participant initiates a call. PushKit provides an out-of-the-box solution to handle the above scenario successfully for iOS VoIP apps with CallKit Support.
Register for Remote Notifications Using APNs
To integrate PushKit notifications with your app, you should obtain the required certificates from your Apple Developer Program account and configure them to work with your iOS VoIP app. These certificates are needed to register your app and the device that runs it to APNs.
The following are the main steps involved:
- Request a Certificate Using Keychain
- Create an App ID using an Apple Developer Program account
- Create a New VoIP Services Certificate using an Apple Developer Program account
- Convert Your VoIP Services Certificate
.certo a binary file.p12 - Create an iOS app with CallKit support
- Send Push Notifications to an iOS Device
Request a Certificate Using Keychain
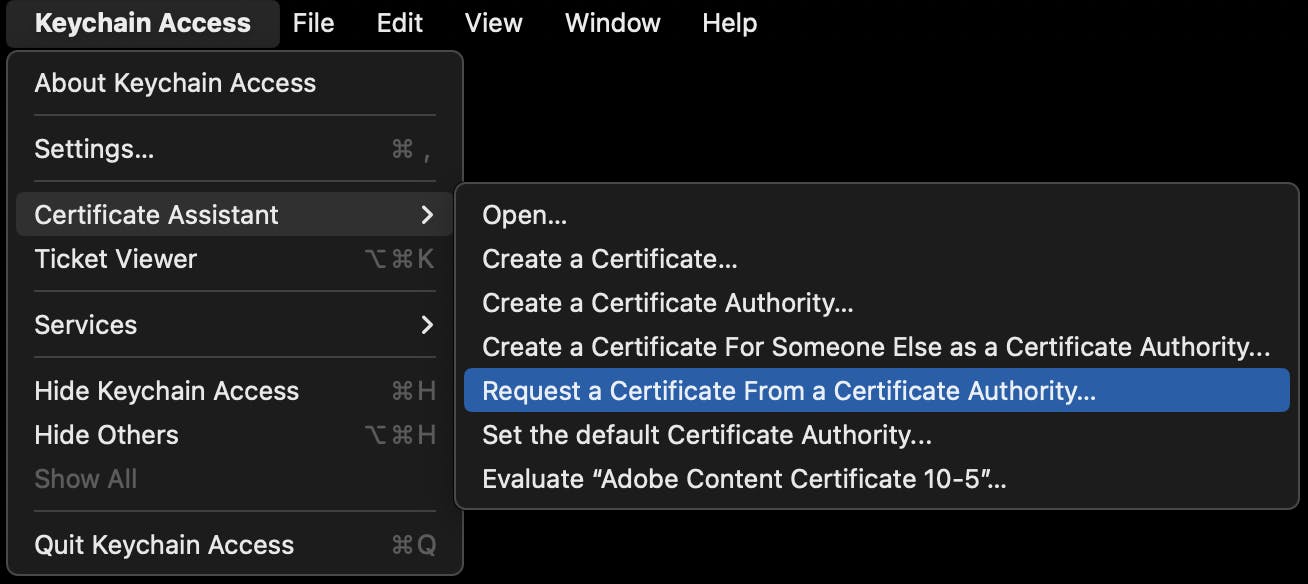
The first step in getting PushKit to work with the app is to request a private certificate using the Keychain Access app on Mac. The certificate connects to your Apple Developer Program account. It is required to sign the iOS VoIP apps with CallKit support. To create a certificate, launch Keychain Access.
- Select Certificate Assistant -> Request a Certificate From a Certificate Authority....
- Choose your email, and common name, and click continue

- Modify the certificate's name and save it.

Create an App ID
Secondly, you should register for an App ID. You should have an Apple Developer Program account to add an App ID. The Apple Developer Program is a paid service and costs $99, depending on your locale.
In this section, you should do the following:
- Create an App ID
- Specify the Bundle Identifier
- Enable Push Notifications for the capabilities.
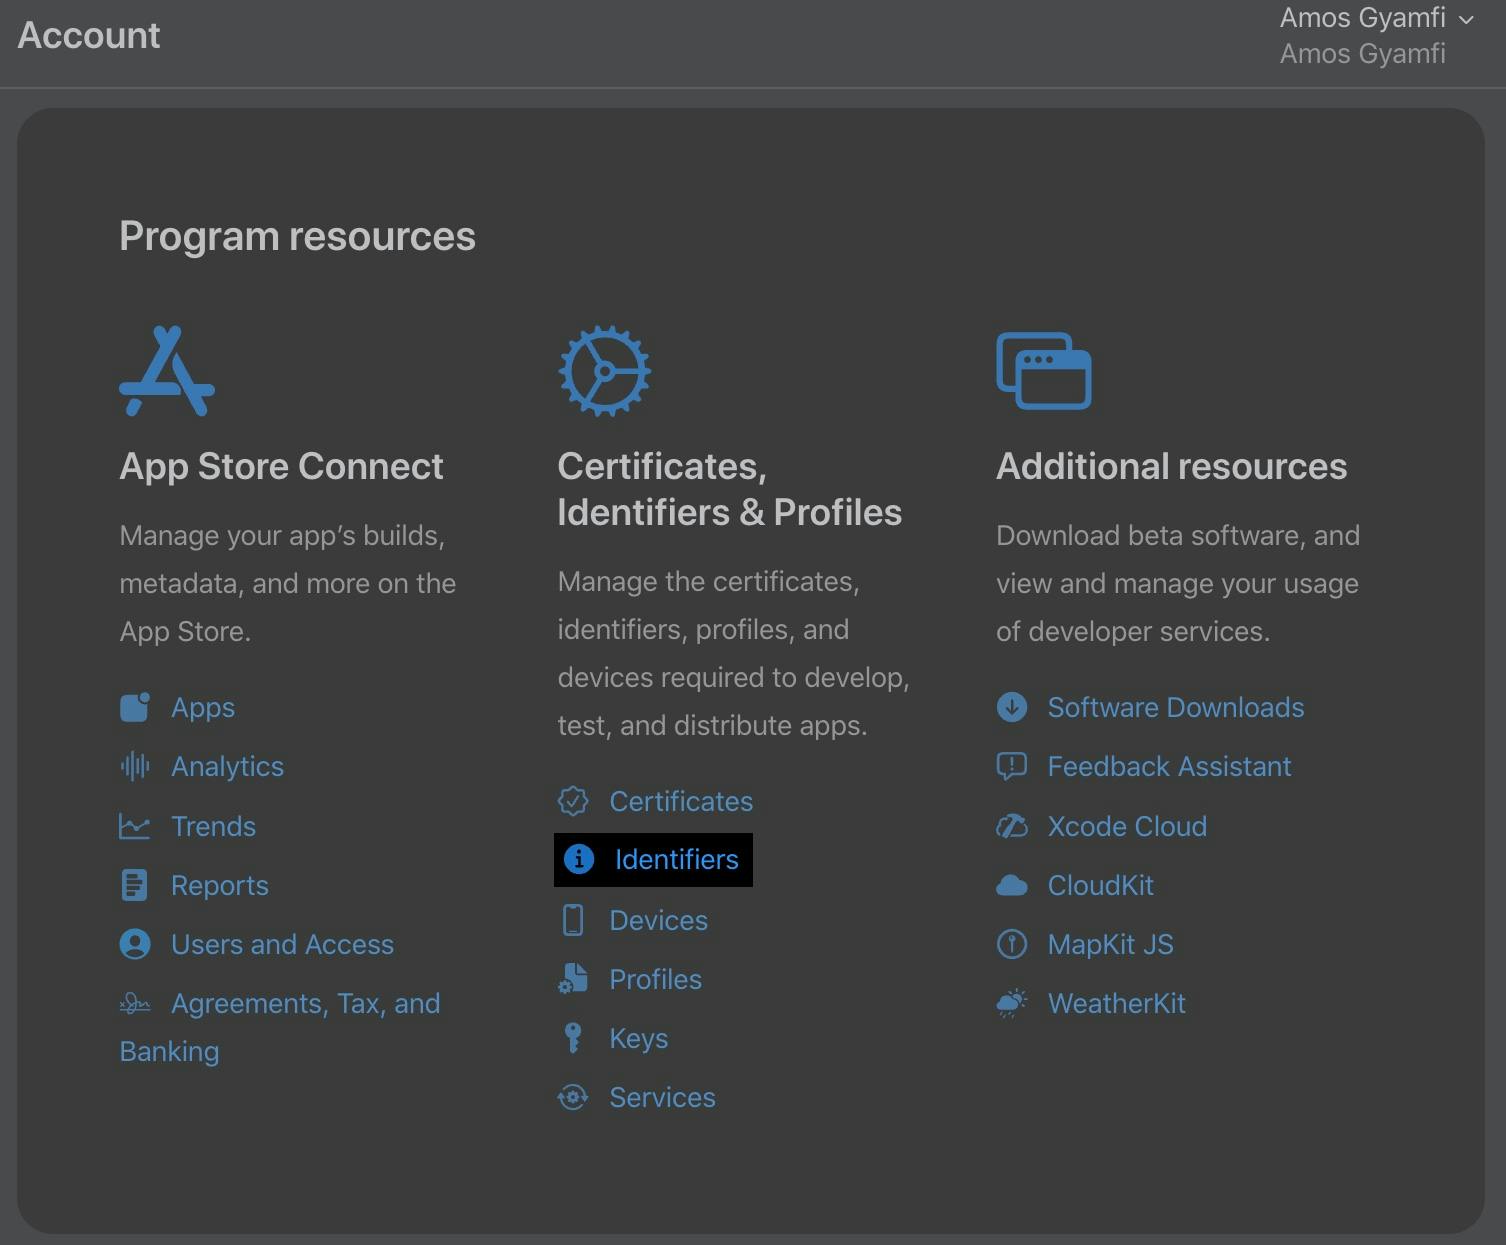
To add an app ID, sign in to your Apple Developer account and follow the steps below.
-
Select Identifiers under the section Certificates, Identifiers & Profiles.
-
Click the plus (+) icon next to Identifiers and follow the steps.

- Add the description, specify your bundle ID, check PushKit under Capabilities, and click continue.

The image below shows the finished App ID.

Create a New VoIP Services Certificate
Head to the Certificates category in your Apple Developer Program account and follow the steps below to add a new certificate.
- Choose the Certificates category next to Identifiers and click the plus (+) to add a new one.

- Check VoIP Services Certificate and choose the App ID you created in the previous section of this tutorial. Apple recommends using a reverse domain for App IDs. The App ID used for the project in this tutorial is com.streamcall.

- Select the private certificate you generated in one of the previous steps using Keychain Access and click continue.
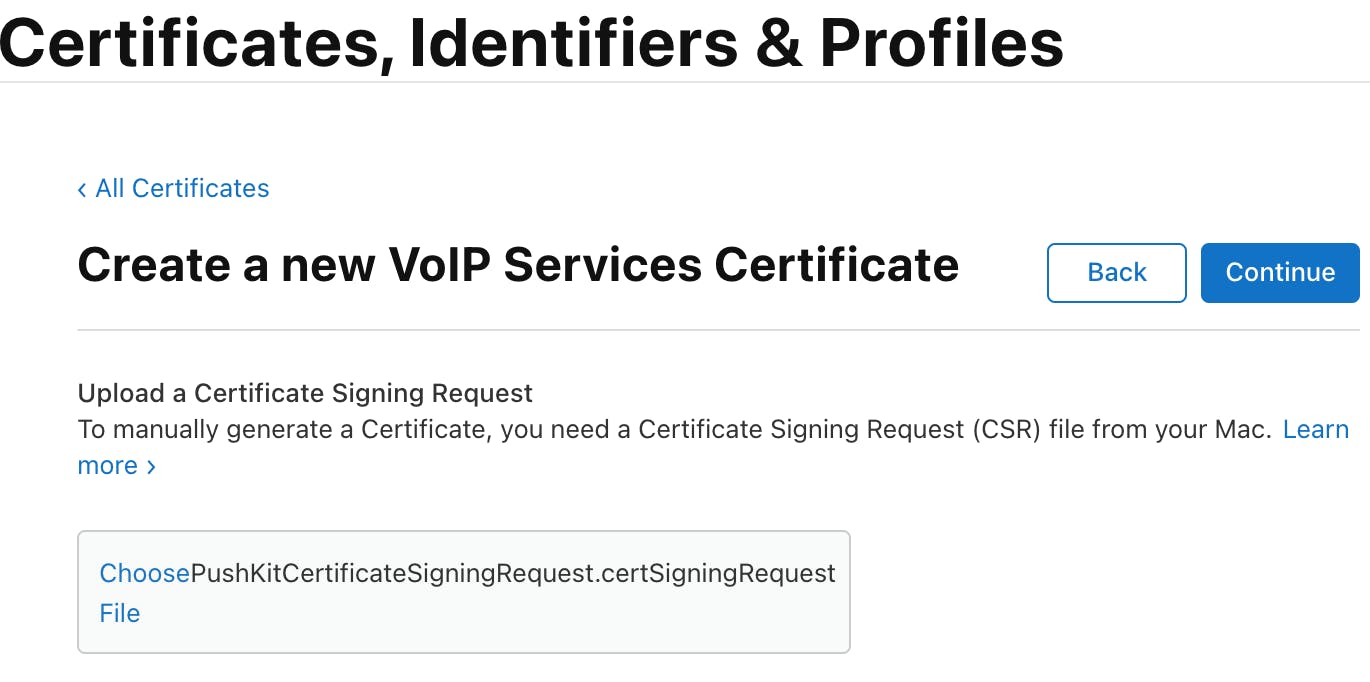
- Finally, download the VoIP services certificate. When you download the certificate, it will be saved as voip_services.cer.

Convert Your VoIP Services Certificate .cer to a Binary File .p12
The digital VoIP services certificate you downloaded has the extension .cer. Convert it to a secure binary format called .p12. The .p12 is a certificate that Apple issues to you if you want to build and publish your apps.
Double-click on the certificate voip_services.cer you downloaded to launch Keychain Access. Locate the certificate VoIP Services: com.streamcall, right-click it and follow the steps to save it as a .p12, which is a secure binary file.

Your VoIP servicers certificate will differ because of the bundle id. In this step, the system will require you to give a password to your certificate. Then, enter your Keychain password to save it to a location on your Mac.
Convert the .p12 certificate to .pem
To send push notifications to an iOS device, you should convert the .p12 file generated from Keychain Access to a .pem file. A .pem file is normally used for storing private certificates. To convert the .p12 certificate to .pem, launch your favorite command line utility, navigate to the location of the .p12, and enter the following command openssl pkcs12 -in PushKitTutorial.p12 -out PushKitTutorial.pem.
Note: Replace PushKitTutorial in the command above with the name of your .p12 file. The command creates PushKitTutorial.pem in the location where the previous certificates are stored.

Launch Xcode and Create a New iOS/UIKit Project

Create a new iOS app in Xcode with the settings in the image above. Add the project name, set the Interface option as Storyboard, and leave the Language as Swift.
Set Background Modes and Privacy in Your Xcode Project
Voice and video calling applications may perform some tasks in the background when the app on the user's device is not running. Before your app can send and receive push notifications, you should ask the user's permission and specify the app can perform some background tasks. These capabilities are called background modes. Background modes allow your app to fetch data in the background, update itself, and even wake up upon receiving push notifications. When you build VoIP apps, Apple requires you to set these background capabilities in Xcode for circumstances whereby your app may not be active on the user's device.

There are several background modes for different kinds of applications. However, there is one background mode you should set when building an audio or video calling application. Select your project name (PushKitTutorial) in the Xcode Project Navigator.
In the Info category:
- Select your project's name (PushKitTutorial) under Targets.
- Then, hover your mouse cursor on any of the keys and click the plus (+) button to add a new capability.
- Select Required Background Modes from the list of options. Background modes are key-value pairs.
- Set the Type as String and choose App Provides Voice over IP service as shown in the image above.
Failure to set this capability will prevent your app from working.
Additionally, when users want to use your VoIP app for the first time, Apple requires you to seek their permission for camera and microphone usage. You can set these privacies in the Info category similarly to setting the background modes previously. You should set the microphone and camera usage descriptions as shown in the image above.
Enable Push Notifications For Your App in Xcode

To support PushKit in your app, add push notifications in the Xcode project. Head to the Signing and Capabilities category and search for Push Notifications.
Configure the App to Receive PushKit Notifications and Show an Incoming Call
The PushKit framework provides the required objects and methods for implementing VoIP push notifications. To receive PushKit notifications in the iOS project you just created, you should implement PKPushRegistry and configure it to support VoIP calls. See the complete implementation in ViewController.swift.
12345678910111213141516171819202122232425262728293031323334353637383940414243444546import UIKit
import CallKit
import PushKit
class ViewController: UIViewController, CXProviderDelegate, PKPushRegistryDelegate {
    override func viewDidLoad() {
        // Create a push registry object to request VoIP notification
        let callRegistry = PKPushRegistry(queue: nil)
        callRegistry.delegate = self
        // Register to receive push notifications
        callRegistry.desiredPushTypes = [PKPushType.voIP]
    }
    // Create an object to handle the receipt of PushKit notifications
    func registerForVoIPCalls(_ voipRegistry: PKPushRegistry, didReceiveIncomingPushWith payload: PKPushPayload, for type: PKPushType, completion: @escaping () -> Void) {

        // Create an object to handle call configurations and settings
        let callConfigObject = CXProviderConfiguration()
        // Enable video calls
        callConfigObject.supportsVideo = true;
        // Show missed, received and sent calls in the phone app's Recents category
        callConfigObject.includesCallsInRecents = true;
        // Set a custom ring tone for incoming calls
        callConfigObject.ringtoneSound = "ES_CellRingtone23.mp3"

        // Create an object to give update about call-related events
        let callReport = CXCallUpdate()
        // Display the name of the caller
        callReport.remoteHandle = CXHandle(type: .generic, value: "Amos Gyamfi")
        // Enable video call
        callReport.hasVideo = true

        // Create an object to give update about incoming calls
        let callProvider = CXProvider(configuration: callConfigObject)
        callProvider.reportNewIncomingCall(with: UUID(), update: callReport, completion: { error in })
        callProvider.setDelegate(self, queue: nil)
    }

    // Call this function when the app receives push credentials
    func pushRegistry(_ voipRegistry: PKPushRegistry, didUpdate pushCredentials: PKPushCredentials, for type: PKPushType) {
        // Display the iOS device token in the Xcode console
        print(pushCredentials.token.map { String(format: "%02.2hhx", $0) }.joined())
    }

    func providerDidReset(_ callProvider: CXProvider) {
        //
    }
}
The function of the PKPushRegistry object in the sample code above is to register your app to the PushKit framework to receive high-priority notifications. When the app's registration is successfully confirmed, PushKit sends a data token to the Xcode console when you run the app. The unique data token contains information about the type of push notification and the current iOS device Xcode runs the app on. For this demo, the token generated in the Xcode console for an iPhone 14 Pro Max is a83158c40786a257202e0216e15ae7dd107fdec4b16c8440f506f533a8e4782c.

When you create a push registry object, it transfers the request to its delegate. Register a push registry object to request VoIP notification with the code snippet below.
1234567override func viewDidLoad() {
        // Create a push registry object to request VoIP notification
        let callRegistry = PKPushRegistry(queue: nil)
        callRegistry.delegate = self
        // Register to receive push notifications
        callRegistry.desiredPushTypes = [PKPushType.voIP]
    }
The app receives the token as a data object. To forward it to your server, convert it to a joined hexadecimal string print(pushCredentials.token.map { String(format: "%02.2hhx", $0) }.joined()).
Send PushKit Notifications to iOS Device
The diagram below illustrates the basic operating principle of push notifications and APNs.
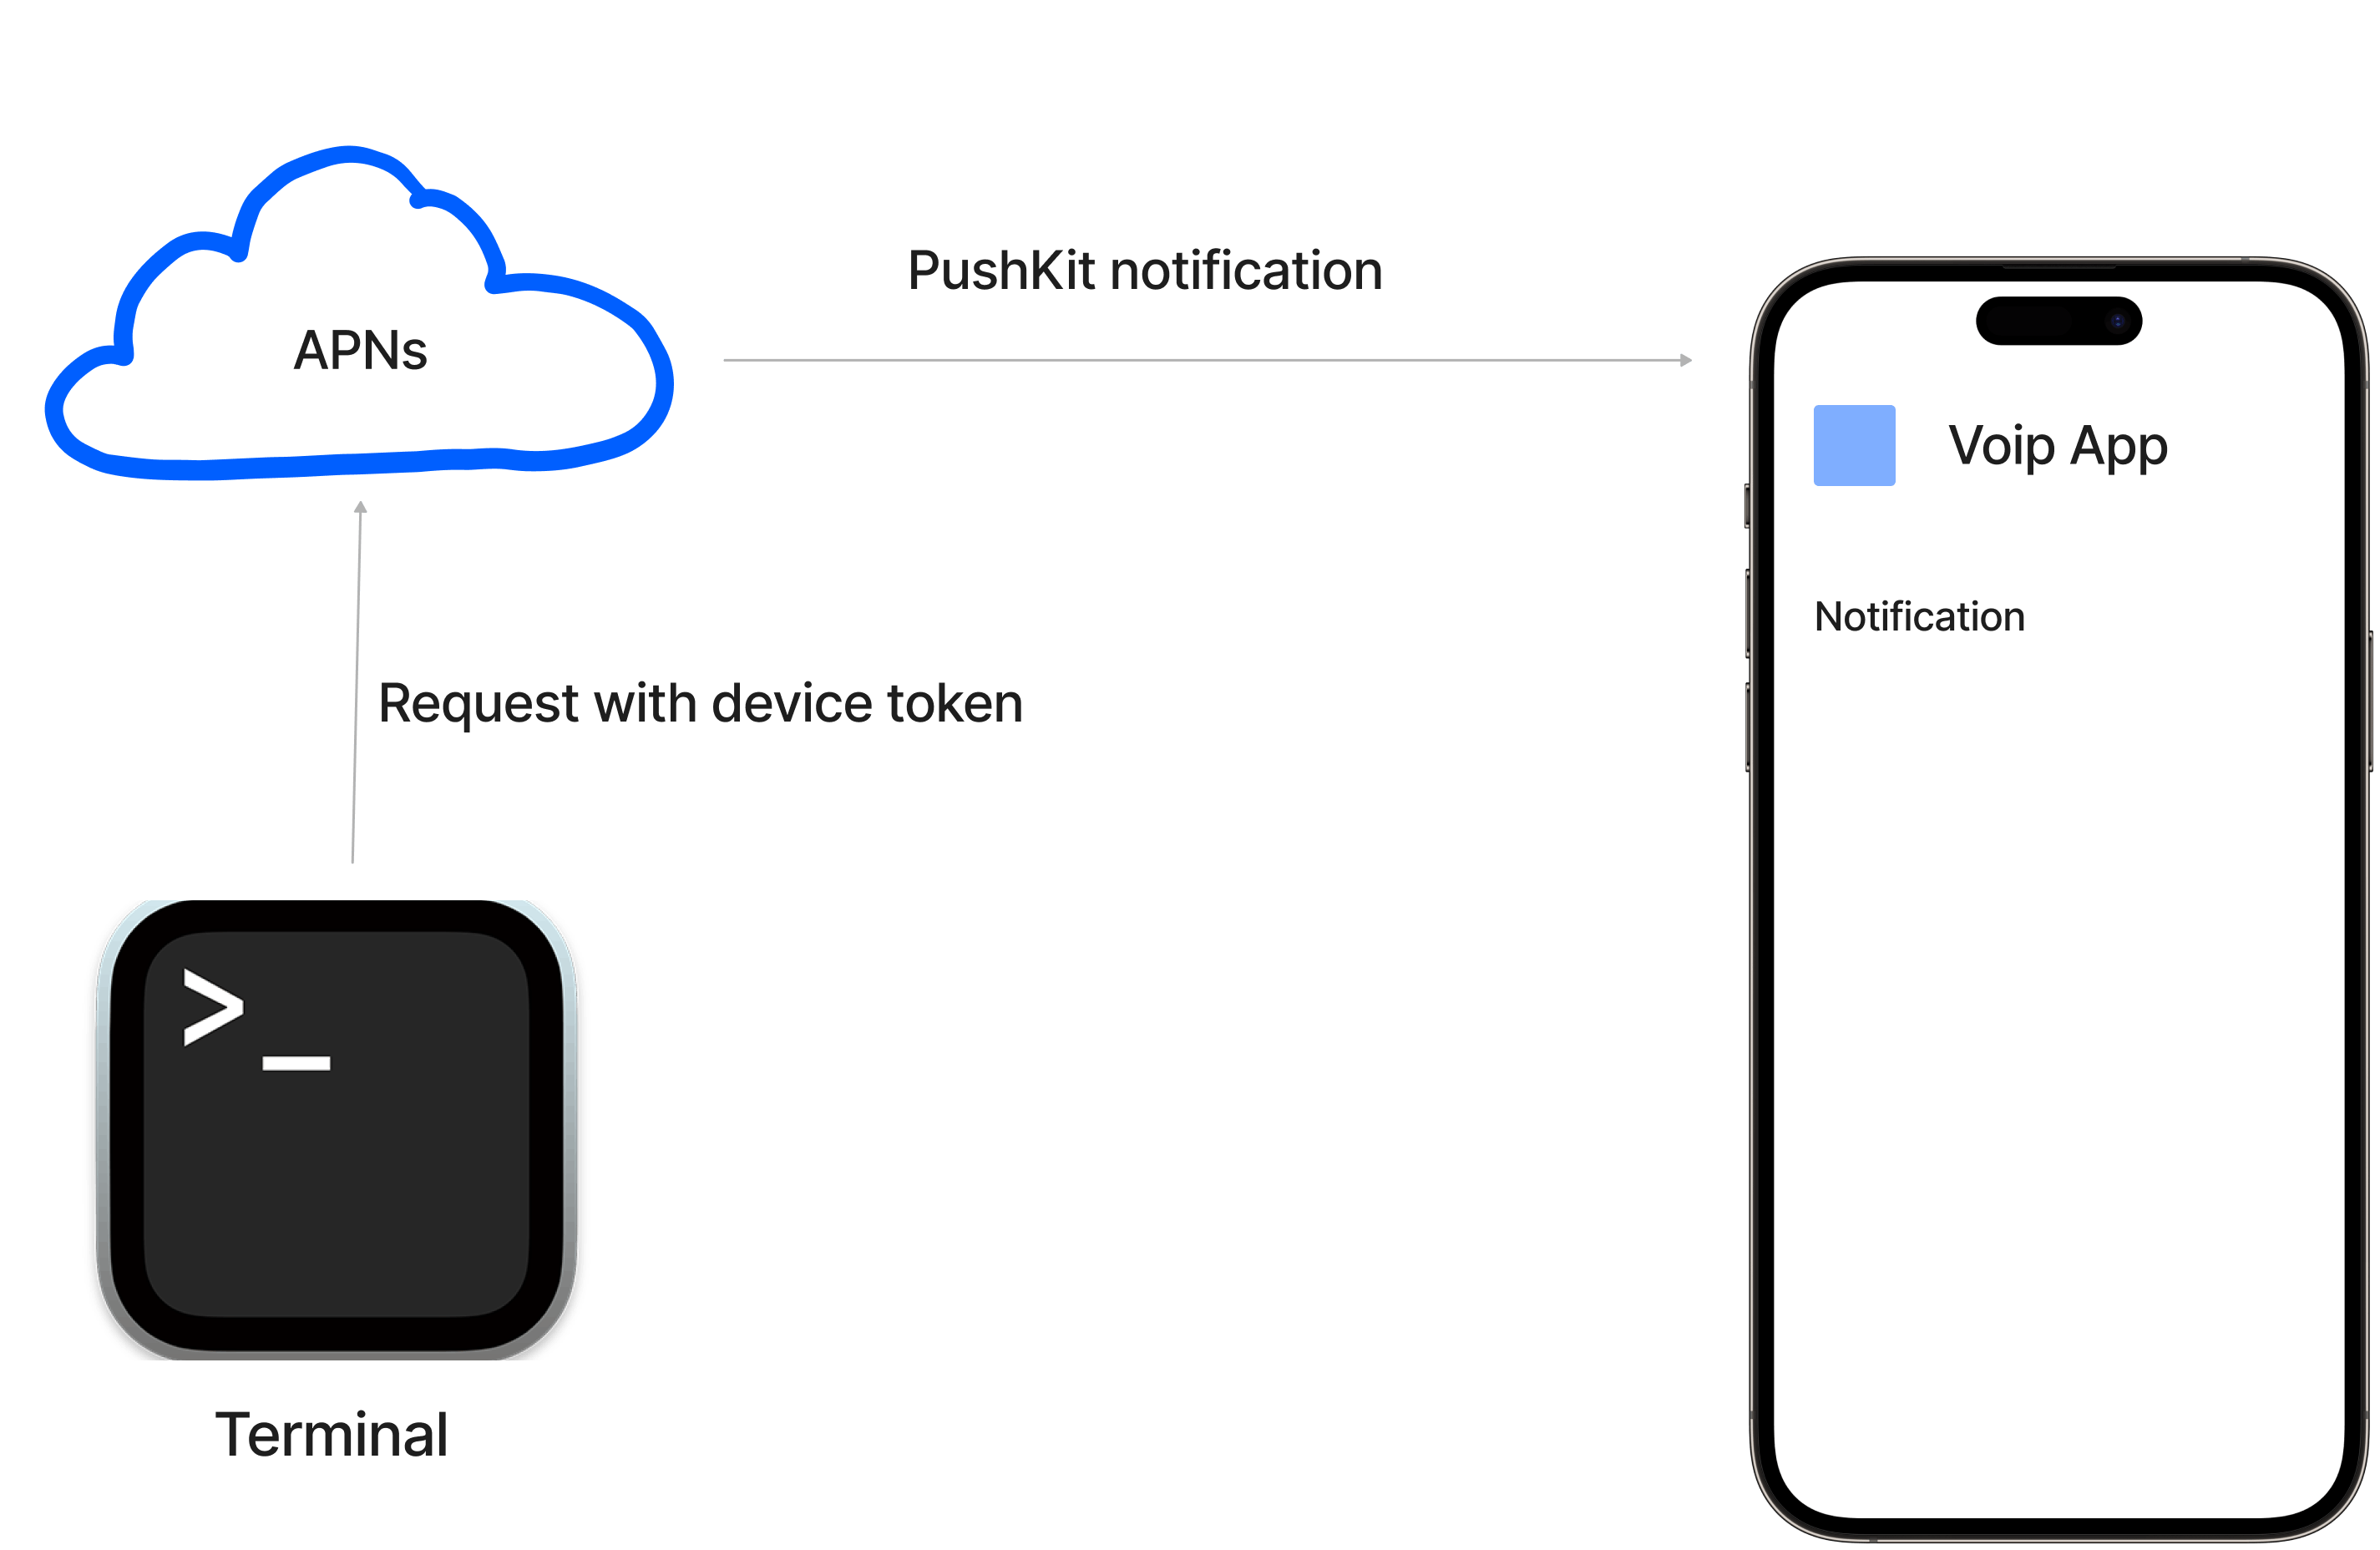
Check out the Apple documentation to learn more about using command-line tools to send push notification requests to APNs.
Receiving PushKit notifications start with making a notification request to APNs using a device token. For testing purposes, you can use your favorite command line tool to forward the token to APNs to handle the notification delivery as shown in the diagram above. This demo uses the device token Xcode generates along with a Curl command in Terminal to initiate a notification request and forward it to APNs % curl -v --header "apns-topic: ${TOPIC}" --header "apns-push-type: alert" --cert "${CERTIFICATE_FILE_NAME}" --cert-type DER --key "${CERTIFICATE_KEY_FILE_NAME}" --key-type PEM --data '{"aps":{"alert":"test"}}' --http2 https://${APNS_HOST_NAME}/3/device/${DEVICE_TOKEN}.
After using the above curl command to transfer the device token and notification request to APNs, the sample code in ViwController.swift will trigger the PKPushRegistry method. It will make PushKit wake up the demo app when it is in the background (closed) or foreground (running) to display the incoming call screen.

The request displays the incoming call notification in Dynamic Island on iPhone 14 Pro and Max. You can tap it to show the full-screen and the native incoming call UI.
Set Up a Push Notification Server For Production
In a production environment, you must set up a remote notification server to make the notification request to APNs to push data to devices that install your app.

In the diagram above, your server initiates the notification request from APNs by sending a unique device token. When APNs, receive the request, it checks the validity. If it registers the device token as valid, it generates a push notification and dispatches it to the device that uses your app.
Note: Sending remote notifications is a paid service from Apple. A one-year membership costs $99.
Conclusion
Bravo! This tutorial showed the steps you need to receive PushKit notifications in iOS VoIP apps. You now know the APNs and Keychain certificates you should obtain and configure to receive push notifications for VoIP calls. Additionally, you discovered CallKit and its resources to help you build real-time audio and video calling apps.
Where Do I Go Next?
The PushKit framework works seamlessly with CallKit in building fully functional and real-time audio and video applications. Although, the process requires several configurations and setups. You can integrate Stream's Video SDK into your apps to streamline the process of creating in-app live video experiences. Head to Strem's website to request early access to the video SDKs. Want to build a live video app with chat messaging integration? Check out Stream's iOS/SwiftUI SDKs to get started.