
Introduction
This is an updated version of an article published two years ago on blog.autsoft.hu. This new version supports non-Android libraries, uses command line GPG handling instead of a specific Windows GUI app, includes new best practices, and uses GitHub Actions for its CI integration.
Update, April 2021: addressed new Sonatype infra, moved to using AGP Maven Publish plugin integration for release components, and to using the new gradle-nexus/publish-plugin.
Update, July 2021: fixed keyserver being used (thanks Chetan Gupta), moved to using in-memory GPG keys for signing (thanks Arkadii Ivanov).
Update, July 2021: use JDK11 in GitHub Actions configuration to support new AGP versions.
Creating a great library is hard work. Coming up with the idea, implementing it, making sure you have a nice, stable public API that you control carefully and maintain... That's already lots to do.
After all that, you need to make your library available to the public. Technically, you could distribute the .aar file any way you want, but the norm is publishing it to a publicly available Maven repository. It's a good idea to use one of the well-established repositories that people are already likely to have in their projects, to make getting started with your library as easy as possible.
The simplest choice would be JitPack, which might not give you much in terms of customization or control, but is very easy to get started with. All you have to do is publish your project on GitHub, and JitPack should be able to build and distribute it immediately. If you're new to libraries, this is a great choice for getting your code out there.
The next step up is Jcenter... Which no longer accepts new packages and will stop serving them in February 2022. Using it had its issues anyway.
Finally, the fanciest place you can be in is The Central Repository via Sonatype OSSRH (OSS Repository Hosting), which I'll refer to as simply MavenCentral from here on. This is the place to be if you're a Maven dependency. Artifacts on MavenCentral are well trusted, and their integrity can be verified, as they are all required to be signed by the author.
The publication process, however, and especially automating it, can be quite a headache. It's easy to get stuck at many of the various steps no matter what tutorials you're following, especially if they're out of date, and this can get demotivating very quickly. It's not uncommon to give up and just use Bintray/Jcenter instead - which is not an option anymore.
So, if you feel up for a bit of a challenge, and want to do things the right way, here's how you can get a library into MavenCentral, in 2021.
Overview
Here's a quick overview of the steps we'll go through:
- Registering a Jira account with Sonatype, and verifying your ownership of the group ID you want to publish your artifact with
- Generating a GPG key pair for signing your artifacts, publishing your public key, and exporting your private key
- Setting up Gradle tasks that can sign upload your artifacts to a staging repository
- Manually going through the process of checking your artifacts in the staging repo and releasing them via the Sonatype web UI
- Automating the close & release flow with a Gradle plugin
- Configuring CI workflows with GitHub Actions to automate all of the above
A lot of ground to cover - let's go!
Prerequisites
We'll be using the following tools for this tutorial. You are free to use alternatives, but these are our favourites, and they work well for us.
- The command line
gpgtool - GitHub as the public host of the library's repository
- GitHub Actions as the continuous integration solution
For this article, we'll assume that you already have your library developed, and have uploaded it to a public GitHub repository.
We'll use our very own Android Chat SDK in our examples. This SDK is made up of multiple artifacts, but for simplification, we'll just talk about publishing the low-level networking client, which lives in the stream-chat-android-client module of the GitHub repository.
Shameless plug: if you need a chat solution in your Android app, check out our documentation and our Android In-App Messaging tutorial.
Registering a Sonatype account
First things first, you'll need an account in the Sonatype Jira. Head over there and hit Sign up. Registration is straightforward, it just requires a username, an email, and a password.

After you've logged in, you'll need to open an issue, asking for access to the group ID that you'll want to publish your project under. For us, based on our domain name (getstream.io), our group ID is io.getstream. If you own a domain, it's best to choose the reversed version of that as your group ID. Otherwise, you'll have to stick with having a GitHub-based group ID (see Choosing your Coordinates for more details).
After choosing a language and an avatar, you'll end up on this landing page - click on Create an issue:

Select Community Support - Open Source Project Repository Hosting and then New Project:

On the next page, fill out the following fields:
- Summary: Create repository for your.group.id.here
- Description: An optional, quick summary of what your project is.
- Group Id: Your group ID, as described a few sections earlier.
- Project URL: If your project has a webpage, the URL of that page. This can also be just the GitHub repository.
- SCM url: Your source control URL, i.e. the GitHub repository link.
- Username(s): If you want additional users (on top of the one you're using for this process) to have deploy access for your group ID, you can list them here.
- Already Synced to Central: If you're just getting started, this should be No.

Soon after opening it, your issue will get a comment telling you to verify that you own the domain corresponding to your group ID:

To comply with this, add the required TXT record to your domain - how to do this will depend on where your domain is registered, but it should be a fairly simple task.
1@ TXT 1800 OSSRH-12345
Make sure to replace the ticket number above with your actual number.
When done, don't forget to leave a comment on the issue so that Sonatype knows to check the record. You'll eventually get a response telling you that you now have deploy rights - congrats!

Generating a GPG key pair
As we eluded to earlier, artifacts published on MavenCentral have to be signed by their publishers. You'll need a GPG key for this.
MavenCentral also has its own documentation for Working with PGP Signatures which you can reference if you get stuck along the way.
This part requires access to the gpg command. There are several ways to install this via package managers, and there are many distributions available for different platforms on gnupg.org.
GPG Suite is an easy-to-use distribution for macOS, and you can use Gpg4win if you're on Windows. Both of these come with GUI tools that make managing keys easier.
We'll stick to the command line here, but note that the old article shows how to use the Kleopatra GUI (included in Gpg4win) on Windows for generating and managing keys.
To generate a new key, run the following command:
1gpg --full-gen-key
You'll be prompted to enter a few details:
- Kind of key: Accept the default value, which is
(1) RSA and RSA. - Key size:
4096. - Expiration: You can input
0to generate a key that never expires. You can also create a key that has an expiry date and then renew it periodically, if you prefer to do so. - Real name, email: Should be obvious.
- Comment: Freeform text, can be left empty.
After entering these details, you'll be prompted to enter a passphrase to secure your key with.
Here's the full flow you'll go through, with a bit of truncation:
12345678910111213141516171819202122232425262728293031323334Please select what kind of key you want:
   (1) RSA and RSA (default)
   ...
Your selection? 1

RSA keys may be between 1024 and 4096 bits long.
What keysize do you want? (3072) 4096
Requested keysize is 4096 bits

Please specify how long the key should be valid.
         0 = key does not expire
         ...
Key is valid for? (0) 0
Key does not expire at all
Is this correct? (y/N) y

GnuPG needs to construct a user ID to identify your key.

Real name: Marton Braun
Email address: marton@getstream.io
Comment: Example key for tutorial
You selected this USER-ID:
    "Marton Braun (Example key for tutorial) <marton@getstream.io>"

Change (N)ame, (C)omment, (E)mail or (O)kay/(Q)uit? O

gpg: key 36271B955BEF072A marked as ultimately trusted
gpg: revocation certificate stored as '.../gnupg/openpgp-revocs.d\7A5D73CFEDDDBC915986998A36271B955BEF072A.rev'
public and secret key created and signed.

pub   rsa4096 2021-02-03 [SC]
      7A5D73CFEDDDBC915986998A36271B955BEF072A
uid                      Marton Braun (Example key for tutorial) <marton@getstream.io>
sub   rsa4096 2021-02-03 [E]
You can always check the keys you have on your system by running gpg --list-keys:
1234567gpg: checking the trustdb
.../gnupg/pubring.kbx
-----------------------------------------------
pub   rsa4096 2021-02-03 [SC]
      7A5D73CFEDDDBC915986998A36271B955BEF072A
uid           [ultimate] Marton Braun (Example key for tutorial) <marton@getstream.io>
sub   rsa4096 2021-02-03 [E]
Your key's ID is the last eight digits of its fingerprint (the long hexadecimal string above). In this case, this is 5BEF072A - take note of this, as you'll use this later.
You've generated a pair of keys - a private and a public key. You'll keep the private one hidden and use it to sign your artifacts. The public key has to be uploaded to the server so that anyone can check that it belongs to you, which you can do by running the following (use your own key ID!):
1gpg --keyserver keyserver.ubuntu.com --send-keys 5BEF072A
See Distributing Your Public Key for the list of supported keyservers.
Your private key will need to be referenced by your project when it signs the artifacts. You can get a base 64 export of it with the following:
1gpg --export-secret-keys 5BEF072A | base64
Enter your passphrase that you've set earlier when prompted. You can either copy-paste this key from the terminal output later on, or save it to a file temporarily.
Setting up publication in your project
That's a lot of work without touching your project, but the time has come to do that now. In the next few steps, you will:
- Add Gradle scripts that set up the publication plugin required to push artifacts to a repository.
- Configure the properties of the library you're releasing.
- Grab the necessary authentication details along with the private key you've just exported.
Root project Gradle configuration
To easily automate publishing later, you'll use the gradle-nexus/publish-plugin tool. This has to be added in your project level (root) build.gradle file as a dependency.
You can do this either with a plugins block:
123plugins {
    id("io.github.gradle-nexus.publish-plugin") version "1.1.0"
}
Or with the classic buildscript dependency syntax, and then applying it in your project:
1234567buildscript {
    dependencies {
        classpath 'io.github.gradle-nexus:publish-plugin:1.1.0'
    }
}

apply plugin: 'io.github.gradle-nexus.publish-plugin'
Check the releases page of the plugin to get the latest version.
Next, create a new file called publish-root.gradle in a new scripts folder inside your project. This will contain global configuration you need for publishing, grabbing input values for your scripts, and defining the MavenCentral repository.
Note that here we'll go through the contents of these scripts part by part, with explanations. You can always find the complete, up-to-date files we use in production in the Stream Chat repository.
In this file, you'll grab some configuration parameters. Using the script below, you'll first set all the variables to a dummy empty string. This will let the project sync and build without the publication values set up, which would otherwise be an issue for your contributors.
1234567// Create variables with empty default values
ext["signing.keyId"] = ''
ext["signing.password"] = ''
ext["signing.key"] = ''
ext["ossrhUsername"] = ''
ext["ossrhPassword"] = ''
ext["sonatypeStagingProfileId"] = ''
The first three variables will be used to sign the artifacts after they're built:
signing.keyId: the ID of the GPG key pair, the last eight characters of its fingerprintsigning.password: the passphrase of the key pairsigning.key: the base64 encoded private key you exported earlier
osshrUsername and ossrhPassword: are your account details for MavenCentral, which you've chosen at the Jira registration step. We'll get back to where sonatypeStagingProfileId comes from later on.
Next, you'll try to fetch the values of the variables from a local.properties file in the root of the project if it exists, otherwise you'll look for them in the environment variables. The former lets you easily input these values locally on your machine, while the latter will help with setting up CI.
123456789101112131415File secretPropsFile = project.rootProject.file('local.properties')
if (secretPropsFile.exists()) {
    // Read local.properties file first if it exists
    Properties p = new Properties()
    new FileInputStream(secretPropsFile).withCloseable { is -> p.load(is) }
    p.each { name, value -> ext[name] = value }
} else {
    // Use system environment variables
    ext["ossrhUsername"] = System.getenv('OSSRH_USERNAME')
    ext["ossrhPassword"] = System.getenv('OSSRH_PASSWORD')
    ext["sonatypeStagingProfileId"] = System.getenv('SONATYPE_STAGING_PROFILE_ID')
    ext["signing.keyId"] = System.getenv('SIGNING_KEY_ID')
    ext["signing.password"] = System.getenv('SIGNING_PASSWORD')
    ext["signing.key"] = System.getenv('SIGNING_KEY')
}
Make sure that you've set these variables either in the aforementioned local.properties file or in your environment variables. If you want to use the property file, the syntax for it should look something like this (replace all the data here with your own!):
12345signing.keyId=5BEF072A
signing.password=signingPass123
signing.key=bm90IGEgcmVhbCBrZXksIHdoYXQgd2VyZSB5b3UgZXhwZWN0aW5n
ossrhUsername=yourSonatypeUser
ossrhPassword=yourSonatypePassword
The last piece of code to add to this file will define the MavenCentral (Sonatype) repository where publishing should upload the artifacts. This relies on parameters fetched above to authenticate:
12345678910// Set up Sonatype repository
nexusPublishing {
    repositories {
        sonatype {
            stagingProfileId = sonatypeStagingProfileId
            username = ossrhUsername
            password = ossrhPassword
        }
    }
}
Important: If you're on the new Sonatype infrastructure (happens if you've registered after 2021-02-24 or requested it specifically), you have to add explicit URLs pointing to s01.oss.sonatype.org in this config block next to the existing parameters, like so:
123456789nexusPublishing {
    repositories {
        sonatype {
            /* Existing params here... */
            nexusUrl.set(uri("https://s01.oss.sonatype.org/service/local/"))
            snapshotRepositoryUrl.set(uri("https://s01.oss.sonatype.org/content/repositories/snapshots/"))
        }
    }
}
As the last step, apply this script in your root build.gradle file like so:
1apply from: "${rootDir}/scripts/publish-root.gradle"
This completes the configuration needed in the root project. This gist contains the code blocks detailed above in a single snippet. The final, up-to-date script we use for publishing our SDK can be found in the Stream Chat repository.
Per-module Gradle setup
With the repository defined and parameters fetched, it's time to create a script that will define the artifacts in each module you want to publish. Create a new file called publish-module.gradle in the scripts folder. As its name suggests, this will be applied to each module that you want to publish an artifact from.
In this file, first you'll apply two plugins for publishing and signing.
12apply plugin: 'maven-publish'
apply plugin: 'signing'
Our publishing file also applies the Dokka plugin in this block, which you have to configure separately, if you want to use it.
Then you declare the sources artifact for the library. This is really important - it will make sure that the source files are packaged along with the executable, compiled code, so that your users can easily jump to the definitions that they're calling into within their IDE.
12345678910111213141516task androidSourcesJar(type: Jar) {
    archiveClassifier.set('sources')
    if (project.plugins.findPlugin("com.android.library")) {
        // For Android libraries
        from android.sourceSets.main.java.srcDirs
        from android.sourceSets.main.kotlin.srcDirs
    } else {
        // For pure Kotlin libraries, in case you have them
        from sourceSets.main.java.srcDirs
        from sourceSets.main.kotlin.srcDirs
    }
}

artifacts {
    archives androidSourcesJar
}
Once again, our real publishing file also adds an additional javadocJar task which ships Dokka-generated documentation - again, you can skip this if you want to.
You'll set two properties on the Gradle project itself here, the group ID and the version of the artifact. You'll see where these uppercase values come from later on, when you apply this publication script in the module level build.gradle files.
12group = PUBLISH_GROUP_ID
version = PUBLISH_VERSION
Here comes the complicated part, providing all the metadata for the library you're releasing. See the inline comments for the play-by-play explanation.
12345678910111213141516171819202122232425262728293031323334353637383940414243444546474849505152afterEvaluate {
    publishing {
        publications {
            release(MavenPublication) {
                // The coordinates of the library, being set from variables that
                // we'll set up later
                groupId PUBLISH_GROUP_ID
                artifactId PUBLISH_ARTIFACT_ID
                version PUBLISH_VERSION

                // Two artifacts, the `aar` (or `jar`) and the sources
                if (project.plugins.findPlugin("com.android.library")) {
                    from components.release
                } else {
                    from components.java
                }

                artifact androidSourcesJar
                artifact javadocJar

                // Mostly self-explanatory metadata
                pom {
                    name = PUBLISH_ARTIFACT_ID
                    description = 'Stream Chat official Android SDK'
                    url = 'https://github.com/getstream/stream-chat-android'
                    licenses {
                        license {
                            name = 'Stream License'
                            url = 'https://github.com/GetStream/stream-chat-android/blob/main/LICENSE'
                        }
                    }
                    developers {
                        developer {
                          id = 'zsmb13'
                          name = 'Márton Braun'
                          email = 'marton@getstream.io'
                        }
                        // Add all other devs here...
                    }

                    // Version control info - if you're using GitHub, follow the
                    // format as seen here
                    scm {
                        connection = 'scm:git:github.com/getstream/stream-chat-android.git'
                        developerConnection = 'scm:git:ssh://github.com/getstream/stream-chat-android.git'
                        url = 'https://github.com/getstream/stream-chat-android/tree/main'
                    }
                }
            }
        }
    }
}
Finally, this piece of code grabs signing related values from the root project, and then tells the signing plugin to sign the artifacts you've defined above as a publication.
12345678signing {
    useInMemoryPgpKeys(
            rootProject.ext["signing.keyId"],
            rootProject.ext["signing.key"],
            rootProject.ext["signing.password"],
    )
    sign publishing.publications
}
That's the publish-module.gradle script all built up, ready to use. This gist contains the code blocks shown above in a single snippet. The final, up-to-date script we use for publishing our SDK can be found in the Stream Chat repository.
Time to include this script in a module! Head to the build.gradle file of your library module - in our case, this is the stream-chat-android-client module - and add the following code:
1234567ext {
    PUBLISH_GROUP_ID = 'io.getstream'
    PUBLISH_VERSION = '4.5.2'
    PUBLISH_ARTIFACT_ID = 'stream-chat-android-client'
}

apply from: "${rootProject.projectDir}/scripts/publish-module.gradle"
Here you finally see the group ID, artifact ID, and version being set, so that the publication script can make use of them. Then, the script itself is applied. This is all the code you need to add per-module if you are publishing your library in multiple artifacts, everything else is done by the common script.
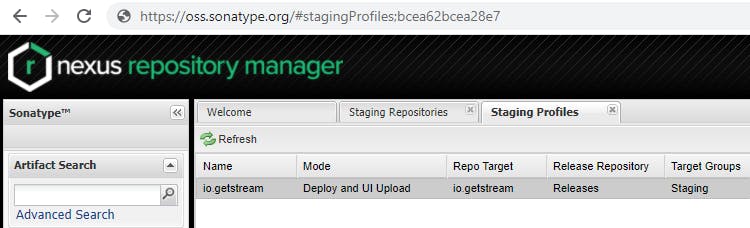
One last configuration step: you'll need to set the sonatypeStagingProfileId variable in your project. This value is an ID that Sonatype assigns to you, which the plugin uses to make sure all the artifacts end up in the right place during the upload.
Go to https://oss.sonatype.org/ and log in. In the menu on the left, select Staging profiles, select your profile, and then look for the ID in the URL.
Either set this value in your local.properties file, or set the corresponding environment variable.
Your first release
With all of that set up, you're now ready to publish the first version of your library!
For each repository you have defined in the publishing script, a Gradle task will be created to publish to that repository. In our example, our first module to publish is stream-chat-android-client, and we've named the repository sonatype. Therefore, we need to execute the following command to start publication (replace the module name with your own here):
1gradlew stream-chat-android-client:publishReleasePublicationToSonatypeRepository
This will create a so-called staging repository for your library, and upload your artifacts (aar and sources) to that repository. At this point, you can check that all the artifacts you wanted to upload have made it, before hitting the release button.
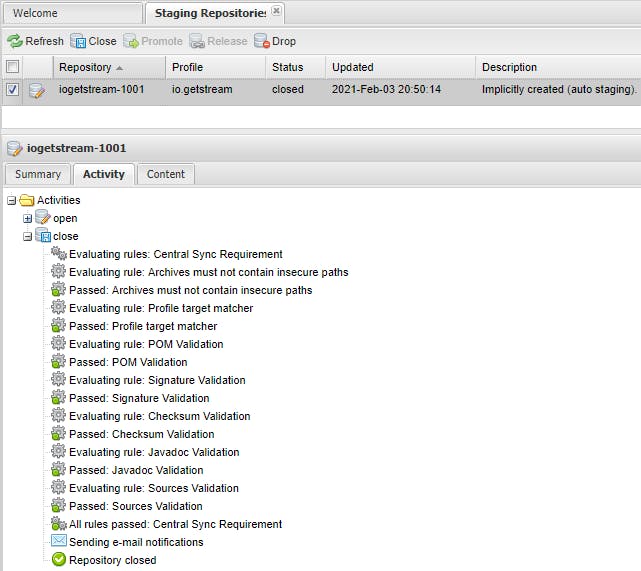
Now, go to the Sonatype site, and in the menu on the left, select Staging repositories.

Find your repository (might be the only one in the list, might have to scroll around a bit for it), which has your group ID in its name. If you select it and look at the Content tab, you'll see the files that have been uploaded.

If everything looks good, and you're done uploading files to the repository, you have to Close it. With the repository selected, hit the Close button in the toolbar on top. Confirm your action in the dialog (you don't need to provide a description here).

This will take just a few moments, you can follow along with it happening in the Activity tab.
With the repository closed, you now have two final options available to you. Drop will throw away the repository, and cancel the publication process. Use this if something went wrong during the upload or you've changed your mind.
Release, on the other hand, will publish the contents of your staging repository to MavenCentral. Again, you get a confirmation dialog, and you can choose Automatically Drop so that the staging repository is cleaned up after the release completes.

The time this process takes can vary a bit. If you get lucky, your artifact will show up on MavenCentral in 10-15 minutes, but it could also take an hour or more in other cases. You can check whether your artifact is available by going to https://repo1.maven.org/maven2/ and browsing for it.
For example, for our client, we can keep refreshing the following page to see if the new version is there: https://repo1.maven.org/maven2/io/getstream/stream-chat-android-client/.
If you see the package via those links, Gradle will also be able to pull it if mavenCentral() is added as a repository and you add your library as a dependency.
Search indexing is a separate, even longer process, so it can take about two hours for your artifact to show up on search.maven.org.
If this was your first release, you should at this point go back and comment on your original Jira issue, to let them know that your repository setup and publication is working.
Automating Sonatype actions
That was quite the adventure! To make things smoother for subsequent releases, you can automate the entire release flow with the publishing plugin that you already have configured in the project.
This, in theory, would mean that you don't have to revisit the Sonatype UI ever again. In practice, you'll do that more often than you'd like when the plugin (really, the Sonatype API it calls) breaks or misbehaves, so it's worth being familiar with.
The plugin provides a Gradle task that you can use to close and then release your staging repository with one simple call:
1gradlew closeAndReleaseSonatypeStagingRepository
At this point, you can upload and publish your library by just invoking these two Gradle tasks in sequence - pretty convenient! As a final step, let's hook this into a CI pipeline.
Continuous integration
Since the library is hosted on GitHub anyway, we use GitHub Actions for running the publication Gradle tasks automatically. Whatever CI solution you're using, setting up publication with it will consist of two main steps:
- Getting your secret variables in place.
- Invoking the two Gradle tasks.
Your secret variables - for the list of these, look at the publishing script again - can simply go into Repository secrets (Add each of these by going to Settings -> Secrets within your GitHub repository):

Now, let's create the GitHub Actions workflow that will put all of this together. The configuration for this will go in the .github/workflows/publish.yml file of the repository. This publish workflow will run every time a new release is created in the repository (you can also change the triggers to run when a tag is created, for example). Again, see the inline comments for some explanation of what each step does.
If you're new to GitHub Actions, check out their introductory documentation first.
1234567891011121314151617181920212223242526272829303132333435363738name: Publish

on:
  release:
    # We'll run this workflow when a new GitHub release is created
    types: [released]

jobs:
  publish:
    name: Release build and publish
    runs-on: ubuntu-latest
    steps:
      - name: Check out code
        uses: actions/checkout@v2
      - name: Set up JDK 11
        uses: actions/setup-java@v2
        with:
          distribution: adopt
          java-version: 11

        # Builds the release artifacts of the library
      - name: Release build
        run: ./gradlew :stream-chat-android-client:assembleRelease

        # Generates other artifacts (javadocJar is optional)
      - name: Source jar and dokka
        run: ./gradlew androidSourcesJar javadocJar

        # Runs upload, and then closes & releases the repository
      - name: Publish to MavenCentral
        run: ./gradlew publishReleasePublicationToSonatypeRepository --max-workers 1 closeAndReleaseSonatypeStagingRepository
        env:
          OSSRH_USERNAME: ${{ secrets.OSSRH_USERNAME }}
          OSSRH_PASSWORD: ${{ secrets.OSSRH_PASSWORD }}
          SIGNING_KEY_ID: ${{ secrets.SIGNING_KEY_ID }}
          SIGNING_PASSWORD: ${{ secrets.SIGNING_PASSWORD }}
          SIGNING_KEY: ${{ secrets.SIGNING_KEY }}
          SONATYPE_STAGING_PROFILE_ID: ${{ secrets.SONATYPE_STAGING_PROFILE_ID }}
MavenCentral uploads tend to be... Flaky, to put it nicely. Here are some recommendations to have fewer issues with them:
- Perform all your Gradle upload tasks in a single job, on a single machine.
- The
--max-workers 1option used above guarantees that the upload task runs on a single thread, even if parallel builds are otherwise configured. - It's also a good idea to put the upload task (all of them, if you're uploading multiple modules' worth of artifacts) in a different Gradle invocation than the assemble & signing tasks, as you see it done above, so that they run closely together.
If a long time passes between your upload calls, or if they originate from different CI machines, you might see problems such as multiple staging repositories being created for you on Sonatype with your files scattered all over them.
Even if you do everything described above right, you might still get random upload errors, or timeouts either during the upload or while the plugin is trying to close and release the repository. At this point, being able to look at the staging repository on the Sonatype UI and manually closing/dropping/releasing repositories will come in handy to fix things up.
If your staging repository seems okay (has correct contents), and it just failed to close, you can close and release it yourself. If it looks messed up somehow, or you ended up with multiple staging repositories, it's best to drop them all and then run the upload workflow again.
Reminder: our up-to-date publishing workflow is always available in our GitHub repository.
Conclusion
Well, that was quite a journey. We hope that this detailed guide helped you get up and running with MavenCentral publication. You can follow us on Twitter @getstream_io for more great technical content - please tweet at us if you've successfully set up publishing following these steps! You can also reach the author @zsmb13 if you have any questions.
If you're looking for a Kotlin-first, powerful Chat SDK to use in your Android app, check out our Android documentation and our Android Chat tutorial.