

Maintaining a safe and engaging chat environment is crucial for any online community.
In this post, we'll demonstrate the practical application of Large Language Models (LLMs) in content moderation, showcasing how advanced AI can enhance community interactions by effectively managing unwanted content. We’ll also introduce essential tools and guide you through setting up a real-time content moderation service powered by an LLM and integrated with Stream’s Chat API through webhook, using GPT as an example of spam detection.
Required Tools
To get started, you’ll need:
- Stream: For chat functionality and webhook support
- OpenAI GPT: For the language model. You can obtain an OpenAI key from their website
- FastAPI: Python library for creating a web service
- Langchain: Python library for managing prompt templates
- Other Python Libraries: pandas, scikit-learn for data handling and model evaluation during the development phase
Selecting Your LLM
For this tutorial, we recommend starting with GPT due to its high-quality output and ease of integration. However, for production environments, you might consider using a self-hosted open-source model to reduce long-term costs and avoid issues related to external API integration and data privacy concerns.
While this example uses OpenAI’s GPT, you have the flexibility to run a local or third-party language model that suits your needs. Each approach has its own set of advantages and disadvantages. Open-source LLMs, such as Mistral 7B, run locally and offer greater cost-effectiveness and customization options. However, they come with increased complexity in setup and maintenance. Below is a table summarizing the pros and cons of each approach.
| Closed Source | Open Source (Local) | Open Source (Cloud) | |
|---|---|---|---|
| Examples | GPT-4, Gemini, Claude 3 Opus | Mistral 7B, LLAMA | LLAMA via Hugging Face Hub |
| Manual overhead setting up, scaling up, and maintaining | Low | High | Low |
| Dependency on external connection | Yes | Not | Yes |
| Data Privacy and Compliance | Potential issues | No issues | Potential issues |
| Inference Cost | Generally High | Low (only infrastructure) | Variable |
| Best use case | PoC/low volume | High volume | Variable |
| Customization | Low | High | High |
| Performance | High, works out of the box | Variable | Variable |
Example: Spam Detection
Spam messages often contain promotions or deceptive content, disrupting the user experience. We will see how by integrating an LLM with Stream Chat, you can automatically classify and filter these messages in real-time, ensuring a safer and more engaging user experience.
Consider the following when working with Machine Learning (ML) Models and LLMs:
- The effectiveness largely depends on how well you design your prompts. A well-crafted prompt can significantly improve the model’s accuracy in identifying spam.
- Using a diverse and comprehensive dataset is key to training an effective model. In this example, we’ll use a public SMS spam dataset, but you should use data relevant to your specific use case.
For these reasons, it is very important to evaluate the output and improve the model if necessary.
Steps Involved
1. Install Python Dependencies
Let’s create a virtual environment and install the necessary dependencies. As Python is an interpreted language, the virtual environment helps define and manage code that depends on multiple software packages, debug code, prevent software conflicts, perform tests, and collaborate with other developers. We will create a virtual environment and install the following libraries:
- FastAPI: To create the web service to handle chat messages
- Langchain: To manage and refine prompt templates
- Langchain-OpenAI: To integrate with OpenAI’s GPT
- Pandas: For data manipulation and preprocessing
- Scikit-learn: For model evaluation
- Stream Chat: For the Stream Python server SDK
123456789101112# Create a virtual environment
$ python -m venv myenv

# Activate the virtual environment
# On macOS/Linux
$ source myenv/bin/activate

# On Windows
$ myenv\Scripts\activate

# Install the required packages
$ pip install langchain==0.2.11 langchain-openai==0.1.20 matplotlib==3.7.1 pandas==2.1.4 scikit-learn==1.3.2 stream-chat==4.18.0
2. Load the Sample Data
Let’s load a public SMS spam dataset as an example for our tutorial. This popular dataset contains 5574 messages, with 747 spam messages and 4827 ham (non-spam) messages. We chose this dataset because it is readily available and contains the types of messages we aim to detect, making it an ideal choice for demonstrating our content moderation system.
Here's how to load the dataset:
123456import pandas as pd

url = 'https://raw.githubusercontent.com/justmarkham/DAT8/master/data/sms.tsv'
df = pd.read_csv(url, sep='\t', header=None, names=['label', 'message'])
df['label'] = df['label'].apply(lambda x: 1 if x == 'spam' else 0)
df.head()
Output:
123456index  label message
0      0     "Go until jurong point, crazy.. Available only in bugis n great world la e buffet... Cine there got amore wat..."
1      0      Ok lar... Joking wif u oni...
2      1      Free entry in 2 a wkly comp to win FA Cup final tkts 21st May 2005. Text FA to 87121 to receive entry question(std txt rate)T&C's apply 08452810075over18's
3      0      U dun say so early hor... U c already then say...
4      0      "Nah I don't think he goes to usf, he lives around here though"
Important: in this tutorial, we use a publicly available dataset to demonstrate the process. If you plan to run this service in production with an external LLM such as GPT-4, ensure you are legally allowed to share chat messages with the external service.
3. Define the Prompt Template
To guide GPT in classifying messages, we need to create a prompt template.
12345678from langchain.prompts import ChatPromptTemplate

chat_template = ChatPromptTemplate.from_messages(
    [
        ("system", """Is this message spam? Return 1 or 0"""),
        ("human", "{input}"),
    ]
)
This prompt template is composed of a system prompt where we define instructions and a human prompt in which we send the actual message. In this simplified example, we prepare the agent to receive a message and ask it to return 1 if the message is spam and 0 if it's a normal message. This binary classification makes it easier to manage and implement within our content moderation system. If you want more fine-grained control, you might want to output scores such as the likelihood of a message being spam (0.1, 0.5…) or the severity of the violation (0, 1, 2..).
GPT does not remember previous requests, so we need to include all necessary context within each request by repeating the system instructions each time. This ensures that every message is evaluated based on the same criteria, providing consistent and predictable results.
4. Set Up the LLM Chain
Now we combine the prompt template with GPT. We can put a limit of 1 to the max_tokens, as we only need one output token here (1 or 0 as we defined above). This helps us with speed and cost saving, as output tokens (text generated by the model) are usually more expensive than input tokens (prompt text). We are using GPT-4o-mini here but feel free to experiment with larger models such as gpt-4o.
12345678910from langchain_openai import ChatOpenAI

llm = ChatOpenAI(openai_api_key='your_openai_api_key', # Replace with your OpenAI Key
    model="gpt-4o-mini", # Model selection
    max_tokens=1) # Limits the output to 1 token (0 or 1 in our case)

# Combine the prompt template with the GPT model
llm_chain = chat_template | llm

llm_chain.invoke("this is not spam")
Output:
AIMessage(content='0', response_metadata={'token_usage': {'completion_tokens': 1, 'prompt_tokens': 164, 'total_tokens': 165}, 'model_name': 'gpt-4o-mini-0125', 'system_fingerprint': None, 'finish_reason': 'stop', 'logprobs': None}, id='run-73531656-bfee-4b94-85d8-08a752f29a5e-0', usage_metadata={'input_tokens': 164, 'output_tokens': 1, 'total_tokens': 165})5. Test On Sample Messages
Now that we have defined our prompt template, let's test the model using a sample of messages from our dataset. We want to see that the model correctly processes input messages and returns the expected output (1 for spam, 0 for non-spam).
Our success criteria for this test are:
- The model should return a boolean value (1 or 0) for each message.
- The output should align with our manual classification of the sample messages, indicating that the model is making accurate predictions.
123456789101112131415# Sample messages for testing
positive_sample = df[df['label']==1].sample(3, random_state=42)['message'].to_list()
negative_sample = df[df['label']==0].sample(3, random_state=42)['message'].to_list()

sample_messages = positive_sample + negative_sample

# Classify sample messages
for message in sample_messages:
    # Send the message to the model and get the prediction
    result = llm_chain.invoke(message).content
    # Convert the result to a boolean (1 for spam, 0 for non-spam)
    is_spam = int(result) == 1

    # Print the classification result
    print(f"Message: {message}\nClassified as: {'Spam' if is_spam else 'Ham'}\n")
The expected output should show the classification of each message, for example:
Message: Summers finally here! Fancy a chat or flirt with sexy singles in yr area? To get MATCHED up just reply SUMMER now. Free 2 Join. OptOut txt STOP Help08714742804
Classified as: Spam

Message: This is the 2nd time we have tried 2 contact u. U have won the 750 Pound prize. 2 claim is easy, call 08718726970 NOW! Only 10p per min. BT-national-rate
Classified as: Spam

Message: Get ur 1st RINGTONE FREE NOW! Reply to this msg with TONE. Gr8 TOP 20 tones to your phone every week just £1.50 per wk 2 opt out send STOP 08452810071 16
Classified as: Spam

Message: If i not meeting ü all rite then i'll go home lor. If ü dun feel like comin it's ok.
Classified as: Ham

Message: I.ll always be there, even if its just in spirit. I.ll get a bb soon. Just trying to be sure i need it.
Classified as: Ham

Message: Sorry that took so long, omw now
Classified as: Ham
6. Evaluate the Model on a Larger Sample
To better understand the model's accuracy for spam classification, we will evaluate it on a larger sample of 400 messages from the dataset. This will tell us how many times we expect the model to make mistakes, such as false positives or false negatives. This evaluation step is very important when using an ML model, as it allows us to understand if the model performs sufficiently well for this task.
Luckily, evaluating an LLM for classification tasks is simpler than for other, more complex generative AI applications. The output is binary, having only two values (spam or not spam). For classification tasks like this, using accuracy as a metric is straightforward. Accuracy is defined as the number of correct predictions divided by the number of total predictions.
To obtain this, we do the following:
- Sample Messages: Select 400 messages (200 spam, 200 non-spam) from the dataset.
- Define Prediction Function: Create a function to use the LLM chain for predictions.
- Apply Predictions: Use the function to classify each message.
- Calculate Accuracy: Compare the predictions to the actual labels and calculate accuracy.
12345678910111213141516171819202122from sklearn.metrics import accuracy_score

# Sample 200 negative and 200 positive examples
sample_size = 400
negatives = df[df['label'] == 0].sample(sample_size//2, random_state=42)
positives = df[df['label'] == 1].sample(sample_size//2, random_state=42)
df_sampled = pd.concat([negatives, positives]).reset_index(drop=True)

# Predict using the LLM chain
def predict_message(message):
    return int(llm_chain.invoke(message).content)

# Apply predictions
for i in range(len(df_sampled)):
    # Print progress
    if i % (len(df_sampled)/10) == 0:
        print(f"{i}/{len(df_sampled)}")
    df_sampled.loc[i, 'predicted'] = predict_message(df_sampled.loc[i, 'message'])

# Calculate accuracy score
accuracy = accuracy_score(df_sampled['label'], df_sampled['predicted'])
print(f"Accuracy: {accuracy}")
Output
1Accuracy: 0.90
The accuracy seems good even with a very simple prompt such as the one we are using. This indicates that the model correctly classified 90% of the messages in our sample, while guessing at random would give us 50% (as there are two possible labels). Good accuracy with a straightforward setup suggests that prompt engineering and LLM integration are effective for this task.
However, this is just a small data sample and a basic prompt, so there is always room for improvement. Future blog posts will explore methods to enhance the model's performance, address edge cases, and reduce errors, ensuring even more reliable content moderation.
7. Integrate with Stream Chat
So far, we have seen a few code snippets that can be run on a notebook, such as Google Colab, to create and evaluate an LLM agent. Our goal is to use this in a production environment. Let’s put it all together in a script and set up a web service to handle chat messages via Stream’s webhook.
123456789101112131415161718192021222324252627282930313233343536373839404142434445from fastapi import FastAPI, Request
from fastapi.responses import JSONResponse
from langchain_core.prompts import ChatPromptTemplate
from langchain_openai import ChatOpenAI
from stream_chat import StreamChat
import uvicorn

# Initialize app
app = FastAPI()

# Setup Stream chat. This step is needed as we need to add a user that acts as the reporter to flag the message
chat = StreamChat(api_key=your_app_api_key, api_secret=your_app_api_secret)
chat.upsert_user({"id": "spam-detector", "role": "admin"})

# Setup openai prompt
chat_template = ChatPromptTemplate.from_messages(
    [
        ("system", """Is this message spam? Return 1 or 0"""),
        ("human", "{input}"),
    ]
)

llm = ChatOpenAI(openai_api_key=your_openai_api_key,
    model="gpt-4o-mini",
    max_tokens=1)

llm_chain = chat_template | llm

@app.post("/")
async def webhook_handler(request: Request):
    data = await request.json()
    # Only execute this code when the webhook event corresponds to a new message
    if data["type"] == "message.new":
        text = data['message']['text']
        # Model evaluation
        is_spam = int(llm_chain.invoke(text).content)
        if is_spam == 1:
         # Flag the message
            chat.flag_message(data["message"]["id"], user_id="spam_detector")
         # Optional: delete the message
            # chat.delete_message(data["message"]["id"])
    return JSONResponse(content=data)

if __name__ == "__main__":
    uvicorn.run(app, host='0.0.0.0', port=8000)
By integrating this spam detection model with Stream's webhook, we can automatically monitor and moderate chat messages in real time, ensuring that every new chat message is evaluated for spam. This integration provides several key benefits:
- We can automatically identify and filter spam messages
- We can leverage the Stream Moderation Dashboard as an intuitive interface to review and manage flagged messages.
- We can quickly respond and manage inappropriate content by customizing the way we respond in case of spam
- The model and actions can be tailored to fit the community's needs.
If a message is flagged as spam, it can be automatically managed (e.g., flagged for review or deleted), maintaining the integrity and quality of the chat environment.
To connect this with Stream Chat to block or flag messages, you will need to do the following:
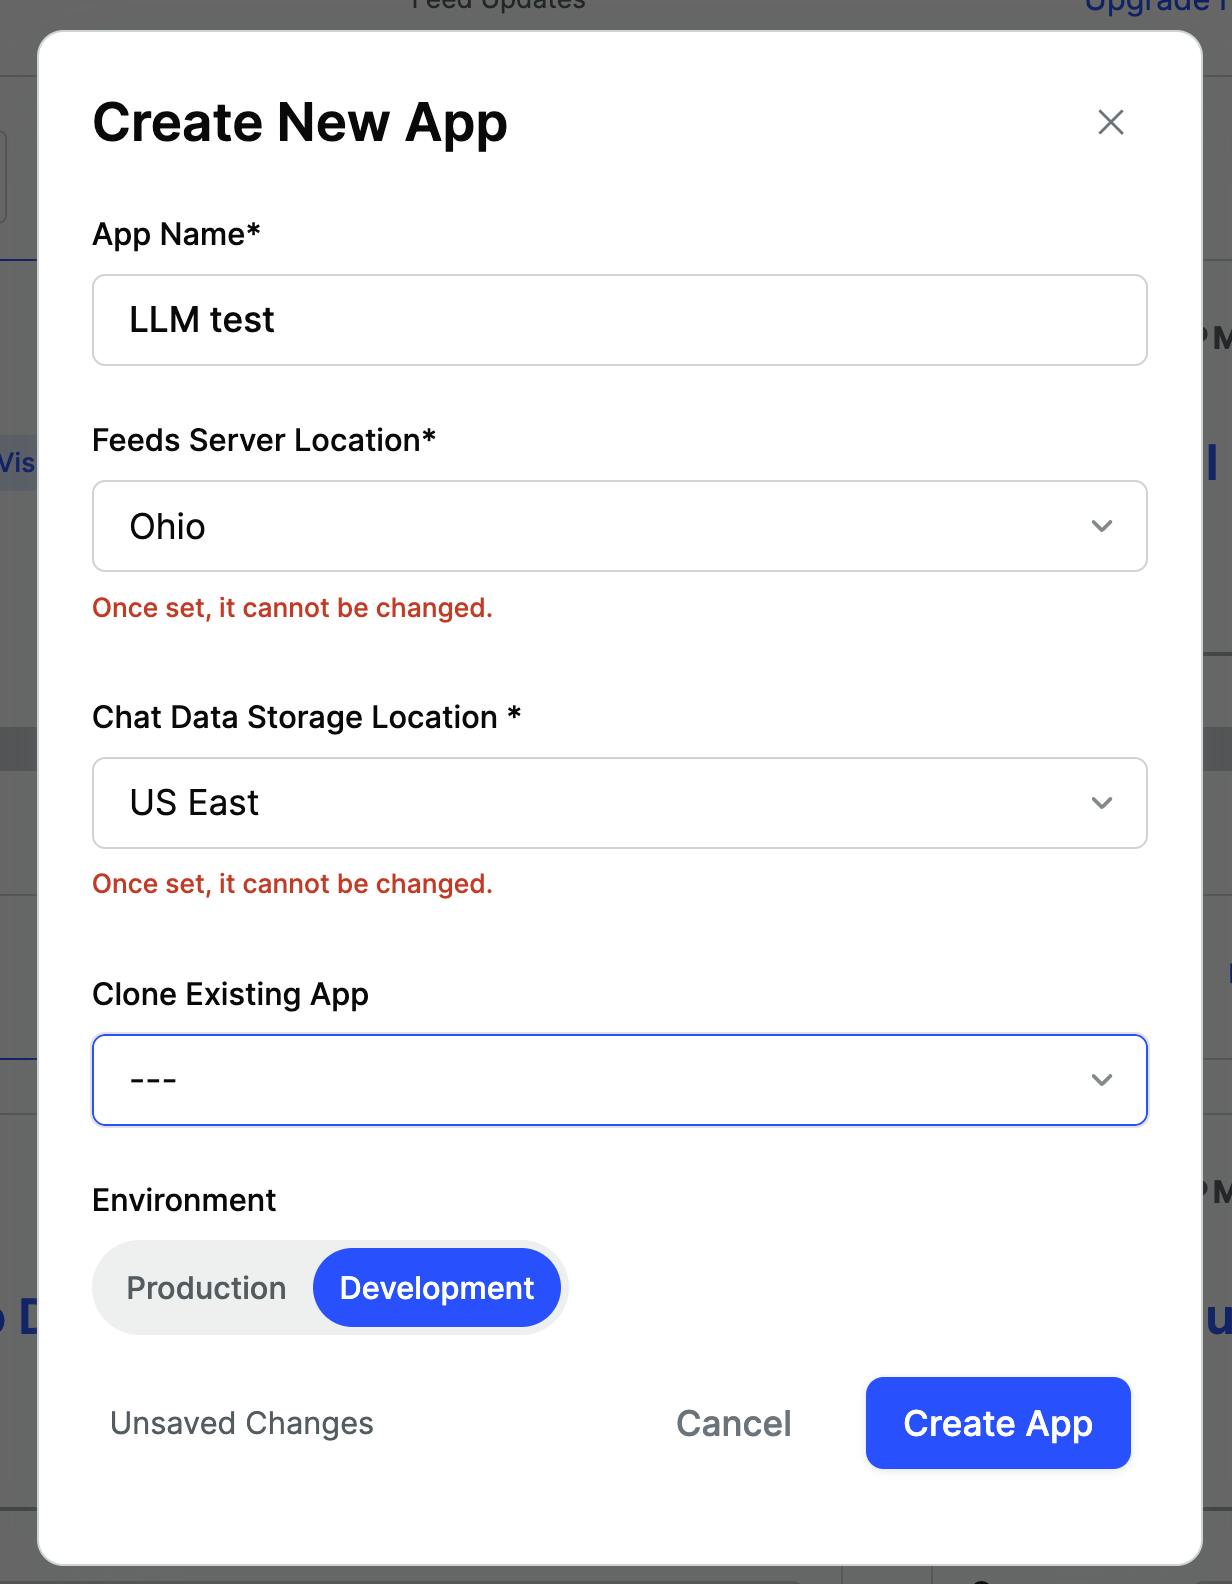
- Create a Stream app: To create an application with Stream, you first need to sign up for a free Stream account. Once you’re registered, go to your Stream Dashboard and click on Create a new App.
-
Create and run your frontend Client: clone a demo app example from our public demos and run the development commands listed in the README file. For more information, check our React Chat Tutorial.
-
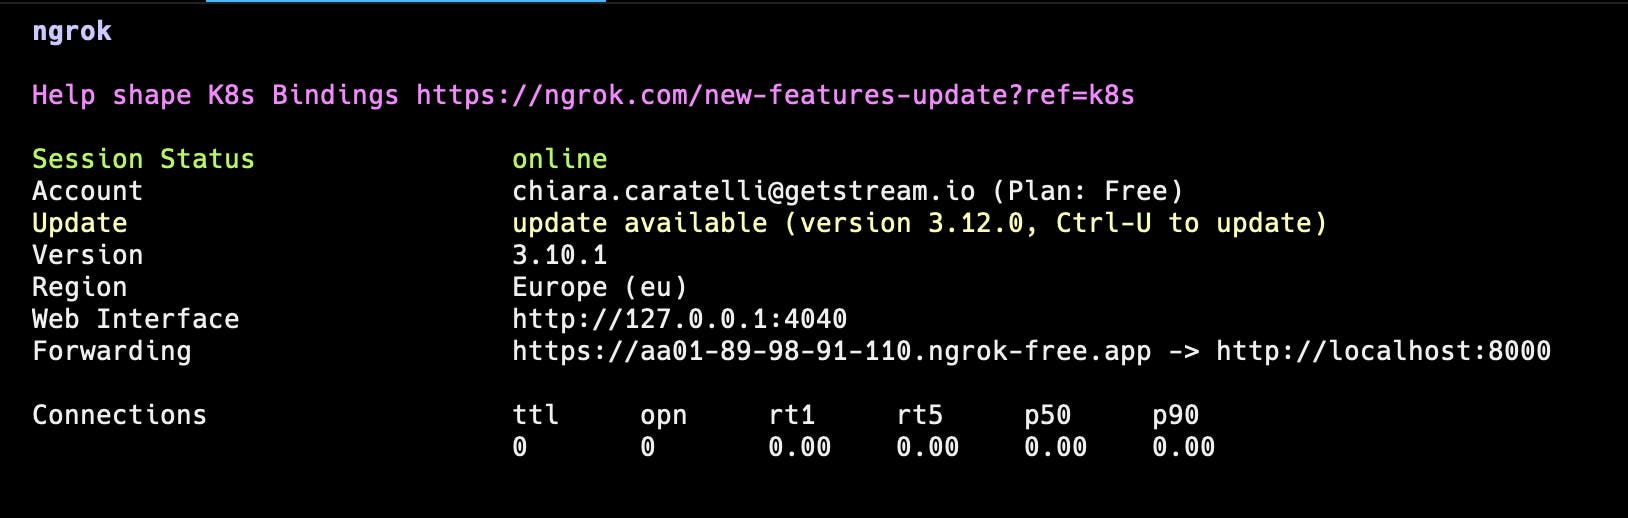
Run your moderation service with a public endpoint using ngrok
Save the code in a file called llm_moderation.py and then execute
$ python llm_moderation.py
Run ngrok
$ ngrok http 8000You will get a response like this:
- Set up a webhook in your application from the chat section in the dashboard (see here) and add the ngrok endpoint you have just started in the previous step.

Testing the Webhook
Now, let’s see the service in action. Using your app client, send a test spam message.

Let’s understand what happens. The spam message is sent to the chat and a request to our LLM service with the message content is made via the webhook. Our service will extract the message text, evaluate it through our LLM and, if the output is spam, it will call the Stream Chat API to flag the message.
If you open the Moderation Dashboard, you will see the message reported and ready to be reviewed.
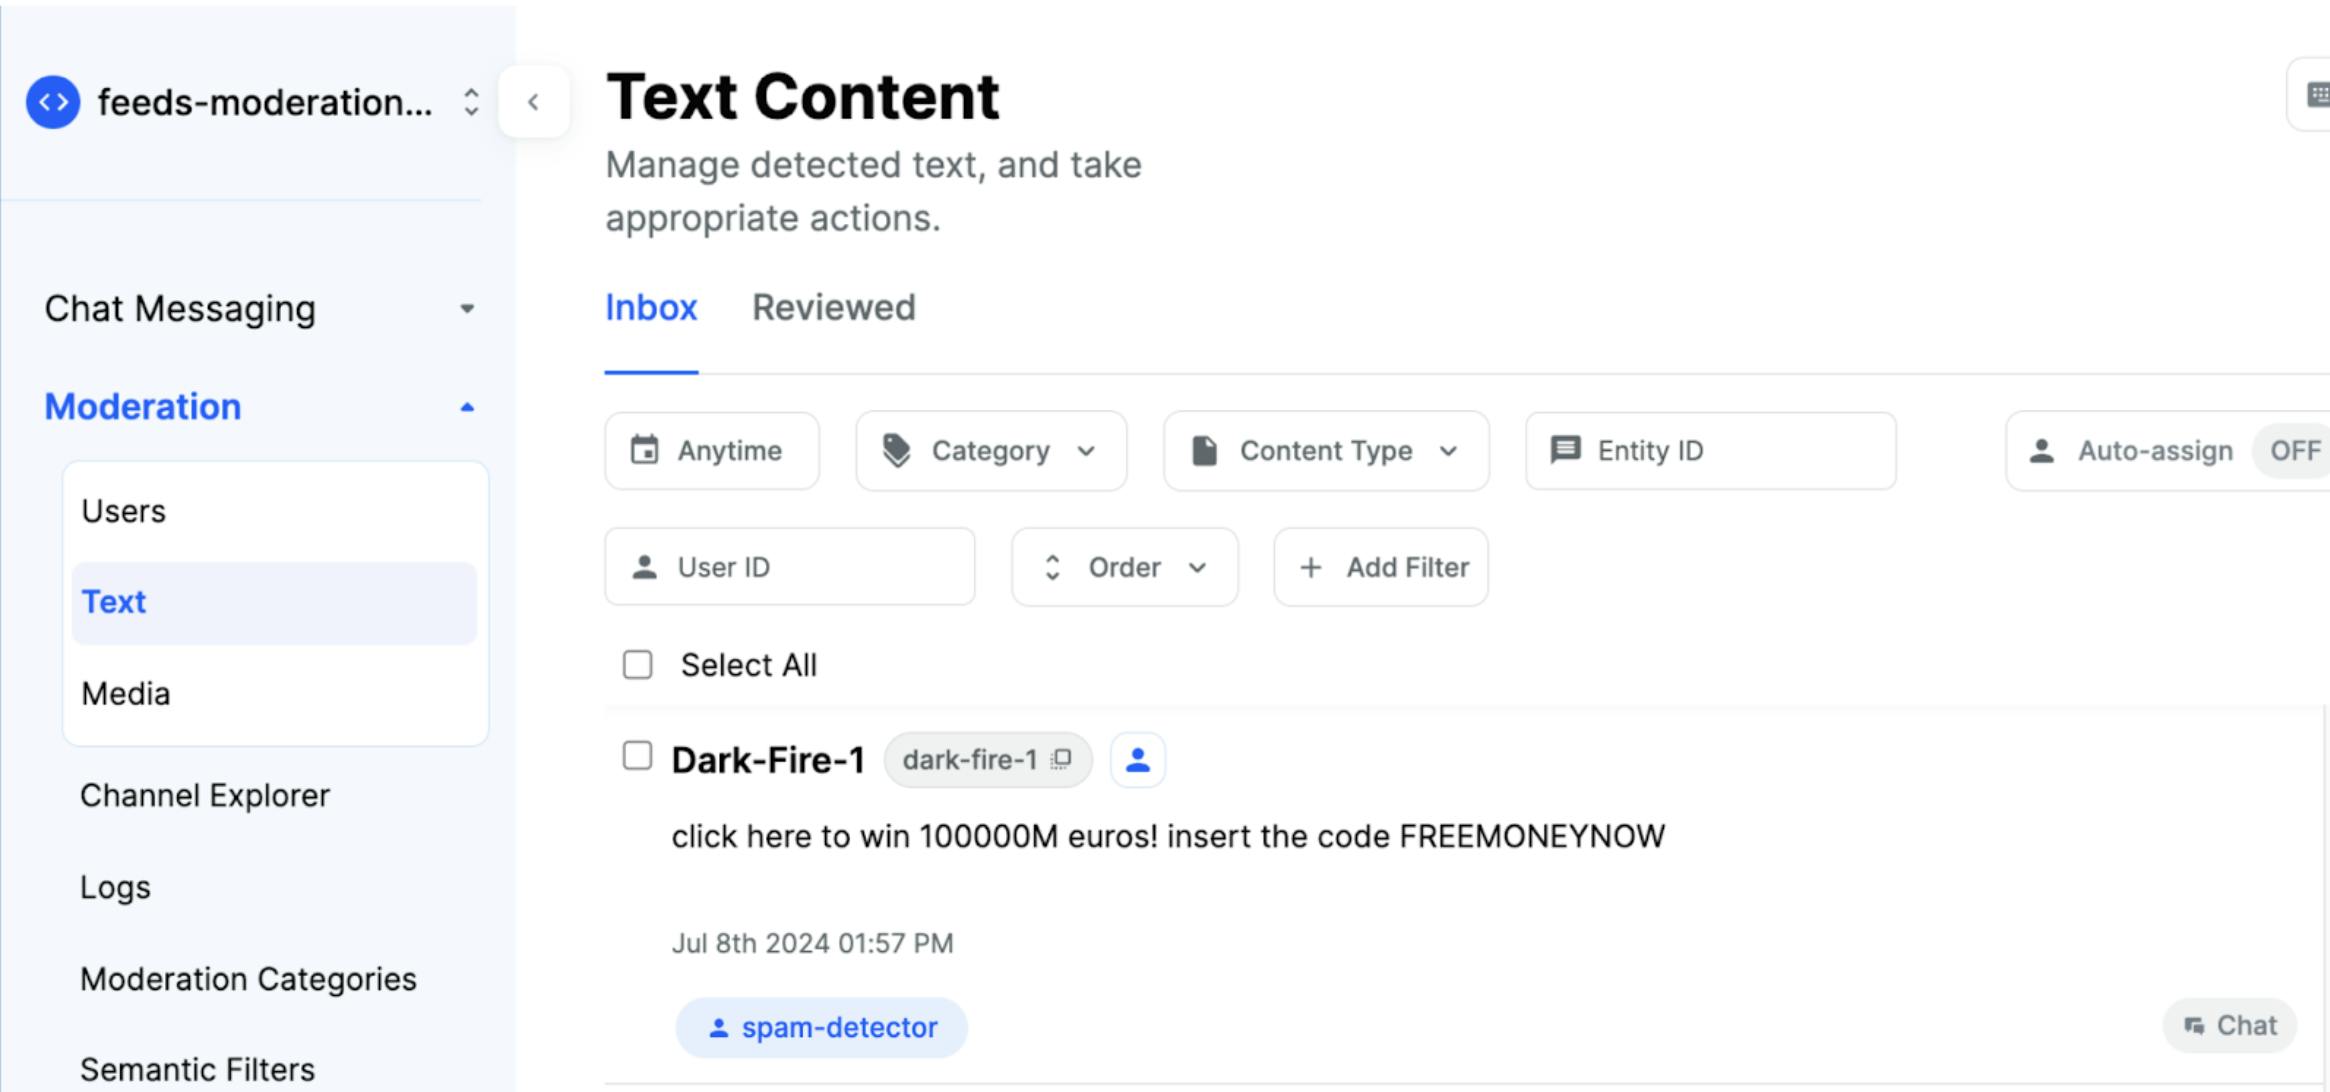
Now, trust and safety team moderators can review this report and take action on this user from the moderation dashboard. You can also add more automated actions via API, such as deleting the message or banning the user directly.
Now we have content moderation tools in our chat! Remember, this was a simple example. In production, you should use a comprehensive dataset to evaluate the prompt and model. We used a public dataset in this example, but your data should be representative of your production data to ensure you can trust the predictions. Make sure to also regularly update and refine your prompt to improve accuracy. Data changes all the time, and your model should reflect that.
Conclusion
Integrating third-party services like OpenAI with Stream’s webhook system is incredibly straightforward and powerful. With this setup, you can leverage the latest AI technology to elevate your chat moderation capabilities effortlessly and enjoy the benefits of intelligent, real-time content moderation.
In this blog post, we talked about a few specific challenges. Now that you have experienced creating a prompt yourself let’s discuss some of the steps you can take to improve the effectiveness of the model:
- Regular Prompt Updates: Continuously refine and update your prompts to adapt to evolving spam patterns and new types of harmful content.
- Diverse Datasets: Use a wide variety of datasets for training to ensure your model can generalize well across different contexts and message types.
- Performance Monitoring: Implement ongoing monitoring of your model’s performance, checking for false positives and false negatives to adjust and improve the model as needed.
This piece is just a glimpse of the sophisticated engineering we apply behind the scenes at Stream to make our service work seamlessly for you. Our goal is to help you maintain a safe, engaging, and vibrant online community. Whether you're looking to enhance chat functionality or need robust content moderation, Stream is here to support you every step of the way.