
We all have probably written chat apps multiple times in our lives, and we all know that it takes time! So I always wondered if there is a way to make a custom and beautiful chat app using some lib/service that does all the heavy lifting for me.
A few weeks ago, I came across Stream, a chat service for quickly adding interactive messaging to your application. Upon a closer look, I was blown away when I saw they support Flutter and provide pre-built widgets!
Fully blown chat app in a matter of hours? FOR FREE? Are you kidding me? 😀
After 6 to 7 hours of trying out their library, I was able to create the following chat preview:
Out of the box, you can use their predefined widgets for standard chat components like channel items (inbox or message item), messages/ threads (single channel or group), and message input for quickly prototyping and building a Flutter chat.
While their pre-made widgets are great, your product manager would probably not be OK with that :). Chat, like every part of an app, has to follow a particular style, which ties nicely to the objective of this article:
Creating custom widgets that developers can quickly incorporate in Stream's chat library 🙂
Before we start working on UI, you need to setup chat client and at least one user, and here they explain how: OFFICIAL TUTORIAL.
Also, take a look at their Github readme and example, for some useful info about permissions etc.
Channel is a group of 1+ users, by default, so you can get very creative.
More info about creating different types of channels can be found HERE.
For the sake of this example, I've created ChatData singleton where I create a client and 2 users, that can be found HERE. Configuration such as this should be done on your back-end side. For the purposes of this tutorial, it is fine.
We will be using the following as our starting point:
12345678910111213141516171819202122232425MaterialApp(
            debugShowCheckedModeBanner: false,
            builder: (_, widget) {
              return StreamChat(
                streamChatThemeData: customThemeData,
                child: widget,
                client: ChatData.getInstance.client,
              );
            },
            home: Scaffold(
              backgroundColor: Colors.white,
              appBar: AppBar(
                backgroundColor: Color(0xFFe973a7),
                title: Text(
                  'Candy land',
                  style: TextStyle(
                      fontWeight: FontWeight.bold,
                      fontFamily: customFontFamily,
                      letterSpacing: 2,
                      fontSize: 28),
                ),
              ),
              body: ListOfChannels(),
            ),
          );
StreamChat widget needs to be high as up as possible in our application widget tree, since it will hold our application's StreamChatClient, a class used for handling all the api calls, websocket connections etc. Also included in the default Stream chat widget is StreamChatThemeData, our best firend when it comes to customizing styles, colors and the appearance of our app.
We can start customizing our application by chaning properties in our StreamChatThemeData. My class looks like the following:
123456789101112131415161718192021222324252627282930313233343536373839final StreamChatThemeData customThemeData = StreamChatThemeData(
  textTheme: TextTheme.light(),
  messageInputTheme: MessageInputTheme(
    inputBackground: Colors.white,
    borderRadius: BorderRadius.all(
      Radius.circular(
        4,
      ),
    ),
    inputTextStyle: TextStyle(
      color: Color(0xff555555),
      fontSize: 16.0,
    ),
    inputDecoration: InputDecoration(
      hintStyle: TextStyle(
        fontSize: 16.0,
        color: Color(0xff777777),
      ),
    ),
    activeBorderGradient: LinearGradient(
      begin: Alignment.bottomLeft,
      colors: [
        Color(0xFFe973a7),
        Color(0xFFe973a7),
      ],
    ),
    idleBorderGradient: LinearGradient(
      begin: Alignment.bottomLeft,
      colors: [
        Color(0xffcccccc),
        Color(0xffcccccc),
      ],
    ),
  ),
  colorTheme: ColorTheme.light(
    //channel image loading background
    accentBlue: Color(0xFFe973a7),
  ),
);
It's pretty self explanatory.
Now, when we have the core structure set, let's design 🙂
List of channels & channel item
1234567891011121314class ListOfChannels extends StatelessWidget { Widget build(BuildContext context) { return ChannelsBloc( child: ChannelListView( padding: EdgeInsets.only(top: 10), sort: [SortOption('last_message_at')], pagination: PaginationParams(limit: 30), separatorBuilder: (_, __) => Container(height: 0), channelPreviewBuilder: (BuildContext anotherContext, Channel channel) => getCustomChannelItem(context, channel), ), ); }
If you are confused by the code above, don't worry, it is actually very simple. Let's break it down!
ChannelsBloc is a widget which takes care (holds instance and performs operations) on list of channels, channel subscriptions, querying, sorting etc.
ChannelsBloc needs to be below the StreamChat widget in the element tree, 'cos it uses StreamChatClient to fetch data.
ChannelsBloc is always accessible via current context(if your context is below ChannelsBloc in the element tree!):
1ChannelsBlocState channelsBloc = ChannelsBloc.of(context);
The code above finds nearest ChannelsBlocState in the element tree, providing us access to our list of channels, their associated stream etc.
Finally, ChannelListView is a Stream's Flutter widget used for displaying channel, Stream's equivalent of groups or DMs. Out of the box, it handles pagination, filtering, loading, etc. There are also builders and properties allowing you to easily add custom message widgets, custom separators, and lots more.
All data needed to draw messages, title, last message time, etc can be fetched through the channel instance via a builder:
12channelPreviewBuilder: (BuildContext anotherContext, Channel channel) =>
            getCustomChannelItem(context, channel),
With the boring background information out of the way, let's create our very own custom channel item:
12345678910111213141516Widget getCustomChannelItem(BuildContext context, Channel channel) { return StreamBuilder<int>( stream: channel.state?.unreadCountStream, initialData: channel.state?.unreadCount, builder: (context, snapshot) { return GestureDetector( onTap: () async {...}, child: AnimatedCrossFade( crossFadeState: snapshot.data > 0 ? CrossFadeState.showFirst : CrossFadeState.showSecond, duration: Duration(milliseconds: 500), firstChild: channelView(snapshot, channel, true), secondChild: channelView(snapshot, channel, false))); }); }
Let us breakdown the above code. When a new unread message arrives, we cross fade initial view, into a colored one. The StreamBuilder listens to the changes in the unreadCountStream provided by Stream's SDK which we use to determine whether the channel has unread messages. Based on this value, we can selectively call our ChannelView with the appropriate boolean value.
Using a boolean parameter allows us to chage the UI for the channel. If we have new (unread) messages it's colored, with light text, and if not, it's plain white, with dark text.
Here is what it looks like in slow motion:
Complete code for the ListOfChannels (list of channel items) can be found HERE.
Channel(Group or Message) Thread
1234567891011121314GestureDetector(
          onTap: () async {
            Navigator.push(
              context,
              MaterialPageRoute(
                builder: (context) {
                  return StreamChannel(
                      channel: channel, child: ChannelThread());
                },
              ),
            );
          },
          child: AnimatedCrossFade(...),
        );
When user clicks on channel item, we open a new screen with messages - ChannelThread, a custom message view built and styled entirely by us.
Simialr to ChannelsBloc, when access a channel, we need to wrap our widget in a StreamChannel widget. This widget serves a similar purpose to ChannelsBloc, it allows us to quickly access the current channel instance via an inherited widget/context lookup:
1StreamChannel.of(context).channel
Within our ChannelThread widget, we fetch nearest channel UP in the element tree using the build context...and as you probably already know, context is a node in the tree of elements 😉.
Complete ChannelThread (header, list of messages and input field) code can be found HERE, but's lets go through the code in the following sections.
Channel Header

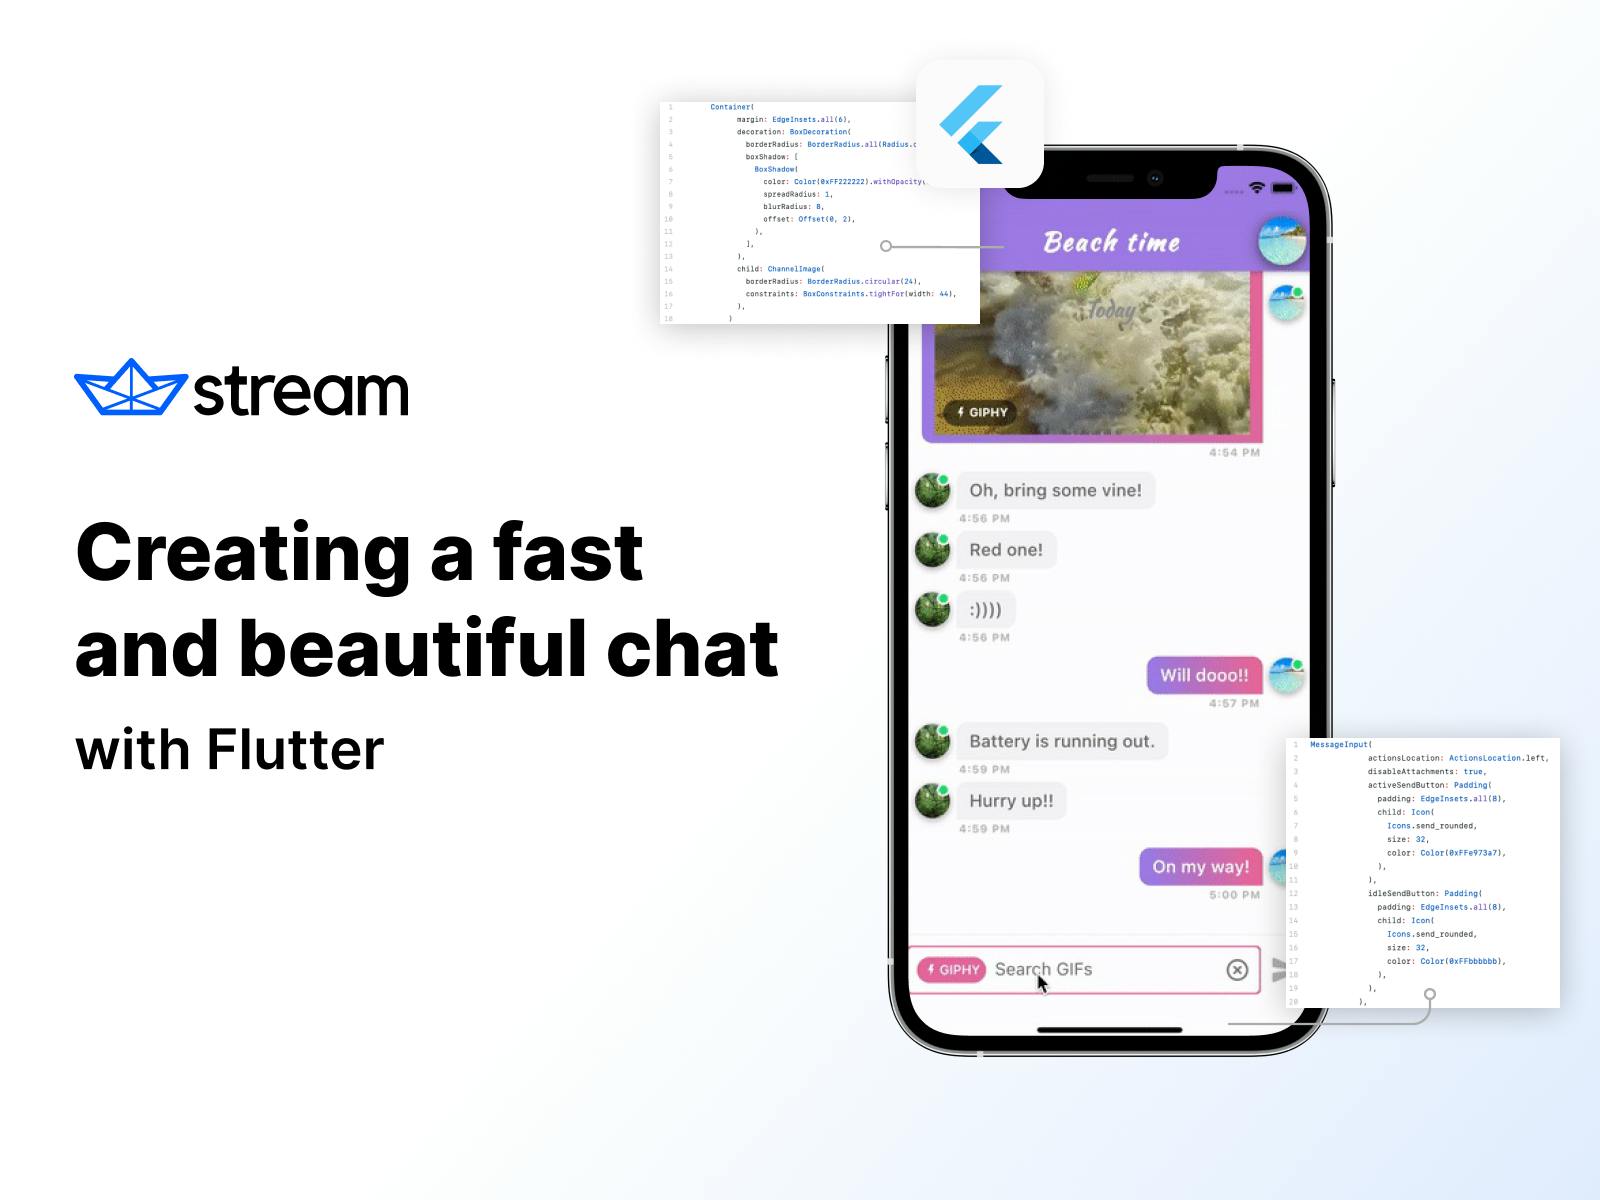
The channel header is just an AppBar in the applciation Scaffold, that contains of the BackButton (does only the popping), ChannelName, a package component that fetches channel from the element tree from the StreamChannel widget we defined above and a ChannelImage also provided to us by the Stream chat package. In the true spirit of stying and customization we add some shadow to it 🙂
123456789101112131415161718Container( margin: EdgeInsets.all(6), decoration: BoxDecoration( borderRadius: BorderRadius.all(Radius.circular(20)), boxShadow: [ BoxShadow( color: Color(0xFF222222).withOpacity(0.5), spreadRadius: 1, blurRadius: 8, offset: Offset(0, 2), ), ], ), child: ChannelImage( borderRadius: BorderRadius.circular(24), constraints: BoxConstraints.tightFor(width: 44), ), )
The interesting thing about ChannelImage widget is it allows us to optionally override the the channel. If no channel is provided, it automatically fetches the nearest instance of Channel from the element tree.
For those curious, here is a look at the constructor and basic implementation:
123456789101112class ChannelImage extends StatelessWidget { const ChannelImage({ Key? key, this.channel, ... }) : super(key: key); Widget build(BuildContext context) { final streamChat = StreamChat.of(context); final channel = this.channel ?? StreamChannel.of(context).channel; ...
💡: Check how they implemented those widgets, it can be used in many different ways 🙂
List of Messages

MessageListView is also a package widget that requires a StreamChannel widget UP in the element tree to fetch and display messages.
1234567891011121314MessageListView(
              dateDividerBuilder: (DateTime dateTime) => Container(
                alignment: Alignment.center,
                child: Text(
                  parseDayOnly(dateTime),
                  style: TextStyle(
                      color: Color(0xff999999),
                      fontSize: 20,
                      fontWeight: FontWeight.bold,
                      fontFamily: customFontFamily),
                ),
              ),
              messageBuilder: _buildCustomBubble,
            )
Let's have some fun by changing with default chat bubble with a custom one(complete _buildCustomBubble method can also be found HERE):
12final Message message = details.message;
final isCurrentUser = StreamChat.of(context).user.id == message.user.id;
In the above code, we make comparison of current user id and message user id. If the id is the same, that means that our current user has created this message, and we'll place its message right on the screen:
123456//used for time label alignment
final crossAxisAlignment =
isCurrentUser ? CrossAxisAlignment.end : CrossAxisAlignment.start;
//used for bubble alignment
final mainAxisAlignment =
isCurrentUser ? MainAxisAlignment.end : MainAxisAlignment.start;
The same logic is used for choosing bubble color and layout(if message user is current user, we first display text, then avatar, and if not, it's reversed).
123if (isCurrentUser) {
  rowItems = rowItems.reversed.toList();
}
Finally, rowItems are place within a Row Widget:
1234Row(
  mainAxisAlignment: mainAxisAlignment,
  children: rowItems,
),
Message Input

With the majority of our chat application complete, the only thing missing is a field for sending messages. Lucky for us, we can use the default MessageInput as a starting point.
1234567891011121314151617181920MessageInput(
            actionsLocation: ActionsLocation.left,
            disableAttachments: true,
            activeSendButton: Padding(
              padding: EdgeInsets.all(8),
              child: Icon(
                Icons.send_rounded,
                size: 32,
                color: Color(0xFFe973a7),
              ),
            ),
            idleSendButton: Padding(
              padding: EdgeInsets.all(8),
              child: Icon(
                Icons.send_rounded,
                size: 32,
                color: Color(0xFFbbbbbb),
              ),
            ),
          ),
As you can probably guess by now, we can style this widget using the StreamChatTheme defined in the StreamChat Widget in the root of our app.
There, you can change input text color, size, background color, input field borders and radius.. and lots more.
If you you're looking to quickly add chat to your next Flutter application, check out Stream's Flutter package, I had a lot of fun styling their widgets 💅.
If your company has five or less team members, less than $10k in monthly revenue and have taken less than $100k in funding, Stream is free/gratis/complimentary.
Happy Fluttering 💙