


To show you how to integrate CoreSpotlight, we'll build an app that displays a list of countries. When the user selects a country, a few things will happen:
- Our app will open a new screen with details about the selected country
- We will index the selection to the Spotlight API
- Now, when the user enters the country name in the Spotlight search bar our app will appear as an option for the search query
The end result will look like this:
Of course, this is a very simple example, but it will help you think of ways you can leverage search functionality in your apps.
For example, if our app also allowed users to book trips to other countries, you could index those trip details so that they appear when a user searches for that country in Spotlight. Very cool, right?
But before we get started, let's talk a bit more about Core Spotlight first.
What Is Spotlight?
Apple's Spotlight is a search engine that allows you to quickly find what you need on your device or the web. You can access Spotlight by swiping down on your iPhone home screen.
When you start entering a query into the Spotlight search bar, you'll notice that results update automatically as you type. You can search Google, Safari, Siri Suggestions based on your iPhone use, your Contacts, or even apps you've downloaded to your iPhone.
Most of the search suggestions are from Apple's apps, but that doesn't mean your app can't appear on that list, too. For example, if you enter a name in your Contacts list that's also saved to your WhatsApp contacts, Spotlight will allow you to call or message from the search bar.
The key to unlocking this functionality is Core Spotlight.
Using Core Spotlight
With the release of iOS 9, Apple expanded the scope of Spotlight search to include third-party apps. By integrating CoreSpotight into your app, you can index app content so that it's searchable from your home screen.
We can communicate with the Spotlight search engine and retrieve information based on a user's interactions. This bidirectional communication style enables us to not only index a user's selections to Spotlight, but also allows us to set identifiers of that information to use in our apps.
Quite often, users remember in broad terms what they were doing in your app. By providing a Spotlight integration, your users get an easy way back into your app using search terms they remember themselves.
Building Our App
Now let's start to implement the code. For this tutorial, we will use programmatic views and UIKit. That means that before you start we should clean up the project from all the storyboards references.
We're going to attack this problem in three phases:
- Create a screen with a list of countries so the user can select one of them.
- Add and remove items from CoreSpotlight and UserDefaults when the user selects any country.
- Finally, respond to deep links when our app is launched from the Spotlight.
Don't worry if the code doesn't compile at first; keep going and everything will make sense in the end!
Setting Up Your Project Interface
To clean up the storyboard from our project we need to do three things:
- Delete the
Main.storyboardfile from the project.

- Go to Project > General on the Main interface and delete the
Maintext.

- Open your
Info.plistand tapcommand+fto find Main. Then, delete the key withStoryboard Namein it.

Now that we don't have any references to the storyboard in our project, we can go to the SceneDelegate.swift and replace the code inside the willConnectTo function with the code below:
1234567func scene(_ scene: UIScene, willConnectTo session: UISceneSession, options connectionOptions: UIScene.ConnectionOptions) { guard let windowScene = (scene as? UIWindowScene) else { return } window = UIWindow(windowScene: windowScene) window?.rootViewController = ViewController() window?.makeKeyAndVisible() }
Now let's use the auto-generated ViewController to be our main screen. Copy+paste the code below into your ViewController.swift:
12345678910111213141516171819202122232425262728293031323334353637383940414243444546474849import UIKit

class ViewController: UIViewController {

    let countryTableView = UITableView()
    let countries = ["The Netherlands", "Brasil", "Italy"]
    let userDefaultsKey = "lastCountrySelected"

    override func viewDidLoad() {
        super.viewDidLoad()
        configureTableView()
    }

    private func configureTableView() {
        view.addSubview(countryTableView)
        countryTableView.translatesAutoresizingMaskIntoConstraints = false

        countryTableView.delegate = self
        countryTableView.dataSource = self

        NSLayoutConstraint.activate([
            countryTableView.topAnchor.constraint(equalTo: view.safeAreaLayoutGuide.topAnchor),
            countryTableView.leadingAnchor.constraint(equalTo: view.safeAreaLayoutGuide.leadingAnchor),
            countryTableView.trailingAnchor.constraint(equalTo: view.safeAreaLayoutGuide.trailingAnchor),
            countryTableView.bottomAnchor.constraint(equalTo: view.safeAreaLayoutGuide.bottomAnchor),
        ])
    }
}

extension ViewController: UITableViewDataSource, UITableViewDelegate {
    func tableView(_ tableView: UITableView, numberOfRowsInSection section: Int) -> Int {
        countries.count
    }

    func tableView(_ tableView: UITableView, cellForRowAt indexPath: IndexPath) -> UITableViewCell {
        let cell = UITableViewCell()
        var contentConfiguration = cell.defaultContentConfiguration()
        contentConfiguration.text = countries[indexPath.row]

        cell.contentConfiguration = contentConfiguration

        return cell
    }

    func tableView(_ tableView: UITableView, didSelectRowAt indexPath: IndexPath) {
        UserDefaults.standard.set(countries[indexPath.row], forKey: userDefaultsKey)

        present(CountryDetailViewControler(countryName:  UserDefaults.standard.string(forKey: userDefaultsKey) ?? ""), animated: true)
    }
There's not too much to explain here - it's just a very simple UITableView configuration. When we tap on an item, it will open CountryDetailViewControler (we haven't created it yet).

Create a new Swift file called CountryDetailViewControler.swift and copy+paste the code below into it:
12345678910111213141516171819202122232425262728293031323334353637383940414243import UIKit

class CountryDetailViewControler: UIViewController {

    let countryName: String
    let countryLabel = UILabel()

    init(countryName: String) {
        self.countryName = countryName
        super.init(nibName: nil, bundle: nil)
        title = countryName

    }

    required init?(coder: NSCoder) {
        fatalError("init(coder:) has not been implemented")
    }

    override func viewDidLoad() {
        super.viewDidLoad()

        view.backgroundColor = [UIColor.systemCyan, UIColor.systemRed, UIColor.systemPink, UIColor.systemBrown, UIColor.systemYellow].randomElement()

        configureCountryLabel()
    }

    private func configureCountryLabel() {
        view.addSubview(countryLabel)
        countryLabel.translatesAutoresizingMaskIntoConstraints = false

        countryLabel.text = "You chose \(countryName). It's a very nice place!"
        countryLabel.textAlignment = .center
        countryLabel.font = .systemFont(ofSize: 26)
        countryLabel.numberOfLines = 0

        NSLayoutConstraint.activate([
            countryLabel.centerXAnchor.constraint(equalTo: view.centerXAnchor),
            countryLabel.centerYAnchor.constraint(equalTo: view.centerYAnchor),
            countryLabel.leadingAnchor.constraint(equalTo: view.leadingAnchor, constant: 20),
            countryLabel.trailingAnchor.constraint(equalTo: view.trailingAnchor, constant: -20)
        ])
    }
}
This is also pretty simple: it's just one label inside a view that shows a message with the selected country name. To make it more fun, I also added a random background color to it.
Now you can run the app and you should see the first screen with a list of three countries. If you tap on one of them you will see a detailed view controller as shown below.

Integrating Core Spotlight
So far our app doesn't do anything besides save the last user-selected country in the User Defaults. Now, we will start to add Spotlight capabilities.
Indexing Your App Content With Core Spotlight
Let's create an extension of our ViewController and put all the CoreSpotlight code there.
Add this to the beginning of your file so that we can use all of the CoreSpotlight features:
1import CoreSpotlight
Now copy/paste the extension below:
1234567891011121314/// Spotlight Logic
extension ViewController {
    private func sendToSpotlight(country: String, countryIndex: Int) {
        removeOldSpotlightItem()

        addNewSpotlightItem(country, countryIndex: countryIndex)
    }

    private func addNewSpotlightItem(_ country: String, countryIndex: Int) {
    }

    private func removeOldSpotlightItem() {
    }
}
Removing Items (Deindexing Content)
Those two functions will handle all the logic needed. Let's start with removing items that we don't need anymore:
1234567private func removeOldSpotlightItem() { CSSearchableIndex.default().deleteSearchableItems(withIdentifiers: countries.indices.map {"\($0)"}) { error in if let error = error { print("An error occurred while trying to remove all countries. Error: \(error.localizedDescription)") } } }
Here we are saying that the Index can remove the SearchableItems with identifiers that are equal to our country's index.
There are a few interesting things worth noting here:
- You don't need to manually remove the
SearchableItems; they have a default expiration time of one month. (You can set your own expiration times for these items, but it's optional.) - If you want to delete items, you will need to think of a way to retrieve their identifiers later on.
You need to decide what the best approach is for your app.
Adding Items (Indexing Content)
Next, we need to index items so they can be found in the search. The addNewSpotlightItem function should look like this:
12345678910111213private func addNewSpotlightItem(_ country: String, countryIndex: Int) { let attributeSet = CSSearchableItemAttributeSet(contentType: .text) // Mark 1 attributeSet.title = country attributeSet.contentDescription = "A very nice place!" let item = CSSearchableItem(uniqueIdentifier: "\(countryIndex)", domainIdentifier: "spotlight.getstream.com", attributeSet: attributeSet) // Mark 2 CSSearchableIndex.default().indexSearchableItems([item]) { error in // Mark 3 if let error = error { print("An error occurred while trying to index \(country). Error: \(error.localizedDescription)") } } }
Here we need to take a step back and explain everything:
At Mark 1 in the snippet above:
The code here shows an example of how to populate the CSSearchableItemAttributeSet object. According to Apple's documentation, we can create an object set with specific metadata to display an item in Spotlight. In our case, we will use the title to display the country name and the contentDescription to display the subtext.
**Note:**There are many ways to describe objects in Spotlight. For instance, you can use properties defined in the
CSSearchableItemAttributeSetto describe places, events, documents, images, messages, music, and more. It's worth your time to explore the API to see what you can do.
At Mark 2 in the snippet above:
Mark 2 shows how to create a CSSearchableItem. This object is the one that will be indexed by the CoreSpotlight framework. To create the item, you need to defin the CSSearchableItem class. It consists of three parts:
- Attribute set: Sets the metadata that will be shown in Spotlight outside the app.
- Unique identifier: Identifies the searchable item. (In our case, we will use the country array index as our unique identifier. Later on, we will use it to restore the object and display the right information for the user in our modal.)
- Domain identifier: Groups together similar types of data.
To update the didSelectRowAt table view function, you can add sendToSpotlight call:
1234567func tableView(_ tableView: UITableView, didSelectRowAt indexPath: IndexPath) { UserDefaults.standard.set(countries[indexPath.row], forKey: userDefaultsKey) sendToSpotlight(country: countries[indexPath.row], countryIndex: indexPath.row) present(CountryDetailViewControler(countryName: UserDefaults.standard.string(forKey: userDefaultsKey) ?? ""), animated: true) }
Now, you've finished the CoreSpotlight implementation. Let's test what we created: Open the app and type in "Brasil".
Close the app, open Spotlight, and enter "Brasil".
You should see the image below:
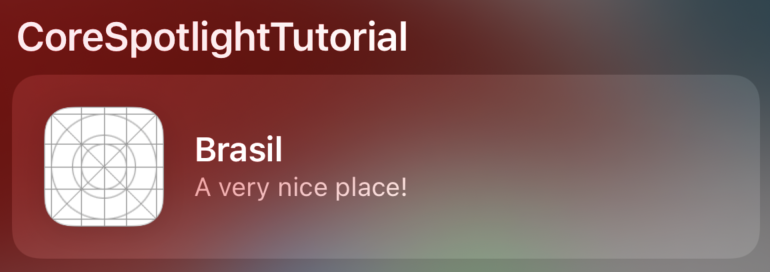
If you tap on it, your app will open automatically. Cool, isn't it?
Spotlight Deep Linking
Deep linking is a very common process in iOS environments. It involves making your app work like the web so that people can click on a link outside of your app - in our case in the Spotlight search result - and be redirected to a specific feature on any screen of your app.
Deep links help your users to interact more with your app because you are creating external touching points between your app and the user.
Until now, we're only sending information to Spotlight. To take full advantage of the feature, though, we need to get information from it in order to create the bidirectional information flow.
Add this function to the ViewController:
1234567func openDetailsViewController(with spotlightCountryCode: String) { if let spotlightCountryCode = Int(spotlightCountryCode), spotlightCountryCode < countries.count { present(CountryDetailViewControler(countryName: countries[spotlightCountryCode]), animated: true) } else { present(CountryDetailViewControler(countryName: UserDefaults.standard.string(forKey: userDefaultsKey) ?? ""), animated: true) } }
This will pick up the Spotlight identifier and transform it into a country to show the user.
To finish, we need to add a function in the SceneDelegate.swift file to add the deep link feature to our example app:
12345678func scene(_ scene: UIScene, continue userActivity: NSUserActivity) { if userActivity.activityType == CSSearchableItemActionType, let spotlightCountryCode = userActivity.userInfo?[CSSearchableItemActivityIdentifier] as? String, let viewController = window?.rootViewController as? ViewController { viewController.openDetailsViewController(with: spotlightCountryCode) } }
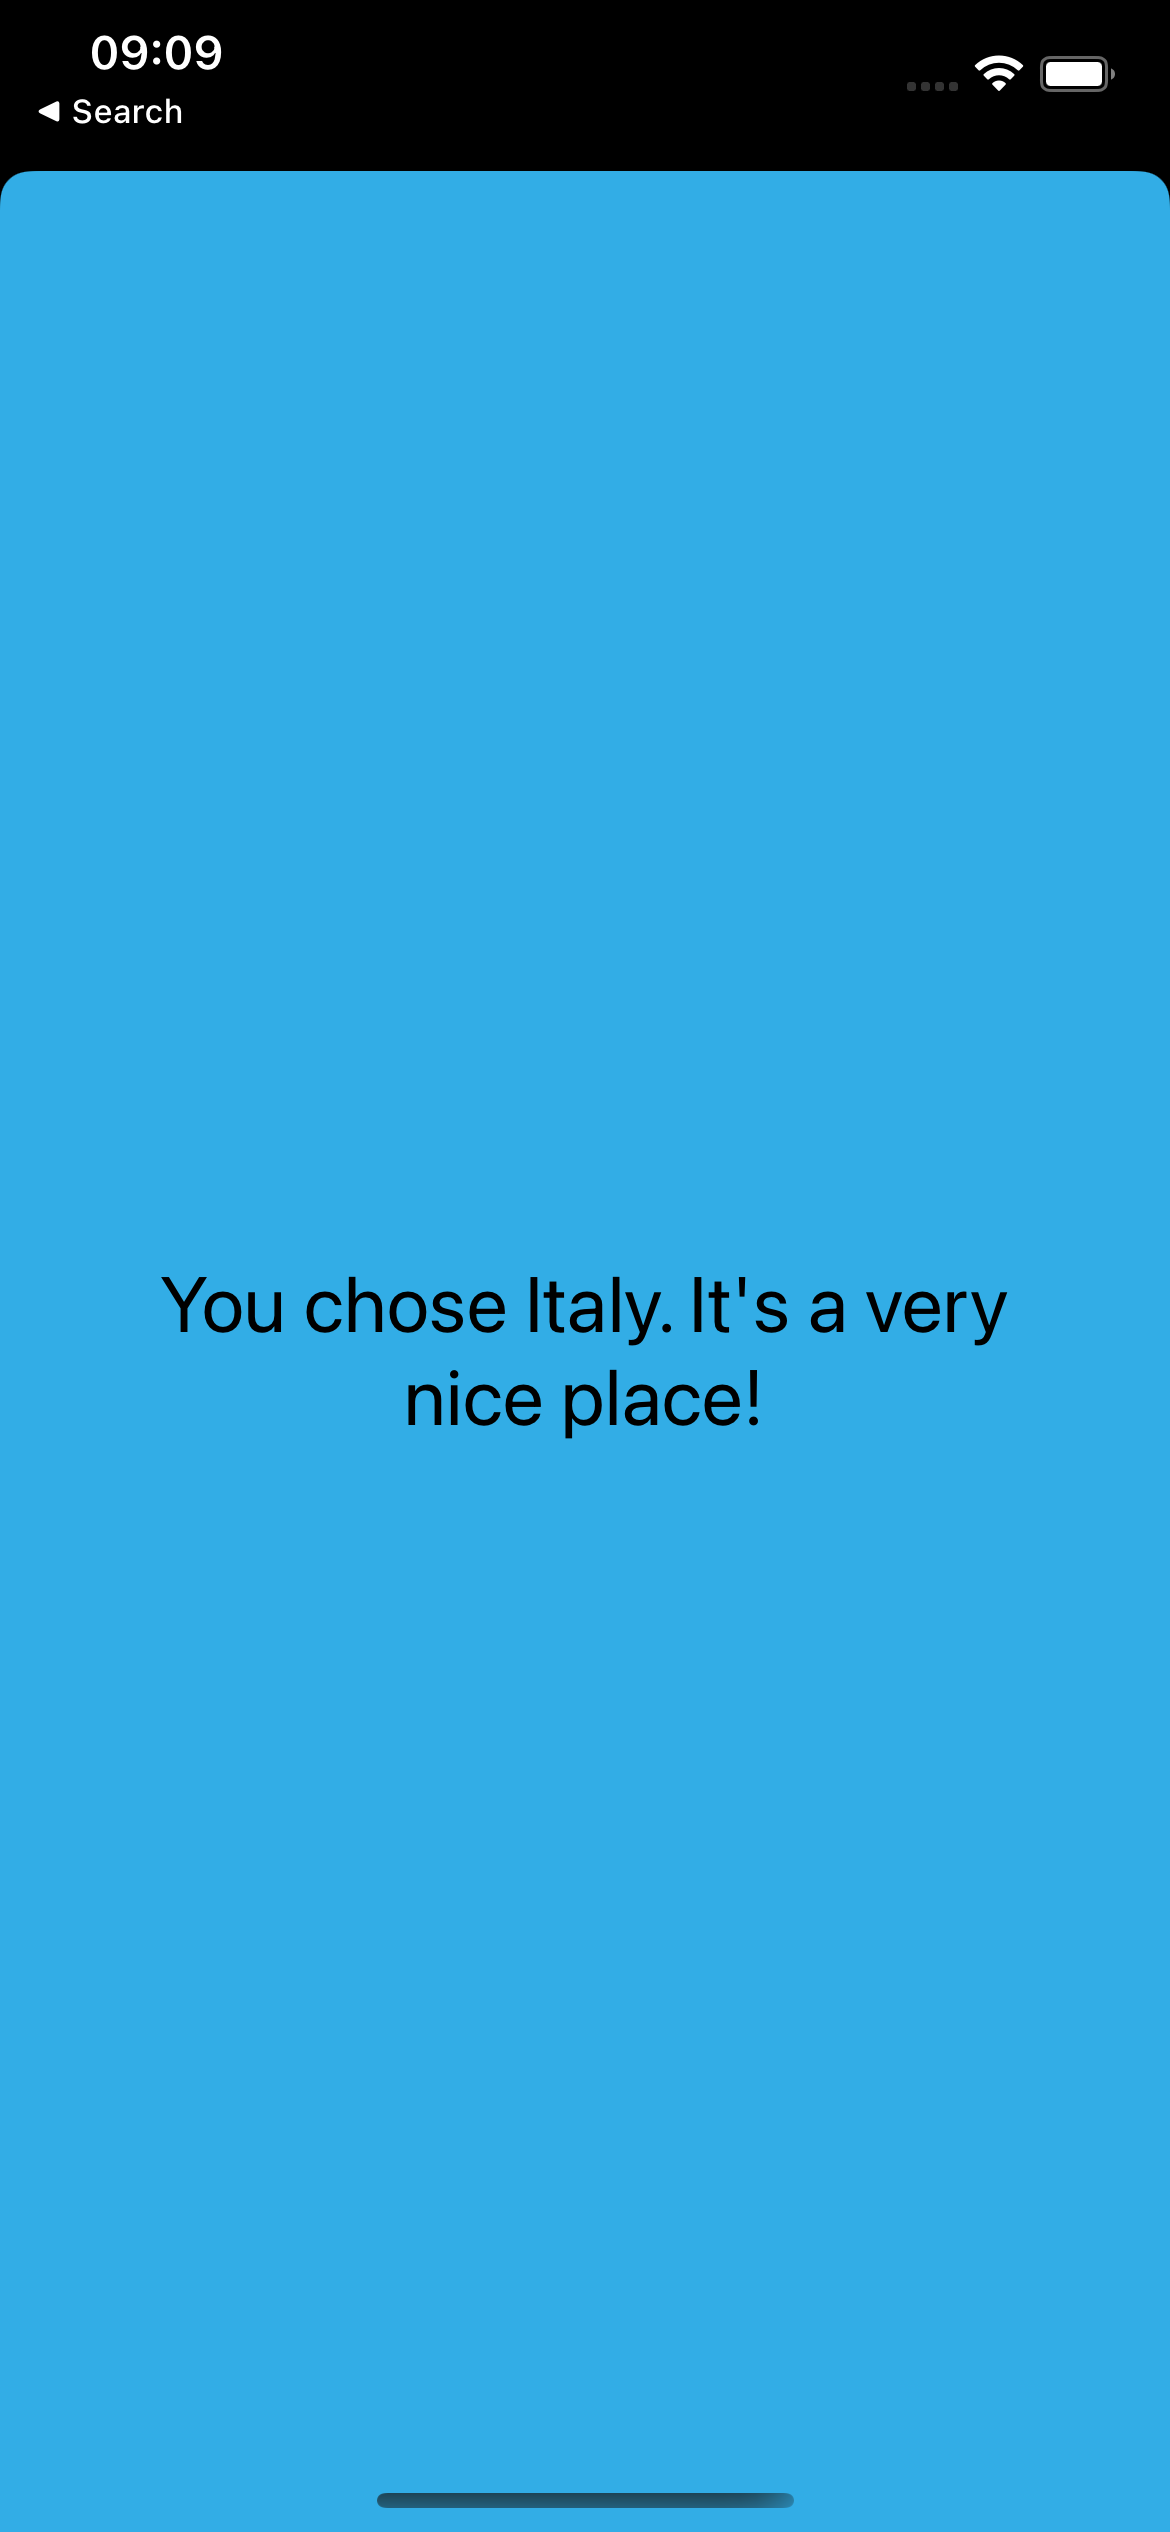
Now launch the app again and type in "Italy".
Close the app and search for "Italy" in Spotlight.

When our app opens, it should show the modal filled with Italy's information as shown below:
And that's it! We finished our little example app project.
Summary
Today we had a look at the Core Spotlight framework. We discussed how easy it is to implement and how it can be used to increase your app presence for your users.
Tweet the team @getstream_io to show us how you're using the Core Spotlight framework in your apps.
As always, happy coding!