In the digital age, chat messaging has become an integral part of daily communication. From personal conversations to customer support interactions, these text-based exchanges contain a wealth of information about users' emotions, opinions, and experiences. Enter sentiment analysis—a powerful tool that can unlock the emotional content hidden within these messages.
Sentiment analysis uses natural language processing (NLP) and machine learning techniques to systematically identify, extract, and quantify the emotional tone of text. When applied to chat messaging, this technology offers businesses unprecedented insights into user sentiment. This enables, for example, to gauge customer satisfaction in real-time, personalize responses based on emotional context, or track brand perception.
Stream offers an easy to integrate API solution to add chat to your app. Together with the sentiment API of Amazon Comprehend, we will build a solution that combines the two powerful products.
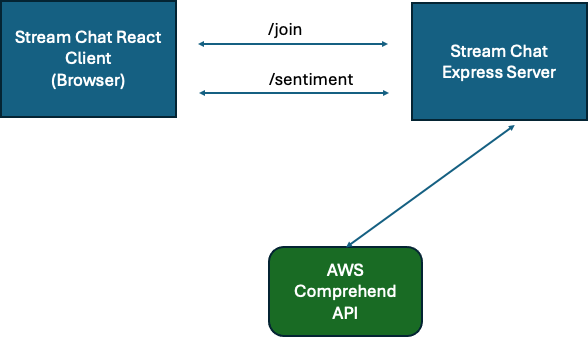
The following image shows the basic architecture of our solution:

On the left side, we have Stream Chat, the frontend and a React client, which runs in the browser. This client connects to the Stream Chat Express server. The Stream Chat server is an Express REST-based application that runs on Node. It exposes two endpoints, one for joining the chat and another for getting the sentiment of a message. This server queries the AWS Comprehend service whenever a message arrives to get a sentiment evaluation. There are four possible values: Positive, for a positive sentiment, negative for a negative sentiment, neutral and mixed for a sentiment that is a bit of both.
When speaking of the AWS Comprehend service and its advantages and disadvantages, the pay-per-use model is one of its advantages. It also supports multiple languages and can process large amounts of text. Its limitations might be its accuracy over more specialized solutions and the possibility of additional costs depending on the amount of text processed.
Now let us look into how to set up your server and client.
Prerequisites
First you need to sign up for Stream. You can use the link here: xxx

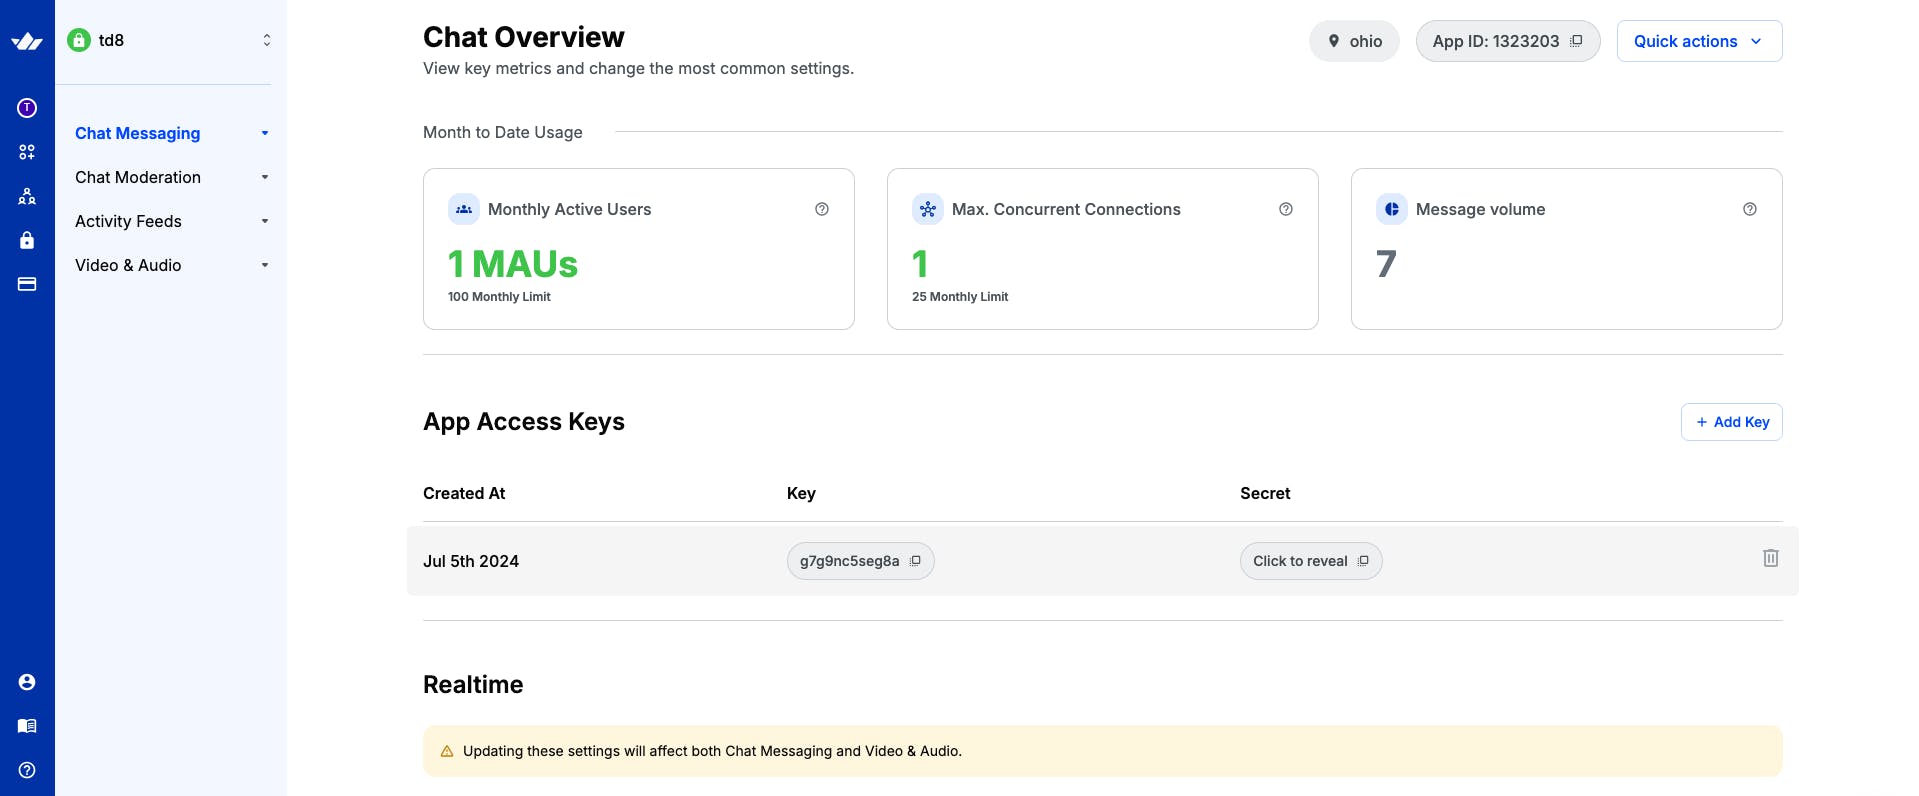
Inside the Stream dashboard, you create a new project. Then, under “Chat Messaging” you add a key. The Stream Chat Express Server later needs both the key and the secret.
If you do not already have an account, you need to sign up for Amazon AWS. From the root account, you can create a new IAM user. Then, assign that user the rights to access AWS Comprehend.
Go to the “IAM Identity Center”, and click on “Permission Sets”. Now, add the policy “ComprehendFullAccess” to your IAM user's permission set. This ensures that your IAM user has the right to access the Comprehend API of AWS.
Setting up the Server
First, clone the source code of the stream-sentiment-server with the following command:
1git clone https://github.com/tderflinger/stream-sentiment-server
Then go into the directory and run:
1npm i
This installs all the dependencies. Now rename the .env.example file to .env and update it with your Stream and AWS credentials.
Before you can start the server, you need to log in to your AWS user by running the following command:
1aws configure sso
If you have not installed the AWS command line before, you can follow this instruction: https://docs.aws.amazon.com/cli/latest/userguide/getting-started-install.html
Once everything is set up and the correct profile name is also entered as an environmental variable as AWS_PROFILE in your .env file you can run the application.
Here is the source code for the main server part in server.mjs:
1234567891011121314151617181920212223242526272829303132333435363738394041424344454647484950515253545556575859606162636465666768697071727374757677787980818283848586878889909192939495969798import "dotenv/config";
import express from "express";
import cors from "cors";
import bodyParser from "body-parser";
import { StreamChat } from "stream-chat";
import { fromSSO } from "@aws-sdk/credential-provider-sso";
import {
 ComprehendClient,
 DetectSentimentCommand,
} from "@aws-sdk/client-comprehend";

const LANGUAGE\_CODE \= "en";

const app \= express();

app.use(cors());
app.use(bodyParser.json());
app.use(bodyParser.urlencoded({ extended: true }));

const comprehendClient \= new ComprehendClient({
 region: process.env.AWS\_REGION,
 credentials: fromSSO({ profile: process.env.AWS\_PROFILE }),
});

const serverSideClient \= new StreamChat(
 process.env.STREAM\_API\_KEY,
 process.env.STREAM\_APP\_SECRET
);

app.post("/sentiment", async (req, res) \=\> {
 const { text } \= req.body;
 const input \= {
   Text: text,
   LanguageCode: LANGUAGE\_CODE,
 };
 const command \= new DetectSentimentCommand(input);
 const response \= await comprehendClient.send(command);

 let emoji \= "";

 switch (response?.Sentiment) {
   case "POSITIVE":
     emoji \= "🌞";
     break;
   case "NEGATIVE":
     emoji \= "😔";
     break;
   case "NEUTRAL":
     emoji \= "😐";
     break;
   case "MIXED":
     emoji \= "🌈";
     break;
 }

 const data \= {
   text,
   sentiment: emoji,
 };
 res.json(data);
});

app.post("/join", async (req, res) \=\> {
 const { username } \= req.body;
 let token;

 try {
   token \= serverSideClient.createToken(username);
   await serverSideClient.updateUser(
     {
       id: username,
       name: username,
     },
     token
   );

   const admin \= { id: "admin" };
   const channel \= serverSideClient.channel("messaging", "discuss", {
     name: "Discussion",
     created\_by: admin,
   });

   await channel.create();
   await channel.addMembers(\[username, "admin"\]);
 } catch (err) {
   console.log(err);
   return res.status(500).end();
 }

 return res
   .status(200)
   .json({ user: { username }, token, api\_key: process.env.STREAM\_API\_KEY });
});

const server \= app.listen(process.env.PORT || 5500, () \=\> {
 const { port } \= server.address();
 console.log(\`Server running on PORT ${port}\`);
});
The server application exposes two endpoints, one for the user joining the chat (/join) and another for returning the sentiment of the chat message (/sentiment). The sentiment endpoint connects to the AWS Comprehend service and runs a sentiment analysis of the text message.
Once the sentiment evaluation is returned by AWS Comprehend, the function returns the chat message together with an appropriate emoticon (e.g. a smiley for positive sentiment).
This is the message that the React frontend application finally displays to the user.
The language of the chat messages is assumed to be English, but AWS Comprehend also supports a number of alternative languages like Spanish and German.
In order to start the application execute the following command:
1node server.mjs
Setting up the React Client
Now that you have a running server, you can set up the React client. For that run the following clone command:
1git clone https://github.com/tderflinger/Stream-sentiment-chat-react
Go into the directory and run:
1npm i
or
1yarn
Now that the dependencies are installed, you can run the application with:
1npm run dev
or
1yarn dev
Be aware that you need to have the server application running at the same time you start the client application for this to work.
Now in your browser, navigate to: http://localhost:5173
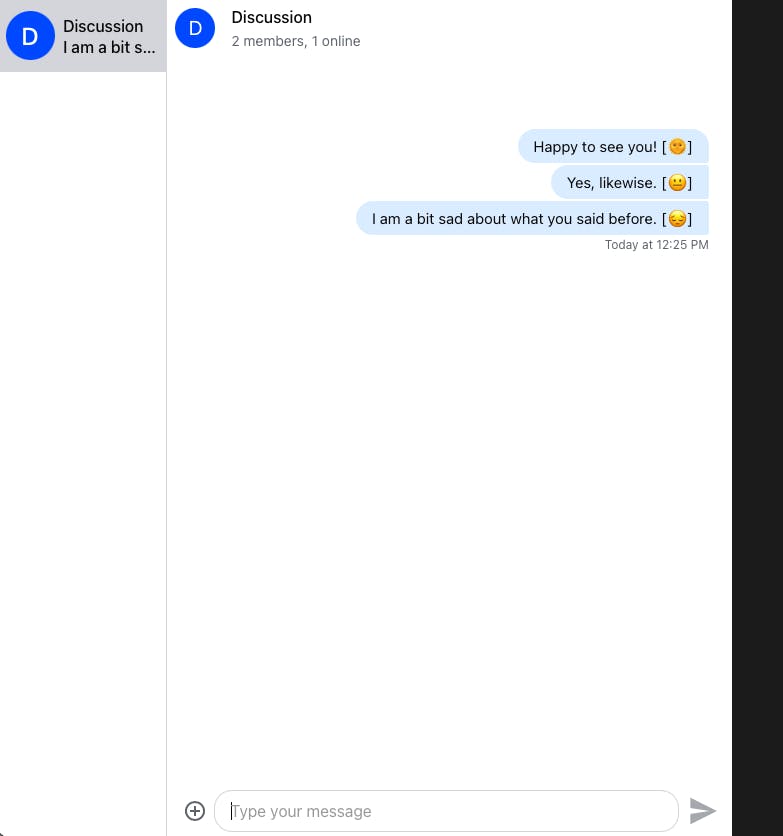
You should see an interface like this:

Chat Application with Sentiment Analysis
Inside the chat application, you can enter any message and see the message displayed together with an emoticon. When your message is positive, you will see a smiling sun. If it is negative, you will see a sad face. If it is neutral, you will see a neutral face. For mixed messages, you will see a rainbow.
This is the source code of the main application part in App.tsx:
123456789101112131415161718192021222324252627282930313233343536373839404142434445464748495051525354555657585960616263646566676869707172737475767778798081828384858687888990919293949596979899100101102103104105106107108109110111112113114115116117import {
 type User,
 type ChannelSort,
 type ChannelFilters,
 type ChannelOptions,
 Channel,
 Event,
 DefaultGenerics,
 MessageResponse,
} from "stream-chat";
import {
 useCreateChatClient,
 Chat,
 Channel as ChannelComponent,
 ChannelHeader,
 ChannelList,
 MessageInput,
 MessageList,
 Thread,
 Window,
} from "stream-chat-react";

import "stream-chat-react/dist/css/v2/index.css";
import "./layout.css";
import axios from "axios";
import { useEffect, useState } from "react";

const userId \= "John";
const userName \= "John";

const user: User \= {
 id: userId,
 name: userName,
 image: \`https://getstream.io/random\_png/?name=${userName}\`,
};

const sort: ChannelSort \= { last\_message\_at: \-1 };
const filters: ChannelFilters \= {
 type: "messaging",
 members: { $in: \[userId\] },
};
const options: ChannelOptions \= {
 limit: 10,
};

const response \= await axios.post("http://localhost:5500/join", {
 username: userName,
});

const userToken \= response.data.token;
const apiKey \= response.data.api\_key;

const App \= () \=\> {
 const \[channel, setChannel\] \= useState\<
   Channel\<DefaultGenerics\> | undefined
 \>();
 const \[loading, setLoading\] \= useState(true);
 const \[messages, setMessages\] \= useState\<MessageResponse\<DefaultGenerics\>\[\]\>(\[\]);

 const client \= useCreateChatClient({
   apiKey,
   tokenOrProvider: userToken,
   userData: user,
 });

 useEffect(() \=\> {
   const setupChannel \= async () \=\> {
     if (client) {
       const channelDef \= client.channel("messaging", "discuss");
       await channelDef.watch();
       setChannel(channelDef);
       setLoading(false);
     }
   };

   setupChannel();
 }, \[client\]);

 if (\!client) return \<div\>Setting up client & connection...\</div\>;
 if (loading) return \<div\>Loading...\</div\>;

 const addSentiment \= (text: string, sentiment: string) \=\> {
   return \`${text} \[${sentiment}\]\`;
 };

 channel?.on("message.new", async (event: Event\<DefaultGenerics\>) \=\> {
   if (event.message?.text) {
     const response \= await axios.post("http://localhost:5500/sentiment", {
       text: event.message.text,
     });

     const messageWithSentiment: MessageResponse\<DefaultGenerics\> \= { ...event.message };
     messageWithSentiment.text \= addSentiment(
       event.message.text,
       response.data.sentiment
     );

     setMessages(\[...messages, messageWithSentiment\]);
   }
 });

 return (
   \<Chat client\={client} theme\="str-chat\_\_theme-custom"\>
     \<ChannelList filters\={filters} sort\={sort} options\={options} /\>
     \<ChannelComponent\>
       \<Window\>
         \<ChannelHeader /\>
         \<MessageList messages\={messages} /\>
         \<MessageInput /\>
       \</Window\>
       \<Thread /\>
     \</ChannelComponent\>
   \</Chat\>
 );
};

export default App;
At the beginning of the code, the user is added to the chat by calling the backend endpoint /join with the user id and name. The setupChannel() function does the setup of the channel with its appropriate name. Once this setup is complete, the channel.on() function receives the chat messages that the user enters. It contacts the backend endpoint /sentiment and sets the message that already includes the appropriate emoticon to the React state. This message is then displayed in the React interface to the user who can then enter other messages.
Conclusion
I hope that this article has shown you how straightforward it is to include sentiment analysis in your Stream chat application. If you do not have an Amazon account yet, the work is probably a bit more to set everything up, but I think it is worth it. The possibilities are great, and you can use the same pattern with other AWS services or even exchange an AWS service with a third-party service. Third-party services could, for example, include an open-source sentiment analysis service.

