
Stream's Activity Feed V3 SDK enables teams of all sizes to build scalable activity feeds. This SDK is designed to enable you to get a feed application up and running quickly and efficiently while supporting customization for complex use cases.
In this tutorial, we will use Stream's Activity Feed V3 SDK for Flutter to:
- Set up a simple activity feed application and connect it to Stream's Activity Feed V3 SDK.
- Create user and timeline feeds.
- Add activities, reactions and comments.
- Explore new content with "For you" feed.
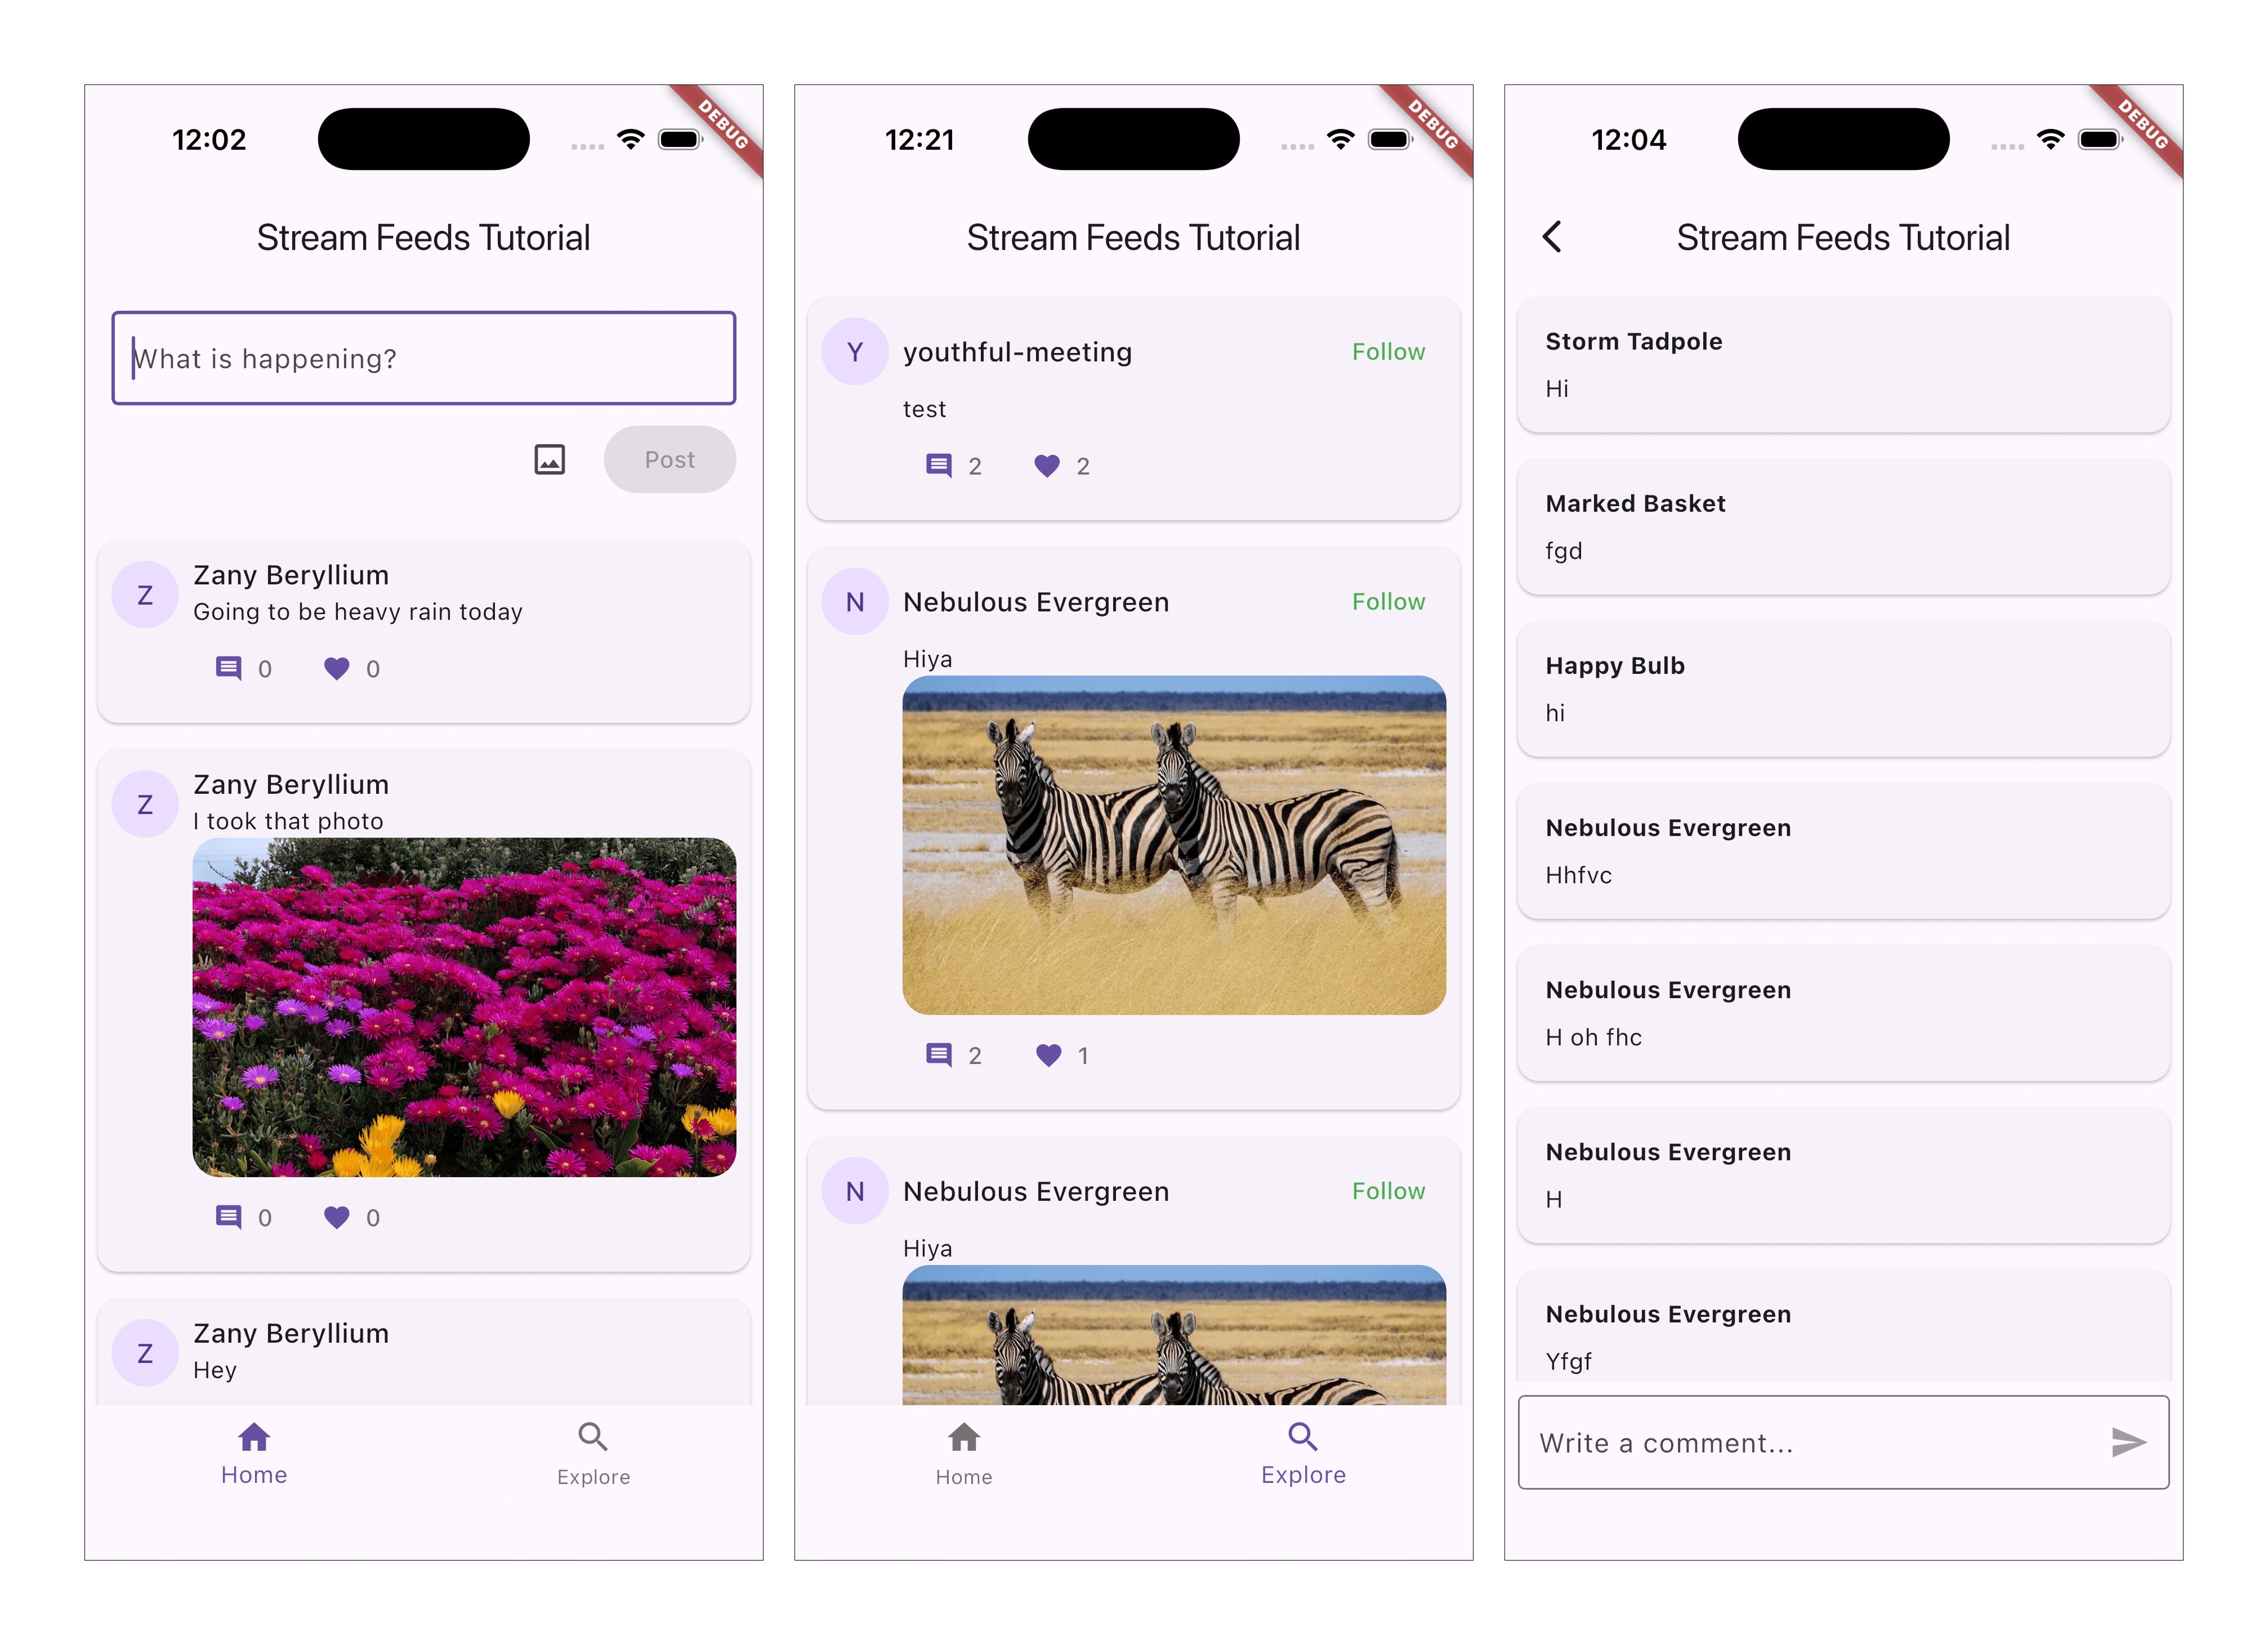
Here is a quick visual overview of the application we're building:
Project Setup and Installation
To follow the tutorial make sure you're installed Flutter and your IDE of choice. The tutorial is focussed on Android and/or iOS, but can run on other platforms as well.
As a first step, you need to create a new Flutter project and install the dependencies we'll use in the tutorial.
We'll start the tutorial from the initial commit. If you wish to see the finished source code, it's the latest commit in the stream-feeds-flutter-tutorial repository.
123flutter create stream_feeds_flutter_tutorial
cd stream_feeds_flutter_tutorial
flutter pub add stream_feeds image_picker flutter_state_notifier
Open the project with your IDE of choice, such as Android Studio or VS Code.
In the pubspec.yaml file you should see the stream_feeds, image_picker and flutter_state_notifier dependencies:
1234dependencies:
  stream_feeds: ^latest
  image_picker: ^latest
  flutter_state_notifier: ^latest
To make the tutorial as easy as possible, we generated credentials for you to pick up and use. These credentials consist of:
API_KEY- an API key that is used to identify your Stream application by our serversidandtoken- authorization information of the current username- optional, used as a display name of the current user
To start using credentials, replace the contents of the main.dart file. You can remove everything that's already there and add the following:
1234const String apiKey = 'REPLACE_WITH_API_KEY';
const String userId = 'REPLACE_WITH_USER_ID';
const String userToken = 'REPLACE_WITH_TOKEN';
const String name = 'REPLACE_WITH_USER_NAME';
Security Note: In production applications, never expose your API secret or generate tokens on the client side. Tokens should always be generated on your backend server to ensure security. The credentials in this tutorial are for development purposes only.
Connect to the Stream API
Let's create and connect the demo user to the Stream API.
To achieve this, we're creating a StreamFeedsClient and connect it while starting the app.
12345678910111213141516171819202122232425262728293031import 'package:flutter/material.dart'; import 'package:stream_feeds/stream_feeds.dart'; const String apiKey = 'REPLACE_WITH_API_KEY'; const String userId = 'REPLACE_WITH_USER_ID'; const String userToken = 'REPLACE_WITH_TOKEN'; const String name = 'REPLACE_WITH_USER_NAME'; final client = StreamFeedsClient( apiKey: apiKey, user: User(id: userId, name: name), tokenProvider: TokenProvider.static(UserToken(userToken)), ); Future<void> main() async { runApp(const Center(child: CircularProgressIndicator())); await client.connect(); runApp(MyApp()); } class MyApp extends StatelessWidget { const MyApp({super.key}); Widget build(BuildContext context) { return MaterialApp( title: 'Stream Feeds Tutorial', home: const Placeholder(), ); } }
For simplicity, the tutorial doesn't handle errors. In a real application, you should always make sure to handle errors.
Creating Feeds
In this step we're creating a few feeds using built-in feed groups. Before we dive into the code, let's understand the core concepts:
- User Feed: A feed that contains all activities (posts) created by a specific user. Each user has their own user feed (e.g.,
user:alice). - Timeline Feed: A feed that contains activities from all the feeds that you follow. When you follow someone's user feed, their activities automatically appear in your timeline feed (this concept is called fan-out).
- Follow Relationship: When you follow a user's feed, your timeline feed subscribes to their user feed. This means new activities from followed users automatically appear in your timeline.
Let's see what the concept looks like in code (no need to add this to your app yet):
1234567// Using user id for the feed id, but you can use any id you want to
final userFeed = client.feedFromId(FeedId.user(userId));
await userFeed.getOrCreate();

// This is our timeline feed where we want to see posts from people we follow
final timelineFeed = client.feedFromId(FeedId.timeline(userId));
await timelineFeed.getOrCreate();
To ensure our own posts are part of our timeline, we need to set up the follow relationship:
12345678// You typically create these relationships on your server-side, we do this here for simplicity
final followsSelf = timelineFeed.currentState.following.any(
  (follow) => follow.targetFeed.id == userFeed.id,
);

if (!followsSelf) {
  await timelineFeed.follow(userFeed);
}
The two main screens of our app, Home and Explore, are going to be part of MyHomePage, so let's add code to create the feeds and dispose them there:
123456789101112131415161718192021222324252627282930313233343536373839404142434445464748495051525354555657585960616263646566676869707172737475767778798081class MyApp extends StatelessWidget { const MyApp({super.key}); Widget build(BuildContext context) { return MaterialApp( title: 'Stream Feeds Tutorial', home: const MyHomePage(), ); } } class MyHomePage extends StatefulWidget { const MyHomePage({super.key}); State<MyHomePage> createState() => _MyHomePageState(); } class _MyHomePageState extends State<MyHomePage> { bool isLoading = true; late final Feed userFeed; late final Feed timelineFeed; late final Feed exploreFeed; void initState() { super.initState(); _loadFeeds(); } Future<void> _loadFeeds() async { userFeed = client.feedFromId(FeedId.user(userId)); await userFeed.getOrCreate(); timelineFeed = client.feedFromId(FeedId.timeline(userId)); await timelineFeed.getOrCreate(); final followsSelf = timelineFeed.state.following.any( (follow) => follow.targetFeed.fid == userFeed.fid, ); if (!followsSelf) { await timelineFeed.follow(targetFid: userFeed.fid); } setState(() { isLoading = false; }); } void dispose() { userFeed.dispose(); timelineFeed.dispose(); super.dispose(); } int _index = 0; Widget build(BuildContext context) { if (isLoading) { return Center(child: CircularProgressIndicator()); } return Scaffold( appBar: AppBar(title: Text('Stream Feeds Tutorial')), body: _index == 0 ? Placeholder() : Placeholder(), bottomNavigationBar: BottomNavigationBar( items: [ BottomNavigationBarItem(icon: Icon(Icons.home), label: 'Home'), BottomNavigationBarItem(icon: Icon(Icons.search), label: 'Explore'), ], currentIndex: _index, onTap: (index) => setState(() => _index = index), ), ); } }
Activity List
Activity Feeds SDKs don't have UI components (yet).
Now that we created feeds, we can create UI components to display the activities. To achieve this we're creating an ActivityItem component.
For now, the
ActivityItemdisplays only the most basic activity information (for exampleactivity.text) and parameters that we'll be relevant in a bit, when we'll extend it with more features. We'll create new files:activity_item.dartandactivity_list_view.dartand add the following code:
1234567891011121314151617181920212223242526import 'package:flutter/material.dart'; import 'package:stream_feeds/stream_feeds.dart'; class ActivityItem extends StatelessWidget { const ActivityItem({ super.key, required this.currentUserId, required this.activity, required this.onFollow, required this.onUnfollow, required this.onCommentPressed, required this.onLikePressed, }); final String currentUserId; final ActivityData activity; final ValueSetter<FeedId> onFollow; final ValueSetter<FeedId> onUnfollow; final VoidCallback onCommentPressed; final VoidCallback onLikePressed; Widget build(BuildContext context) { return Text(activity.text ?? ''); } }
1234567891011121314151617181920212223242526272829303132333435363738394041424344454647484950import 'package:flutter/material.dart'; import 'package:flutter_state_notifier/flutter_state_notifier.dart'; import 'package:stream_feeds/stream_feeds.dart'; import 'activity_item.dart'; class ActivityListView extends StatelessWidget { const ActivityListView({ super.key, required this.client, required this.feed, required this.onFollow, required this.onUnfollow, }); final StreamFeedsClient client; final Feed feed; final ValueSetter<FeedId> onFollow; final ValueSetter<FeedId> onUnfollow; Widget build(BuildContext context) { return StateNotifierBuilder( stateNotifier: feed.notifier, builder: (context, state, child) { if (state.activities.isEmpty) { return Center(child: const Text('No posts yet')); } return ListView( children: [ ...state.activities.map( (activity) => ActivityItem( currentUserId: client.user.id, activity: activity, onFollow: onFollow, onUnfollow: onUnfollow, onCommentPressed: () {}, onLikePressed: () {}, ), ), if (feed.state.canLoadMoreActivities) TextButton( onPressed: () => feed.queryMoreActivities(), child: Text('Load more'), ), ], ); }, ); } }
1import 'activity_list_view.dart';
123456789101112131415161718192021222324252627282930313233class _MyHomePageState extends State<MyHomePage> { /// (... initState and dispose methods ...) Widget build(BuildContext context) { if (isLoading) { return Center(child: CircularProgressIndicator()); } return Scaffold( appBar: AppBar(title: Text('Stream Feeds Tutorial')), body: _index == 0 ? ActivityListView( feed: timelineFeed, onFollow: onFollow, onUnfollow: onUnfollow, client: client, ) : Placeholder(), bottomNavigationBar: BottomNavigationBar( items: [ BottomNavigationBarItem(icon: Icon(Icons.home), label: 'Home'), BottomNavigationBarItem(icon: Icon(Icons.search), label: 'Explore'), ], currentIndex: _index, onTap: (index) => setState(() => _index = index), ), ); } void onFollow(FeedId feed) {} void onUnfollow(FeedId feed) {} }
The activity list is currently empty. We'll change that in the next step. Before doing that, let's recap what we did in this step:
- We created an instance of
StreamFeedsClientfor our user (1 instance maps to 1 user) - We used the client to create
userFeedandtimelineFeed, representing the feeds of the user's own activities and followed users' activities respectively - We created an
ActivityItemcomponent and used it to display the activities from the timeline feed's statefeed.notifieris aStateNotifierthat automatically updates when activities are updated
Activity Composer
Let's add an ActivityComposer component and add it with a Column to the first tab of MyHomePage:
As mentioned previously: users post on their
userfeed and their posts automatically appear in theirtimelinefeed via follow relationship.
1234567891011121314151617181920212223242526272829303132333435363738394041424344454647484950515253545556575859606162636465666768import 'package:flutter/material.dart'; import 'package:stream_feeds/stream_feeds.dart'; class ActivityComposer extends StatefulWidget { const ActivityComposer({super.key, required this.userFeed}); final Feed userFeed; State<ActivityComposer> createState() => _ActivityComposerState(); } class _ActivityComposerState extends State<ActivityComposer> { final TextEditingController _controller = TextEditingController(); bool _hasText = false; bool _isSending = false; void initState() { super.initState(); _controller.addListener(() { final hasText = _controller.text.trim().isNotEmpty; if (_hasText != hasText) { setState(() => _hasText = hasText); } }); } void dispose() { _controller.dispose(); super.dispose(); } Widget build(BuildContext context) { return Padding( padding: EdgeInsets.all(16), child: Column( mainAxisSize: MainAxisSize.min, crossAxisAlignment: CrossAxisAlignment.start, children: [ TextField( controller: _controller, decoration: InputDecoration( hintText: 'What is happening?', border: OutlineInputBorder(), ), ), SizedBox(height: 8), Row( mainAxisAlignment: MainAxisAlignment.end, children: [ ElevatedButton( onPressed: _hasText && !_isSending ? _createActivity : null, child: Text('Post'), ), ], ), ], ), ); } Future<void> _createActivity() async { // TODO: implement posting logic } }
1import 'activity_composer.dart';
123456789101112131415161718192021222324252627282930313233Widget build(BuildContext context) { if (isLoading) { return Center(child: CircularProgressIndicator()); } return Scaffold( appBar: AppBar(title: Text('Stream Feeds Tutorial')), body: _index == 0 ? Column( children: [ ActivityComposer(userFeed: userFeed), Expanded( child: ActivityListView( client: client, feed: timelineFeed, onFollow: onFollow, onUnfollow: onUnfollow, ), ), ], ) : Placeholder(), bottomNavigationBar: BottomNavigationBar( items: [ BottomNavigationBarItem(icon: Icon(Icons.home), label: 'Home'), BottomNavigationBarItem(icon: Icon(Icons.search), label: 'Explore'), ], currentIndex: _index, onTap: (index) => setState(() => _index = index), ), ); }
With the UI ready, we can implement the posting logic in the ActivityComposer. To do that, we just need to replace the _createActivity function stub with the actual implementation:
1234567891011121314Future<void> _createActivity() async { setState(() => _isSending = true); await widget.userFeed.addActivity( request: FeedAddActivityRequest( feeds: [widget.userFeed.fid.toString()], type: 'post', text: _controller.text, ), ); _controller.clear(); setState(() { _isSending = false; }); }
Go ahead and post something! It'll automatically appear on your timeline.
Explore Page
The "Explore" page uses the foryou feed to explore new content by showing popular activities.
Just like we did for other feeds, we are going to add an exploreFeed to _MyHomePageState and initialize it accordingly in the loadFeeds function:
1234567891011121314151617181920212223242526272829Future<void> _loadFeeds() async { userFeed = client.feedFromId(FeedId.user(userId)); await userFeed.getOrCreate(); timelineFeed = client.feedFromId(FeedId.timeline(userId)); await timelineFeed.getOrCreate(); final followsSelf = timelineFeed.state.following.any( (follow) => follow.targetFeed.fid == userFeed.fid, ); if (!followsSelf) { await timelineFeed.follow(targetFid: userFeed.fid); } exploreFeed = client.feedFromId(FeedId(group: 'foryou', id: userId)); await exploreFeed.getOrCreate(); setState(() { isLoading = false; }); } void dispose() { userFeed.dispose(); timelineFeed.dispose(); exploreFeed.dispose(); super.dispose(); }
Now we're ready to implement the "Explore" page UI. The layout is similar to Home tab, except that we're not adding the activity composer:
1234567891011121314151617181920212223242526272829303132333435363738Widget build(BuildContext context) { if (isLoading) { return Center(child: CircularProgressIndicator()); } return Scaffold( appBar: AppBar(title: Text('Stream Feeds Tutorial')), body: _index == 0 ? Column( children: [ ActivityComposer(userFeed: userFeed), Expanded( child: ActivityListView( client: client, feed: timelineFeed, onFollow: onFollow, onUnfollow: onUnfollow, ), ), ], ) : ActivityListView( client: client, feed: exploreFeed, onFollow: onFollow, onUnfollow: onUnfollow, ), bottomNavigationBar: BottomNavigationBar( items: [ BottomNavigationBarItem(icon: Icon(Icons.home), label: 'Home'), BottomNavigationBarItem(icon: Icon(Icons.search), label: 'Explore'), ], currentIndex: _index, onTap: (index) => setState(() => _index = index), ), ); }
Note that the
foryoufeed uses the "popular" activity selector, which doesn't support real-time updates. The documentation details how real-time updates work.
In the next step, we're adding a follow button, so we can follow users from the foryou page.
Follow and Unfollow
To implement following and unfollowing feeds we're:
- Performing the actual follow/unfollow operation in
main.dart - Extending the
ActivityItemcomponent by adding the follow/unfollow button
12345678910111213Future<void> onFollow(FeedId value) async { await timelineFeed.follow(targetFid: value); // Ensure the feeds are up to date after follow/unfollow await timelineFeed.getOrCreate(); await exploreFeed.getOrCreate(); } Future<void> onUnfollow(FeedId value) async { await timelineFeed.unfollow(targetFid: value); // Ensure the feeds are up to date after follow/unfollow await timelineFeed.getOrCreate(); await exploreFeed.getOrCreate(); }
123456789101112131415161718192021222324252627282930313233343536373839404142434445464748495051525354555657585960616263646566676869707172737475767778798081828384858687888990919293949596979899import 'package:flutter/material.dart'; import 'package:stream_feeds/stream_feeds.dart'; class ActivityItem extends StatelessWidget { const ActivityItem({ super.key, required this.currentUserId, required this.activity, required this.onFollow, required this.onUnfollow, required this.onCommentPressed, required this.onLikePressed, }); final String currentUserId; final ActivityData activity; final ValueSetter<FeedId> onFollow; final ValueSetter<FeedId> onUnfollow; final VoidCallback onCommentPressed; final VoidCallback onLikePressed; Widget build(BuildContext context) { return Card( margin: EdgeInsets.all(8), child: Padding( padding: EdgeInsets.all(8), child: Row( crossAxisAlignment: CrossAxisAlignment.start, children: [ Padding( padding: EdgeInsets.only(top: 4), child: CircleAvatar( child: Text(activity.user.name?[0].toUpperCase() ?? ''), ), ), SizedBox(width: 8), Expanded( child: Column( crossAxisAlignment: CrossAxisAlignment.start, children: [ ActivityHeader( currentUserId: currentUserId, activity: activity, onFollow: onFollow, onUnfollow: onUnfollow, ), Text(activity.text ?? ''), ], ), ), ], ), ), ); } } class ActivityHeader extends StatelessWidget { const ActivityHeader({ super.key, required this.currentUserId, required this.activity, required this.onFollow, required this.onUnfollow, }); final String currentUserId; final ActivityData activity; final ValueSetter<FeedId> onFollow; final ValueSetter<FeedId> onUnfollow; Widget build(BuildContext context) { final isFollowing = activity.currentFeed?.ownFollows?.isNotEmpty ?? false; return Row( children: [ Expanded( child: Text( activity.user.name ?? '', style: Theme.of(context).textTheme.titleMedium, ), ), if (!isFollowing && activity.user.id != currentUserId) TextButton( onPressed: () => onFollow(activity.currentFeed!.fid), child: Text('Follow', style: TextStyle(color: Colors.green)), ), if (isFollowing && activity.user.id != currentUserId) TextButton( onPressed: () => onUnfollow(activity.currentFeed!.fid), child: Text('Unfollow', style: TextStyle(color: Colors.red)), ), ], ); } }
Let's walk through the steps:
feed.followandfeed.unfollowlet us follow/unfollow feeds.- To immediately see the results of the follow/unfollow, we're reloading the feeds with
getOrCreate. - We're using
activity.currentFeed.ownFollowsto know if the user's timeline feed follows the feed or not.activity.currentFeedhas information about the feed the activity was posted to. It's useful if you're building Reddit-style applications where there is no 1:1 mapping between feeds and users. It lets you display name/image of the feed the activity belongs to.
- The Stream API also supports follow requests where approval from the feed owner is required to follow
Now that the follow button is working, you can start following other users using the "Explore" page.
Reactions
To make our application more interactive, we'll add reactions for activities.
To achieve this, we'll follow the same approach we used for the follow button:
- Implementing the "like" operation in
activity_list_view.dart - Extend the
ActivityItemcomponent by adding the button to toggle a "like" reaction
12345678910111213141516171819202122232425262728293031return ListView( children: [ ...state.activities.map( (activity) => ActivityItem( currentUserId: client.user.id, activity: activity, onFollow: onFollow, onUnfollow: onUnfollow, onCommentPressed: () {}, onLikePressed: () { if (activity.ownReactions.isEmpty) { feed.addActivityReaction( activityId: activity.id, request: AddReactionRequest(type: 'like'), ); } else { feed.deleteActivityReaction( activityId: activity.id, type: 'like', ); } }, ), ), if (feed.state.canLoadMoreActivities) TextButton( onPressed: () => feed.queryMoreActivities(), child: Text('Load more'), ), ], );
123456789101112131415161718192021222324252627282930313233343536373839404142434445464748495051Widget build(BuildContext context) { return Card( margin: EdgeInsets.all(8), child: Padding( padding: EdgeInsets.all(8), child: Row( crossAxisAlignment: CrossAxisAlignment.start, children: [ Padding( padding: EdgeInsets.only(top: 4), child: CircleAvatar( child: Text(activity.user.name?[0].toUpperCase() ?? ''), ), ), SizedBox(width: 8), Expanded( child: Column( crossAxisAlignment: CrossAxisAlignment.start, children: [ ActivityHeader( currentUserId: currentUserId, activity: activity, onFollow: onFollow, onUnfollow: onUnfollow, ), Text(activity.text ?? ''), Row( children: [ TextButton.icon( onPressed: onLikePressed, icon: Icon(Icons.favorite), label: Text( '${activity.reactionGroups["like"]?.count ?? 0}', ), style: TextButton.styleFrom( foregroundColor: activity.ownReactions.isEmpty ? Colors.black54 : Colors.red, ), ), ], ), ], ), ), ], ), ), ); }
You can use the demo app to follow your tutorial user, and to react to their activities.
Let's do a recap of this step:
- We used
client.addActivityReactionandclient.deleteActivityReactionto toggle reactions- We used "like" as reaction
type, but it can be any string you'd like - Since the Flutter SDK provides reactive state management, the UI is automatically updated anytime anything on the activity changes
- We used "like" as reaction
- We use
activity.ownReactionsandactivity.reactionGroupsto get real-time reaction data for the activity - Some advanced features not shown in the tutorial:
- A single user can add multiple reactions to an activity
- Comments can have reactions too
- Check out the activity reactions and comment reactions pages in the documentation for more information
Comments
Comments are another good way to add interactivity to an app. To add this feature to the tutorial project we need to:
- Implement
CommentsPageand the components to display and post comments - Implement
CommentComposerto post comments - Extend the
ActivityItemcomponent with a button to navigate to the comments screen - Extend the
ActivityListViewcomponent to implement the navigation.
123456789101112131415161718192021222324252627282930313233343536373839404142434445464748495051525354555657585960616263646566676869707172737475767778798081828384858687888990919293949596979899100101102103104105106107108109110111112113114115116117118119120121122123124125126127import 'package:flutter/material.dart'; import 'package:flutter_state_notifier/flutter_state_notifier.dart'; import 'package:stream_feeds/stream_feeds.dart'; import 'comment_composer.dart'; class CommentsPage extends StatefulWidget { static MaterialPageRoute<void> route( StreamFeedsClient client, String activityId, FeedId feedId, ) { return MaterialPageRoute( builder: (context) => CommentsPage(client: client, activityId: activityId, feedId: feedId), ); } const CommentsPage({ super.key, required this.client, required this.activityId, required this.feedId, }); final StreamFeedsClient client; final String activityId; final FeedId feedId; State<CommentsPage> createState() => _CommentsPageState(); } class _CommentsPageState extends State<CommentsPage> { late Activity activity; void initState() { super.initState(); _loadActivity(); } void didUpdateWidget(covariant CommentsPage oldWidget) { if (oldWidget.activityId != widget.activityId) { activity.dispose(); _loadActivity(); } super.didUpdateWidget(oldWidget); } void dispose() { activity.dispose(); super.dispose(); } Future<void> _loadActivity() async { activity = widget.client.activity( activityId: widget.activityId, fid: widget.feedId, ); await activity.get(); } Widget build(BuildContext context) { return Scaffold( appBar: AppBar(title: Text('Stream Feeds Tutorial')), body: Column( children: [ Expanded( child: StateNotifierBuilder( stateNotifier: activity.notifier, builder: (context, state, child) { if (state.comments.isEmpty) { return Center(child: Text('No comments yet')); } return ListView( children: [ ...state.comments.map( (comment) => CommentItem(comment: comment), ), if (activity.state.canLoadMoreComments) TextButton( onPressed: () => activity.queryMoreComments(), child: Text('Load more'), ), ], ); }, ), ), CommentComposer(activity: activity), ], ), ); } } class CommentItem extends StatelessWidget { const CommentItem({super.key, required this.comment}); final CommentData comment; Widget build(BuildContext context) { return Card( margin: EdgeInsets.all(8), child: Padding( padding: EdgeInsets.all(16), child: Column( mainAxisSize: MainAxisSize.min, crossAxisAlignment: CrossAxisAlignment.start, children: [ Text( comment.user.name ?? '', style: TextStyle(fontWeight: FontWeight.bold), ), SizedBox(height: 8), Text(comment.text ?? ''), ], ), ), ); } }
123456789101112131415161718192021222324252627282930313233343536373839404142434445464748495051525354555657585960616263646566import 'package:flutter/material.dart'; import 'package:stream_feeds/stream_feeds.dart'; class CommentComposer extends StatefulWidget { const CommentComposer({super.key, required this.activity}); final Activity activity; State<CommentComposer> createState() => _CommentComposerState(); } class _CommentComposerState extends State<CommentComposer> { final TextEditingController _controller = TextEditingController(); bool _hasText = false; bool _isSending = false; void initState() { super.initState(); _controller.addListener(() { final hasText = _controller.text.trim().isNotEmpty; if (_hasText != hasText) { setState(() => _hasText = hasText); } }); } void dispose() { _controller.dispose(); super.dispose(); } Widget build(BuildContext context) { return SafeArea( child: Padding( padding: EdgeInsets.all(8), child: TextField( controller: _controller, decoration: InputDecoration( hintText: 'Write a comment...', border: OutlineInputBorder(), suffixIcon: IconButton( onPressed: _hasText && !_isSending ? _createComment : null, icon: Icon(Icons.send), color: Theme.of(context).colorScheme.primary, disabledColor: Colors.grey, ), ), ), ), ); } Future<void> _createComment() async { await widget.activity.addComment( request: ActivityAddCommentRequest( comment: _controller.text, activityId: widget.activity.activityId, ), ); _controller.clear(); } }
123456789101112131415161718192021222324Row( children: [ TextButton.icon( onPressed: onCommentPressed, icon: Icon(Icons.comment), label: Text(activity.commentCount.toString()), style: TextButton.styleFrom( foregroundColor: Colors.black54, ), ), TextButton.icon( onPressed: onLikePressed, icon: Icon(Icons.favorite), label: Text( '${activity.reactionGroups["like"]?.count ?? 0}', ), style: TextButton.styleFrom( foregroundColor: activity.ownReactions.isEmpty ? Colors.black54 : Colors.red, ), ), ], ),
1import 'comments_page.dart';
12345onCommentPressed: () { Navigator.of( context, ).push(CommentsPage.route(client, activity.id, feed.fid)); },
Let's recap what happened in this step:
- We instantiated an
Activityobject usingclient.activityand called.get()to load the activity data, including the comments- Notice this is very similar to what we did for
Feedobjects
- Notice this is very similar to what we did for
- We posted new comments by calling
activity.addComment - We use
activity.commentCountto display the total number of comments on an activity
Comments can be threaded/nested too (not shown in the tutorial).
Posting Images
Stream API allows attaching files to activities and comments. Let's extend our app with attaching images to activities. To achieve this we need to:
- Extend the
ActivityComposercomponent to let users pick an image to attach and display a preview - Update the activity posting logic to include the attachment
- Extend the
Activitycomponent to display the attachment
123import 'dart:io';

import 'package:image_picker/image_picker.dart';
123456789101112131415161718192021222324252627282930313233343536373839404142434445464748495051525354555657585960616263646566676869707172737475767778798081828384858687888990class _ActivityComposerState extends State<ActivityComposer> { final TextEditingController _controller = TextEditingController(); StreamAttachment? _attachment; bool _hasText = false; bool _isSending = false; void initState() { super.initState(); _controller.addListener(() { final hasText = _controller.text.trim().isNotEmpty; if (_hasText != hasText) { setState(() => _hasText = hasText); } }); } void dispose() { _controller.dispose(); super.dispose(); } Widget build(BuildContext context) { return Padding( padding: EdgeInsets.all(16), child: Column( mainAxisSize: MainAxisSize.min, crossAxisAlignment: CrossAxisAlignment.start, children: [ TextField( controller: _controller, decoration: InputDecoration( hintText: 'What is happening?', border: OutlineInputBorder(), ), ), SizedBox(height: 8), if (_attachment != null) Image.file(File(_attachment!.file.path), height: 100, width: 100), Row( mainAxisAlignment: MainAxisAlignment.end, children: [ IconButton( onPressed: () { _pickImage(); }, icon: Icon(Icons.image_outlined), ), SizedBox(width: 8), ElevatedButton( onPressed: _hasText && !_isSending ? _createActivity : null, child: Text('Post'), ), ], ), ], ), ); } Future<void> _createActivity() async { setState(() => _isSending = true); await widget.userFeed.addActivity( request: FeedAddActivityRequest( feeds: [widget.userFeed.fid.toString()], type: 'post', text: _controller.text, attachmentUploads: _attachment != null ? [_attachment!] : null, ), ); _controller.clear(); setState(() { _attachment = null; _isSending = false; }); } Future<void> _pickImage() async { final image = await ImagePicker().pickImage(source: ImageSource.gallery); if (image != null) { final attachment = StreamAttachment( type: AttachmentType.image, file: AttachmentFile.fromXFile(image), ); setState(() => _attachment = attachment); } } }
123456789101112131415161718192021222324ActivityHeader( currentUserId: currentUserId, activity: activity, onFollow: onFollow, onUnfollow: onUnfollow, ), Text(activity.text ?? ''), ...activity.attachments .where((attachment) => attachment.imageUrl != null) .map( (attachment) => Container( decoration: BoxDecoration( borderRadius: BorderRadius.circular(16), image: DecorationImage( image: NetworkImage(attachment.imageUrl!), fit: BoxFit.cover, ), ), constraints: BoxConstraints( maxHeight: MediaQuery.of(context).size.width * 0.5, minWidth: double.infinity, ), ), ),
Go ahead and post an image! Or send an image URL, as the Stream API can automatically attach URL metadata as an attachment.
Final Thoughts
In this tutorial, we built a fully-functioning Flutter activity feed application with Stream's Activity Feed V3 SDK. We showed how easy it is to:
- Set up a simple activity feed application and connect it to Stream's Activity Feed V3 SDK.
- Create user and timeline feeds.
- Add activities, reactions and comments.
- Explore new content with "For you" feed.
Even though this was a long tutorial, Activity Feed V3 has even more features:
- Activity selectors and ranking for customizing what content to show for users
- Activity processors for extracting topics from activity content
- Notification feeds (with aggregation)
- Story feed (activity expiration)
- Custom feed groups
- Feed and activity visibility including premium activities with feed memberships
- Moderation and fine-grained permission system
- Polls
- For more examples, checkout the stream-feeds-flutter repository