In this tutorial, we'll walk through building a simple video and audio calling application with ringing functionality using the Stream Video React Native SDK. The goal is to have an application that will:
- Allow users to make calls that ring on the recipient's device.
- Work on both Android and iOS.
- Support both audio and video calls.
- Ensure ringing works even when the app is in the background or closed.
If you prefer to skip this tutorial but still want to implement the same functionality, refer to the official React Native Ringing Documentation.
⚠️ Note: You can find the complete code for this tutorial sample in the "stream-video-js" Repository
Let's get started! If you have any questions or feedback, use the feedback button — we're here to help.
Step 1 - Create a new React Native app
We will use Expo as a React Native framework of choice for this tutorial. If you haven't done this already, let's set up your environment for local expo development builds. Once ready, let's continue with the steps below to create an application and start developing.
Let's create a new Expo app project called ringing-tutorial by running the following command in your terminal of choice:
1npx create-expo-app@latest ringing-tutorial
⚠️ Note: The SDK also supports creating React Native Apps without Expo. We are using Expo here for a minimalistic boilerplate and simplicity.
The next step is to add the Stream Video React Native SDK and its peer dependencies to your app. To do that, run the following command in your terminal of choice:
12345678cd ringing-tutorial
npx expo install \
    @stream-io/video-react-native-sdk \
    @stream-io/react-native-webrtc \
    @config-plugins/react-native-webrtc \
    react-native-svg \
    @react-native-community/netinfo \
    expo-build-properties
Add config plugins
Add the config plugin for @stream-io/video-react-native-sdk and react-native-webrtc to your app.json file:
12345678910111213141516{
  "expo": {
    ...
    "plugins": [
      ...
      "@stream-io/video-react-native-sdk",
      [
        "@config-plugins/react-native-webrtc",
        {
          "cameraPermission": "$(PRODUCT_NAME) requires camera access in order to capture and transmit video",
          "microphonePermission": "$(PRODUCT_NAME) requires microphone access in order to capture and transmit audio"
        }
      ]
    ]
  }
}
Set the application ID
The following is an example app.json that sets the Application ID to the example value of com.mycorp.myapp.
You should change this to your own unique identifier. This is important for later, at the stage where we add Push Notifications.
We should also add the aps-environment: production entitlement as it is necessary for iOS Push Notifications.
12345678910111213{
  "expo": {
    "ios": {
      "entitlements": {
        "aps-environment": "production"
      },
      "bundleIdentifier": "com.mycorp.myapp"
    },
    "android": {
      "package": "com.mycorp.myapp"
    },
  }
}
After this point, it is good to commit your changes to version control.
12git add .
git commit -m "Add Stream Video React Native SDK and dependencies"
Generate native code directories
Now, let's generate the native code directories for the app after the new config plugins by running the following command:
1npx expo prebuild --clean
Step 2 - Authentication
To run this sample, we need valid user tokens. These tokens are typically generated by your server-side API and are used to authenticate users when they log in to your app.
For the ringing functionality to work, we need at least two users who can log in on separate devices.
Generating User Tokens
- First, create a new application in the Stream Dashboard.
- Then, use this token generation form to generate sample tokens.
- Provide your App Secret and User ID to create tokens for each user.
Creating Hardcoded Users
To simplify testing, we'll create a UserWithToken type in a new file to store hardcoded user data. Let's create this file at constants/Users.ts.
Replace the id, name, and token fields with the values you generated for three different users.
1234567891011121314151617181920212223export type UserWithToken = {
  id: string;
  name: string;
  token: string;
};

export const Users: UserWithToken[] = [
  {
    id: '{REPLACE_WITH_USER_1_ID}',
    name: '{REPLACE_WITH_USER_1_NAME}',
    token: '{REPLACE_WITH_USER_1_TOKEN}',
  },
  {
    id: '{REPLACE_WITH_USER_2_ID}',
    name: '{REPLACE_WITH_USER_2_NAME}',
    token: '{REPLACE_WITH_USER_2_TOKEN}',
  },
  {
    id: '{REPLACE_WITH_USER_3_ID}',
    name: '{REPLACE_WITH_USER_3_NAME}',
    token: '{REPLACE_WITH_USER_3_TOKEN}',
  },
];
Building a simple login screen and the main screen
We will use the Expo Router library for navigation flow. We shall use runtime logic to redirect users away from main app screens depending on whether they are authenticated. This is achieved in an organized way by using React Context and Route Groups.
We will also persist the logged-in user. This will allow us to keep the user logged in even after the app is closed and receive and join ringing calls even when the app is in the background.
We'll use @react-native-async-storage/async-storage to store the user ID in the device's local storage.
1npx expo install @react-native-async-storage/async-storage
Now, let's set up a React Context provider that will provide the authentication session to the entire app.
Let's start by creating contexts/authentication-provider.tsx.
We will use this context provider to wrap the component tree with StreamVideo provider after login.
We'll also initialize the Stream Video client using your API key and the token of the logged-in user.
The Stream Video client instance will:
- Establish a connection with the Stream backend.
- Listen for events and enable call creation.
- Handle incoming calls via push notifications.
123456789101112131415161718192021222324252627282930313233343536373839404142434445464748495051525354555657585960616263646566676869707172737475767778798081828384858687888990import React, {
  createContext,
  type PropsWithChildren,
  useContext,
  useEffect,
  useState,
} from 'react';
import {
  StreamVideo,
  StreamVideoClient,
  StreamVideoRN,
} from '@stream-io/video-react-native-sdk';
import { Users, UserWithToken } from '../constants/Users';
import AsyncStorage from '@react-native-async-storage/async-storage';

const API_KEY = '{REPLACE_WITH_STREAM_API_KEY}';

const AuthContext = createContext<{
  signIn: (userId: string) => void;
  signOut: () => void;
  userWithToken?: UserWithToken;
  isLoading: boolean;
}>({
  signIn: () => null,
  signOut: () => null,
  isLoading: false,
});

export function useAuthentication() {
  const value = useContext(AuthContext);
  if (!value) {
    throw new Error(
      'useAuthentication must be wrapped in a <AuthenticationProvider />',
    );
  }
  return value;
}

export function AuthenticationProvider({ children }: PropsWithChildren) {
  const [userId, setUserId] = useState<string>();
  const [isLoading, setIsLoading] = useState(true);

  const userWithToken = Users.find((user) => user.id === userId);
  const client =
    userWithToken &&
    StreamVideoClient.getOrCreateInstance({
      apiKey: API_KEY,
      token: userWithToken.token,
      user: {
        id: userWithToken.id,
        name: userWithToken.name,
        image: `https://robohash.org/${userWithToken.id}`,
      },
      options: { logLevel: 'debug' },
    });

  useEffect(() => {
    AsyncStorage.getItem('@userid-key')
      .then((id) => {
        if (id) setUserId(id);
      })
      .catch((error) => console.error(`Can't find user-id`, error))
      .finally(() => setIsLoading(false));
  }, []);

  return (
    <AuthContext.Provider
      value={{
        signIn: (id: string) => {
          AsyncStorage.setItem('@userid-key', id);
          setUserId(id);
        },
        signOut: () => {
          AsyncStorage.removeItem('@userid-key');
          client?.disconnectUser();
          StreamVideoRN.onPushLogout();
          setUserId(undefined);
        },
        userWithToken,
        isLoading,
      }}
    >
      {client ? (
        <StreamVideo client={client}>{children}</StreamVideo>
      ) : (
        <>{children}</>
      )}
    </AuthContext.Provider>
  );
}
In the code above, we:
- Store and retrieve user data to maintain login sessions, even if the app is closed.
- Initialize the Stream Video client using the user token and API key.
- On sign-out, we disconnect the user from the Stream Video client and remove the login session.
Now, let's create common components that will be shared across multiple screens in this app.
They will be created inside the components folder.
12345678910111213141516171819202122232425262728293031323334353637383940414243444546474849505152import { Pressable, type PressableProps, StyleSheet, Text } from 'react-native';

type UserButtonProps = PressableProps & {
  userName: string;
  selected: boolean;
};

export const UserButton = ({
  userName,
  selected,
  ...rest
}: UserButtonProps) => {
  // Determine which color to use based on selection state
  const currentBorderColor = selected ? '#4CAF50' : '#757575';

  return (
    <Pressable
      style={({ pressed }) => [
        styles.userButton,
        { borderColor: currentBorderColor },
        { opacity: pressed ? 0.8 : 1 },
      ]}
      {...rest}
    >
      <Text style={[styles.userButtonText, { color: currentBorderColor }]}>
        {userName}
      </Text>
    </Pressable>
  );
};

const styles = StyleSheet.create({
  userButton: {
    backgroundColor: '#fff',
    borderWidth: 1,
    borderRadius: 30,
    paddingVertical: 12,
    paddingHorizontal: 24,
    marginBottom: 24,
    minWidth: 120,
    alignItems: 'center',
    elevation: 2,
    shadowColor: '#000',
    shadowOffset: { width: 0, height: 1 },
    shadowOpacity: 0.2,
    shadowRadius: 1,
  },
  userButtonText: {
    fontSize: 16,
    fontWeight: '600',
  },
});
123456789101112131415161718192021222324252627282930313233343536373839import { Pressable, type PressableProps, StyleSheet, Text } from 'react-native';

type ActionButtonProps = PressableProps & {
  action: string;
};

export const ActionButton = ({ action, ...rest }: ActionButtonProps) => {
  return (
    <Pressable
      {...rest}
      style={({ pressed }) => [
        styles.loginButton,
        { opacity: pressed ? 0.8 : 1 },
        rest.disabled && styles.loginButtonDisabled,
      ]}
    >
      <Text style={styles.loginButtonText}>{action}</Text>
    </Pressable>
  );
};

const styles = StyleSheet.create({
  loginButton: {
    backgroundColor: '#673AB7',
    borderRadius: 4,
    paddingVertical: 12,
    paddingHorizontal: 24,
    alignItems: 'center',
    marginTop: 40,
  },
  loginButtonDisabled: {
    backgroundColor: '#B39DDB',
  },
  loginButtonText: {
    color: '#fff',
    fontSize: 16,
    fontWeight: 'bold',
  },
});
Now, let's remove all the files with the app folder.
This is the folder where all the route components will be present. We will create new routes for the authentication flow.
Let's add the below files inside the app folder:
_layout.tsx: the entry point of your app.login.tsx: the screen to authenticate a user.(app)/_layout.tsx: the entry point to the(app)route group. This route group has a stack of screens for authenticated users.(app)/index.tsx: the first screen in the(app)route group's stack. The screen displays a list of users available to call.
1234567891011import React from 'react';
import { Slot } from 'expo-router';
import { AuthenticationProvider } from '../contexts/authentication-provider';

export default function Root() {
  return (
    <AuthenticationProvider>
      <Slot />
    </AuthenticationProvider>
  );
}
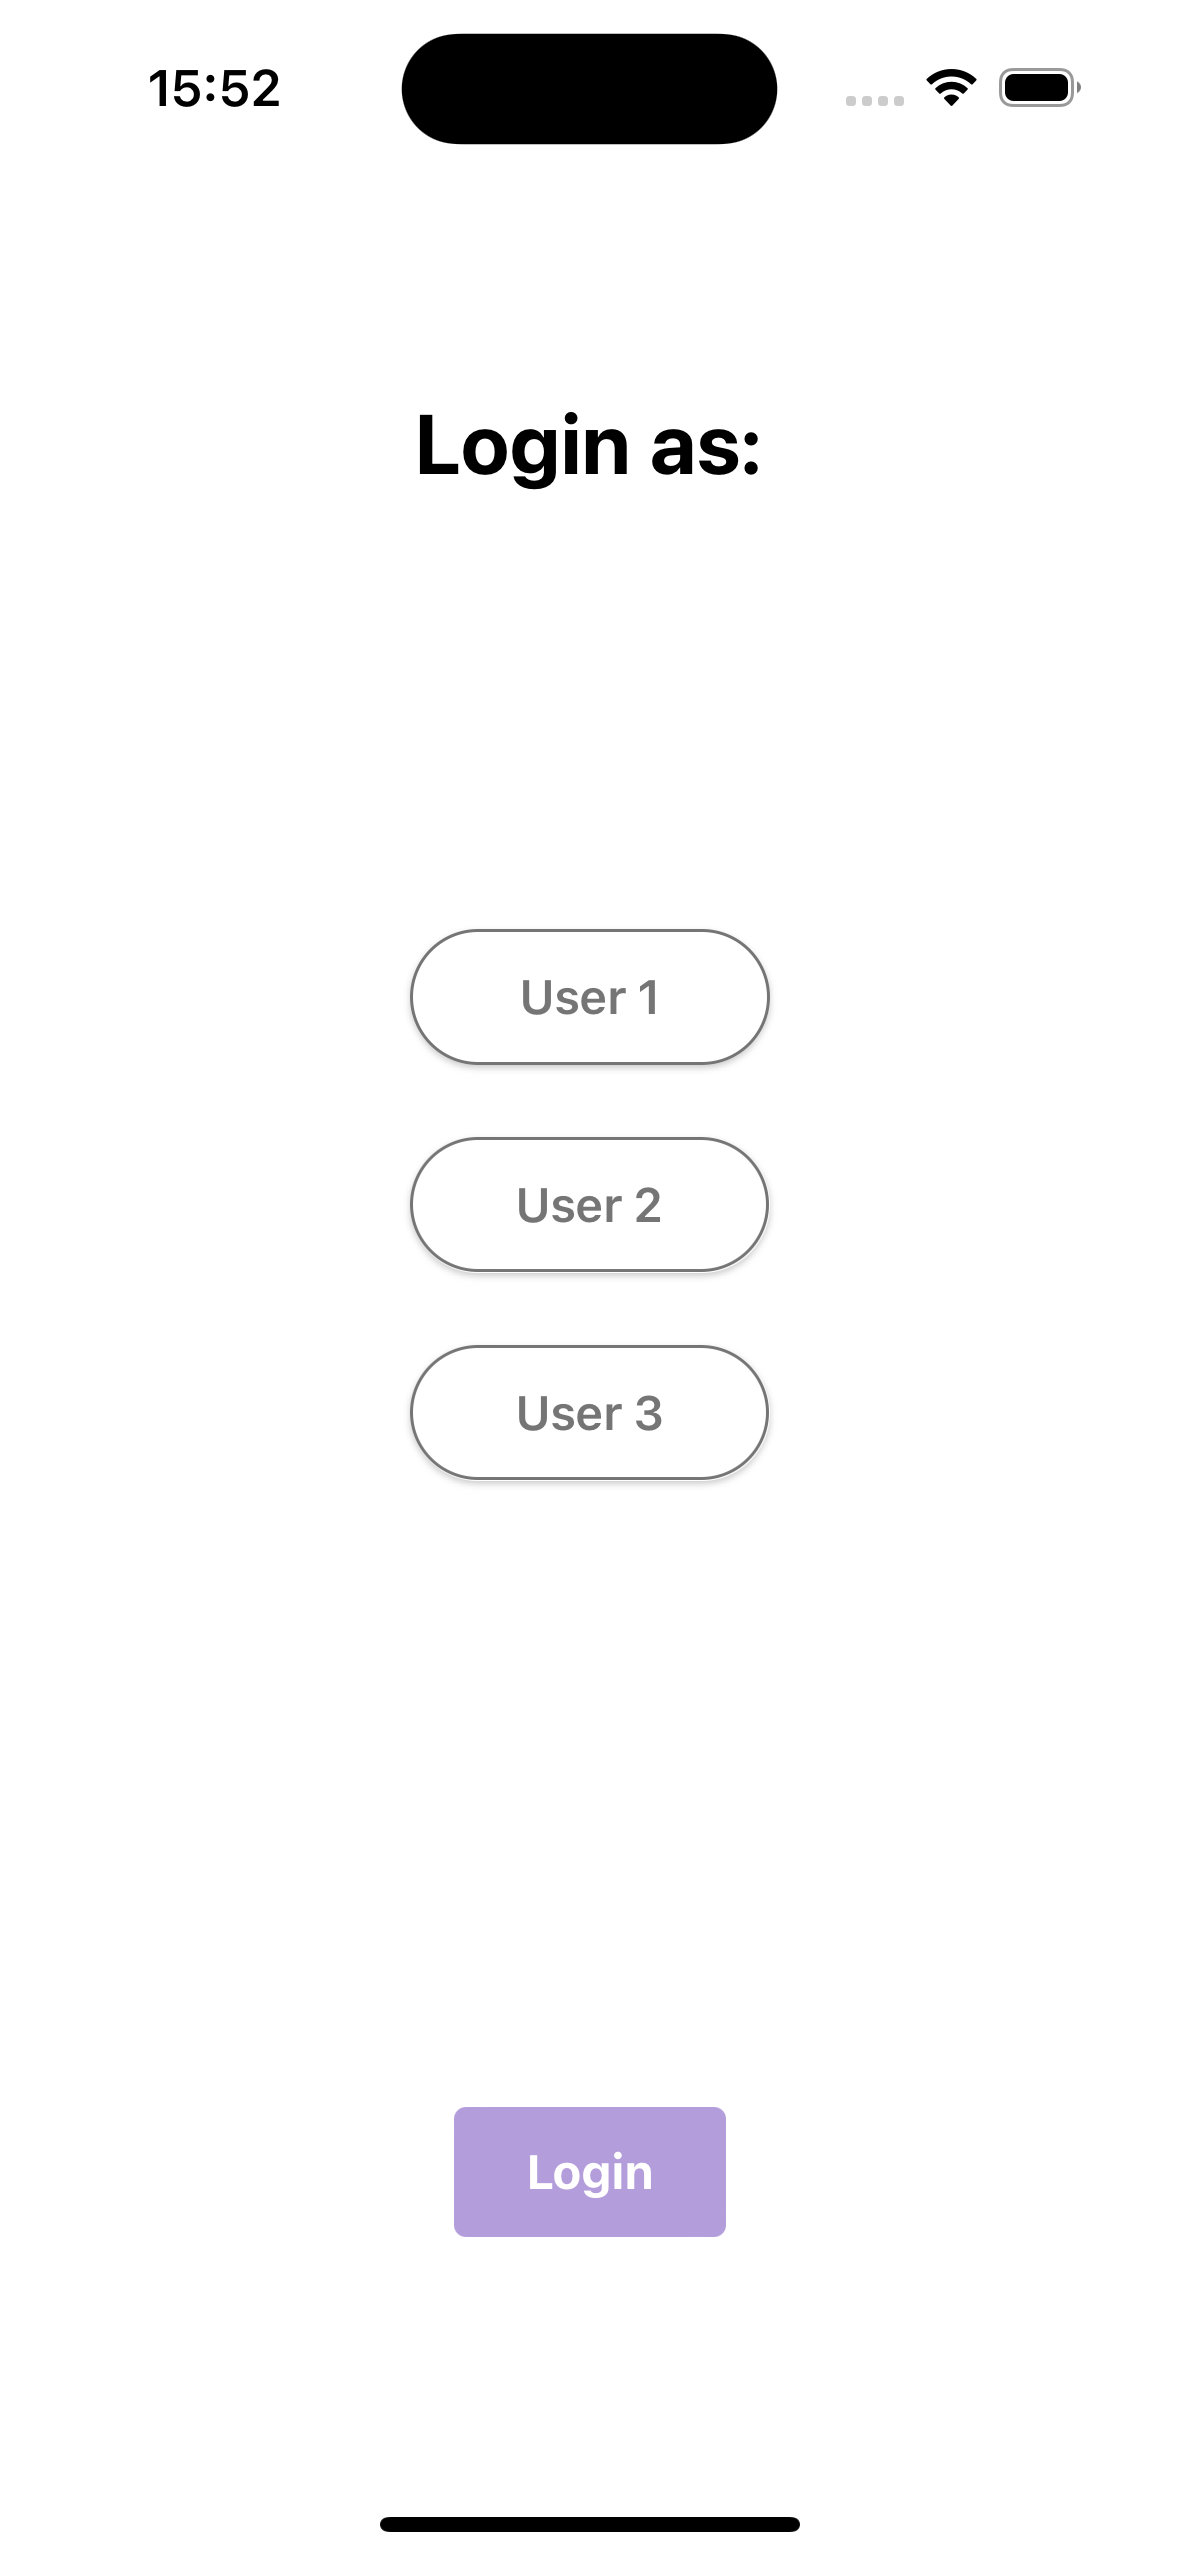
1234567891011121314151617181920212223242526272829303132333435363738394041424344454647484950515253545556575859606162import { useState } from "react";
import { StyleSheet, Text, View } from 'react-native';
import { router } from 'expo-router';
import { Users } from '../constants/Users';
import { useAuthentication } from '../contexts/authentication-provider';
import { UserButton } from '../components/user-button';
import { ActionButton } from '../components/action-button';
import { SafeAreaView } from 'react-native-safe-area-context';

export default function LoginScreen() {
  const [selectedUser, setSelectedUser] = useState<string | null>(null);
  const { signIn } = useAuthentication();

  const handleLogin = () => {
    if (selectedUser === null) {
      return;
    }
    signIn(selectedUser);
    // Navigate to main app
    router.replace('/');
  };

  return (
    <SafeAreaView style={styles.container}>
      <Text style={styles.title}>Login as:</Text>

      <View style={styles.userButtonsContainer}>
        {Users.map((user) => (
          <UserButton
            key={user.id}
            userName={user.name}
            selected={selectedUser === user.id}
            onPress={() => setSelectedUser(user.id)}
          />
        ))}
      </View>

      <ActionButton
        disabled={selectedUser === null}
        onPress={handleLogin}
        action="Login"
      />
    </SafeAreaView>
  );
}

const styles = StyleSheet.create({
  container: {
    flex: 1,
    justifyContent: 'space-around',
    alignItems: 'center',
  },
  title: {
    fontSize: 28,
    fontWeight: 'bold',
    textAlign: 'center',
  },
  userButtonsContainer: {
    width: '100%',
    alignItems: 'center',
  },
});
- The screen displays the three users that we can login to.
- The "Login" button will establish a connection with the Stream backend for the logged-in user and navigate to the main screen.
1234567891011121314151617import { Text } from 'react-native';
import { Redirect, Stack } from 'expo-router';
import { GestureHandlerRootView } from 'react-native-gesture-handler';
import { useAuthentication } from '../../contexts/authentication-provider';

export default function AppLayout() {
  const { userWithToken, isLoading } = useAuthentication();

  if (isLoading) return <Text>Loading...</Text>;
  if (!userWithToken) return <Redirect href="/login" />;

  return (
    <GestureHandlerRootView>
      <Stack screenOptions={{ headerShown: false }} />
    </GestureHandlerRootView>
  );
}
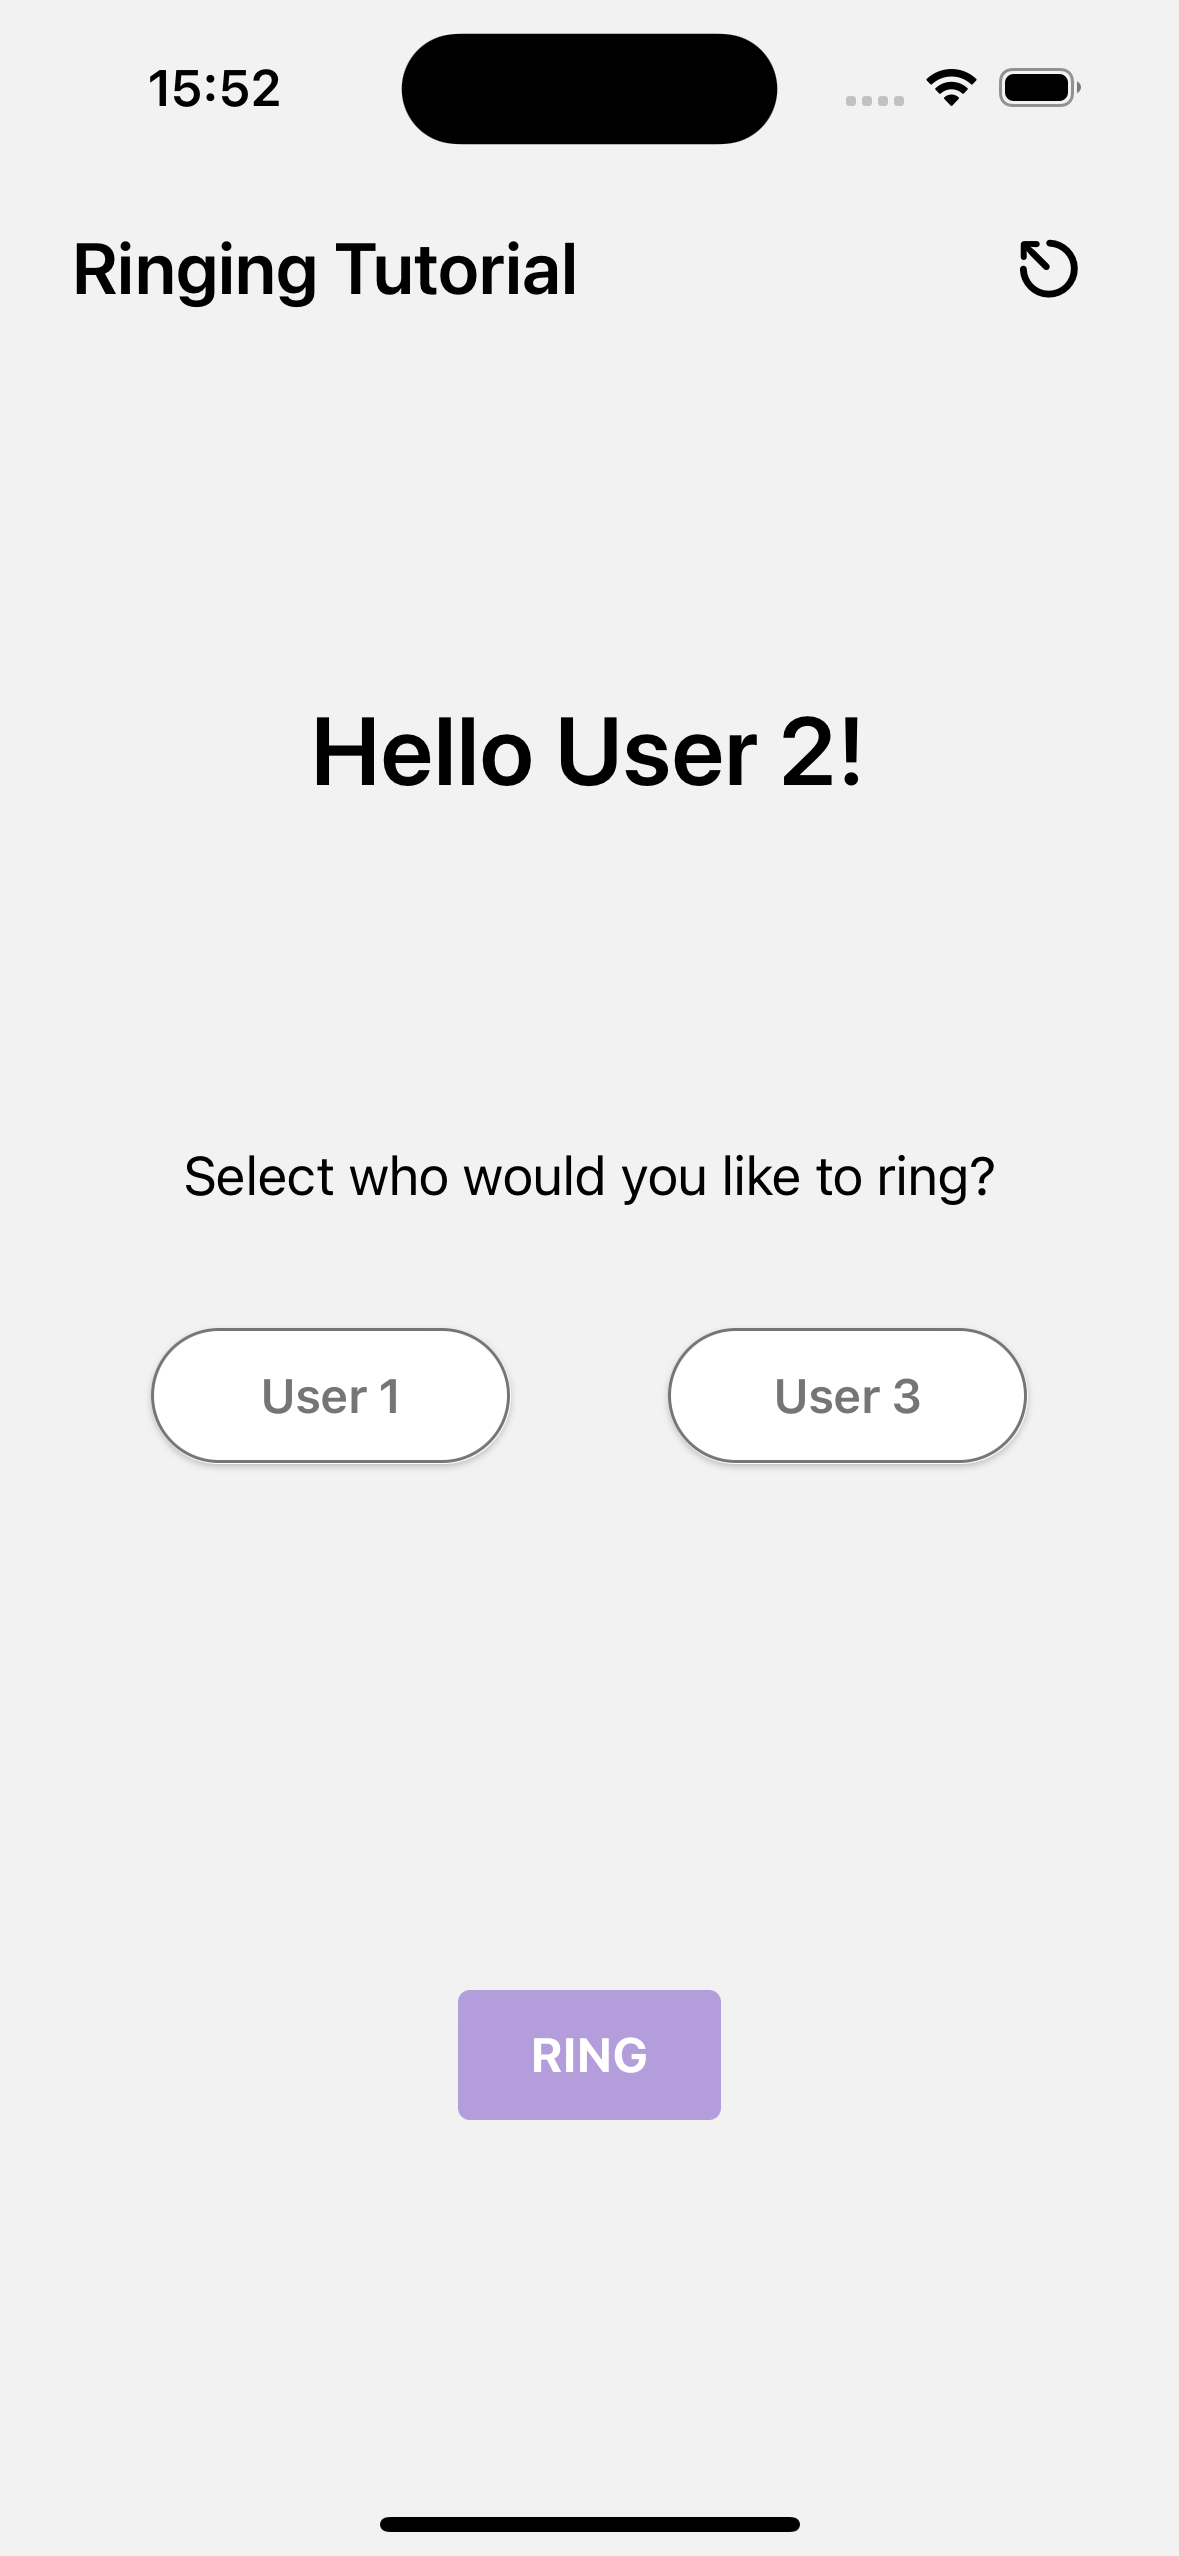
123456789101112131415161718192021222324252627282930313233343536373839404142434445464748495051525354555657585960616263646566676869707172737475767778798081828384858687888990919293949596979899100101102103104105106import { useState } from "react";
import { Pressable, StyleSheet, Text, View } from "react-native";
import { useAuthentication } from "../../contexts/authentication-provider";
import { Users } from "../../constants/Users";
import { UserButton } from "../../components/user-button";
import { ActionButton } from "../../components/action-button";
import { SafeAreaView } from "react-native-safe-area-context";

export default function Index() {
  const { signOut, userWithToken } = useAuthentication();
  const [selectedUsers, setSelectedUsers] = useState<string[]>([]);

  const onRing = async () => {
    console.log("onRing");
  };

  return (
    <SafeAreaView style={styles.container}>
      {/* Header */}
      <View style={styles.header}>
        <Text style={styles.headerTitle}>Ringing Tutorial</Text>
        <Pressable onPress={signOut} style={styles.signOutButton}>
          <Text style={styles.headerTitle}>⎋</Text>
        </Pressable>
      </View>

      {/* Main Content */}
      <View style={styles.content}>
        <Text style={styles.greeting}>Hello {userWithToken?.name}!</Text>

        <View style={styles.selectionContainer}>
          <Text style={styles.selectionText}>
            Select who would you like to ring?
          </Text>
          <View style={styles.userButtons}>
            {Users.filter((user) => user.id !== userWithToken?.id).map(
              (user) => (
                <UserButton
                  key={user.id}
                  userName={user.name}
                  selected={selectedUsers.includes(user.id)}
                  onPress={() =>
                    setSelectedUsers((prev) =>
                      prev.includes(user.id)
                        ? prev.filter((id) => id !== user.id)
                        : [...prev, user.id],
                    )
                  }
                />
              ),
            )}
          </View>
        </View>

        <ActionButton
          disabled={selectedUsers.length === 0}
          onPress={onRing}
          action="RING"
        />
      </View>
    </SafeAreaView>
  );
}

const styles = StyleSheet.create({
  container: {
    flex: 1,
    paddingHorizontal: 24,
  },
  header: {
    flexDirection: 'row',
    justifyContent: 'space-between',
    alignItems: 'center',
    paddingTop: 8,
    paddingBottom: 8,
  },
  headerTitle: {
    fontSize: 24,
    fontWeight: '600',
  },
  signOutButton: {
    padding: 8,
  },
  content: {
    flex: 1,
    alignItems: 'center',
    justifyContent: 'space-evenly',
  },
  greeting: {
    fontSize: 32,
    fontWeight: '600',
  },
  selectionContainer: {
    alignItems: 'center',
    width: '100%',
  },
  selectionText: {
    fontSize: 18,
    marginBottom: 40,
  },
  userButtons: {
    flexDirection: 'row',
    justifyContent: 'space-around',
    width: '100%',
  },
});
- The screen displays a list of users available to call.
- The user can select who to call.
- The "RING" button will initiate a call with ringing (this will be implemented in the next steps).
Step 3 - Add In-app Incoming Calls
When the app is in the foreground, we can display an in-app incoming call screen.
To do that, let's first implement the onRing in the app/(app)/index.tsx file.
123456789101112131415161718192021222324import { useStreamVideoClient } from "@stream-io/video-react-native-sdk";

export default function Index() {
  // ...the other code
  const client = useStreamVideoClient();

  const onRing = async () => {
    const callId = "tutorial-" + Math.random().toString(16).substring(2);
    const myCall = client!.call("default", callId);
    await myCall.getOrCreate({
      ring: true,
      data: {
        members: [
          // include self
          { user_id: userWithToken!.id },
          // include the userId of the callees
          ...selectedUsers.map((userId) => ({ user_id: userId })),
        ],
      },
    });
  };

  // .. the rest of the code
}
In the code above, we:
- Create a unique call-id for every ring call.
- Create or retrieve the call
- We call
client.getOrCreate()to either create a new call or fetch an existing one. - We pass:
ring: true: Marks the call asringing. When configured, this operation will trigger a push notification to the callee(s).members: An array of user IDs to include in the call. This includes the caller and the callee(s). The callee(s) will receive a push notification.
- We call
Next, let's watch for ringing kind of calls in the same component and navigate to a new ringing screen.
Replace the code in the file with the one below:
1234567891011121314151617import { useCalls } from '@stream-io/video-react-native-sdk';

export default function Index() {
  // ...the other code
  const client = useStreamVideoClient();
  const calls = useCalls().filter((c) => c.ringing);

  //.. the other code

  // right before render
  if (ringingCall) {
    return <Redirect href="/(app)/ringing" />;
  }

  // the main render
  return (...)
};
In the code above, we:
- Watch for incoming and outgoing calls using the
useCallshook. We are only interested in calls that have theringingproperty set totrue. - When a call is found, we redirect to the ringing screen that we will create next.
Create a new file app/(app)/ringing.tsx with the following content:
1234567891011121314151617181920212223242526272829303132333435363738import React, { useEffect } from 'react';
import { StyleSheet } from 'react-native';
import { SafeAreaView } from 'react-native-safe-area-context';
import {
  RingingCallContent,
  StreamCall,
  useCalls,
} from '@stream-io/video-react-native-sdk';
import { router } from 'expo-router';

export default function Ringing() {
  const calls = useCalls().filter((c) => c.ringing);
  const ringingCall = calls[0];

  useEffect(() => {
    if (!ringingCall) {
      // redirect to the main app, when the call is removed from the client's call list
      router.replace("/");
    }
  }, [ringingCall]);

  if (!ringingCall) return null;

  return (
    <StreamCall call={ringingCall}>
      <SafeAreaView style={styles.container}>
        <RingingCallContent />
      </SafeAreaView>
    </StreamCall>
  );
}


const styles = StyleSheet.create({
  container: {
    flex: 1,
  },
});
In the code above, we:
- We use the StreamCall wrapper and RingingCallContent component to display an active call.
- When a call is left and removed from the client, we redirect to the main screen.
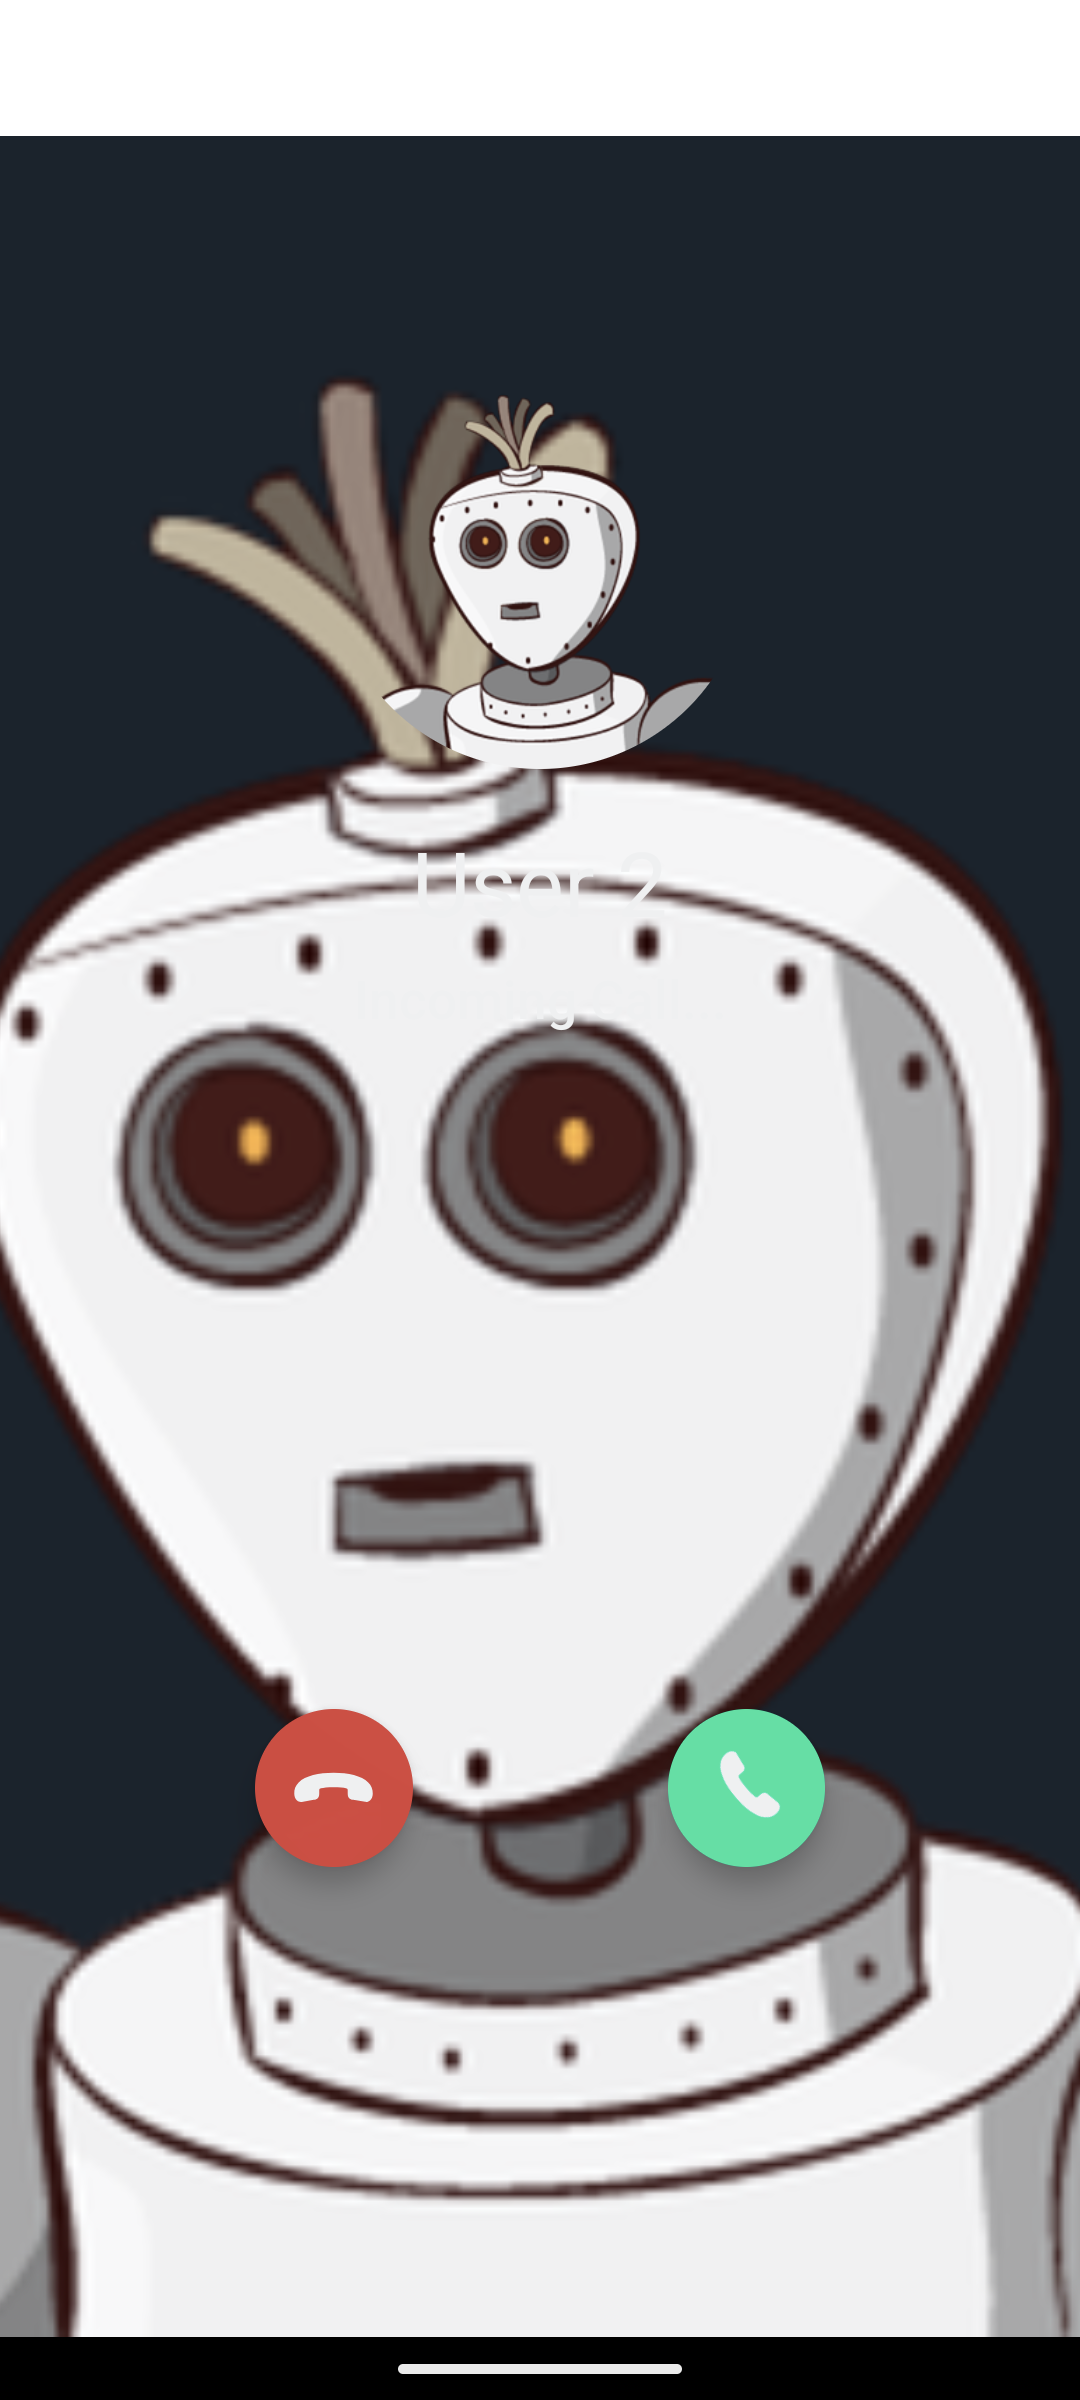
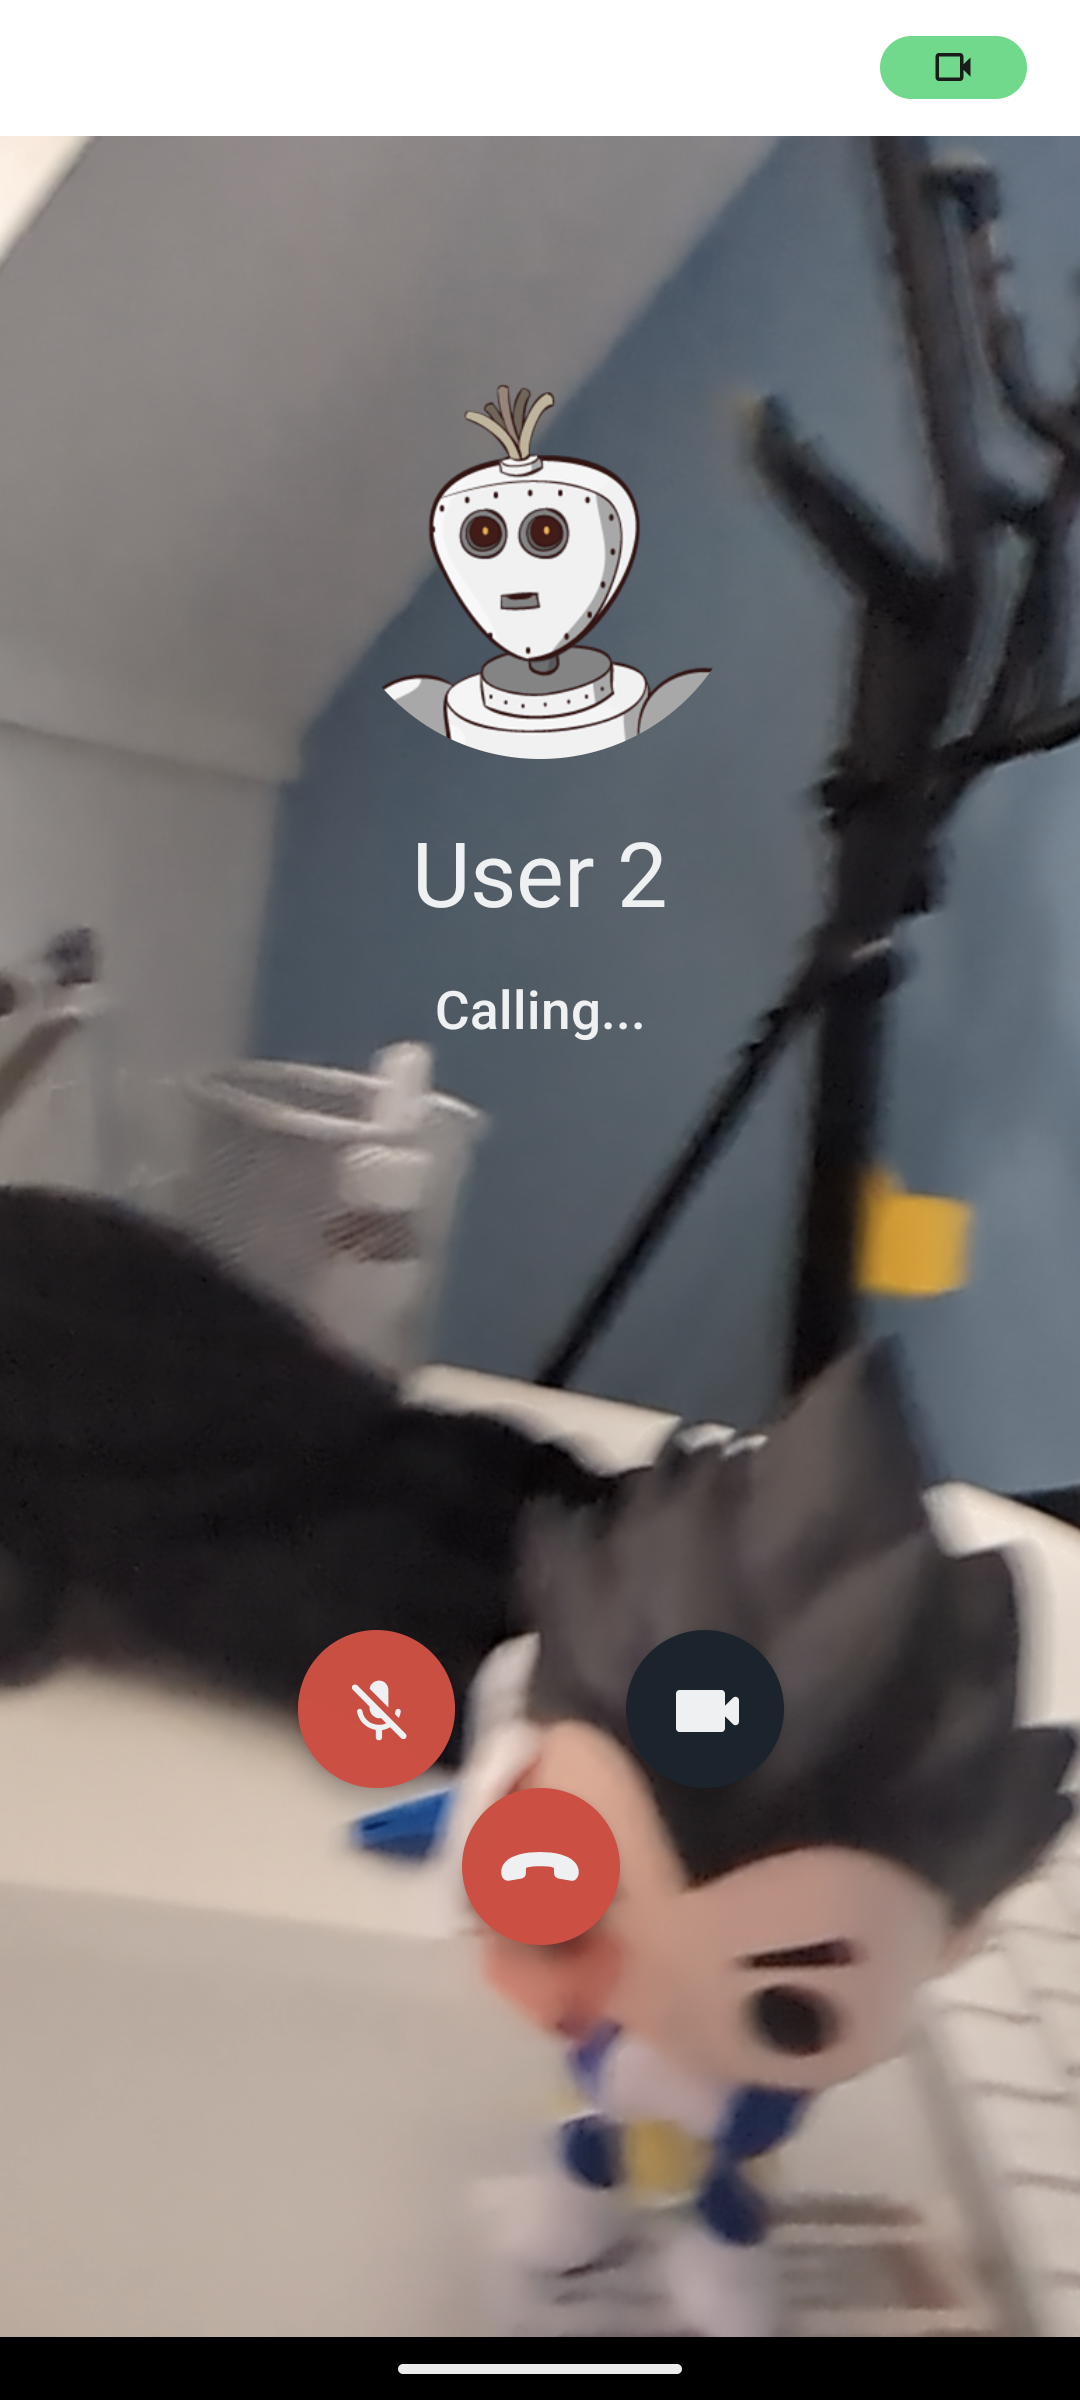
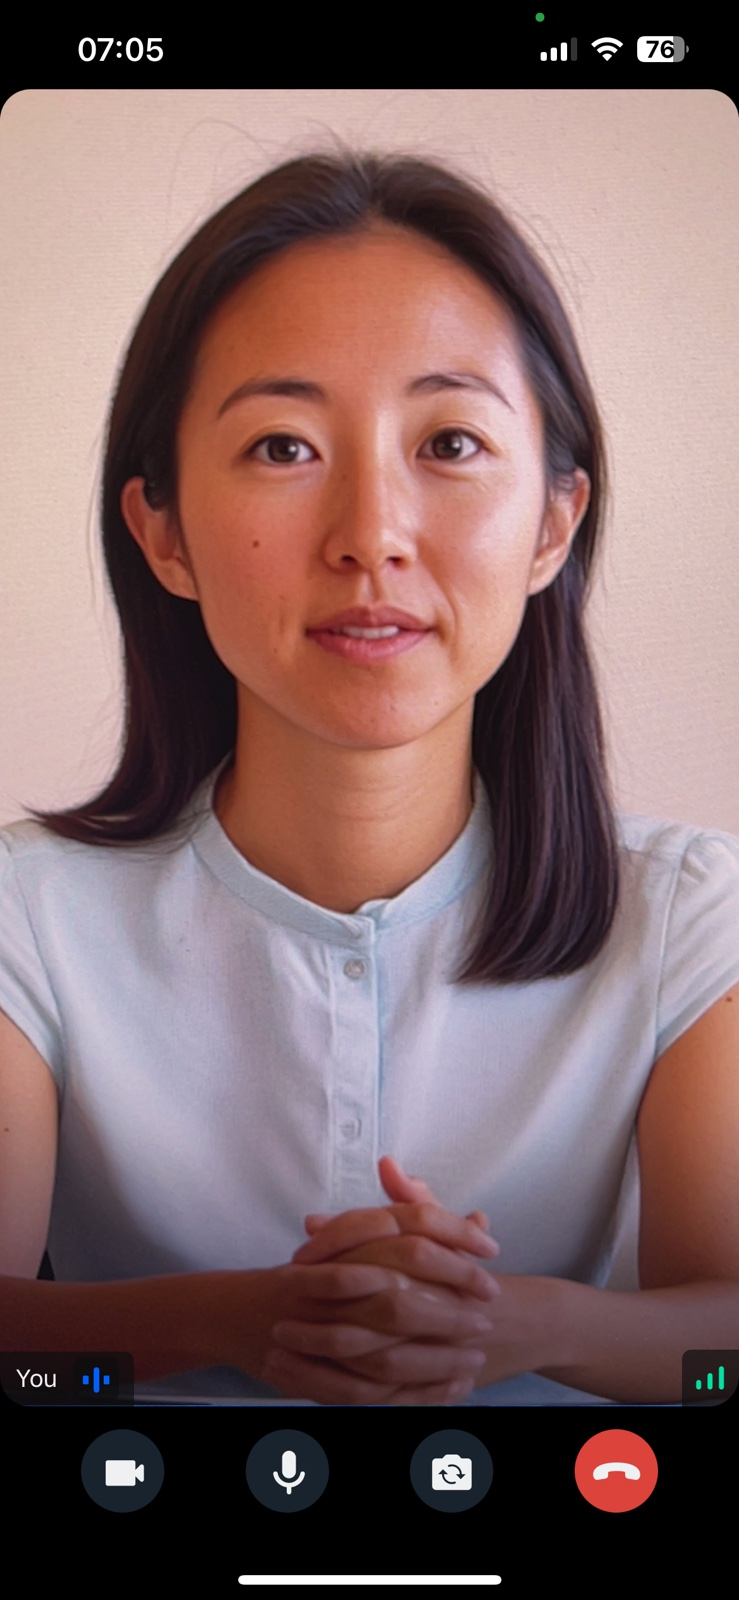
At this point, we haven't yet handled push notifications for incoming calls when the app is in background. However, when you initiate a call, the caller's device should now display the ongoing call UI. Or when there is an incoming call the device should display an incoming call UI.
-
Incoming call screen preview
-
Outgoing call screen preview
-
Active call screen preview
Next, we'll add ringing push notifications so that recipients get notified when someone calls them when the app is in terminated or background state.
Step 4 - Add Push Notification support
Configuring Push Notification Providers
For push notification support, the Stream backend requires push providers to be configured. Let's use the following guides to configure these providers in the Stream Dashboard:
- Android - Firebase Cloud Messaging (FCM)
- iOS - Apple Push Notification Service (APNS)
Install dependencies
Install the following peer dependencies for the SDK to be able to get push notification support.
1234567npx expo install \
  @react-native-firebase/app \
  @react-native-firebase/messaging \
  @notifee/react-native \
  react-native-voip-push-notification \
  react-native-callkeep \
  @config-plugins/react-native-callkeep
Add Firebase credentials
-
In the Firebase console, click the setting icon next to Project overview and open Project settings. Then, under Your apps, click the Android icon to open Add Firebase to your Android app and follow the steps. Make sure that the Android package name you enter is the same as the value of
expo.android.packagefrom your app.json. -
After registering the app, download the google-services.json file and place it in your project's root directory.
-
In app.json, add an
android.googleServicesFilefield with the relative path to the downloaded google-services.json file. If you placed it in the root directory, the path is./google-services.json. -
Similarly, for iOS, in the console, click the setting icon next to Project overview and open Project settings. Then, under Your apps, click the iOS icon to open Add Firebase to your Apple app and follow the steps. Make sure that the Apple bundle ID you enter is the same as the value of
expo.ios.bundleIdentifierfrom your app.json.. -
After registering the app, download the GoogleService-Info.plist file and place it in your project's root directory.
-
In app.json, add an
ios.googleServicesFilefield with the relative path to the downloaded GoogleService-Info.plist file. If you placed it in the root directory, the path is./GoogleService-Info.plist. -
The
app.jsonfile should look like below if the new files were placed in the root directory.
123456789101112131415{
  "expo": {
    "android": {
      "entitlements": {
        "aps-environment": "production"
      },
      "googleServicesFile": "./google-services.json",
      "package": "com.mycorp.myapp"
    },
    "ios": {
      "googleServicesFile": "./GoogleService-Info.plist",
      "bundleIdentifier": "com.mycorp.myapp"
    },
  }
}
Add the config plugin properties
In app.json, in the plugins field, add the ringingPushNotifications property to the @stream-io/video-react-native-sdk plugin. Also, add the @config-plugins/react-native-callkeep and @react-native-firebase plugins.
1234567891011121314151617181920212223242526272829303132333435363738{
 "plugins": [
      [
        "@stream-io/video-react-native-sdk",
        {
          "ringingPushNotifications": {
            "disableVideoIos": false,
            "includesCallsInRecentsIos": false,
            "showWhenLockedAndroid": true
          },
          "androidKeepCallAlive": true,
        }
      ],
      "@config-plugins/react-native-callkeep",
      [
        "@config-plugins/react-native-webrtc",
        {
          "cameraPermission": "$(PRODUCT_NAME) requires camera access in order to capture and transmit video",
          "microphonePermission": "$(PRODUCT_NAME) requires microphone access in order to capture and transmit audio"
        }
      ],
      "@react-native-firebase/app",
      "@react-native-firebase/messaging",
      [
        "expo-build-properties",
        {
          "android": {
            "extraMavenRepos": [
              "$rootDir/../../../node_modules/@notifee/react-native/android/libs"
            ]
          },
          "ios": {
            "useFrameworks": "static"
          }
        }
      ]
  ]
}
Generate native code directories
Now, do the following to regenerate the native code directories for the app after the new config plugins.
1npx expo prebuild --clean
Add Firebase message handlers
Disable Firebase initialization on iOS
We do not use Firebase on iOS, rather we use react-native-voip-push-notification.
But the React Native Firebase Messaging library automatically registers the device with APNs to receive remote messages.
Hence, we must disable it via the firebase.json file that we are about to create.
12345{
  "react-native": {
    "messaging_ios_auto_register_for_remote_messages": false
  }
}
Request for notification permissions in Android
As soon as we login, we will ask the user to grant push notification permissions. This is an appropriate place to request in this app. This permission must be granted so that push notifications can work.
Let's update the app/(app)/index.tsx file to request for the notification permissions.
1234567891011121314import { useEffect } from 'react';
import { PermissionsAndroid, Platform } from 'react-native';

export default function Index() {
  //... rest
  useEffect(() => {
    if (Platform.OS === 'android') {
      PermissionsAndroid.request(
        PermissionsAndroid.PERMISSIONS.POST_NOTIFICATIONS,
      );
    }
  }, []);
  //... rest
}
Add Firebase event handlers for Android
To process the incoming push notifications from Firebase, the SDK provides the utility functions that you must add to your existing or new Firebase notification listeners. This should be only added for Android using the Platform-specific extensions for React Native.
To do this, let's add the following files in our project inside the folder utils:
123export const setFirebaseListeners = () => {
  // do nothing
};
We keep the setFirebaseListeners.ts to be empty so that nothing is processed on iOS.
Now, for Android, let's register the utility functions from the SDK to process the events from coming from Firebase:
123456789101112131415161718192021222324252627282930313233import messaging from '@react-native-firebase/messaging';
import {
  firebaseDataHandler,
  isFirebaseStreamVideoMessage,
  isNotifeeStreamVideoEvent,
  onAndroidNotifeeEvent,
} from '@stream-io/video-react-native-sdk';
import notifee from '@notifee/react-native';

export const setFirebaseListeners = () => {
  // Set up the background message handlers
  messaging().setBackgroundMessageHandler(async (msg) => {
    if (isFirebaseStreamVideoMessage(msg)) {
      await firebaseDataHandler(msg.data);
    }
  });
  notifee.onBackgroundEvent(async (event) => {
    if (isNotifeeStreamVideoEvent(event)) {
      await onAndroidNotifeeEvent({ event, isBackground: true });
    }
  });
  // Set up the foreground message handlers
  messaging().onMessage((msg) => {
    if (isFirebaseStreamVideoMessage(msg)) {
      firebaseDataHandler(msg.data);
    }
  });
  notifee.onForegroundEvent((event) => {
    if (isNotifeeStreamVideoEvent(event)) {
      onAndroidNotifeeEvent({ event, isBackground: false });
    }
  });
};
Setup the push notifications configuration for the SDK
Add the following configuration in a new file at utils/setPushConfig.ts.
123456789101112131415161718192021222324252627282930313233343536373839404142434445464748495051525354import {
  StreamVideoClient,
  StreamVideoRN,
} from '@stream-io/video-react-native-sdk';
import { AndroidImportance } from '@notifee/react-native';
import AsyncStorage from '@react-native-async-storage/async-storage';
import { Users } from '../constants/Users';

const API_KEY = '{REPLACE_WITH_STREAM_API_KEY}';

export function setPushConfig() {
  StreamVideoRN.setPushConfig({
    isExpo: true,
    ios: {
      pushProviderName: '{REPLACE_WITH_APN_PUSH_PROVIDER_NAME_FROM_DASHBOARD}',
    },
    android: {
      pushProviderName: '{REPLACE_WITH_FIREBASE_PUSH_PROVIDER_NAME_FROM_DASHBOARD}',
      callChannel: {
        id: 'stream_call_notifications',
        name: 'Call notifications',
        importance: AndroidImportance.HIGH,
        sound: 'default',
      },
      incomingCallChannel: {
        id: 'stream_incoming_call',
        name: 'Incoming call notifications',
        importance: AndroidImportance.HIGH,
      },
      incomingCallNotificationTextGetters: {
        getTitle: (createdUserName: string) =>
          `Incoming call from ${createdUserName}`,
        getBody: () => 'Tap to open the call',
      },
    },
    createStreamVideoClient,
  });
}

const createStreamVideoClient = async () => {
  const userId = await AsyncStorage.getItem('@userid-key');
  const userWithToken = Users.find((user) => user.id === userId);
  if (!userWithToken) {
    console.error(
      'Push - createStreamVideoClient -- userWithToken is undefined',
    );
    return;
  }
  return StreamVideoClient.getOrCreateInstance({
    apiKey: API_KEY,
    token: userWithToken.token,
    user: { id: userWithToken.id, name: userWithToken.name },
  });
};
In the code above, we:
- Provide the
pushProviderNamethat we created in the Stream Dashboard to the SDK. - Add the Android notification channels, the title, and the body for the Android notifications.
- Add the
createStreamVideoClientfunction to allows the SDK to instantiate the client when app is not opened.
Initialize the push notification configuration
Let's call the methods we have created outside of the regular application cycle. index.js is a good place do this
as the app can be opened from a dead state through a push notification, and in that case,
we need to use the configuration and notification callbacks as soon as the JS bridge is initialized.
123456import 'expo-router/entry';
import { setPushConfig } from './utils/setPushConfig';
import { setFirebaseListeners } from './utils/setFirebaseListeners';

setPushConfig();
setFirebaseListeners();
The index.js file must be made as the entry point file to your app. This can be done via editing the main property in the package.json file:
12345{
  ...
  "main": "index.js",
  ...
}
Testing Incoming Call
To test properly:
- Use a real device (APNs do not work in simulators).
- Ensure your Firebase/APNs credentials are correctly configured in the Stream Dashboard.
Run the Android and iOS app to the respective devices using the following command:
1234npx expo prebuild --clean

npm run ios -- -d
npm run android -- -d
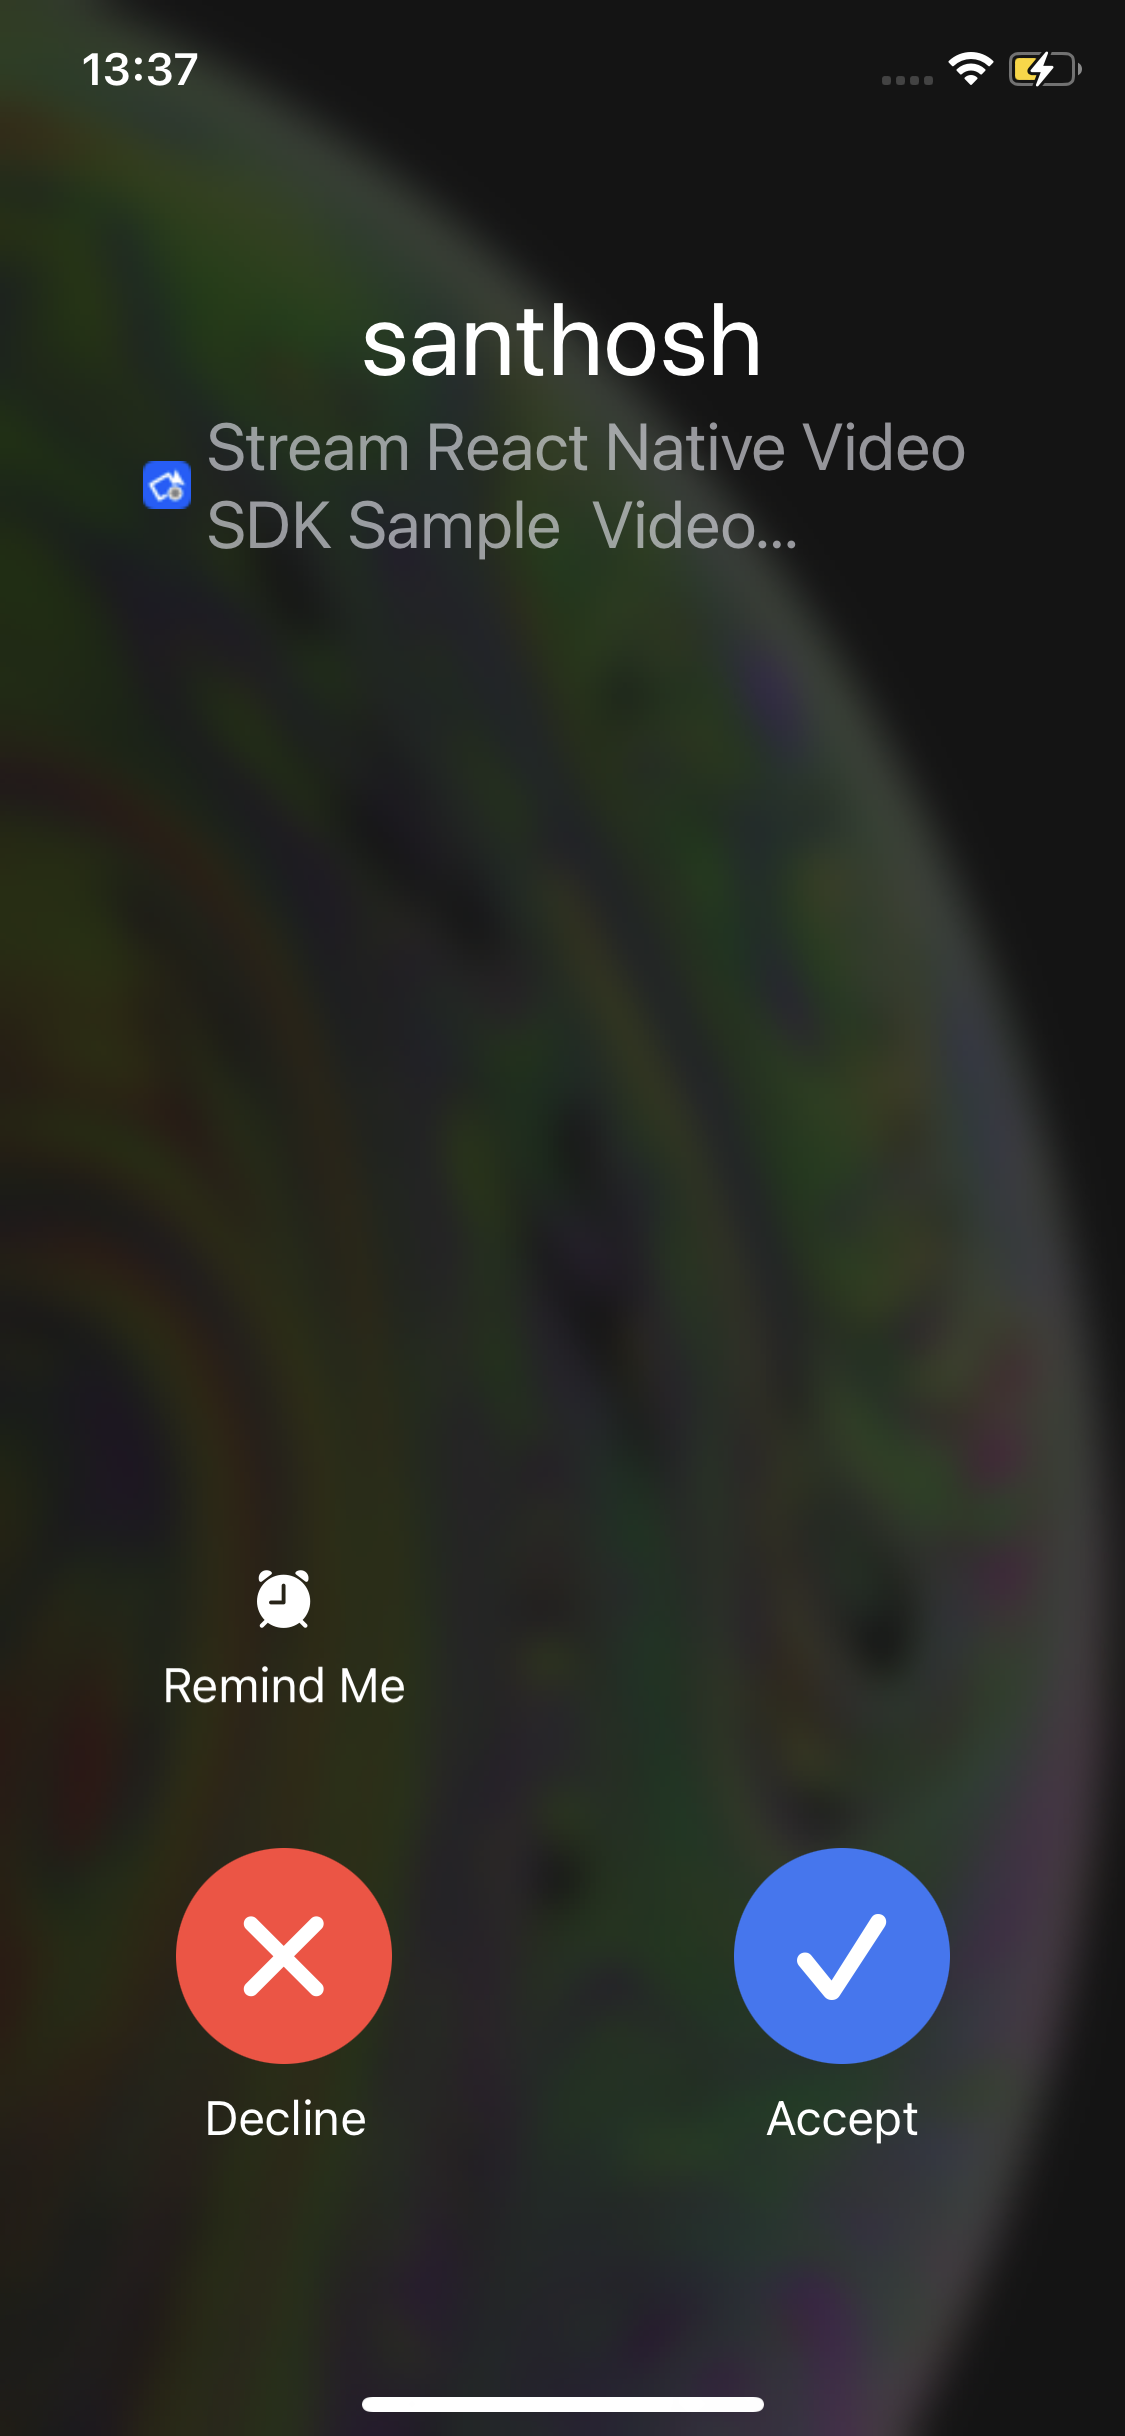
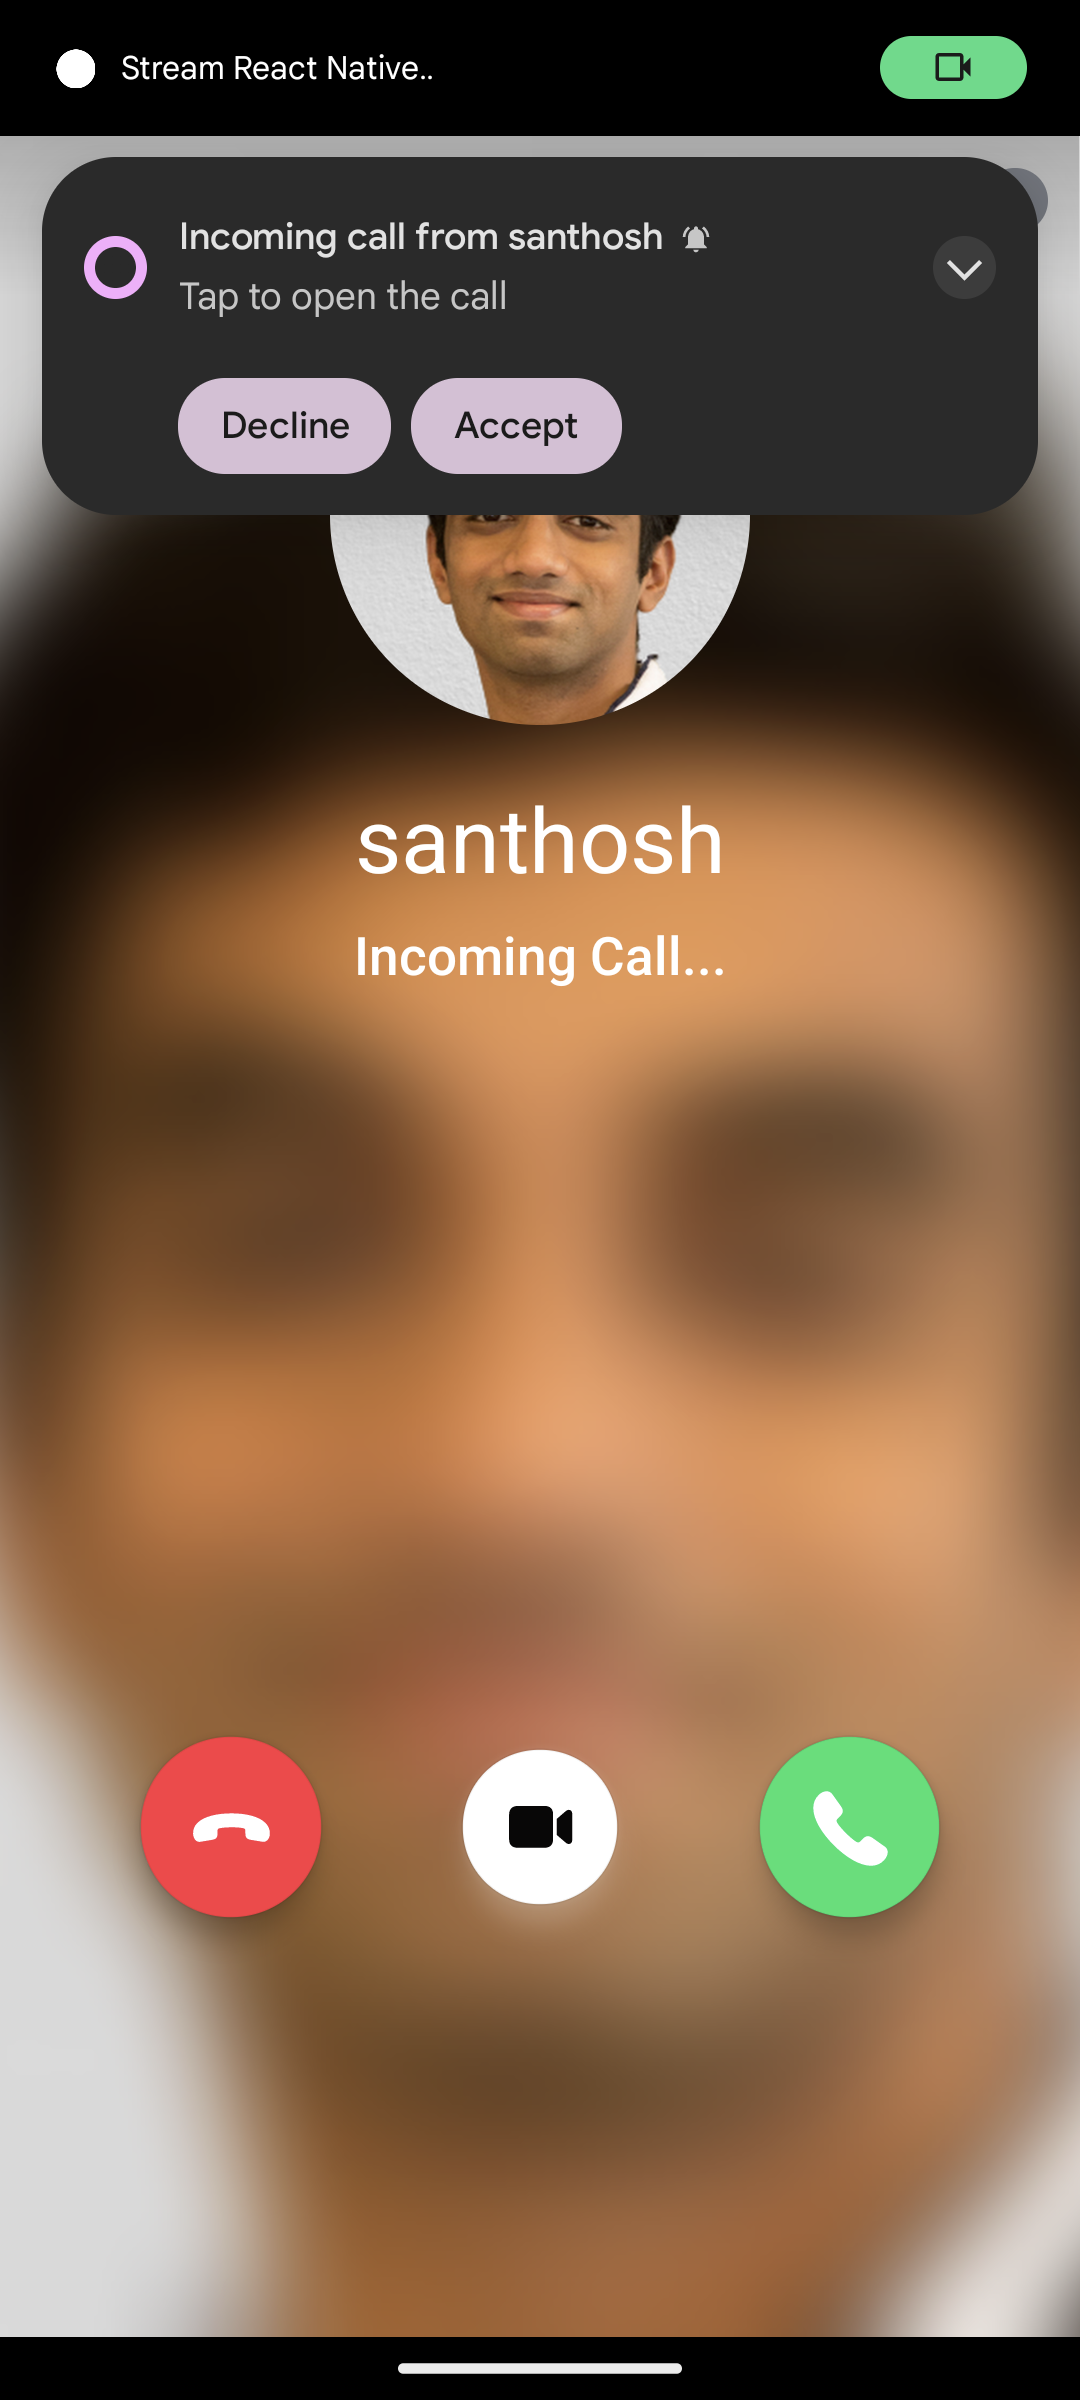
And that's it! Now when you receive a call on an Android/iOS device you should see the incoming call notification.
-
iOS preview
-
Android preview
Congratulations! 🎉 You've successfully built a fully functional ringing experience using Stream Video in a React Native app.
What We Covered:
- Setting up Stream Video and initializing the client.
- Building UI for login, home, and call screens.
- Handled authentication and user data storage.
- Configured FCM and APNs providers in the Stream Dashboard.
- Creating and handling calls.
- Implementing push notifications for incoming calls for handling background and terminated states on Android and iOS.
At this point, your app should be able to send and receive calls with ringing notifications across devices, even when in the background or terminated.
Next Steps
To further improve your app, check out these helpful links:
- Stream Video Docs: Deep dive into Stream Video's incoming call documentation
- Troubleshooting Common Issues: Learn how to troubleshoot common issues
- Working Ringing Sample App: Sample app build based on this tutorial
- Dogfooding App: Our internal Dogfooding with most of the SDK features implemented
If you prefer to skip this tutorial but still want to implement the same functionality, refer to the official React Native Ringing Documentation.