This tutorial teaches you how to quickly build a production-ready voice AI agent with OpenAI realtime using Stream’s video edge network, React Native, and Node.
- The instructions to the agent are sent server-side (node) so you can do function calling or RAG
- The integration uses Stream’s video edge network (for low latency) and WebRTC (so it works under slow/unreliable network conditions)
- You have full control over the AI setup and visualization
The end result will look something like this:

Step 1 - Credentials and Backend setup
First, we are going to set up the Node.js backend and get Stream and OpenAI credentials.
Step 1.1 - OpenAI and Stream credentials
To get started, you need an OpenAI account and an API key. Please note that the OpenAI credentials will never be shared client-side and will only be exchanged between yours and Stream servers.
Additionally, you will need a Stream account and use the API key and secret from the Stream dashboard.
Step 1.2 - Create the Node.js project
Make sure that you are using a recent version of Node.js such as 22 or later, you can check that with node -v
First, let’s create a new folder called “openai-audio-tutorial”. From the terminal, go to the folder, and run the following command:
1npm init -y
This command generates a package.json file with default settings.
Step 1.3 - Installing the dependencies
Next, let’s update the generated package.json with the following content:
12345678910111213141516{
  "name": "@stream-io/video-ai-demo-server",
  "type": "module",
  "dependencies": {
    "@hono/node-server": "^1.13.8",
    "@stream-io/node-sdk": "^0.4.17",
    "@stream-io/openai-realtime-api": "^0.1.0",
    "dotenv": "^16.3.1",
    "hono": "^4.7.4",
    "open": "^10.1.0"
  },
  "scripts": {
    "server": "node ./server.mjs",
    "standalone-ui": "node ./standalone.mjs"
  }
}
Then, run the following command to install the dependencies:
1npm install
Step 1.4 - Setup the credentials
Create a .env file in the project root with the following variables:
123456# Stream API credentials
STREAM_API_KEY=your_stream_api_key
STREAM_API_SECRET=your_stream_api_secret

# OpenAI API key
OPENAI_API_KEY=your_openai_api_key
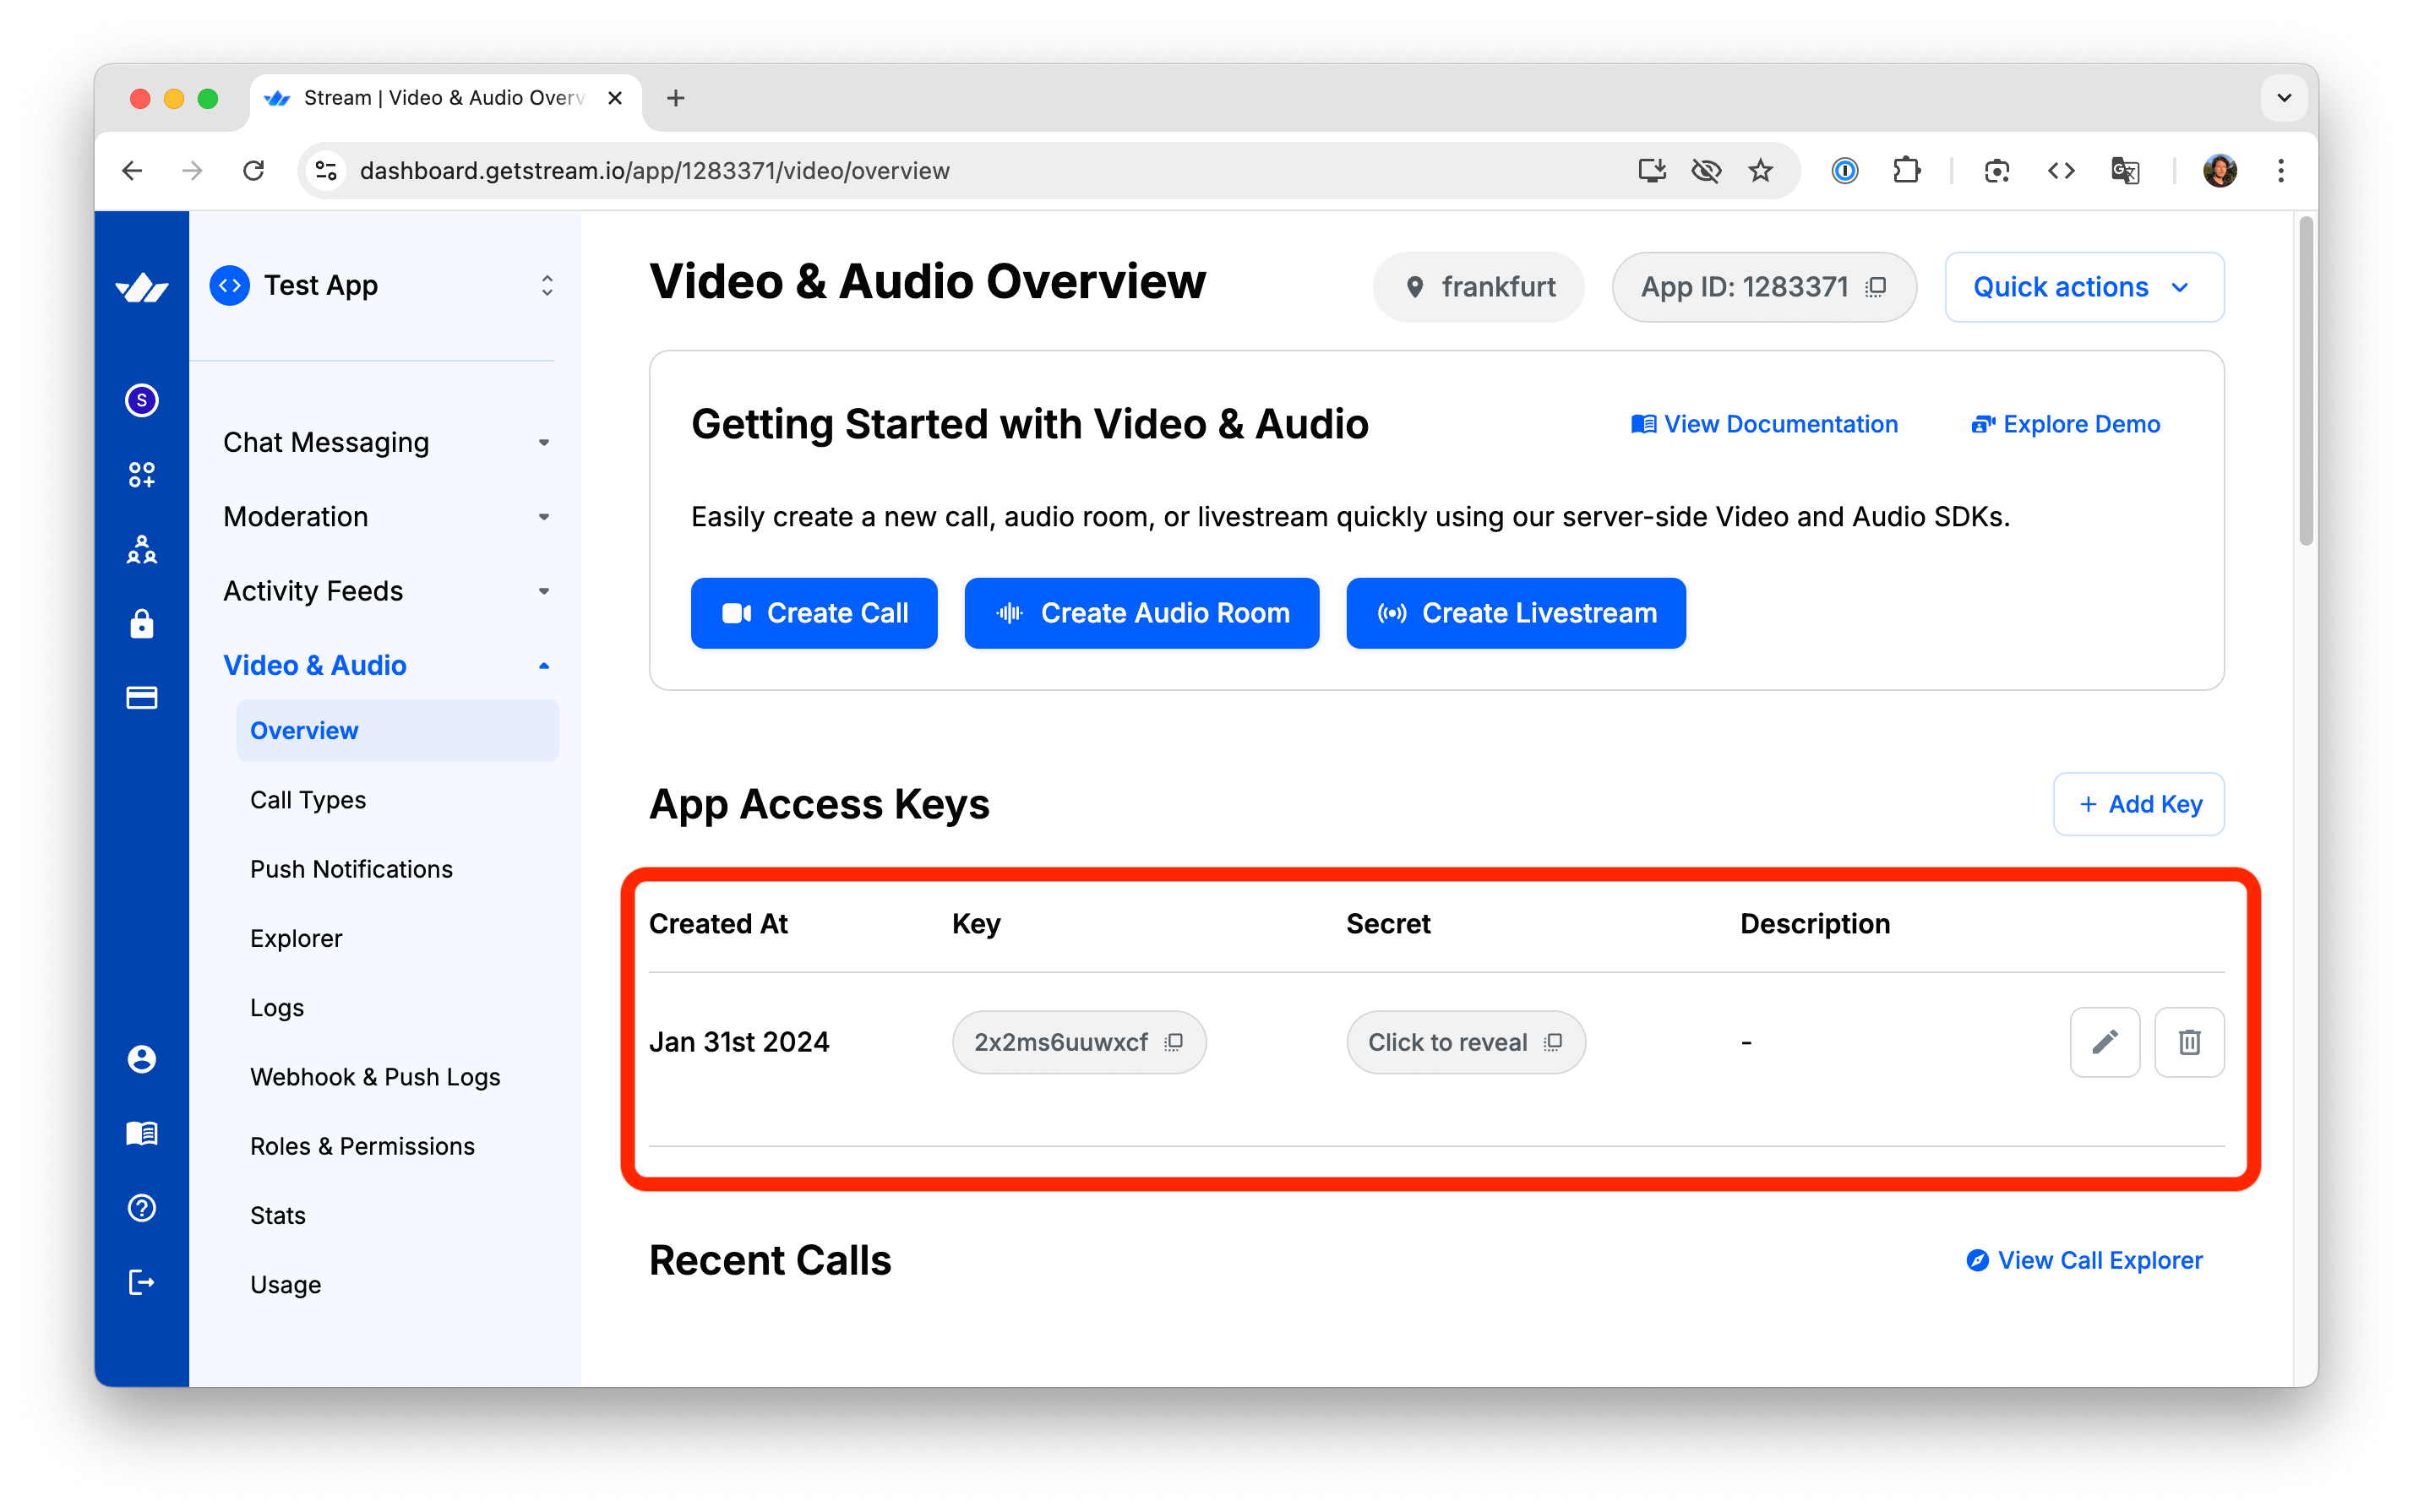
Then edit the .env file with your actual API keys from Step 1.1. You can find the keys on your Stream Dashboard:
Step 1.5 - Implement the standalone-ui script
Before diving into the React Native integrations, we will build a simple server integration that will show how to connect to the AI agent to a call and connect to it with a simple web app.
Create a file called standalone.mjs and paste this content.
1234567891011121314151617181920212223242526272829303132333435363738394041424344454647484950515253545556import { config } from 'dotenv';
import { StreamClient } from '@stream-io/node-sdk';
import open from 'open';
import crypto from 'crypto';

// load config from dotenv
config();

async function main() {
    // Get environment variables
    const streamApiKey = process.env.STREAM_API_KEY;
    const streamApiSecret = process.env.STREAM_API_SECRET;
    const openAiApiKey = process.env.OPENAI_API_KEY;

    // Check if all required environment variables are set
    if (!streamApiKey || !streamApiSecret || !openAiApiKey) {
        console.error("Error: Missing required environment variables, make sure to have a .env file in the project root, check .env.example for reference");
        process.exit(1);
    }

    const streamClient = new StreamClient(streamApiKey, streamApiSecret);
    const call = streamClient.video.call("default", crypto.randomUUID());

    // realtimeClient is https://github.com/openai/openai-realtime-api-beta openai/openai-realtime-api-beta
    const realtimeClient = await streamClient.video.connectOpenAi({
        call,
        openAiApiKey,
        agentUserId: "lucy",
    });

    // Set up event handling, all events from openai real-time API are available here: https://platform.openai.com/docs/api-reference/realtime-server-events
    realtimeClient.on('realtime.event', ({ time, source, event }) => {
        console.log(`got an event from OpenAI ${event.type}`);
        if (event.type === 'response.audio_transcript.done') {
            console.log(`got a transcript from OpenAI ${event.transcript}`);
        }
    });

    realtimeClient.updateSession({
        instructions: "You are a helpful assistant who can answer questions and help with tasks.",
    });

    // Get token for the call
    const token = streamClient.generateUserToken({user_id:"theodore"});

    const callUrl = `https://pronto.getstream.io/join/${call.id}?type=default&api_key=${streamClient.apiKey}&token=${token}&skip_lobby=true`;

    // Open the browser
    console.log(`Opening browser to join the call... ${callUrl}`);
    await open(callUrl);
}

main().catch(error => {
    console.error("Error:", error);
    process.exit(1);
});
Step 1.6 - Running the sample
At this point, we can run the script with this command:
1npm run standalone-ui
This will open your browser and connect you to a call where you can talk to the OpenAI agent. As you talk to the agent, you will notice your shell will contain logs for each event that OpenAI is sending.
Let’s take a quick look at what it happening in the server-side code we just added:
- Here we instantiate Stream Node SDK with the API credentials and then use that to create a new call object. That call will be used to host the conversation between the user and the AI agent.
12const streamClient = new StreamClient(streamApiKey, streamApiSecret);
const call = streamClient.video.call("default", crypto.randomUUID());
- The next step, is to have the Agent connect to the call and obtain an OpenAI Realtime API Client. The
connectOpenAifunction does the following things: it instantiates the Realtime API client and then uses Stream API to connect the agent to the call. The agent will connect to the call as a user with ID"lucy"
12345const realtimeClient = await streamClient.video.connectOpenAi({
    call,
    openAiApiKey,
    agentUserId: "lucy",
});
- We then use the realtimeClient object to pass instructions to OpenAI and to listen to events emitted by OpenAI. The interesting bit is that
realtimeClientis an instance of OpenAI’s official API client. This gives you full control of what you can do with OpenAI
12345678910realtimeClient.on('realtime.event', ({ time, source, event }) => {
    console.log(`got an event from OpenAI ${event.type}`);
    if (event.type === 'response.audio_transcript.done') {
        console.log(`got a transcript from OpenAI ${event.transcript}`);
    }
});

realtimeClient.updateSession({
    instructions: "You are a helpful assistant that can answer questions and help with tasks.",
});
Step 2 - Setup your server-side integration
This example was pretty simple to set up and showcases how easy it is to add an AI bot to a Stream call. When building a real application, you will need your backend to handle authentication for your clients as well as send instructions to OpenAI (RAG, function calling in most applications, needs to run on your backend).
So the backend we are going to build will take care of two things:
- Generate a valid token to the React Native app to join the call running on Stream
- Use Stream APIs to join the same call with the AI agent and set it up with instructions
Step 2.1 - Implement the server.mjs
Create a new file in the same project, called server.mjs, and add the following code:
123456789101112131415161718192021222324252627282930313233343536373839404142434445464748495051525354555657585960616263646566676869707172737475767778798081828384858687888990919293949596979899100101102103104105106107108109110111112113114115116117118119120121122123124125126127128129130131132133134135136import { serve } from "@hono/node-server";
import { StreamClient } from "@stream-io/node-sdk";
import { Hono } from "hono";
import { cors } from "hono/cors";
import crypto from 'crypto';
import { config } from 'dotenv';

// load config from dotenv
config();

// Get environment variables
const streamApiKey = process.env.STREAM_API_KEY;
const streamApiSecret = process.env.STREAM_API_SECRET;
const openAiApiKey = process.env.OPENAI_API_KEY;

// Check if all required environment variables are set
if (!streamApiKey || !streamApiSecret || !openAiApiKey) {
    console.error("Error: Missing required environment variables, make sure to have a .env file in the project root, check .env.example for reference");
    process.exit(1);
}

const app = new Hono();
app.use(cors());

const streamClient = new StreamClient(streamApiKey, streamApiSecret);

/**
 * Endpoint to generate credentials for a new video call.
 * Creates a unique call ID, generates a token, and returns necessary connection details.
 */
app.get("/credentials", (c) => {
  console.log("got a request for credentials");
  // Generate a shorter UUID for callId (first 12 chars)
  const callId = crypto.randomUUID().replace(/-/g, '').substring(0, 12);
  // Generate a shorter UUID for userId (first 8 chars with prefix)
  const userId = `user-${crypto.randomUUID().replace(/-/g, '').substring(0, 8)}`;
  const callType = "default";
  const token = streamClient.generateUserToken({
    user_id: userId,
  });
  return c.json({
    apiKey: streamApiKey,
    token,
    callType,
    callId,
    userId
  });
});

/**
 * Endpoint to connect an AI agent to an existing video call.
 * Takes call type and ID parameters, connects the OpenAI agent to the call,
 * sets up the real-time client with event handlers and tools,
 * and returns a success response when complete.
 */
app.post("/:callType/:callId/connect", async (c) => {
  console.log("got a request for connect");
  const callType = c.req.param("callType");
  const callId = c.req.param("callId");

  const call = streamClient.video.call(callType, callId);
  const realtimeClient = await streamClient.video.connectOpenAi({
    call,
    openAiApiKey,
    agentUserId: "lucy",
  });
  await setupRealtimeClient(realtimeClient);
  console.log("agent is connected now");
  return c.json({ ok: true });
});

async function setupRealtimeClient(realtimeClient) {
  realtimeClient.on("error", (event) => {
    console.error("Error:", event);
  });

  realtimeClient.on("session.update", (event) => {
    console.log("Realtime session update:", event);
  });

  realtimeClient.updateSession({
    instructions: "You are a helpful assistant that can answer questions and help with tasks.",
    turn_detection: { type: "semantic_vad" },
    input_audio_transcription: { model: "gpt-4o-transcribe" },
    input_audio_noise_reduction: { type: "near_field" },
  });

  realtimeClient.addTool(
    {
      name: "get_weather",
      description:
        "Call this function to retrieve current weather information for a specific location. Provide the city name.",
      parameters: {
        type: "object",
        properties: {
          city: {
            type: "string",
            description: "The name of the city to get weather information for",
          },
        },
        required: ["city"],
      },
    },
    async ({ city, country, units = "metric" }) => {
      console.log("get_weather request", { city, country, units });
      try {
        // This is a placeholder for actual weather API implementation
        // In a real implementation, you would call a weather API service here
        const weatherData = {
          location: country ? `${city}, ${country}` : city,
          temperature: 22,
          units: units === "imperial" ? "°F" : "°C",
          condition: "Partly Cloudy",
          humidity: 65,
          windSpeed: 10
        };

        return weatherData;
      } catch (error) {
        console.error("Error fetching weather data:", error);
        return { error: "Failed to retrieve weather information" };
      }
    },
  );

  return realtimeClient;
}

// Start the server
serve({
  fetch: app.fetch,
  hostname: "0.0.0.0",
  port: 3000,
});

console.log(`Server started on :3000`);
In the code above, we set up two endpoints: /credentials, which generates a unique call ID and authentication token, and /:callType/:callId/connect, which connects the AI agent (that we call “lucy”) to a specific video call.
The assistant follows predefined instructions, in this case trying to be helpful with tasks. Based on the purpose of your AI bot, you should update these instructions accordingly. In the same updateSession call we instruct OpenAI to use the semantic classifier for voice activity detection to detect when the user has finished speaking, a GPT-4o based model for transcriptions, and near-field noise reduction for audio.
We also show an example of a function call, using the get_weather tool.
Step 2.2 - Running the server
We can run the server now, this will launch a server and listen on port:3000
1npm run server
To make sure everything is working as expected, you can run a curl GET request from your terminal.
1curl -X GET http://localhost:3000/credentials
As a result, you should see credentials required to join the call. With that, we’re all setup server-side!
Step 3 - Setting up the React Native project
Now, let’s switch to the React Native app, that will connect to this API, and provide the visualizations of the AI’s audio levels.
Step 3.1 - Bootstrap your React Native app
We are going to use React Native CLI to bootstrap our project. Execute the following command to create a React Native project with TypeScript support (as usual, feel free to use the package manager of your choice):
12npx @react-native-community/cli@latest init AiVideoDemo
cd AiVideoDemo
Step 3.2 - Adding the Stream Video dependency
Let’s create a new project, for example called AIVideoDemo, and add the Stream Video React Native SDK.
Follow the steps here to add the SDK as a dependency to your project. For the best experience, we recommend using version 1.10.10 or above.
123456789npm install \
   @stream-io/video-react-native-sdk \
   @stream-io/react-native-webrtc \
   @react-native-community/netinfo \
   react-native-incall-manager \
   react-native-svg \
   react-native-gesture-handler

npx pod-install
Step 3.3 - Setup Microphone Permissions
As we will be using the microphone to communicate with the AI bot, we need to configure the appropriate permissions for both iOS and Android platforms.
iOS
Add the “NSMicrophoneUsageDescription” permission in the ios/AiVideoDemo/Info.plist file:
1234567<plist version="1.0">
<dict>
  <!-- ... -->
  <key>NSMicrophoneUsageDescription</key>
  <string>Microphone access needed for talking with AI.</string>
</dict>
</plist>
Android
Add the RECORD_AUDIO permission to the AndroidManifest.xml file:
12345678910<manifest xmlns:android="http://schemas.android.com/apk/res/android">
  <!-- ... -->

  <uses-permission android:name="android.permission.RECORD_AUDIO" />

  <application>
	  <!-- ... -->
  </application>
  <!-- ... -->
</manifest>
Step 3.4 - Local server setup
As this demo application needs to connect to your locally running server, you’ll need to configure your iOS app to allow non-HTTPS connections to your development server. Update the following to your ios/AiVideoDemo/Info.plist file:
1234567891011<plist version="1.0">
  <!-- ... -->
	<key>NSAppTransportSecurity</key>
	<dict>
		<key>NSAllowsArbitraryLoads</key>
		<true/>  <!-- change this value to true -->
		<key>NSAllowsLocalNetworking</key>
		<true/>
	</dict>
	<!-- ... -->
</plist>
Step 4 - Stream Video setup
To connect to the call, we must first fetch the credentials (GET /credentials) from the server we implemented in the previous steps.
Then, we need to use the POST /:callType/:id/connect endpoint to add the AI agent to the call.
Step 4.1 - Fetching the credentials
Let’s create a method to fetch the credentials from our server. Create a new file src/join.ts and add the following code:
123456789101112131415161718192021import { Call, StreamVideoClient } from "@stream-io/video-react-native-sdk";

interface CallCredentials {
  apiKey: string;
  token: string;
  callType: string;
  callId: string;
  userId: string;
}

const baseUrl = "http://localhost:3000";

export async function fetchCallCredentials(): Promise<CallCredentials> {
  const res = await fetch(`${baseUrl}/credentials`);

  if (res.status !== 200) {
    throw new Error("Could not fetch call credentials");
  }

  return (await res.json()) as CallCredentials;
}
This method sends a GET request to fetch the credentials, which we'll use to set up the StreamVideoClient and join the call.
Note that we're using http://localhost:3000 as the base URL because, for the purposes of this tutorial, we'll be running the server we implemented in the previous steps locally.
The baseUrl should be set to the URL of your local server. This method sends a GET request to fetch the credentials to set up the StreamVideoClient object and get the call data.
Note: We are using localhost here (as defined in the baseUrl), the simplest way to test this is to run on simulator. You can also test this on a real device. You need to set baseUrl to your local network IP address instead. Additionally, your device and your computer should be on the same WiFi network and you need to allow Arbitrary Loads and Local Networking in your plist (the local server uses HTTP and not HTTPS). If we still have issues accessing the local server, we can use ngrok to expose our local server to the internet.
Step 4.2 - Connecting to Stream Video
We now have a way to fetch the credentials, we can connect to Stream Video. To do this, add the following code to src/join.ts:
12345678910111213141516171819202122232425262728293031export async function joinCall(
  credentials: CallCredentials
): Promise<[client: StreamVideoClient, call: Call]> {
  const client = new StreamVideoClient({
    apiKey: credentials.apiKey,
    user: { id: credentials.userId },
    token: credentials.token,
  });

  const call = client.call(credentials.callType, credentials.callId);
  await call.camera.disable();
  try {
    await Promise.all([connectAgent(call), call.join({ create: true })]);
  } catch (err) {
    await call.leave();
    await client.disconnectUser();
    throw err;
  }

  return [client, call];
}

async function connectAgent(call: Call) {
  const res = await fetch(`${baseUrl}/${call.type}/${call.id}/connect`, {
    method: "POST",
  });

  if (res.status !== 200) {
    throw new Error("Could not connect agent");
  }
}
We are doing several things at once in this function:
- Creating and authenticating the
StreamVideoClientwith the credentials. - Using the
/:type/:id/connectendpoint to add the AI agent to the call. - Using the
call.join()method to add the user to the call.
We will call this method from our UI in the next steps.
Step 5 - Building the UI
Let’s start building our UI top to bottom. Replace the contents of App.tsx file with the following code:
123456789101112131415161718192021222324252627282930313233343536373839404142434445464748495051525354555657585960616263646566676869707172737475767778798081828384858687888990919293949596979899100101102103104105106107108109110111112113114115116117118119120121122123124125126127128129130131132133import React, { useState } from "react";
import { Button, StyleSheet, Text, View } from "react-native";
import {
  Call,
  HangUpCallButton,
  StreamCall,
  StreamVideo,
  StreamVideoClient,
  useCall,
  useCallStateHooks,
} from "@stream-io/video-react-native-sdk";
import { GestureHandlerRootView } from "react-native-gesture-handler";
import inCallManager from "react-native-incall-manager";
import { fetchCallCredentials, joinCall } from "./src/join";

const credentialsPromise = fetchCallCredentials();

function App() {
  const [client, setClient] = useState<StreamVideoClient | null>(null);
  const [call, setCall] = useState<Call | null>(null);
  const [status, setStatus] = useState<
    "start" | "joining" | "awaiting-agent" | "joined-with-agent" | "end"
  >("start");

  const handleJoin = () => {
    setStatus("joining");
    credentialsPromise
      .then((credentials) => joinCall(credentials))
      .then(([client, call]) => {
        setClient(client);
        setCall(call);
        setStatus("joined-with-agent");
        inCallManager.setSpeakerphoneOn(true);
      })
      .catch((err: any) => {
        console.error("Could not join call", err);
        setStatus("start");
      });
  };

  const handleLeave = () => {
    setStatus("start");
  };

  return (
    <GestureHandlerRootView>
      <View style={styles.container}>
        {status === "start" && (
          <View style={styles.joinContainer}>
            <Button title="Click to talk with AI" onPress={handleJoin} />
          </View>
        )}
        {(status === "joining" || status === "awaiting-agent") && (
          <View style={styles.textContainer}>
            <Text style={styles.statusText}>Waiting for agent to join...</Text>
          </View>
        )}
        {client && call && status !== "start" && (
          <View style={styles.callContainer}>
            <StreamVideo client={client}>
              <StreamCall call={call}>
                {status !== "end" ? (
                  <CallLayout
                    onAgentJoined={() => setStatus("joined-with-agent")}
                    onLeave={handleLeave}
                  />
                ) : (
                  <Text>End</Text>
                )}
              </StreamCall>
            </StreamVideo>
          </View>
        )}
      </View>
    </GestureHandlerRootView>
  );
}

function CallLayout(props: {
  onAgentJoined?: () => void;
  onLeave?: () => void;
}) {
  const call = useCall();

  return (
    <>
      <View style={styles.callControls}>
        <HangUpCallButton
          onPressHandler={() => {
            call?.endCall();
            props.onLeave?.();
          }}
        />
      </View>
    </>
  );
}

const styles = StyleSheet.create({
  container: {
    flex: 1,
    justifyContent: "center",
    alignItems: "center",
    backgroundColor: "black",
  },
  joinContainer: {
    flex: 1,
    justifyContent: "center",
    width: "100%",
    alignItems: "center",
  },
  textContainer: {
    justifyContent: "center",
    alignItems: "center",
  },
  callContainer: {
    flex: 1,
    padding: 16,
    width: "100%",
  },
  statusText: {
    color: "white",
    fontSize: 16,
  },
  callControls: {
    flexDirection: "row",
    justifyContent: "center",
    alignItems: "center",
    padding: 16,
  },
});

export default App;
The CallLayout component is responsible for displaying the call controls and the audio visualizer. It will be used to display the audio animations for the voice of the AI agent and the human participant.
Step 6 - Adding the Audio Visualizer
Let’s create new file, src/AudioVisualizer.tsx We’ll add the implementation of it later:
12345678interface AudioVisualizerProps {
  colorScheme?: 'blue' | 'red';
  audioLevel: number;
}

export const AudioVisualizer = (props: AudioVisualizerProps) => {
  return null;
}
To distinguish between the human participant and the AI Agent, we’ll use different color schemes: red for the local one and blue for the AI agent.
Each call participant has an audioLevel property, which is a number representing the audio level of the participant which we can use to display the audio visualizer.
Let’s update the CallLayout component now:
1234567891011121314151617181920212223242526272829303132// imports ...

import { AudioVisualizer } from './src/AudioVisualizer';

// the rest of the code

function CallLayout(props: {
  onAgentJoined?: () => void;
  onLeave?: () => void;
}) {
  const call = useCall();
  const { useDominantSpeaker } = useCallStateHooks();
  const dominantSpeaker = useDominantSpeaker();
  return (
    <>
      <AudioVisualizer
        colorScheme={dominantSpeaker?.isLocalParticipant ? "red" : "blue"}
        audioLevel={dominantSpeaker?.audioLevel || 0}
      />
      <View style={styles.callControls}>
        <HangUpCallButton
          onPressHandler={() => {
            call?.endCall();
            props.onLeave?.();
          }}
        />
      </View>
    </>
  );
}

// styles...
At this point, we can run the app, join a call, and converse with the AI agent. However, we can take this step further, and show nice visualizations based on the audio levels of the participants.
Step 7 - Visualizing the audio levels
AudioVisualizer will consider the provided colorScheme and audioLevel props and animate accordingly. The audioLevel prop comes from the Participant state of our SDK and updates accordingly.
We won’t dive deep in the specifics of the glowing animation, but you can copy-paste this code to your AudioVisualizer.tsx file.
123456789101112131415161718192021222324252627282930313233343536373839404142434445464748495051525354555657585960616263646566676869707172737475767778798081828384858687888990919293949596979899100101102103104105106107108109110111112113114115116117118119120121122123124125126127128129130131132133134135136137138139140141142143144145146147148149150151152153154155156157158159160161162163164165166167168169170171172173174175176177178179180181182183184185186187188189190191192193194195196197198199200201202203204205206207208209import React, {useEffect, useRef} from 'react';
import {StyleSheet, View, Animated, Easing} from 'react-native';
import Svg, {Path,PathProps, Defs, RadialGradient, Stop} from 'react-native-svg';

interface AudioVisualizerProps {
  colorScheme?: 'blue' | 'red';
  audioLevel: number;
}

type AnimatedPathProps = Animated.AnimatedProps<PathProps>;

const normalizeAudioLevel = (
  level: number,
  minInput = 0,
  maxInput = 1.5,
  randomFactor = 15,
): number => {
  const clampedLevel = Math.max(minInput, Math.min(maxInput, level));
  const factor = 150;

  let normalizedValue =
    ((clampedLevel - minInput) / (maxInput - minInput)) * factor;

  // Add randomization
  // Calculate the maximum random adjustment (higher for mid-range values, lower for extremes)
  const maxAdjustment =
    (randomFactor * normalizedValue * (factor - normalizedValue)) / 25;

  // Generate a random adjustment between -maxAdjustment and +maxAdjustment
  const randomAdjustment = (Math.random() * 2 - 1) * maxAdjustment;

  // Apply the random adjustment
  normalizedValue += randomAdjustment;

  return Math.max(0, Math.min(factor, normalizedValue));
};

export const AudioVisualizer: React.FC<AudioVisualizerProps> = ({
  colorScheme = 'blue',
  audioLevel = 0,
}) => {
  const normalizedAudioLevel = normalizeAudioLevel(audioLevel);

  // Create a local animated value
  const audioLevelAnim = useRef(new Animated.Value(0)).current;

  // Create a continuous animation value
  const continuousAnim = useRef(new Animated.Value(0)).current;

  // Store previous audio level for smoother transitions
  const prevAudioLevelRef = useRef(0);

  // Generate intermediate values for smoother transitions
  const generateIntermediateValues = (
    start: number,
    end: number,
    steps: number,
  ) => {
    const result = [];
    for (let i = 1; i <= steps; i++) {
      result.push(start + (end - start) * (i / steps));
    }
    return result;
  };

  // Start continuous animation
  useEffect(() => {
    const startContinuousAnimation = () => {
      Animated.loop(
        Animated.sequence([
          Animated.timing(continuousAnim, {
            toValue: 5,
            duration: 1000,
            useNativeDriver: false,
          }),
          Animated.timing(continuousAnim, {
            toValue: 0,
            duration: 1000,
            useNativeDriver: false,
          }),
        ]),
      ).start();
    };

    startContinuousAnimation();

    return () => {
      continuousAnim.stopAnimation();
    };
  }, [continuousAnim]);

  // React to changes in audioLevel prop with smoother transitions
  useEffect(() => {
    if (Math.abs(normalizedAudioLevel - prevAudioLevelRef.current) > 5) {
      // For significant changes, create intermediate steps
      const steps = 10; // Number of intermediate steps
      const intermediateValues = generateIntermediateValues(
        prevAudioLevelRef.current,
        normalizedAudioLevel,
        steps,
      );

      // Create a sequence of animations through intermediate values
      const animations = intermediateValues.map(value =>
        Animated.timing(audioLevelAnim, {
          toValue: value,
          duration: 30, // Short duration for each step
          useNativeDriver: false,
          easing: Easing.bezier(0.25, 0.1, 0.25, 1), // Smooth cubic bezier curve
        }),
      );

      // Run the sequence
      Animated.sequence(animations).start();
    } else {
      // For small changes, animate directly
      Animated.timing(audioLevelAnim, {
        toValue: normalizedAudioLevel,
        duration: 30,
        useNativeDriver: false,
        easing: Easing.bezier(0.25, 0.1, 0.25, 1), // Smooth cubic bezier curve
      }).start();
    }

    // Update previous value
    prevAudioLevelRef.current = normalizedAudioLevel;
  }, [normalizedAudioLevel, audioLevelAnim]);

  // Combine the base animation with the continuous animation
  const combinedAnimation = Animated.add(audioLevelAnim, continuousAnim);

  // Scale the combined value to the animation range with smoother interpolation
  const animation = combinedAnimation.interpolate({
    inputRange: [0, 25, 50, 75, 100], // More interpolation points
    outputRange: [0.3, 0.5, 0.7, 0.85, 1], // More gradual scaling
    extrapolate: 'clamp',
  });

  const blueGradient = {
    center: '#ffffff',
    middle: '#40ffff',
    outer: '#0099ff',
    edge: '#0066cc',
  };

  const redGradient = {
    center: '#ffffff',
    middle: '#ff4040',
    outer: '#ff0000',
    edge: '#cc0000',
  };

  const colors = colorScheme === 'blue' ? blueGradient : redGradient;

  const AnimatedPath = Animated.createAnimatedComponent(Path);

  const animatedProps: AnimatedPathProps = {
    fill: 'url(#grad)',
    d: animation.interpolate({
      inputRange: [0, 1],
      outputRange: [
        // Base state - larger starting size
        'M 200 140 C 250 140, 260 140, 260 200 C 260 260, 250 260, 200 260 C 150 260, 140 260, 140 200 C 140 140, 150 140, 200 140',
        // Expanded state - even larger maximum size
        'M 200 80 C 290 80, 320 80, 320 200 C 320 320, 290 320, 200 320 C 110 320, 80 320, 80 200 C 80 80, 110 80, 200 80',
      ],
    }),
  };

  return (
    <View style={styles.container}>
      <View style={styles.blobContainer}>
        <Svg height="500" width="500" viewBox="0 0 400 400">
          <Defs>
            <RadialGradient
              id="grad"
              cx="50%"
              cy="50%"
              rx="50%"
              ry="50%"
              fx="50%"
              fy="50%">
              <Stop offset="0%" stopColor={colors.center} stopOpacity="1" />
              <Stop offset="20%" stopColor={colors.middle} stopOpacity="0.9" />
              <Stop offset="50%" stopColor={colors.outer} stopOpacity="0.7" />
              <Stop offset="100%" stopColor={colors.edge} stopOpacity="0" />
            </RadialGradient>
          </Defs>
          <AnimatedPath {...animatedProps} />
        </Svg>
      </View>
    </View>
  );
};

const styles = StyleSheet.create({
  container: {
    flex: 1,
    backgroundColor: 'black',
    justifyContent: 'center',
    alignItems: 'center',
  },
  blobContainer: {
    width: 500,
    height: 500,
    justifyContent: 'center',
    alignItems: 'center',
  },
});
Finally, we can talk to the AI and see some beautiful visualizations while the participants speak. To run the app execute the following commands in your terminal:
- start the Metro server with
npm start - start the app on the device or simulator with
npm run androidornpm run ios
Note: On the first on iOS it is possible to get this: error Signing for "AiVideoDemo" requires a development team. Select a development team in the Signing & Capabilities editor.
Open the XCode Workspace in XCode pick a team in the Signing and Capabilities for the project.
You can find the source code of the Node.js backend here, while the completed Android tutorial can be found on the following page.
Recap
In this tutorial, we have built an example of an app that lets you talk with an AI bot using OpenAI Realtime and Stream’s video edge infrastructure. The integration uses WebRTC for the best latency and quality even with poor connections.
We have shown you how to use OpenAI’s real-time API and provide the agent with custom instructions, voice, and function calls. On the React Native side, we have shown you how to join the call and build an animation using the audio levels.
Both the video SDK for React Native and the API have plenty more features available to support more advanced use cases.
Next Steps
- Explore the tutorials for other platforms: React, iOS, Android, Flutter.
- Check the Backend documentation with more examples in JS and Python.
- Read more about the React Native SDK documentation about additional features.