This tutorial teaches you how to quickly build a production-ready voice AI agent with OpenAI realtime using Stream’s video edge network, Swift, and Node.
- The instructions to the agent are sent server-side (node) so you can do function calling or RAG
- The integration uses Stream’s video edge network (for low latency) and WebRTC (so it works under slow/unreliable network conditions)
- You have complete control over the AI setup and visualization
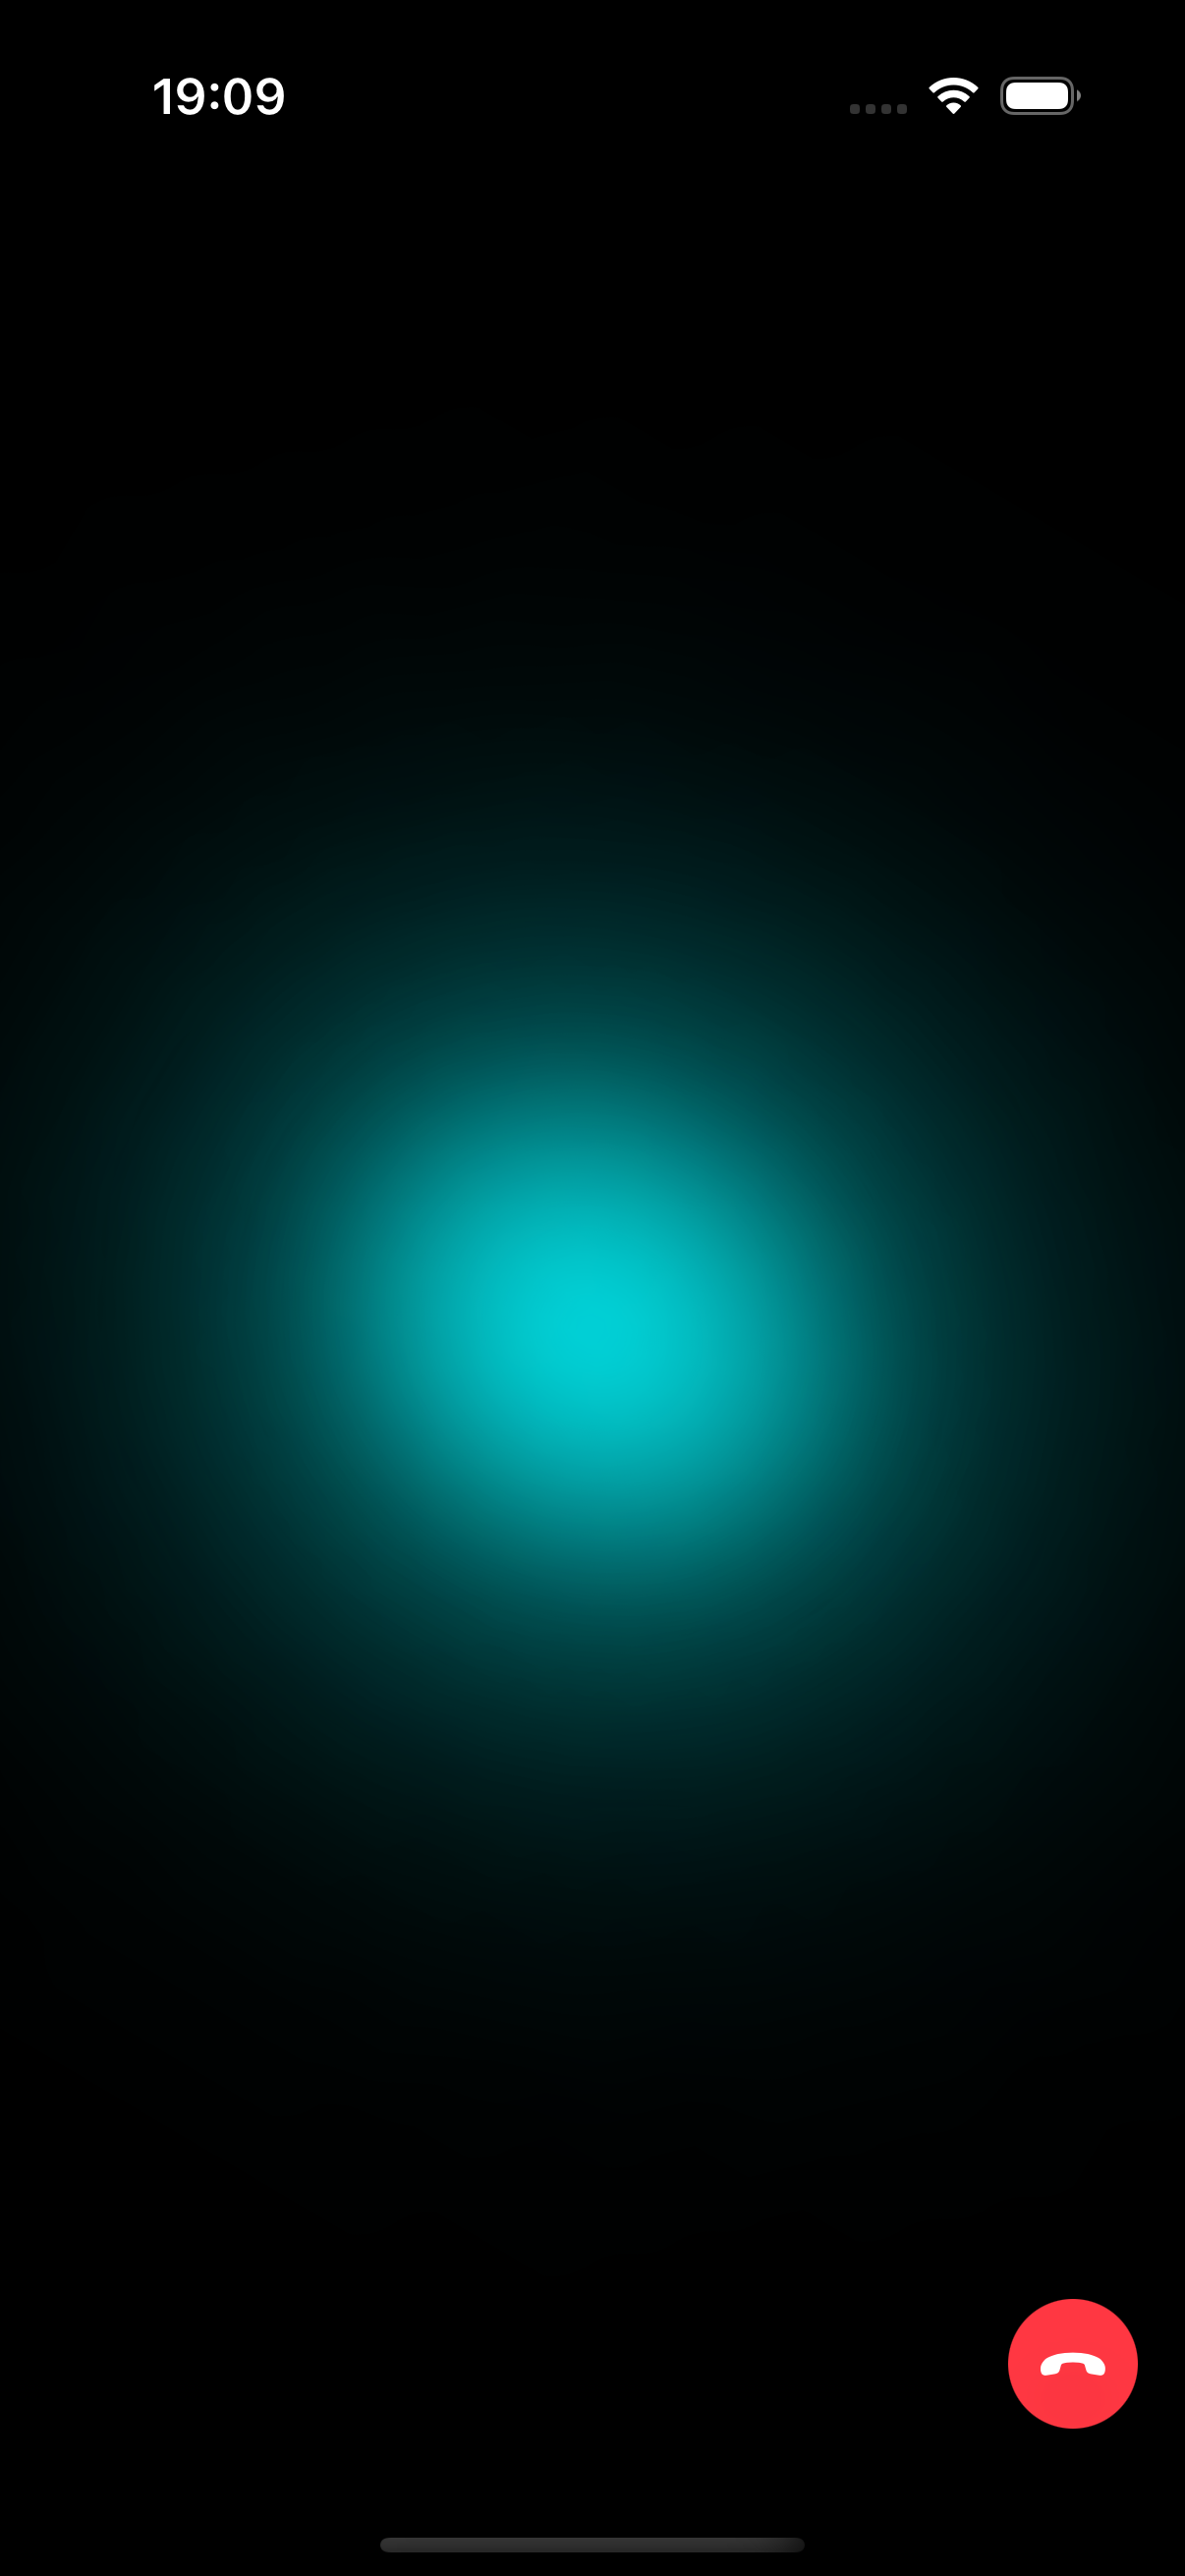
The result will look something like this:
While this tutorial uses Node + Swift you could achieve something similar with any other backend language + Stream SDK. (Swift, Kotlin, React, JS, Flutter, React Native, Unity, etc)
Step 1 - Credentials and Backend setup
First, we will set up the Node.js backend and get Stream and OpenAI credentials.
Step 1.1 - OpenAI and Stream credentials
To get started, you need an OpenAI account and an API key. Please note that the OpenAI credentials will never be shared client-side and will only be exchanged between yours and Stream servers.
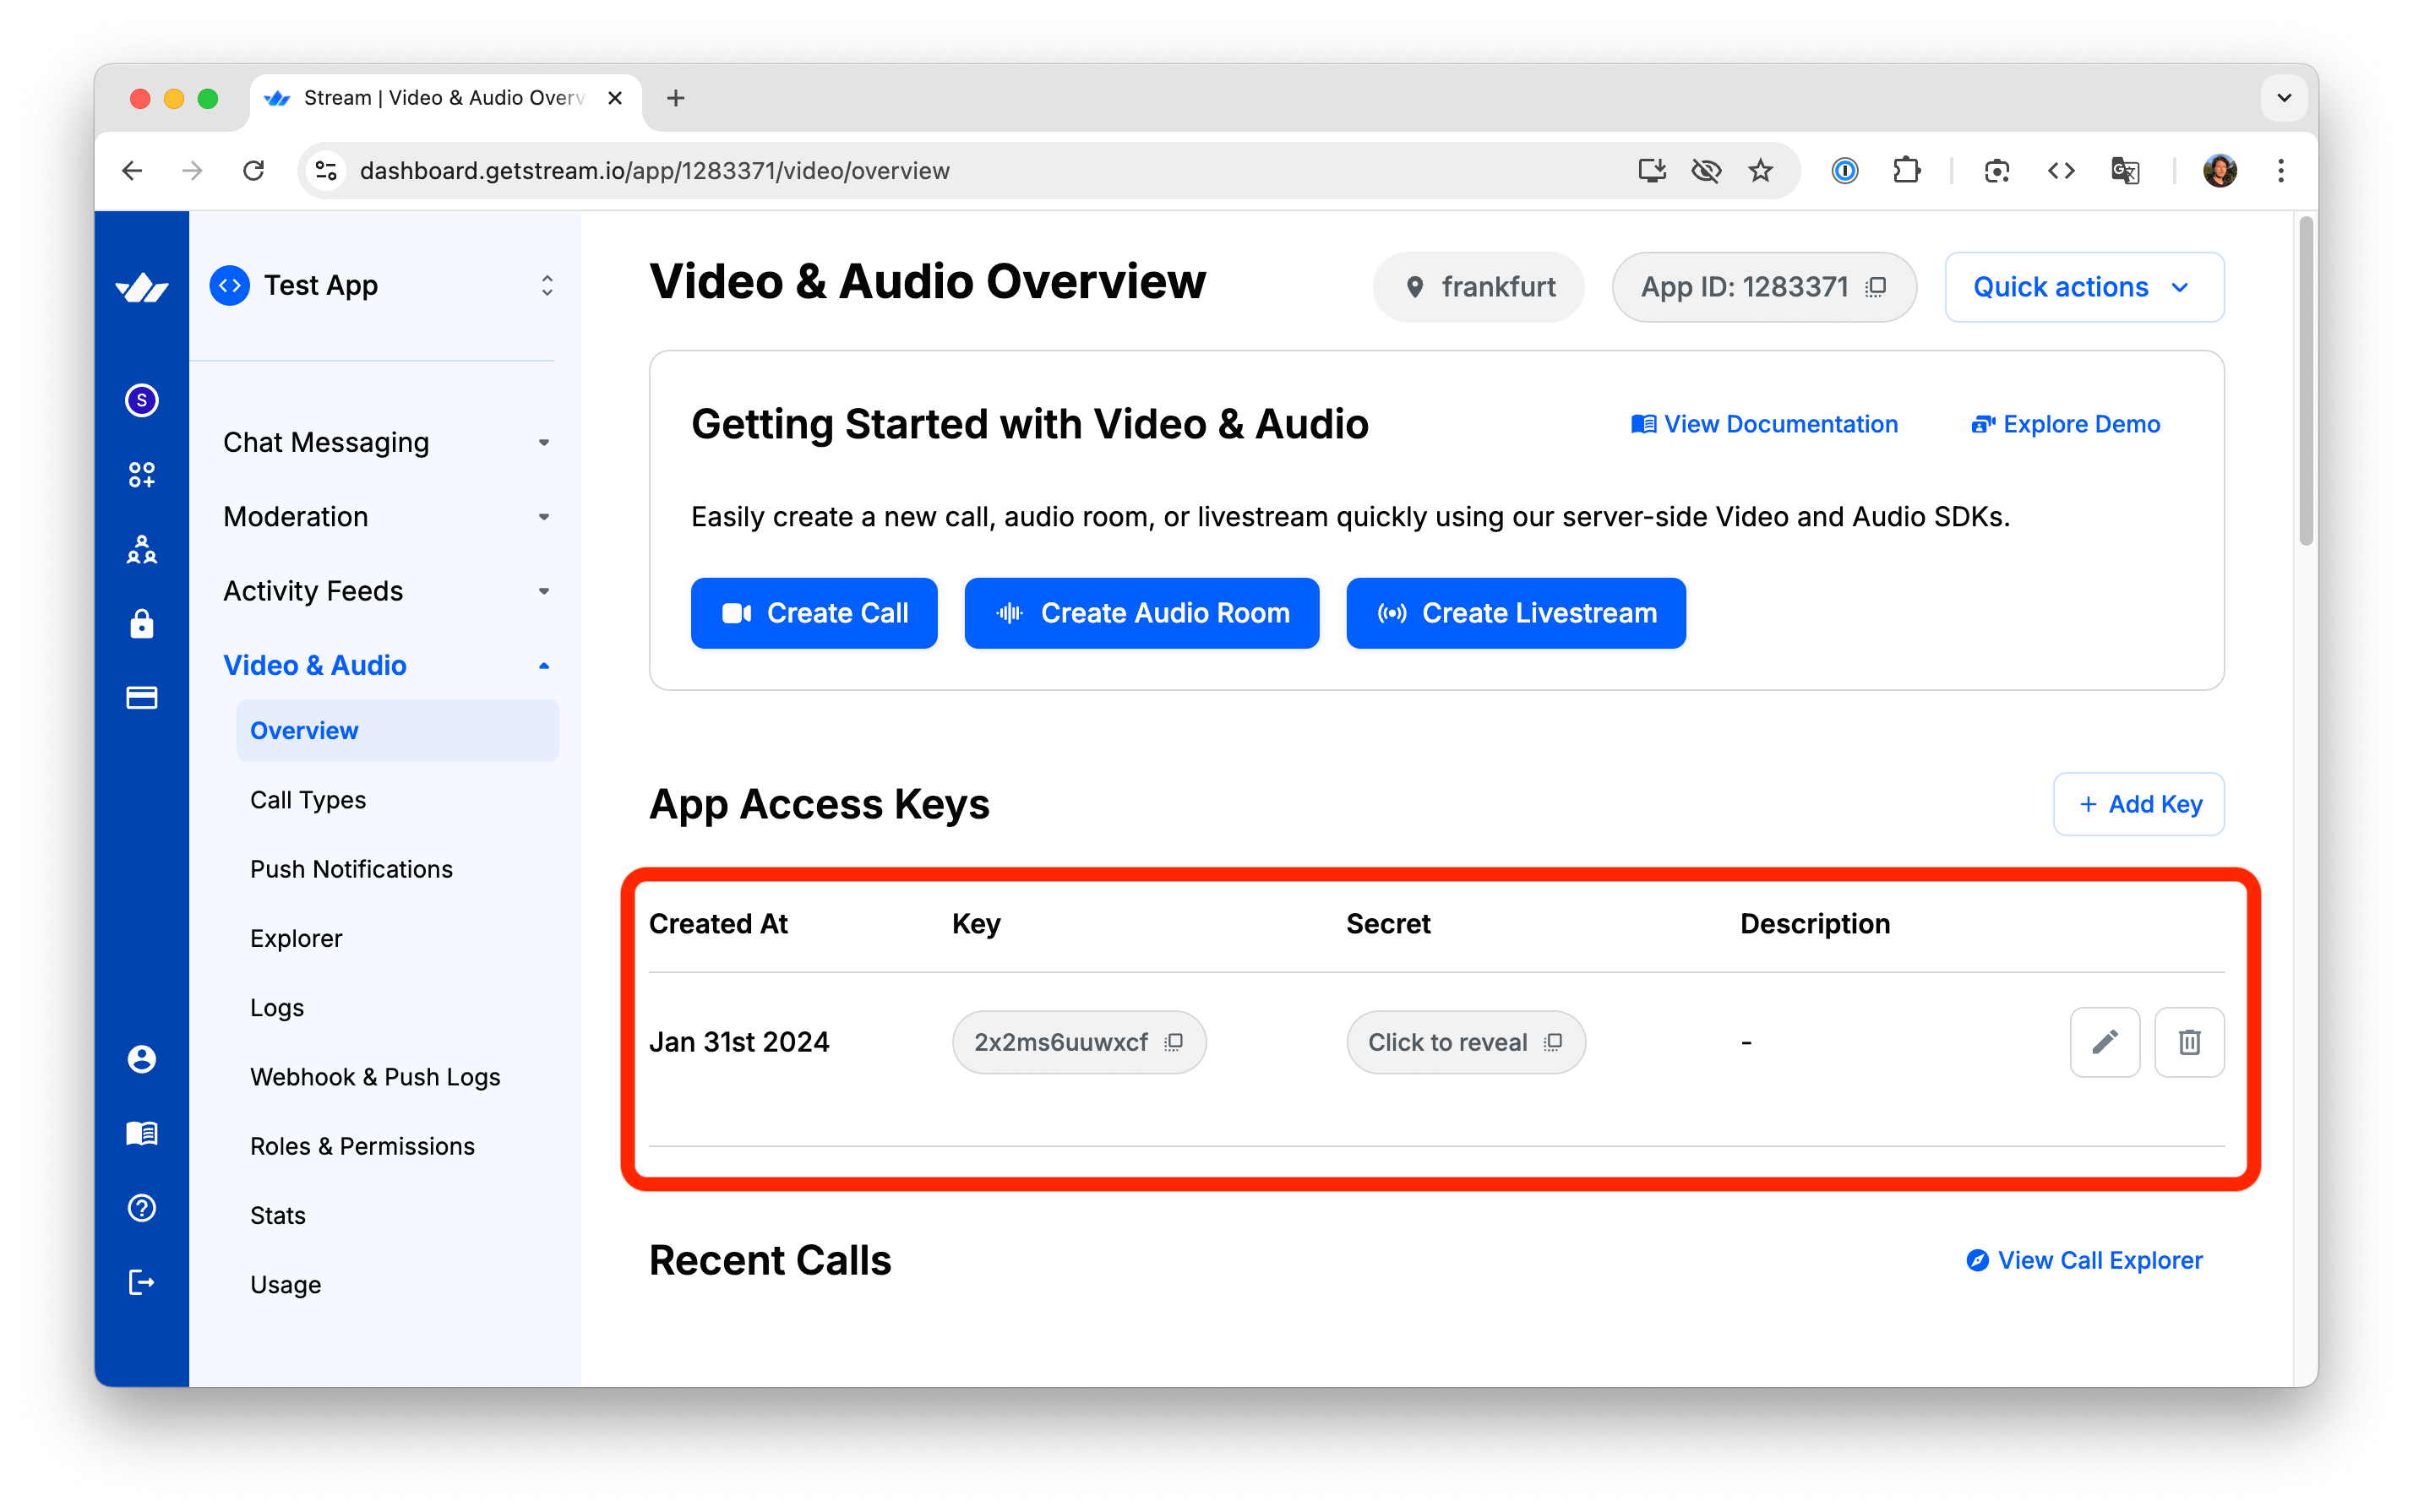
Additionally, you will need a Stream account and use the API key and secret from the Stream dashboard.
Step 1.2 - Create the Node.js project
Make sure that you are using a recent version of Node.js such as 22 or later, you can check that with node -v
First, let’s create a new folder called “openai-audio-tutorial”. From the terminal, go to the folder, and run the following command:
1npm init -y
This command generates a package.json file with default settings.
Step 1.3 - Installing the dependencies
Next, let’s update the generated package.json with the following content:
12345678910111213141516{
  "name": "@stream-io/video-ai-demo-server",
  "type": "module",
  "dependencies": {
    "@hono/node-server": "^1.13.8",
    "@stream-io/node-sdk": "^0.4.17",
    "@stream-io/openai-realtime-api": "^0.1.0",
    "dotenv": "^16.3.1",
    "hono": "^4.7.4",
    "open": "^10.1.0"
  },
  "scripts": {
    "server": "node ./server.mjs",
    "standalone-ui": "node ./standalone.mjs"
  }
}
Then, run the following command to install the dependencies:
1npm install
Step 1.4 - Setup the credentials
Create a .env file in the project root with the following variables:
123456# Stream API credentials
STREAM_API_KEY=your_stream_api_key
STREAM_API_SECRET=your_stream_api_secret

# OpenAI API key
OPENAI_API_KEY=your_openai_api_key
Then edit the .env file with your actual API keys from Step 1.1. You can find the keys on your Stream Dashboard:
Step 1.5 - Implement the standalone-ui script
Before diving into the iOS integrations, we will build a simple server integration that will show how to connect to the AI agent to a call and connect to it with a simple web app.
Create a file called standalone.mjs and paste this content.
1234567891011121314151617181920212223242526272829303132333435363738394041424344454647484950515253545556import { config } from 'dotenv';
import { StreamClient } from '@stream-io/node-sdk';
import open from 'open';
import crypto from 'crypto';

// load config from dotenv
config();

async function main() {
    // Get environment variables
    const streamApiKey = process.env.STREAM_API_KEY;
    const streamApiSecret = process.env.STREAM_API_SECRET;
    const openAiApiKey = process.env.OPENAI_API_KEY;

    // Check if all required environment variables are set
    if (!streamApiKey || !streamApiSecret || !openAiApiKey) {
        console.error("Error: Missing required environment variables, make sure to have a .env file in the project root, check .env.example for reference");
        process.exit(1);
    }

    const streamClient = new StreamClient(streamApiKey, streamApiSecret);
    const call = streamClient.video.call("default", crypto.randomUUID());

    // realtimeClient is https://github.com/openai/openai-realtime-api-beta openai/openai-realtime-api-beta
    const realtimeClient = await streamClient.video.connectOpenAi({
        call,
        openAiApiKey,
        agentUserId: "lucy",
    });

    // Set up event handling, all events from openai realtime api are available here see: https://platform.openai.com/docs/api-reference/realtime-server-events
    realtimeClient.on('realtime.event', ({ time, source, event }) => {
        console.log(`got an event from OpenAI ${event.type}`);
        if (event.type === 'response.audio_transcript.done') {
            console.log(`got a transcript from OpenAI ${event.transcript}`);
        }
    });

    realtimeClient.updateSession({
        instructions: "You are a helpful assistant that can answer questions and help with tasks.",
    });

    // Get token for the call
    const token = streamClient.generateUserToken({user_id:"theodore"});

    const callUrl = `https://pronto.getstream.io/join/${call.id}?type=default&api_key=${streamClient.apiKey}&token=${token}&skip_lobby=true`;

    // Open the browser
    console.log(`Opening browser to join the call... ${callUrl}`);
    await open(callUrl);
}

main().catch(error => {
    console.error("Error:", error);
    process.exit(1);
});
Step 1.6 - Running the sample
At this point, we can run the script with this command:
1npm run standalone-ui
This will open your browser and connect you to a call where you can talk to the OpenAI agent. As you talk to the agent, you will notice your shell will contain logs for each event that OpenAI is sending.
Let’s take a quick look at what it happening in the server-side code we just added:
- Here we instantiate Stream Node SDK with the API credentials and then use that to create a new call object. That call will be used to host the conversation between the user and the AI agent.
12const streamClient = new StreamClient(streamApiKey, streamApiSecret);
const call = streamClient.video.call("default", crypto.randomUUID());
- The next step, is to have the Agent connect to the call and obtain a OpenAI Realtime API Client. The
connectOpenAifunction does the following things: it instantiate the Realtime API client and then uses Stream API to connect the agent to the call. The agent will connect to the call as a user with ID"lucy"
12345const realtimeClient = await streamClient.video.connectOpenAi({
    call,
    openAiApiKey,
    agentUserId: "lucy",
});
- We then use the realtimeClient object to pass instructions to OpenAI and to listen to events emitted by OpenAI. The interesting bit is that
realtimeClientis an instance of OpenAI’s official API client. This gives you full control of what you can do with OpenAI
12345678910realtimeClient.on('realtime.event', ({ time, source, event }) => {
    console.log(`got an event from OpenAI ${event.type}`);
    if (event.type === 'response.audio_transcript.done') {
        console.log(`got a transcript from OpenAI ${event.transcript}`);
    }
});

realtimeClient.updateSession({
    instructions: "You are a helpful assistant that can answer questions and help with tasks.",
});
Step 2 - Setup your server-side integration
This example was pretty simple to set up and showcases how easy it is to add an AI bot to a Stream call. When building a real application, you will need your backend to handle authentication for your clients as well as send instructions to OpenAI (RAG, function calling in most applications, needs to run on your backend).
So the backend we are going to build will take care of two things:
- Generate a valid token to the iOS app to join the call running on Stream
- Use Stream APIs to join the same call with the AI agent and set it up with instructions
Step 2.1 - Implement the server.mjs
Create a new file in the same project, called server.mjs, and add the following code:
123456789101112131415161718192021222324252627282930313233343536373839404142434445464748495051525354555657585960616263646566676869707172737475767778798081828384858687888990919293949596979899100101102103104105106107108109110111112113114115116117118119120121122123124125126127128129130131132133134135136import { serve } from "@hono/node-server";
import { StreamClient } from "@stream-io/node-sdk";
import { Hono } from "hono";
import { cors } from "hono/cors";
import crypto from 'crypto';
import { config } from 'dotenv';

// load config from dotenv
config();

// Get environment variables
const streamApiKey = process.env.STREAM_API_KEY;
const streamApiSecret = process.env.STREAM_API_SECRET;
const openAiApiKey = process.env.OPENAI_API_KEY;

// Check if all required environment variables are set
if (!streamApiKey || !streamApiSecret || !openAiApiKey) {
    console.error("Error: Missing required environment variables, make sure to have a .env file in the project root, check .env.example for reference");
    process.exit(1);
}

const app = new Hono();
app.use(cors());

const streamClient = new StreamClient(streamApiKey, streamApiSecret);

/**
 * Endpoint to generate credentials for a new video call.
 * Creates a unique call ID, generates a token, and returns necessary connection details.
 */
app.get("/credentials", (c) => {
  console.log("got a request for credentials");
  // Generate a shorter UUID for callId (first 12 chars)
  const callId = crypto.randomUUID().replace(/-/g, '').substring(0, 12);
  // Generate a shorter UUID for userId (first 8 chars with prefix)
  const userId = `user-${crypto.randomUUID().replace(/-/g, '').substring(0, 8)}`;
  const callType = "default";
  const token = streamClient.generateUserToken({
    user_id: userId,
  });
  return c.json({
    apiKey: streamApiKey,
    token,
    callType,
    callId,
    userId
  });
});

/**
 * Endpoint to connect an AI agent to an existing video call.
 * Takes call type and ID parameters, connects the OpenAI agent to the call,
 * sets up the real-time client with event handlers and tools,
 * and returns a success response when complete.
 */
app.post("/:callType/:callId/connect", async (c) => {
  console.log("got a request for connect");
  const callType = c.req.param("callType");
  const callId = c.req.param("callId");

  const call = streamClient.video.call(callType, callId);
  const realtimeClient = await streamClient.video.connectOpenAi({
    call,
    openAiApiKey,
    agentUserId: "lucy",
  });
  await setupRealtimeClient(realtimeClient);
  console.log("agent is connected now");
  return c.json({ ok: true });
});

async function setupRealtimeClient(realtimeClient) {
  realtimeClient.on("error", (event) => {
    console.error("Error:", event);
  });

  realtimeClient.on("session.update", (event) => {
    console.log("Realtime session update:", event);
  });

  realtimeClient.updateSession({
    instructions: "You are a helpful assistant that can answer questions and help with tasks.",
    turn_detection: { type: "semantic_vad" },
    input_audio_transcription: { model: "gpt-4o-transcribe" },
    input_audio_noise_reduction: { type: "near_field" },
  });

  realtimeClient.addTool(
    {
      name: "get_weather",
      description:
        "Call this function to retrieve current weather information for a specific location. Provide the city name.",
      parameters: {
        type: "object",
        properties: {
          city: {
            type: "string",
            description: "The name of the city to get weather information for",
          },
        },
        required: ["city"],
      },
    },
    async ({ city, country, units = "metric" }) => {
      console.log("get_weather request", { city, country, units });
      try {
        // This is a placeholder for actual weather API implementation
        // In a real implementation, you would call a weather API service here
        const weatherData = {
          location: country ? `${city}, ${country}` : city,
          temperature: 22,
          units: units === "imperial" ? "°F" : "°C",
          condition: "Partly Cloudy",
          humidity: 65,
          windSpeed: 10
        };

        return weatherData;
      } catch (error) {
        console.error("Error fetching weather data:", error);
        return { error: "Failed to retrieve weather information" };
      }
    },
  );

  return realtimeClient;
}

// Start the server
serve({
  fetch: app.fetch,
  hostname: "0.0.0.0",
  port: 3000,
});

console.log(`Server started on :3000`);
In the code above, we set up two endpoints: /credentials, which generates a unique call ID and authentication token, and /:callType/:callId/connect, which connects the AI agent (that we call “lucy”) to a specific video call.
The assistant follows predefined instructions, in this case trying to be helpful with tasks. Based on the purpose of your AI bot, you should update these instructions accordingly. In the same updateSession call we instruct OpenAI to use the semantic classifier for voice activity detection to detect when the user has finished speaking, a GPT-4o based model for transcriptions, and near-field noise reduction for audio.
We also show an example of a function call, using the get_weather tool.
Step 2.2 - Running the server
We can run the server now, this will launch a server and listen on port:3000
1npm run server
To make sure everything is working as expected, you can run a curl GET request from your terminal.
1curl -X GET http://localhost:3000/credentials
As a result, you should see the credentials required to join the call. With that, we’re all set up server-side!
Step 3 - Setting up the iOS project
Now, let’s switch to the iOS app, that will connect to this API, and provide the visualizations of the AI’s audio levels.
Step 3.1 - Adding the Stream Video dependency
Let’s create a new project, such as AIVideoDemo, and add the StreamVideo iOS SDK.
Follow the steps here to add the SDK as a dependency to your project. For the best experience, we recommend using version 1.18.0 or above.
Step 3.2 - Setup Microphone Usage description
Since you will use the microphone to communicate with the AI bot, add the “Privacy - Microphone Usage Description” permission in your Info.plist file. For example, you can use the following text as a description: “Microphone access needed for talking with AI.”
Step 4 - Stream Video Setup
Step 4.1 - Declaring the required properties
It’s time to write some iOS code. Head over to the created AIVideoDemoApp.swift file, and add the following @State properties:
1234567891011121314151617import SwiftUI
import StreamVideo
import StreamVideoSwiftUI

@main
struct AIVideoDemoApp: App {

    private let baseURL = "http://localhost:3000"

    @State var streamVideo: StreamVideo?
    @State var call: Call?
    @State var credentials: Credentials?
    @State var connectTask: Task<Void, Error>?
    @State var callState: AICallState = .idle

    // Existing code
 }
After declaring these properties, we need to set them up. We will use the streamVideo object to communicate with Stream’s Video API and store the relevant call information in the call object.
We will fetch the credentials required to set up the streamVideo object and the call from the Node.js server API we created above and populate the credentials value with the response from the Node.js server.
Let’s add the Credentials model that reflects this response:
1234567struct Credentials: Codable {
    let apiKey: String
    let token: String
    let callType: String
    let callId: String
    let userId: String
}
We are also declaring a callState enum of type AICallState, which will allow us to show different UI, depending on the app's state. Here are the possible values of this enum:
12345enum AICallState {
    case idle
    case joining
    case active
}
Step 4.2 - Fetching the credentials
Now, we can create a method to fetch the credentials from our server. Add the following code in the AIVideoDemoApp.swift file.
12345678func fetchCredentials() async throws -> Credentials {
    let urlSession = URLSession.shared
    let url = URL(string: "\(baseURL)/credentials")!
    var request = URLRequest(url: url)
    request.httpMethod = "GET"
    let data = try await urlSession.data(for: request).0 as Data
    return try JSONDecoder().decode(Credentials.self, from: data)
}
This method fetches the credentials to set up the StreamVideo object and get the call data.
Note: We are using “localhost” here (as defined in the baseURL property), the simplest way to test this is to run on a simulator. You can also test this on an actual device. You need to set baseURL to your local network IP address instead. Additionally, your device and your computer should be on the same WiFi network and you need to allow “Arbitrary Loads” and “Local Networking” in your plist (the local server uses HTTP and not HTTPS).
Step 4.3 - Connecting to Stream Video
We now have the credentials, and we can connect to Stream Video. To do this, add the following code:
123456789101112131415func connect() async throws {
    let credentials = try await fetchCredentials()
    let user = User(id: credentials.userId)

    let streamVideo = StreamVideo(
        apiKey: credentials.apiKey,
        user: user,
        token: .init(rawValue: credentials.token)
    )

    self.streamVideo = streamVideo
    self.credentials = credentials

    try await streamVideo.connect()
}
This method fetches the credentials, creates a StreamVideo object, and connects to it.
We will call this method on the appearance of the root view in our next step.
Step 5 - Building the UI
We can now start building the UI for our app. Replace the contents of var body: some Scene in the AIVideoDemoApp.swift file with the following code:
1234567891011121314151617181920212223242526272829303132333435363738394041424344454647484950var body: some Scene { WindowGroup { ZStack { if callState == .active, let call { AISpeakingView(callState: call.state) .overlay( VStack { Spacer() VStack { HStack { Spacer() StatelessHangUpIconView(call: call) { call.leave() self.call = nil self.callState = .idle } } } .padding() } ) .id(call.cId) } else if callState == .joining { HStack { Text("Waiting for AI agent to join...") ProgressView() } } else { Button { guard callState == .idle else { return } Task { try await joinCall() } } label: { Text("Click to talk to AI") .padding() } } } .foregroundColor(.white) .frame(maxWidth: .infinity, maxHeight: .infinity) .background(Color.black.edgesIgnoringSafeArea(.all)) .onAppear { guard connectTask == nil else { return } connectTask = Task { try await connect() } } } }
As mentioned above, we first connect to StreamVideo using the onAppear lifecycle method. We store the connection flow in a connectTask.
Next, we are showing a different UI based on the state of the callState.
When the state is .active, we show a new AISpeakingView. This view will show a nice audio visualization when the current user and AI speak. We will provide more details for this view in the next section. It’s enough to declare it with a simple TODO text.
1234567struct AISpeakingView: View {
    @ObservedObject var callState: CallState

    var body: some View {
        Text("TODO: implement this")
    }
}
Additionally, we are adding an overlay that shows a button for leaving the call. We are using the StatelessHangUpIconView from the SwiftUI Video SDK.
Next, when the state is .joining, we show appropriate text and a progress view.
When the state is .idle, we show a button with the text “Click to talk to AI”. When the button is tapped, we are calling the joinCall method that will join the call with the AI bot:
123456789101112131415161718192021222324252627282930func joinCall() async throws {
    do {
        self.callState = .joining
        _ = await connectTask?.result
        guard let credentials, let streamVideo else { return }
        self.call = streamVideo.call(
            callType: credentials.callType,
            callId: credentials.callId,
            callSettings: .init(videoOn: false)
        )
        Task {
            try await connectAI(callType: credentials.callType, callId: credentials.callId)
        }
        try await call?.join(
            create: true,
        )
        self.callState = .active
    } catch {
        print(error)
        self.callState = .idle
    }
}

func connectAI(callType: String, callId: String) async throws {
    let urlSession = URLSession.shared
    let url = URL(string: "\(baseURL)/\(callType)/\(callId)/connect")!
    var request = URLRequest(url: url)
    request.httpMethod = "POST"
    _ = try await urlSession.data(for: request)
}
At this point, you can run the app, join a call, and converse with the AI agent. However, we can take this step further and show nice visualizations based on the audio levels of the participants.
Step 6 - Visualizing the audio levels
Let’s implement the AISpeakingView next. This view will listen to the audio levels provided by the call state, for each of its participants. It will then visualize them, with a nice glowing animation that expands and contracts based on the user’s voice amplitude. Additionally, it subtly rotates and changes shape.
Step 6.1 - AISpeakingView
Replace the existing TODO content, with the following implementation:
123456789101112131415161718192021222324252627282930313233343536373839404142434445464748495051525354555657struct AISpeakingView: View {
    private let agentId = "lucy"

    @ObservedObject var callState: CallState

    @State var amplitude: CGFloat = 0.0
    @State var audioLevels = [Float]()
    @State var speakerState: AISpeakerState = .idle

    var body: some View {
        GlowView(amplitude: amplitude, gradientColors: speakerState.gradientColors)
            .frame(maxWidth: .infinity, maxHeight: .infinity)
            .padding()
            .background(Color.black)
            .onChange(of: callState.activeSpeakers) { oldSpeakers, newSpeakers in
                if let speaker = newSpeakers.first(where: { participant in
                    participant.userId.contains(agentId)
                }) {
                    if speakerState != .aiSpeaking {
                        self.speakerState = .aiSpeaking
                    }
                    self.audioLevels = speaker.audioLevels
                        .map { value in
                            value / Float(Int.random(in: 1...3))
                        }
                } else if let speaker = newSpeakers.first(where: { $0.id == callState.localParticipant?.id }) {
                    if speakerState != .userSpeaking {
                        self.speakerState = .userSpeaking
                    }
                    self.audioLevels = speaker.audioLevels
                } else {
                    self.speakerState = .idle
                    self.audioLevels = []
                }
                self.amplitude = computeSingleAmplitude(from: audioLevels)
            }
    }

    func computeSingleAmplitude(from levels: [Float]) -> CGFloat {
        let normalized = normalizePeak(levels)
        guard !normalized.isEmpty else { return 0 }

        let sum = normalized.reduce(0, +)
        let average = sum / Float(normalized.count)
        return CGFloat(average)
    }

    func normalizePeak(_ levels: [Float]) -> [Float] {
        // 1) Find the peak (largest absolute value)
        guard let maxLevel = levels.map({ abs($0) }).max(), maxLevel > 0 else {
            return levels // Avoid dividing by zero if empty or all zeros
        }

        // 2) Divide each sample by the peak
        return levels.map { $0 / maxLevel }
    }
}
Before we dive into the GlowView implementation, let’s discuss the onChange modifier, that listens to the change of the activeSpeakers in the callState.
We call our agent “lucy”, and based on that, we filter out this participant from the current user. We show a different color depending on who is speaking. If the AI speaks, we show a blue color with different gradients. When the current user is speaking, we use a red color instead.
This is represented by the enum AISpeakingState:
12345678910111213141516171819202122enum AISpeakerState {
    case aiSpeaking
    case userSpeaking
    case idle
}

extension AISpeakerState {
    var gradientColors: [Color] {
        switch self {
        case .userSpeaking:
            return [
                Color.red,
                Color.red.opacity(0.0)
            ]
        default:
            return [
                Color(red: 0.0, green: 0.976, blue: 1.0),
                Color(red: 0.0, green: 0.227, blue: 1.0, opacity: 0.0)
            ]
        }
    }
}
The audioLevels array is the data source for these visualizations. It’s filled with the values of each participant’s audioLevels array, which are available in each participant’s state.
These values then compute the current amplitude, which we pass to the glow view.
Step 6.2 - GlowView
Let’s implement the GlowView next. This view will contain three glow layers, which will be animated with a subtle rotating animation.
For each layer, we will define the minimum and maximum values of the radius size, brightness, blurring, opacity, and wave length.
Feel free to adjust these values to customize the animation.
123456789101112131415161718192021222324252627282930313233343536373839404142434445464748495051525354555657585960616263646566676869707172737475767778798081828384858687888990919293949596979899100101102103104105106107108109110111112113114115116117118119120121122123124125126127128129130131132133134135136struct GlowView: View {
    /// Normalized audio level [0.0 ... 1.0]
    let amplitude: CGFloat
    let gradientColors: [Color]

    @State private var time: CGFloat = 0
    @State private var rotationAngle: CGFloat = 0

    var body: some View {
        GeometryReader { geo in
            ZStack {
                // LAYER 1 (Outer)
                glowLayer(
                    baseRadiusMin: 150,   // radius at amplitude=0
                    baseRadiusMax: 250,  // radius at amplitude=1
                    blurRadius: 60,
                    baseOpacity: 0.35,
                    scaleRange: 0.3,   // how much amplitude grows it
                    waveRangeMin: 0.2, // bigger morph at low amplitude
                    waveRangeMax: 0.02, // smaller morph at high amplitude
                    geoSize: geo.size,
                    gradientColors: gradientColors
                )

                // LAYER 2 (Mid)
                glowLayer(
                    baseRadiusMin: 100,
                    baseRadiusMax: 150,
                    blurRadius: 40,
                    baseOpacity: 0.55,
                    scaleRange: 0.3,
                    waveRangeMin: 0.15,
                    waveRangeMax: 0.03,
                    geoSize: geo.size,
                    gradientColors: gradientColors
                )

                // LAYER 3 (Bright Core)
                glowLayer(
                    baseRadiusMin: 50,
                    baseRadiusMax: 100,
                    blurRadius: 20,
                    baseOpacity: 0.9,
                    scaleRange: 0.5,
                    waveRangeMin: 0.35,
                    waveRangeMax: 0.05,
                    geoSize: geo.size,
                    gradientColors: gradientColors
                )
            }
            .frame(width: geo.size.width, height: geo.size.height)
            // Rotate the entire glow. This ensures a unified rotation “centered” animation.
            .rotationEffect(.degrees(Double(rotationAngle)))
        }
        .background(Color.black.edgesIgnoringSafeArea(.all))
        // Animate amplitude changes
        .animation(.easeInOut(duration: 0.2), value: amplitude)
        .onAppear {
            // Continuous rotation over ~10s
            let spinDuration: CGFloat = 10
            withAnimation(.linear(duration: Double(spinDuration)).repeatForever(autoreverses: false)) {
                rotationAngle = 360
            }

            // CADisplayLink for smooth ~60fps; we keep `time` in [0..1] to loop seamlessly
            let displayLink = CADisplayLink(target: DisplayLinkProxy { dt in
                let speed: CGFloat = 0.05
                let next = time + speed * CGFloat(dt)
                time = next.truncatingRemainder(dividingBy: 1.0)
            }, selector: #selector(DisplayLinkProxy.tick(_:)))
            displayLink.add(to: .main, forMode: .common)
        }
    }

    /// - `baseRadiusMin` / `baseRadiusMax`: radius shrinks/grows with amplitude
    /// - `waveRangeMin` / `waveRangeMax`: morphing is stronger at low amplitude, weaker at high amplitude
    private func glowLayer(
        baseRadiusMin: CGFloat,
        baseRadiusMax: CGFloat,
        blurRadius: CGFloat,
        baseOpacity: CGFloat,
        scaleRange: CGFloat,
        waveRangeMin: CGFloat,
        waveRangeMax: CGFloat,
        geoSize: CGSize,
        gradientColors: [Color]
    ) -> some View {

        // The actual radius = lerp from min->max based on amplitude
        let baseRadius = lerp(a: baseRadiusMin, b: baseRadiusMax, t: amplitude)

        // The waveRange also “lerps,” but we want big wave at low amplitude => waveRangeMin at amplitude=1
        // => just invert the parameter. Another approach: waveRange = waveRangeMax + (waveRangeMin-waveRangeMax)*(1 - amplitude).
        let waveRange = lerp(a: waveRangeMax, b: waveRangeMin, t: (1 - amplitude))

        let gradient = RadialGradient(
            gradient: Gradient(stops: [
                .init(color: gradientColors[0], location: 0.0),
                .init(color: gradientColors[1], location: 1.0)
            ]),
            center: .center,
            startRadius: 0,
            endRadius: baseRadius
        )

        // Subtle elliptical warping from sin/cos
        let shapeWaveSin = sin(2 * .pi * time)
        let shapeWaveCos = cos(2 * .pi * time)

        // scale from amplitude
        let amplitudeScale = 1.0 + scaleRange * amplitude

        // final x/y scale => merges amplitude + wave
        let xScale = amplitudeScale + waveRange * shapeWaveSin
        let yScale = amplitudeScale + waveRange * shapeWaveCos

        return Ellipse()
            .fill(gradient)
            .opacity(baseOpacity)
            .scaleEffect(x: xScale, y: yScale)
            .blur(radius: blurRadius)
            .frame(width: geoSize.width, height: geoSize.height)
    }

    // Linear interpolation
    private func lerp(a: CGFloat, b: CGFloat, t: CGFloat) -> CGFloat {
        a + (b - a) * t
    }
}

// MARK: - CADisplayLink Helper
fileprivate class DisplayLinkProxy {
    private let tickHandler: (CFTimeInterval) -> Void
    init(_ handler: @escaping (CFTimeInterval) -> Void) { self.tickHandler = handler }
    @objc func tick(_ link: CADisplayLink) { tickHandler(link.duration) }
}
Now, you can run the app, talk to the AI, and see beautiful visualizations while the participants speak.
You can find the source code of the Node.js backend here, while the completed iOS tutorial can be found on the following page.
Recap
In this tutorial, we have built an example of an app that lets you talk with an AI bot using OpenAI Realtime and Stream’s video edge infrastructure. Even with poor connections, the integration uses WebRTC for the best latency and quality.
We have shown you how to use OpenAI’s real-time API and provide the agent with custom instructions, voice, and function calls. On the iOS side, we have shown you how to join the call and build an animation using the audio levels.
Both the video SDK for iOS and the API have plenty more features available to support more advanced use cases.
Next Steps
- Explore the tutorials for other platforms: React, Android, Flutter, React Native.
- Check the Backend documentation with more examples in JS and Python.
- Read more about the iOS SDK documentation about additional features.