


This tutorial covers building the full stack video calling application using Amazon Chime SDK and AWS Lambda.
Video calling applications need a specialized server setup to handle real-time video streaming. Building and maintaining such servers for one application is challenging. Hence, services like Amazon Chime SDK or Stream Video API provide API-based access to these backend servers. You can simply call their APIs and leverage the infrastructure required for real-time streaming.
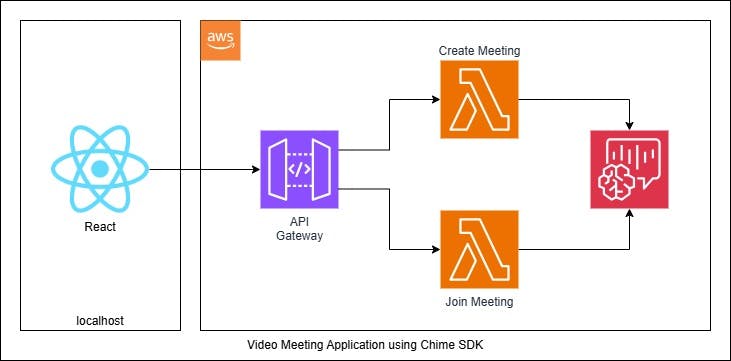
In this tutorial, you will learn how to use these APIs by building a full-stack video-meet application. The application will allow users to create and join meetings, share screens, and use audio/video controls. The front end is built using React, leveraging the Chime-react-component library. The backend has two lambda functions using the Chime SDK, which is served via an API gateway.
Developer Setup
You need an AWS account and local setup with AWS CLI, nodejs, and NPM installed.
Use the below steps to set up the front-end application.
- Start by creating a basic React app
bash1
$ npx create-react-app video-meet-app \--template typescript - Change directory
bash1
$ cd video-meet-app - Install dependencies
bash1
$ npm install - Install the Amazon Chime SDK React Component Library and peer dependencies
bash1
$ $ npm install --save amazon-chime-sdk-component-library-react amazon-chime-sdk-js styled-components styled-system aws-amplify && npm install --save-dev @types/styled-components - (optional) Adjust the react version in case of an ERESOLVE error
bash1
$ npm install react@18 react-dom@18
Setting Up Frontend
In this step, we create the front-end code and put it in the src directory inside the video-meet-app project directory.
Make sure you are inside this directory and clone this repository - https://github.com/pratiksk/aws-chime-sdk-video-meet.git.
It will populate the src directory along with package.json and tsconfig.json files. The final project structure should look like -
123456789101112131415161718├── README.md
├── build
│   ├── asset-manifest.json
│   ├── index.html
│   └── static
│       └── js
├── package-lock.json
├── package.json
├── public
│   └── index.html
├── src
│   ├── components
│   │   ├── Meeting.tsx
│   │   └── MeetingForm.tsx
│   ├── index.tsx
│   └── utils
│       └── api.ts
└── tsconfig.json
Some important code snippets are as follows.
MeetingForm.jsx contains the core logic of creating and joining meetings.
12345678910111213141516171819202122// Core logic for creating or joining a meeting
let joinInfo;
if (\!title) {
    // Create a new meeting if no meeting ID is provided
    const meetingResponse \= await createMeeting(\`meeting-${Date.now()}\`);
    joinInfo \= await joinMeeting(meetingResponse.meeting.MeetingId, name);
} else {
    // Join an existing meeting
    joinInfo \= await joinMeeting(title, name);
}
const meetingSessionConfiguration \= new MeetingSessionConfiguration(
    joinInfo.meeting,
    joinInfo.attendee
);
console.log('Joining with configuration:', {
    meetingId: joinInfo.meeting.MeetingId,
    attendeeId: joinInfo.attendee.AttendeeId
});
await meetingManager.join(meetingSessionConfiguration, {
    deviceLabels: DeviceLabels.AudioAndVideo
});
await meetingManager.start();
Meeting.jsx file handles the functionality of the actual meeting after it is created and joined by users. The following code snippet shows that the video tile status is maintained as users join or leave.
123456789101112131415const Meeting: React.FC \= () \=\> {
  const meetingManager \= useMeetingManager();
  const meetingStatus \= useMeetingStatus();
  const { tiles } \= useRemoteVideoTileState();
  const { isVideoEnabled } \= useLocalVideo();

  // Log when remote video tiles change
  useEffect(() \=\> {
    console.log('Remote video tiles:', tiles);
  }, \[tiles\]);

  const handleEndMeeting \= async () \=\> {
    await meetingManager.leave();
    window.location.reload(); // Simple way to get back to the form
  };
App.ts handles API calls to the backend lambda function. Make sure to paste your API URL in this file.
123456789101112const API\_URL \= "YOUR API URL HERE";
\`\`\`
Create a new meeting
\`\`\`typescript
export async function createMeeting(meetingId: string): Promise\<CreateMeetingResponse\> {
  try {
    const response \= await fetch(\`${API\_URL}/create-meeting\`, {
      method: 'POST',
      headers: { 'Content-Type': 'application/json' },
      body: JSON.stringify({ meetingId }),
    });
}
Join an existing meeting
12345678export async function joinMeeting(meetingId: string, attendeeName: string): Promise\<JoinMeetingResponse\> {
  try {
    const response \= await fetch(\`${API\_URL}/join-meeting\`, {
      method: 'POST',
      headers: { 'Content-Type': 'application/json' },
      body: JSON.stringify({ meetingId, attendeeName }),
    });
}
Setting Up Backend
The backend consists of two lambda functions: one for creating a meeting using the Chime SDK and the other for joining it. These lambda functions are served via HTTP API Gateway using proxy integration.
Lambda Functions
Refer to this git for code - https://github.com/pratiksk/backend-aws-chime-sdk-video-meet.git
create_meeting function creates a meeting using Amazon Chime SDK and sends the meeting ID and other relevant data in response
123456789101112131415161718192021import { ChimeSDKMeetings } from '@aws-sdk/client-chime-sdk-meetings';

// Create Chime SDK client
const chimeSDKMeetings \= new ChimeSDKMeetings({ region: 'us-east-1' });

export const handler \= async (event) \=\> {
    try {
        const body \= JSON.parse(event.body || '{}');
        const meetingId \= body.meetingId || \`meeting-${Date.now()}\`;

        const meetingResponse \= await chimeSDKMeetings.createMeeting({
            ClientRequestToken: meetingId,
            MediaRegion: 'us-east-1',
            ExternalMeetingId: meetingId
        });

        return {    …    }
            })
        };
    }
};
join_meeting function handles attendees joining and returns meeting details and joining tokens
12345678910111213141516171819202122232425262728import { ChimeSDKMeetings } from '@aws-sdk/client-chime-sdk-meetings';

// Create client
const chimeSDKMeetings \= new ChimeSDKMeetings({ region: 'us-east-1' });

export const handler \= async (event) \=\> {
    try {
        const body \= JSON.parse(event.body || '{}');
        const meetingId \= body.meetingId;
        const attendeeName \= body.attendeeName || 'Anonymous';

        if (\!meetingId) {
            return { statusCode: 400, body: JSON.stringify({ error: 'Missing meetingId parameter' }) };
        }

        // Get the meeting using SDK v3 syntax
        const meeting \= await chimeSDKMeetings.getMeeting({ MeetingId: meetingId });

        // Create a new attendee for the meeting
        const attendee \= await chimeSDKMeetings.createAttendee({
            MeetingId: meetingId,
            ExternalUserId: \`${attendeeName}-${Date.now()}\`
        });

        return {    ...  })
        };
    }
};
API Gateway
Create HTTP API Gateway with two routes -
- create-meeting - integrate it to the create meeting lambda function
- join-meeting - integrate it to the join meeting lambda function
Select AWS Lambda from the integration type dropdown.
CORS is handled inside the code since we are using proxy integration. Make sure NOT to set CORS in API Gateway settings since it overrides the headers from the backend function. Browsers won’t be allowed to use API if this is not set up correctly.
Testing the Setup
1npm start
- Run this command and wait for the browser to open.
- Enter the user name, keep the meeting ID blank, and click the create/join button.
For the first time, since the meeting does not exist already, the backend will create the meeting and send the meeting ID back. - You will be joined inside the call automatically.
- Copy the meeting ID using the copy meeting ID button.
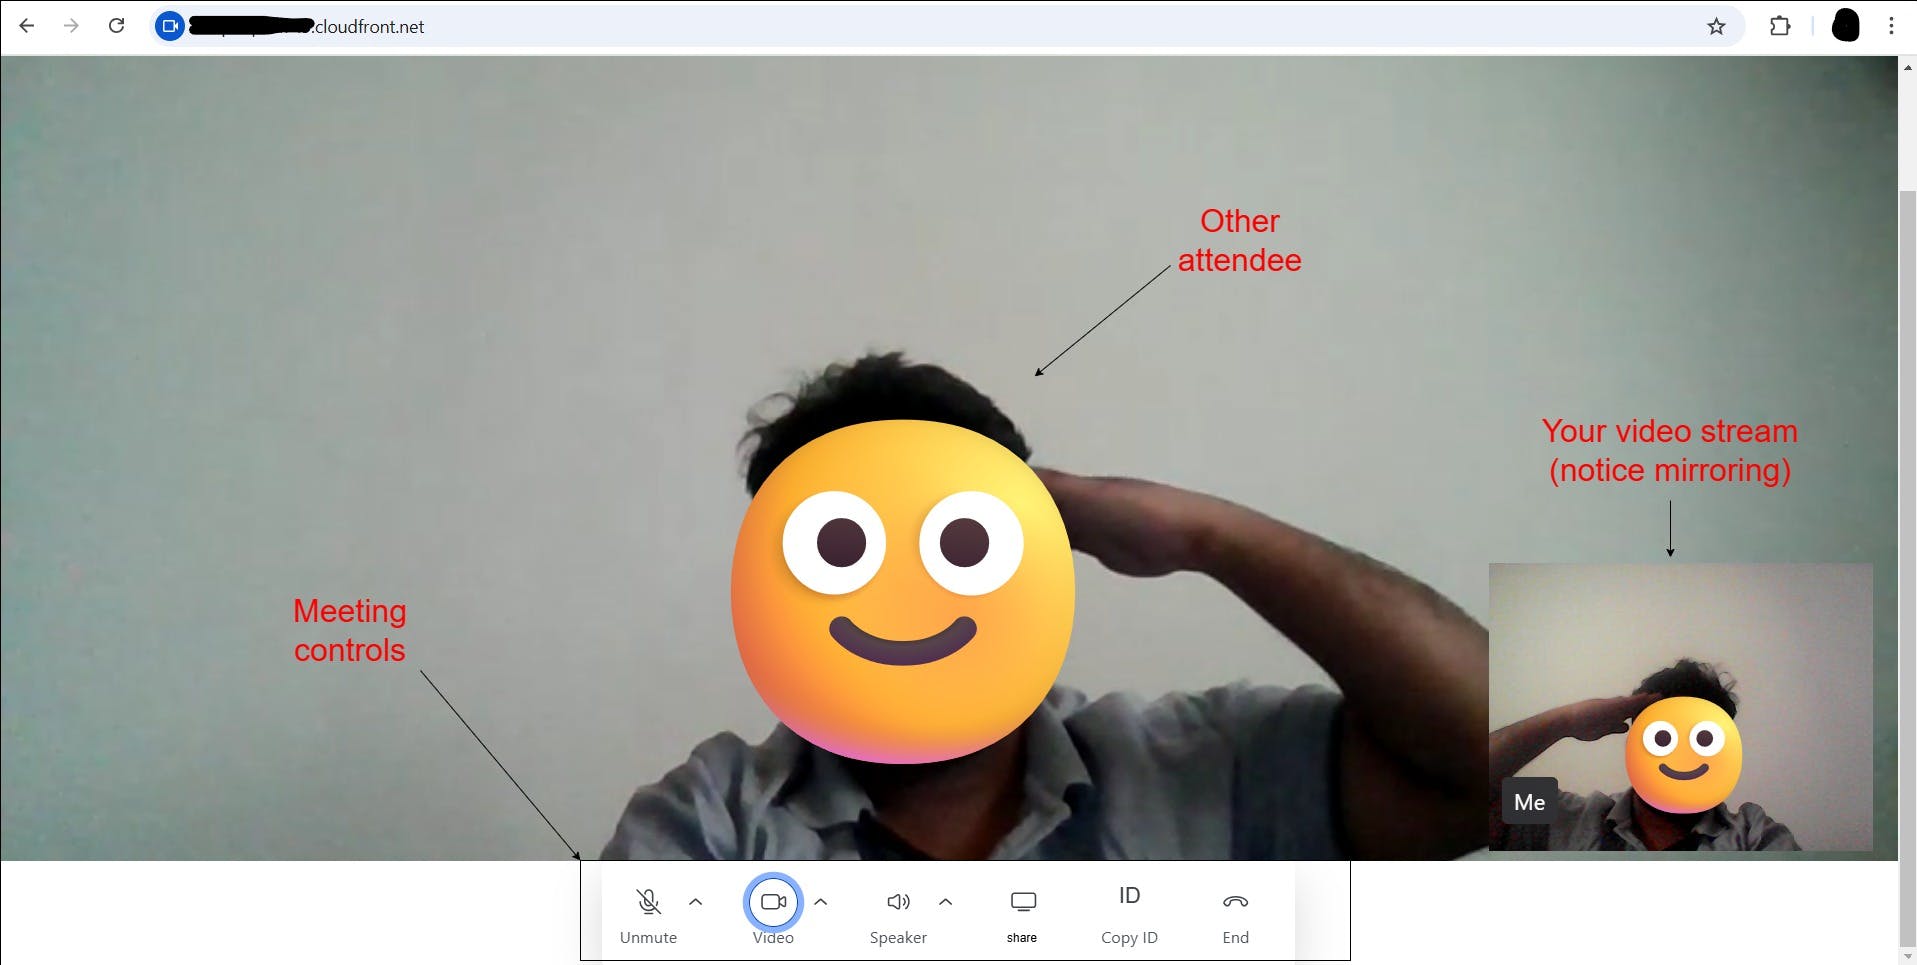
- Go to another browser, go to localhost, and join the meeting using this meeting ID. You should see the other user's video.
- Share screen using the share screen/content button.
Limitation: If you test from a single system, the camera is shared, and both users cannot use it simultaneously. To test, you can switch off one video and start another.
Optionally, you can expose your localhost to the internet or host the react frontend on S3 and serve using Cloudfront to test it with your friends.
AWS Chime SDK vs. Stream Video API
The main difference between Amazon Chime SDK and Stream Video lies in the backend setup. You need the backend setup with Amazon Chime SDK, but Stream can be directly called from the front-end application.
AWS Chime SDK uses an AWS’s IAM-based authentication system. Therefore, a service with proper AWS permissions (like lambda) is needed to talk with Chime SDK. For the front end to talk to lambda, you need to set up another API layer using AWS API Gateway (along with other technical setups like CORS)
Stream Video works based on tokens, which are safe to integrate into the front end. Step 2 of this tutorial shows how easy it is to implement. You just use the SDK to create or join meetings from your typescript code.
Stream also provides a rich React UI component library, which you can leverage to create a professional user experience.

Conclusion
Adding video streaming to your application provides an edge. However, it requires a complex backend architecture to stream live videos in real-time from multiple meeting attendees.
Ready-made solutions like Amazon Chime SDK simplify this by abstracting away those complexities. You can simply call APIs from the backend.
Stream simplifies it even further by providing a highly scalable video infrastructure that can be directly integrated into the front end. You can select an appropriate solution based on your requirements and current architecture.