

When learning a new technology, there is no better approach than starting with a side project, getting your hands dirty with the code, and stumbling upon a dozen errors, which make the whole process memorable (and frankly enjoyable).
In this tutorial, we will showcase how to build a simple URL Shortener application using only Go standard library for the backend (sorry, no backend frameworks this time, although some are great!), Redis is a fast in-memory data store and HTMX for a simple yet reactive UI. We have a lot to cover, so let's get started.
Setting up the Environment
Starting fresh, we need the right tools for our development, we will need to install and setup a couple of things first:
Setting up Go
Go is the primary technology that we are using for this web application. It's a powerful and modern programming language developed by Google. You can read here on the Stream blog why Go can be a great choice for implementing back ends.
Go is available on all major operating systems: Windows, macOS, and Linux, the latest stable version at the time of writing this article is 1.23 which is the one we will use for the tutorial, but feel free to use any reasonably modern version (>=1.18). To install Golang, you need to download the compressed package for your system and then extract the go binary. Yep, you heard that right, only one binary file for language, in fact, this is one of Go's selling points: you can pack everything you build into one statically linked binary, including the language itself.

You need to extract the go binary, and preferably the accompanying files to somewhere on your machine (e.g C:\\go\\... on Windows or /usr/local/go/....on Linux). The instructions for each system are well explained on the official download page, we will only cover installation for Linux-based systems in this tutorial.
For Linux, you can download the compressed tarball file from the Go official website and then run the following script, which deletes any previous Go installation, and extracts the tar file to /usr/local/go.
1rm -rf /usr/local/go && tar -C /usr/local -xzf go1.23.0.linux amd64.tar.gz
Afterward, you can add the extracted binary to your PATH, to do so, add the following to your .bashrc file (or .zshrc if you are using ZSH) to permanently have it on your PATH variable on every session:
1export PATH=$PATH:/usr/local/go/bin
Then in the terminal, run source ~/.bashrc to update the changes to your bash profile, this should add Go to your PATH environment variable, to check that you successfully installed Go, run:
1go version
If you get the version, then you installed Go properly!
Now let's create a directory that will hold your project and then run:
1go mod init JonDoe/url-shortener
This command will initialize a new go module, and create a go.mod file that will hold information about the Go version that's used as well as the different dependencies. Go ahead and create a simple main.go file:
1234567package main

import "fmt"

func main(){
  fmt.Println("Hello")
}
Setting up Redis
The URL shortener will need a data store that stores mappings between the original URL sent by the user and the newly generated short URL. For this purpose, we will be using Redis, a very fast and persistent in-memory cache that can also be used as a database and in other ways. Redis is a free and open-source technology that you can use on your server (self-managed way); however, the company behind Redis Labs offers several paid options to make this experience easier and smoother.
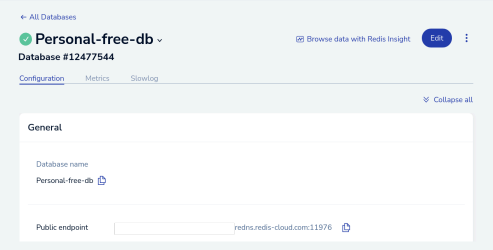
There are many ways to get a Redis server installed, we can run it in a docker container or install it on Linux/macOS (Windows users will need to use WSL 2 unfortunately). However, the best approach to using Redis on small projects is to use the free tier plan offered by Redis Labs, which gives you a free Redis server with generous limits (up to 30 MB in RAM which is plenty for our use case). Start by creating an account on redis.io and opt for the free-tier plan. On the homepage, you will find the necessary credentials that we will use to connect to our Redis instance.
In the project root, create a .env file and fill it with the corresponding values for REDIS_HOST and REDIS_PASSWORD. Add this .env file to the .gitignore file so that important credentials are not pushed online. Always make sure that you are not committing and pushing secure credentials to online repositories.
In the project root, create a .env file and fill it with the corresponding values for REDIS_HOST and REDIS_PASSWORD. Add this .env file to the .gitignore file so that important credentials are not pushed online. Always make sure that you are not committing and pushing secure credentials to online repositories.
Building the Back-end
We will build our back end using Go and its standard library only. Yes, we are not using any third-party frameworks, that's because Go has amazing modules in its standard library that are more than enough for our needs.
Building a Basic Server
We will first start by building a simple HTTP server that can listen for HTTP requests and return responses (JSON, HTML, etc.). Using the net/http package from the standard library, building a simple server is quite straightforward:
1234567891011121314151617package main

import (
  "fmt"
  "net/http"
)

func main() {
    // We use the http.HandleFunc to define our routes and their corresponding handler functions
    http.HandleFunc("/", func(writer http.ResponseWriter, req *http.Request) {
        fmt.Fprintln(writer, "Welcome to the URL Shortener!")
    })

    // Start the server on port 8080
    fmt.Println("Server is running on http://localhost:8080")
    http.ListenAndServe(":8080", nil)
}
The net/http package provides a large set of methods for building and configuring HTTP servers, handling requests, and more. To better understand this code, let's start at the end of the main function and work our way to the top.
The http.ListenAndServe(":8080", nil) creates an HTTP server in duplex mode, meaning that the server will listen for requests and serve responses using only one method. The first parameter indicates the address, while the second indicates the router/handler to use. If nil is specified, it will use the default router/HTTP multiplexer: DefaultServeMux.
Handling Incoming Requests
An HTTP multiplexer (router), is a fancy name for a piece of our server that maps routes to the corresponding logic, so when we call / , it would display the index page, or when we call /shorten it would call the URL shortening logic. By default, the Go HTTP server provided by the net/http package has a default router/multiplexer, where we can add routes and handle requests using http.HandleFunc which adds a request handler to the default HTTP multiplexer.
Let's add two request handlers: the first one maps / to serving our index page (UI, explained in Section 4) and /shorten which will handle the shortening logic, we will discuss the shortening algorithm shortly.
1234567http.HandleFunc("/", func(writer http.ResponseWriter, req *http.Request) {
    // Serve index page
})

http.HandleFunc("/shorten", func(writer http.ResponseWriter, req  *http.Request) {
    // Shorten the provided URL, store it and return it to our UI
})
Here we have added two request handlers to the default router. We will start by explaining the shortening logic, then we will move to building and serving the UI in a future chapter.
Shortening URLs: A Simple Approach
For this small project, we will adopt a simple and straightforward URL shortening algorithm, we will explain at the end a more robust and production-ready approach used more frequently by real URL shorteners, but for the case of this tutorial, we will keep things short and sweet. Our algorithm works as follows:
- Read the URL from the user
- Create a short code
- Grab the current UNIX timestamp in nanoseconds using time package and the time.Now().UnixNano() function which returns an int64.
- Convert the timestamp integer ( int64 ) to a byte slice.
- Encode the timestamp, represented as a byte slice to a string using base64 encoding.
- The returned string will be a bit long with similar first characters, so we take all the chars from the 16th characters to the last one, we also drop the two last characters since they always end with == suffix chars (e.g: ``)
- Store a key-value in Redis with the new generated short code as a key and the original URL as a value ( {shortcode: url} ).
- Return the short code to our UI to show it to the user.
To keep our code clean, let's create a utils package as a folder in the project root, that will hold the shortening logic in shorten.go. In this file we will define a GetShortCode function that implements only the shortening algorithm, meaning without dealing with Redis or manipulating the request input yet:
1234567891011121314151617181920package utils
import (
    "encoding/base64"
    "fmt"
    "time"
)

func GetShortCode() string {
    fmt.Println("Shortening URL")
    ts := time.Now().UnixNano()
    fmt.Println("Timestamp: ", ts)
    // We convert the timestamp to byte slice and then encode it to base64 string
    ts_bytes := []byte(fmt.Sprintf("%d", ts))
    key := base64.StdEncoding.EncodeToString(ts_bytes)
    fmt.Println("Key: ", key)
    // We remove the last two chars since they are usuall always equal signs (==)
    key = key[:len(key)-2]
    // We return the last chars after 16 chars, these are almost always different
    return key[16:]
}
We will then import this package in our main.go , and use it in the request handler for /shorten . We will also need to read the URL provided by the user from the request form data (we are assuming the request is to be sent with POST method and the data encoded as form data, this will be defined in the UI).
1234567891011121314http.HandleFunc("/shorten", func(writer http.ResponseWriter, req  *http.Request) {
    // Get the URL to shorten from the request
    url := req.FormValue("url")
    // Close the body when done
    fmt.Println("Payload: ", url)
    // Shorten the URL
    shortURL := utils.GetShortCode()
    fullShortURL := fmt.Sprintf("http://localhost:8080/r/%s",
shortURL)
    // Generated short URL
    fmt.Printf("Generated short URL: %s\n", shortURL) // Log to console
    // @TODO: Store {shortcode: url} in Redis
    // @TODO return the shortened URL in the UI
})
So far, if you go ahead and hit localhost:8080/shorten with a POST request having a URL url in its data, the server will generate a short code (based on the timestamp) and will log it to the console. Notice that we have two missing steps to implement in this handler: storing the shortened URL and the mapped original URL in the Redis data store, along with returning the shortened URL to the UI, we will discuss these in section 3 and 4 respectively.
More advanced shortening algorithm: The currently implemented algorithm is an easy and straightforward one, however, it doesn't scale well, and we can quickly run into collisions if we have a large number of requests per second. Besides, it doesn't depend on the original URL, which is not a nice design. A better design would be to get the latest ID of the stored URL, increment it, and then use base64 encoding along with a valid character set. Since IDs in the database are unique by definition, this would eliminate the collision risk. You can read more about this approach on this Stackoverflow question.
Redis as a (Very) Fast Database
So far, we have a basic HTTP server up and running that can handle requests to /shorten and generate a short code based on a simple algorithm. We need to store the mapping between these generated codes and the original URL provided by the user in a persistent data store (i.e. database), to be able to redirect to the original URL whenever the shortened URL is used.
For this matter, we will use Redis, a fast in-memory persistent data-store, that is commonly used as a cache, but can definitely be used as a database.
A Redis Primer
Unlike traditional databases that store data primarily on disk and then load parts of it to memory (pages), in-memory databases like Redis store all the data at the memory level (RAM) which makes the data access very fast, for comparison take a look at the following figure from Andy Pavlo's databases course at CMU (a great in-depth course to understand the internals of databases).
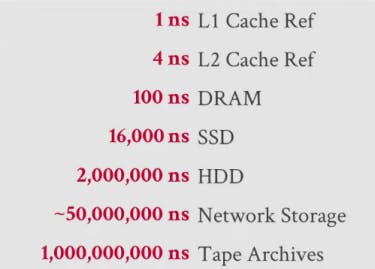
As you can see, the latency between DRAM (memory) and SSD access is significant and even worse when the disk is HDD. Thus, Redis' lightning speed is mainly because it keeps everything in-memory (along with other optimizations that we won't cover in this tutorial).
But since memory (RAM) is volatile, won't turning off the Redis instance/server lose all the data?
This is a valid question, RAM is emptied whenever power supply is lost (like turning off your laptop), however, Redis is persistent, meaning that it continuously writes the data in memory
to the disk. According to the official Redis documentation regarding persistence, Redis has several modes for writing data to disk: Redis Database Backup (RDB), Append Only File (AOF), or both combined, you can read more about persistence and how to configure it for Redis in the official docs.
Interacting with the Redis Server
In order to interact with the Redis server we need to use a client, the most common client, is the Redis CLI which you can install on your system. You can then launch it from the terminal with redis-cli command.
In the Redis CLI, you can execute REDIS commands, these commands are equivalent to SQL queries for traditional relational databases. However, Redis doesn't support SQL directly, it supports a fixed number of commands based on the type of data you are dealing with.
The two essential commands you need to know for this tutorial are SET and GET commands. The SET command adds a new key-value pair to Redis, the syntax is SET key value . On the other hand, we can fetch the value of a key using GET {key}, where {key} is the key you are using to fetch. Here is a basic example using Redis CLI.

Here we set the key-value pair {name: annis} in Redis using the SET command, and we get back the value using the GET command.
Using Redis in our Application
Now let's move to connect to the Redis server from the Go code, we will use the go-redis official package that we can download and install with:
1go get github.com/go-redis/redis/v8
This will download the go-redis package and add it to the go.mod file as a requirement. In the utils package that we created previously, let's add store.go file which will handle our Redis logic to store and get URL and their shortened version.
The first step is to implement a function that connects to the Redis instance provided by Redis Labs that we previously set up and returns a pointer to the server ( *redis.Client). This method will essentially create a new client and pass the environment variables from the
os package, namely the REDIS_HOST and REDIS_PASSWORD environment variables that we set in the .env file previously in this tutorial. It is worth noting that the function is called only once in main.go so that we only create one connection to the Redis server and use it through the app. If many connections are created, Redis uses IO multiplexing to handle several requests without blocking the main thread.
123456789101112func NewRedisClient() *redis.Client {
    fmt.Println("Connecting to redis server on:", os.Getenv("REDIS_HOST"))

    // Create a new Redis client
    rdb := redis.NewClient(&redis.Options{
        Addr: os.Getenv("REDIS_HOST"),
        Password: os.Getenv("REDIS_PASSWORD"), // no password set
        DB: 0, // use default DB
    })

    return rdb
}
Second, We need a function to store the shortened code as a key and the original URL as a value, so that we can grab it later using GET {shortcode} , to do this we will implement SetKey method that takes a pointer to the general app context (defined in main.go ), a pointer to the created Redis client as well as the key and value as strings, below is the function implementation:
12345678910func SetKey(ctx *context.Context, rdb *redis.Client, key string, value  string, ttl int) {

    // We set the key value pair in Redis, we use the context defined in main by reference and a TTL of 0 (no expiration)

    fmt.Println("Setting key", key, "to", value, "in Redis")

    rdb.Set(*ctx, key, value, 0)

    fmt.Println("The key", key, "has been set to", value, "successfully")
}
Next, always in utils/store.go file, we will implement a function that returns the original URL based on the shortened URL, this function is essential for the redirecting logic that we will implement in section 5.
123456789101112131415161718func GetLongURL(ctx *context.Context, rdb *redis.Client, shortURL string) (string, error) {

longURL, err := rdb.Get(*ctx, shortURL).Result()

if err \== redis.Nil {

return "", fmt.Errorf("short URL not found")
} else if err \!= nil {

return "", fmt.Errorf("failed to retrieve from Redis: %v",

err)

}

return longURL, nil

}
The rdb.Get(*ctx, shortURL).Result() is what build the query and execute it on the Redis server and stores the resulting value in longURL . In addition, we perform some error handling so that the function returns an error if the corresponding short URL is non-existent or if there has been a problem while communicating with the Redis server.
Finally, we need to call the NewClient and the SetKey correctly in main.go . Start by importing the utils package in top of main.go , then create a global context that we will use to instantiate the Redis client, afterward, we create on Redis client at the top of the main function that is used throughout the different routes.
12345678910var ctx \= context.Background()

func main() {
    // We create the DB connection here and use it in the handlers dbClient := utils.NewRedisClient()
    if dbClient \== nil {
        fmt.Println("Failed to connect to Redis")
        return
    }

// Rest of main()
We will also add the call to SetKey in the request handler for the /shorten route, so the (almost) full code for that handler looks like the following:
1234567891011121314151617181920212223http.HandleFunc("/shorten", func(writer http.ResponseWriter, req  *http.Request) {

    // Get the URL to shorten from the request
    url := req.FormValue("url")

    // Close the body when done
    fmt.Println("Payload: ", url)

    // Shorten the URL
    shortURL := utils.GetShortCode()

    fullShortURL := fmt.Sprintf("http://localhost:8080/r/%s", shortURL)

    // Generated short URL

    fmt.Printf("Generated short URL: %s\\n", shortURL) // Log to console

    // Set the key in Redis
    utils.SetKey(&ctx, dbClient, shortURL, url, 0)
    // Ideally, we would return some html tags

    // Return the UI (next section)
})
Note that we need to pass the context by reference using the & operand, however, dbClient is already a pointer to the Redis client so we can pass it directly.
Simple and Beautiful UI with HTMX and TailwindCSS
We will build a simple UI using HTMX which is a new and trending technology for building reactive UIs without the need for bloated JS frameworks (React 👀). HTMX in itself is built in JavaScript, but it's quite lightweight and can be added quickly to your website using CDN.
HTMX offers a set of non-standard HTML attributes that enhance basic HTML with AJAX, swapping elements, CSS transitions, and more. For example, we can use the hx-post attribute to specify a route to which a POST request is sent asynchronously through AJAX. Similarly, hx-target attribute will take an HTML element using its ID and fill it with the response returned from the server. Thus, HTMX favors building reactive UI that is rendered server-side without the need for a complex Next/Nuxt setup. The official HTMX website has a nice set of essays that are worth reading if you are interested in understanding the philosophy behind HTMX and Hypermedia in general, why it was developed, and how to use it correctly. Moreover, we will use Tailwind CSS to style our UI using predefined CSS classes, TailwindCSS is commonly used in industry to build beautiful web designs without dealing with vanilla CSS.
Let's create a template folder with an index.html file:
<!doctype html>
<html lang="en">
    <head>
        <meta charset="UTF-8" />
        <meta name="viewport" content="width=device-width, initial scale=1.0" />
        <title>GoSHort: Fastest URL Shortener</title>
        <script src="https://unpkg.com/htmx.org@1.9.10"></script>
        <script src="https://cdn.tailwindcss.com"></script>
    </head>
    <body class="bg-gray-100 min-h-screen flex items-center justify center">
        <div class="bg-white p-8 rounded-lg shadow-md w-96">
            <h1 class="text-2xl font-bold mb-4">GoShort: Fast URL Shortener</h1>
            <form hx-post="/shorten" hx-target="#result" hx swap="innerHTML">
                <input type="url"  name="url"  placeholder="Enter URL to shorten" class="w-full p-2 border rounded mb-4" required />
                <button type="submit" class="w-full bg-blue-500 text-white p-2 rounded hover:bg-blue-600" >
                    Shorten URL
                </button>
            </form>
            <div id="result"></div>
        </div>
    </body>
</html>
This HTML page would result in the following interface:
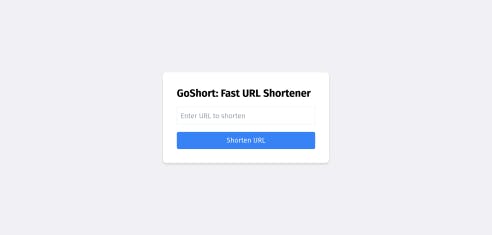
Notice the hx-post , hx-target, and hx-swap attributes in the form element, these are HTMX attributes that will:
- Send a POST request when the "Shorten URL" button is pressed, the request is sent asynchronously through AJAX so it doesn't require any page refresh.
- Use the #resul t HTML div as a target for the server response
- Swap the inner part of #result ( hx-swap="innerHTML" ) with the server response.
On the other hand, we will need to return the HTML part as a response in our request handler for /shorten , here is the full code for that handler:
12345678910111213141516171819http.HandleFunc("/shorten", func(writer http.ResponseWriter, req  *http.Request) {
// Get the URL to shorten from the request
url := req.FormValue("url")
// Close the body when done
fmt.Println("Payload: ", url)
// Shorten the URL
shortURL := utils.GetShortCode()
fullShortURL := fmt.Sprintf("http://localhost:8080/r/%s",
shortURL)
// Generated short URL
fmt.Printf("Generated short URL: %s\n", shortURL) // Log
to console
// Set the key in Redis
utils.SetKey(&ctx, dbClient, shortURL, url, 0)
// Finally, we return the response to be rendered with
HTMX
fmt.Fprintf(writer,
`<p class="mt-4 text-green-600">Shortened URL: <a
href="/r/%s" class="underline">%s</a></p>`, shortURL, fullShortURL) })
As you can see, at the end of the handler, we use fmt.Fprintf which will format the HTML string and write to the writer object (instance of http.ResponseWrite ). Thus, when we pass a long URL and press the "Shorten URL" button, we get the following:

Finally, we also need to serve this index.html page whenever / is hit, for this let's fill the second request handler: we will use the templ package from the standard library to load the HTML template and return it as an HTTP response:
1234567http.HandleFunc("/", func(writer http.ResponseWriter, req *http.Request) { tmpl :=

template.Must(template.ParseFiles("templates/index.html"))

tmpl.Execute(writer, nil)

})
Now we have a functional UI that is hooked to our backend along with nice reactivity features provided by HTMX.
Redirecting Users
The sole role of a URL shortener is to redirect users when they use the shortened URL to the original URL, for this we will use the /r/\<shortcode\> route as shown in the previous screenshot. The logic behind this third handler is quite straightforward: we grab the shortcode in the route, and we use it to get the original URL from Redis using the utils.GetLongURL(...) function that we previously implemented, which uses Redis GET \<key> command behind the scenes. We will also need to perform some basic error handling in case the code is non-existent and returns an HTTP 404 - Not Found response.
Afterward, we need to redirect the user to their original URL using an HTTP permanent redirect (status code: 301). The handler for redirects will have the following implementation:
12345678910111213141516171819202122232425262728293031http.HandleFunc("/r/{code}", func(writer http.ResponseWriter, req  *http.Request) {

key := req.PathValue("code")

if key \== "" {

http.Error(writer, "Invalid URL",

http.StatusBadRequest)

return

}

longURL, err := utils.GetLongURL(&ctx, dbClient, key)

if err \!= nil {

http.Error(writer, "Shotened URL not found",

http.StatusNotFound)

return

}

http.Redirect(writer, req, longURL,

http.StatusPermanentRedirect)

})
Conclusion
We now have a fully operating URL shortener built with Go, Redis and HTMX, it is very fast, simple and useful. This tutorial showcases how far we can get using only Go's extensive standard library. You can find the full code on GitHub along with a Dockerfile for containerizing the application for deployment: https://github.com/annis-souames/goshort.
Go and Redis are two key technologies that make Stream fast and reliable for millions of end users. Hopefully, with this tutorial, you now have a basic understanding of how you can also use them to build fast and scalable web applications.