

When using Stream Chat, you most likely want tight integration between Stream Chat and the rest of your application. If something is a concept in your product, you want to be able to attach it to a chat message. By default, Stream Chat supports several attachment types already. Images are rendered in a gallery layout, files are displayed in a list, and links are shown with a rich preview of the content available at the link's location.
With Stream Chat, you can render a custom attachment any way you want. You just need to facilitate two things:
- How to recognize the custom attachment
- How to render the custom attachment
What you want to render as custom attachments is up to your imagination and maybe your UX designers. The rendered custom attachments are SwiftUI views allowing for interaction and dynamic updating of contents.
Attachment Example in our SwiftUI Tutorial
In our SwiftUI tutorial, we have a basic attachment example. It detects an email address in a chat message and renders an envelop icon when found. This is the most basic form of a custom attachment. But we can go a lot further. This article will show you another attachment example that does just that. By the end of this tutorial, you can develop a use case for your environment and create a custom attachment according to your specifications.
Please review the SwiftUI tutorial before we begin. If you want to skip straight to what is in this article, look at the repository containing the finished tutorial example.
Attachment Recap
If you look closely at the attachment example in the SwiftUI tutorial, you will notice an attachment can be triggered on any property of a chat message. In the tutorial, the contents of the chat message are inspected for a string that looks like an email address.
What we will do in this article instead is demonstrate what is possible when using an actual custom attachment object. A piece of custom data that is a separate entity, a blob of data like an image or video. But you will need to tell the SDK how to handle this piece of data by extending the functionality of the attachment rendering.
Before we dive in, here are some examples of what you could do with custom attachments.
Defining the Data We Want to Render
As mentioned, we can use any data as an attachment. And here is one huge caveat to be aware of. When storing data in an attachment, and you are using Stream's CDN, the data stored is "content-addressable." This is a fancy way of saying if you know the URL of the stored information, you can get the stored information. There is no further access control in place. So you have to make sure the data in the attachment is ok to be public to some extent. With images and videos, this is usually not a big deal.
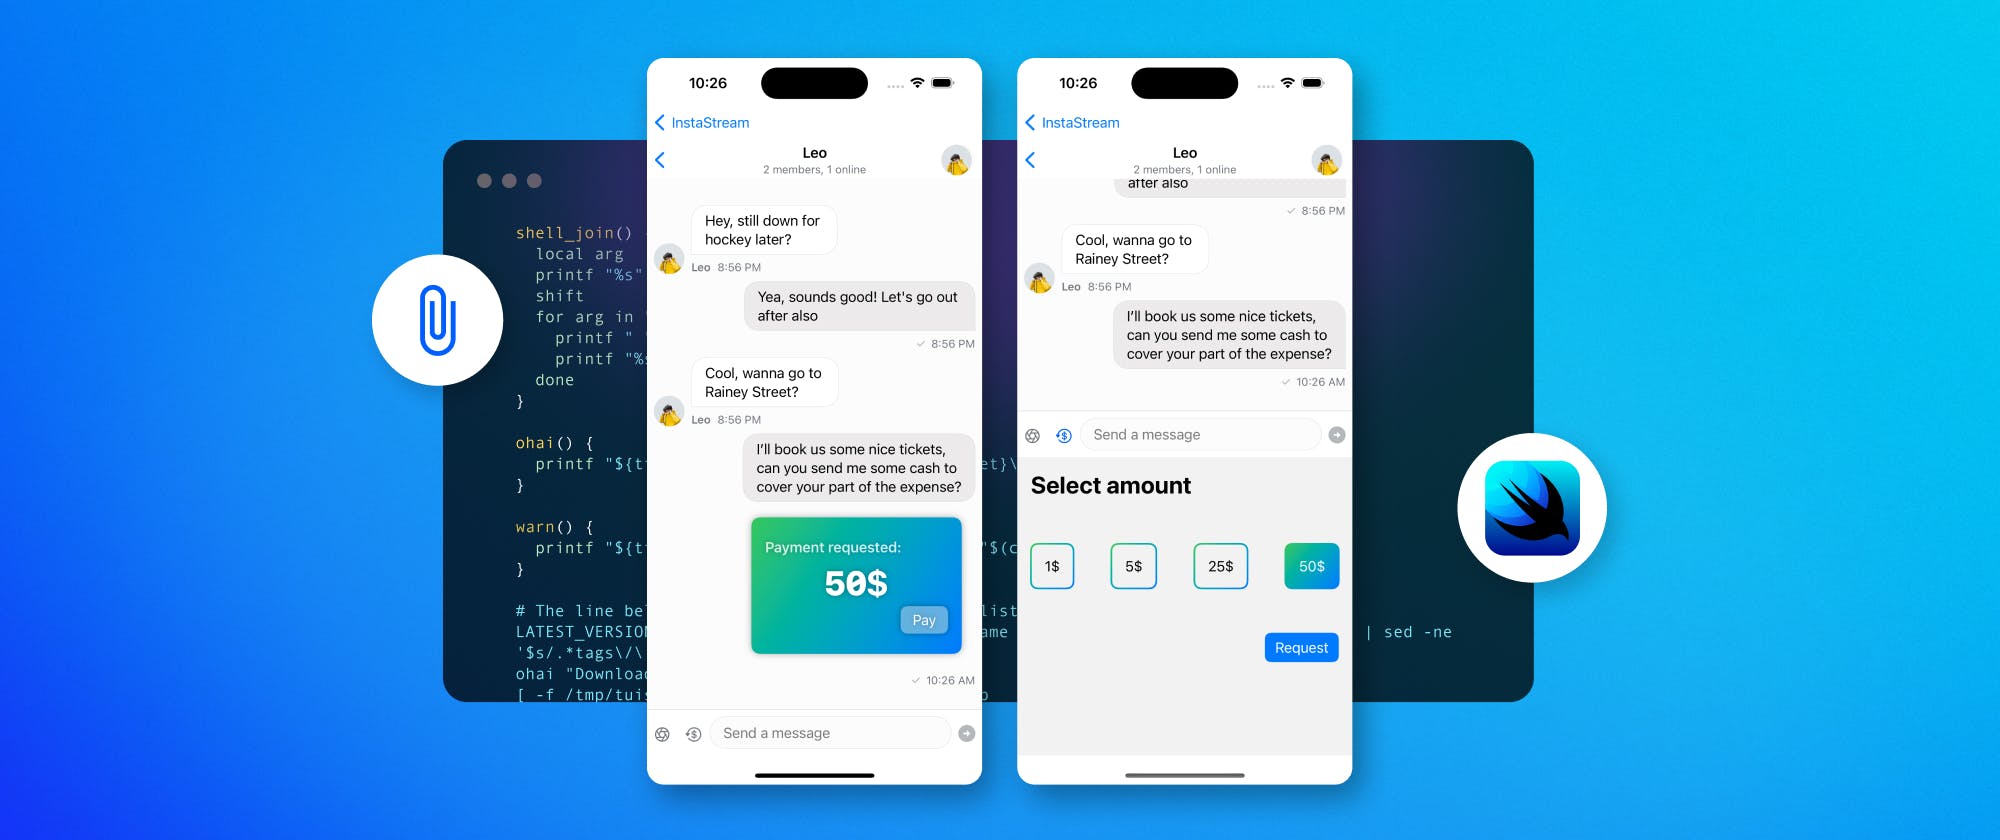
In the example in this article, we are sending a payment request as an attachment. In a real-life scenario, you would store the payment state in your service. To simplify this example, we hang on to the payment state in a message's extraData field.
What we want to demo is a conversation between two people, which at some point requires a transfer of money. A common use case in banking apps.
To achieve this result, we need to do several things:
- Declare a custom payment attachment type
- Make sure the Stream Chat SDK can recognize, render and add these attachments
- Define the behavior and look of a payment attachment
Everything else is provided out of the box by the Stream Chat SDK. The only limit is your imagination.
The entire example and all code in this article are available as an Xcode project on GitHub.
Defining the Payment Attachment Payload
First of all, we will define the attachment itself.
1234567891011121314import Foundation
import StreamChat

struct PaymentAttachmentPayload: AttachmentPayload, Identifiable {
    static let type: AttachmentType = .payment

    var id: String = UUID().uuidString
    var amount: Int
}

extension PaymentAttachmentPayload {

    static var preview: PaymentAttachmentPayload = PaymentAttachmentPayload(amount: 25)
}
12345import StreamChat

extension AttachmentType {
    static let payment = Self(rawValue: "payment")
}
Next, we need to make sure the Stream Chat SDK can recognize the attachment type. To do that, we need to define a custom MessageResolver.
123456789import StreamChat
import StreamChatSwiftUI

class CustomMessageResolver: MessageTypeResolving {
    func hasCustomAttachment(message: ChatMessage) -> Bool {
        let paymentAttachments = message.attachments(payloadType: PaymentAttachmentPayload.self)
        return !paymentAttachments.isEmpty
    }
}
This detects the presence of our newly defined attachments.
We need to define how a payment looks when sent to another user.
123456789101112131415161718192021222324252627282930313233343536373839404142434445464748495051525354555657585960616263646566676869707172737475767778798081828384858687888990919293949596979899100101102103104105106107108109110111112113114115116117118119import SwiftUI
import StreamChat

struct PaymentAttachmentView: View {

    @ObservedObject var viewModel: MyChannelListViewModel

    var payload: PaymentAttachmentPayload
    var paymentState: PaymentState
    var paymentDate: String?
    var messageId: MessageId

    @State private var processing = false
    @State private var processingText = ""

    var title: String {
        switch paymentState {
        case .requested:
            return "Payment requested:"
        case .processing:
            return "Processing payment"
        case .done:
            return "Payment done!"
        }
    }

    var body: some View {
        VStack(alignment: .leading) {
            if processing {
                HStack {
                    Spacer()

                    ProgressView()
                        .tint(.white)

                    Spacer()
                }

                Text(processingText)
                    .font(.caption)
                    .frame(maxWidth: .infinity)
                    .padding(.top)
            } else {
                Text(title)
                    .font(.headline)
                    .opacity(0.8)

                Text("\(payload.amount)$")
                    .font(.system(size: 40, weight: .black, design: .monospaced))
                    .frame(maxWidth: .infinity, maxHeight: 40)

                if paymentState == .requested {
                    HStack {
                        Spacer()

                        Button {
                            withAnimation {
                                processingText = "Requesting payment info ..."
                                processing = true
                            }

                            Task {
                                try? await Task.sleep(for: .seconds(1))

                                await MainActor.run {
                                    withAnimation {
                                        processingText = "Finalizing payment ..."
                                    }
                                }

                                try? await Task.sleep(for: .seconds(1))

                                await MainActor.run {
                                    viewModel.updatePaymentPaid(
                                        messageId: messageId,
                                        amount: payload.amount
                                    )
                                }
                            }
                        } label: {
                            Text("Pay")
                                .padding(.horizontal, 14)
                                .padding(.vertical, 6)
                                .background(
                                    .ultraThinMaterial,
                                    in: RoundedRectangle(cornerRadius: 8, style: .continuous)
                                )

                        }
                    }
                    .frame(height: 30)
                }

                if paymentState == .done, let dateString = paymentDate {
                    HStack {
                        Spacer()

                        Text("Paid: \(dateString)")
                            .font(.footnote)
                            .foregroundColor(.white)
                            .opacity(0.6)
                    }
                }
            }
        }
        .foregroundColor(.white)
        .padding()
        .frame(maxWidth: .infinity, idealHeight: 160, maxHeight: 160)
        .background(
            LinearGradient.payment,
            in: RoundedRectangle(
                cornerRadius: 10,
                style: .continuous
            )
        )
        .padding()
        .shadow(radius: 4)
    }
}
But we also need UI to allow a user to send an attachment.
123456789101112131415161718192021222324252627282930313233343536373839404142434445464748495051525354555657585960616263646566import SwiftUI

struct PaymentAttachmentPickerView: View {

    @ObservedObject var viewModel: MyChannelListViewModel

    @State private var selectedAmount: Int? = nil

    var paymentAmounts: [Int] = [
        1, 5, 25, 50
    ]

    var body: some View {
        VStack(alignment: .leading, spacing: 20) {
            Text("Select amount")
                .font(.title)
                .bold()
                .padding()

            HStack {
                ForEach(paymentAmounts.indices, id: \.self) { index in
                    Button {
                        withAnimation {
                            selectedAmount = paymentAmounts[index]
                        }
                    } label: {
                        Text("\(paymentAmounts[index])$")
                            .foregroundColor(paymentAmounts[index] == selectedAmount ? .white : .primary)
                            .padding()
                            .background(
                                paymentAmounts[index] == selectedAmount ? LinearGradient.payment : LinearGradient.clear,
                                in: RoundedRectangle(cornerRadius: 8, style: .continuous)
                            )
                            .overlay {
                                RoundedRectangle(cornerRadius: 8, style: .continuous)
                                    .stroke(LinearGradient.payment, lineWidth: 2)
                            }

                    }

                    if index < paymentAmounts.count - 1 {
                        Spacer()
                    }
                }
            }
            .padding()

            HStack {
                Spacer()

                Button {
                    guard let selectedAmount else { return }

                    viewModel.requestPayment(amount: selectedAmount)
                } label: {
                    Text("Request")
                }
                .buttonStyle(.borderedProminent)
                .disabled(selectedAmount == nil)
            }
            .padding()

            Spacer()
        }
    }
}
1234567891011121314151617181920212223242526272829303132333435363738394041424344454647484950515253545556575859606162636465666768import SwiftUI
import StreamChat
import StreamChatSwiftUI

class MyChannelListViewModel: ChatChannelListViewModel {

    @Injected(\.chatClient) var chatClient

    @Published var selectedCustomAttachment: SelectedCustomAttachment = .payment

    var onPickerStateChange: ((AttachmentPickerState) -> Void)?
    var closeAttachments: (() -> Void)?

    func tryCallingPickerStateChange() {
        if let onPickerStateChange {
            onPickerStateChange(.custom)
        }
    }

    func requestPayment(amount: Int) {
        guard let selectedChannelId = selectedChannel?.id else {
            print("Selected channel ID couldn't be retrieved")
            return
        }
        let channelId = ChannelId(type: .messaging, id: selectedChannelId)
        let payloadAttachment = PaymentAttachmentPayload(amount: amount)
        let extraData: [String: RawJSON] = [
            "paymentState": .string(PaymentState.requested.rawValue)
        ]

        chatClient.channelController(for: channelId).createNewMessage(
            text: "",
            attachments: [AnyAttachmentPayload(payload: payloadAttachment)],
            extraData: extraData
        )

        withAnimation {
            if let closeAttachments {
                closeAttachments()
            }
        }
    }

    func updatePaymentPaid(messageId: MessageId, amount: Int) {
        guard let selectedChannelId = selectedChannel?.id else {
            print("Selected channel ID couldn't be retrieved")
            return
        }

        let channelId = ChannelId(type: .messaging, id: selectedChannelId)

        let messageController = chatClient.messageController(
            cid: channelId,
            messageId: messageId
        )

        let extraData: [String: RawJSON] = [
            "paymentState": .string(PaymentState.done.rawValue),
            "paymentDate": .string(Date().formatted())
        ]

        messageController.editMessage(text: "", extraData: extraData)
    }
}

enum PaymentState: String, Codable {
    case requested = "request", processing = "processing", done = "done"
}
We have defined all the components we need, but we still need to tell the Stream Chat SDK how and when to display this.
To do that, we need to declare a custom view factory. This class overrides the defaults of our Chat SDK and allows for the injection of new or custom views based on conditions you define.
When implementing a custom view factory, you have access to a lot of the data and metadata related to all the chat messages being rendered. Based on this information, you can evaluate if and when you want to trigger the rendering of your custom attachment views.
1234567891011121314151617181920212223242526272829303132333435363738394041424344454647484950515253545556575859606162636465import SwiftUI
import StreamChat
import StreamChatSwiftUI

class MyViewFactory: ViewFactory {

    @Injected(\.chatClient) var chatClient: ChatClient

    @ObservedObject var viewModel: MyChannelListViewModel

    init(viewModel: MyChannelListViewModel) {
        self.viewModel = viewModel
    }

    func makeLeadingComposerView(
        state: Binding<PickerTypeState>,
        channelConfig: ChannelConfig?
    ) -> some View {
        viewModel.closeAttachments = {
            state.wrappedValue = .expanded(.none)
        }
        return LeadingComposerView(pickerTypeState: state, viewModel: viewModel)
    }

    func makeCustomAttachmentView(
        addedCustomAttachments: [CustomAttachment],
        onCustomAttachmentTap: @escaping (CustomAttachment) -> Void
    ) -> some View {
        PaymentAttachmentPickerView(viewModel: viewModel)
    }

    func makeCustomAttachmentViewType(
        for message: ChatMessage,
        isFirst: Bool,
        availableWidth: CGFloat,
        scrolledId: Binding<String?>
    ) -> some View {
        let paymentAttachments = message.attachments(payloadType: PaymentAttachmentPayload.self)
        let paymentState = PaymentState(rawValue: message.extraData["paymentState"]?.stringValue ?? "")
        let paymentDate = message.extraData["paymentDate"]?.stringValue

        return VStack {
            ForEach(paymentAttachments.indices, id: \.self) { [weak self] index in
                if let viewModel = self?.viewModel, let paymentState {
                    PaymentAttachmentView(
                        viewModel: viewModel,
                        payload: paymentAttachments[index].payload,
                        paymentState: paymentState,
                        paymentDate: paymentDate,
                        messageId: message.id
                    )
                }
            }
        }
    }

    func makeAttachmentSourcePickerView(
        selected: AttachmentPickerState,
        onPickerStateChange: @escaping (AttachmentPickerState) -> Void
    ) -> some View {
        viewModel.onPickerStateChange = onPickerStateChange
        return EmptyView()
    }

}
Especially the function makeCustomAttachmentViewType is of interest. When the CustomMessageResolver we defined earlier detects a custom attachment, the Stream SDK asks the view factory to create a custom attachment view. In our case a PaymentAttachmentView.
Similar things happen for the PaymentAttachmentPickerView and the PaymentAttachmentPreview. When a custom attachment is detected, a custom view is created. Exactly what we need. My recommendation is to run this code and see things happen in a debugger.
So to recap, there are three key moments to consider when dealing with a custom attachment.
- We need to enable the application to display a button in the message composer to initiate adding a custom attachment to a message. We do this by creating a custom
LeadingComposerView, which adds a button to the message composer. - We need logic and UI to allow the user to add the actual attachment to the message. This involves the
CustomAttachmentView, which displays thePaymentAttachmentPickerViewin case the attachment being added to the message is of typepayment. - On the message list side of things, we need a way to display a custom attachment when it has been sent by a user. This involves the
PaymentAttachmentViewand related models. On thePaymentAttachmentViewyou are free to do whatever you want in relation to your attachment. It could be about displaying static data like an image, but it can also be more dynamic, like a payment.
You will have noticed several details about getting a custom attachment going. But make no mistake, custom attachments are a powerful feature of our Chat SDK, allowing you to tightly integrate your domain with our Chat SDK. By creating a tight integration, your end users will enjoy the benefits of being able to share information relevant to your app with ease, and it will increase the engagement of your audience.
Conclusion
By now, you know how easy it is to add custom attachments to your app using Stream's SwiftUI Chat SDK. With custom attachments, you can display custom media, location-based information, shopping details, and more content customized to suit your target audience's needs.
To learn more about our in-app messaging SDK for SwiftUI, look at its GitHub repository. Make sure to give it a star while you are there. You should also take a look at our documentation to learn more. To get you started even quicker, we have a SwiftUI tutorial available as well. Our tutorial is the quickest way to get you started using our Chat SDK.
I hope you enjoyed this article. Look for us on Twitter and let us know what you think. If you have any questions, do reach out as well. We are always happy to help.